Chrysler Pacifica. Manual - part 260
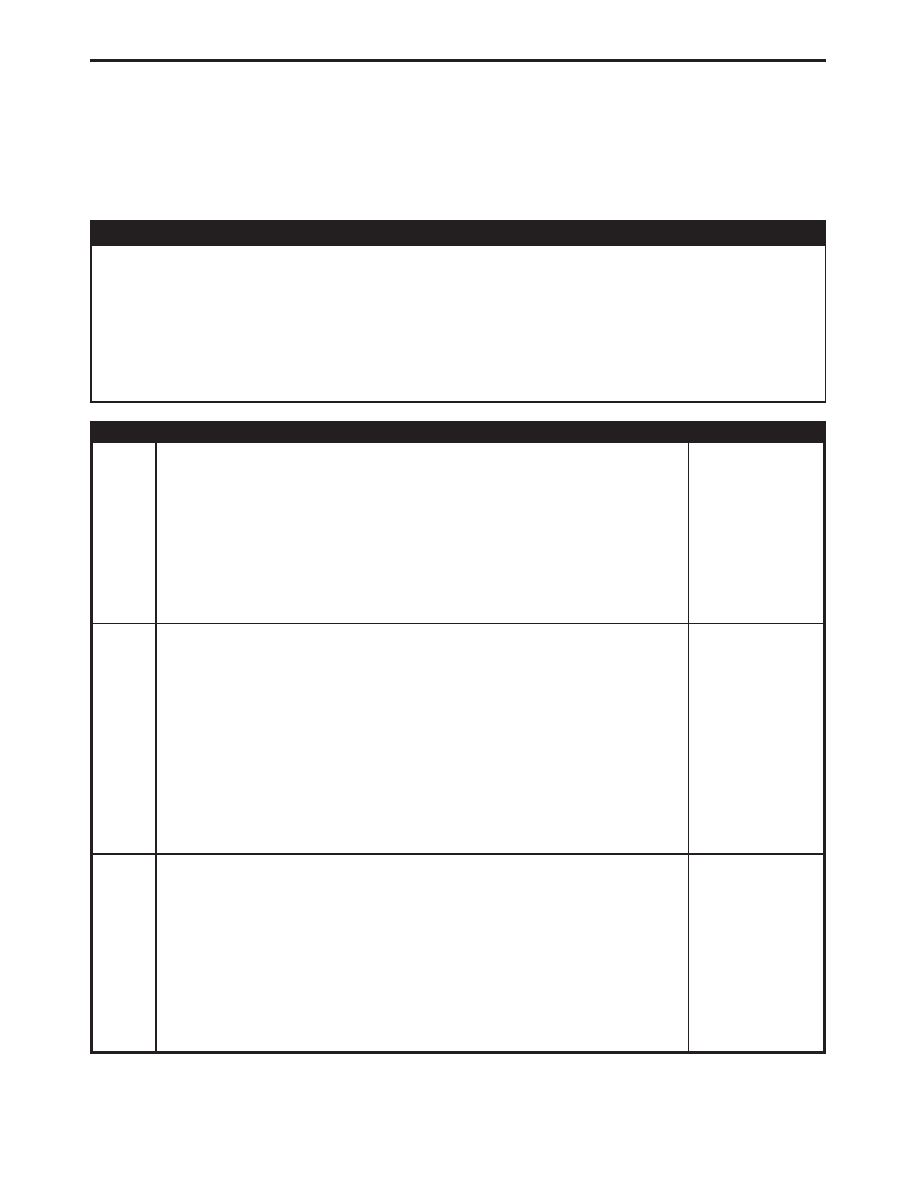
Symptom:
*ONE WINDOW MOTOR INOPERATIVE FROM ANY SWITCH
POSSIBLE CAUSES
DTC PRESENT
WINDOW MOTOR
WINDOW DRIVER DOWN WIRE OPEN
WINDOW DRIVER UP WIRE OPEN
DOOR MODULE OPEN
DOOR MODULE OPEN
TEST
ACTION
APPLICABILITY
1
Turn the ignition on.
With the DRBIII
t, erase DTCs.
Try to operate the inoperative power window several times but do not hold the switch
longer than 5 seconds.
With the DRBIII
t, read DTCs.
Are there any POWER WINDOW related trouble codes present?
All
Yes
→ Refer to POWER WINDOWS for the related symptom(s).
Perform BODY VERIFICATION TEST - VER 1.
No
→ Go To 2
2
Remove the appropriate door panel and gain access to the motor connector.
Disconnect the power window motor connector.
Using a 12-volt test light, connect one lead to the WINDOW DRIVER UP circuit and
the other lead to the WINDOW DRIVER DOWN circuit in the connector.
Turn the ignition on.
Press the Power Window Switch UP and then DOWN several times while observing
the test light.
Does the test light illuminate brightly when the switch is pressed in both directions?
All
Yes
→ Check and repair any binding conditions. If okay, replace the
inoperative power window motor (regulator).
Perform BODY VERIFICATION TEST - VER 1.
No
→ Go To 3
3
Remove the appropriate door panel and gain access to the motor connector.
Disconnect the power window motor connector.
Using a 12-volt test light connected to Ground, check the WINDOW DRIVER DOWN
circuit.
Turn the ignition on.
Press the Power Window Switch DOWN and observe the test light.
Does the test light illuminate brightly when the switch is pressed in the DOWN
position?
All
Yes
→ Go To 4
No
→ Go To 6
1037
POWER WINDOWS