Chrysler 300/300 Touring/300C, Dodge Magnum. Manual - part 1865


  Index      Chrysler     Chrysler 300/300 Touring/300C, Dodge Magnum - service repair manual


Search            


Content   ..  1863  1864  1865  1866   ..


Chrysler 300/300 Touring/300C, Dodge Magnum. Manual - part 1865


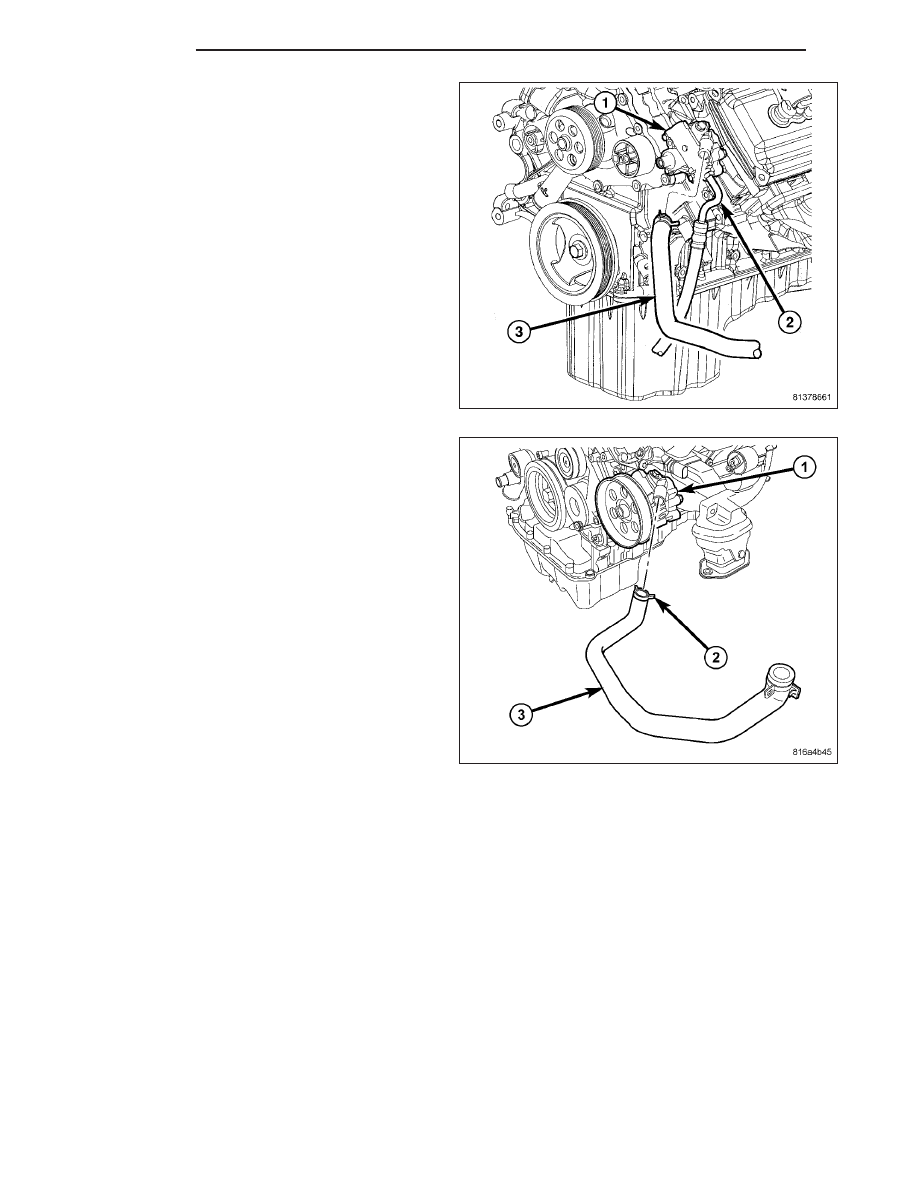
3. 5.7L/6.1L Engines – Install supply hose (3) on

pump (1). Install clamp securing hose in place.

4. 3.0L Diesel Engine – Install supply hose (3) on

pump (1). Install clamp (2) securing hose in place.

5. Install air cleaner housing and inlet tube. (Refer to 9 - ENGINE/AIR INTAKE SYSTEM/AIR CLEANER HOUSING

- INSTALLATION)

19 - 278

PUMP

LX

6. Connect battery negative cable (2) to battery post.

It is important that this is performed properly. (Refer
to 8 - ELECTRICAL/BATTERY SYSTEM - STAN-
DARD PROCEDURE)

7. Fill pump reservoir with fluid and perform pump ini-

tial operation procedure. (Refer to 19 - STEERING/
PUMP - STANDARD PROCEDURE)

LX

PUMP

19 - 279

PULLEY

REMOVAL

1. Remove power steering pump from engine. (Refer to 19 - STEERING/PUMP - REMOVAL)

CAUTION: Do not hammer on power steering
pump pulley or shaft to remove power steering
pump pulley. This will damage pulley and power
steering pump.

2. Mount Puller (2), Special Tool C-4333, on power

steering pump pulley (3). Mount Puller (with power
steering pump (1)) in a vise as shown; Do not
mount pump in vise
. Placing Puller in vise will
keep shaft of pump from turning while removing
pulley (3) and help keep tension on Puller and pul-
ley hub.

3. Tighten Puller and remove pulley from shaft of

power steering pump.

NOTE: Inspect pulley. Replace if pulley is bent,
cracked, or loose.

INSTALLATION

CAUTION: Do not hammer on power steering
pump pulley (2) or pump shaft to install pulley.
This action will damage pulley and power steering
pump.

1. Place power steering pump pulley (2) squarely on

end of power steering pump shaft.

2. Place Installation Spacer (1), Special Tool 6936, on

top of pump pulley (2).

19 - 280

PUMP

LX

NOTE: Later build pumps feature a shaft with
internal threads that are not as deep as earlier
production, thus requiring a stack of washers,
approximately 13 mm (0.5 in.) thickness (3), placed
over Spacer 6936 (2), before mounting Installer
C-4063C (1) on the pump. To know if a replace-
ment pump requires the stack of washers, mea-
sure the depth of the shaft hole. A later build
pump will have a depth of 20 mm (0.78 in.) while
an earlier build pump will have a depth of 32 mm
(1.25 in.).

3. As necessary (see above note), place a stack of

washers approximately 13 mm (0.5 in.) thickness
(3) over Spacer 6936 (2).

NOTE: Installer, Special Tool C-4063C, is a combi-
nation of Installer, Special Tool C-4063B, and Forc-
ing Screw, Special Tool C-4063-2. It is important to
use Forcing Screw C-4063-2 when performing this
procedure.

4. Thread Installer (1), Special Tool C-4063C, com-

pletely into internal threads of power steering pump
shaft, then rotate Installer Nut down against wash-
ers (as necessary) and Spacer (2) on pump pulley.

5. Ensuring that special tools and pulley remain

aligned with pump shaft, tighten Installer Nut, forc-
ing pulley onto power steering pump shaft until
Spacer (2) comes in contact with end of pump
shaft. When Spacer (2) is against shaft of power
steering pump, Installer (1) Nut will no longer rotate.

6. Remove special tools from power steering pump.

7. Install power steering pump on engine. (Refer to 19 - STEERING/PUMP - INSTALLATION).

LX

PUMP

19 - 281


Content   ..  1863  1864  1865  1866   ..