Chrysler Le Baron, Dodge Dynasty, Plymouth Acclaim. Manual - part 165


  Index      Chrysler     Chrysler Le Baron, Dodge Dynasty, Plymouth Acclaim - service repair manual 1993 year


Search            


Content   ..  163  164  165  166   ..


Chrysler Le Baron, Dodge Dynasty, Plymouth Acclaim. Manual - part 165


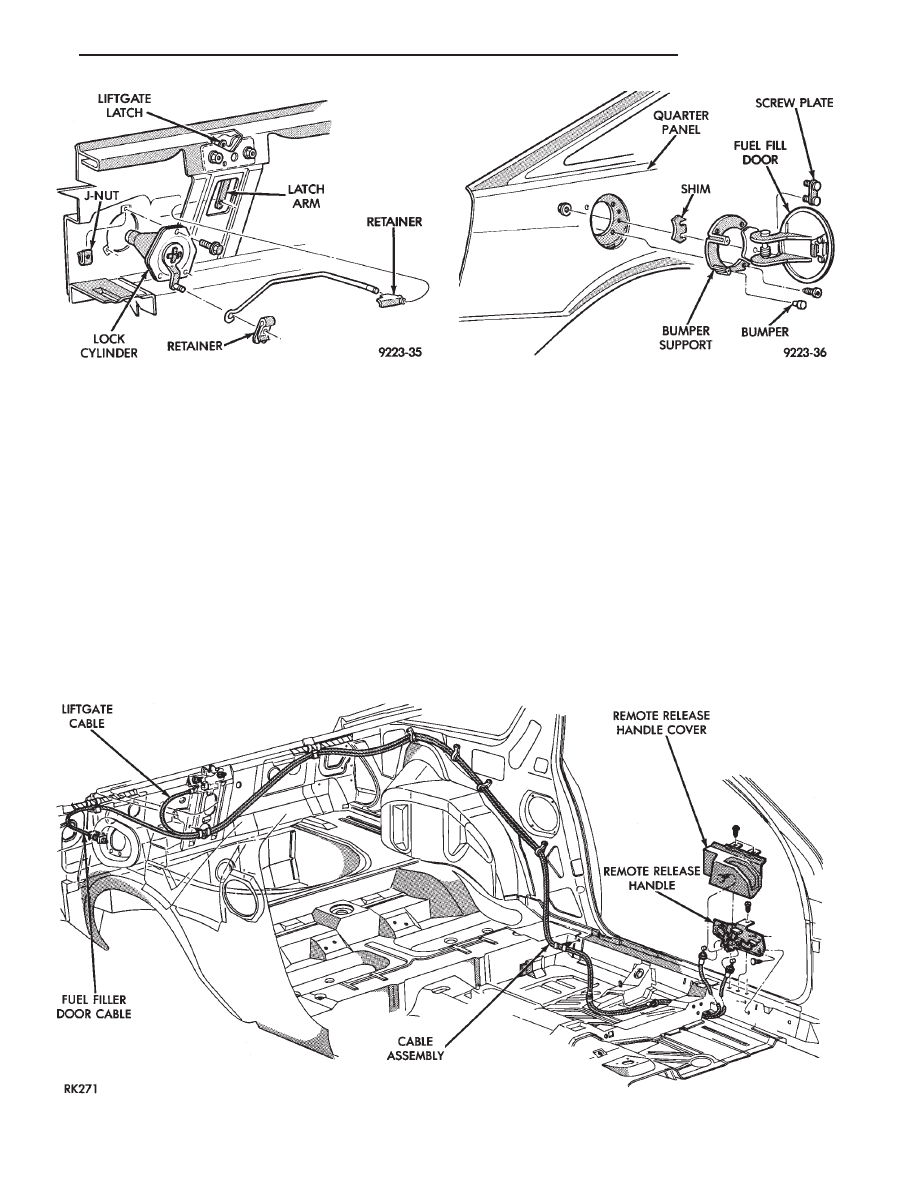
LIFT GATE AND FUEL FILL DOOR RELEASE
CABLES

LIFT GATE AND FUEL FILL DOOR CABLES
REMOVAL (FIG. 45)

(1) Remove interior trim as necessary to gain ac-

cess to release cables.

(2) Remove left front door opening scuff plate.
(3) Remove screw holding trim cover to release ca-

ble handle and separate cover from handle.

(4) Remove screw holding release handle to door

sill.

(5) Pry open retainer tab holding cable core end in

handle pivot. Pry cable case end from handle.

(6) On fuel fill door cable, remove nut holding ca-

ble latch to fuel fill opening.

(7) On lift gate latch, remove lift gate latch cover

and disconnect cable end from latch. Route cable
back through trunk lid.

LIFT GATE AND FUEL FILL DOOR CABLES
INSTALLATION

Reverse the preceding operation.

TAIL LAMP CLOSURE PANEL

REMOVAL

(1) Remove lift gate opening scuff plate.
(2) Remove lift gate opening sill cover.
(3) Remove luggage compartment tail panel trim.
(4) Remove lower quarter trim panels.

Fig. 45 Lift Gate and Fuel Fill Door Release Cables

Fig. 43 Lift Gate Lock Cylinder

Fig. 44 Fuel Fill Door

Ä

AG-BODY

23 - 69

(5) Remove bolt holding quarter panel spoiler to

tail lamp closure panel, if equipped.

(6) Remove tail lamps and license plate lamps, re-

fer to Group 8L, Lamps for proper procedures.

(7) Remove nuts holding tail lamp closure panel to

tail panel.

(8) Remove nuts holding tail lamp closure panel to

quarter panel ends.

(9) Separate tail lamp closure panel from vehicle.

INSTALLATION

Reverse the preceding operation.

Fig. 46 Tail Lamp Closure Panel

23 - 70

AG-BODY

Ä

AJ-VEHICLE BODY COMPONENT SERVICE

INDEX

page

page

A-Pillar and Roof Rail Mouldings

. . . . . . . . . . . . . 77

Cowl Cover

. . . . . . . . . . . . . . . . . . . . . . . . . . . . . 73

Cowl Panel Trim and Scuff Plates

. . . . . . . . . . . . 77

Door Glass

. . . . . . . . . . . . . . . . . . . . . . . . . . . . . 76

Door Glass Lift Plate and Guide Post

. . . . . . . . . 76

Door Latch

. . . . . . . . . . . . . . . . . . . . . . . . . . . . . 75

Door Trim Panel

. . . . . . . . . . . . . . . . . . . . . . . . . 74

Floor Carpet

. . . . . . . . . . . . . . . . . . . . . . . . . . . . 80

Front Center Console

. . . . . . . . . . . . . . . . . . . . . 79

Front Door and Hinge

. . . . . . . . . . . . . . . . . . . . . 75

Front Door Silencer and Water Shield

. . . . . . . . . 74

Front End Splash Shields

. . . . . . . . . . . . . . . . . . 73

Front Seat Belts

. . . . . . . . . . . . . . . . . . . . . . . . . 78

Front Seats

. . . . . . . . . . . . . . . . . . . . . . . . . . . . . 78

Fuel Fill Door

. . . . . . . . . . . . . . . . . . . . . . . . . . . 84

Glass Run Weatherstrip—AJ-21 Body

. . . . . . . . . 76

Grille

. . . . . . . . . . . . . . . . . . . . . . . . . . . . . . . . . . 71

Grille Header Molding

. . . . . . . . . . . . . . . . . . . . . 71

Grille Opening Panel

. . . . . . . . . . . . . . . . . . . . . . 71

Head Lining

. . . . . . . . . . . . . . . . . . . . . . . . . . . . . 81

Hood and Hinges

. . . . . . . . . . . . . . . . . . . . . . . . 72

Hood Latch and Release Cable

. . . . . . . . . . . . . . 72

Inside Latch Release Handle

. . . . . . . . . . . . . . . . 76

Lower Grille

. . . . . . . . . . . . . . . . . . . . . . . . . . . . . 71

Outside Door Latch Release Handle

. . . . . . . . . . 76

Overhead Console

. . . . . . . . . . . . . . . . . . . . . . . . 80

Power Door Lock Actuator

. . . . . . . . . . . . . . . . . . 76

Quarter Extension Trim Panel

. . . . . . . . . . . . . . . 77

Quarter Glass Module

. . . . . . . . . . . . . . . . . . . . . 85

Quarter Trim Panel

. . . . . . . . . . . . . . . . . . . . . . . 77

Rear Seat Belts

. . . . . . . . . . . . . . . . . . . . . . . . . . 78

Rear Seats

. . . . . . . . . . . . . . . . . . . . . . . . . . . . . 79

Rear Shelf Trim Panel

. . . . . . . . . . . . . . . . . . . . . 78

Rear Window Glass

. . . . . . . . . . . . . . . . . . . . . . 81

Sun Roof Air Deflector

. . . . . . . . . . . . . . . . . . . . 81

Sun Roof Drain Tubes

. . . . . . . . . . . . . . . . . . . . 81

Sun Roof Weatherstrip

. . . . . . . . . . . . . . . . . . . . 81

Trunk Lid

. . . . . . . . . . . . . . . . . . . . . . . . . . . . . . 82

Trunk Lid and Fuel Fill Door Release Cables

. . . 83

Trunk Lid Hinge

. . . . . . . . . . . . . . . . . . . . . . . . . 82

Trunk Lid Latch

. . . . . . . . . . . . . . . . . . . . . . . . . . 83

Trunk Lid Lock

. . . . . . . . . . . . . . . . . . . . . . . . . . 83

Trunk Lid Luggage Rack

. . . . . . . . . . . . . . . . . . . 83

Trunk Lid Torsion Bar

. . . . . . . . . . . . . . . . . . . . . 83

Trunk Opening Weatherstrip

. . . . . . . . . . . . . . . . 83

Window Regulator

. . . . . . . . . . . . . . . . . . . . . . . . 75

GRILLE

REMOVAL (FIG. 1)

(1) Remove screws holding grille to header mold-

ing at top of grille.

(2) Push downward on top of bumper fascia to gain

clearance for grille removal.

(3) Push grille downward and pull outward.
(4) Separate grille from vehicle.

INSTALLATION

Reverse the preceding operation.

GRILLE HEADER MOLDING

REMOVAL (FIG. 1)

(1) Remove grille.
(2) Remove nuts holding header molding to grille

opening panel.

(3) Separate header molding from vehicle.

INSTALLATION

Reverse the preceding operation.

LOWER GRILLE

REMOVAL (FIG. 1)

(1) Remove screws holding lower grille to fascia.
(2) Separate lower grille from vehicle.

INSTALLATION

Reverse the preceding operation.

GRILLE OPENING PANEL

REMOVAL (FIG. 2)

(1) Remove front bumper and fascia.
(2) Remove grille.
(3) Remove headlamp modules.
(4) Remove bolt holding grille opening panel to

bracket forward of radiator.

(5) Raise hood and remove push-in fasteners hold-

ing sight shields to closure panel. Separate sight
shields from vehicle.

Fig. 1 Grille Assembly

Ä

AJ-BODY

23 - 71

(6) Remove nuts holding grille opening panel to

front fenders.

(7) Remove bolts holding grille opening panel to

front fenders.

(8) Separate grille opening panel form vehicle.

INSTALLATION

Reverse the preceding operation. Align grille open-

ing panel to fit flush across fender joining locations.

HOOD AND HINGES

HOOD REMOVAL (FIG. 2)

(1) Raise hood to full up position.
(2) Lift front edge of cowl cover on the right side of

the windshield washer bottle and disconnect the un-
der hood lamp wire connector.

(3) Mark all bolt and hinge attachment locations

with a grease pencil or other suitable device to pro-
vide reference marks for installation. When install-
ing hood, align all marks and secure bolts. The hood
should be aligned to 4 mm (0.160 in.) gap to the front
fenders and flush across the top surfaces along fend-
ers.

(4) Remove the top hood to hinge attaching bolts

and loosen the bottom bolts until they can be re-
moved by hand.

(5) With assistance of a helper at the opposite side

of the vehicle to support the hood, remove the bottom
hood to hinge attaching bolts. Separate the hood
from the vehicle.

HOOD INSTALLATION

Reverse the preceding operation.

HOOD HINGE REMOVAL (FIG. 3)

(1) Support hood on the side that requires hinge

replacement.

(2) Mark all bolt and hinge attachment locations

with a grease pencil or other suitable device to pro-
vide reference marks for installation. When install-

ing hood hinge, align all marks and secure bolts. The
hood should be aligned to 4 mm (0.160 in.) gap to the
front fenders and flush across the top surfaces along
fenders. Shims can be added or removed under hood
hinge to achieve proper hood height.

(3) Remove hood to hinge attaching bolts.
(4) Remove hood hinge to front fender attaching

bolts and separate hinge from vehicle.

HOOD HINGE INSTALLATION

Reverse the preceding operation. If necessary, paint

new hinge before installation.

HOOD LATCH AND RELEASE CABLE

HOOD LATCH REMOVAL (FIG. 4)

(1) Raise hood to the full up position.
(2) Remove hood latch attaching bolts holding

latch to radiator closure panel and separate from ve-
hicle.

(3) Pry release cable casing attachment from slot

receiver on latch, disengage cable end from latch arm
hook.

HOOD LATCH INSTALLATION

Reverse the preceding operation.

HOOD LATCH RELEASE CABLE REMOVAL

(1) Raise hood to the full up position.
(2) Remove push-in fasteners holding hood latch

cover to radiator closure panel and separate cover
from vehicle.

(3) Disconnect hood release cable casing and cable

end from hood latch assembly. Refer to Hood Latch
Removal procedure in this section.

Fig. 2 Grille Opening Panel

Fig. 2 Hood Assembly Remove or Install—Typical

23 - 72

AJ-BODY

Ä


Content   ..  163  164  165  166   ..