BMW 3 (E46). Manual - part 167


  Index      BMW     BMW 3 (E46) - service repair manual 2006 year


Search            


Content   ..  165  166  167  168   ..


BMW 3 (E46). Manual - part 167


331-3


Rear Differential

All rear differential work requires some
method of raising the car and
supporting it securely while the work is
performed. Jack stands and a floor jack
can easily be used, but use extreme
caution when working beneath the car.
See 


010 General

.

Note:

Removal of rear subframe (differential
carrier) is covered in 


330 Rear

Suspension

.


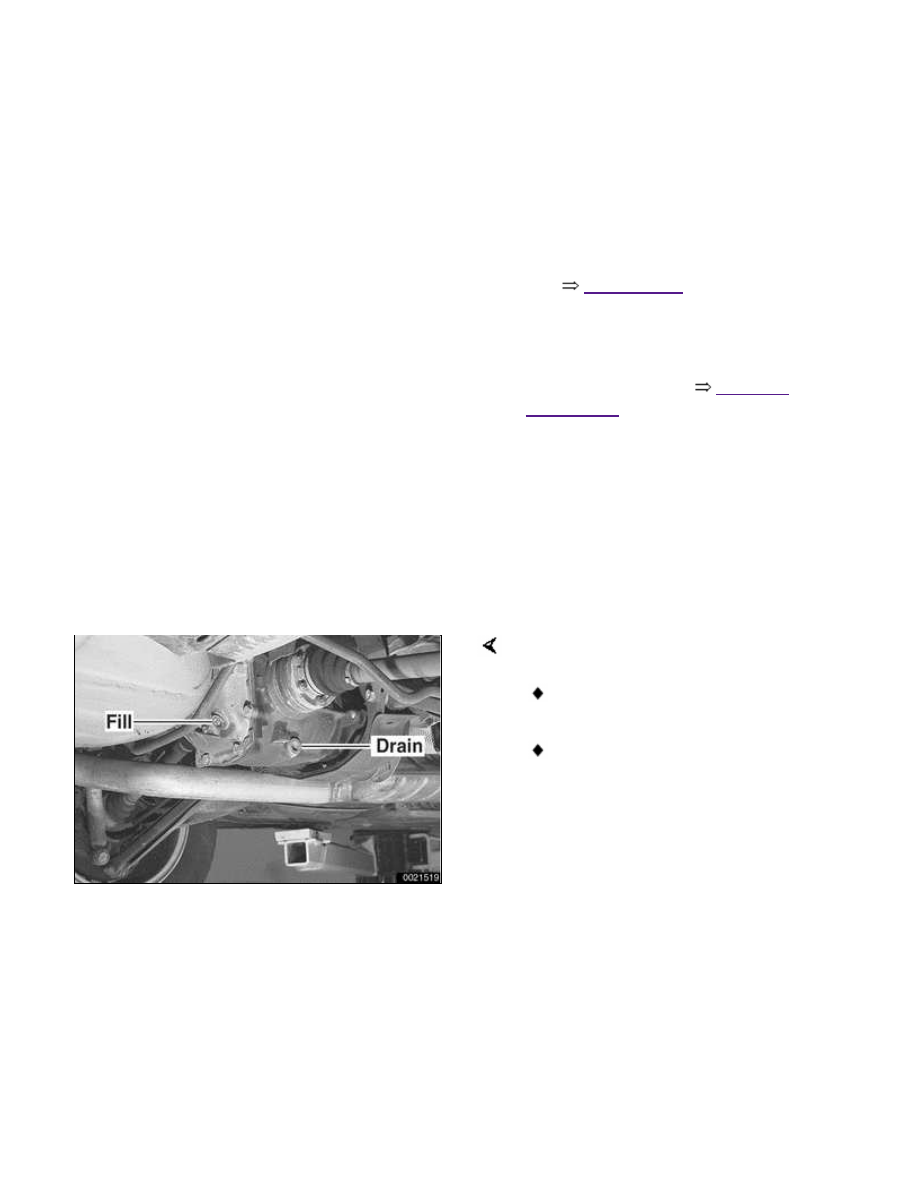
Rear differential oil, checking
and filling

Note:

BMW supplies the E46 rear differential
with lifetime lubricant.

To check rear differential oil level:

Remove oil filler plug.

Insert finger into fill hole. If finger
is wetted from oil, level is correct.

Note:

Use a 14 mm Allen socket to remove
the fill or drain plug. Alternatively, cut
approximately 30 mm (1.2 in) from an
Allen key and use a box end wrench on
the key stub.

 -

If necessary, fill differential with
appropriate type and quantity of
lubricant.

Note:

The differential fluid level is correct
when the fluid begins to spill from the
fill plug.

 -

Install and tighten fill plug.

Differential oil

Differential oil capacity

Rear wheel drive

0.9 liter (0.95 US

qt.)

All wheel drive

1.0 liter (1.06 US

qt.)

Oil specification

BMW SAF-XO

synthetic oil

Tightening torques

Differential drain or
fill plug

70 Nm (52 ft-lb)


Rear differential, removing and
installing

 -

Raise rear end of car and support
it securely on jack stands.

WARNING!

Make sure that the car is firmly
supported on jack stands designed
for the purpose. Place the jack
stands beneath a structural chassis
point. Do not place jack stands
under suspension parts.

 -

Remove rear drive axles.

 -

If necessary, drain differential oil.

Remove rear suspension reinforcement
brace:

Remove heat shield between
reinforcement brace and exhaust
pipe.

Remove bolts (A) mounting brace
to undercarriage.

Remove nuts (B) mounting brace
and front of rear subframe to
undercarriage.

Lower and remove reinforcement.

Note:

If necessary, tilt rear half of exhaust
system down. Support exhaust system
securely.

 -

Detach driveshaft from differential
input shaft flange and suspend.
See 


260 Driveshaft

.

CAUTION!

Suspend the detached drive axle
from the car body with a stiff wire
hook to prevent damage to the outer
CV joint.

 -

Remove rear stabilizer bar.

Support differential with transmission
jack. Remove rear (A) and front (B)
mounting bolts at subframe.

 -

Slowly lower differential unit and
remove toward rear.

 -

Installation is reverse of removal.
In order to prevent excess
vibration and noise, follow
sequence for tightening

differential mounting bolts:

Install bolts finger tight.

Tighten front bolts (B).

Tighten rear bolt (A).

Tightening torques

Differential drain or
fill plug

70 Nm (52 ft-lb)

Differential to rear subframe

Front mount (M12
bolts)

95 Nm (70 ft-lb)

Rear mount (M14
bolt)

174 Nm (128

ft-lb)

Drive axle to differential flange

M10x20 mm Torx
bolt

83 Nm (61 ft-lb)

M10x46 mm bolt
(black)

100 Nm (74

ft-lb)

M10x46 mm bolt
(silver) (always
replace)

80 Nm (59 ft-lb)

Driveshaft to differential flange

M10 compression
nut

64 Nm (47 ft-lb)

M10 Torx bolt

85 Nm (63 ft-lb)

Rear suspension reinforcement to
undercarriage

M12 self-locking
nut

77 Nm (57 ft-lb)

M8 bolt 8.8 grade

21 Nm (15 ft-lb)

M8 bolt 10.9 grade

30 Nm (22 ft-lb)

 -

Be sure to refill differential.


Content   ..  165  166  167  168   ..