Acura TL (1995-1998) body repair. Manual - part 9


  Index      Acura     Acura TL (1995-1998) body repair manual


Search            


Content   ..  7  8  9  10   ..


Acura TL (1995-1998) body repair. Manual - part 9


Front Side Frame

Replacement

1. Remove the related parts.

• Front suspension related parts
• Brake hoses and pipes
• Engine compartment electrical components
• Fittings in passenger compartment, etc.
• Steering gearbox.

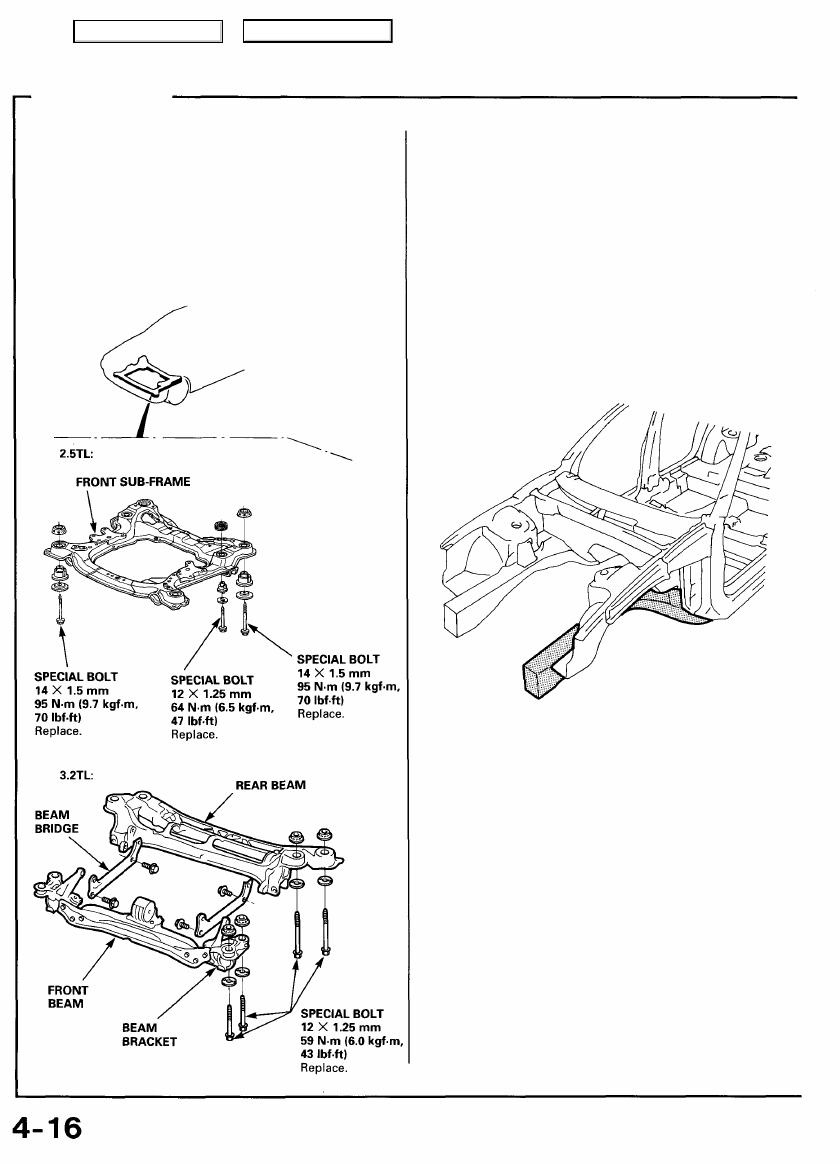
2. Remove the sub-frame.

NOTE: With the front bulkhead removed.

3. Roughly pull out and straighten the damaged area.

• Attach the car to the frame straightener by tighten-

ing the underbody clamps located at the horizontal
pinch welds.

NOTE: Refer to the 95-96 Acura 2.5TL & 96 Acura 3.2TL

Service Manuals for safety stand location points.

• Before cutting off the damaged sections, pull them

out so that they are restored to the original shape.

• Cutting off the front side frame before roughly

pulling out the damage makes repair of the related

front floor, lower dashboard, and other related parts

difficult.

4. Peel off the undercoat.

Heat the undercoat at the weld areas of the lower
dashboard, front floor and side sill with a gas torch and
peel off the undercoat with a metal spatula.

CAUTION: Be careful not to burn the fittings inside

the passenger compartment when heating.

5. Remove the front side frame.

NOTE: It's not necessary to separate the front wheel-

house from the front side frame if the wheelhouse/
damper housing is to be replaced also.

• Center punch around the spot weld imprints on the

wheelhouse, damper housing, lower dashboard, front
floor and floor frame.

• Using a spot cutter, drill holes in the spot welded

areas.

• Peel off the welding flange using the chisel.

Main Menu

Table of Contents

Remove the burrs from the drilled sections with a
disc sander.

To prevent eye injury, wear goggles

or safety glasses whenever sanding, cutting or
grinding.

NOTE: When drilling holes and be careful not to
drill down to the inside sill.

2.5TL:

• Center punch around the spot weld imprints on the

front side frame and front side outrigger from inside
the passenger compartment.

• Drill holes in the spot welded area with a 5 mm (0.2 in)

drill.

NOTE: Drill holes completely through the parts since the
replacement front side frame, front side outrigger and jack-up
stiffener will be welded by MIG welding.

• Remove the MIG welds of the front side frame-and-lower

dashboard with a disc sander.

Main Menu

Table of Contents

Front Side Frame

Replacement (cont'd)

6. Mold the related parts.

• Reshape the front wheelhouse and damper housing

lower dashboard-to-front floor joint using a hammer
and dolly.

• Fill all drilled holes by MIG or gas welding.

7. Set the new front side frame.

• Remove the undercoat from the both sides of the

welding section, and expose the steel plate using a

disc sander.

To prevent eye injury, wear goggles

or safety glasses whenever sanding, cutting or

grinding.

NOTE: Apply the spot sealer to the welding surface

when spot welding.

• Tighten the front side frame against the front floor

and side sill using vise-grips or pliers.

• Place a jack under the front side frame end and

support it, and measure the positions for temporary
attachment.

NOTE: Use of a positioning jig is recommended (see
page 

1-7

).

• Clamp the front bulkhead and front wheelhouse/

damper housing with squill vises and vise-grips.

• Measure the front compartment diagonally.

• Spot weld several points in the clamped sections,

and temporarily attach the front side frame.

To prevent eye injury and burns

when welding, wear an approved welding helmet,
gloves and safety shoes.

• Check the body dimensions (see 

section 6

).

Main Menu

Table of Contents

8. Perform the main welding.

• Make 20% to 30% more spot welds than there were

holes drilled.

• Weld as much as possible with the jig still mounted.

To prevent eye injury and burns

when welding, wear an approved welding helmet,

gloves and safety shoes.

• Weld the front side frame, wheelhouse, damper

housing and bulkhead.

• and make 5 mm (0.2 in) holes in the MIG weld

holes with the outrigger, and plug weld the inside sill
with a MIG welder.

2.5TL:

3.2TL:

• From the passenger compartment side, plug weld

the holed areas of the lower dashboard and front
floor with a MIG welder.

2.5TL:

Main Menu

Table of Contents


Content   ..  7  8  9  10   ..