Acura RSX Honda Integra. Manual - part 378


  Index      Acura     Acura RSX Honda Integra - service repair manual 2002-2006 year


Search            


Content   ..  376  377  378  379   ..


Acura RSX Honda Integra. Manual - part 378


01

02

S6M6A22J34200000000FEAT00

Closing Force: 200

290 N (20

30 kgf, 44

66 lbf)

20-48

Moonroof

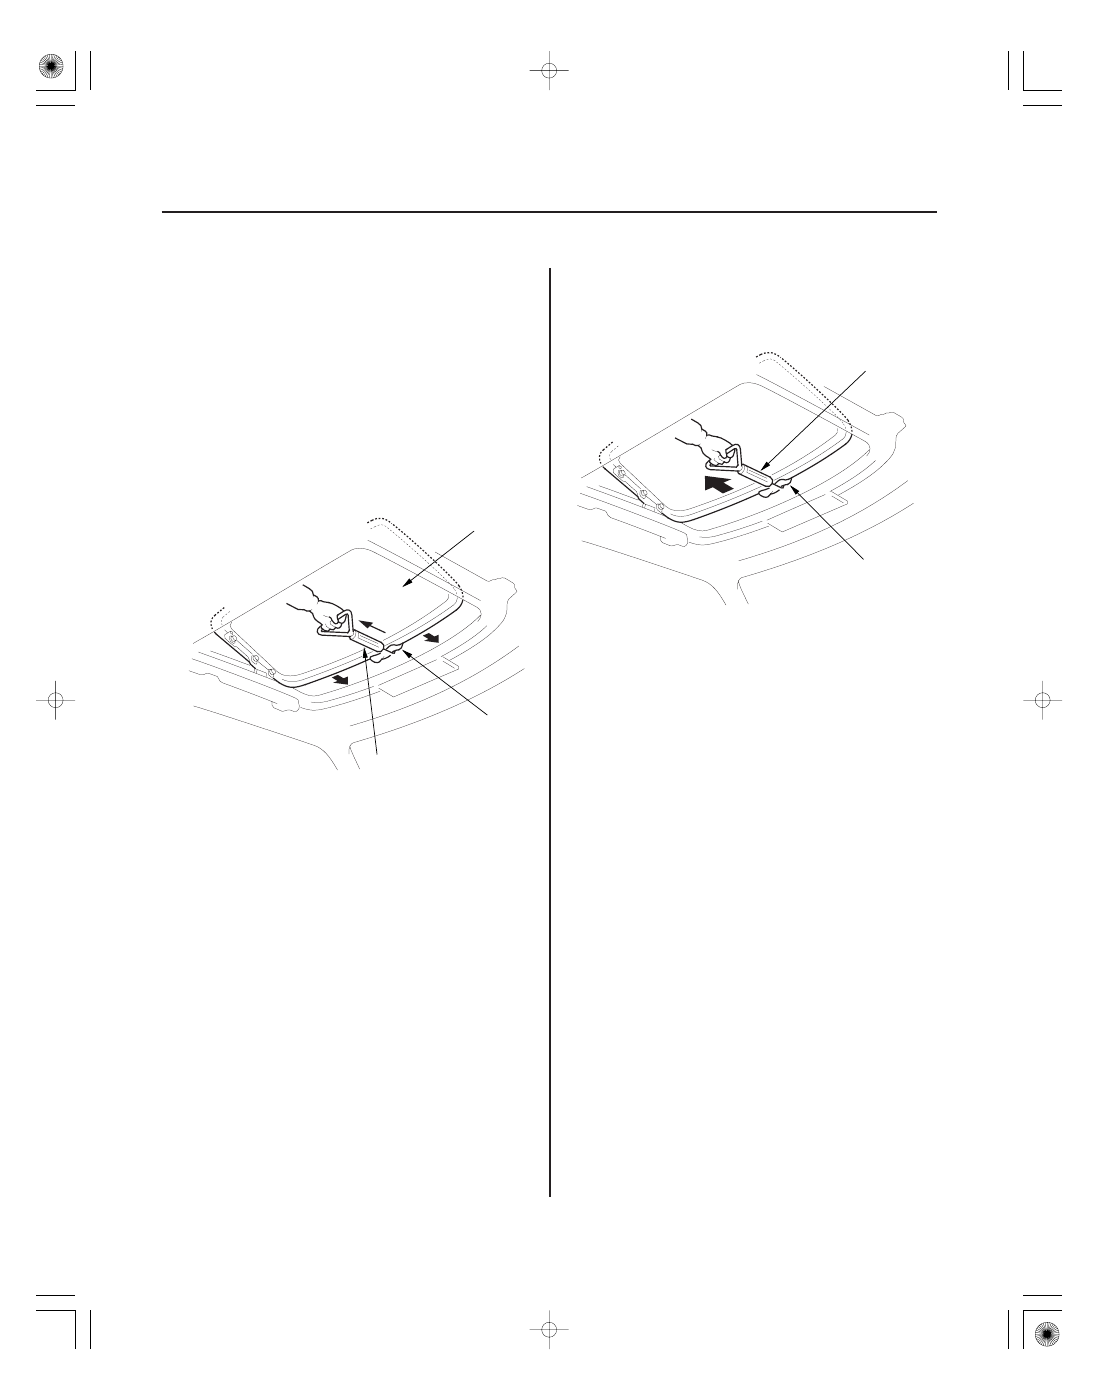
Closing Force and Opening Drag Check

B

A

C

B

A

1. Remove the headliner (see page 20-55).

2. Closing force check:

• With a shop towel (A) on the leading edge of the

glass (B), attach a spring scale (C) as shown.

• Have an assistant hold the switch to close the

glass while you measure the force required to
stop it.

• Read the force as soon as the glass stops moving,

then immediately release the switch and spring
scale.

3. If the force is not within specification, remove the

moonroof motor (see page 20-42), then check these
items:

• The gear position and the inner cable for

breakage and damage. If the gear portion is
broken, replace the motor. If the inner cable is
damaged, remove the frame (see page 20-43),
and replace the cable assembly (see page 20-45).

• The moonroof motor (see page 22-131). If the

motor fails to run or doesn’t turn smoothly,
replace it.

• The opening drag. Go to step 4.

4. Opening drag check: Protect the leading edge of the

glass with a shop towel (A). Measure the effort
required to open the glass using a spring scale (B)
as shown.

5. If the load is over 40 N (4 kgf, 9 lbf), check these

items:

• The side clearance and glass height adjustment

(see page 20-40).

• For broken or damaged sliding parts. If any

sliding parts are damaged, replace them.

05/06/27 18:23:02 61S6M040_200_0049

01

S6M6A00J26273400000KDAT10

Special Tools Required

20-50

Interior Trim

Trim Removal/Installation - Door Areas

A

B

(Black)

C

: Clip, 4

:

(White)

Clip, 6

: Clip, 4

DOOR OPENING TRIM

A-PILLAR TRIM

LEFT KICK PANEL

RIGHT KICK PANEL

DOOR SILL TRIM

DOOR OPENING TRIM

DOOR SILL TRIM

REAR SIDE TRIM PANEL

SIDE STEP TRIM

A

A

A

A

A

A

C

C

C

C

B

Inside

B

B

B

Fastener Locations

KTC trim tool set SOJATP2014

NOTE:

• Put on gloves to protect your hands.
• Use the appropriate tool from the KTC trim tool set to avoid damage when prying components.
• Take care not to bend or scratch the trim and panels.

1. Remove the trim as shown.

2. Install the trim in the reverse order of removal, and note these items:

• Replace any damaged or stress-whitened clips.
• When reinstalling the door opening trim, first align the rear upper corner portion of the trim on the rear upper

corner of the door opening flange.

• Push the clips into place securely.

05/06/27 18:23:07 61S6M040_200_0051

02

S6M6A00J26273400000KDAT15

Special Tools Required

20-51

Trim Removal/Installation - Rear Side Area

A

B

C

: Clip, 1

DOOR OPENING TRIM

DOOR SILL TRIM

REAR SIDE
TRIM PANEL

A

A

A

A

A

C

B

QUARTER
PILLAR
TRIM

PIN

HOOK

REAR SIDE
TRIM PANEL

A

QUARTER PILLAR TRIM

HOOKS
(Five places)

REAR SPEAKER
CONNECTOR

REAR SEAT-BACK
PIVOT BRACKET

REAR SPEAKER

REAR SPEAKER
COVER

D

D

C

D

: Clip, 2

: Clip, 6

: Clip, 1

SCREW

8 x 1.25 mm
22 N·m
(2.2 kgf·m, 16 lbf·ft)

Fastener Locations

KTC trim tool set SOJATP2014

NOTE:

• Put on gloves to protect your hands.
• Use the appropriate tool from the KTC trim tool set to avoid damage when prying components.
• Take care not to bend or scratch the trim and panels.

1. Remove these items, and remove the trim as shown:

• Rear seat-back and seat cushion (see page 20-85)
• Rear seat-back pivot bracket (see page 20-86)
• Door sill trim (see page 20-50)

2. Install the trim in the reverse order of removal, and note these items:

• Replace any damaged or stress-whitened clips.
• Make sure the connectors are plugged in properly.
• When installing the rear side trim panel, make sure there are no pinches in the belt.
• Apply liquid thread lock to the rear seat-back pivot bolt before installation.
• Push the clips into place securely.

05/06/27 18:23:07 61S6M040_200_0052

03

S6M6A00J26273400000KDAT44

Special Tools Required

20-52

Interior Trim

Trim Removal/Installation - Quarter Pillar Area

Fastener Locations

A

: Clip, 3

B

: Clip, 7

UPPER ANCHOR CAP

REAR SIDE TRIM PANEL

UPPER ANCHOR CAP

REAR SEAT BELT
UPPER ANCHOR BOLT
7/16-20 UNF
32 N·m (3.3 kgf·m, 24 lbf·ft)

QUARTER PILLAR TRIM

HOOKS
(Six places)

COAT HANGER

DOOR OPENING TRIM

FRONT SEAT BELT
UPPER ANCHOR BOLT
7/16-20 UNF
32 N·m (3.3 kgf·m, 24 lbf·ft)

A

A

A

B

B

B

B

B

B

B

SCREW

(Black)

(White)

KTC trim tool set SOJATP2014

NOTE:

• Put on gloves to protect your hands.
• Use the appropriate tool from the KTC trim tool set to avoid damage when prying components.
• Take care not to bend or scratch the trim and panels.

1. Remove the trim as shown:

• To remove the quarter pillar trim, remove the upper portion of the rear side trim panel as necessary (see page

20-51).

• To remove the right quarter pillar trim, disconnect the cargo area light connector.

2. Install the trim in the reverse order of removal, and note these items:

• Replace any damaged or stress-whitenings clips.
• Apply liquid thread lock to the anchor bolts before installation.
• When installing the rear side trim panel, make sure there are no pinches in the belt.
• Before installing the anchor bolts, make sure there are no twists or kinks in the belts.
• Push the clips into place securely.

If necessary,
remove it.

05/06/27 18:23:08 61S6M040_200_0053


Content   ..  376  377  378  379   ..