Porshe 911 (997). Manual - part 385


  Index      Hummer     Porshe 911 997 series - service repair manual 2004-2008 year


Search            


Content   ..  383  384  385  386   ..


Porshe 911 (997). Manual - part 385


Cutting the side section

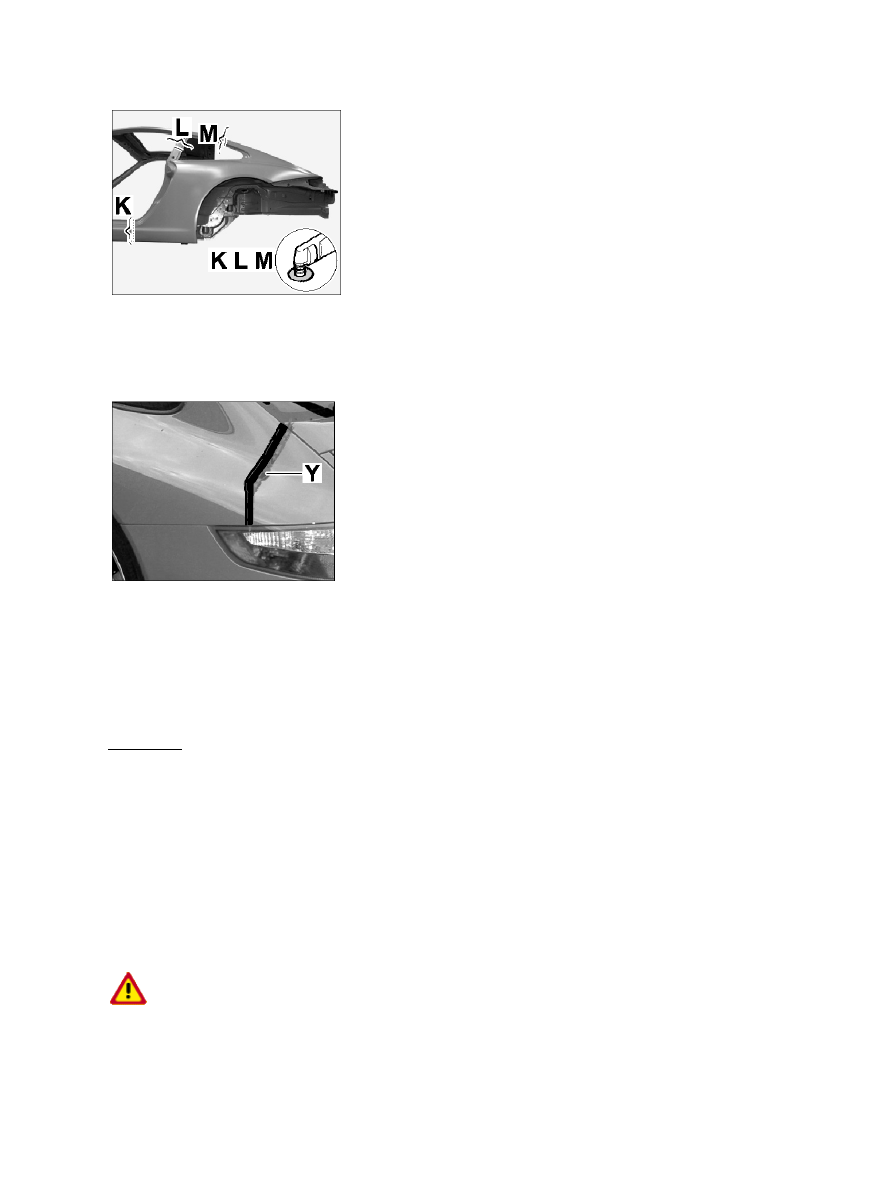
3. Cut through the side section at the marked joints K, L,

M

.

Removing expanded sealant

4. Remove expanded sealant

4.1. The side section is factory sealed with expanded sealant Y from the light housing to the rear centre

section connection. The expanded sealant will be destroyed when replacing the side section and must be
replaced.

Preparing connection areas of the body for installation of the
side section

Safety instructions for flying sparks during grinding and welding work

ATTENTION

Danger of explosion and fire from flying sparks during grinding and welding work!

Danger of injury and danger of damage to vehicle parts and other vehicles due to flying sparks

• 

Diagnostic system: reading out fault memory and activating systems

 Preparing connection areas of the body for installation of the side section

1697

→ Cover vehicle parts such as battery, fuel system, paintwork, glass and passenger compartment parts with

fire-proof covers and, if necessary, remove batteries and fuel-carrying components.

→ No other vehicles may be left unprotected in areas used for body repair!

Preparing connection areas of the body for installation of the side section

Preparing connection areas of the body for installing the side members

1. Clean the body connection flanges of undersealing, adhesive residue and paint in the marked areas

using a hot-air gun or rotary brush. Grind the connection flanges until bare.

Fitting side section and preparing for installation

Safety instructions for sharp-edged body and unit parts

ATTENTION

Danger of injury! Sharp-edge burrs on body and unit parts!

Injuries from sharp edges on body and unit parts.

• 

→ Wear protective gloves when working in the area of sharp-edged body and unit parts!

Diagnostic system: reading out fault memory and activating systems

Safety instructions for flying sparks during grinding and welding work

1698

Fitting in side section and preparing for installation

Fit in side section at the rear to the body

1. Fit in side section to the body at the rear

1.1. Cut the replacement part so that there is approx. 60 mm overlap at the joints.

1.2. To complete the fit, install the doors and lid at the rear and set the gap dimensions between the door and

lid at the rear and the side section according to the respective adjustment values. → 501000  Diagram -
body gap dimensions

1.3. Fix the side section at the rear with tensioning

clamps.

Fitting in side section joints and making the cuts

2. Fit in side section joints and make the cuts

2.1. Use a body saw to cut the two sheetmetal panels in the area of the overlap between the side section and

body. Do not damage the internal components when doing this.

Diagnostic system: reading out fault memory and activating systems

Fitting in side section and preparing for installation

1699

Cleaning welding and sealing areas

3. Cleaning welding and sealing areas

3.1. Grind both sides of the connecting flanges of the side sections in the marked areas A, B, C, D, F, G, H, I,

L, J, K, L, M with a rotary brush until they are bright.

3.2. Drill Ø 7 mm holes in area J for the plug welds under shielding

gas.

Installing side section

Installing side section

Fitting the seal

1. Install

seal

1.1. Apply a triangular bead of body sealant Y -dimension "X" = approx. 12 mm high - on all sides of the

seal. Apply seal to the prepared holes on the inside of the side section, position the pins of the seal and
press into place.

2. Apply adhesive on the side section

Diagnostic system: reading out fault memory and activating systems

 Installing side section

1700


Content   ..  383  384  385  386   ..