Land Rover Engine 2.0 Litre L Series. Manual - part 4


  Index      Land Rover     Land Rover Engine 2.0 Litre L Series Diesel - service manual 2000 year


Search            


Content   ..  1  2  3  4  5  ..


Land Rover Engine 2.0 Litre L Series. Manual - part 4


ENGINE

6

OVERHAUL

CAUTION: If engine front mounting plate
was removed, clean all traces of Loctite
from plate and cylinder block. Reseal plate

to block using Loctite 638.

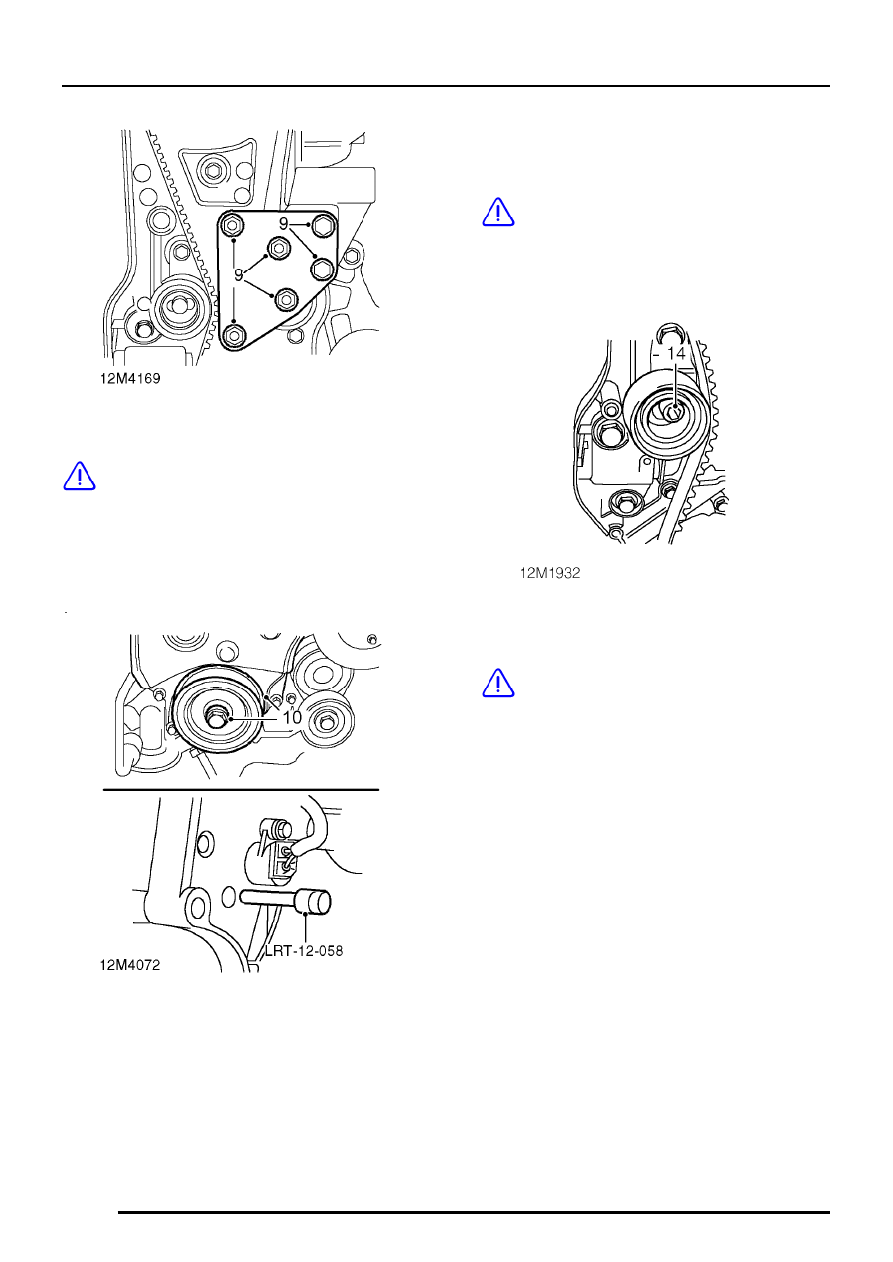
9. Fit engine front mounting plate, fit 4 nuts and 2

bolts and tighten bolts to 45 Nm and nuts to 30
Nm then further 120

°

.

10. Locate crankshaft pulley on crankshaft, fit and

lightly tighten bolt.

11. Remove timing pin LRT-12-058.

12. Using crankshaft pulley bolt, rotate crankshaft

2 turns clockwise and refit timing pin
LRT-12-058.

CAUTION: Do not use camshaft timing belt
gear, gear retaining bolt or timing belt to
rotate crankshaft.

13. Check that camshaft gear timing mark is

aligned exactly with pointer on timing belt
upper rear cover.

14. Loosen Allen screw or bolt until tensioner

pulley moves to tension belt then tighten screw
or bolt to 55 Nm.

CAUTION: Do not exceed specified torque
figure.

15. Remove crankshaft pulley bolt and pulley.

ENGINE

OVERHAUL

7

16. Position camshaft timing belt lower front cover

to timing belt lower rear cover.

17. Fit lower front cover securing screws ensuring

that 3 longest screws are in correct fitted
position, tighten all screws to 5 Nm.

18. Fit crankshaft pulley and bolt, tighten bolt to 63

Nm then a further 90

°

. Remove timing pin

LRT-12-058.

19. Fit camshaft gear damper, ensuring that the

timing mark on the damper is aligned to the
timing mark on the camshaft gear.

20. Fit new Torx screws and tighten to 10 Nm.

NOTE: Do not fit camshaft timing belt
upper front cover until engine has been
installed in vehicle and FIP timing belt has

been fitted and adjusted.

ENGINE

8

OVERHAUL

CYLINDER HEAD ASSEMBLY

Remove

1. Remove and discard camshaft timing belt.

2. Restrain camshaft timing belt gear using tool

12-182 and remove bolt securing fuel injection
pump drive belt gear to camshaft, remove
gear, discard bolt.

CAUTION: Ensure camshaft does not
rotate when removing bolt and do not
rotate crankshaft or camshaft with timing

belt removed and cylinder head fitted.

3. Restrain camshaft timing belt gear using tool

12-182 and remove bolt securing camshaft
timing belt gear. Remove gear and discard
bolt.

CAUTION: Ensure camshaft does not
rotate when removing bolt and do not
rotate crankshaft or camshaft with timing

belt removed and cylinder head fitted.

4. Remove 5 screws securing camshaft timing

belt upper rear cover, remove cover, recover
sealing strip.

NOTE: Shortest screws are fitted in
camshaft carrier.

ENGINE

OVERHAUL

9

5. Remove Allen screw securing fuel injection

pump drive belt tensioner, remove tensioner.

6. Remove 3 screws securing fuel injection pump

drive belt rear cover, remove cover and collect
bracket.

7. Progressively loosen then remove 12 bolts

securing camshaft cover.

8. Remove camshaft cover and discard gasket.

9. Using sequence shown, progressively loosen

then remove 10 Torx bolts and washers.

CAUTION: Keep bolts in their fitted order,
do not attempt to remove washers from
bolts.

10. Using assistance, remove cylinder head

assembly and support each end of cylinder
head on blocks of wood to protect valves
which, when open, protrude below face of
cylinder head.

CAUTION: Cylinder head is dowel located,
do not tap it sideways to free it from
cylinder block.

11. Remove and discard cylinder head gasket.


Content   ..  1  2  3  4  5  ..