Land Rover Engine 1.8 Litre K Series. Manual - part 9


  Index      Land Rover     Land Rover Engine 1.8 Litre K Series - service manual 2000 year


Search            


Content   ..  7  8  9  10   ..


Land Rover Engine 1.8 Litre K Series. Manual - part 9


ENGINE

22

OVERHAUL

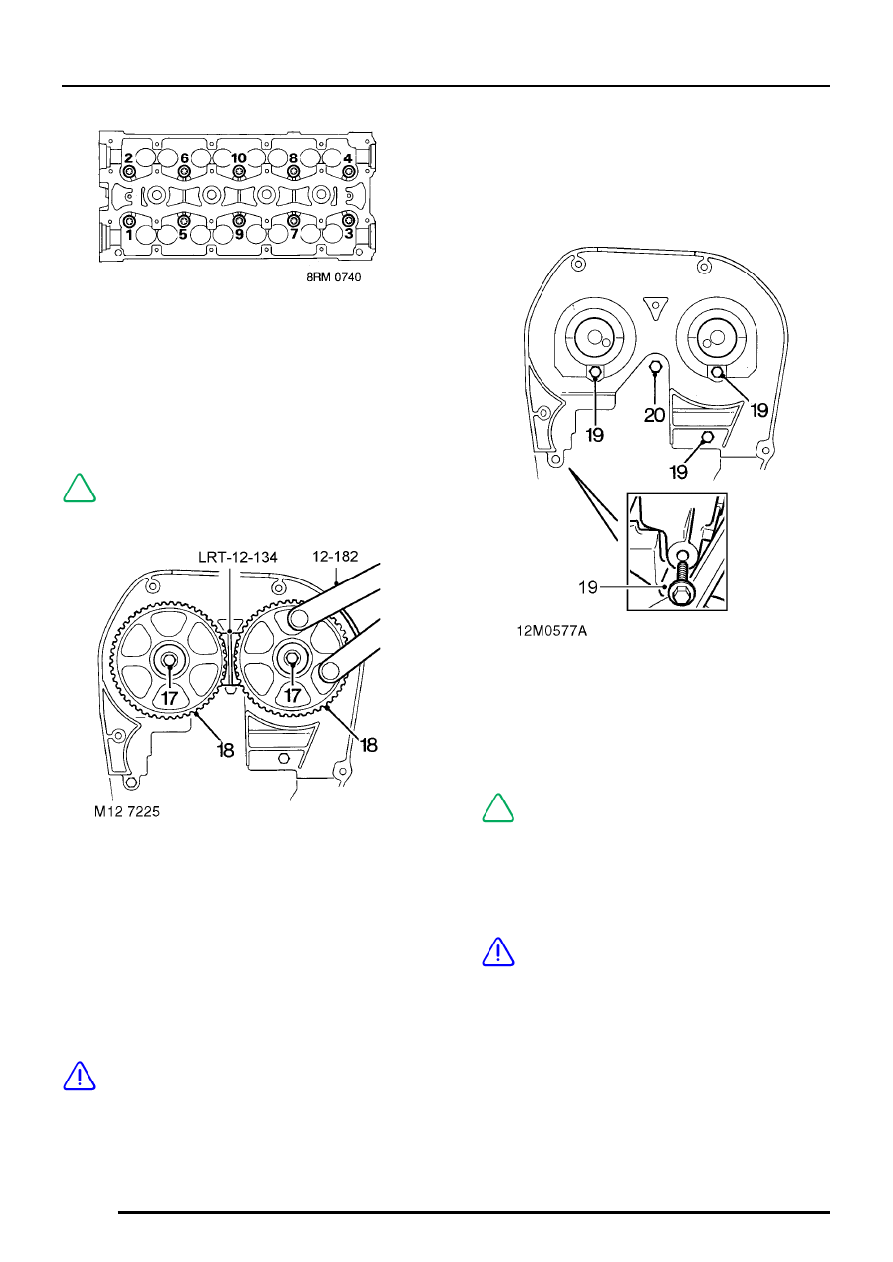
14. Using sequence shown, progressively loosen

cylinder head bolts:
Early engines:- Remove bolts 1 to 8 and store
in fitted order.
Later engines with modified camshafts:-
Remove bolts 1 to 6 and store in fitted order.

NOTE: It will be necessary to carry out the
following operations in order to remove
the remaining bolts.

15. Remove locking tool LRT-12-134 from

camshaft gears.

16. Using tool 12-182, turn both camshafts

clockwise to gain access to bolts:
Early engines:- Bolts 9 and 10
Later engines with modified camshafts:- Bolts 7
and 8.
Progressively loosen then remove the
remaining bolts and store in fitted order.

CAUTION: Removal of cylinder head bolts
results in a ’tightening-up’ of crankshaft;
rotation of crankshaft must, therefore, be

kept to a minimum. Do not rotate crankshaft until
cylinder liner retainer clamps are fitted.

17. Suitably identify each camshaft gear to its

respective camshaft and using tool 12-182 to
hold camshaft gear against rotation, remove
bolt and plain washer from each camshaft
gear.

18. Remove camshaft gears.

19. Remove screws securing upper part of timing

belt rear cover to cylinder head and screw
securing rear of cover to coolant pump.

NOTE: This is the longest of the rear cover
securing screws.

20. Automatic timing belt tensioner :- Remove

timing belt tensioner spring pillar bolt.

21. Using assistance, remove cylinder head

assembly from cylinder block.

CAUTION: Cylinder head is dowel located,
do not tap it sideways to free it from
cylinder block. Place cylinder head

assembly on blocks of wood to prevent
damaging valves.

22. Remove and discard cylinder head gasket.

ENGINE

OVERHAUL

23

23. Assemble cylinder liner retainer clamps

LRT-12-144 to cylinder head bolts. Position
retainer clamps on cylinder liners ensuring
clamps do not protrude over liner bores. Lightly
tighten bolts into oil rail sufficient to retain
clamps.

CAUTION: Ensure that bolts used are
those originally fitted in that location.

Camshafts - check end-float

1. Check end-float of each camshaft using a DTI.

Camshaft end-float = 0.06 to 0.19 mm
Service limit = 0.3 mm

2. Renew components as necessary to achieve

correct end-float.

ENGINE

24

OVERHAUL

Camshaft carrier and camshafts - remove

1. Remove bolts securing blanking plate to rear of

camshaft carrier, remove plate.

2. Using sequence shown, progressively loosen

26 bolts until valve spring pressure is released.
Remove bolts.

3. Remove camshaft carrier.

NOTE: Dowel located.

4. Remove 2 camshafts.
5. Remove and discard 4 oil seals from

camshafts.

6. Using a stick magnet, remove 16 tappets from

cylinder head. Retain tappets in fitted order
and invert to prevent oil loss.

CAUTION: Camshafts fitted to later
engines incorporate a reluctor ring, these
camshafts are not interchangeable with

those fitted to early engines. Commencing
engine numbers for the modified camshafts are
listed in Information.

ENGINE

OVERHAUL

25

Tappets - inspection

CAUTION: A modified tappet has been
introduced and will be supplied as a
replacement for all engines. The above

illustration shows the early tappet A and the
modified tappet B. When the modified tappets
are already fitted to an engine, they may be
replaced on an individual basis but may only be
fitted as replacements for early tappets in
cylinder sets.

1. Check tappets for signs of wear, scoring and

overheating.

2. Measure outside diameter of tappet,

measurement must be taken half-way along
tappet body.
Tappet outside dia. = 32.959 to 32.975 mm.

3. Ensure oil hole in each tappet is clear.

NOTE: Retain tappets in their fitted order
and keep them inverted to prevent oil loss.

Camshafts and timing gears - inspection

Camshafts

NOTE: Carry out camshaft inspection after
removal of valves.

1. Clean camshafts, camshaft carrier and cylinder

head bearing surfaces, use suitable solvent to
remove sealant.

2. Inspect cams and bearing journals for wear,

pitting and scoring; replace components as
necessary.

Checking camshaft bearing clearance

3. Position camshaft(s) in cylinder head and place

Plastigage across each journal.

4. Fit camshaft carrier and tighten bolts in

sequence shown to 10 Nm. Do not rotate
camshaft(s).

5. Progressively loosen bolts and then remove

camshaft carrier.


Content   ..  7  8  9  10   ..