Land Rover Engine 1.8 Litre K Series. Manual - part 8


  Index      Land Rover     Land Rover Engine 1.8 Litre K Series - service manual 2000 year


Search            


Content   ..  6  7  8  9   ..


Land Rover Engine 1.8 Litre K Series. Manual - part 8


ENGINE

18

OVERHAUL

Refit

1. Clean thermostat housing, cover and sealing

faces.

2. Lubricate new ’O’ rings with silicone grease

and fit to thermostat housing and cover.

3. Fit a new seal to thermostat.
4. Align and fit thermostat to shoulder in

thermostat housing.

5. Fit cover to thermostat housing, fit and tighten

bolts to 8 Nm.

CAUTION: Torque figure must not be
exceeded.

6. Fit thermostat housing to coolant pump, align

dipstick tube bracket, fit and tighten bolt to 10
Nm.

7. Connect water rail to thermostat cover.
8. Align water rail to cylinder block, fit and tighten

bolts to 25 Nm.

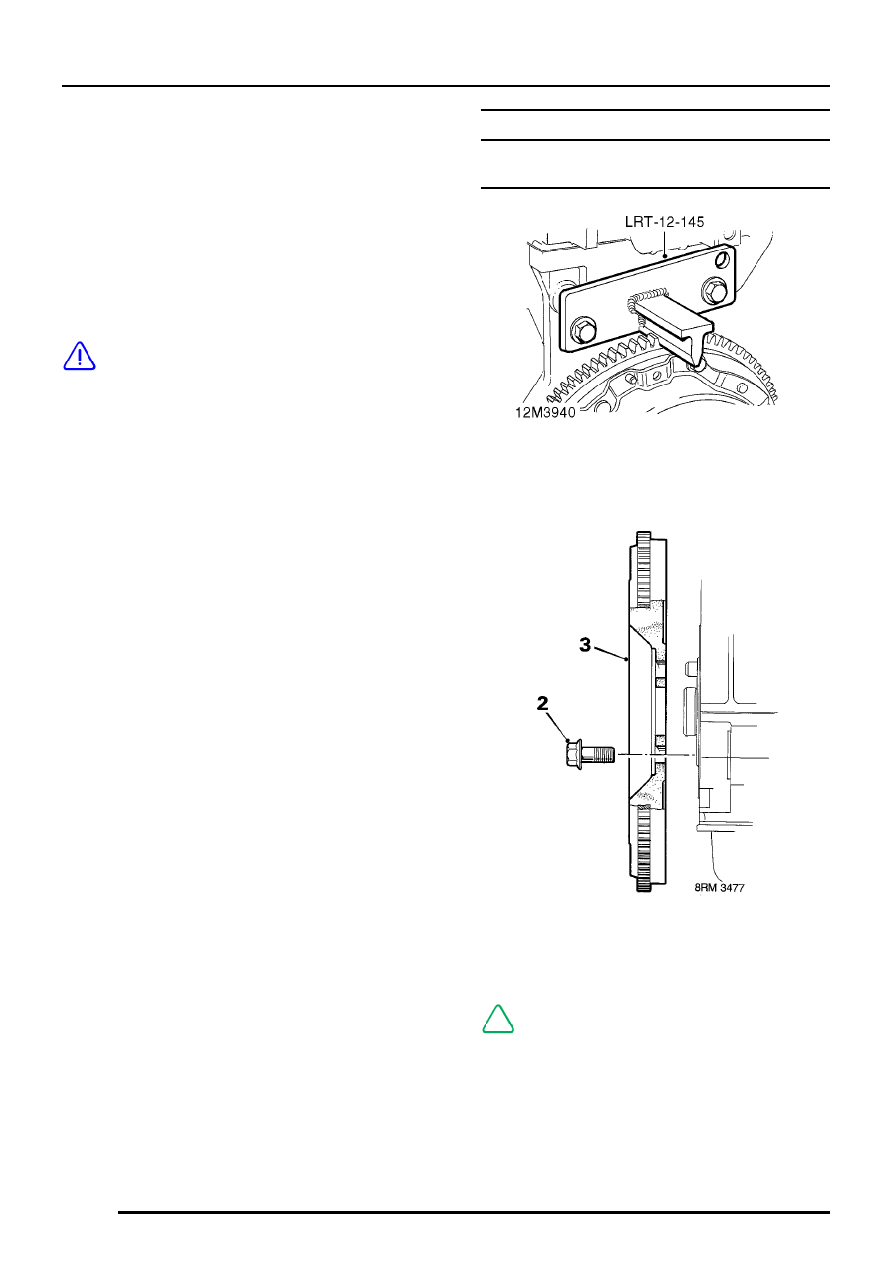
FLYWHEEL AND STARTER RING GEAR

Flywheel - remove

1. Fit flywheel locking tool LRT-12-145 to

cylinder block, tighten 2 bolts.

2. Remove and discard 6 bolts securing flywheel.
3. Using assistance, remove flywheel from

crankshaft.

NOTE: Dowel located.

ENGINE

OVERHAUL

19

Starter ring gear - remove

1. Remove flywheel.
2. Drill a 3 mm diameter hole at root of 2 teeth.
3. Apply a cold chisel to root of teeth, break ring

gear and remove from flywheel.

WARNING: Suitable eye protection must
be worn.

Starter ring gear - refit

1. Heat ring gear evenly to 350

°

C, indicated by

light BLUE colour. Locate ring gear on flywheel
and press hard against flange.

WARNING: Handle hot ring gear with care.

2. Allow ring gear to air cool.
3. Fit flywheel.

Flywheel - refit

1. Clean flywheel and crankshaft faces.

Use a clean bolt with two saw cuts along
threads and clean adhesive from threaded
holes in crankshaft.

2. Using assistance, fit flywheel to crankshaft.
3. Fit flywheel locking tool LRT-12-145, tighten 2

bolts.

4. Fit and tighten new Patchlok bolts to 80 Nm.

ENGINE

20

OVERHAUL

CYLINDER HEAD

Cylinder head - remove

CAUTION: If crankshaft is to be removed
during overhaul it will be necessary to
check and record crankshaft end-float

prior to removing cylinder head.

1. Remove and discard camshaft timing belt.

CAUTION: Do not rotate crankshaft whilst
timing belt is removed and cylinder head
is fitted, pistons will contact the valves.

2. Engines fitted with manual timing belt

tensioner: Remove bolt securing timing belt
tensioner, remove tensioner.

3. Release 2 screws and remove spark plug

cover.

4. Disconnect 4 plug tubes from spark plugs.

Remove any debris from spark plug recesses
and remove 4 spark plugs.

5. Lift clip plate and grommet and position plug

leads aside.

6. If fitted: Remove 2 bolts and air cleaner

support bracket.

7. Progressively loosen then remove bolts and on

early engines, 2 pillar bolts securing camshaft
cover.

NOTE: On later engines, pillar bolts have
been replaced by ’cast-in’ supports which
are an integral part of the camshaft cover.

8. Remove camshaft cover assembly, remove

and discard gasket.

9. Check and record crankshaft end-float.

ENGINE

OVERHAUL

21

10. Release 2 screws and remove distributor cap.
11. Remove and discard screw securing rotor arm.
12. Remove rotor arm.
13. Remove anti-flash shield.

NOTE: Later engines are fitted with
modified camshafts which incorporate a
reluctor ring and the procedure for

removing cylinder head bolts differs from early
engines. Commencing engine numbers for the
modified camshafts are listed in Information.


Content   ..  6  7  8  9   ..