GASGAS MC 85. OWNER'S MANUAL (2024)

TABLE OF CONTENTS
TABLE OF CONTENTS
1
MEANS OF REPRESENTATION
5
7.5
Preparing the vehicle for rides on wet
sand
22
1.1
Symbols used
5
7.6
Preparing the vehicle for rides on wet
1.2
Formats used
5
and muddy circuits
22
2
SAFETY ADVICE
6
7.7
Preparing vehicle for high temperatures
or slow riding
23
2.1
Use definition - intended use
6
7.8
Preparing the vehicle for low
2.2
Misuse
6
temperatures or snow
23
2.3
Safety advice
6
8
RIDING INSTRUCTIONS
24
2.4
Degrees of risk and symbols
6
2.5
Tampering warning
6
8.1
Checks and maintenance measures
2.6
Safe operation
7
when preparing for use
24
2.7
Protective clothing
7
8.2
Starting the vehicle
24
2.8
Work rules
8
8.3
Starting off
25
2.9
Environment
8
8.4
Shifting, riding
25
2.10
Owner's Manual
8
8.5
Braking
26
8.6
Stopping, parking
26
3
IMPORTANT NOTES
9
8.7
Transporting
27
3.1
Manufacturer warranty, implied
8.8
Refueling
27
warranty
9
9
SERVICE SCHEDULE
29
3.2
Fuel, auxiliary substances
9
3.3
Spare parts, accessories
9
9.1
Additional information
29
3.4
Service
9
9.2
Service schedule
29
3.5
Figures
9
10
TUNING THE CHASSIS
31
3.6
Customer service
9
10.1
Checking the basic chassis setting with
4
VIEW OF VEHICLE
10
rider's weight
31
4.1
View of vehicle, front left (example)
10
10.2
Air suspension XACT 5543
31
4.2
View of vehicle, rear right (example)
11
10.3
Compression damping of the shock
absorber
32
5
SERIAL NUMBERS
12
10.4
Adjusting the low-speed compression
5.1
Vehicle identification number
12
damping of the shock absorber
32
5.2
Frame label
12
10.5
Adjusting the high-speed compression
5.3
Engine number
12
damping of the shock absorber
32
5.4
Fork part number
12
10.6
Adjusting the rebound damping of the
5.5
Shock absorber article number
13
shock absorber
33
10.7
Measuring the dimension of the rear
6
CONTROLS
14
wheel unloaded
33
6.1
Clutch lever
14
10.8
Checking the static sag of the shock
6.2
Hand brake lever
14
absorber
34
10.9
Checking the riding sag of the shock
6.3
Throttle grip
14
absorber
35
6.4
Stop button
14
10.10
Adjusting the spring preload of the
6.5
Opening the fuel tank filler cap
15
shock absorber
35
6.6
Closing the fuel tank filler cap
15
10.11
Adjusting the riding sag
36
6.7
Fuel tap
16
10.12
Checking the basic setting of the fork
37
6.8
Choke
16
10.13
Adjusting the fork air pressure
37
6.9
Shift lever
16
10.14
Adjusting the compression damping of
6.10
Kick starter lever
17
the fork
39
6.11
Foot brake lever
17
10.15
Adjusting the rebound damping of the
6.12
Plug-in stand
17
fork
39
7
PREPARING FOR USE
18
10.16
Handlebar position
40
10.17
Adjusting the handlebar position
40
7.1
Advice on preparing for first use
18
7.2
Running in the engine
20
11
SERVICE WORK ON THE CHASSIS
41
7.3
Preparing the vehicle for difficult
11.1
Raising the motorcycle with a lift stand
41
operating conditions
20
11.2
Removing the motorcycle from the lift
7.4
Preparing the vehicle for rides on dry
stand
41
sand
20
11.3
Bleeding the fork legs
41
2

TABLE OF CONTENTS
11.4
Cleaning the dust boots of the fork legs
42
12.6
Checking brake linings of the front brake
11.5
Removing the fork legs
42
are secure
71
11.6
Installing the fork legs
43
12.7
Changing the brake linings of the front
11.7
Removing the fork protector
44
brake
71
11.8
Installing the fork protector
44
12.8
Checking the free travel of foot brake
11.9
Removing the lower triple clamp
45
lever
73
12.9
Adjusting the basic position of the foot
11.10
Installing the lower triple clamp
46
brake lever
73
11.11
Checking the steering head bearing play ... 48
12.10
Checking the rear brake fluid level
74
11.12
Adjusting the steering head bearing
play
49
12.11
Adding rear brake fluid
75
11.13
Lubricating the steering head bearing
50
12.12
Checking brake linings of the rear brake
are secure
76
11.14
Removing the start number plate
50
12.13
Changing the rear brake linings
76
11.15
Installing the start number plate
50
11.16
Removing front fender
51
13
WHEELS, TIRES
79
11.17
Installing front fender
51
13.1
Removing the front wheel
79
11.18
Removing the shock absorber
51
13.2
Installing the front wheel
79
11.19
Installing the shock absorber
52
13.3
Removing the rear wheel
80
11.20
Removing the seat
52
13.4
Installing the rear wheel
81
11.21
Mounting the seat
52
13.5
Checking the tire condition
82
11.22
Removing the air filter box cover
53
13.6
Checking tire pressure
83
11.23
Installing the air filter box cover
53
13.7
Checking spoke tension
83
11.24
Removing the air filter
53
11.25
Cleaning the air filter and air filter
14
COOLING SYSTEM
85
box
54
14.1
Cooling system
85
11.26
Installing the air filter
54
11.27
Removing the main silencer
55
14.2
Radiator cover
85
14.3
Installing the radiator cover
85
11.28
Installing the main silencer
55
11.29
Changing the glass fiber yarn filling of
14.4
Removing the radiator cover
86
the main silencer
55
14.5
Checking the antifreeze and coolant
level
87
11.30
Removing the fuel tank
56
11.31
Installing the fuel tank
57
14.6
Checking the coolant level
88
14.7
Draining the coolant
88
11.32
Checking for chain dirt accumulation
58
11.33
Cleaning the chain
59
14.8
Refilling with coolant
89
14.9
Changing the coolant
90
11.34
Checking the chain tension
59
11.35
Adjusting the chain tension
60
15
TUNING THE ENGINE
92
11.36
Checking the chain, rear sprocket,
engine sprocket, and chain guide
61
15.1
Checking the play in the throttle cable
92
11.37
Checking the frame
63
15.2
Adjusting the play in the throttle
11.38
Checking the link fork
63
cable
92
15.3
Carburetor tuning
93
11.39
Checking the throttle cable routing
63
11.40
Checking the rubber grip
64
15.4
Carburetor - idle setting
95
15.5
Carburetor - adjusting the idle speed
96
11.41
Adjusting the basic position of the clutch
lever
64
15.6
Emptying the carburetor float
chamber
97
11.42
Checking the fluid level of the hydraulic
clutch
65
15.7
Plug-in connector of ignition timing map
11.43
Correcting the fluid level of the hydraulic
adjustment
98
clutch
65
15.8
Changing the ignition timing map
98
11.44
Changing the hydraulic clutch fluid
66
15.9
Checking the basic position of the shift
lever
98
12
BRAKE SYSTEM
68
15.10
Adjusting the basic position of the shift
lever
98
12.1
Checking the free travel of the hand
brake lever
68
16
SERVICE WORK ON THE ENGINE
100
12.2
Adjusting the free travel of the
handbrake lever
68
16.1
Checking the gear oil level
100
12.3
Checking the brake discs
68
16.2
Changing the gear oil
100
12.4
Checking the front brake fluid level
69
16.3
Adding the gear oil
101
12.5
Adding front brake fluid
69
3

TABLE OF CONTENTS
17
CLEANING, CARE
103
17.1
Cleaning the motorcycle
103
18
STORAGE
105
18.1
Storage
105
18.2
Preparing for use after storage
106
19
TROUBLESHOOTING
107
20
TECHNICAL SPECIFICATIONS
109
20.1
Motor
109
20.2
Motor tightening torques
109
20.3
Carburetor
111
20.3.1
Carburetor tuning
111
20.3.2
Basic carburetor setting for sandy
surfaces
112
20.4
Capacities
112
20.4.1
Gear oil
112
20.4.2
Coolant
112
20.4.3
Fuel
112
20.5
Chassis
112
20.6
Tires
113
20.7
Fork
113
20.8
Shock absorber
114
20.9
Chassis tightening torques
114
21
SUBSTANCES
116
22
AUXILIARY SUBSTANCES
118
23
STANDARDS
120
24
LIST OF ABBREVIATIONS
121
INDEX
123
4

MEANS OF REPRESENTATION
1
1.1
Symbols used
The meaning of specific symbols is described below.
Indicates an expected reaction (e.g., of a work step or a function).
Indicates an unexpected reaction (e.g., of a work step or a function).
Indicates work that requires expert knowledge and technical understanding. In the interest of your own
safety, have this work performed by an authorized GASGAS Motorcycles workshop. Your motorcycle will
be cared for there to the highest degree by specially trained experts using the special tools required.
Indicates a page reference (more information is provided on the specified page).
Indicates information with more details or tips.
Indicates the result of a testing step.
Indicates a voltage measurement.
Indicates a current measurement.
Indicates the end of an activity, including potential reworking.
1.2
Formats used
The typographical formats used in this document are explained below.
Proprietary name
Indicates a proprietary name.
Name®
Indicates a protected name.
Brand™
Indicates a brand available on the open market.
Underlined terms
Refer to technical details of the vehicle or indicate technical terms, which are
explained in the glossary.
5

2
SAFETY ADVICE
2.1
Use definition - intended use
This vehicle has been designed and built to withstand the normal stresses and strains of racing. This vehicle complies with
the currently valid regulations and categories of the top international motorsports organizations.
Info
Only operate this vehicle in closed-off areas remote from public road traffic.
2.2
Misuse
The vehicle must only be used as intended.
Dangers can arise for people, property and the environment through use not as intended.
Any use of the vehicle beyond the intended and defined use constitutes misuse.
Misuse also includes the use of operating and auxiliary fluids which do not meet the required specification for the respec-
tive use.
2.3
Safety advice
A number of safety instructions need to be followed to operate the product described safely. Therefore read this instruction
and all further instructions included carefully. The safety instructions are highlighted in the text and are referred to at the
relevant passages.
Info
Various information and warning labels are attached in prominent locations on the product described. Do not
remove any information or warning labels. If they are missing, you or others may not recognize dangers and may
therefore be injured.
2.4
Degrees of risk and symbols
Danger
Identifies a danger that will immediately and invariably lead to fatal or serious permanent injury if the appropriate
measures are not taken.
Warning
Identifies a danger that is likely to lead to fatal or serious injury if the appropriate measures are not taken.
Caution
Identifies a danger that may lead to minor injuries if the appropriate measures are not taken.
Note
Identifies a danger that will lead to considerable machine and material damage if the appropriate measures are not taken.
Note
Indicates a danger that will lead to environmental damage if the appropriate measures are not taken.
2.5
Tampering warning
Tampering with the noise control system is prohibited. Federal law prohibits the following acts or the causing thereof:
6

SAFETY ADVICE
2
1
The removal or rendering inoperative by any person other than for purposes of servicing, repair, or replacement, of
any device or element of design incorporated into any new vehicle for the purpose of noise control prior to its sale or
delivery to the ultimate purchaser or while it is in use, or
2
the use of the vehicle after such device or element of design has been removed or rendered inoperative by any person.
Among those acts presumed to constitute tampering are the acts listed below:
1
Removal or puncturing of the main silencers, baffles, header pipes or any other components which conduct exhaust
gases.
2
Removal or puncturing of parts of the intake system.
3
Lack of proper maintenance.
4
Replacing moving parts of the vehicle, or parts of the exhaust system or intake system, with parts other than those
specified by the manufacturer.
2.6
Safe operation
Danger
Danger of accidents A rider who is not fit to ride poses a danger to him or herself and others.
- Do not operate the vehicle if you are not fit to ride due to alcohol, drugs or medication.
- Do not operate the vehicle if you are physically or mentally impaired.
Danger
Danger of poisoning Exhaust gases are toxic and inhaling them may result in unconsciousness and death.
- Always make sure there is sufficient ventilation when running the engine.
- Use effective exhaust extraction when starting or running the engine in an enclosed space.
Warning
Danger of burns Some vehicle components become hot when the vehicle is operated.
- Do not touch any parts such as the exhaust system, radiator, engine, damper, or brake system before the vehi-
cle parts have cooled down.
- Let the vehicle parts cool down before you perform any work on the vehicle.
Only operate the vehicle when it is in perfect technical condition, in accordance with its intended use, and in a safe and
environmentally compatible manner.
The vehicle should only be used by trained persons.
Have malfunctions that impair safety immediately eliminated by an authorized GASGAS Motorcycles workshop.
Adhere to the information and warning labels on the vehicle.
2.7
Protective clothing
Warning
Risk of injury Missing or poor protective clothing presents an increased safety risk.
- Ensure your child wears appropriate protective clothing such as helmet, boots, gloves as well as trousers and a
jacket with protectors on all rides.
- Alway use protective clothing for your child that is in good condition and meets the legal requirements.
- When you ride a motorcycle, set an example for your child and wear suitable protective clothing.
In the interest of your own safety, GASGAS Motorcycles recommends that you only operate the vehicle while wearing pro-
tective clothing.
7

2
SAFETY ADVICE
2.8
Work rules
Unless specified otherwise, the ignition must be turned off during all work (models with ignition lock, models with transpon-
der key) or the motor must be at a standstill (models without ignition lock or transponder key).
Special tools are necessary for certain tasks. The tools are not a component of the vehicle, but can be ordered using the
number in parentheses. Example: bearing puller (15112017000)
Unless otherwise noted, normal conditions apply to all tasks and descriptions.
Ambient temperature
20 °C (68 °F)
Ambient air pressure
1,013 mbar (14.69 psi)
Relative air humidity
60 ± 5 %
During assembly, use new parts to replace parts which cannot be reused (e.g. self-locking screws and nuts, expansion
screws, seals, sealing rings, O-rings, pins, and lock washers).
In the case of certain screws, a screw adhesive (e.g. Loctite®) is required. Observe the manufacturer's instructions.
If thread locker (e.g., Precote®) has already been applied to a new part, do not apply any additional thread locker.
After disassembly, clean the parts that are to be reused and check them for damage and wear. Change damaged or worn
parts.
After completing a repair or service work, check the operating safety of the vehicle.
2.9
Environment
If you use your motorcycle responsibly, you can ensure that problems and conflicts do not occur. To protect the future of
the motorcycle sport, make sure that you use your motorcycle legally, be environmentally aware, and respect the rights of
others.
When disposing of used oil, other operating and auxiliary fluids, and used components, comply with the laws and regula-
tions of the respective country.
Because motorcycles are not subject to the EU regulations governing the disposal of used vehicles, there are no legal regu-
lations that pertain to the disposal of an end-of-life motorcycle. Your authorized GASGAS Motorcycles dealer will be glad to
advise you.
2.10
Owner's Manual
It is important that you read this Owner's Manual carefully and completely before your child makes his or her first trip. The
Owner's Manual contains useful information and many tips for you and your child on how to operate, handle, and service
your motorcycle. This is the only way for you to find out how to ideally tune the vehicle and how to protect your child from
injury.
Tip
Store the Owner's Manual on your terminal device, for example, so that you can read it whenever you need to.
If you would like to know more about the vehicle or have questions on the material you read, please contact an authorized
GASGAS Motorcycles dealer.
The Owner's Manual is an important component of the vehicle. If the vehicle is sold, the Owner's Manual must be down-
loaded again by the new owner.
The Owner's Manual can be downloaded several times using the QR code or the link on the delivery certificate.
The Owner's Manual is also available for download from your authorized GASGAS Motorcycles dealer and on the GAS-
GAS Motorcycles website. A printed copy can also be ordered from your authorized GASGAS Motorcycles dealer.
International GASGAS Motorcycles website: http://www.gasgas.com
8

IMPORTANT NOTES
3
3.1
Manufacturer warranty, implied warranty
The work specified in the service schedule may only be carried out in an authorized GASGAS Motorcycles workshop and
confirmed in the GASGAS Motorcycles Dealer.net, as otherwise all warranty claims will be void. Damage or secondary dam-
age caused by tampering with and/or conversions on the vehicle are not covered by the manufacturer warranty.
3.2
Fuel, auxiliary substances
Note
Environmental hazard Improper handling of fuel is a danger to the environment.
- Do not allow fuel to enter the groundwater, the soil, or the sewage system.
Use fuels and auxiliary substances in accordance with the Owner's Manual and specification.
3.3
Spare parts, accessories
For your own safety, only use spare parts and accessory products that are approved and/or recommended by
GASGAS Motorcycles and have them installed by an authorized GASGAS Motorcycles workshop. GASGAS Motorcycles
accepts no liability for other products and any resulting damage or loss.
Certain spare parts and accessory products are specified in parentheses in the descriptions. Your authorized
GASGAS Motorcycles dealer will be glad to advise you.
The latest news GASGAS Technical Accessories on your vehicle can be found on the GASGAS Motorcycles website.
International GASGAS Motorcycles website: http://www.gasgas.com
3.4
Service
A prerequisite for perfect operation and prevention of premature wear is that the service, care, and tuning work on the
engine and chassis is properly carried out as described in the Owner's Manual. An incorrect suspension setting can lead to
damage and breakage of chassis components.
Use of the vehicle under difficult conditions, such as on sand or on wet, dusty and muddy surfaces, can result in significantly
increased wear of components, such as the drive train, brake system, air filter or suspension components. For this reason, it
may be necessary to inspect or replace parts before the next scheduled service.
It is imperative that you adhere to the stipulated run-in times and service intervals. If you observe these exactly, you will
ensure a much longer service life for your motorcycle.
The relevant mileage or time interval is whichever occurs first.
3.5
Figures
The figures contained in the manual may depict special equipment.
In the interest of clarity, some components may be shown disassembled or may not be shown at all. It is not always neces-
sary to disassemble the component to perform the activity in question. Please follow the instructions in the text.
3.6
Customer service
Your authorized GASGAS Motorcycles dealer will be happy to answer any questions you may have regarding your vehicle
and GASGAS Motorcycles.
A list of authorized GASGAS Motorcycles dealers can be found on the GASGAS Motorcycles website.
International GASGAS Motorcycles website: http://www.gasgas.com
9
4
VIEW OF VEHICLE
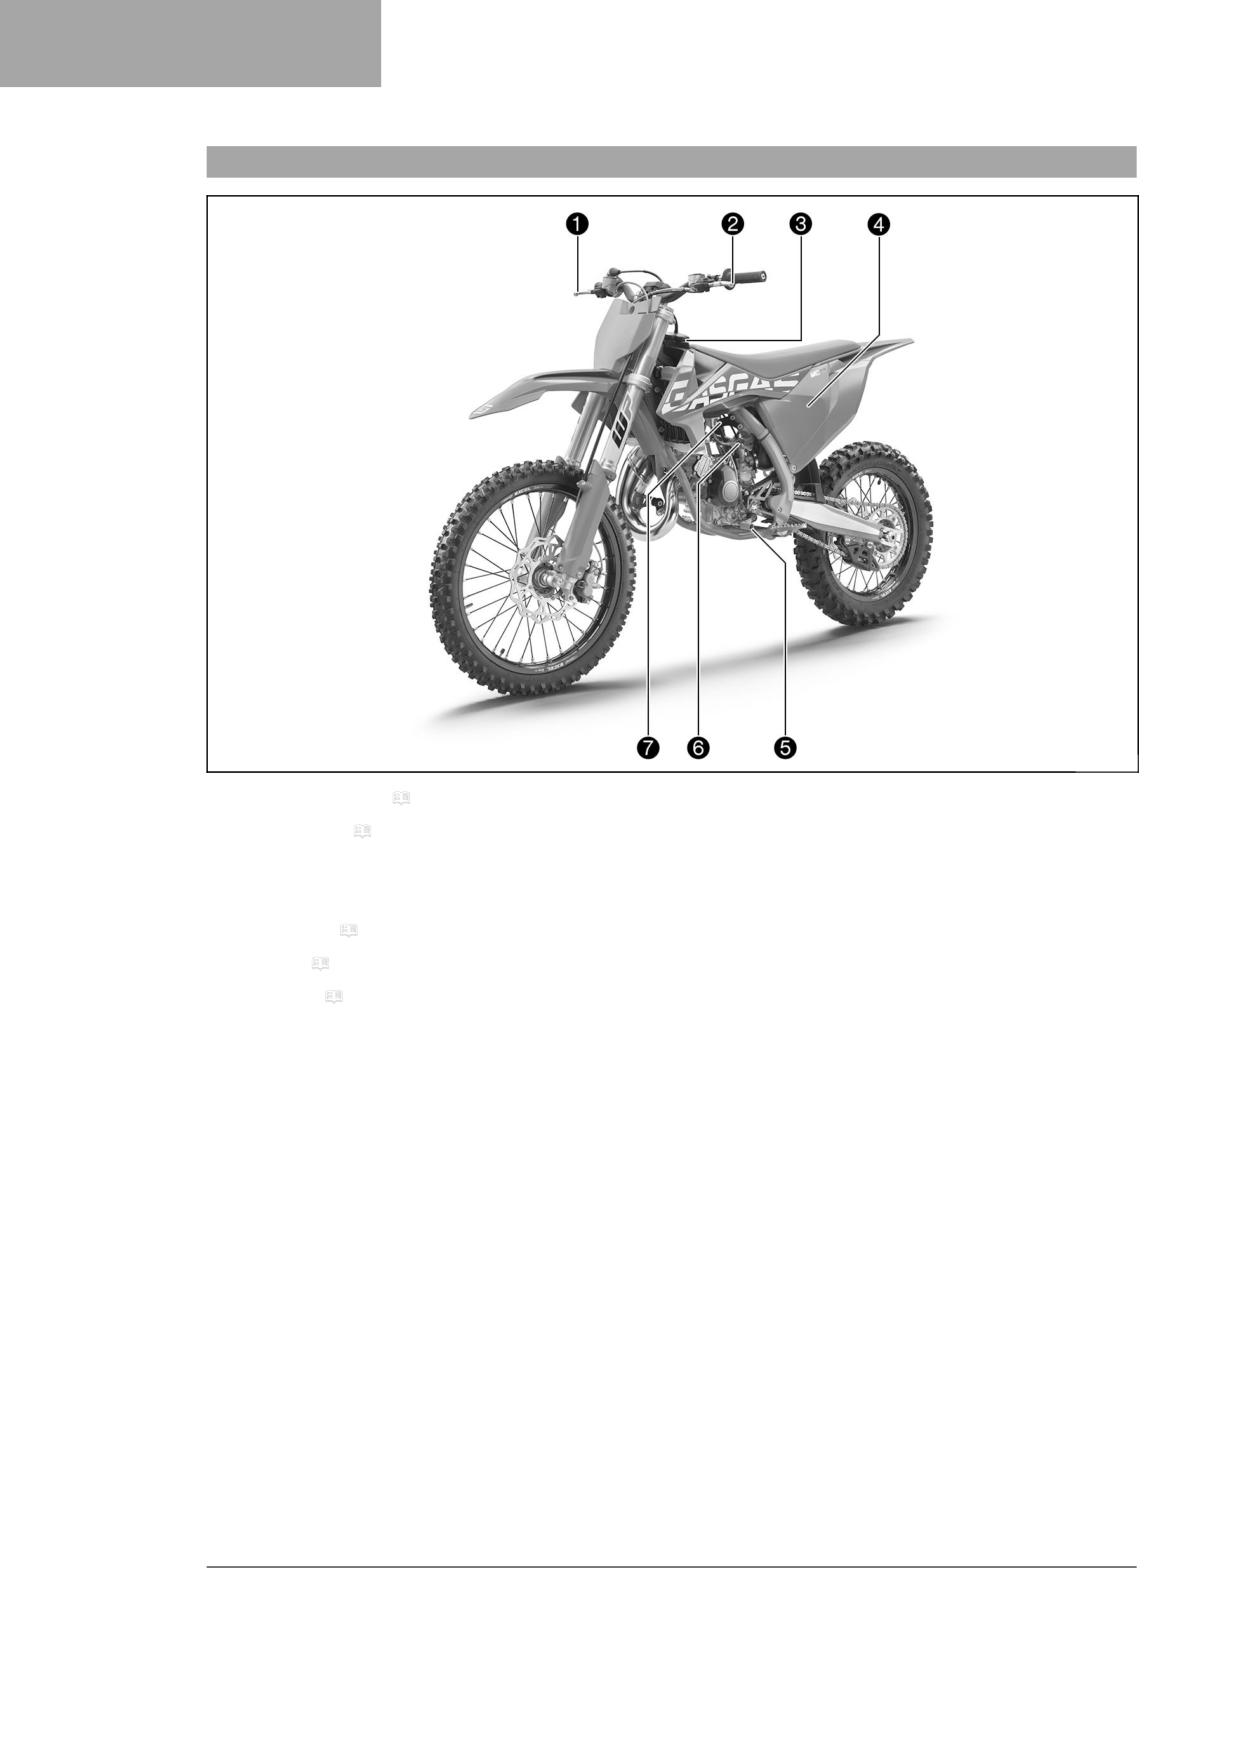
4.1
View of vehicle, front left (example)
K01414-10
1 Hand brake lever ( p. 14)
2 Clutch lever ( p. 14)
3 Fuel tank filler cap
4 Air filter box cover
5 Shift lever ( p. 16)
6 Choke ( p. 16)
7 Fuel tap ( p. 16)
10
VIEW OF VEHICLE
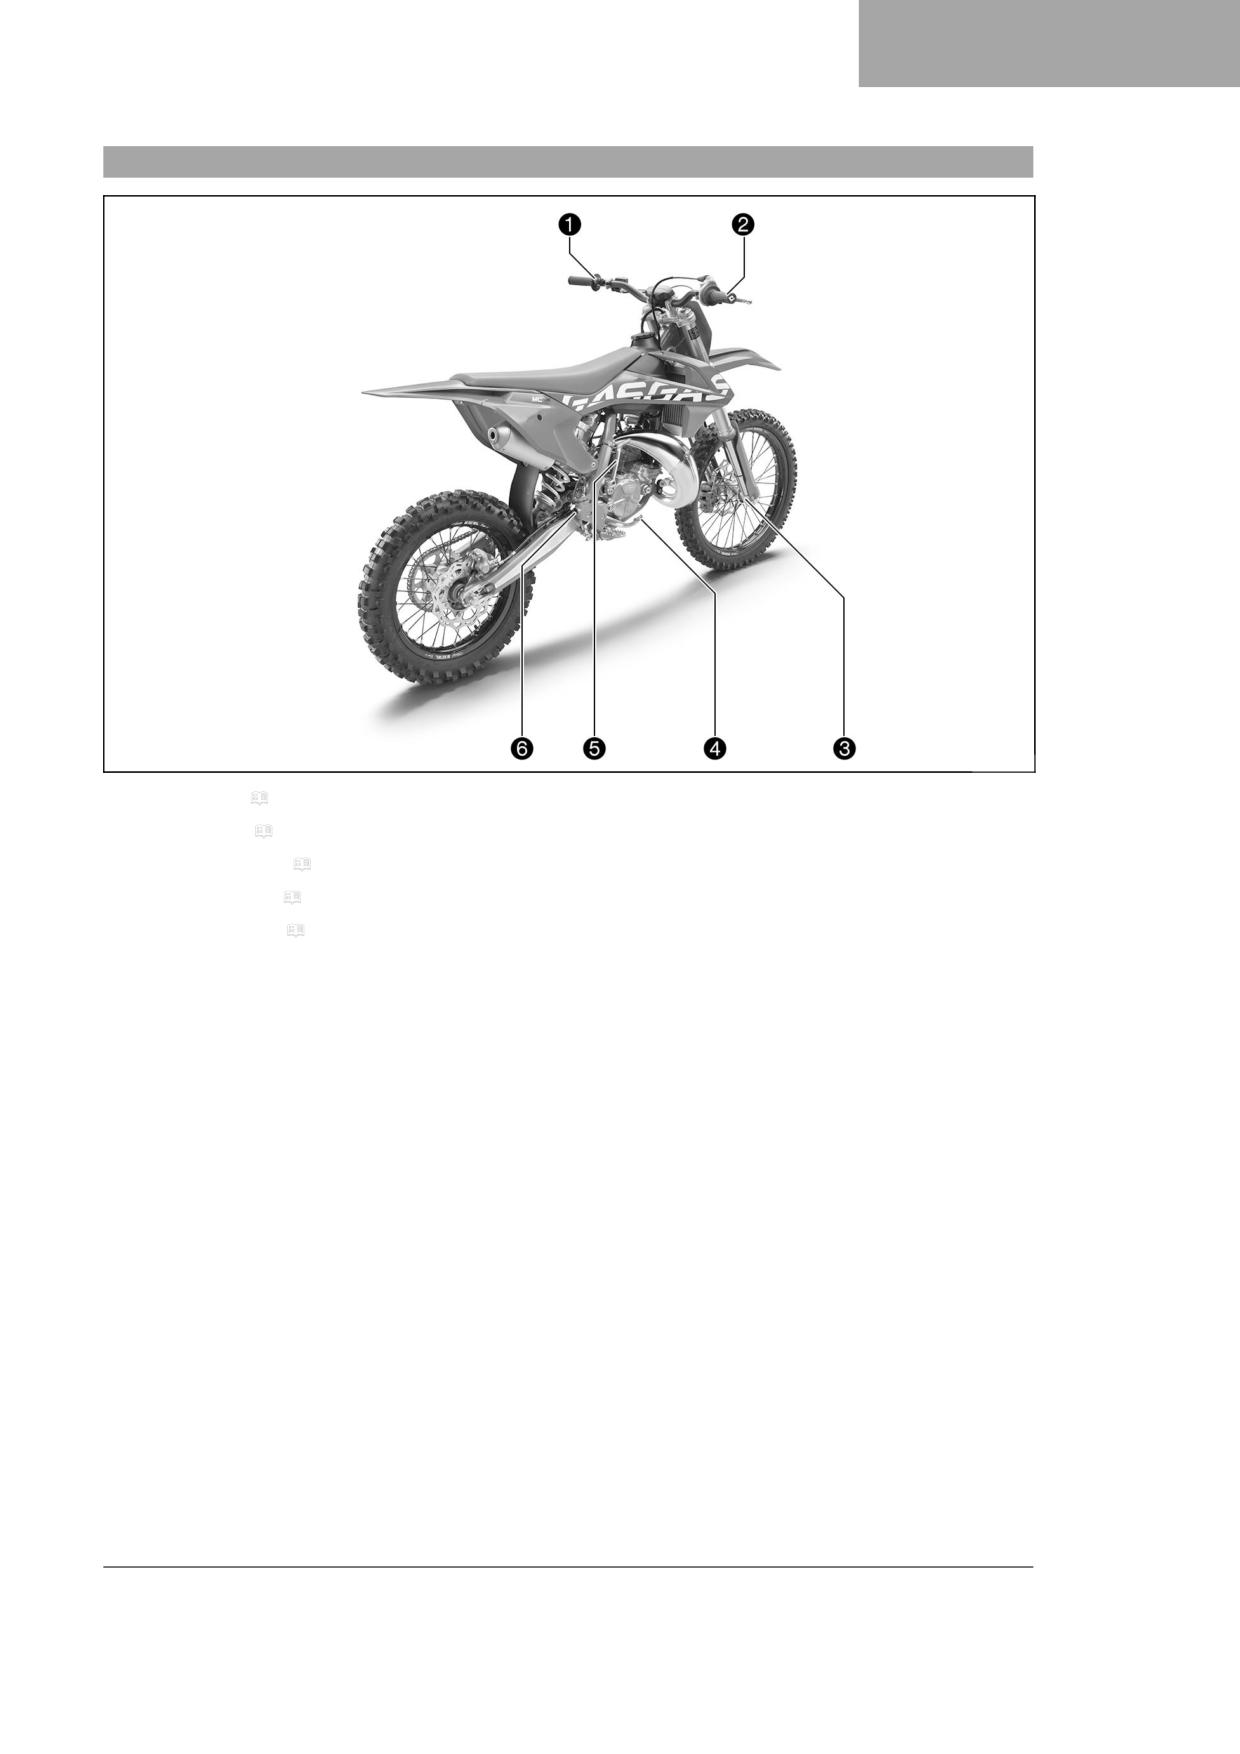
4
4.2
View of vehicle, rear right (example)
K01415-10
1 Stop button ( p. 14)
2 Throttle grip ( p. 14)
3 Fork part number ( p. 12)
4 Foot brake lever ( p. 17)
5 Kick starter lever ( p. 17)
6 Level viewer for brake fluid, rear
11
5
SERIAL NUMBERS
5.1
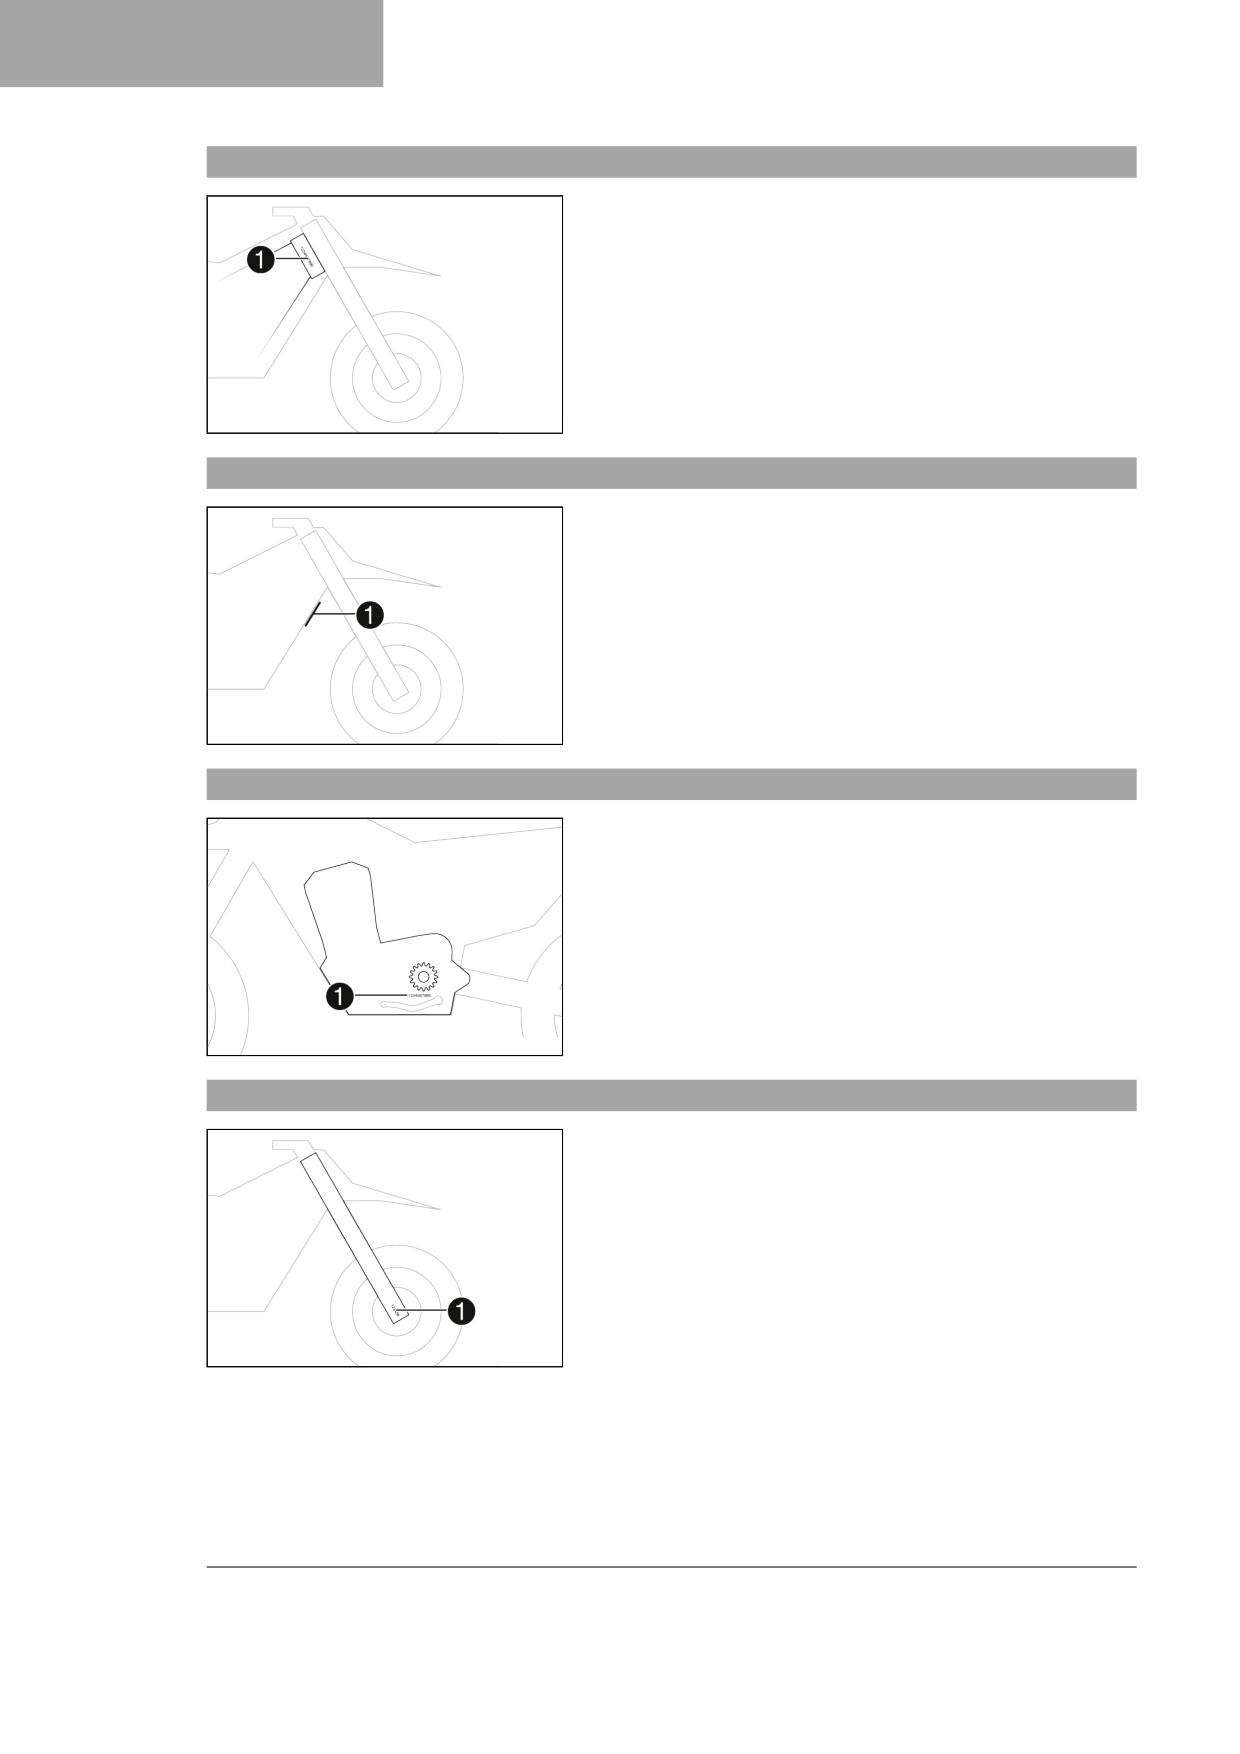
Vehicle identification number
The vehicle identification number 1 is stamped on the right side of the
steering head.
401945-10
5.2
Frame label
Frame label 1 is located on the front frame tube.
402154-10
5.3
Engine number
The engine number 1 is located on the left side of the engine under
the engine sprocket.
401949-10
5.4
Fork part number
Fork part number 1 is stamped on the inner side of the axle clamp.
401947-10
12

SERIAL NUMBERS
5
5.5
Shock absorber article number
The shock absorber part number 1 is stamped on the top of the shock
absorber above the adjusting ring towards the engine side.
H02222-10
13
6
CONTROLS
6.1
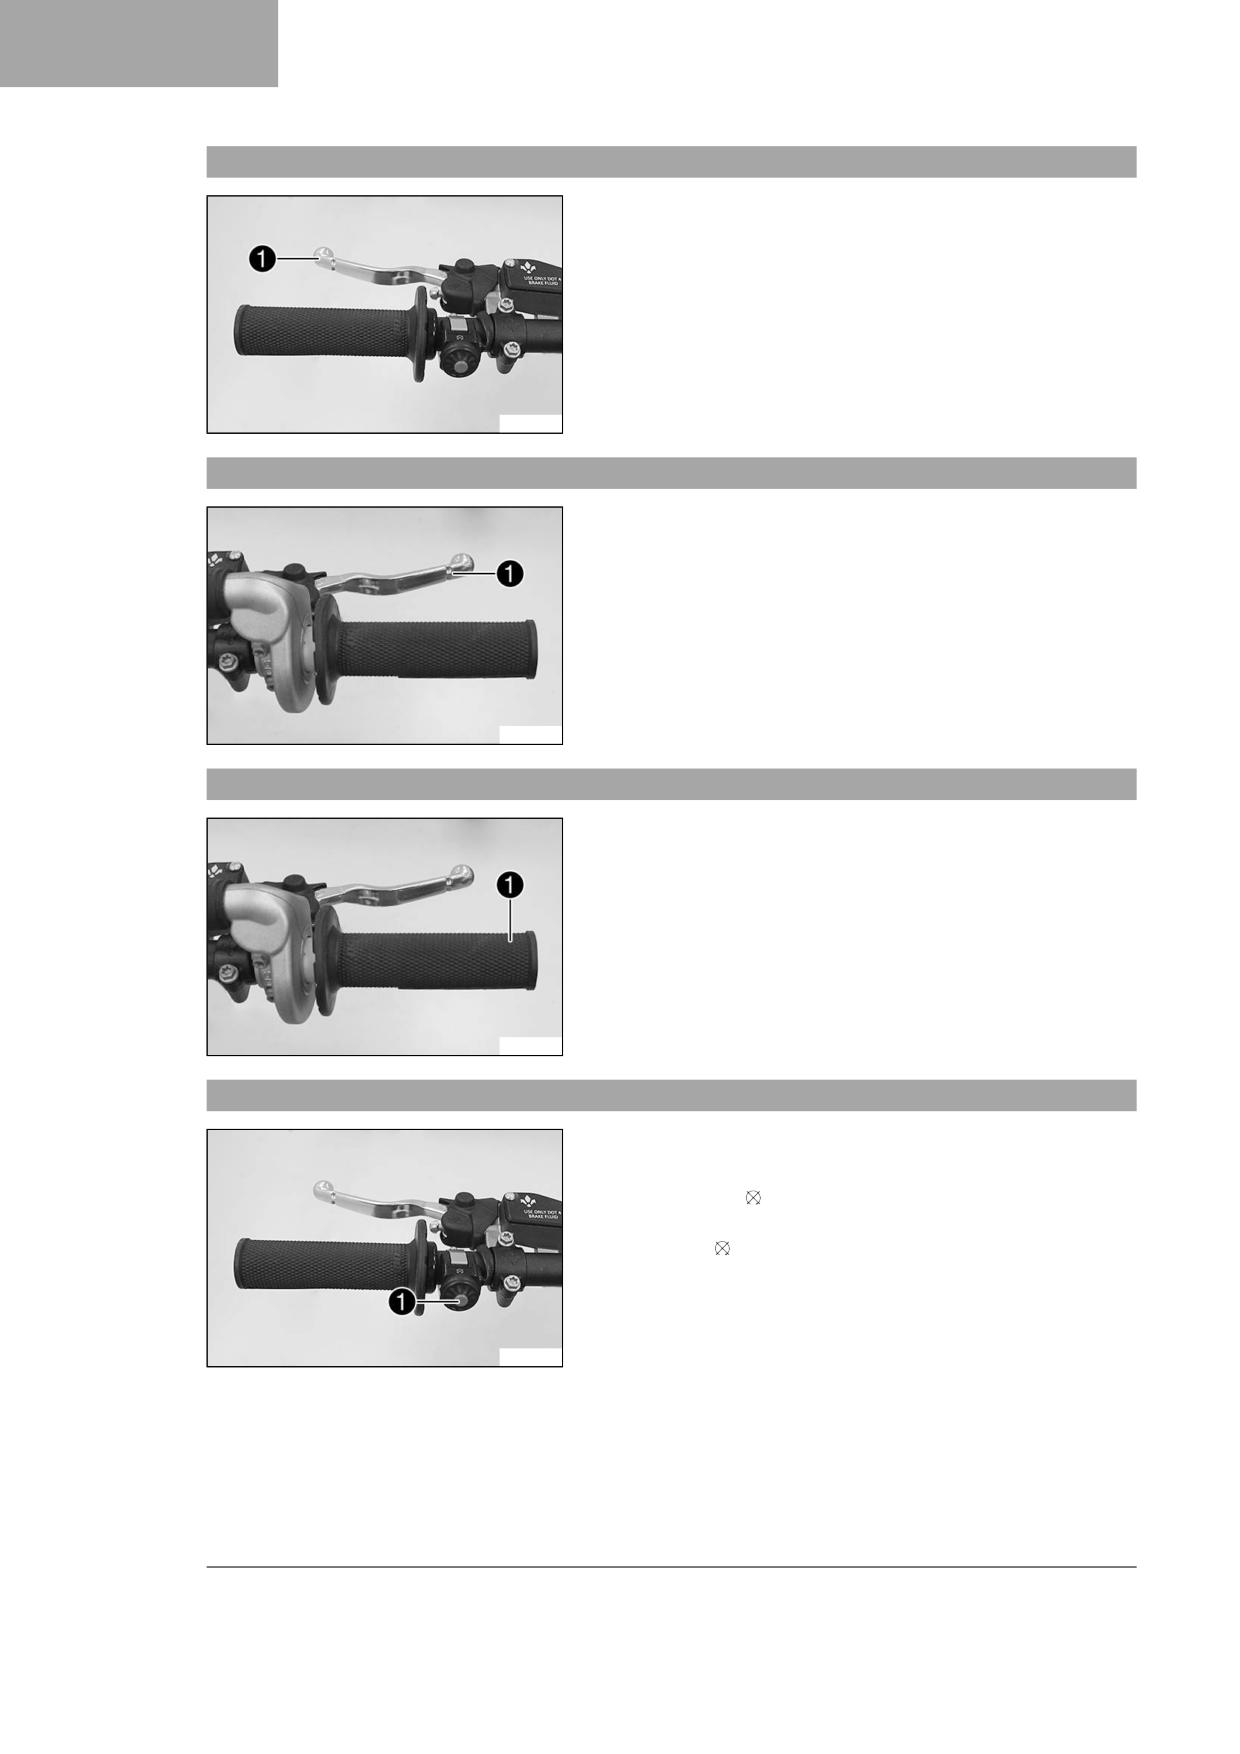
Clutch lever
Clutch lever 1 is fitted on the left side of the handlebar.
The clutch is hydraulically operated and self-adjusting.
S04274-10
6.2
Hand brake lever
The hand brake lever 1 is fitted on the right side of the handlebar.
The front brake is engaged using the hand brake lever.
S04275-10
6.3
Throttle grip
Throttle grip 1 is fitted on the right side of the handlebar.
S04275-11
6.4
Stop button
The stop button 1 is fitted on the left side of the handlebar.
Possible states
• The stop button is in the basic position - In this position, the
ignition circuit is closed and the engine can be started.
• Stop button pressed - In this position, the ignition circuit is inter-
rupted, a running engine stops, and a non-running engine will not
start.
S04274-11
14
CONTROLS
6
6.5
Opening the fuel tank filler cap
Danger
Fire hazard Fuel is highly flammable.
The fuel in the fuel tank expands when warm and can escape if overfilled.
- Do not fuel the vehicle in the vicinity of open flames or lit cigarettes.
- Switch off the engine for refueling.
- Make sure that no fuel is spilled; particularly not on hot parts of the vehicle.
- If any fuel is spilled, wipe it off immediately.
- Observe the specifications for refueling.
Warning
Danger of poisoning Fuel is harmful to health.
- Avoid skin, eye and clothing contact with fuel.
- Immediately consult a doctor if you swallow fuel.
- Do not inhale fuel vapors.
- Rinse the affected area immediately with plenty of water in the event of contact with the skin.
- Rinse the eyes thoroughly with water, and consult a doctor in case of fuel contact with the eyes.
- Change your clothing if fuel spills on them.
- Keep fuels correctly in a suitable canister, and out of the reach of children.
Note
Environmental hazard Improper handling of fuel is a danger to the environment.
- Do not allow fuel to enter the groundwater, the soil, or the sewage system.
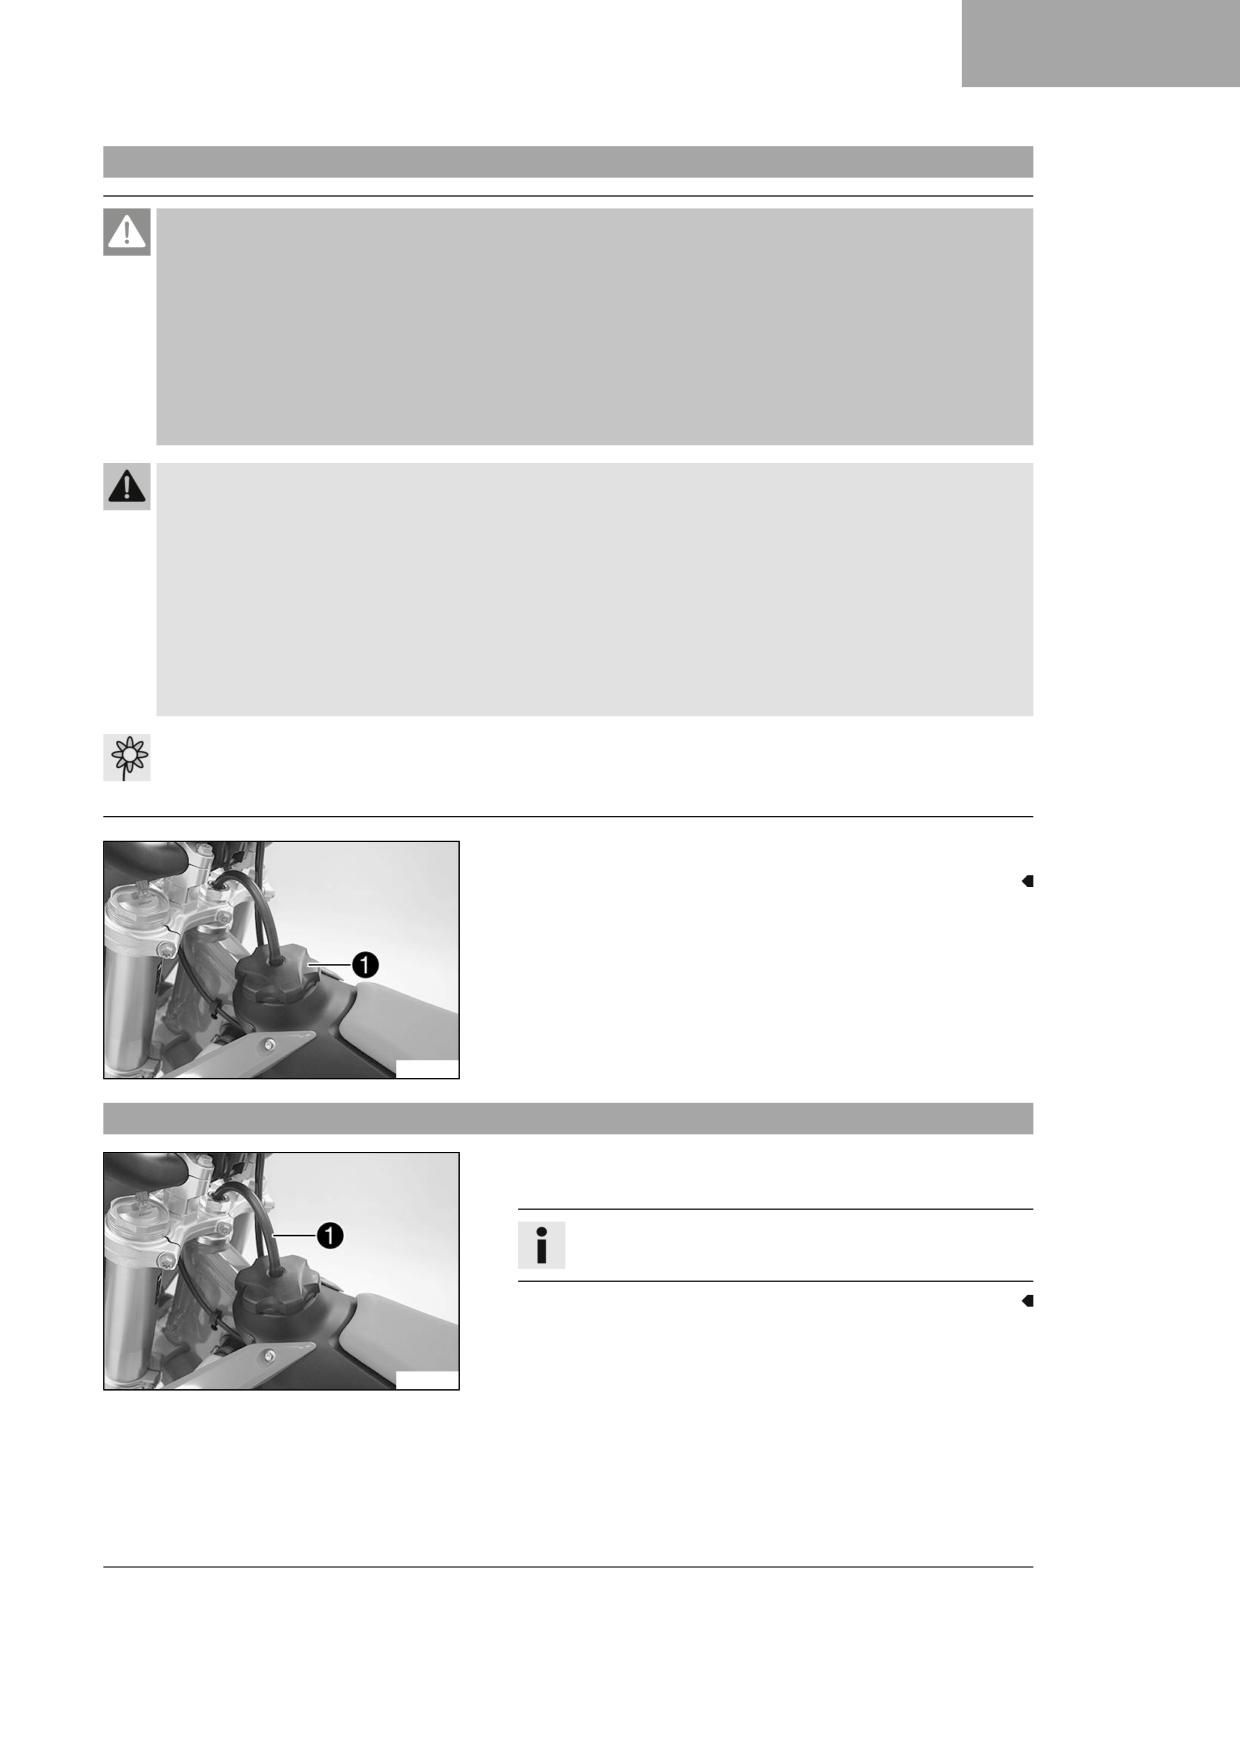
- Turn fuel tank filler cap 1 counterclockwise and lift it off.
S04317-10
6.6
Closing the fuel tank filler cap
- Mount the fuel tank filler cap and turn it clockwise until the fuel tank
is tightly closed.
Info
Route fuel tank breather hose 1 without kinks.
S04317-11
15
6
CONTROLS
6.7
Fuel tap
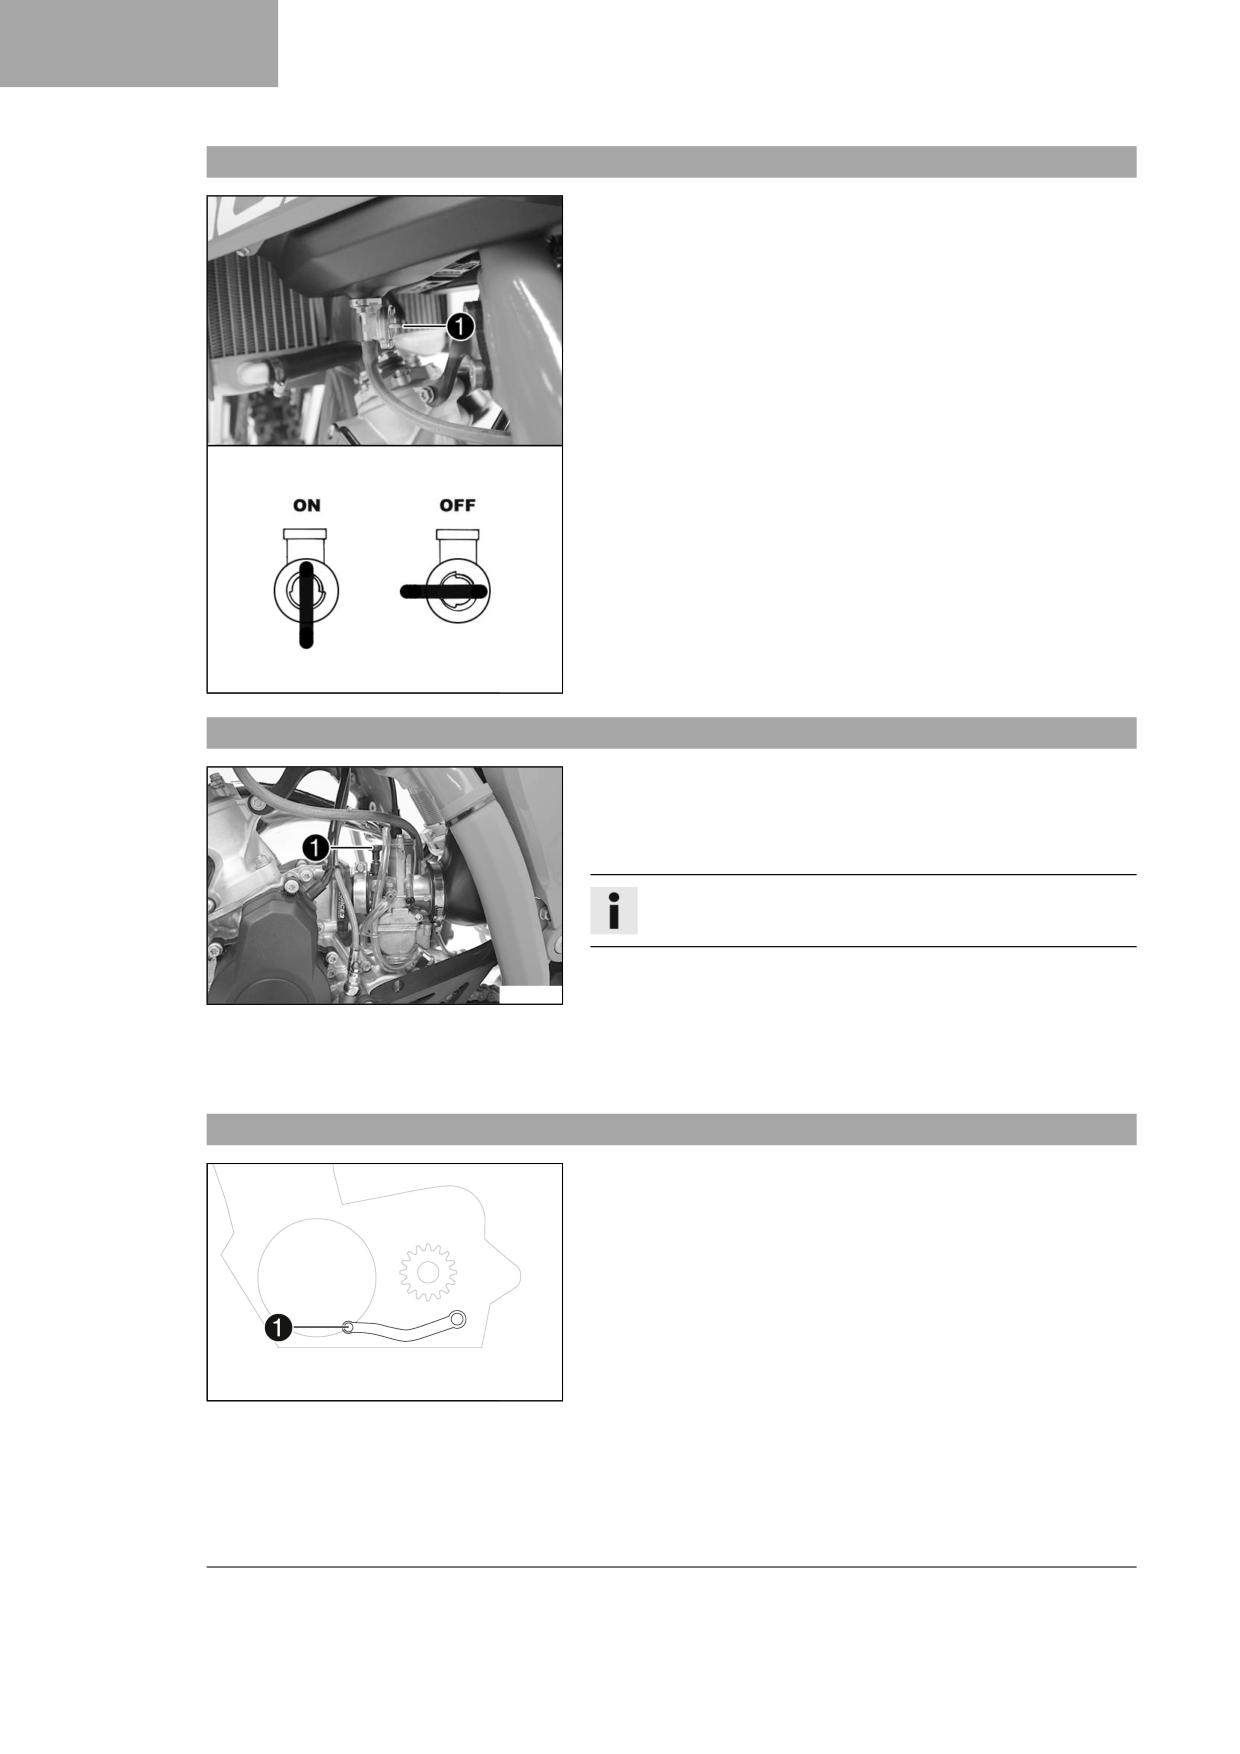
The fuel tap is on the left side of the fuel tank.
Using the tap handle 1 on the fuel tap, you can open or close the fuel
supply to the carburetor.
Possible states
• Fuel supply closed OFF - Fuel cannot flow from the fuel tank to the
carburetor.
• Fuel supply open ON - Fuel can flow from the fuel tank to the car-
buretor. The fuel tank empties completely.
S04318-10
6.8
Choke
Choke 1 is fitted on the left side of the carburetor.
Activating the choke function frees a drill hole in the carburetor through
which the engine can draw extra fuel. This results in a richer fuel-air mix-
ture, which is needed for a cold start.
Info
If the engine is warm, the choke function must be deactivated.
Possible states
S04319-10
• Choke function activated - The choke lever is pulled out to the
stop.
• Choke function deactivated - The choke lever is pushed in to the
stop.
6.9
Shift lever
Shift lever 1 is mounted on the left side of the engine.
401950-10
16
CONTROLS
6
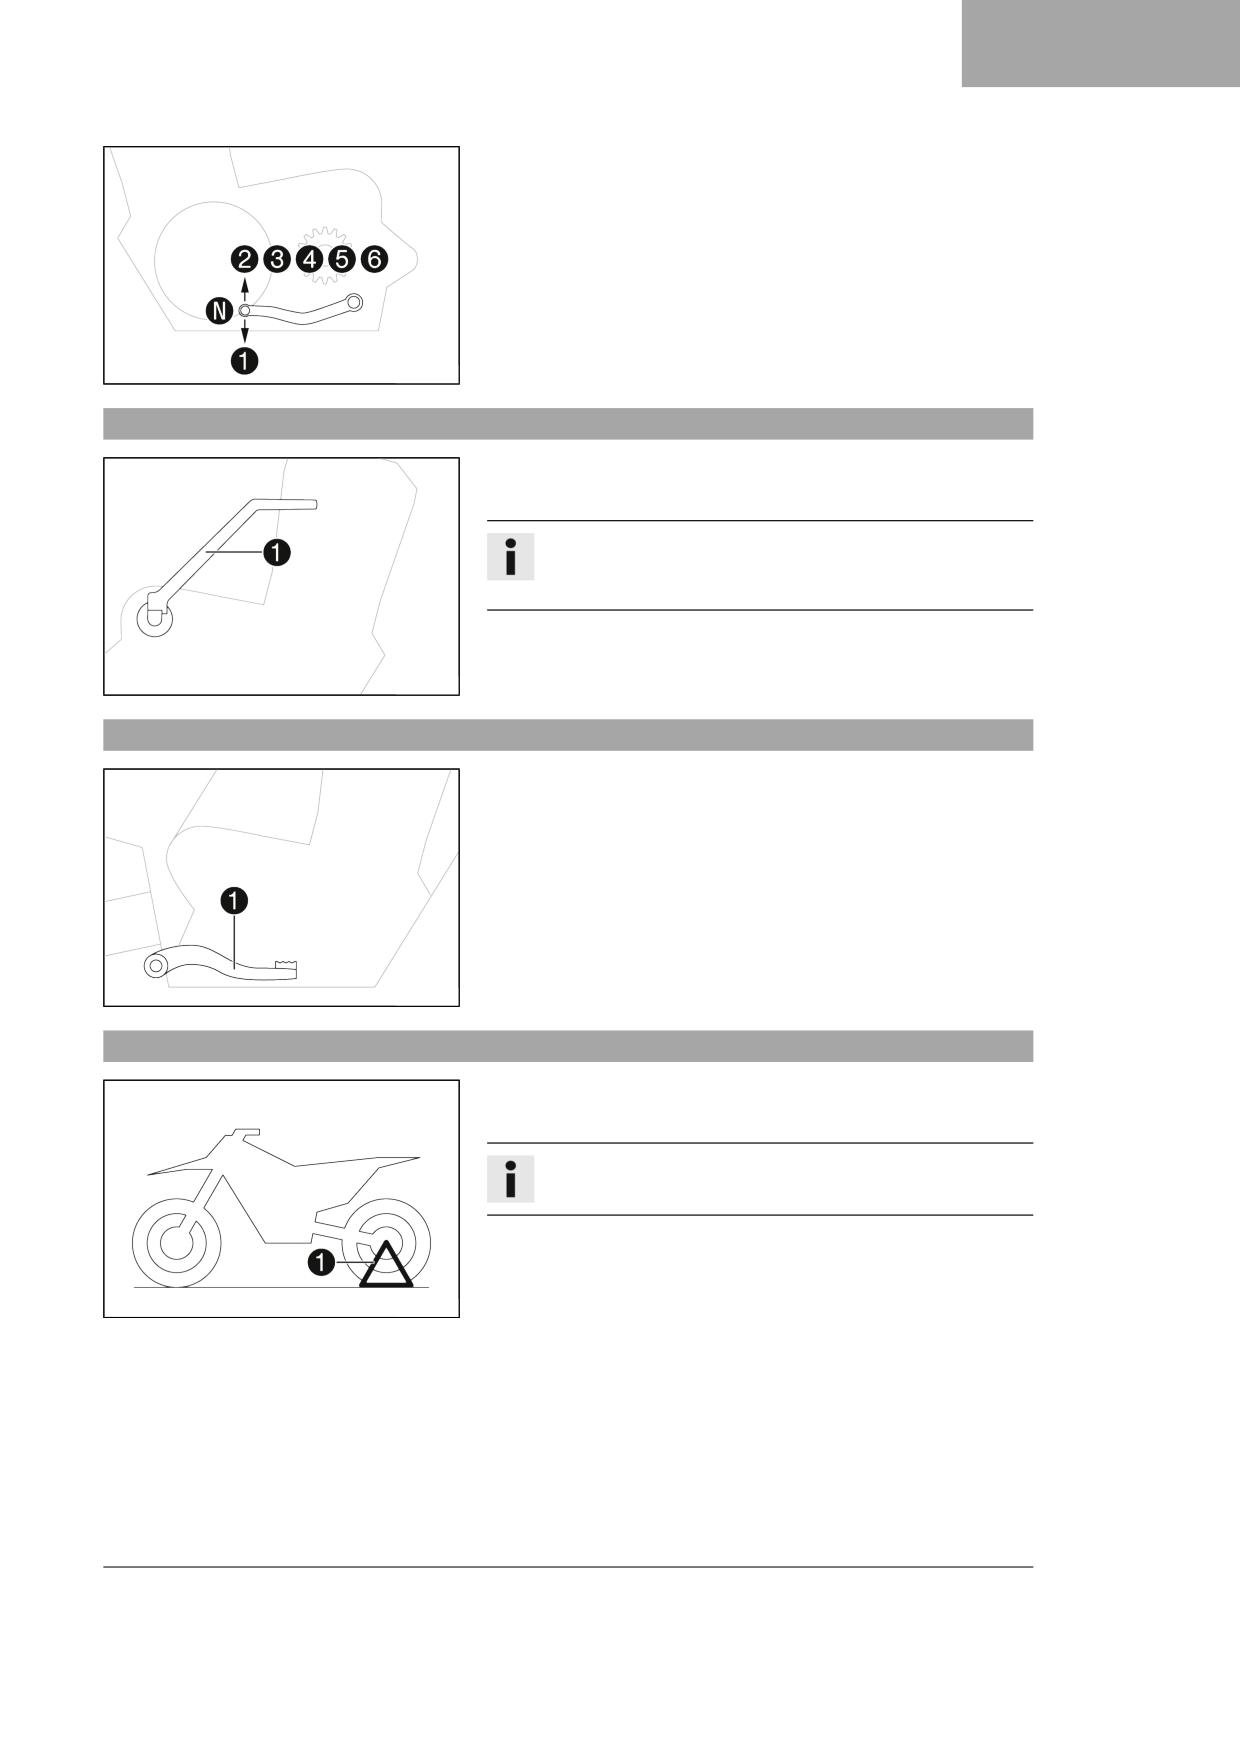
The gear positions can be seen in the photograph.
The neutral or idle position N is between the first and second gears.
401950-11
6.10
Kick starter lever
Kick starter lever 1 is fitted on the right side of the engine.
The kick starter lever can be swiveled.
Info
Before riding, swing the kick starter lever inwards towards the
engine.
401954-10
6.11
Foot brake lever
Foot brake lever 1 is located in front of the right footrest.
The foot brake lever is used to activate the rear brake.
401956-10
6.12
Plug-in stand
The support for plug-in stand 1 is the left side of the wheel spindle.
The plug-in stand is used to park the motorcycle.
Info
Remove the plug-in stand before riding.
402001-10
17

7
PREPARING FOR USE
7.1
Advice on preparing for first use
Warning
Danger of accidents A lack of physical and mental readiness on the part of the child poses a major risk.
Children often underestimate or fail to recognize dangerous situations.
- Your child must already be able to ride a bicycle.
- Your child must be able to put the vehicle upright independently after a fall.
- Your child must understand that regulations and instructions from you or from other guardians must be fol-
lowed.
- Make it clear to your child that he or she should not, under any circumstances, operate the vehicle without
supervision.
- Make it clear to your child that he or she may only drive at speeds commensurate with the child's riding abili-
ties and the road conditions.
- Do not ask too much of your child.
Do not consider participation in competitive activities until your child's stamina, riding techniques and motiva-
tion are at the necessary levels.
- Only let your child ride on the vehicle if he or she is physically and mentally ready.
Warning
Risk of injury Missing or poor protective clothing presents an increased safety risk.
- Ensure your child wears appropriate protective clothing such as helmet, boots, gloves as well as trousers and a
jacket with protectors on all rides.
- Alway use protective clothing for your child that is in good condition and meets the legal requirements.
- When you ride a motorcycle, set an example for your child and wear suitable protective clothing.
Warning
Danger of crashing Different tire tread patterns on the front and rear wheel impair the handling characteristic.
Different tire tread patterns can make the vehicle significantly more difficult to control.
- Make sure that only tires with a similar tire tread pattern are fitted to the front and rear wheel.
Warning
Danger of accidents An unadapted riding style constitutes a major risk.
- Ensure that your child adapts the riding speed to the road conditions and to his or her riding abilities.
Warning
Danger of accidents The vehicle is not designed to carry passengers.
- Make it clear to your child that he or she must not carry a passenger.
Warning
Danger of accidents The brake system fails in the event of overheating.
If the foot brake lever is not released, the brake linings drag continuously.
- Ensure that your child raises his or her foot from the foot brake lever if he or she does not want to brake.
Warning
Danger of accidents The suspension components will become damaged or destroyed if overloaded.
- Do not exceed the maximum permissible weight of the rider.
18

PREPARING FOR USE
7
Warning
Risk of injury People who act without authorization may not be familiar with the vehicle.
- Do not leave the vehicle unattended if the engine is running.
- Protect the vehicle against access by unauthorized persons.
Info
When using your motorcycle, remember that others may feel disturbed by excessive noise.
-
Make sure that the pre-sales inspection work has been carried out by an authorized GASGAS Motorcycles workshop.
You will receive a delivery certificate when the vehicle is handed over.
-
Carefully read the entire Owner's Manual together with your child before going for the first ride.
Info
Pay particular attention to the safety instructions and risks of injury.
Explain to your child the techniques of riding and falling, e.g. how shifting weight can influence handling charac-
teristics.
-
Familiarize your child with the controls.
–
Adjust the basic position of the clutch lever. ( p. 64)
–
Adjust the free travel of the handbrake lever. ( p. 68)
–
Adjust the basic position of the foot brake lever.
(
p. 73)
–
Before using the vehicle for the first time, ensure that the basic settings of the chassis are suitable for the weight of
your child.
-
Allow your child to become accustomed to the handling of the motorcycle on suitable terrain, preferably on a large,
open meadow.
Info
To give your child a feeling for the brake system, you should push your child at first. Do not start the engine
until your child is able to apply the necessary front brake pressure.
Initially, let your child ride to another person who can help your child stop and turn.
-
Erect obstacles for your child to navigate around to accustom your child to handling the vehicle.
–
Your child should also try to ride as slowly as possible and in a standing position to get a better feeling for the motorcy-
cle.
-
Do not let your child ride on terrain that exceed your child's capabilities and experience.
–
Your child should hold the handlebar firmly with both hands and keep his or her feet on the footrests when riding.
–
Make sure the maximum permissible weight of the rider is not exceeded.
Guideline
Maximum rider weight
75 kg (165 lb.)
–
Check the spoke tension. ( p. 83)
Info
The spoke tension must be checked after half an hour of operation.
-
Run the engine in. ( p. 20)
19
7
PREPARING FOR USE
7.2
Running in the engine
– During the running-in phase, do not exceed the specified engine performance.
Guideline
Maximum engine performance
During the first 3 operating hours
< 70 %
During the first 5 operating hours
< 100 %
Info
The use of a service hour counter is recommended in order to be able to check the mileage at any time.
- Avoid fully opening the throttle!
7.3
Preparing the vehicle for difficult operating conditions
Info
Use of the vehicle under difficult conditions, such as on sand or on wet and muddy surfaces, can result in signifi-
cantly increased wear of components, such as the drive train, brake system, or suspension components. For this
reason, it may be necessary to inspect or replace parts before the next scheduled service.
- Clean the air filter and air filter box.
(
p. 54)
Info
Check the air filter approx. every 30 minutes.
- Check the electrical connector for humidity and corrosion and to ensure it is firmly seated.
» If humidity, corrosion, or damage is found:
- Clean and dry the connector, or change it if necessary.
Difficult operating conditions are:
- Rides on dry sand. ( p. 20)
- Rides on wet sand. ( p. 22)
- Rides on wet and muddy circuits. ( p. 22)
- Rides at high temperatures or slow riding. ( p. 23)
- Riding at low temperatures and in snow. ( p. 23)
7.4
Preparing the vehicle for rides on dry sand
- Make sure that no radiator covers ( p. 85) are installed.
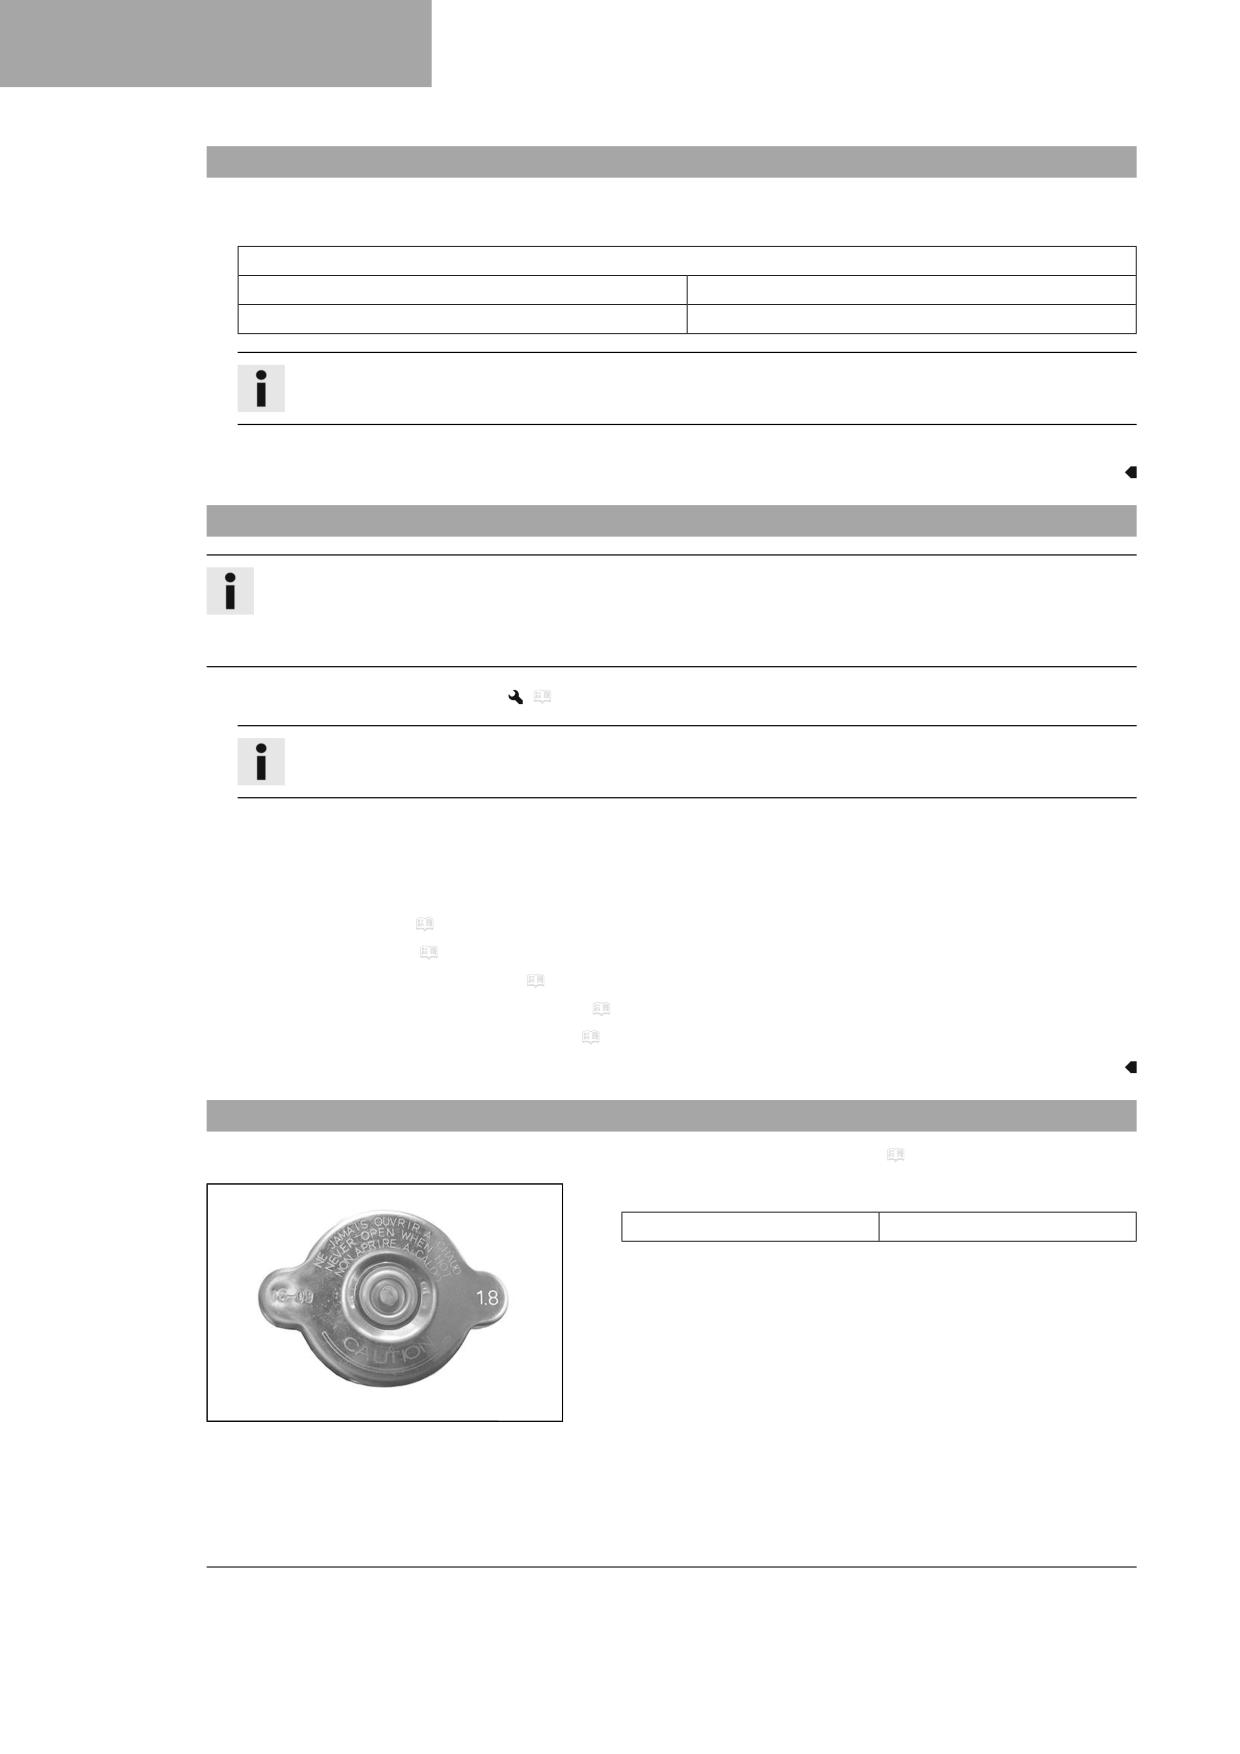
- Check the radiator cap.
Value on the radiator cap
1.8 bar (26 psi)
» If the indicated value does not correspond to the setpoint value:
V00814-01
20
PREPARING FOR USE
7
Warning
Danger of scalding During motorcycle operation,
the coolant gets hot and is under pressure.
- Do not open the radiator, the radiator hoses or
other cooling system components if the engine
or the cooling system are at operating temper-
ature.
- Allow the cooling system and the engine to
cool down before you open the radiator, the
radiator hoses or other components of the
cooling system.
- In the event of scalding, rinse the area affected
immediately with lukewarm water.
- Change the radiator cap.
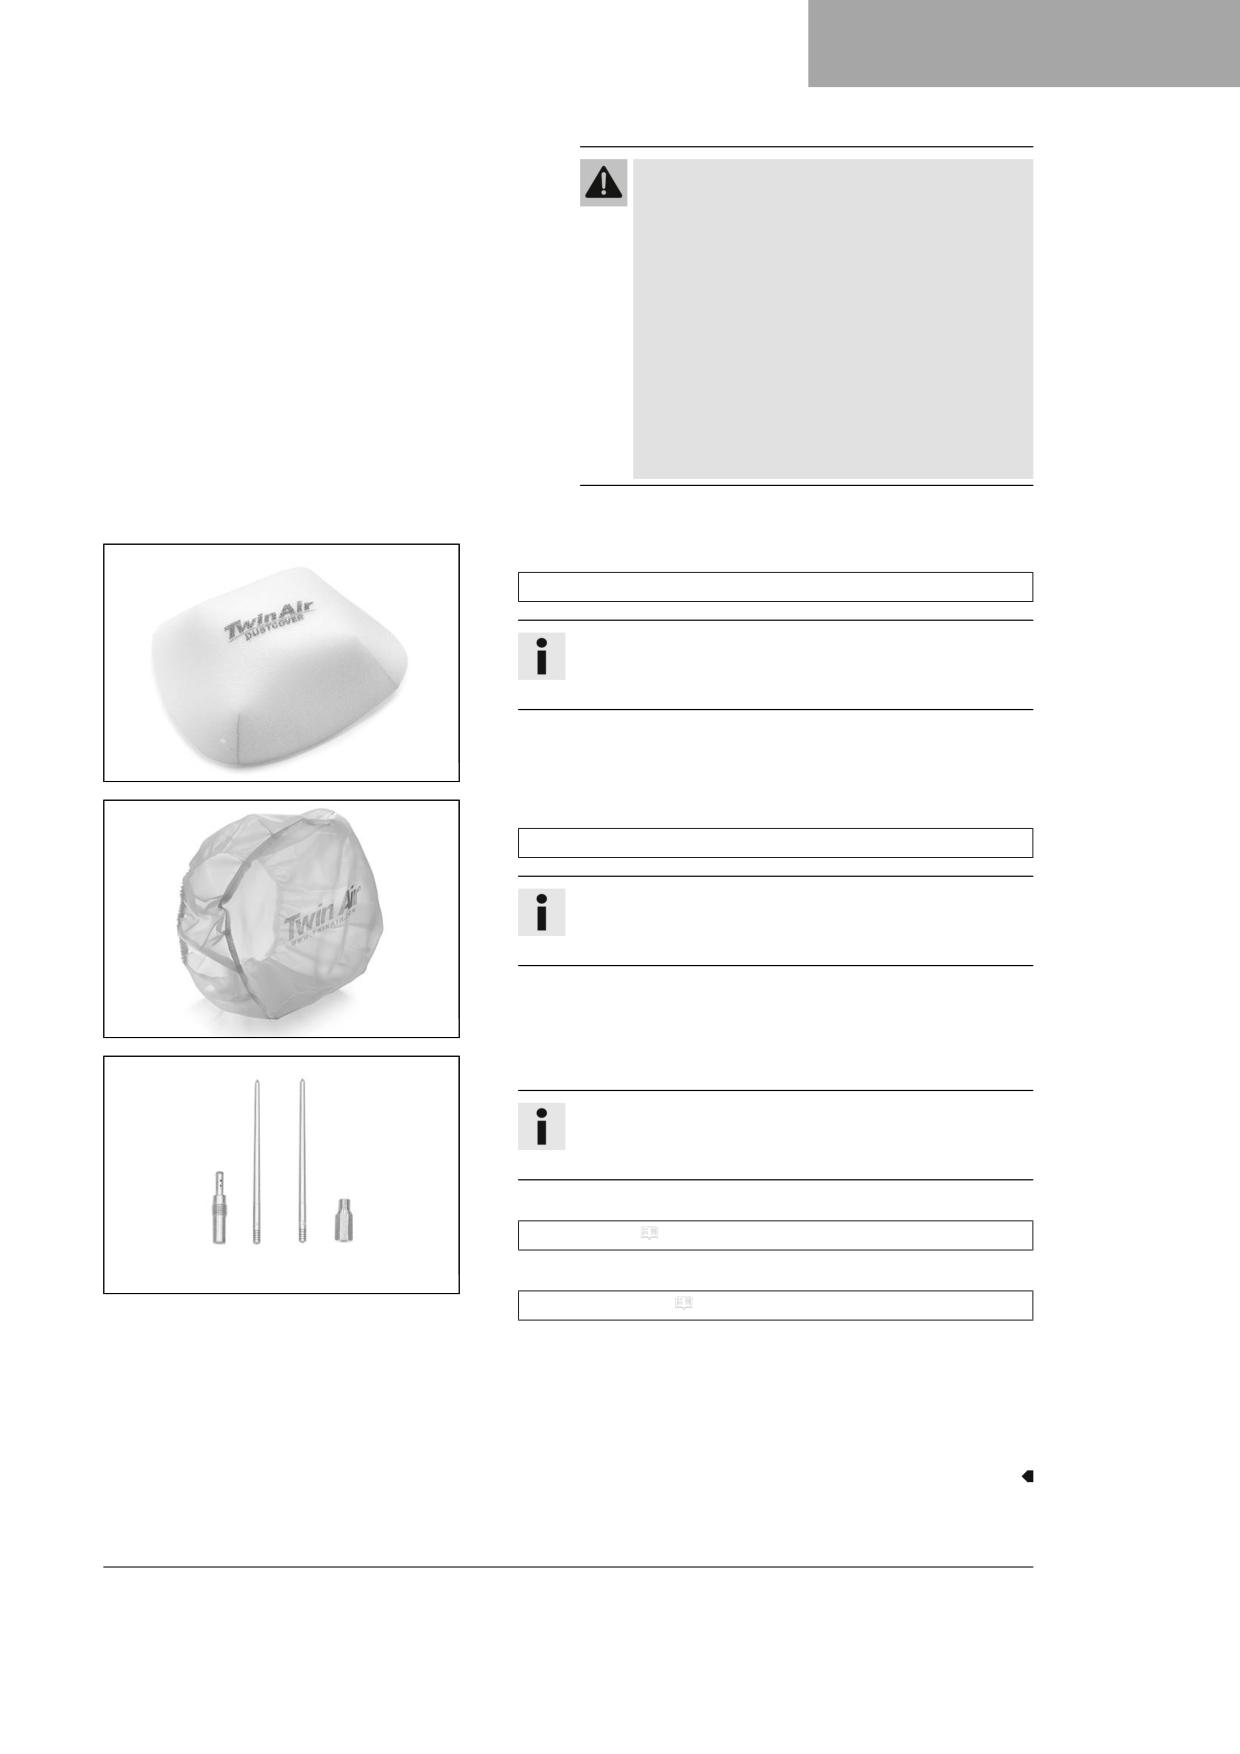
- Mount the air filter dust cover.
Air filter dust cover (47206920000)
Info
Observe the GASGAS Technical Accessories fitting instruc-
tions.
M01104-01
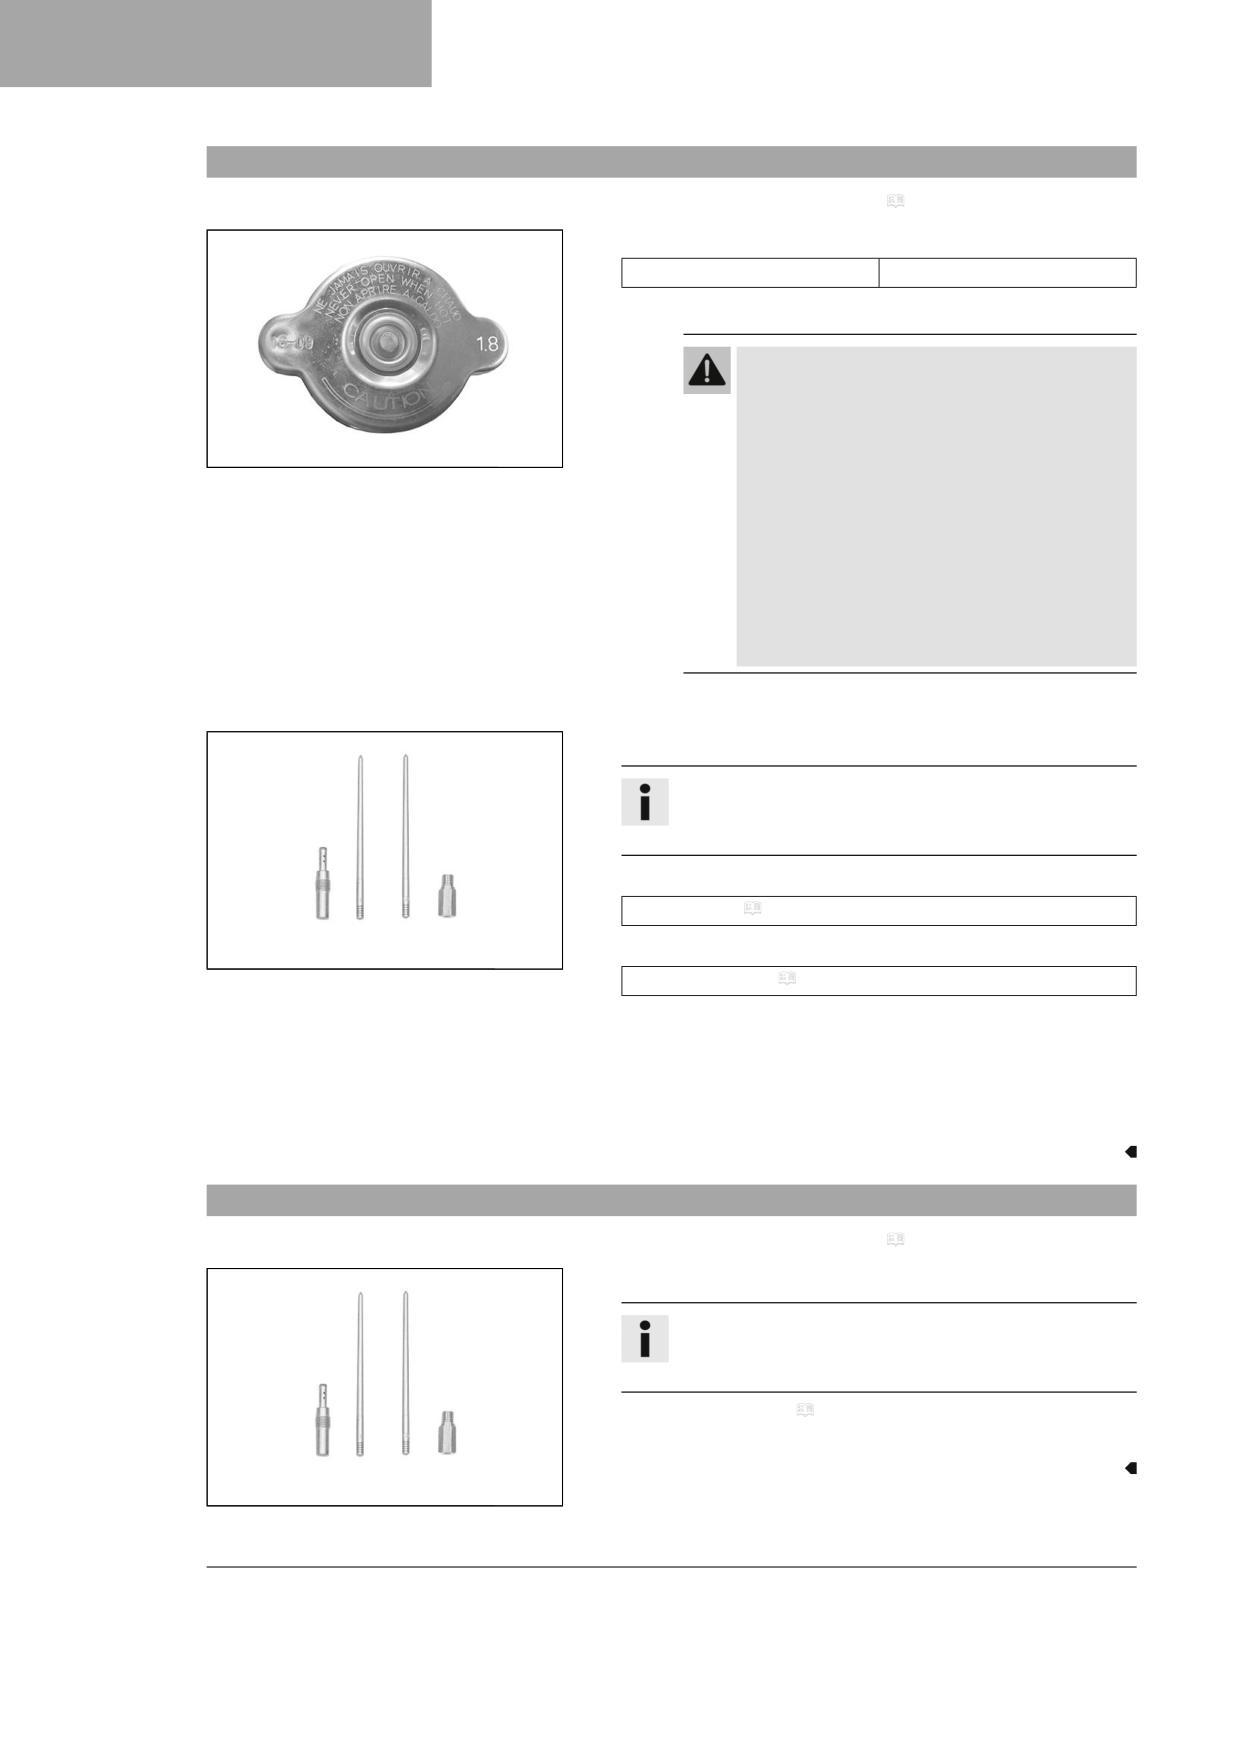
- Mount the air filter sand cover.
Air filter sand cover (79006922000)
Info
Observe the GASGAS Technical Accessories fitting instruc-
tions.
M01105-01
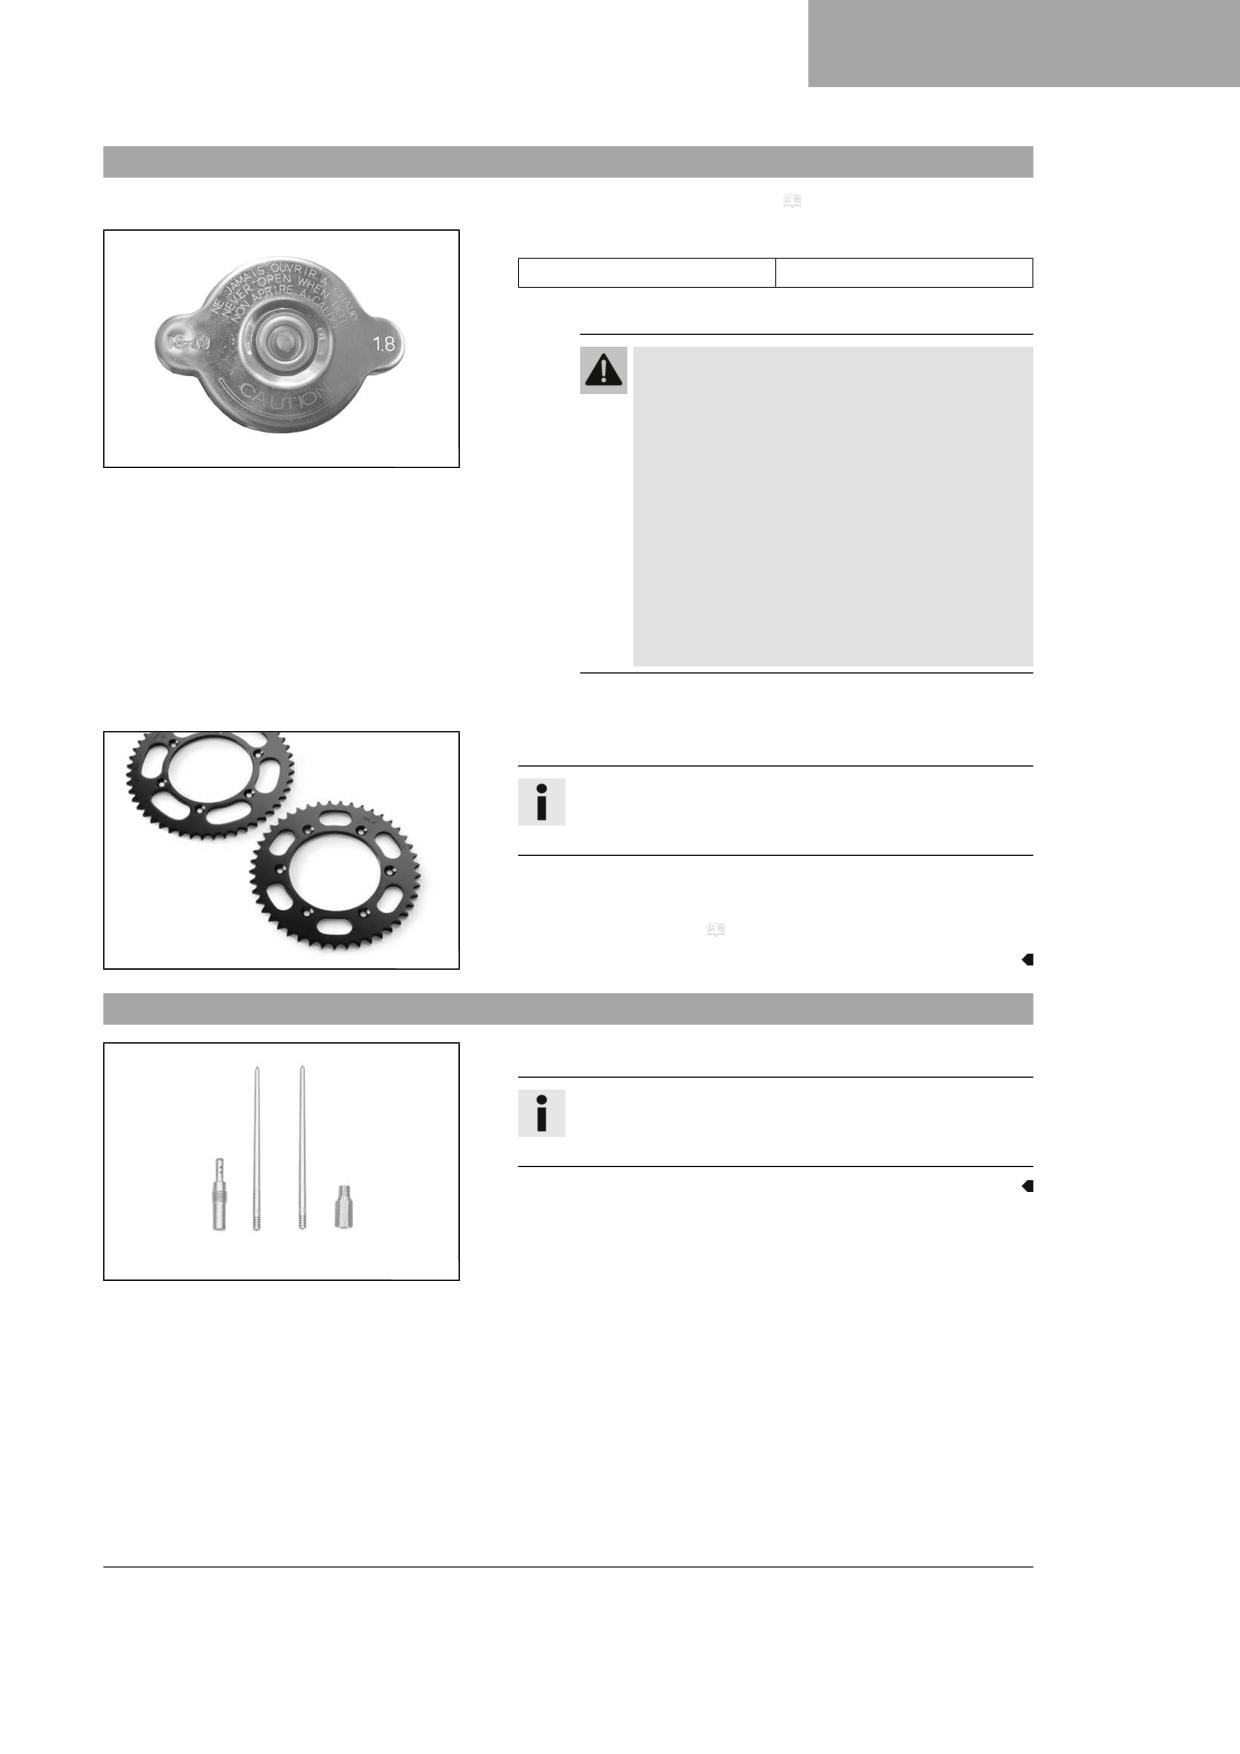
- Adjust the carburetor jetting and setting.
Info
The recommended carburetor tuning is available from your
authorized GASGAS Motorcycles workshop.
- Clean the chain.
Chain cleaner ( p. 118)
- Grease the chain.
M01107-01
Universal oil spray ( p. 119)
- Clean the radiator fins.
- Straighten the bent radiator fins carefully.
Condition
Regular use in sand
- Change the piston every 10 operating hours.
21
7
PREPARING FOR USE
7.5
Preparing the vehicle for rides on wet sand
-
Make sure that no radiator covers ( p. 85) are installed.
–
Check the radiator cap.
Value on the radiator cap
1.8 bar (26 psi)
» If the indicated value does not correspond to the setpoint value:
Warning
Danger of scalding During motorcycle operation,
the coolant gets hot and is under pressure.
- Do not open the radiator, the radiator hoses or
V00814-01
other cooling system components if the engine
or the cooling system are at operating temper-
ature.
- Allow the cooling system and the engine to
cool down before you open the radiator, the
radiator hoses or other components of the
cooling system.
- In the event of scalding, rinse the area affected
immediately with lukewarm water.
- Change the radiator cap.
-
Adjust the carburetor jetting and setting.
Info
The recommended carburetor tuning is available from your
authorized GASGAS Motorcycles workshop.
-
Clean the chain.
Chain cleaner ( p. 118)
-
Grease the chain.
M01107-01
Universal oil spray ( p. 119)
-
Clean the radiator fins.
–
Straighten the bent radiator fins carefully.
Condition
Regular use in sand
- Change the piston every 10 operating hours.
7.6
Preparing the vehicle for rides on wet and muddy circuits
- Make sure that no radiator covers ( p. 85) are installed.
- Adjust the carburetor jetting and setting.
Info
The recommended carburetor tuning is available from your
authorized GASGAS Motorcycles workshop.
- Clean the motorcycle. ( p. 103)
- Straighten the bent radiator fins carefully.
M01107-01
22
PREPARING FOR USE
7
7.7
Preparing vehicle for high temperatures or slow riding
- Make sure that no radiator covers ( p. 85) are installed.
- Check the radiator cap.
Value on the radiator cap
1.8 bar (26 psi)
» If the indicated value does not correspond to the setpoint value:
Warning
Danger of scalding During motorcycle operation,
the coolant gets hot and is under pressure.
- Do not open the radiator, the radiator hoses or
V00814-01
other cooling system components if the engine
or the cooling system are at operating temper-
ature.
- Allow the cooling system and the engine to
cool down before you open the radiator, the
radiator hoses or other components of the
cooling system.
- In the event of scalding, rinse the area affected
immediately with lukewarm water.
- Change the radiator cap.
- Adjust the secondary drive to the road conditions.
Info
The engine oil heats up quickly when the clutch is operated
frequently due to an excessively high secondary ratio.
- Clean the radiator fins.
- Straighten the bent radiator fins carefully.
- Check the coolant level. ( p. 88)
600868-01
7.8
Preparing the vehicle for low temperatures or snow
- Adjust the carburetor jetting and setting.
Info
The recommended carburetor tuning is available from your
authorized GASGAS Motorcycles workshop.
M01107-01
23
8
RIDING INSTRUCTIONS
8.1
Checks and maintenance measures when preparing for use
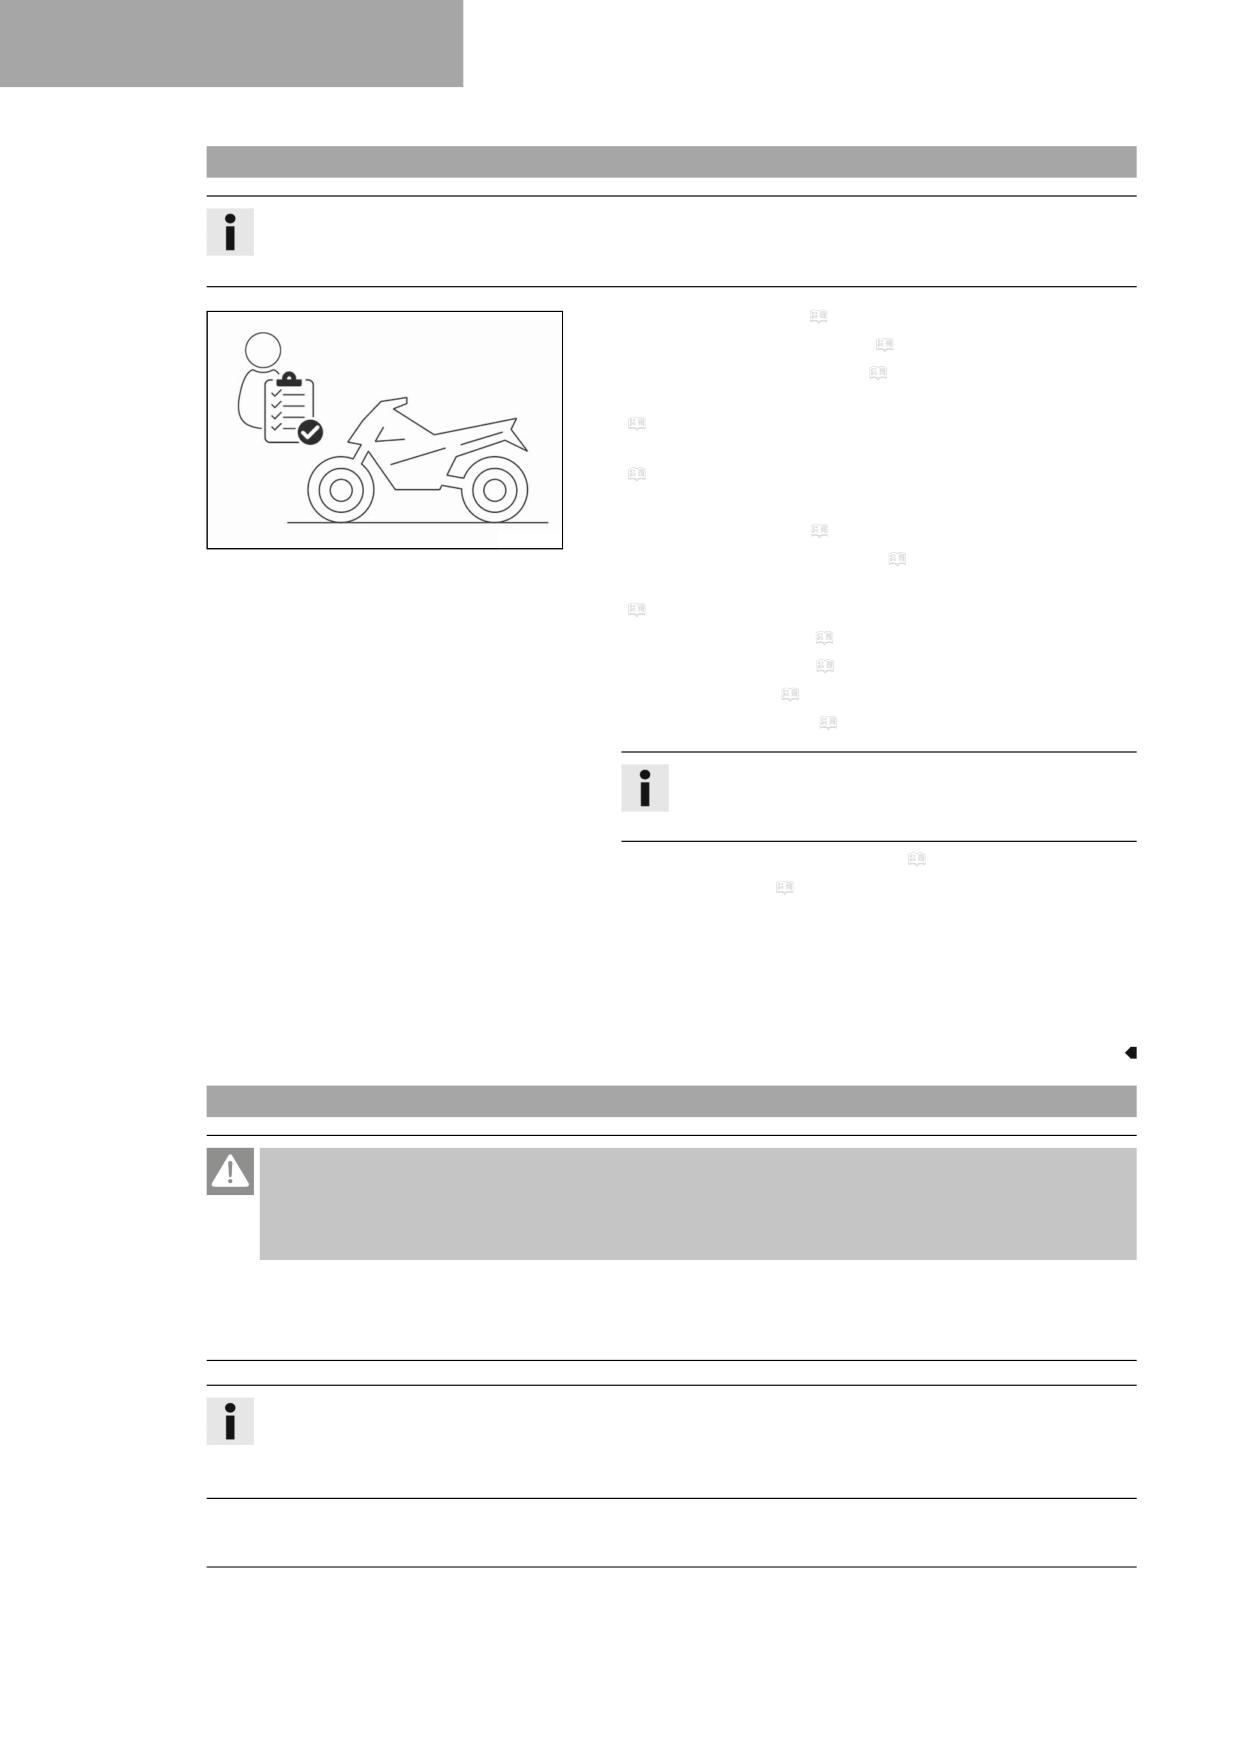
Info
Before every trip, check the condition of the vehicle and ensure that it is safe to operate.
The vehicle must be in perfect technical condition when it is being operated.
- Check the gear oil level. ( p. 100)
- Check the front brake fluid level. ( p. 69)
- Check the rear brake fluid level. ( p. 74)
- Check that the brake linings of the front brake are secured.
(
p. 71)
– Checking that the brake linings of the rear brake are secured.
(
p. 76)
– Check that the brake system is functioning properly.
H02217-01
- Check the coolant level. ( p. 88)
- Check for chain dirt accumulation. ( p. 58)
- Check the chain, rear sprocket, engine sprocket, and chain guide.
(
p. 61)
– Check the chain tension. ( p. 59)
- Check the tire condition. ( p. 82)
- Check tire pressure. ( p. 83)
- Check the spoke tension. ( p. 83)
Info
The spoke tension must be checked regularly as incorrect
spoke tension will strongly impair riding safety.
- Clean the dust boots of the fork legs. ( p. 42)
- Bleed the fork legs. ( p. 41)
- Check the air filter.
- Check the settings of all controls and ensure that they can be oper-
ated smoothly.
- Check all screws, nuts, and hose clamps regularly for tightness.
- Check the fuel level.
8.2
Starting the vehicle
Danger
Danger of poisoning Exhaust gases are toxic and inhaling them may result in unconsciousness and death.
- Always make sure there is sufficient ventilation when running the engine.
- Use effective exhaust extraction when starting or running the engine in an enclosed space.
Note
Engine failure High rpm with a cold engine negatively impacts the lifespan of the engine.
- Ensure that the engine is always warmed up at low engine speeds.
Info
If the motorcycle is unwilling to start, the cause can be old fuel in the float chamber. The flammable elements of the
fuel evaporate after a long time of standing.
If the float chamber is filled with fresh fuel, the engine starts immediately.
24

RIDING INSTRUCTIONS
8
The motorcycle has been out of use for more than 1 week
- Empty the carburetor float chamber.
(
p. 97)
– Turn tap handle of the fuel tap to the ON position.
Fuel can flow from the fuel tank to the carburetor.
- Remove the motorcycle from the stand.
- Shift the transmission into neutral.
The engine is cold
- Pull the choke lever out as far as possible.
- Press the kick starter lever robustly through its full range.
Info
Do not open the throttle.
8.3
Starting off
Info
The plug-in stand must be removed before riding.
- Pull the clutch lever, engage 1st gear, release the clutch lever slowly and simultaneously open the throttle carefully.
8.4
Shifting, riding
Warning
Danger of accidents If you change down at high engine speed, the rear wheel blocks and the engine races.
- Make it clear to your child that he or she must not change into a low gear at high engine speed.
Info
If unusual noises occur while riding, stop immediately, switch off the engine, and contact an authorized
GASGAS Motorcycles workshop.
First-gear is used for starting off and for steep inclines.
- When conditions allow (incline, road situation, etc.), your child can shift into a higher gear. To do so, release the throttle
while simultaneously pulling the clutch lever, shift into the next gear, release the clutch lever and open the throttle.
- If the choke function has been activated, deactivate it after the engine has warmed up.
- After reaching maximum speed by fully opening the throttle grip, turn the throttle back so it is ¾ open. This will barely
reduce the speed, but fuel consumption will be considerably lower.
- Your child should always open the throttle only as much as the engine can handle - abruptly opening the throttle
increases fuel consumption.
- To shift down, apply the brakes and close the throttle at the same time.
- Pull the clutch lever and shift into a lower gear, release the clutch lever slowly, and either open the throttle or shift
again.
- Your child should switch off the engine if prolonged operation at idle speed or while stationary is imminent.
Guideline
≥ 2 min
- Your child should avoid frequent and extended slipping of the clutch. This causes the engine oil, engine and cooling sys-
tem to heat up.
- Insist that your child ride with a low speed instead of with a high speed and a slipping clutch.
25

8
RIDING INSTRUCTIONS
8.5
Braking
Warning
Danger of accidents Excessively forceful application of the brakes blocks the wheels.
- Explain to your child that he or she must adapt the braking to the traffic situation and the road conditions.
Warning
Danger of accidents A spongy pressure point on the front or rear brake reduces braking efficiency.
- Check the brake system and do not allow your child to continue riding until the problem is eliminated. (Your
authorized GASGAS Motorcycles workshop will be glad to help.)
Warning
Danger of accidents Moisture and dirt impair the brake system.
- Explain to your child that he or she must brake carefully several times to dry out and remove dirt from the
brake linings and the brake discs.
- On sandy, wet, or slippery surfaces, use the rear brake.
- Always finish braking before the going into a bend. Your child should change down to a lower gear appropriate to the
road speed.
- Insist that your child take advantage of the braking action of the engine when riding on long downhills. To do so, shift
back one or two gears, but do not overrev the engine. Your child will need to apply the brakes far less often and the
brake system will not overheat.
8.6
Stopping, parking
Warning
Risk of injury People who act without authorization may not be familiar with the vehicle.
- Do not leave the vehicle unattended if the engine is running.
- Protect the vehicle against access by unauthorized persons.
Warning
Danger of burns Some vehicle components become hot when the vehicle is operated.
- Do not touch any parts such as the exhaust system, radiator, engine, damper, or brake system before the vehi-
cle parts have cooled down.
- Let the vehicle parts cool down before you perform any work on the vehicle.
Note
Material damage The vehicle may be damaged by incorrect procedure when parking.
Significant damage may be caused if the vehicle rolls away or falls over.
The components for parking the vehicle are designed only for the weight of the vehicle.
- Park the vehicle on a firm and level surface.
- Ensure that nobody sits on the vehicle when the vehicle is parked on a stand.
Note
Fire hazard Hot vehicle components pose a fire hazard and explosion risk.
- Do not park the vehicle near to materials which are highly flammable or explosive.
- Allow the vehicle to cool down before covering it.
- Apply the brakes on the motorcycle.
- Shift the transmission into neutral.
- Press and hold the stop button while the engine is idling until the engine stops.
- Turn tap handle of the fuel tap to the OFF position.
26

RIDING INSTRUCTIONS
8
– Park the motorcycle on firm ground.
8.7
Transporting
Note
Danger of damage The parked vehicle can roll away or fall over.
- Park the vehicle on a firm and level surface.
Note
Fire hazard Hot vehicle components pose a fire hazard and explosion risk.
- Do not park the vehicle near to materials which are highly flammable or explosive.
- Allow the vehicle to cool down before covering it.
- Switch off the engine.
- Use tension belts or other suitable devices to secure the motorcycle
against falling over or rolling away.
401475-01
8.8
Refueling
Danger
Fire hazard Fuel is highly flammable.
The fuel in the fuel tank expands when warm and can escape if overfilled.
- Do not fuel the vehicle in the vicinity of open flames or lit cigarettes.
- Switch off the engine for refueling.
- Make sure that no fuel is spilled; particularly not on hot parts of the vehicle.
- If any fuel is spilled, wipe it off immediately.
- Observe the specifications for refueling.
Warning
Danger of poisoning Fuel is harmful to health.
- Avoid skin, eye and clothing contact with fuel.
- Immediately consult a doctor if you swallow fuel.
- Do not inhale fuel vapors.
- Rinse the affected area immediately with plenty of water in the event of contact with the skin.
- Rinse the eyes thoroughly with water, and consult a doctor in case of fuel contact with the eyes.
- Change your clothing if fuel spills on them.
Note
Environmental hazard Improper handling of fuel is a danger to the environment.
- Do not allow fuel to enter the groundwater, the soil, or the sewage system.
- Switch off the engine.
- Open the fuel tank filler cap. ( p. 15)
27

8
RIDING INSTRUCTIONS
- Fill the fuel tank with fuel up to measurement A.
Guideline
35 mm (1.38 in)
Measurement of A
Fuel tank capacity,
5.2 l
Super unleaded (98
approx.
(1.37 US gal)
octane) mixed with
2-stroke engine oil
(1:40) ( p. 117)
401522-10
Engine oil, 2-stroke ( p. 116)
- Close the fuel tank filler cap. ( p. 15)
28
SERVICE SCHEDULE
9
9.1
Additional information
Any further work that results from the service work must be ordered separately and invoiced separately.
Different service intervals may apply in your country, depending on the local operating conditions.
Individual service intervals and scopes may change in the course of technical developments. The most up-to-date service
schedule can always be found on GASGAS Motorcycles Dealer.net. Your authorized GASGAS Motorcycles dealer will be glad
to advise you.
The use of a service hour counter is recommended in order to be able to check the mileage at any time.
Service hour counter (A54012920000)
9.2
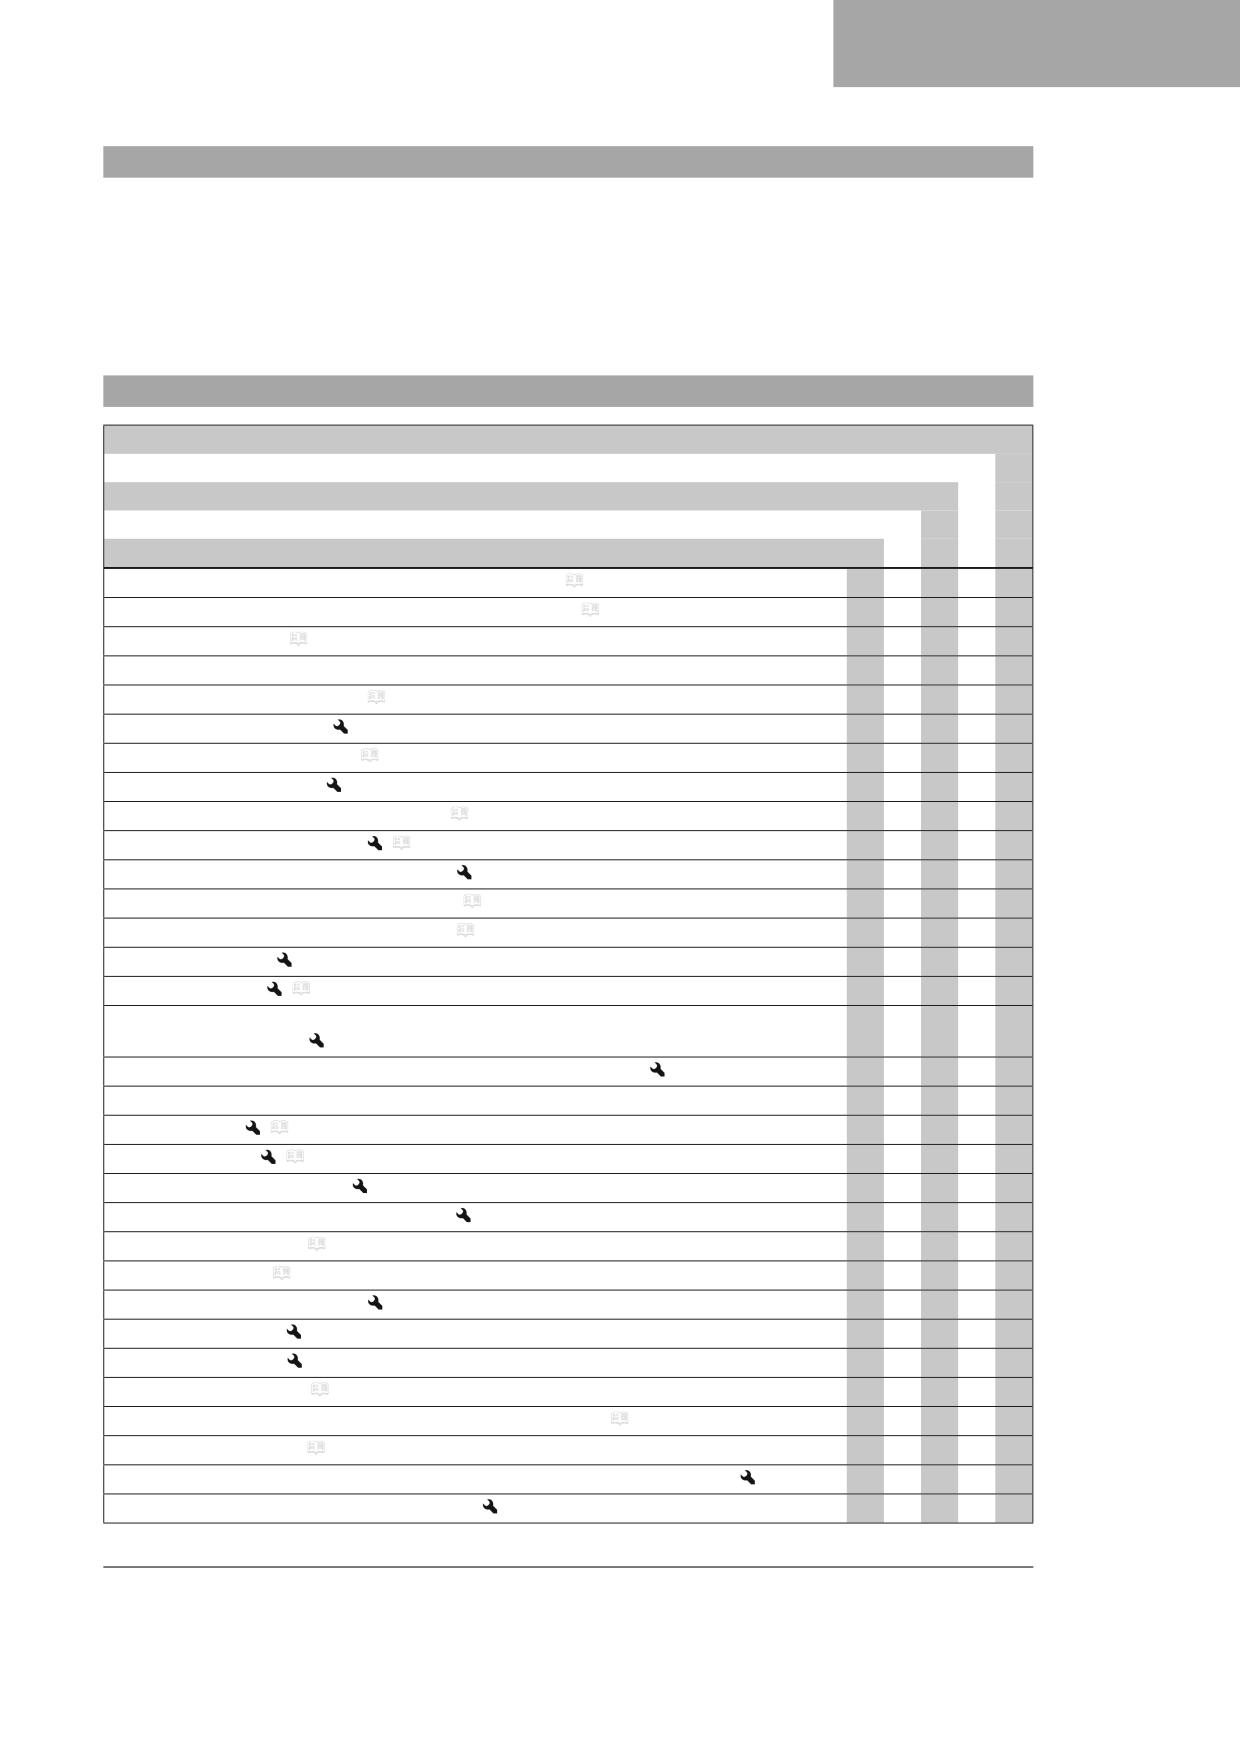
Service schedule
every 24 months
Every 90 operating hours
Every 45 operating hours
Every 15 operating hours
After 1 operating hour
Check that the brake linings of the front brake are secured. ( p. 71)
○
●
●
●
●
Checking that the brake linings of the rear brake are secured. ( p. 76)
○
●
●
●
●
Check the brake discs. ( p. 68)
○
●
●
●
●
Check the brake lines for damage and tightness.
○
●
●
●
●
Check the front brake fluid level. ( p. 69)
○
●
●
Change the front brake fluid.
●
●
Check the rear brake fluid level. ( p. 74)
○
●
●
Change the rear brake fluid.
●
●
Check the fluid level of the hydraulic clutch. ( p. 65)
●
Change the hydraulic clutch fluid.
(
p. 66)
●
●
Replace the sealing cup of the brake cylinder.
●
●
Check the free travel of the hand brake lever. ( p. 68)
○
●
●
●
●
Check the free travel of the foot brake lever. ( p. 73)
○
●
●
●
●
Check the idle speed.
○
●
●
●
●
Change the gear oil.
(
p. 100)
○
●
●
●
●
Check all hoses (e.g. fuel, cooling, bleeder, drainage hoses, etc.) and sleeves for cracking, tight-
○
●
●
●
●
ness, and correct routing.
Check the cables for damage and that there are no kinks in the routing.
●
●
●
●
Check that the throttle cables are undamaged, routed without kinks, and set correctly.
●
●
●
●
Check the frame.
(
p. 63)
●
●
●
Check the link fork.
(
p. 63)
●
●
●
Check the fork bearing for play.
●
●
Check the shock absorber heim joint for play.
●
●
Check the tire condition. ( p. 82)
●
●
●
●
Check tire pressure. ( p. 83)
○
●
●
●
●
Check the wheel bearing for play.
●
●
●
Check the wheel hubs.
●
●
●
Check the rim run-out.
○
●
●
●
Check the spoke tension. ( p. 83)
○
●
●
●
Check the chain, rear sprocket, engine sprocket, and chain guide. ( p. 61)
○
●
●
●
Check the chain tension. ( p. 59)
○
●
●
●
●
Grease all moving parts (e.g., hand lever, chain,...) and check for smooth operation.
○
●
●
●
●
Change the spark plug and spark plug connector.
●
●
●
29
9
SERVICE SCHEDULE
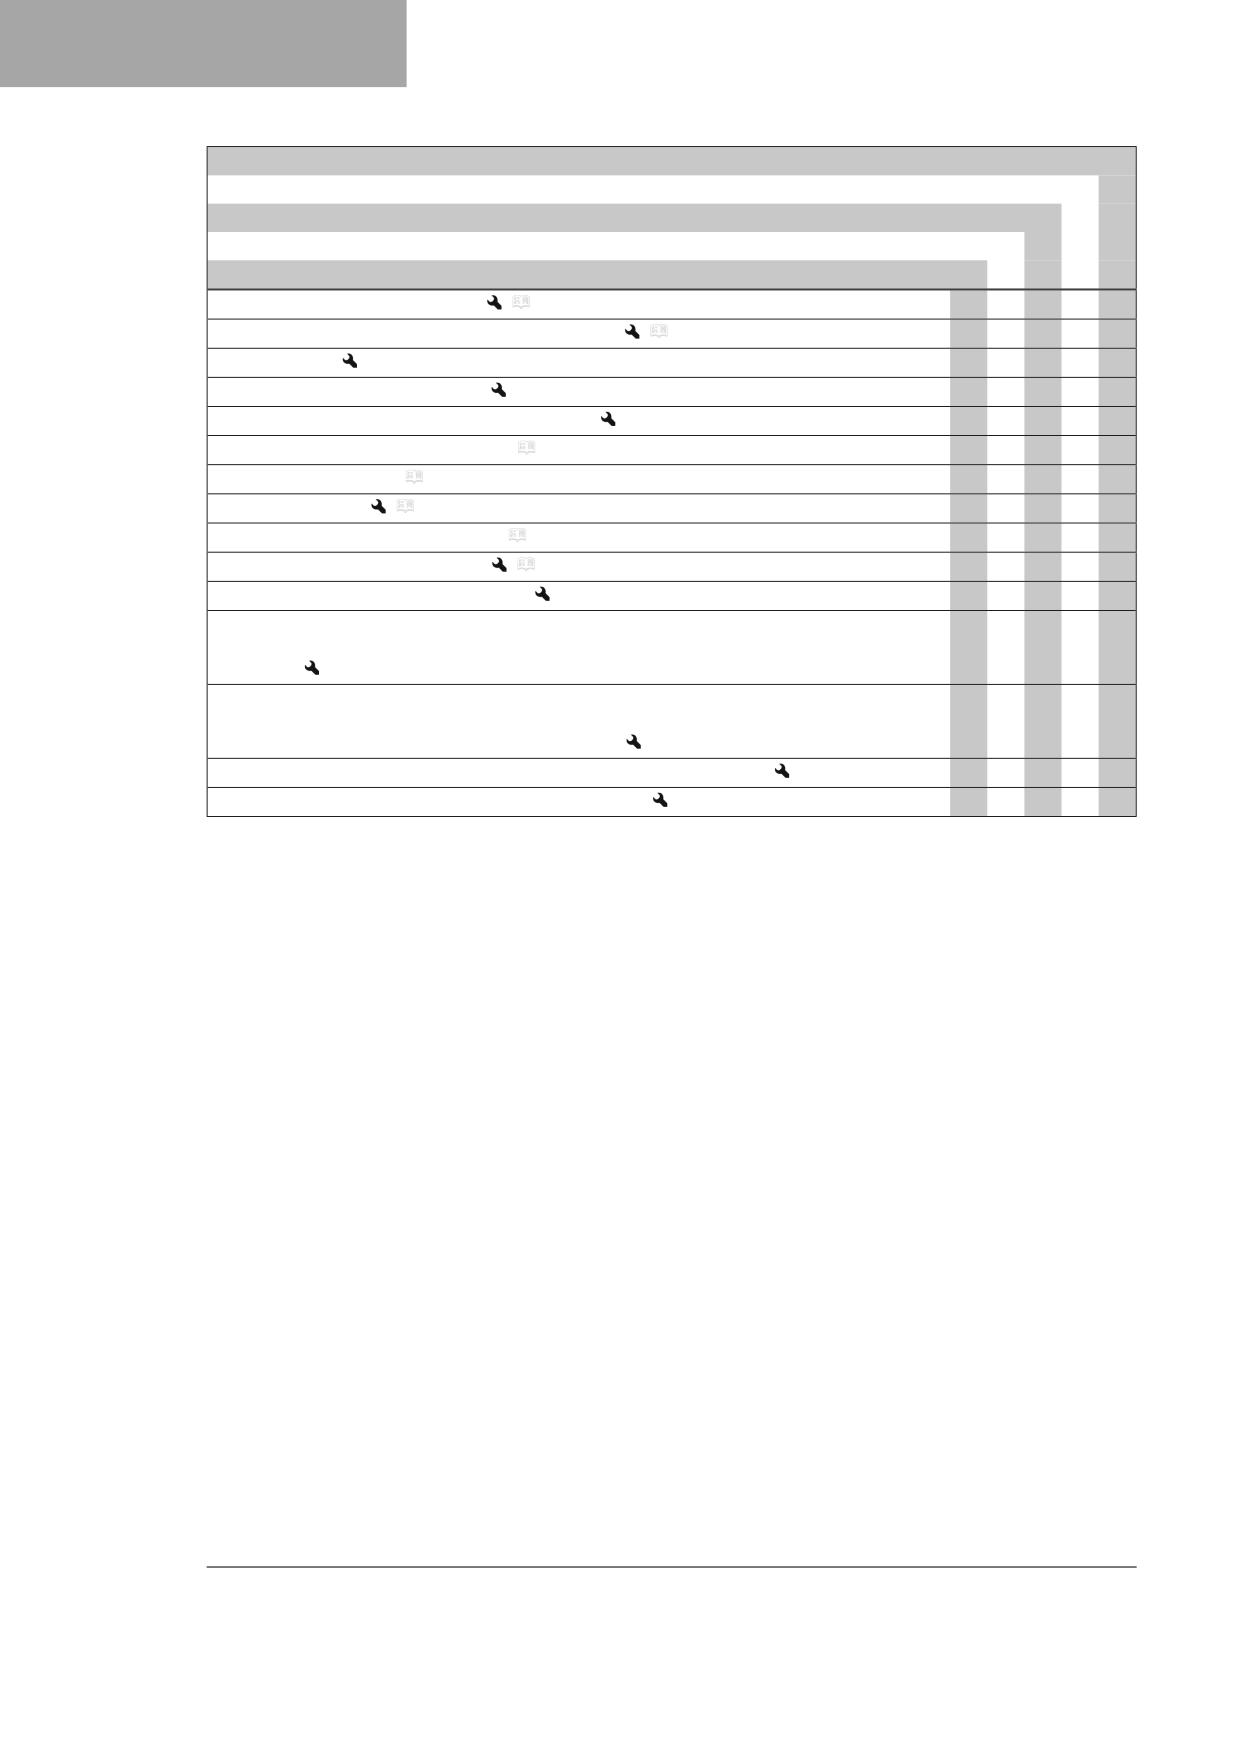
every 24 months
Every 90 operating hours
Every 45 operating hours
Every 15 operating hours
After 1 operating hour
Clean the air filter and air filter box.
(
p. 54)
●
●
●
●
Change the glass fiber yarn filling of the main silencer.
(
p. 55)
●
●
Service the fork.
●
●
Perform the shock absorber service.
●
●
Check all screws, nuts, and hose clips for a tight fit.
○
●
●
●
●
Check the antifreeze and coolant level. ( p. 87)
●
●
Check the coolant level. ( p. 88)
○
●
Change the coolant.
(
p. 90)
●
Check the steering head bearing play. ( p. 48)
○
●
Lubricate the steering head bearing.
(
p. 50)
●
●
●
Check/adjust the carburetor components.
●
●
●
Perform minor engine service. (Check the inlet membrane. Check the clutch. Change the piston
●
●
●
and check the cylinder and Z dimension. Check the exhaust control for functioning and smooth
operation.)
Perform major engine service including removing and installing the engine. (Change the con-
●
●
necting rod, conrod bearing, and crank pin. Check the transmission and the shift mechanism.
Change the intake flange. Change all engine bearings.)
Final check: Check the vehicle for operating safety and take for a test ride.
○
●
●
●
●
Make a service entry in GASGAS Motorcycles Dealer.net.
○
●
●
●
●
○ One-time interval
● Periodic interval
30

TUNING THE CHASSIS
10
10.1
Checking the basic chassis setting with rider's weight
Info
When adjusting the basic chassis setting, first adjust the shock absorber and then the fork.
- For optimal motorcycle riding characteristics and to avoid damage
to forks, shock absorbers, link fork and frame, the basic settings of
the suspension components must match the rider's weight.
- This vehicle is delivered pre-set for a standard rider's weight (with
full protective clothing).
Guideline
Standard rider weight
45 … 55 kg (99 … 121 lb.)
– If the rider's weight is above or below this range, the basic setting of
the suspension components must be adjusted accordingly.
- Small weight differences can be compensated by adjusting the
spring preload, but in the case of large weight differences, the
springs must be replaced.
401030-01
10.2
Air suspension XACT 5543
Air suspension WP Suspension XACT 5543 is used in the fork.
In this system, suspension is located in the left fork leg and damping in the right fork leg.
As fork springs are no longer required, a significant weight advantage is achieved when compared to conventional forks. The
response on slightly uneven surfaces is significantly improved.
In normal driving mode, suspension is provided exclusively by an air cushion. A steel spring is located in the left fork leg as
an end stop.
Info
If the fork is frequently overloaded, then the air pressure in the fork must be increased to avoid damage to the fork
and frame.
The air pressure in the fork can be quickly adjusted to the rider's weight, surface conditions and the rider's preference using
a fork airpump. The fork does not have to be dismantled. The time consuming mounting of harder or softer fork springs is
not required.
If the air chamber loses air due to a damaged seal, the fork will still not sag. In this case the air is retained in the fork. The
suspension travel is maintained as far as possible. The damping becomes harder and the riding comfort reduces.
As with a conventional fork, the damping can be adjusted in rebound and compression stages.
The rebound adjustment is located at the upper end of the right fork leg.
The compression adjuster is located at the lower end of the right fork leg.
31
10
TUNING THE CHASSIS
10.3
Compression damping of the shock absorber
The compression damping of the shock absorber is divided into two ranges: high-speed and low-speed.
High-speed and low-speed refer to the compression speed of the rear wheel suspension and not to the vehicle speed.
The high-speed compression adjuster has an effect, for example, when landing after a jump: the rear wheel suspension
compresses quickly.
The low-speed compression adjuster has an effect, for example, when riding over long ground swells: the rear wheel sus-
pension compresses slowly.
These two ranges can be adjusted separately, although the transition between high-speed and low-speed is gradual. Thus,
modifications in the high-speed range affect the compression damping in the low-speed range and vice versa.
10.4
Adjusting the low-speed compression damping of the shock absorber
Caution
Risk of injury Parts of the shock absorber will move around if the shock absorber is detached incorrectly.
The shock absorber is filled with highly compressed nitrogen.
- Please follow the description provided. (Your authorized GASGAS Motorcycles workshop will be glad to help.)
Info
The effect of the low-speed compression adjuster can be seen in slow to normal compression of the shock
absorber.
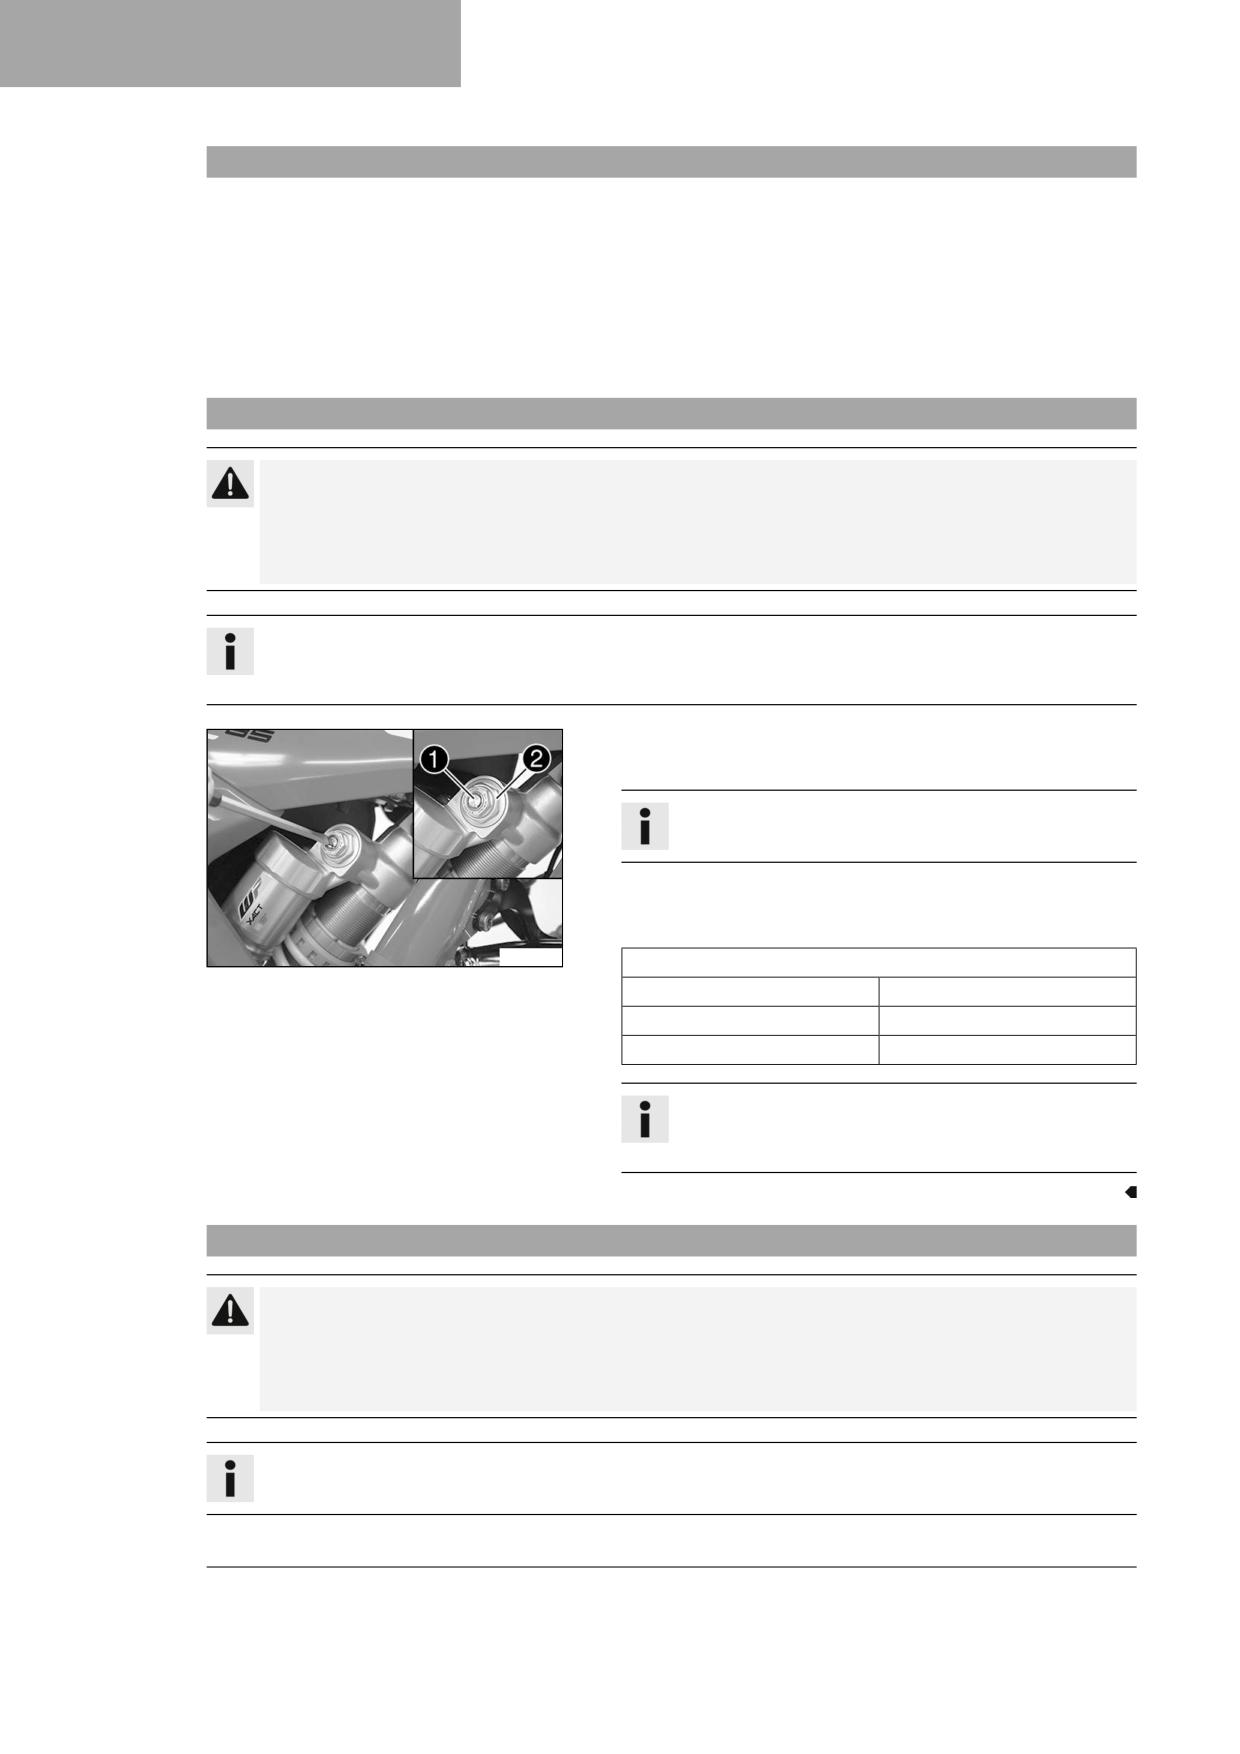
- Turn adjusting screw 1 clockwise with a screwdriver as far as the
last perceptible click.
Info
Do not loosen fitting 2!
- Turn counterclockwise by the number of clicks corresponding to the
shock absorber type.
Guideline
S04321-10
Low-speed compression damping
Comfort
18 clicks
Standard
15 clicks
Sport
12 clicks
Info
Turn clockwise to increase damping; turn counterclockwise
to reduce damping.
10.5
Adjusting the high-speed compression damping of the shock absorber
Caution
Risk of injury Parts of the shock absorber will move around if the shock absorber is detached incorrectly.
The shock absorber is filled with highly compressed nitrogen.
- Please follow the description provided. (Your authorized GASGAS Motorcycles workshop will be glad to help.)
Info
The effect of the high-speed compression adjuster can be seen in fast compression of the shock absorber.
32
TUNING THE CHASSIS
10
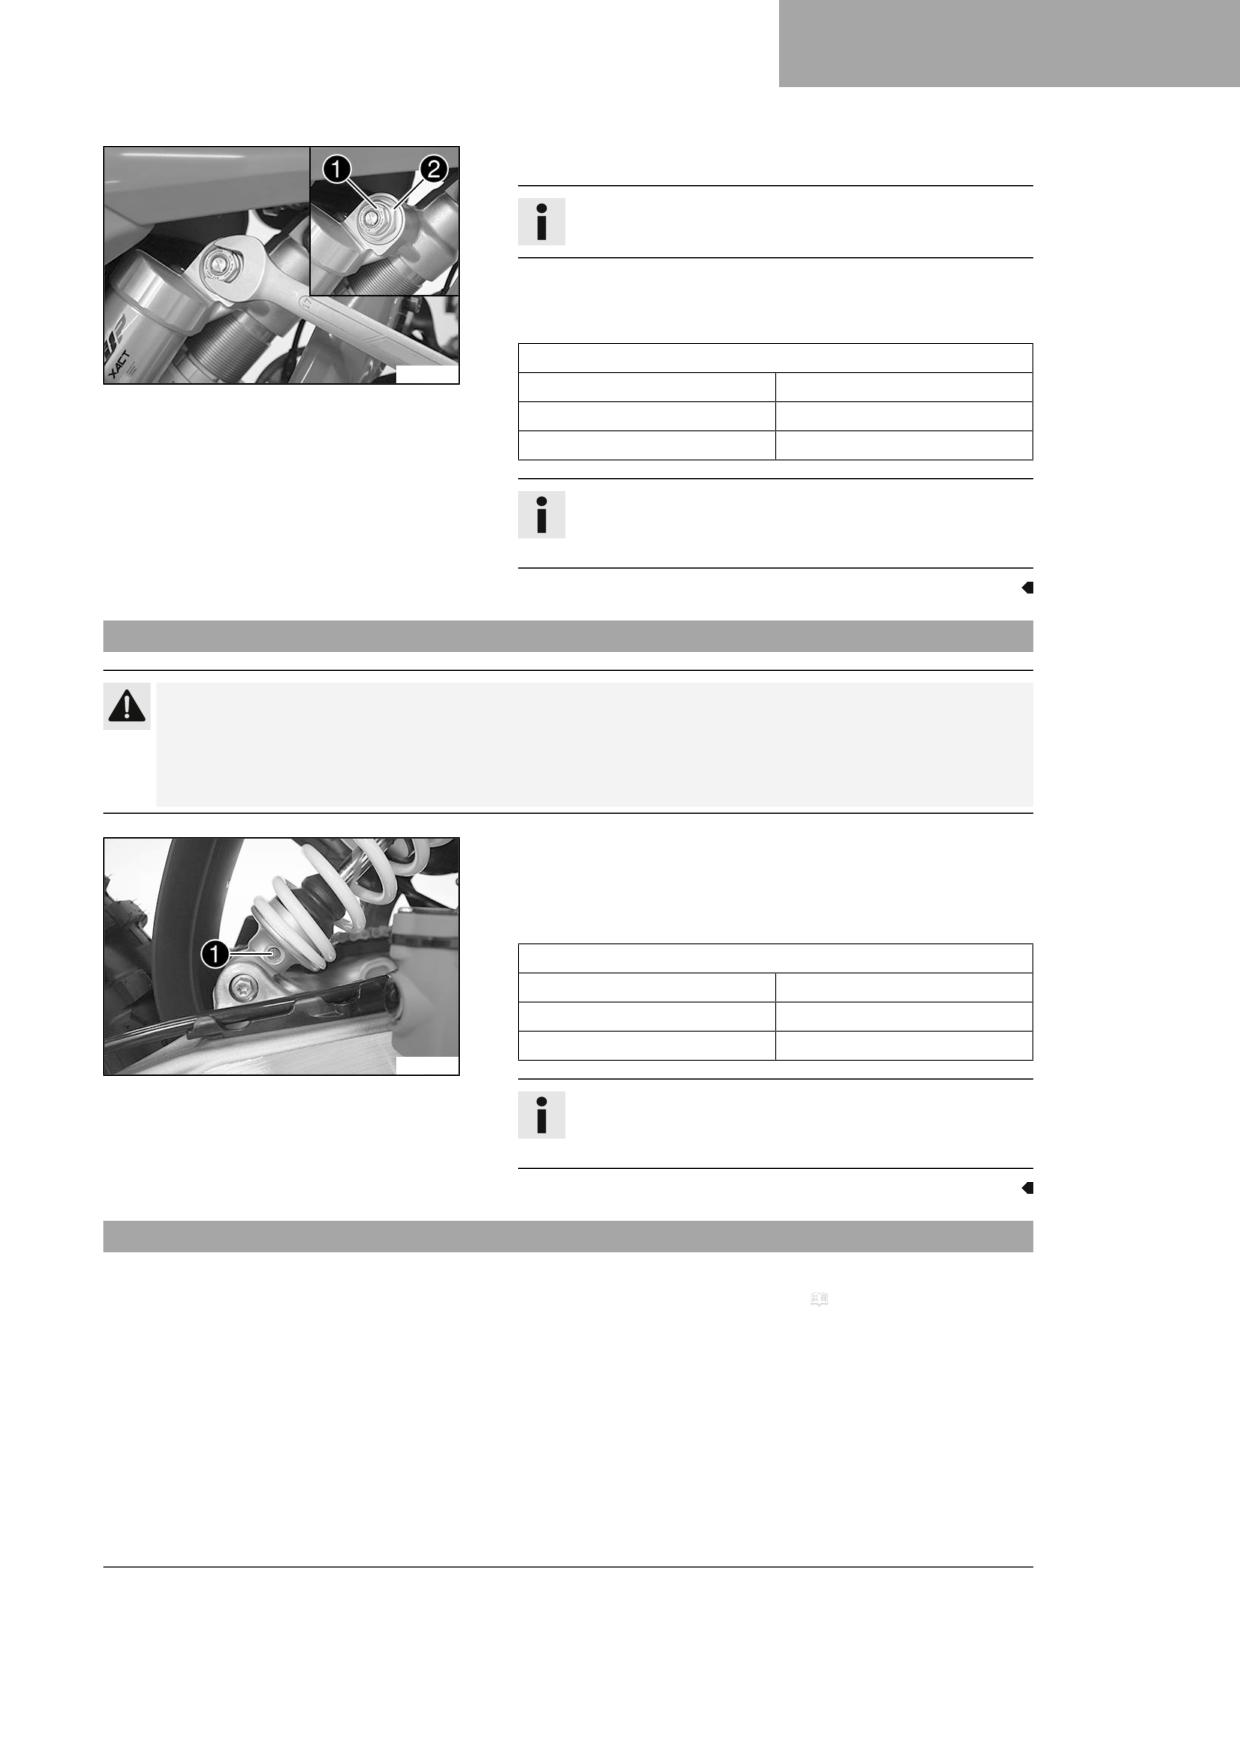
– Turn adjusting screw 1 clockwise all the way.
Info
Do not loosen fitting 2!
- Turn counterclockwise by the number of turns corresponding to the
shock absorber type.
Guideline
High-speed compression damping
S04322-10
Comfort
2.5 turns
Standard
2 turns
Sport
1.5 turns
Info
Turn clockwise to increase damping; turn counterclockwise
to reduce damping.
10.6
Adjusting the rebound damping of the shock absorber
Caution
Risk of injury Parts of the shock absorber will move around if the shock absorber is detached incorrectly.
The shock absorber is filled with highly compressed nitrogen.
- Please follow the description provided. (Your authorized GASGAS Motorcycles workshop will be glad to help.)
- Turn adjusting screw 1 clockwise up to the last perceptible click.
- Turn counterclockwise by the number of clicks corresponding to the
shock absorber type.
Guideline
Rebound damping
Comfort
18 clicks
Standard
15 clicks
Sport
12 clicks
S04323-10
Info
Turn clockwise to increase the damping; turn counterclock-
wise to reduce damping when the shock absorber rebounds.
10.7
Measuring the dimension of the rear wheel unloaded
Preparatory work
- Raise the motorcycle with a lift stand. ( p. 41)
33
10
TUNING THE CHASSIS
Main work
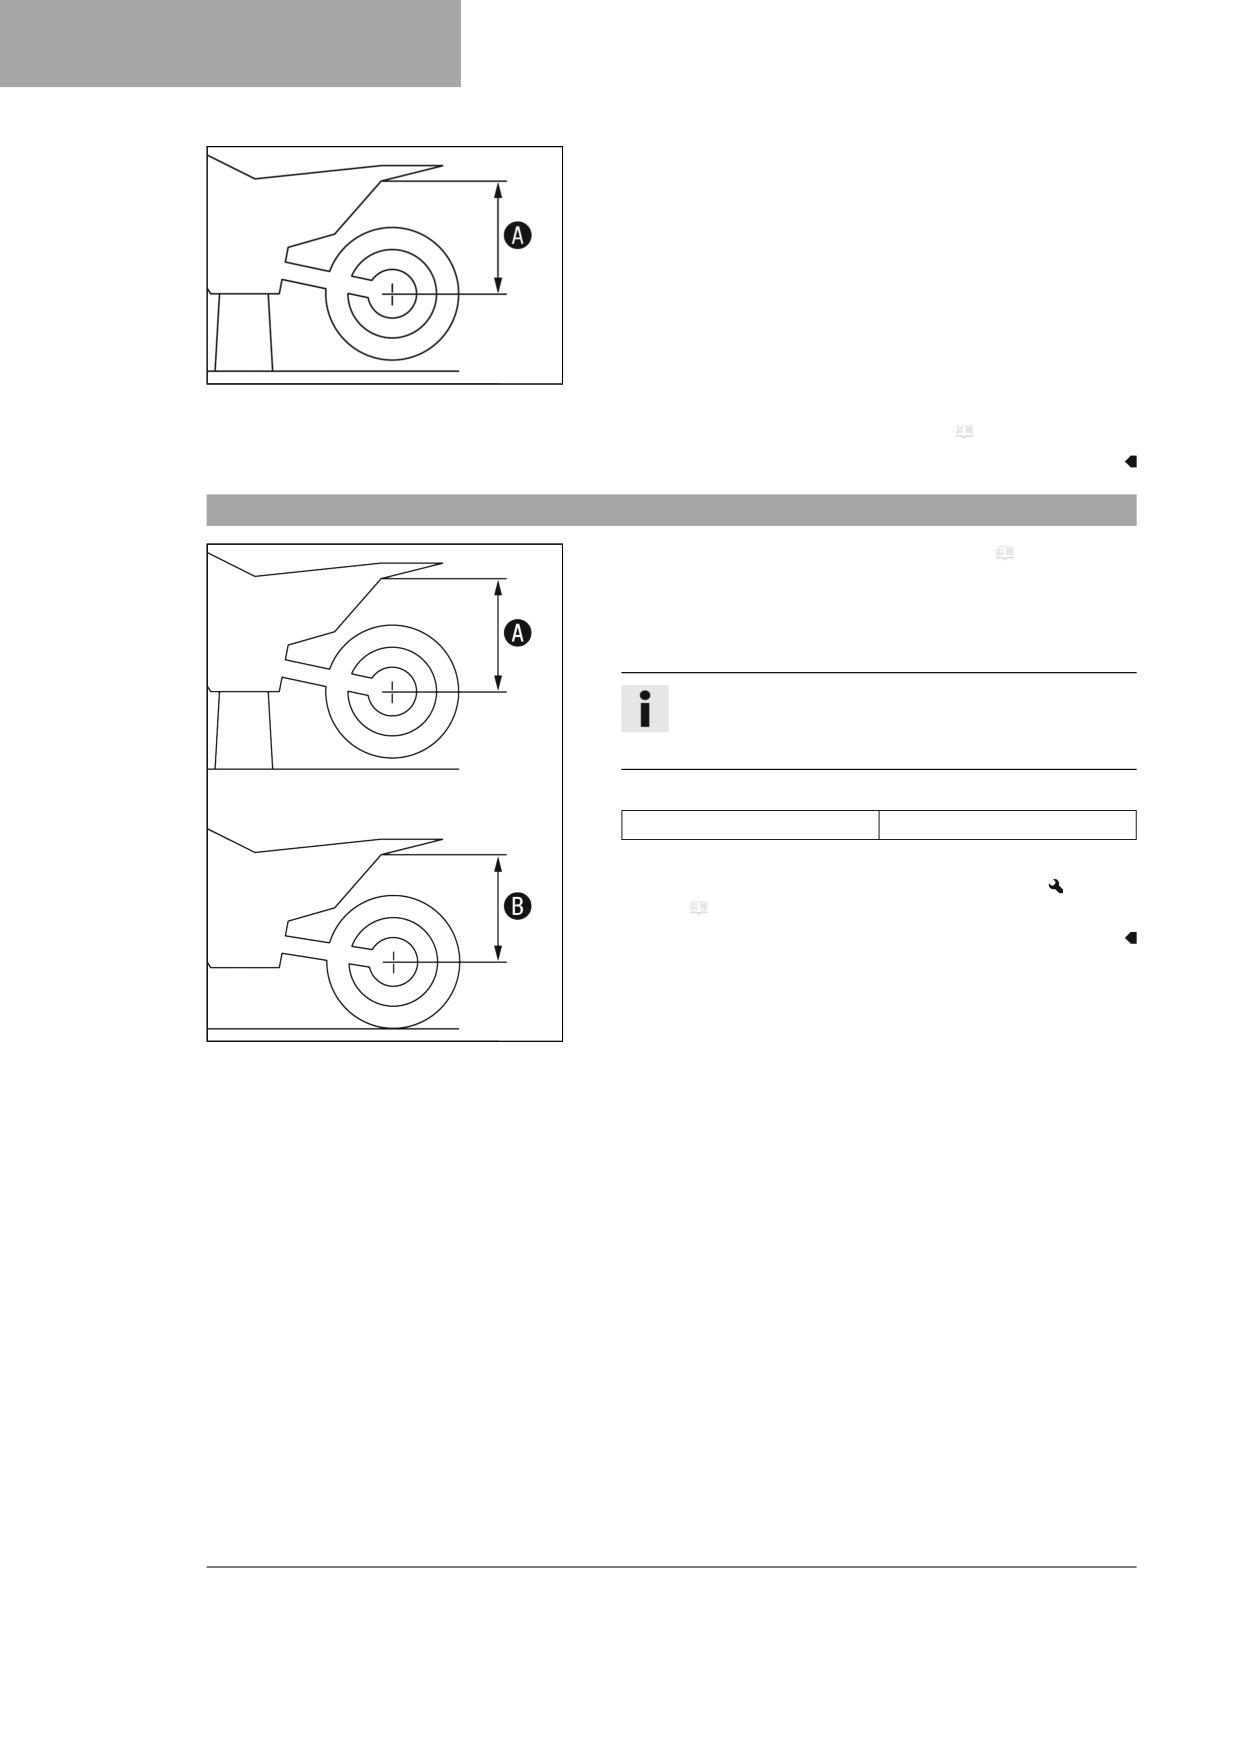
- Measure the vertical distance between the rear axle and a fixed
point, such as a marking on the side cover.
- Note the value as dimension A.
400988-10
Finishing work
- Remove the motorcycle from the lift stand. ( p. 41)
10.8
Checking the static sag of the shock absorber
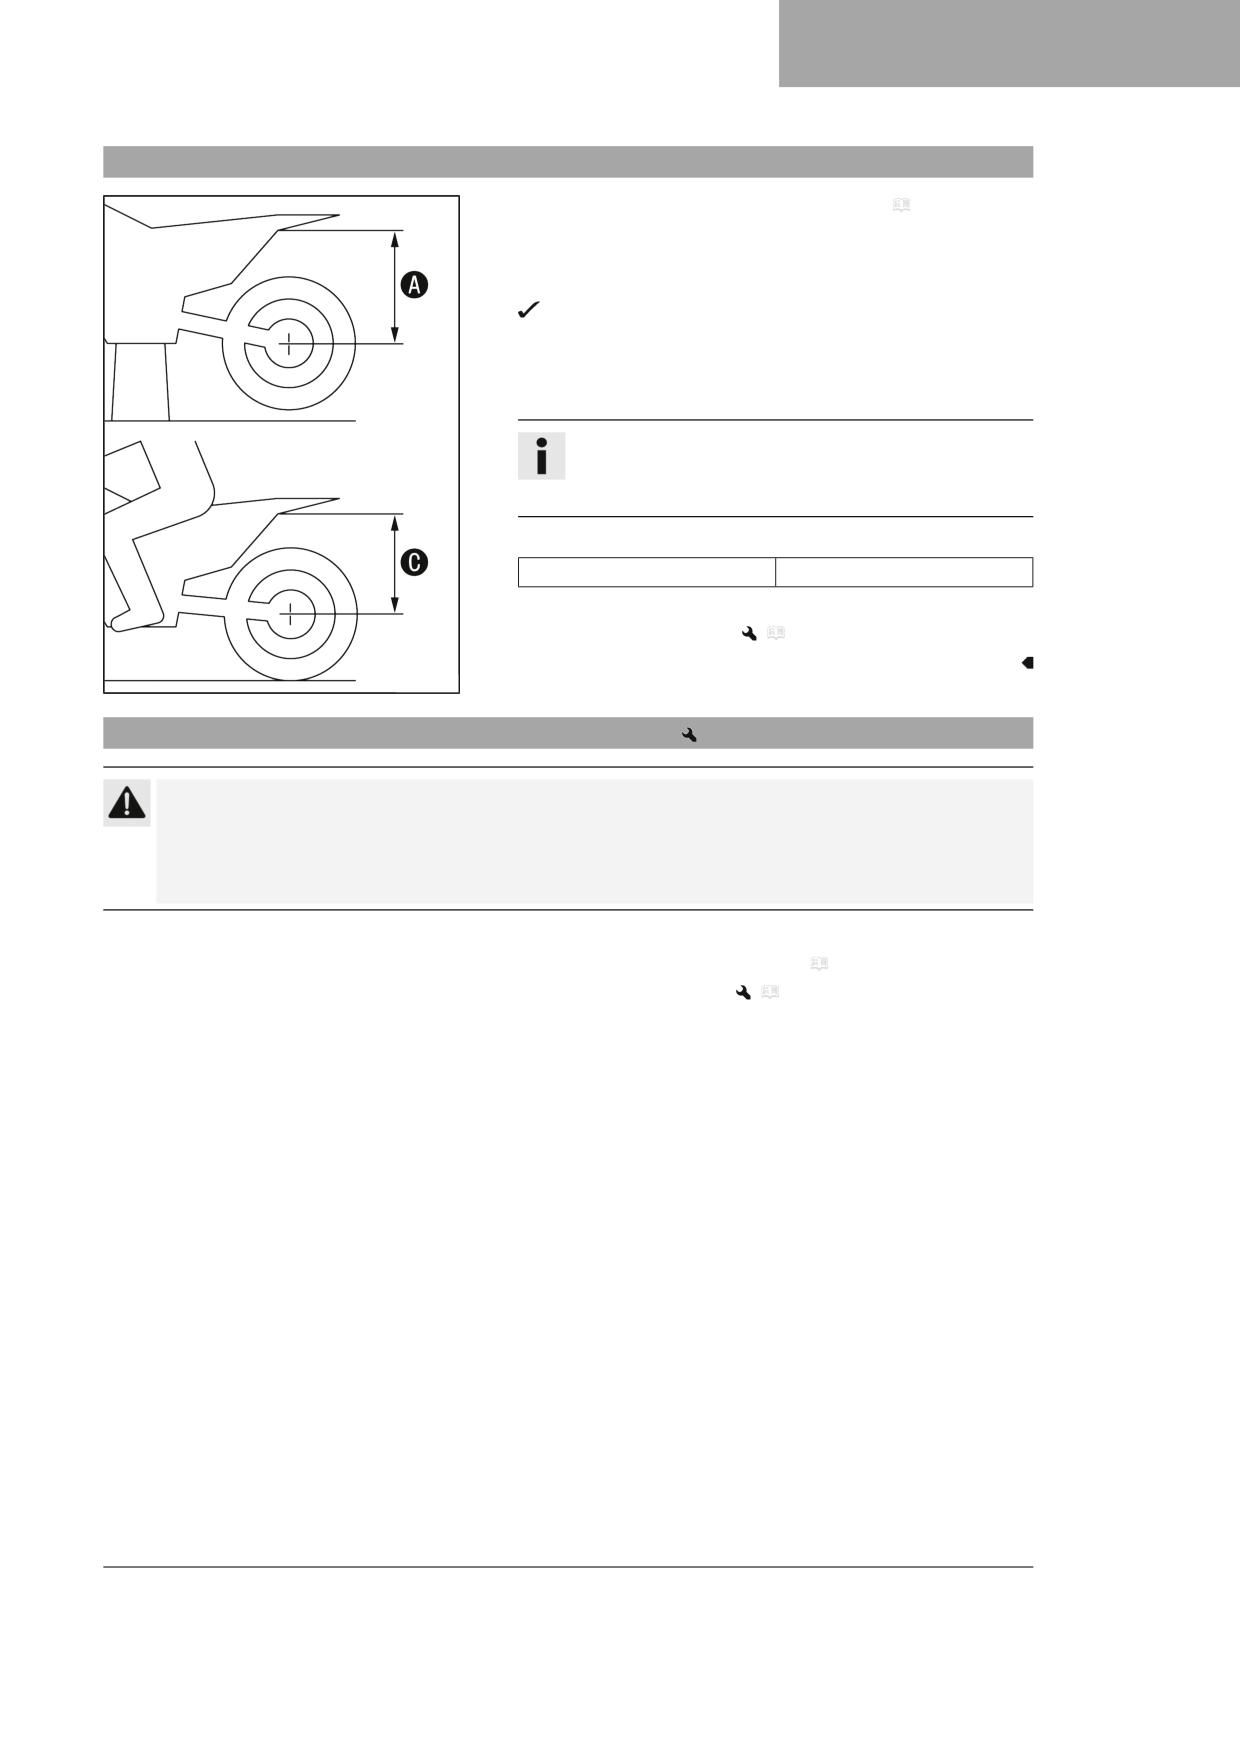
- Measure dimension A of rear wheel unloaded. ( p. 33)
- Hold the motorcycle upright with aid of an assistant.
- Measure the distance between rear axle and fixed point again.
- Note the value as dimension B.
Info
The static sag is the difference between measurements A
and B.
- Check the static sag.
Static sag
30 mm (1.18 in)
» If the static sag is less or more than the specified value:
- Adjust the spring preload of the shock absorber.
(
p. 35)
400989-10
34
TUNING THE CHASSIS
10
10.9
Checking the riding sag of the shock absorber
- Measure dimension A of rear wheel unloaded. ( p. 33)
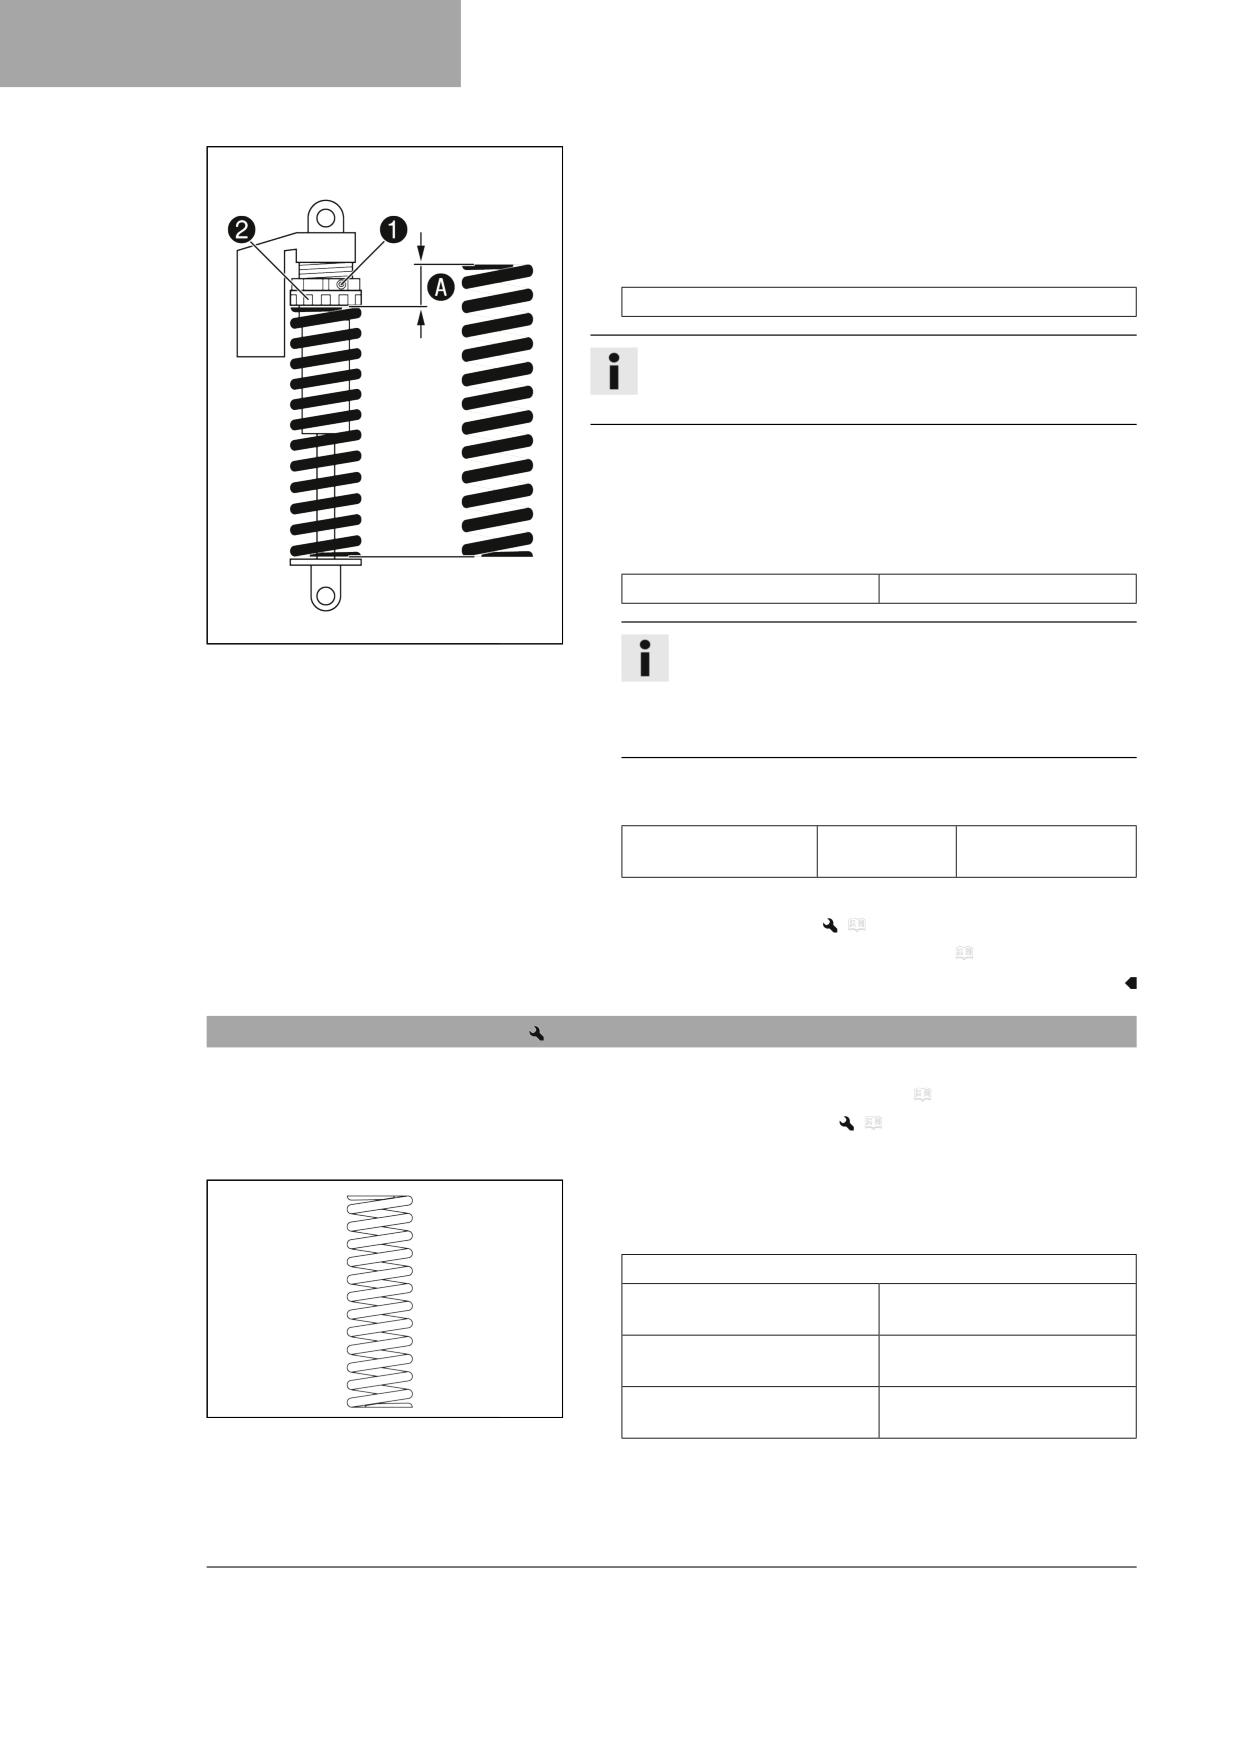
- With another person holding the motorcycle, the rider, wearing full
protective clothing, sits on the seat in a normal sitting position (feet
on footrests) and bounces up and down a few times.
The rear wheel suspension levels out.
- Another person now measures the distance between the rear axle
and the fixed point.
- Note the value as dimension C.
Info
The riding sag is the difference between measurements A
and C.
- Check riding sag.
Riding sag
120 mm (4.72 in)
» If the riding sag differs from the specified measurement:
- Adjust the riding sag.
(
p. 36)
400990-10
10.10
Adjusting the spring preload of the shock absorber
Caution
Risk of injury Parts of the shock absorber will move around if the shock absorber is detached incorrectly.
The shock absorber is filled with highly compressed nitrogen.
- Please follow the description provided. (Your authorized GASGAS Motorcycles workshop will be glad to help.)
Preparatory work
- Raise the motorcycle with a lift stand. ( p. 41)
- Remove the shock absorber.
(
p. 51)
– After removing the shock absorber, clean it thoroughly.
35
10
TUNING THE CHASSIS
Main work
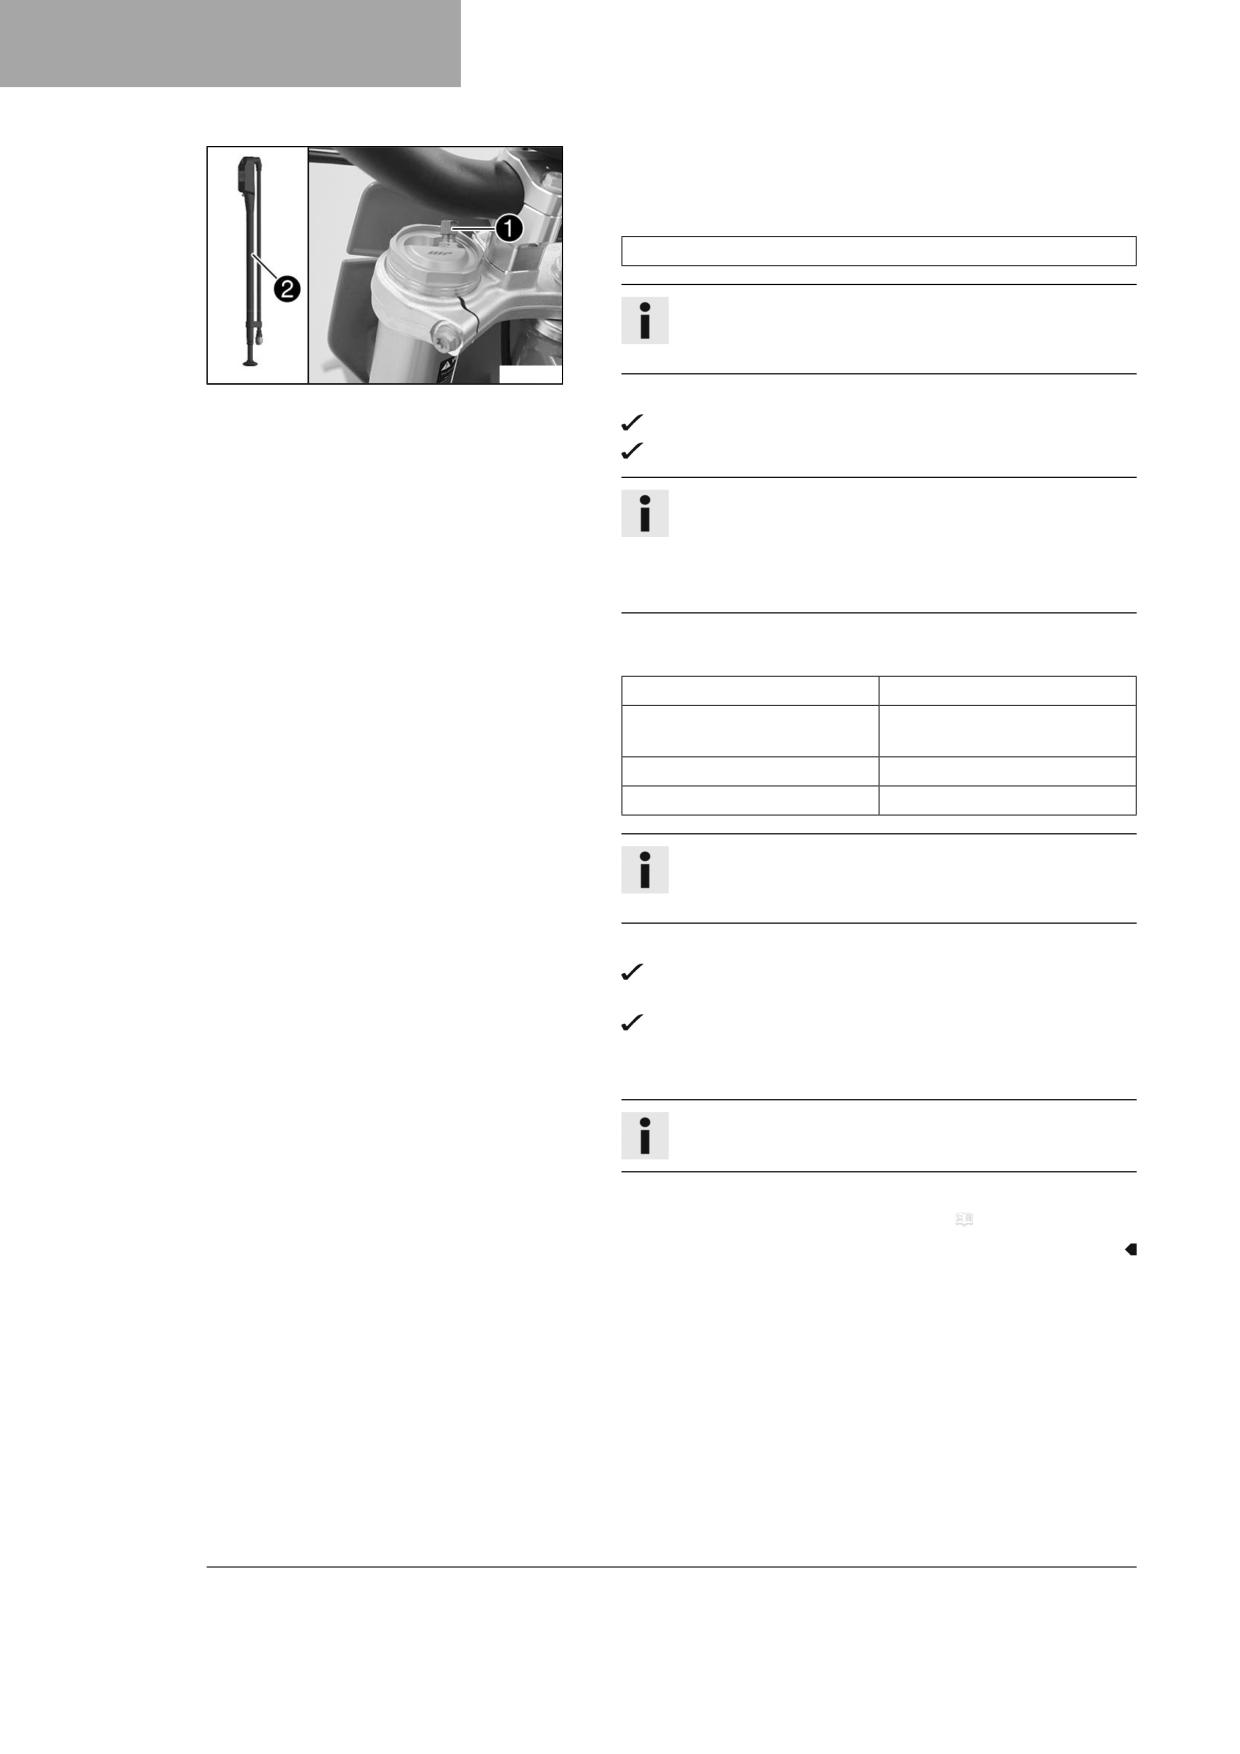
- Measure the full spring length while it is under tension and note
down the value.
- Loosen screw 1.
- Turn adjusting ring 2 until the spring is no longer under tension.
Hook wrench (90129051000)
Info
If the spring cannot be fully released, the spring must be
removed to accurately measure the spring length.
- Measure the total spring length while the spring is not under ten-
sion.
- Tension the spring by turning adjusting ring 2 to specified dimen-
sion A.
Guideline
Spring preload
11 mm (0.43 in)
402659-10
Info
The spring preload is the difference between the relaxed
spring length and the tensioned spring length.
Depending on the static sag and/or the riding sag, it may be
necessary to increase or decrease the spring preload.
- Tighten screw 1.
Guideline
Screw, shock absorber
M5
5 Nm (3.7 lbf ft)
adjusting ring
Finishing work
- Install the shock absorber.
(
p. 52)
– Remove the motorcycle from the lift stand. ( p. 41)
10.11
Adjusting the riding sag
Preparatory work
- Raise the motorcycle with a lift stand. ( p. 41)
- Remove the shock absorber.
(
p. 51)
– After removing the shock absorber, clean it thoroughly.
Main work
- Choose and mount a suitable spring.
Guideline
Spring rate
Weight of rider: < 45 kg
35 N/mm (200 lb/in)
(< 99 lb.)
Weight of rider: 45 … 55 kg
40 N/mm (228 lb/in)
(99 … 121 lb.)
Weight of rider: > 55 kg
45 N/mm (257 lb/in)
B00292-10
(> 121 lb.)
36

TUNING THE CHASSIS
10
Info
The spring rate is shown on the outside of the spring.
Smaller weight differences can be compensated by changing
the spring preload.
Finishing work
- Install the shock absorber.
(
p. 52)
– Remove the motorcycle from the lift stand. ( p. 41)
- Check the static sag of the shock absorber. ( p. 34)
- Check the riding sag of the shock absorber. ( p. 35)
- Adjust the rebound damping of the shock absorber. ( p. 33)
10.12
Checking the basic setting of the fork
Info
For various reasons, no exact riding sag can be determined for the fork.
- Smaller differences in the rider's weight can be compensated for by
the fork air pressure.
- However, if the fork frequently bottoms out (hard end stop on com-
pression), the fork air pressure must be increased, within the speci-
fied values, to avoid damage to the fork and frame.
401000-01
10.13
Adjusting the fork air pressure
Warning
Danger of accidents Modifications to the suspension setting may seriously alter the handling characteristic.
Modifications which are not coordinated with others to the suspension setting may cause a serious deterioration
in the handling characteristic and overload components.
- Only make adjustments within the recommended range.
- Make sure your child rides slowly to start with after making adjustments in order that he or she can assess the
new handling characteristic.
Info
Check or adjust the air pressure under the same conditions at the earliest 5 minutes after switching off the engine.
The air suspension is located in the left fork leg. The rebound damping is located in the right fork leg.
Preparatory work
- Raise the motorcycle with a lift stand. ( p. 41)
37
10
TUNING THE CHASSIS
Main work
- Remove protection cap 1.
- Push together fork airpump 2 fully.
Fork airpump (79412966100)
Info
The fork airpump is included as part of the motorcycle's
accessory pack.
S04324-10
- Connect the fork airpump to the left fork leg.
The fork airpump switches on automatically.
A little air escapes from the fork leg when connecting.
Info
This is due to the volume of the hose and not due to a
defect in the fork airpump or the fork.
Read the accompanying GASGAS Technical Accessories
instructions.
- Adjust the air pressure as specified.
Guideline
Air pressure
5 bar (73 psi)
Gradual changing of the air
0.2 bar (3 psi)
pressure in steps of
Minimum air pressure
4 bar (58 psi)
Maximum air pressure
8 bar (116 psi)
Info
Never adjust the air pressure to a value outside the stated
range.
- Disconnect the fork airpump from the left fork leg.
When disconnecting, excess pressure will escape from the hose
- the fork leg does not lose any air.
The fork pump airpump switches off automatically after 80 sec-
onds.
- Mount the protection cap.
Info
Only mount the protection cap by hand.
Finishing work
- Remove the motorcycle from the lift stand. ( p. 41)
38
TUNING THE CHASSIS
10
10.14
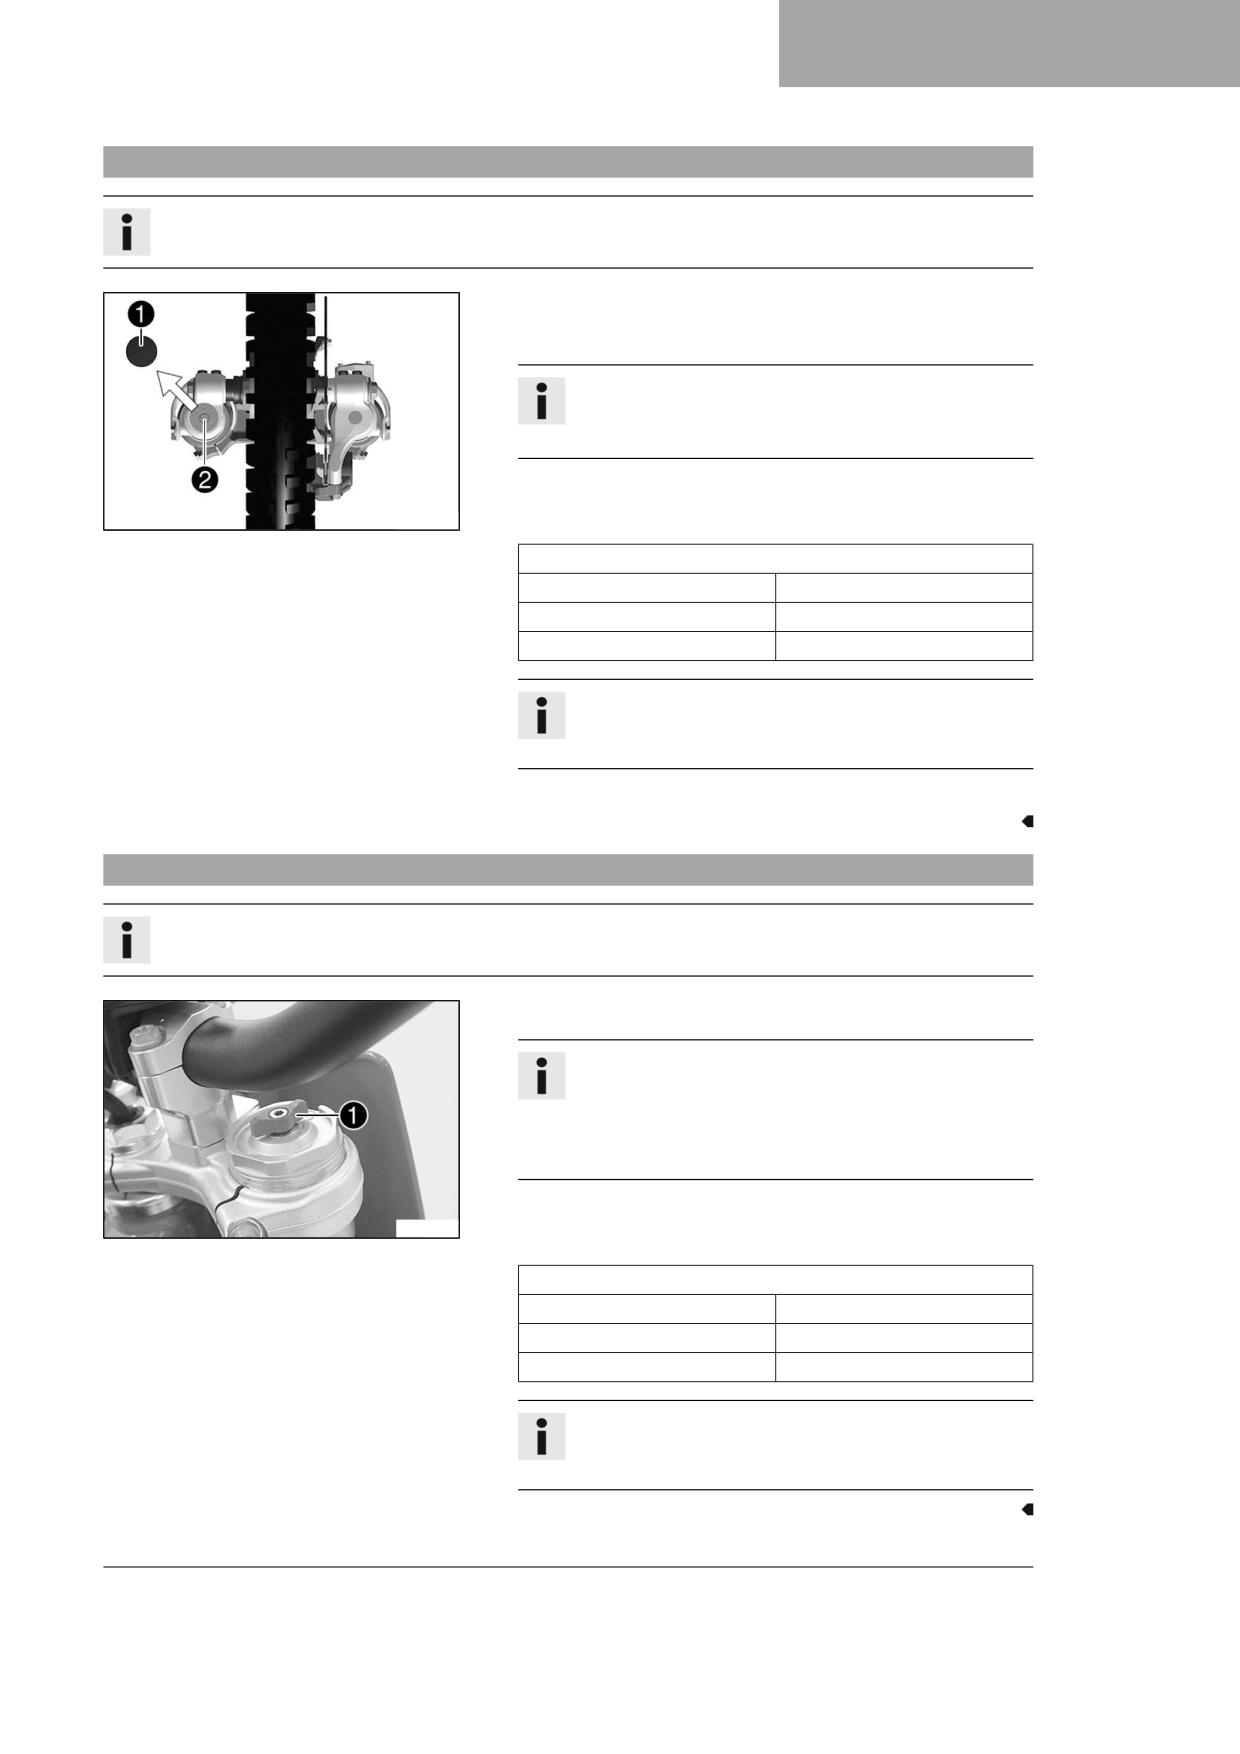
Adjusting the compression damping of the fork
Info
The hydraulic compression damping determines the fork suspension behavior.
- Take off protection cap 1.
- Turn adjusting screw 2 clockwise all the way.
Info
The adjusting screw 2 is located at the lower end of the
right fork leg.
- Turn counterclockwise by the number of clicks corresponding to the
fork type.
V00823-10
Guideline
Compression damping
Comfort
17 clicks
Standard
12 clicks
Sport
7 clicks
Info
Turn clockwise to increase damping; turn counterclockwise
to reduce damping during compression.
- Mount protection cap 1.
10.15
Adjusting the rebound damping of the fork
Info
The hydraulic rebound damping determines the fork suspension behavior.
- Turn red adjusting screw 1 clockwise as far as it will go.
Info
Adjusting screw 1 is located at the upper end of the right
fork leg.
The rebound damping is located in right fork leg REB (red
adjusting screw).
- Turn counterclockwise by the number of clicks corresponding to the
S04325-10
fork type.
Guideline
Rebound damping
Comfort
17 clicks
Standard
12 clicks
Sport
7 clicks
Info
Turn clockwise to increase the damping; turn counterclock-
wise to reduce damping when the shock absorber rebounds.
39
10
TUNING THE CHASSIS
10.16
Handlebar position
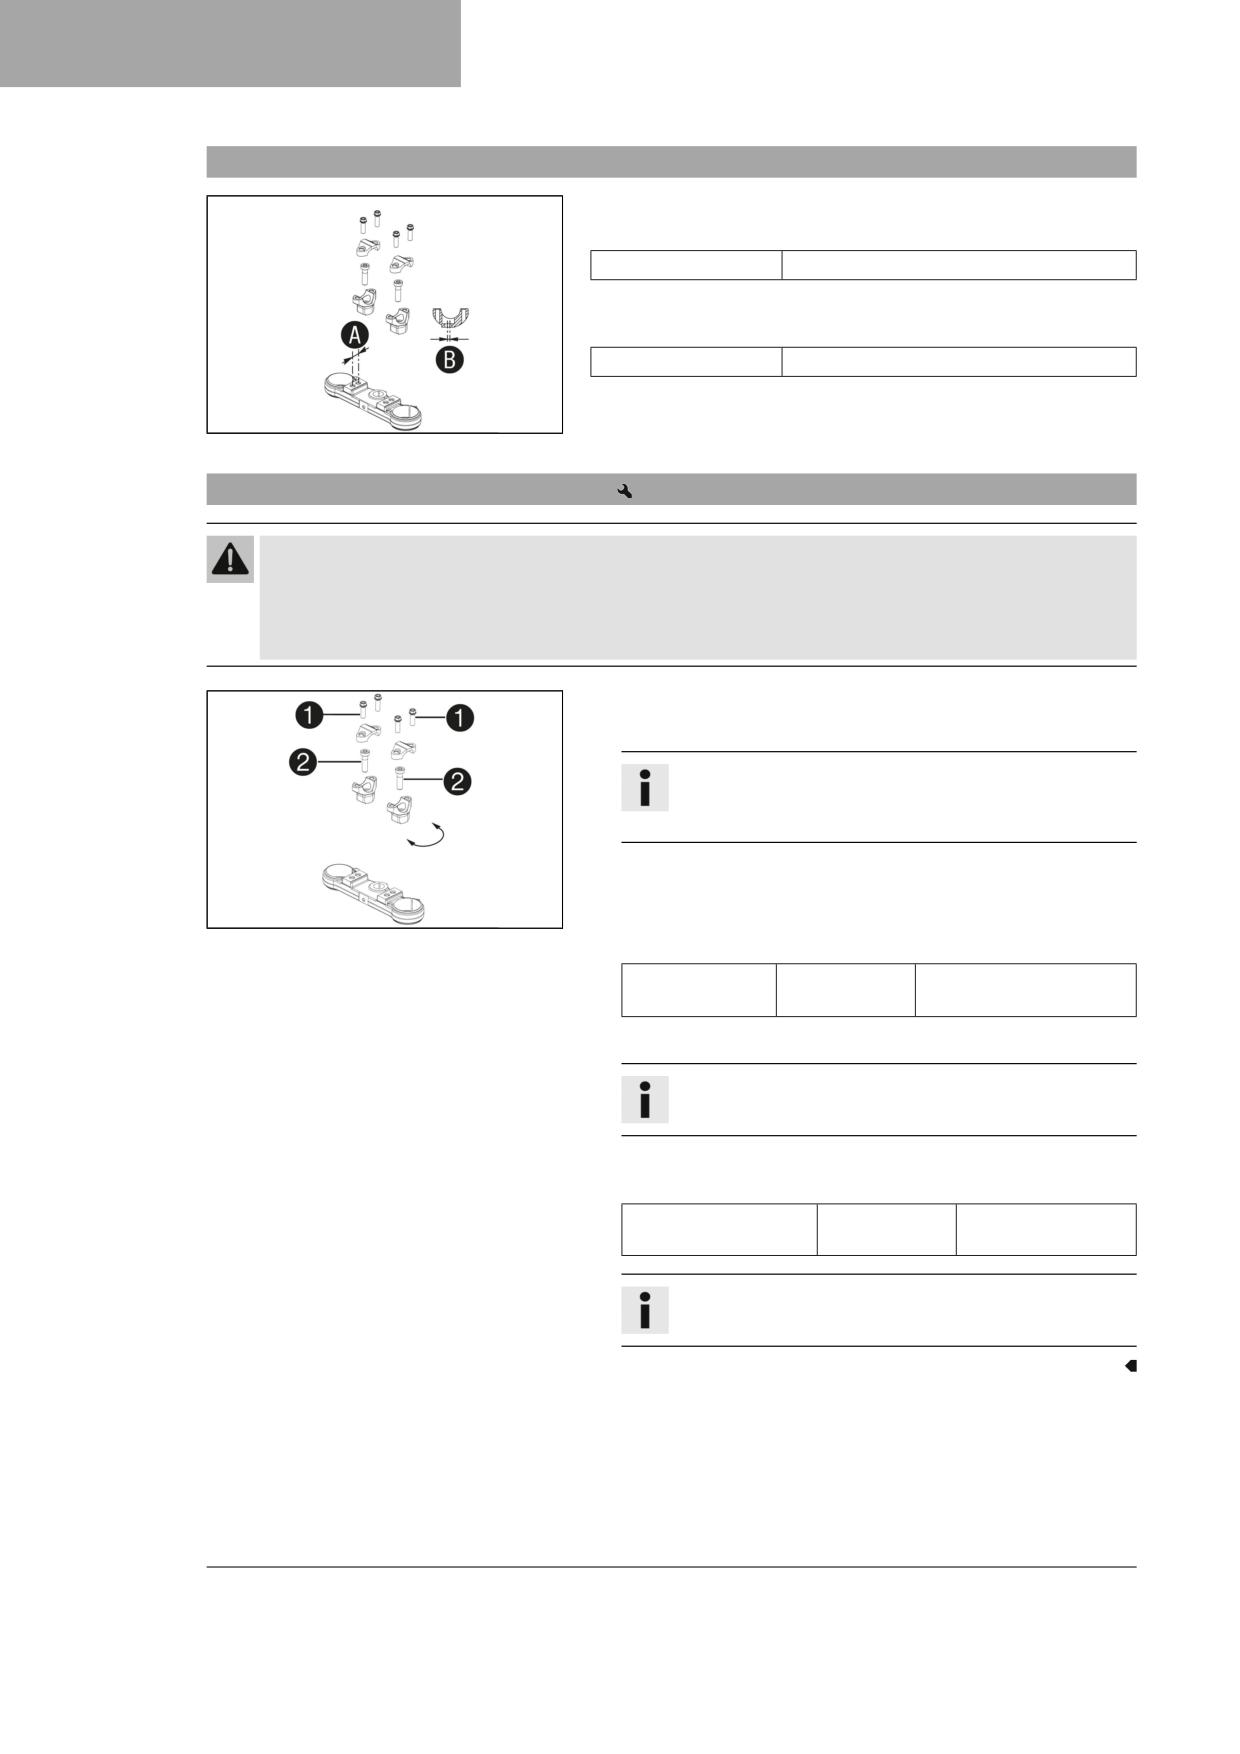
On the upper triple clamp, there are 2 holes at a distance of A to each
other.
Hole distance A
15 mm (0.59 in)
The holes on the handlebar supports are placed at a distance of B
from the center.
Hole distance B
3.5 mm (0.138 in)
The handlebar supports can be mounted in four different positions. This
C00248-10
allows the handlebar to be mounted in the most comfortable position
for the rider.
10.17
Adjusting the handlebar position
Warning
Danger of accidents A repaired handlebar poses a safety risk.
If the handlebar is bent or straightened, the material becomes fatigued. The handlebar may break as a result.
- Change the handlebar if the handlebar is damaged or bent.
- Remove screws 1. Take off the handlebar clamps. Remove the
handlebar and lay it to one side.
Info
Cover the components to protect them against damage.
Do not kink the cables and lines.
- Remove screws 2. Take off the handlebar support.
- Place the handlebar support in the required position. Mount and
C00249-10
tighten screws 2.
Guideline
Screw, handlebar
M10
40 Nm (29.5 lbf ft)
support
Loctite®243™
– Position handlebar.
Info
Make sure the cables and wiring are positioned correctly.
- Position handlebar clamps. Mount screws 1 and tighten evenly.
Guideline
Screw, handlebar
M8
20 Nm (14.8 lbf ft)
clamp
Info
Make sure the gap widths are even.
40
SERVICE WORK ON THE CHASSIS
11
11.1
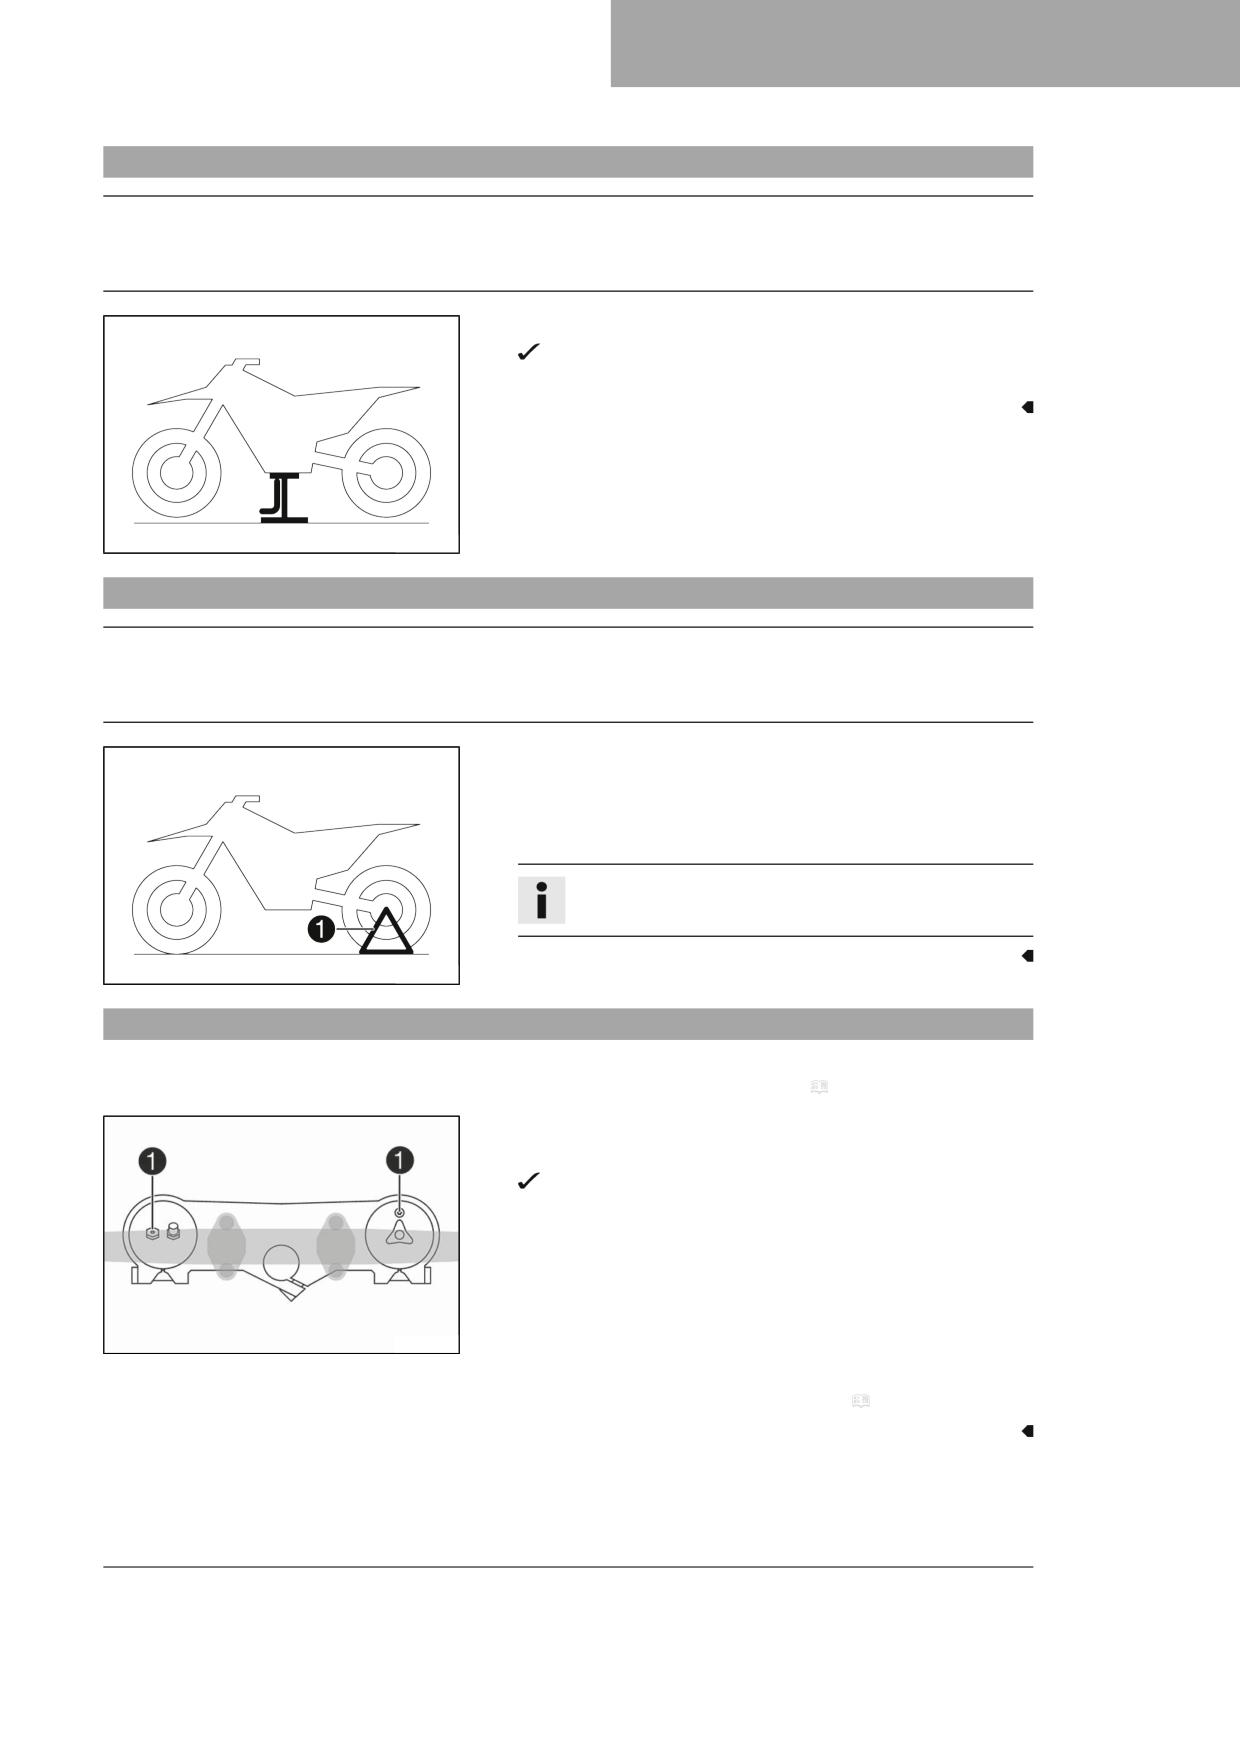
Raising the motorcycle with a lift stand
Note
Danger of damage The parked vehicle can roll away or fall over.
- Park the vehicle on a firm and level surface.
- Raise the motorcycle at the frame underneath the engine.
Neither wheel is in contact with the ground.
- Secure the motorcycle against falling over.
401942-01
11.2
Removing the motorcycle from the lift stand
Note
Danger of damage The parked vehicle can roll away or fall over.
- Park the vehicle on a firm and level surface.
- Remove the motorcycle from the lift stand.
- Remove the lift stand.
- To park the motorcycle, insert plug-in stand 1 into the left side of
the wheel spindle.
Info
Remove the plug-in stand before riding.
402001-10
11.3
Bleeding the fork legs
Preparatory work
- Raise the motorcycle with a lift stand. ( p. 41)
Main work
- Release bleeder screws 1.
Any excess pressure escapes from the interior of the fork.
- Tighten the bleeder screws.
H02311-10
Finishing work
- Remove the motorcycle from the lift stand. ( p. 41)
41
11
SERVICE WORK ON THE CHASSIS
11.4
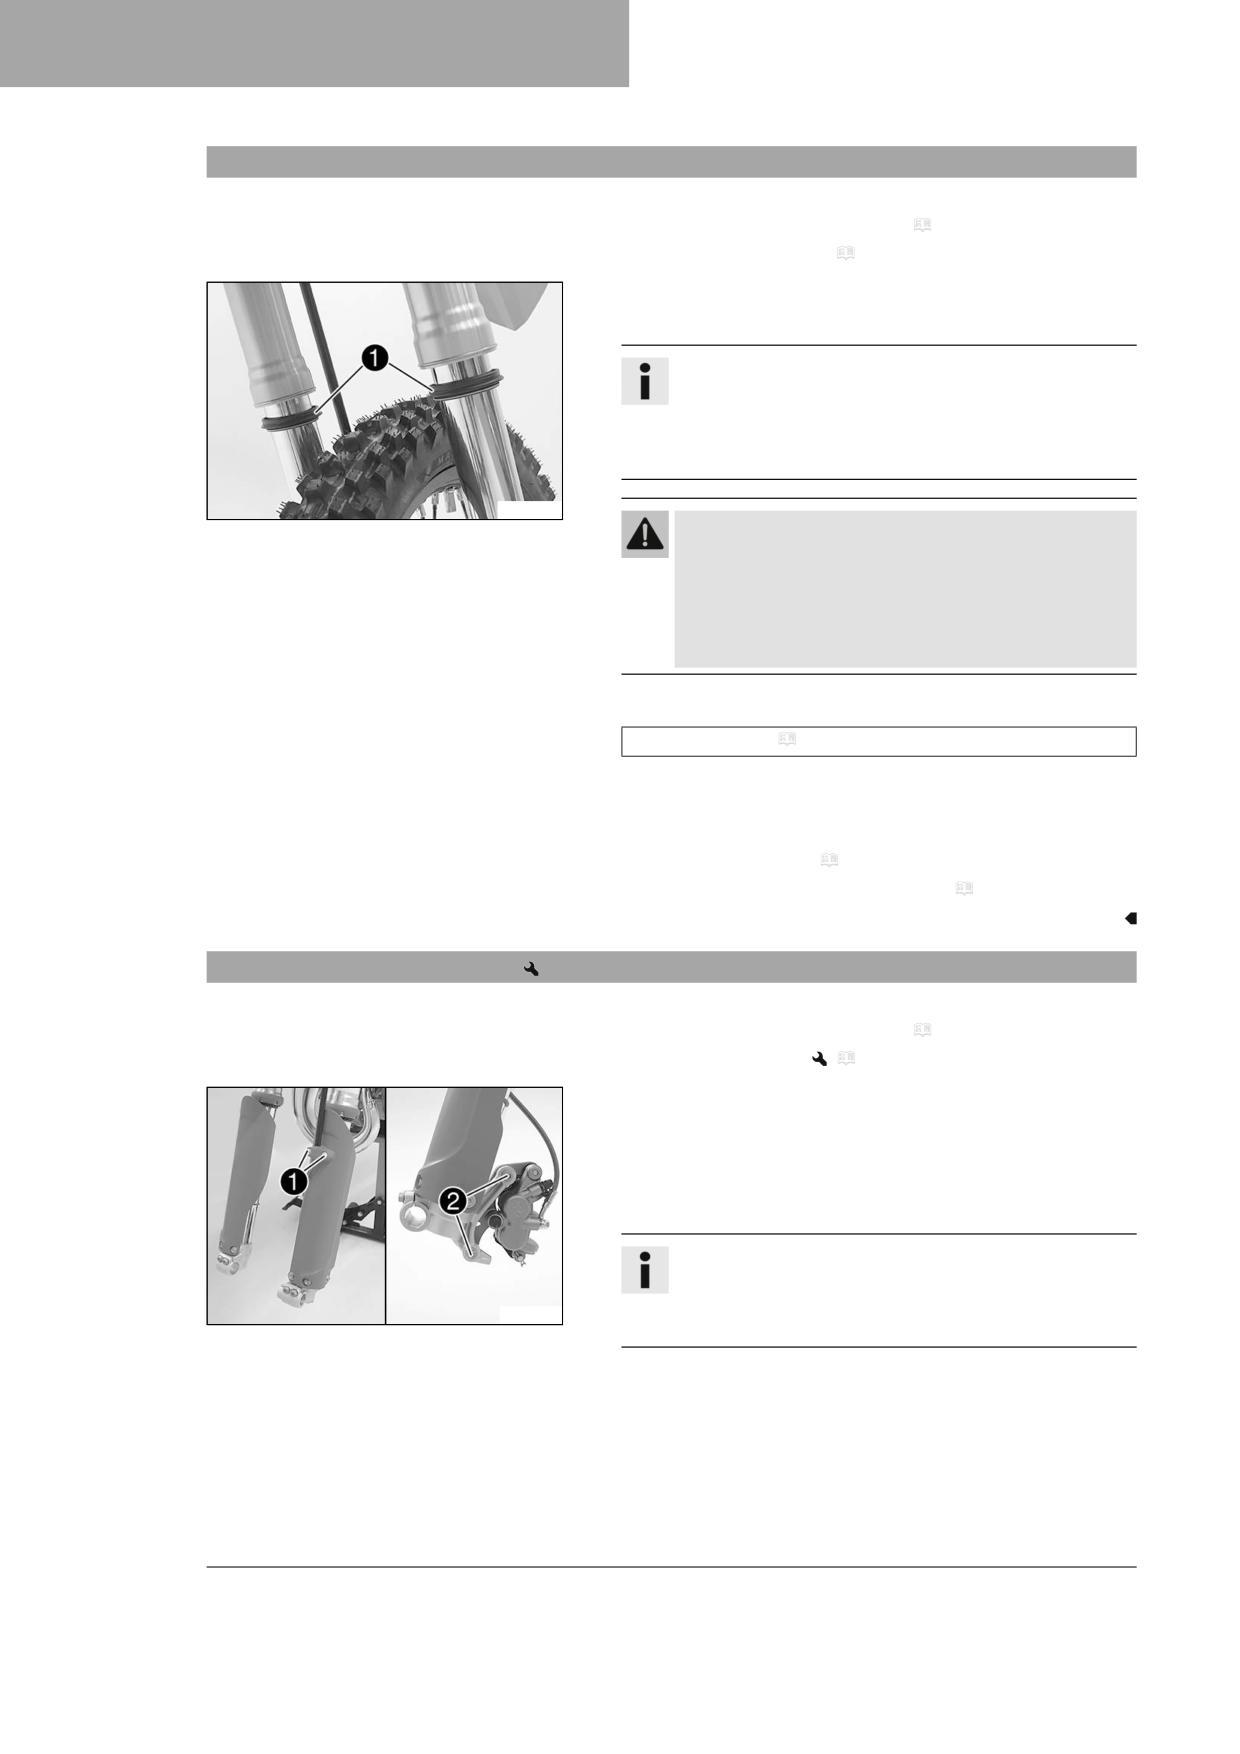
Cleaning the dust boots of the fork legs
Preparatory work
- Raise the motorcycle with a lift stand. ( p. 41)
- Remove the fork protector. ( p. 44)
Main work
- Push dust boots 1 of both fork legs downward.
Info
The dust boots remove dust and coarse dirt particles from
the inside fork tubes. Over time, dirt can accumulate behind
the dust boots. If this dirt is not removed, the oil seals
behind can start to leak.
H01353-10
Warning
Danger of accidents Oil or grease on the brake discs
reduces the braking effect.
- Always keep the brake discs free of oil and grease.
- Clean the brake discs with brake cleaner when neces-
sary.
- Clean and oil the dust boots and inner fork tubes of both fork legs.
Universal oil spray ( p. 119)
- Press the dust boots back into their installation position.
- Remove excess oil.
Finishing work
- Install the fork protector. ( p. 44)
- Remove the motorcycle from the lift stand. ( p. 41)
11.5
Removing the fork legs
Preparatory work
- Raise the motorcycle with a lift stand. ( p. 41)
- Remove the front wheel.
(
p. 79)
Main work
- Remove screws 1 and take off the clamp.
- Remove screws 2.
- Allow the brake caliper and the brake line to hang loosely to the
side.
Info
Do not kink the brake line.
Do not operate the hand brake lever if the brake caliper has
S04326-10
been removed.
42
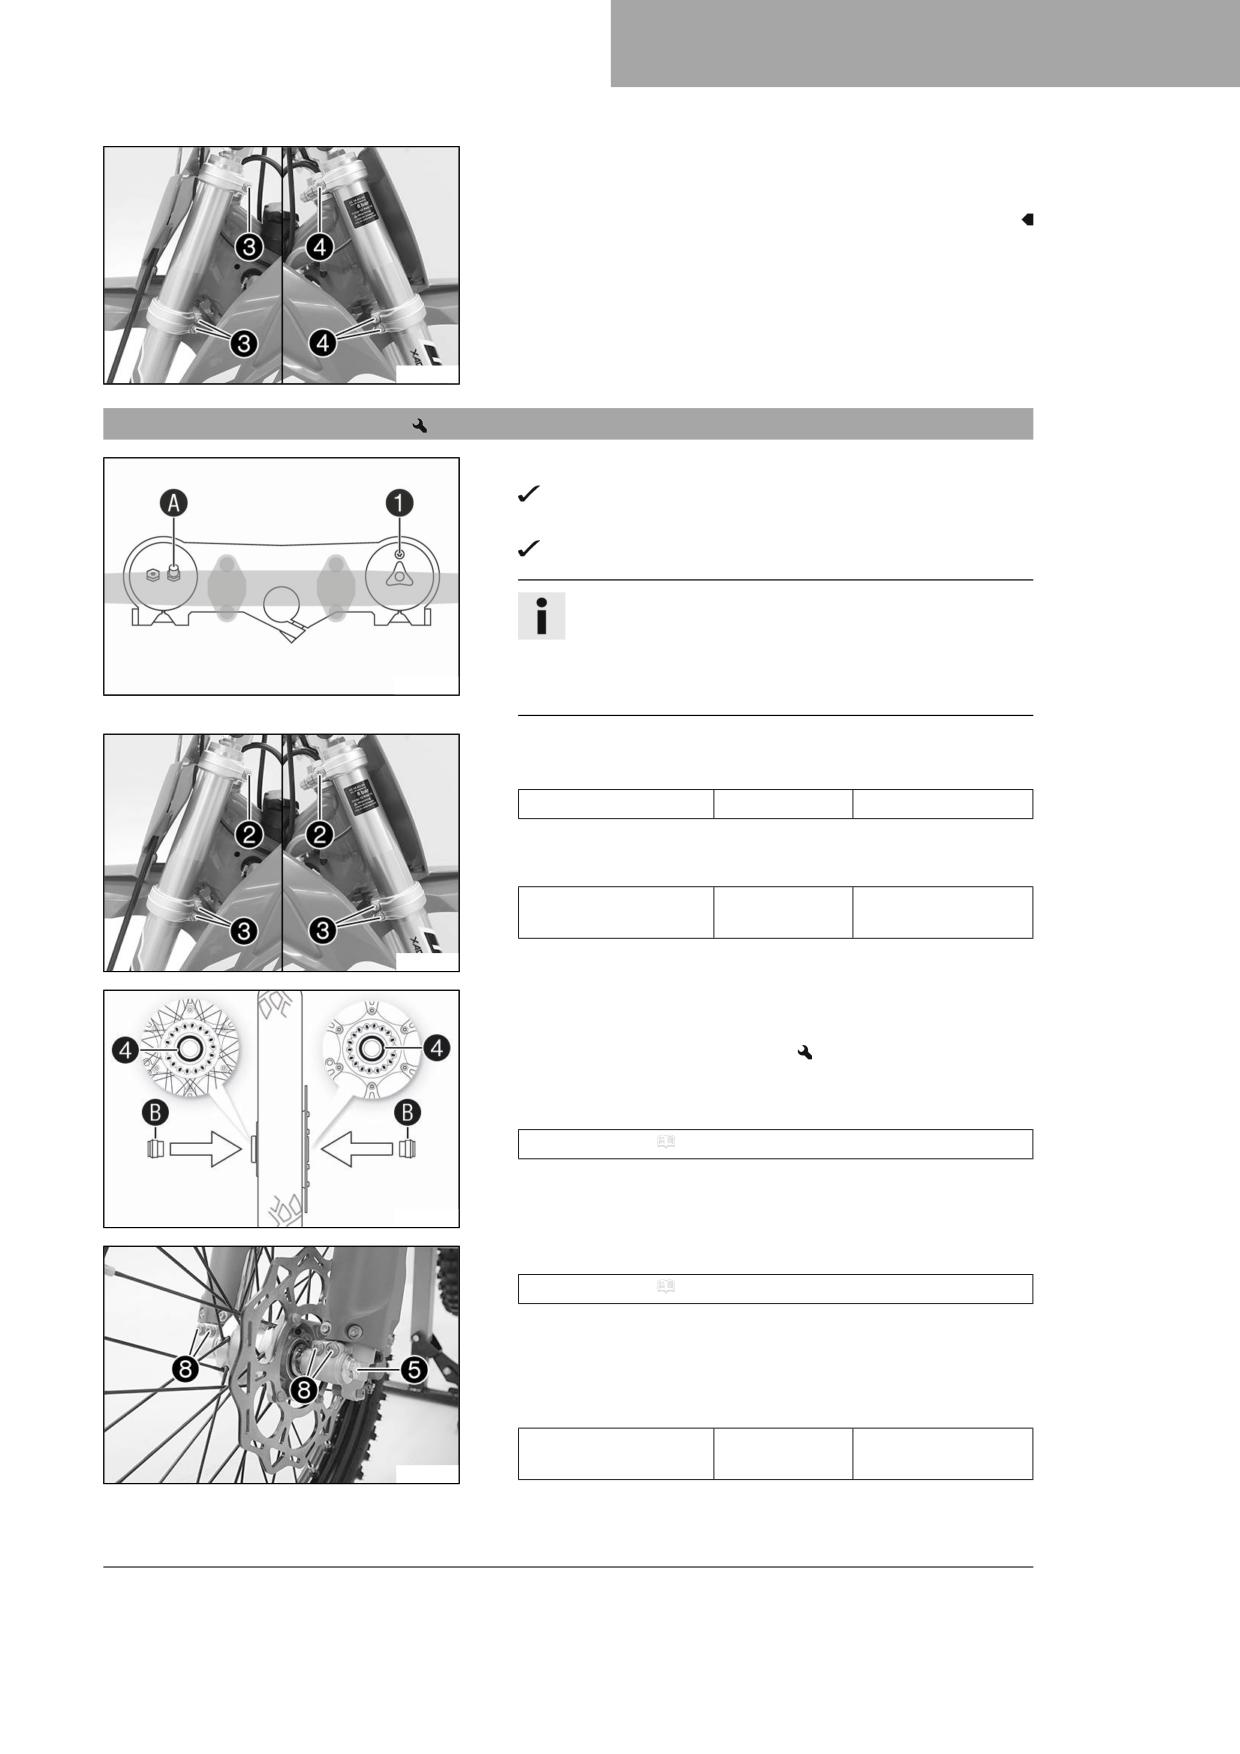
SERVICE WORK ON THE CHASSIS
11
– Loosen screws 3. Remove the left fork leg.
- Loosen screws 4. Remove the right fork leg.
S04327-10
11.6
Installing the fork legs
-
Position the fork legs.
Air bleeder screw 1 of the right fork leg is positioned to the
front.
Valve A of the left fork leg faces the front.
Info
The second milled groove (from the top) must be flush with
the upper edge of the upper triple clamp.
The air suspension is located in the left fork leg. The pres-
H02312-11
sure and rebound damping is located in the right fork leg.
-
Tighten screws 2.
Guideline
Screw, top triple clamp
M8
17 Nm (12.5 lbf ft)
–
Tighten screws 3.
Guideline
Screw, bottom triple
M8
15 Nm (11.1 lbf ft)
clamp
S04327-11
-
Check the wheel bearing for damage and wear.
» If the wheel bearing is damaged or worn:
- Change front wheel bearing.
-
Clean and grease shaft seal rings 4 and contact surfaces B of the
spacers.
Long-life grease ( p. 118)
-
Insert the spacers.
H00935-15
-
Clean and grease the wheel spindle.
Long-life grease ( p. 118)
-
Position the front wheel.
–
Insert the wheel spindle.
–
Mount and tighten screw 5.
Guideline
Screw, front wheel
M20x1.5
35 Nm (25.8 lbf ft)
spindle
S04328-10
43
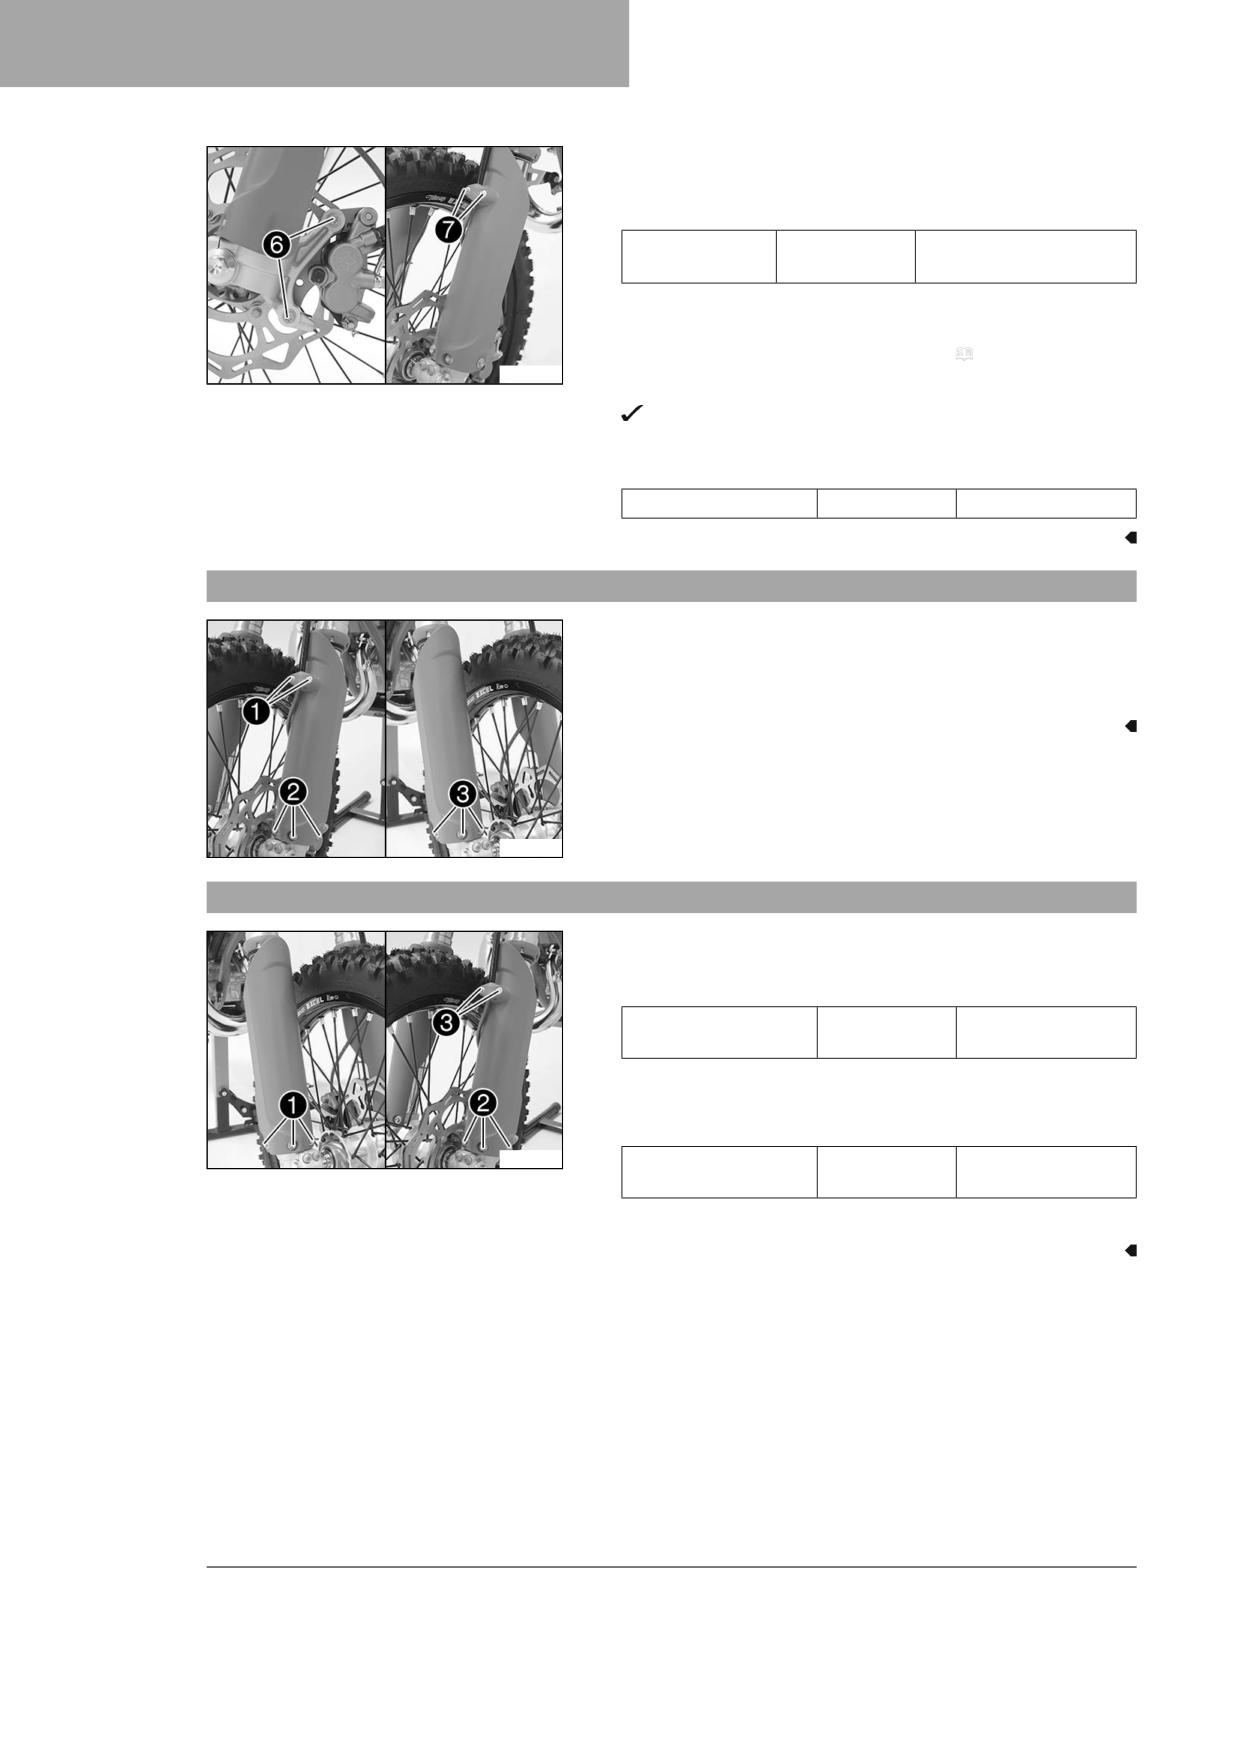
11
SERVICE WORK ON THE CHASSIS
- Position the brake caliper.
- Mount and tighten screws 6.
Guideline
Screw, front
M8
25 Nm (18.4 lbf ft)
brake caliper
Loctite®243™
– Position the brake line and the clamp. Mount and tighten
screws 7.
- Remove the motorcycle from the lift stand. ( p. 41)
S04329-10
- Operate the front brake and compress the fork a few times firmly.
The fork legs straighten.
- Tighten screws 8.
Guideline
Screw, fork stub
M8
15 Nm (11.1 lbf ft)
11.7
Removing the fork protector
- Remove screws 1 and take off the clamp.
- Remove screws 2 on the left fork leg. Take off the fork protector.
- Remove screws 3 on the right fork leg. Take off the fork protector.
S04330-10
11.8
Installing the fork protector
- Position the fork protector on the right fork leg. Mount and tighten
screws 1.
Guideline
Remaining screws,
M6
10 Nm (7.4 lbf ft)
chassis
- Position the fork protector on the left fork leg. Mount and tighten
screws 2.
Guideline
S04331-10
Remaining screws,
M6
10 Nm (7.4 lbf ft)
chassis
- Position the brake line and clamp. Mount and tighten screws 3.
44
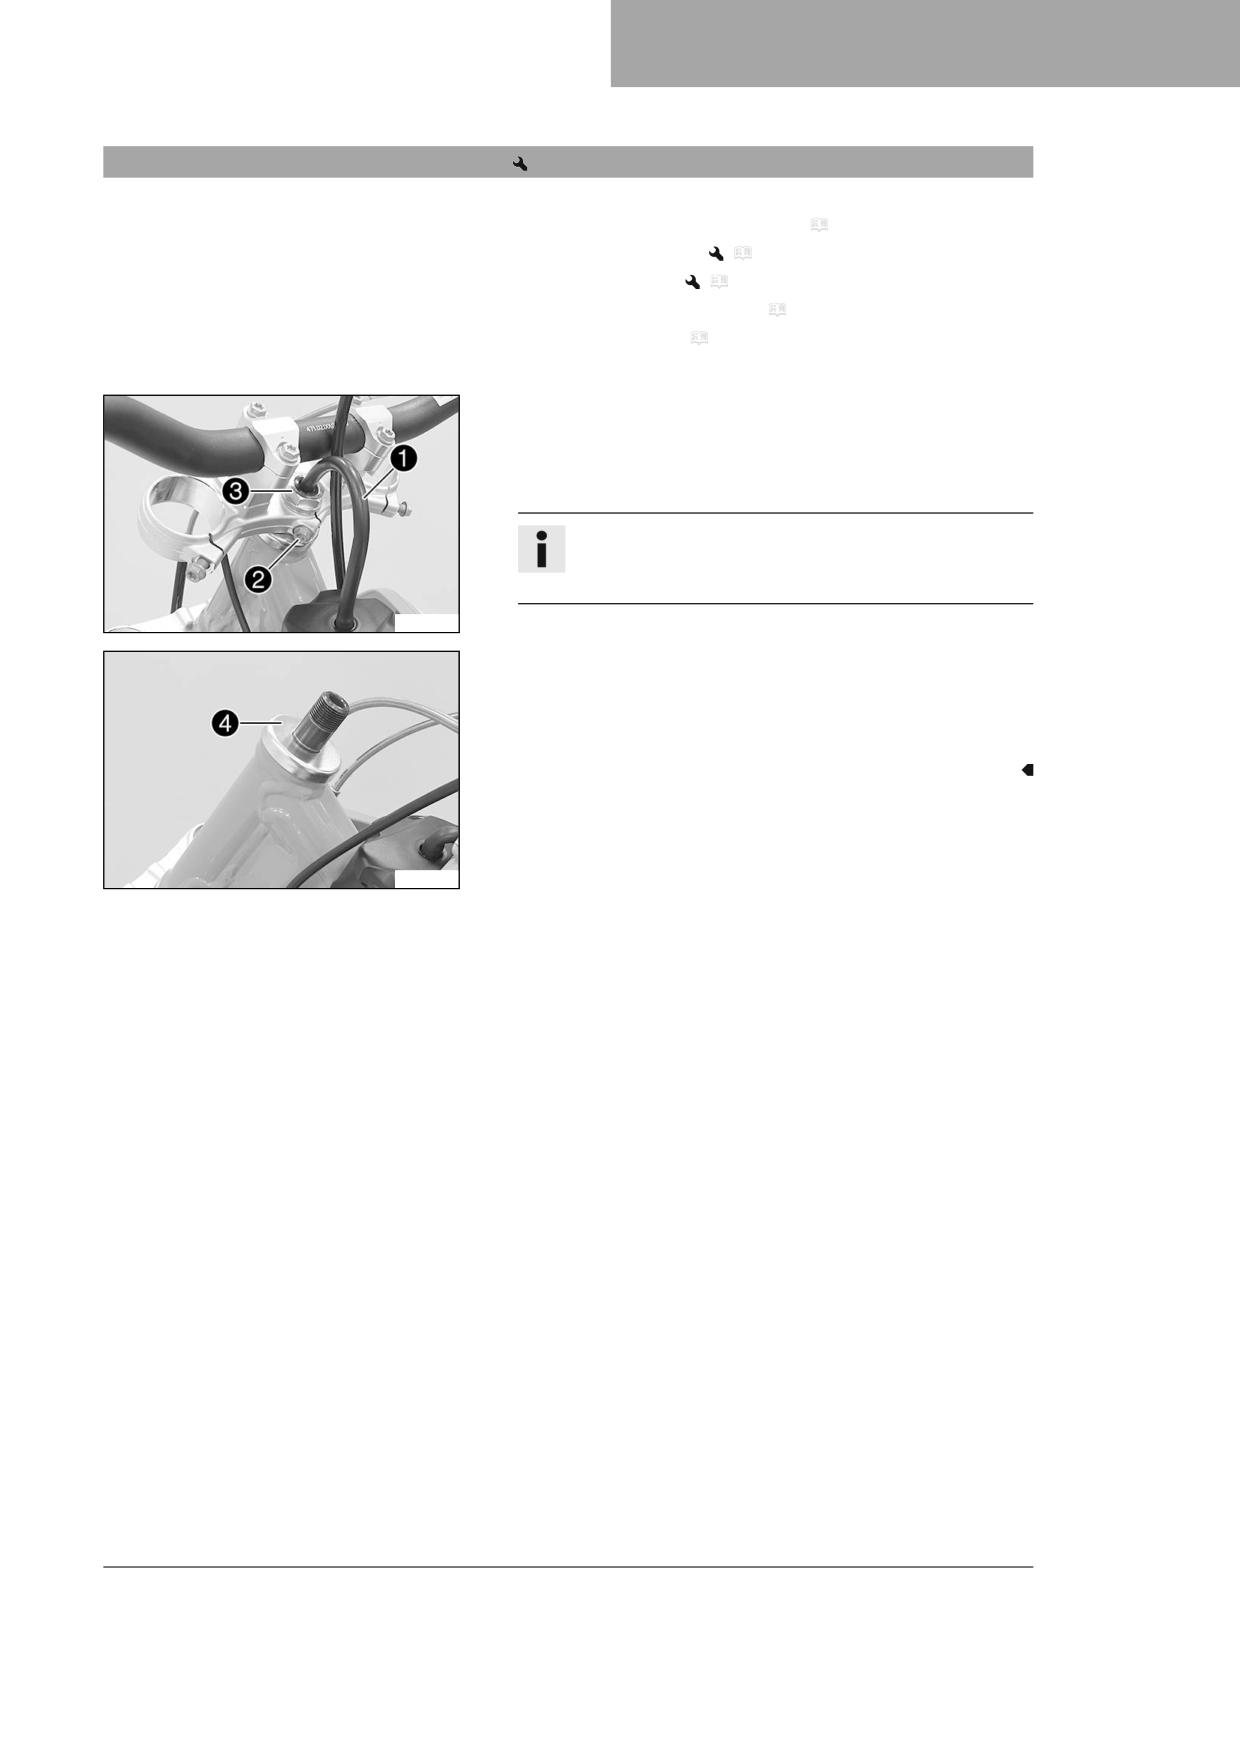
SERVICE WORK ON THE CHASSIS
11
11.9
Removing the lower triple clamp
Preparatory work
- Raise the motorcycle with a lift stand. ( p. 41)
- Remove the front wheel.
(
p. 79)
– Remove the fork legs.
(
p. 42)
– Remove the start number plate. ( p. 50)
- Remove front fender. ( p. 51)
- Remove the handlebar cushion.
Main work
- Pull fuel tank breather 1 out of the steering stem.
- Loosen screw 2. Remove nut 3, pull off the upper triple clamp
with the handlebar in an upward direction, and hang it to the side.
Info
Cover the components to protect them against damage.
Do not kink the cables and lines.
V00874-10
- Remove protective ring 4.
- Take off the lower triple clamp with the steering stem in a down-
ward direction.
- Remove the upper steering head bearing.
V00875-10
45
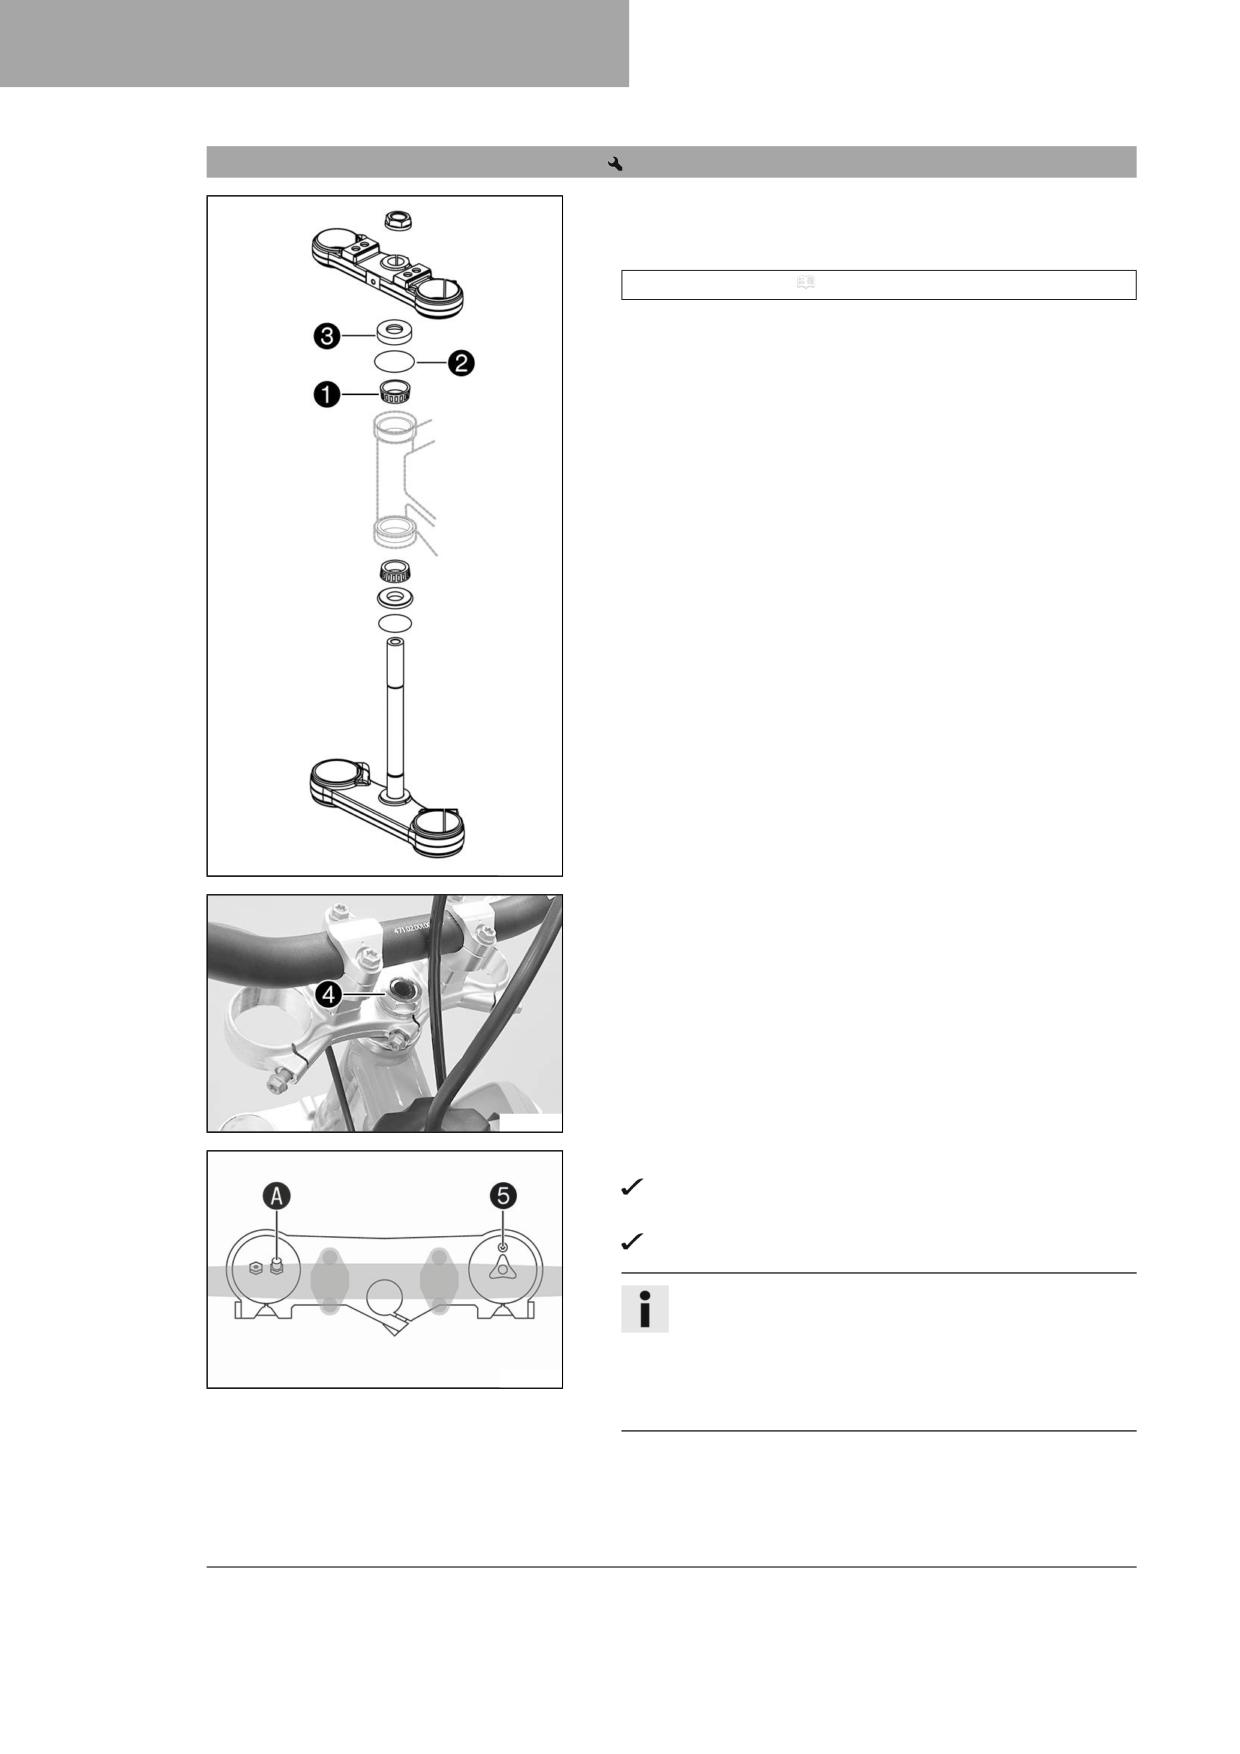
11
SERVICE WORK ON THE CHASSIS
11.10
Installing the lower triple clamp
Main work
- Clean the bearing and sealing elements, check for damage, and
grease.
High viscosity grease ( p. 118)
- Insert the lower triple clamp with the steering stem. Mount upper
steering head bearing 1.
- Slide on O-ring 2.
- Position protective ring 3.
V00489-10
- Position the upper triple clamp with the handlebar.
- Mount nut 4, but do not tighten yet.
S03451-10
- Position the fork legs.
Air bleeder screw 5 of the right fork leg is positioned to the
front.
Valve A of the left fork leg faces the front.
Info
The second milled groove (from the top) must be flush with
the upper edge of the upper triple clamp.
The air suspension is located in the left fork leg. The
S03452-10
rebound and compression damping is located in the right
fork leg.
46
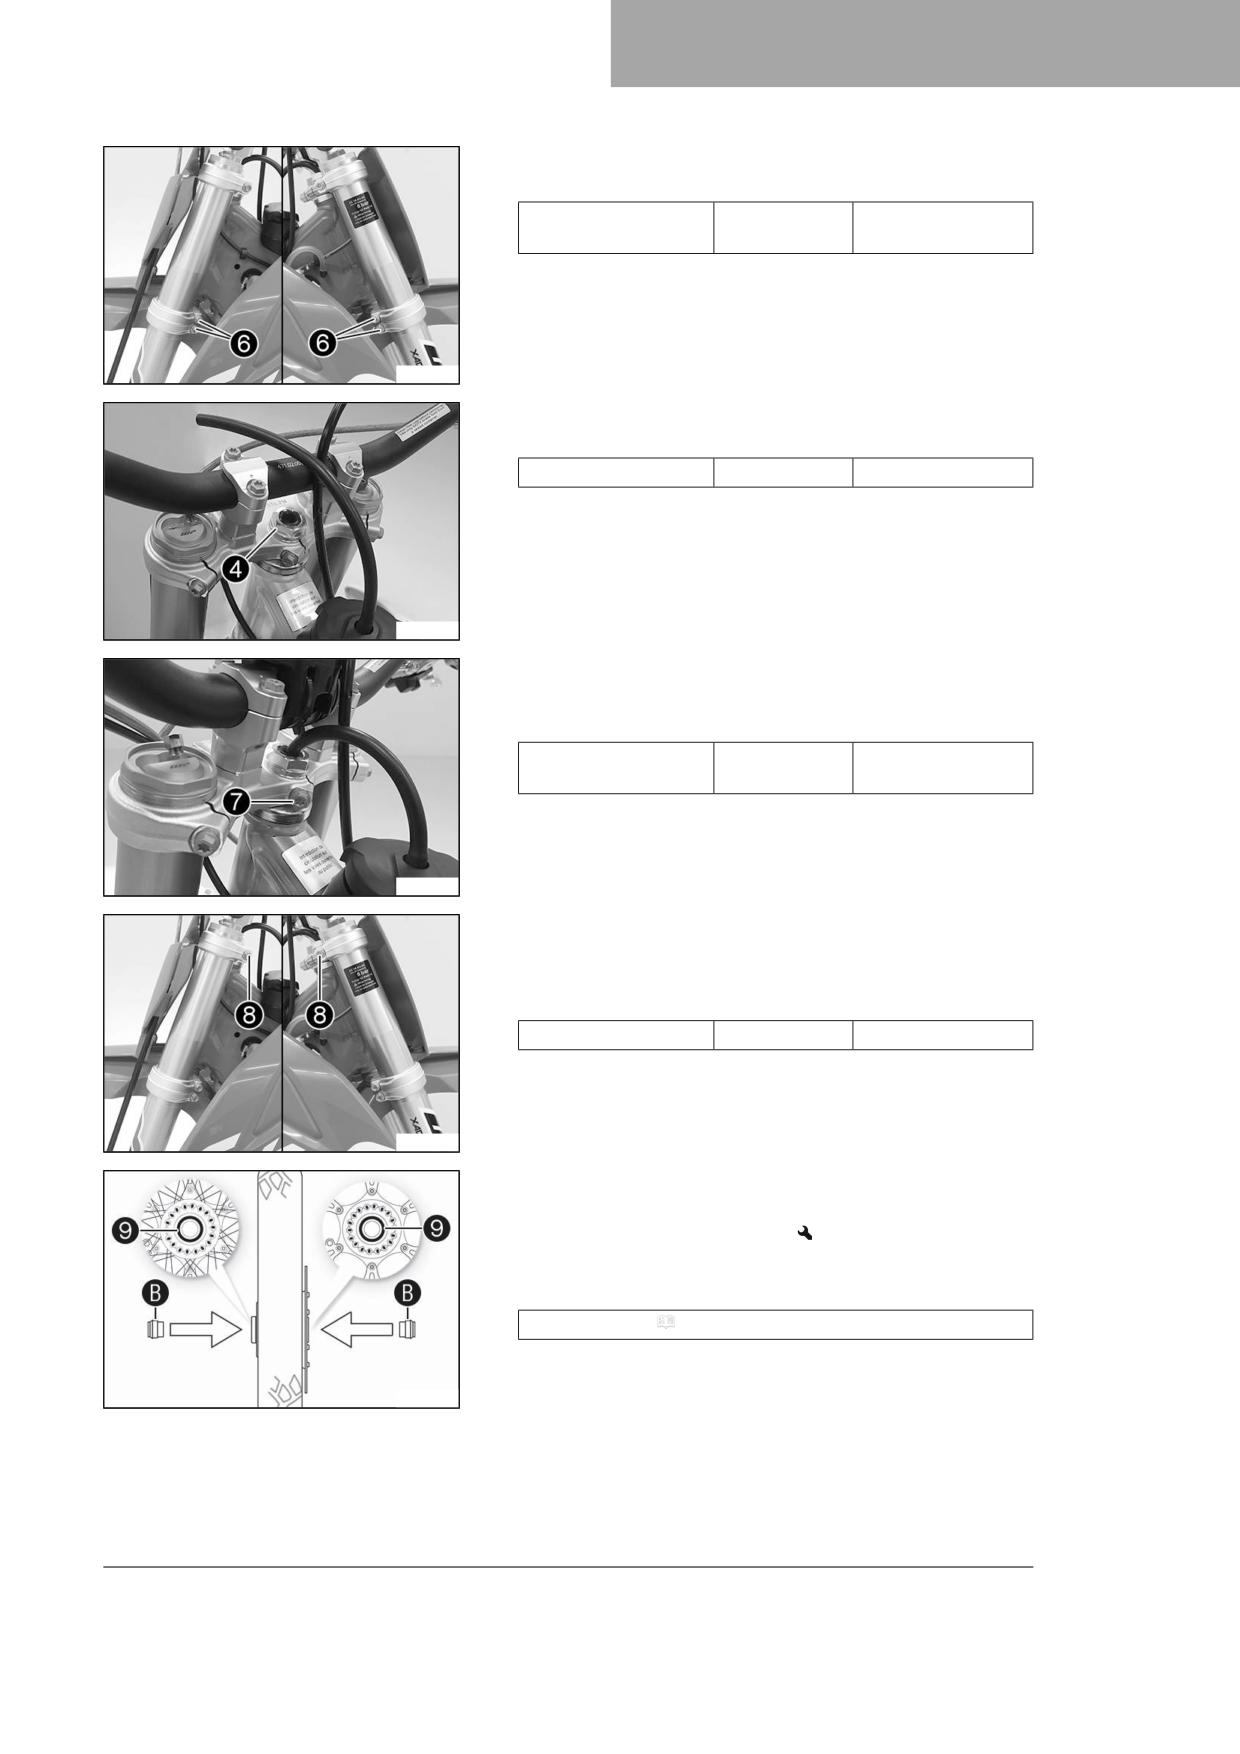
SERVICE WORK ON THE CHASSIS
11
– Tighten screws 6.
Guideline
Screw, bottom triple
M8
15 Nm (11.1 lbf ft)
clamp
S04327-12
- Tighten nut 4.
Guideline
Nut, steering stem
M20x1.5
10 Nm (7.4 lbf ft)
S03419-10
- Position the fuel tank breather in the steering stem.
- Tighten screw 7.
Guideline
Steering stem clamp
M8
20 Nm (14.8 lbf ft)
screw
S03416-11
- Using a plastic hammer, tap lightly on the upper triple clamp to
avoid stresses.
- Tighten screws 8.
Guideline
Screw, top triple clamp
M8
17 Nm (12.5 lbf ft)
S04327-13
- Check the wheel bearing for damage and wear.
» If the wheel bearing is damaged or worn:
- Change front wheel bearing.
- Clean and grease shaft seal rings 9 and contact surfaces B of the
spacers.
Long-life grease ( p. 118)
- Insert the spacers.
S03455-10
47
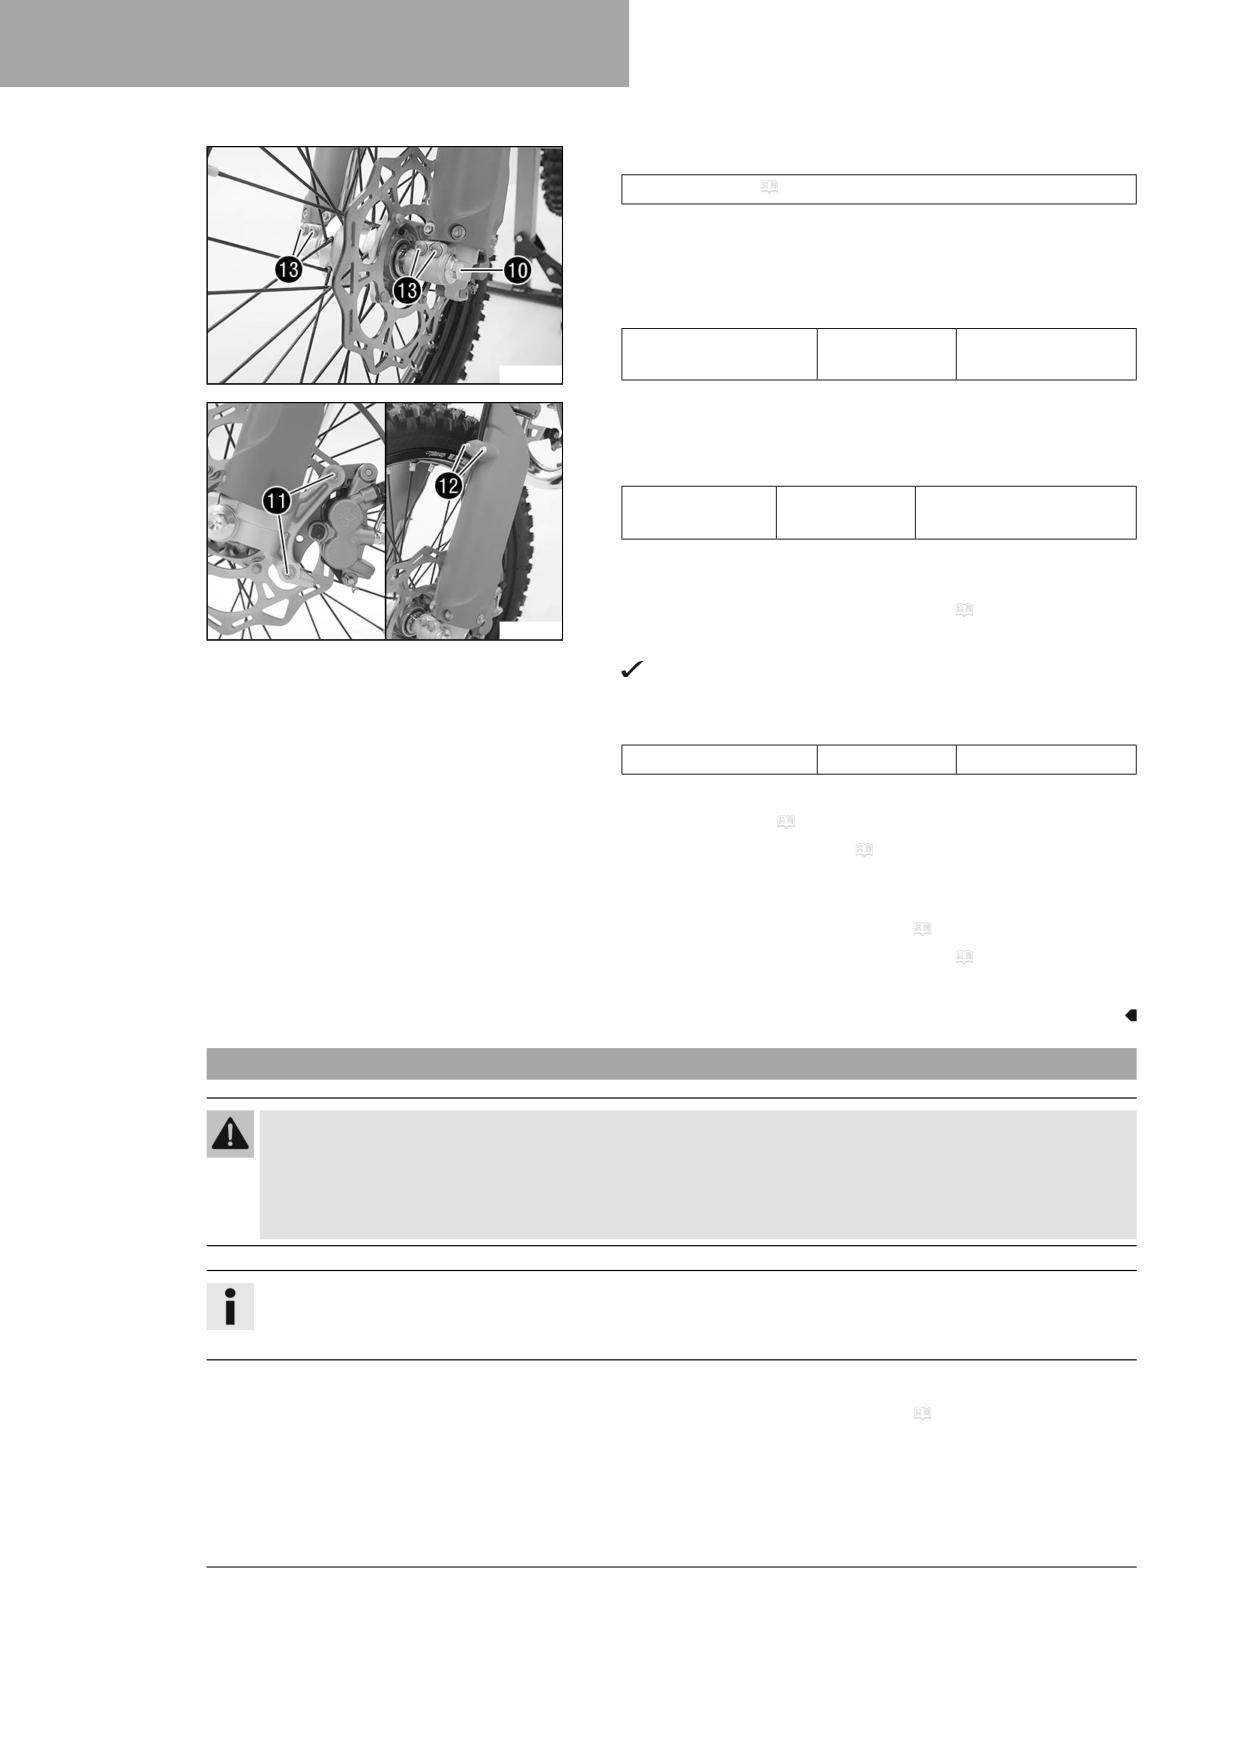
11
SERVICE WORK ON THE CHASSIS
- Clean and grease the wheel spindle.
Long-life grease ( p. 118)
- Position the front wheel.
- Insert the wheel spindle.
- Mount and tighten screw bk.
Guideline
Screw, front wheel
M20x1.5
35 Nm (25.8 lbf ft)
spindle
S04328-11
- Position the brake caliper.
- Mount and tighten screws bl.
Guideline
Screw, front
M8
25 Nm (18.4 lbf ft)
brake caliper
Loctite®243™
– Position the brake line and the clamp. Mount and tighten
screws bm.
- Remove the motorcycle from the lift stand. ( p. 41)
S04329-11
- Operate the front brake and compress the fork a few times firmly.
The fork legs straighten.
- Tighten screws bn.
Guideline
Screw, fork stub
M8
15 Nm (11.1 lbf ft)
Finishing work
- Install front fender. ( p. 51)
- Install the start number plate. ( p. 50)
- Check that the wiring harness, throttle cables, and brake and clutch
lines can move freely and are routed correctly.
- Check the steering head bearing play. ( p. 48)
- Remove the motorcycle from the lift stand. ( p. 41)
- Position the handlebar cushion and secure with a cable tie.
11.11
Checking the steering head bearing play
Warning
Danger of accidents Incorrect steering head bearing play impairs the handling characteristic and damages com-
ponents.
- Correct incorrect steering head bearing play immediately. (Your authorized GASGAS Motorcycles workshop will
be glad to help.)
Info
If the vehicle is operated for a lengthy period with play in the steering head bearing, the bearings and the bearing
seats in the frame can become damaged over time.
Preparatory work
- Raise the motorcycle with a lift stand. ( p. 41)
48
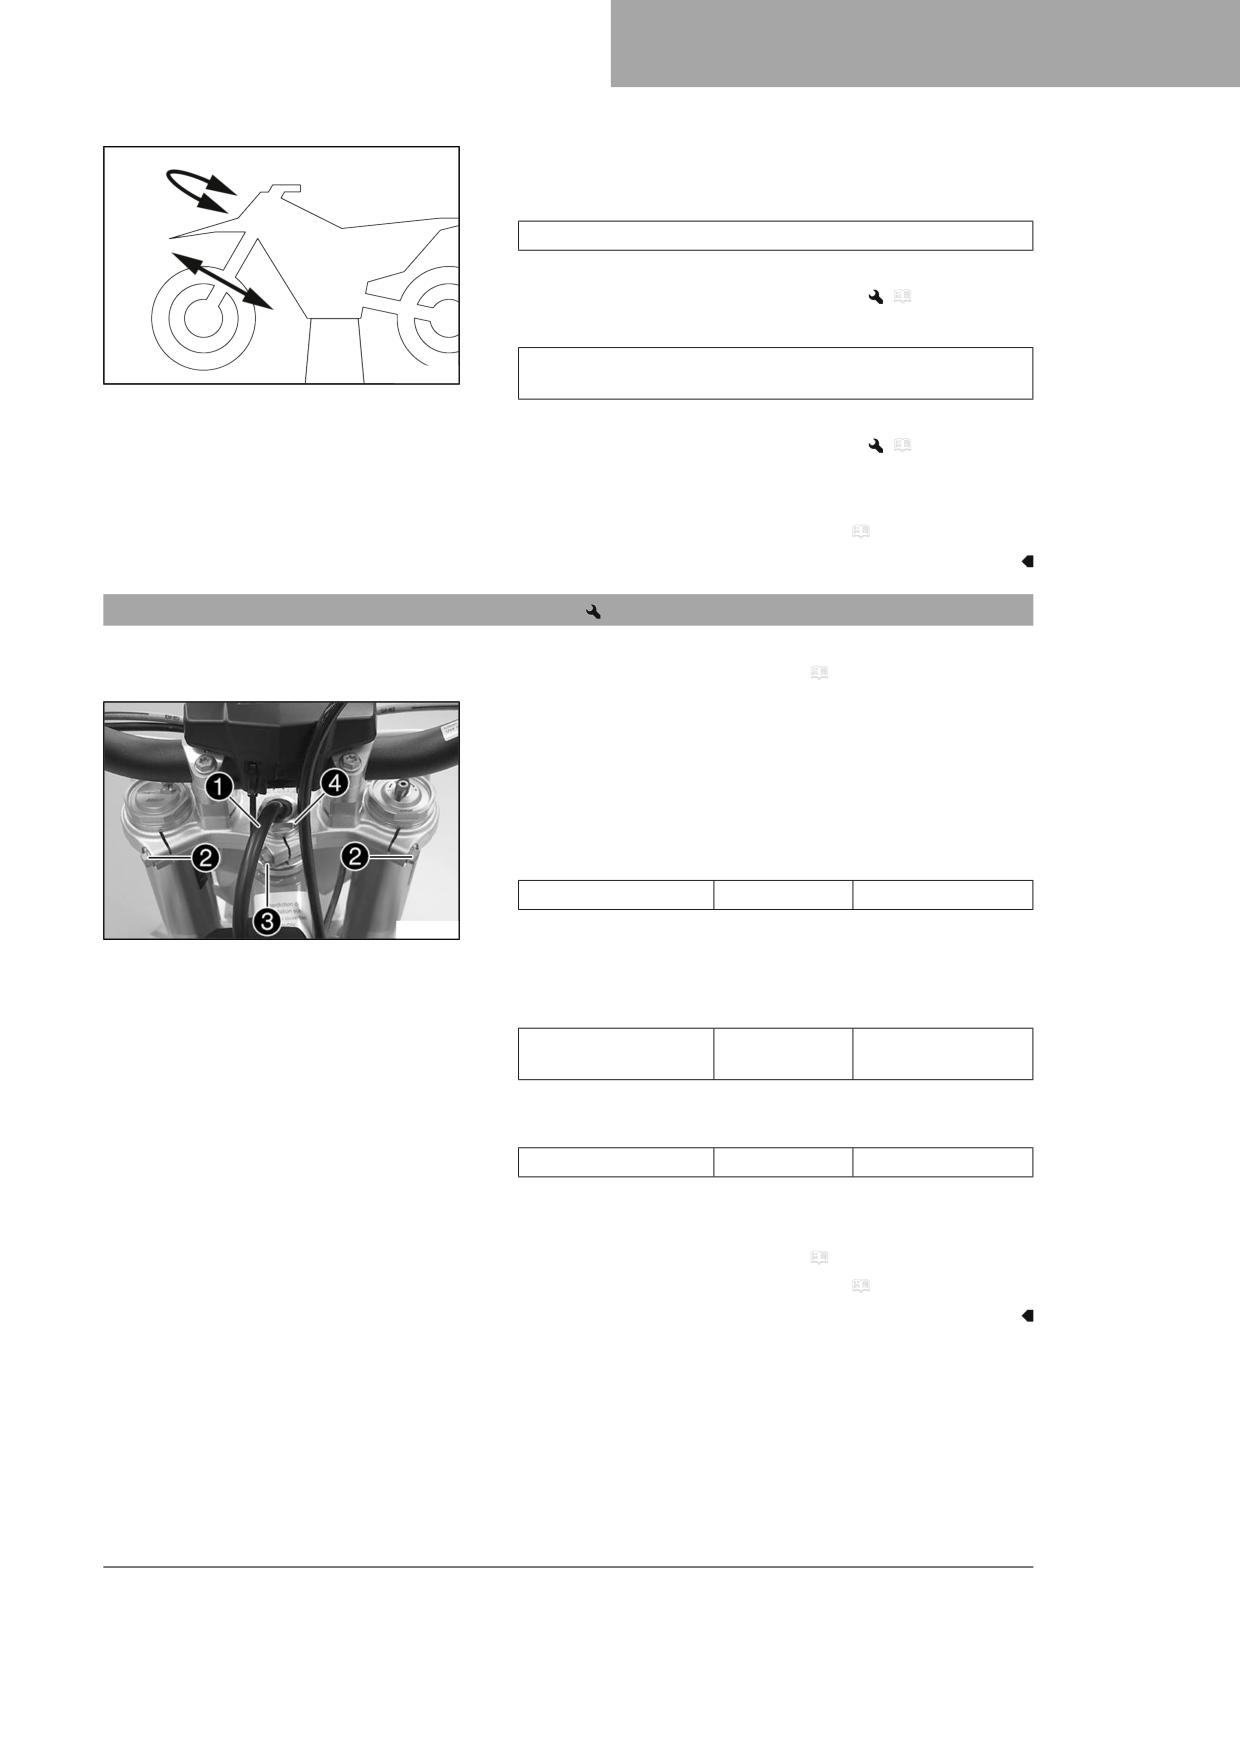
SERVICE WORK ON THE CHASSIS
11
Main work
- Move the handlebar to the straight-ahead position. Move the fork
legs to and fro in the direction of travel.
Play should not be detectable on the steering head bearing.
» If there is detectable play:
- Adjust the steering head bearing play.
(
p. 49)
– Move the handlebar to and fro over the entire steering range.
It must be possible to move the handlebar easily over the entire
H01167-01
steering range. There should be no detectable detent positions.
» If detent positions are detected:
- Adjust the steering head bearing play.
(
p. 49)
– Check the steering head bearing and replace if required.
Finishing work
- Remove the motorcycle from the lift stand. ( p. 41)
11.12
Adjusting the steering head bearing play
Preparatory work
- Raise the motorcycle with a lift stand. ( p. 41)
Main work
- Pull fuel tank breather 1 out of the steering stem.
- Loosen screws 2.
- Loosen screw 3.
- Loosen and retighten nut 4.
Guideline
Nut, steering stem
M20x1.5
10 Nm (7.4 lbf ft)
S03421-10
- Using a plastic hammer, tap lightly on the upper triple clamp to
avoid stresses.
- Tighten screw 3.
Guideline
Steering stem clamp
M8
20 Nm (14.8 lbf ft)
screw
- Tighten screws 2.
Guideline
Screw, top triple clamp
M8
17 Nm (12.5 lbf ft)
– Position the fuel tank breather 1 in the steering stem.
Finishing work
- Check the steering head bearing play. ( p. 48)
- Remove the motorcycle from the lift stand. ( p. 41)
49
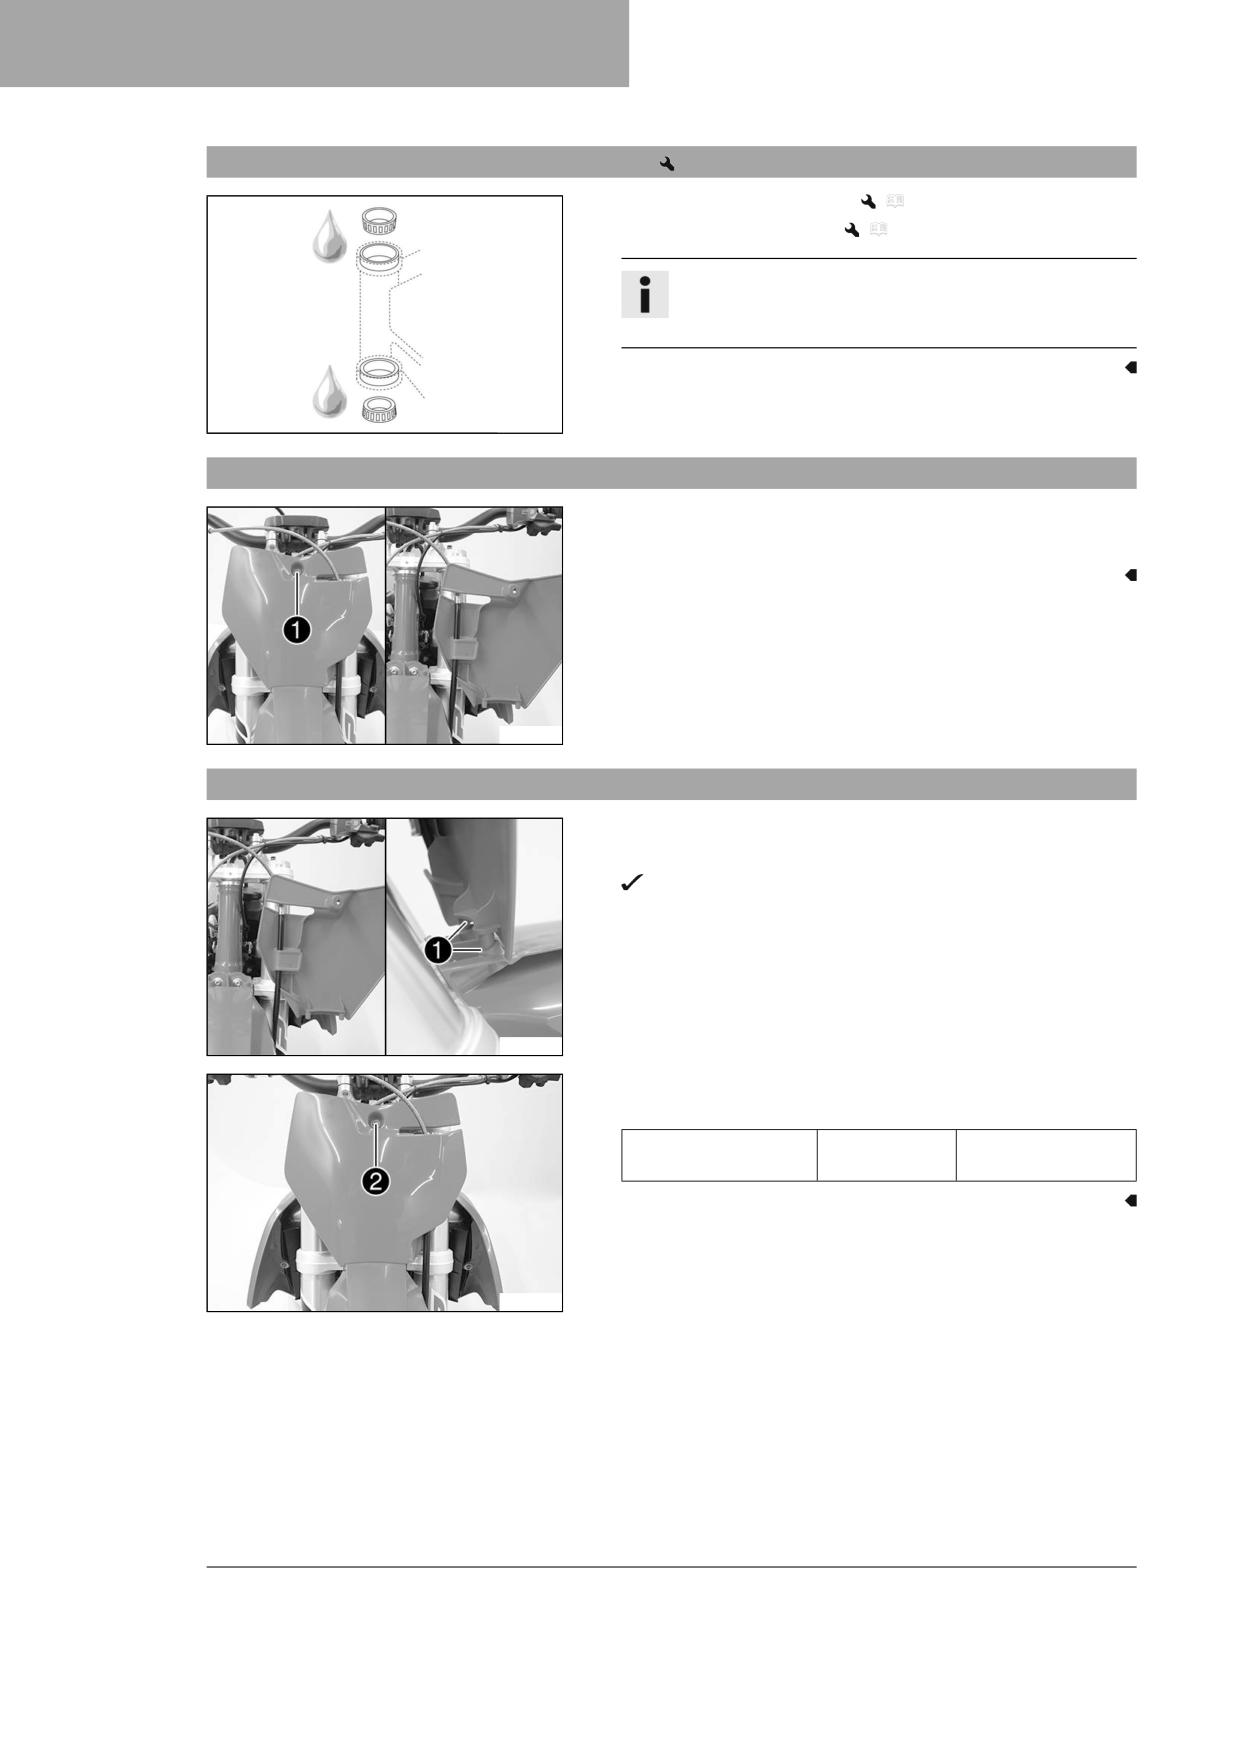
11
SERVICE WORK ON THE CHASSIS
11.13
Lubricating the steering head bearing
- Remove the lower triple clamp.
(
p. 45)
– Install the lower triple clamp.
(
p. 46)
Info
The steering head bearing is cleaned and lubricated in the
course of removal and installation of the lower triple clamp.
H02387-01
11.14
Removing the start number plate
- Remove screw 1.
- Unhook the start number plate from the brake line and remove it.
S04332-10
11.15
Installing the start number plate
- Attach the start number plate to the brake line.
- Position the start number plate.
Holding lugs 1 engage in the fender.
S04333-10
- Mount and tighten screw 2.
Guideline
Start number plate
M6
4 Nm (3 lbf ft)
screw
S04334-10
50
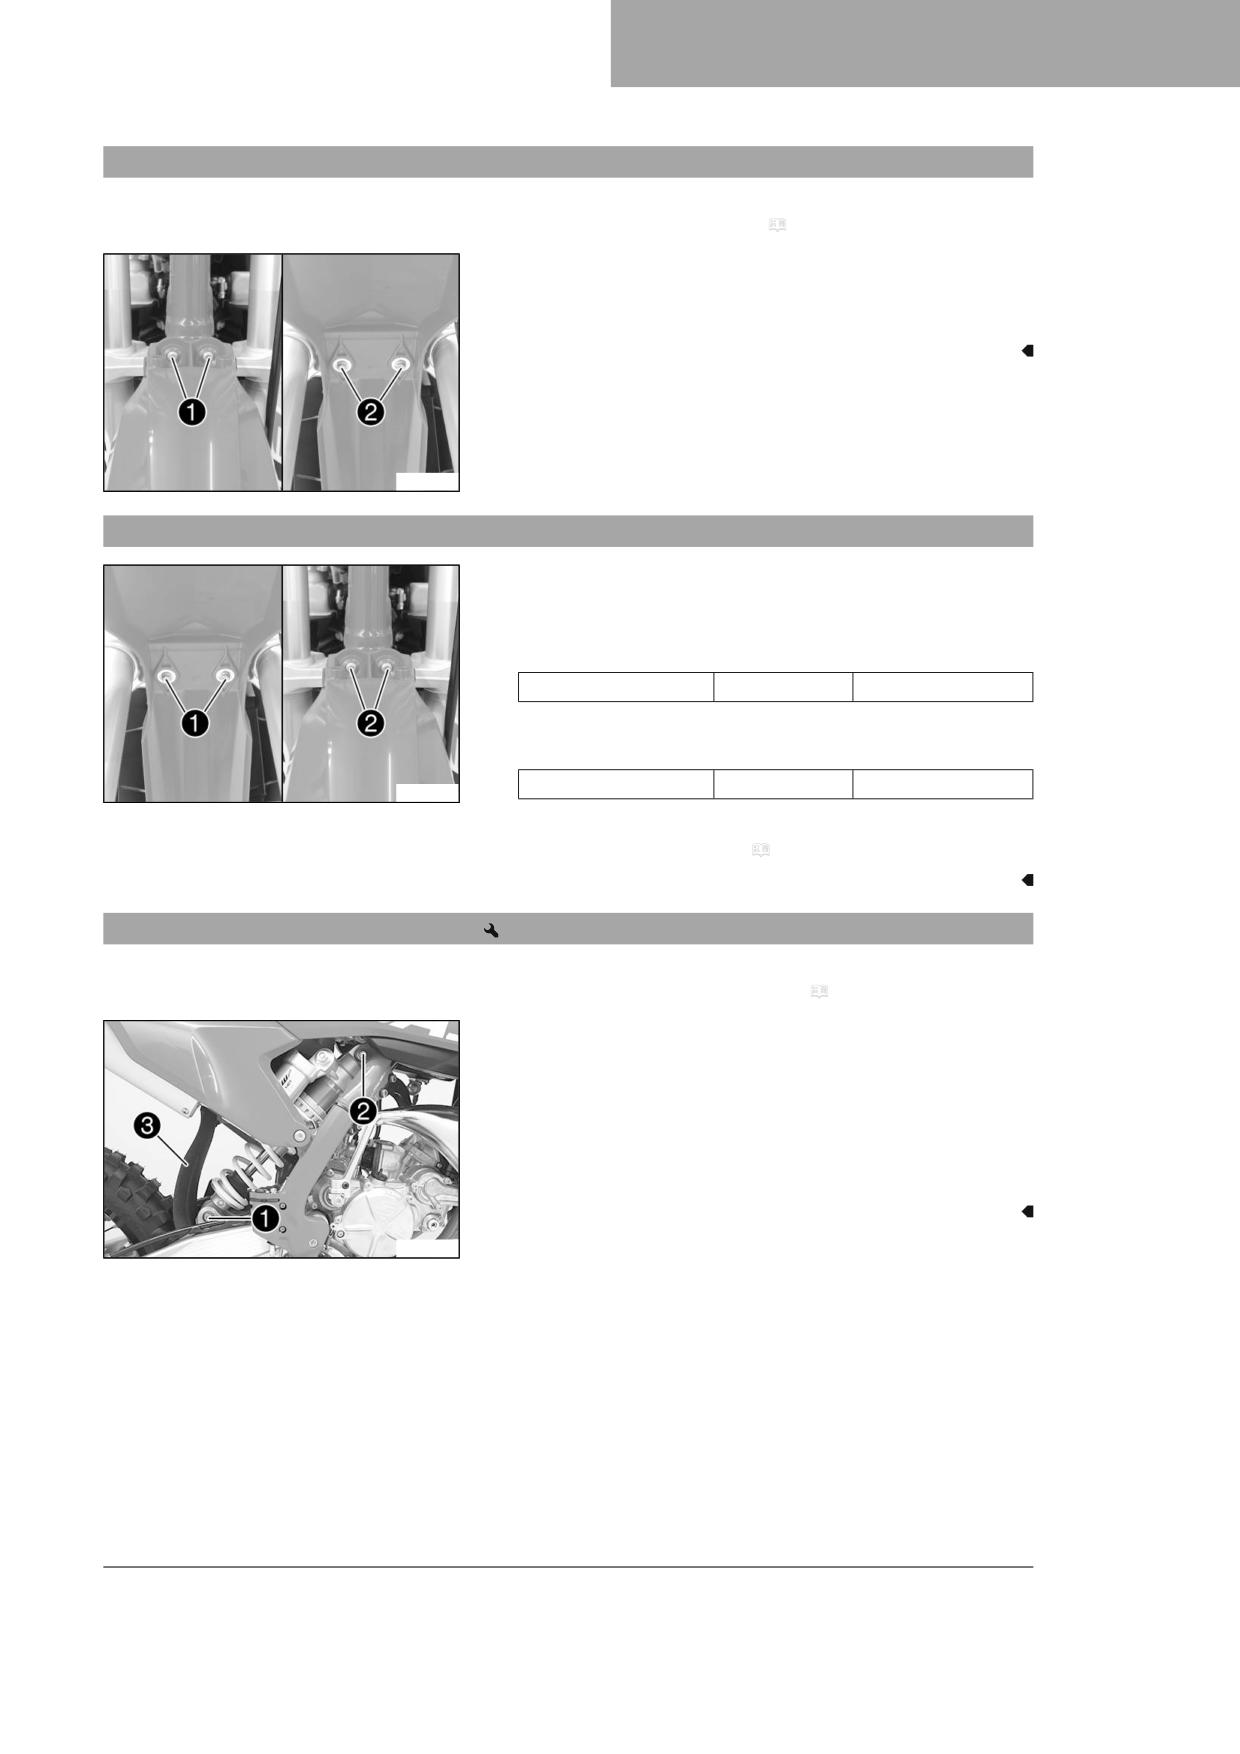
SERVICE WORK ON THE CHASSIS
11
11.16
Removing front fender
Preparatory work
- Remove the start number plate. ( p. 50)
Main work
- Remove screws 1.
- Remove screws 2. Take off the front fender.
S04335-10
11.17
Installing front fender
Main work
- Position front fender.
- Mount and tighten screws 1.
Guideline
Screw, front fender
M6
6 Nm (4.4 lbf ft)
– Mount and tighten screws 2.
Guideline
Screw, front fender
M6
6 Nm (4.4 lbf ft)
S04336-10
Finishing work
- Install the start number plate. ( p. 50)
11.18
Removing the shock absorber
Preparatory work
- Raise the motorcycle with a lift stand. ( p. 41)
Main work
- Detach the brake line from the brake line guide.
- Remove screw 1 and lower the rear wheel with the link fork as far
as possible without blocking the rear wheel. Secure the rear wheel
in this position.
- Remove screw 2, push splash protector 3 to the side, and
remove the shock absorber.
S04337-10
51
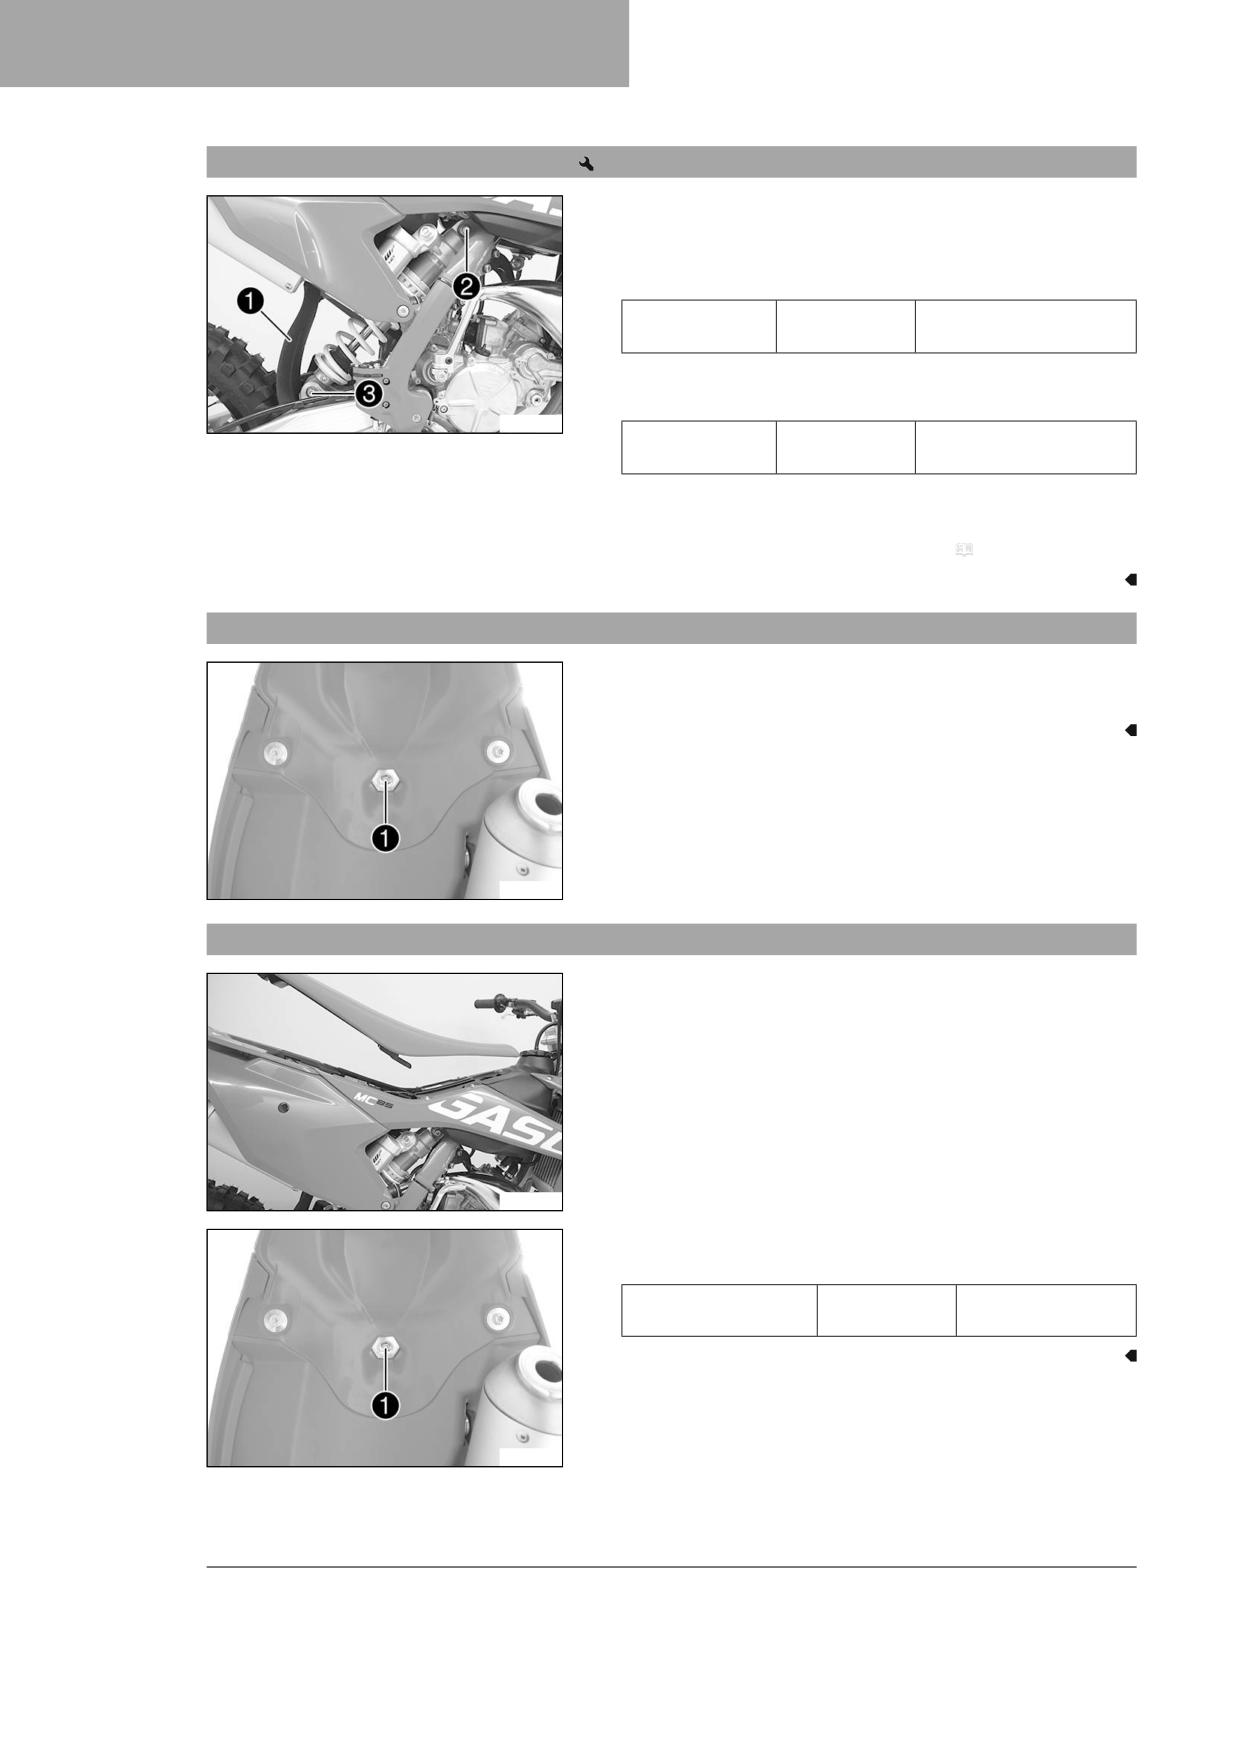
11
SERVICE WORK ON THE CHASSIS
11.19
Installing the shock absorber
Main work
- Push splash protector 1 to the side and position the shock
absorber. Mount and tighten screw 2.
Guideline
Screw, top shock
M12
60 Nm (44.3 lbf ft)
absorber
Loctite®2701™
– Mount and tighten screw 3.
Guideline
S04337-11
Screw, bottom
M12
60 Nm (44.3 lbf ft)
shock absorber
Loctite®2701™
– Attach brake line.
Finishing work
- Remove the motorcycle from the lift stand. ( p. 41)
11.20
Removing the seat
- Remove screw 1.
- Raise the rear of the seat, pull the seat back, and lift it off.
S04338-10
11.21
Mounting the seat
- Mount the front of the seat on the collar bushing of the fuel tank,
lower the seat at the rear, and push the seat forward.
- Make sure that the seat is correctly locked in.
S04339-10
- Mount and tighten screw 1 of the seat fixing.
Guideline
Remaining screws,
M6
10 Nm (7.4 lbf ft)
chassis
S04338-10
52
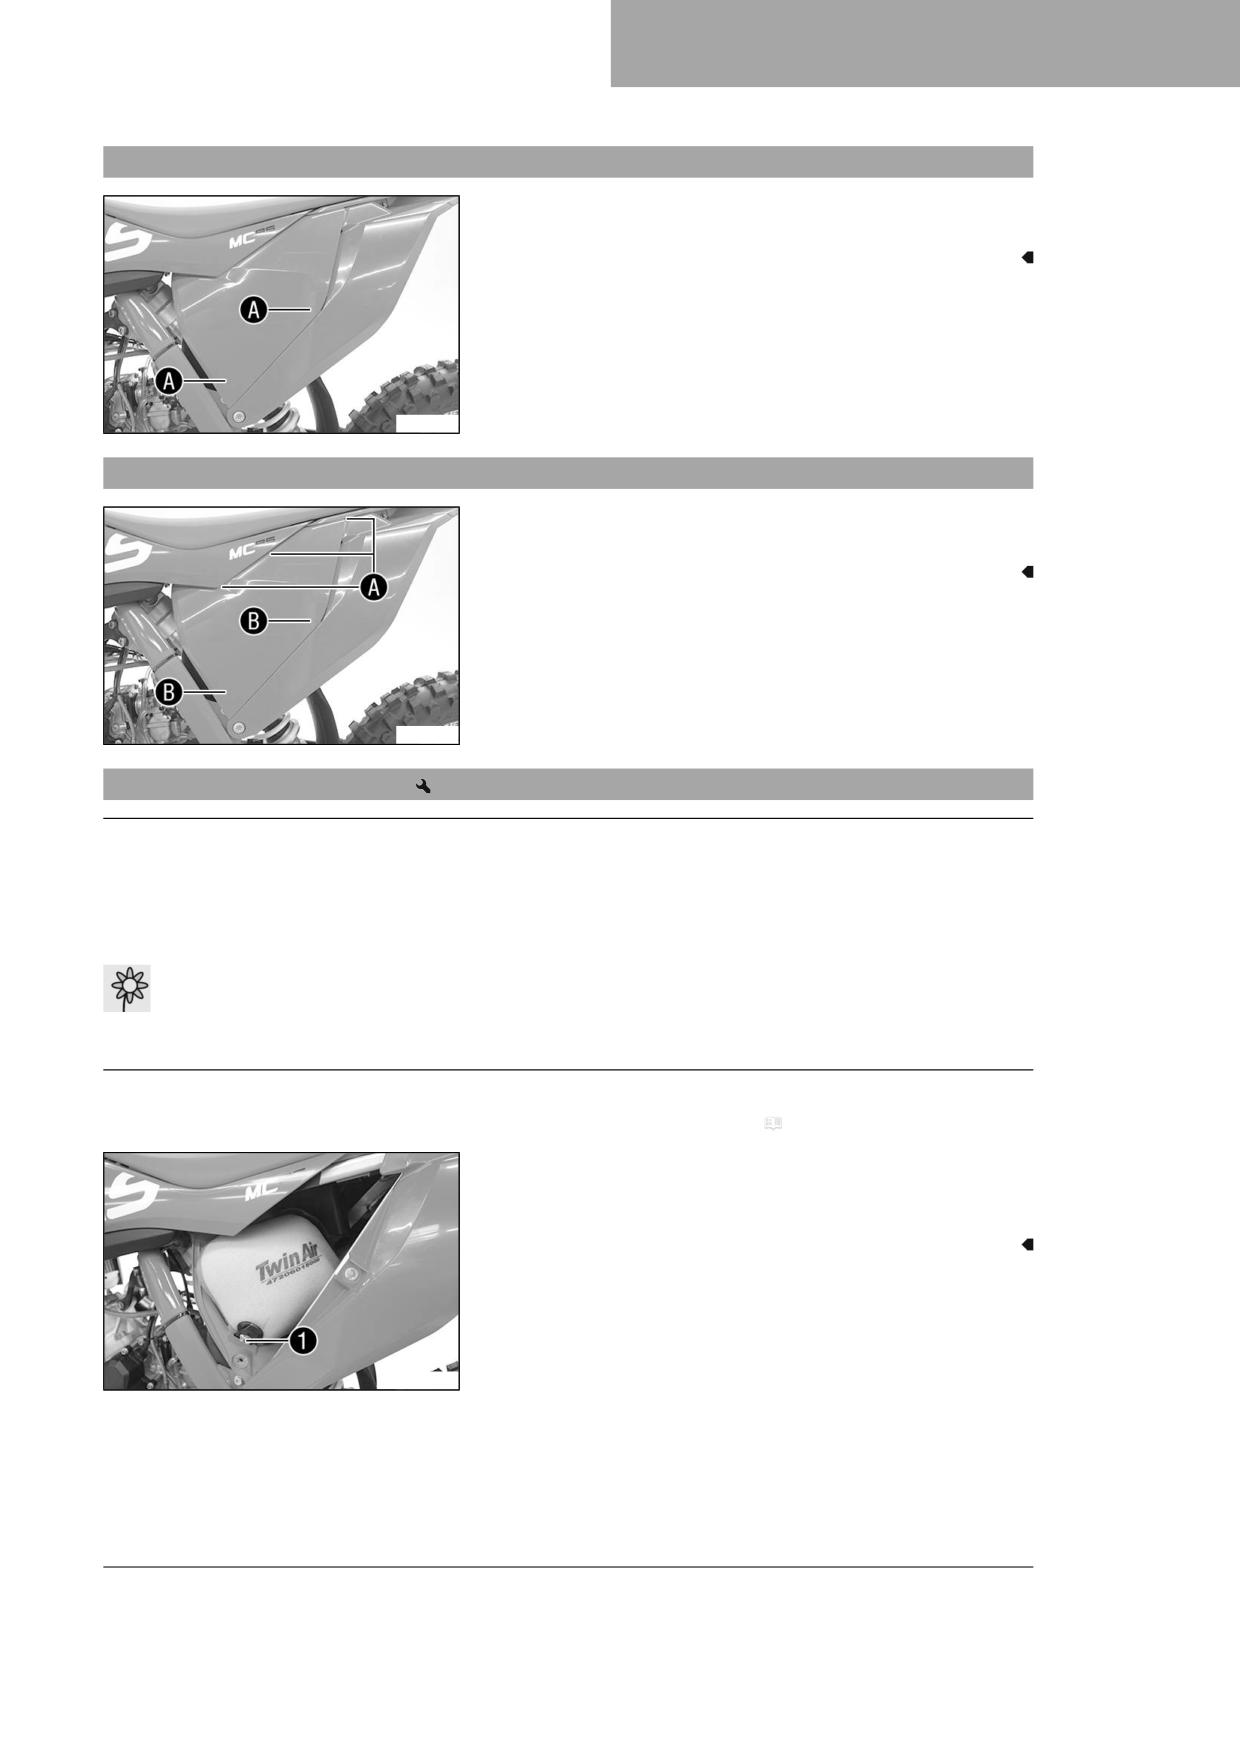
SERVICE WORK ON THE CHASSIS
11
11.22
Removing the air filter box cover
- Pull off the air filter box cover laterally in areas A and take it off
toward the front.
S04340-10
11.23
Installing the air filter box cover
- Attach the air filter box cover in areas A and snap it into place in
areas B.
S04340-11
11.24
Removing the air filter
Note
Engine damage Unfiltered intake air has a negative effect on the service life of the engine.
Dust and dirt will enter the engine without an air filter.
- Only operate the vehicle if it is equipped with an air filter.
Note
Environmental hazard Hazardous substances cause environmental damage.
- Dispose of oils, grease, filters, fuel, cleaning agents, brake fluid, etc., correctly and in compliance with the appli-
cable regulations.
Preparatory work
- Remove the air filter box cover. ( p. 53)
Main work
- Detach retaining tab 1. Remove air filter with air filter support.
- Remove air filter from air filter support.
S04341-10
53
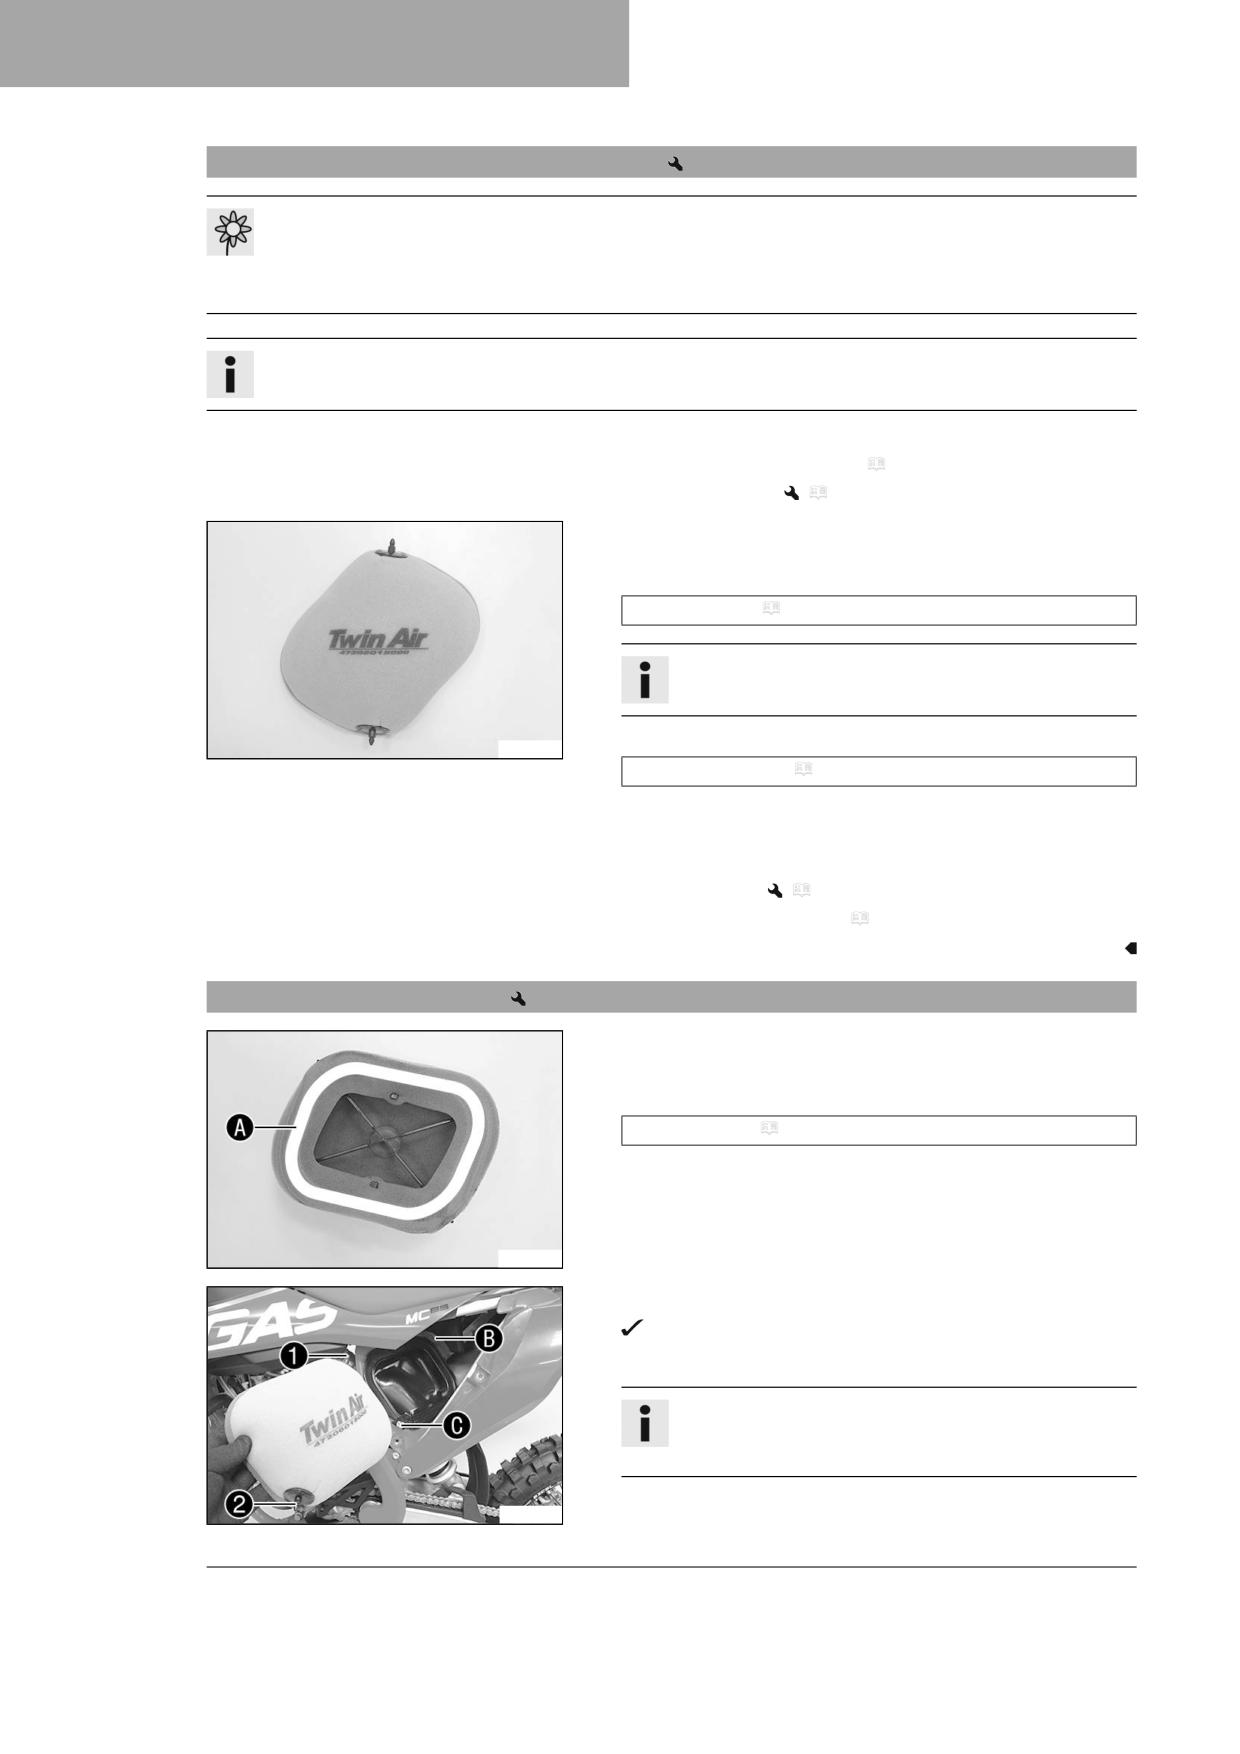
11
SERVICE WORK ON THE CHASSIS
11.25
Cleaning the air filter and air filter box
Note
Environmental hazard Hazardous substances cause environmental damage.
- Dispose of oils, grease, filters, fuel, cleaning agents, brake fluid, etc., correctly and in compliance with the appli-
cable regulations.
Info
Do not clean the air filter with fuel or petroleum since these substances attack the foam.
Preparatory work
- Remove the air filter box cover. ( p. 53)
- Remove the air filter.
(
p. 53)
Main work
- Wash the air filter thoroughly in special cleaning liquid and allow it
to dry properly.
Air filter cleaner ( p. 118)
Info
Only press the air filter to dry it, never wring it out.
- Oil the dry air filter with a high-grade air filter oil.
V00838-01
Oil for foam air filter ( p. 118)
- Clean the air filter box.
- Check intake flange for damage and looseness.
Finishing work
- Install the air filter.
(
p. 54)
– Install the air filter box cover. ( p. 53)
11.26
Installing the air filter
Main work
- Mount the clean air filter on the air filter support.
- Grease the air filter in area A.
Long-life grease ( p. 118)
V00839-10
- Insert the air filter and position top retaining pin 1 in bushing B.
The air filter is correctly positioned.
- Secure the bottom retaining pin 2 with holding tab C.
Info
If the air filter is not mounted correctly, dust and dirt may
enter the engine and result in damage.
S04342-10
54
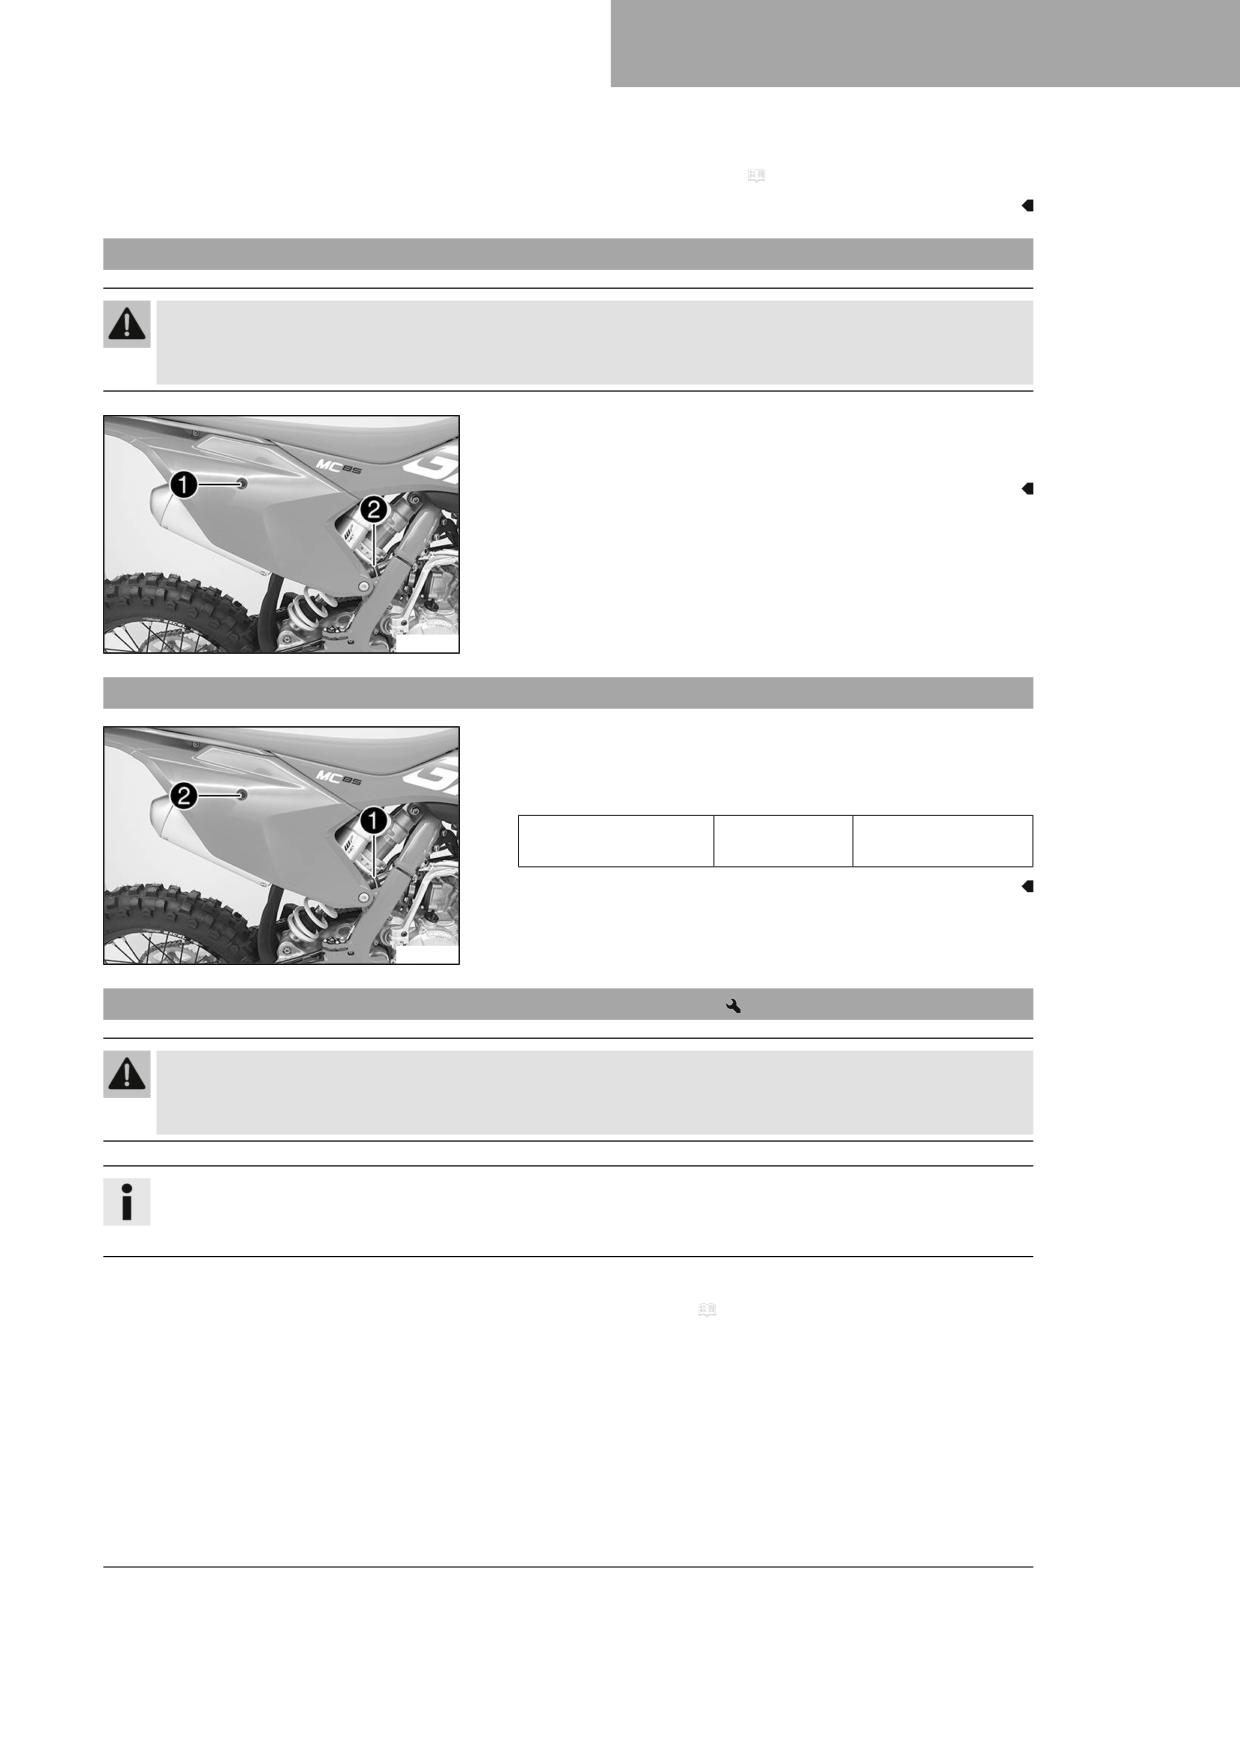
SERVICE WORK ON THE CHASSIS
11
Finishing work
- Install the air filter box cover. ( p. 53)
11.27
Removing the main silencer
Warning
Danger of burns The exhaust system gets hot when the vehicle is driven.
- Allow the exhaust system to cool down before performing any work on the vehicle.
- Remove screw 1.
- Pull off the main silencer from the manifold at exhaust sleeve 2.
S04343-10
11.28
Installing the main silencer
- Mount the main silencer with exhaust sleeve 1.
- Mount and tighten screw 2.
Guideline
Remaining screws,
M6
10 Nm (7.4 lbf ft)
chassis
S04343-11
11.29
Changing the glass fiber yarn filling of the main silencer
Warning
Danger of burns The exhaust system gets hot when the vehicle is driven.
- Allow the exhaust system to cool down before performing any work on the vehicle.
Info
Over time, the fibers of the rock wool dissipate and the silencer “burns out”.
Not only is the noise level higher, the performance characteristics change.
Preparatory work
- Remove main silencer. ( p. 55)
55
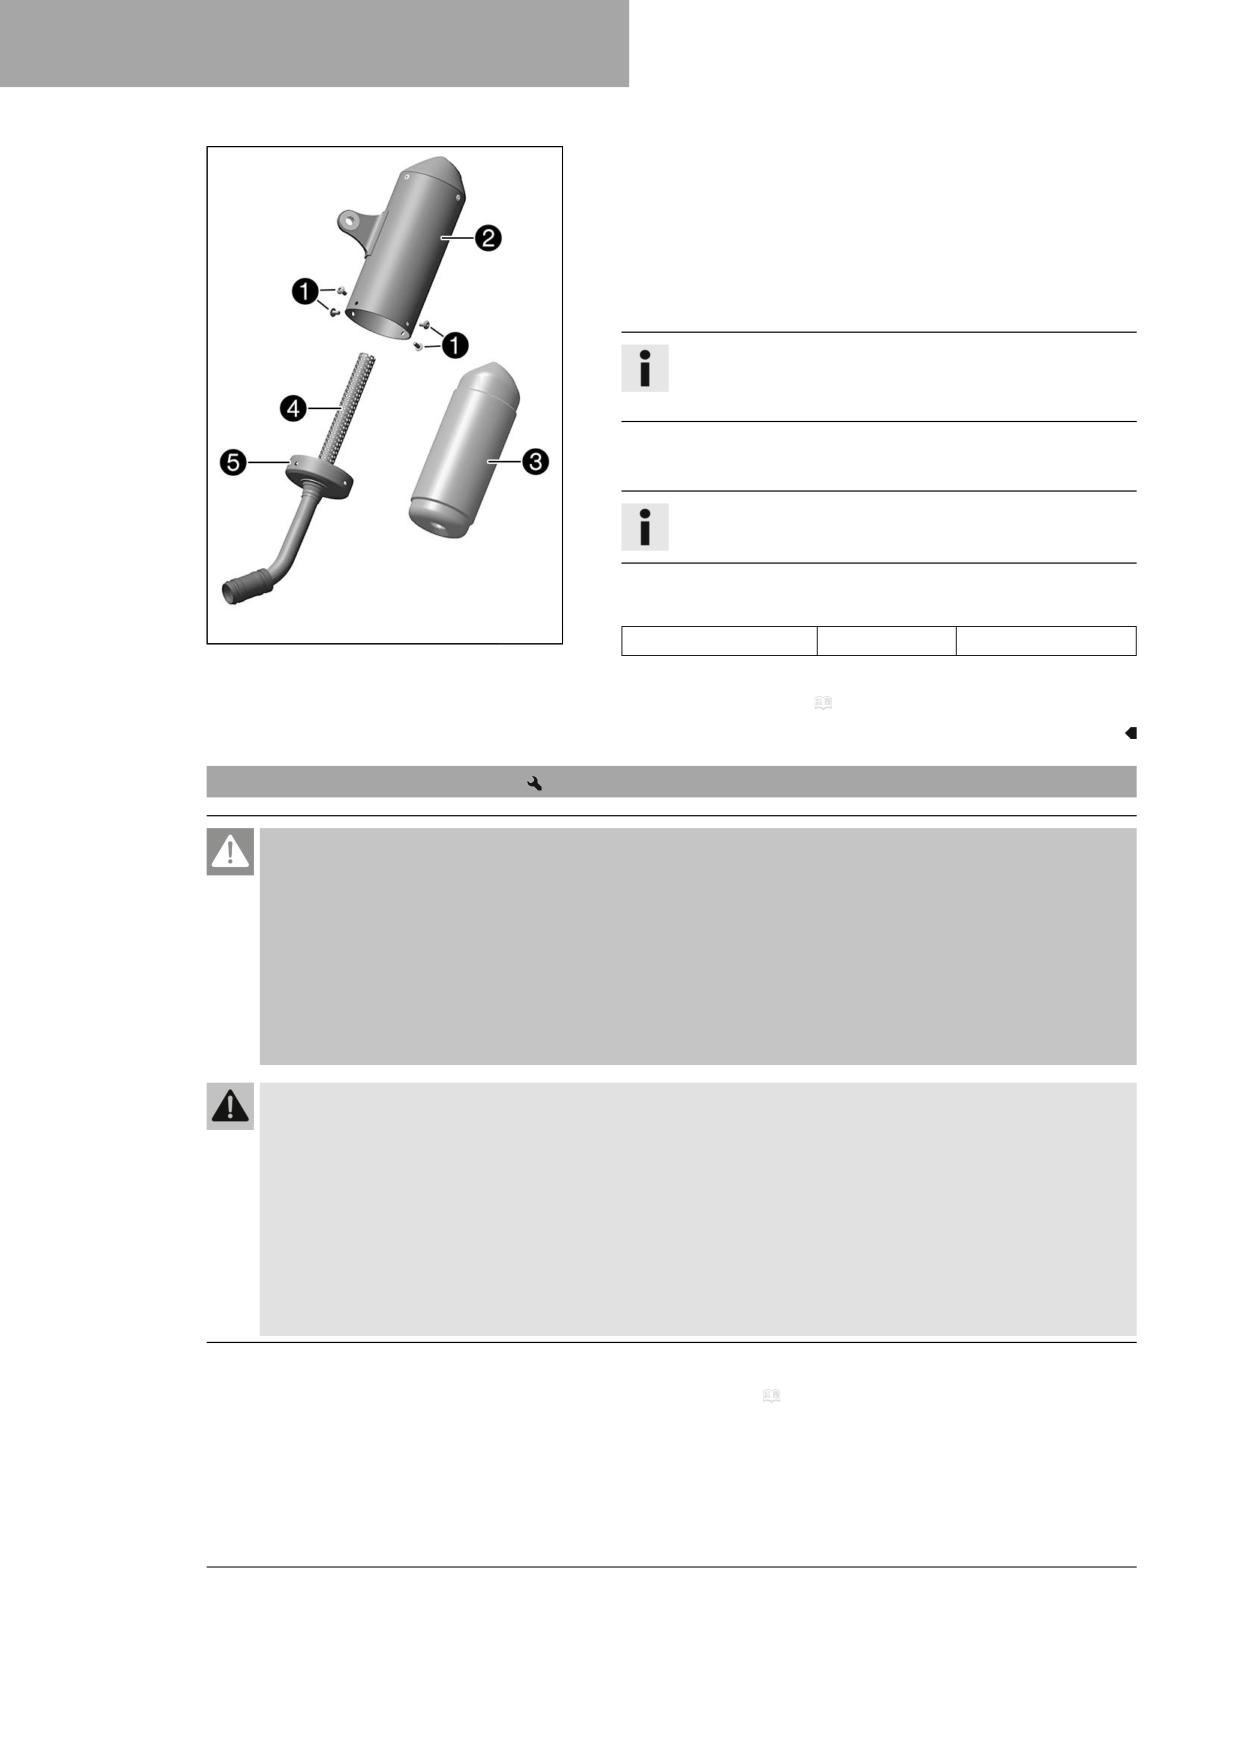
11
SERVICE WORK ON THE CHASSIS
Main work
- Remove screws 1.
- Take off outer tube 2.
- Remove glass fiber yarn filling 3 from inner tube 4.
- Clean the parts that need to be reinstalled and check for damage.
- Mount the new glass fiber yarn filling on the inner tube.
Info
Mount the glass fiber yarn filling so that the thermal protec-
tion foil is positioned on the right in the direction of travel.
- Slide outer tube over the inner tube with the new glass fiber yarn
filling.
Info
Seal the connecting cap 5 to the outer tube with silicone.
- Mount and tighten the screws.
Guideline
V01312-10
Screw, main silencer
M5
7 Nm (5.2 lbf ft)
Finishing work
- Install the main silencer. ( p. 55)
11.30
Removing the fuel tank
Danger
Fire hazard Fuel is highly flammable.
The fuel in the fuel tank expands when warm and can escape if overfilled.
- Do not fuel the vehicle in the vicinity of open flames or lit cigarettes.
- Switch off the engine for refueling.
- Make sure that no fuel is spilled; particularly not on hot parts of the vehicle.
- If any fuel is spilled, wipe it off immediately.
- Observe the specifications for refueling.
Warning
Danger of poisoning Fuel is harmful to health.
- Avoid skin, eye and clothing contact with fuel.
- Immediately consult a doctor if you swallow fuel.
- Do not inhale fuel vapors.
- Rinse the affected area immediately with plenty of water in the event of contact with the skin.
- Rinse the eyes thoroughly with water, and consult a doctor in case of fuel contact with the eyes.
- Change your clothing if fuel spills on them.
- Keep fuels correctly in a suitable canister, and out of the reach of children.
Preparatory work
- Remove the seat. ( p. 52)
- Turn tap handle of the fuel tap to the OFF position.
56
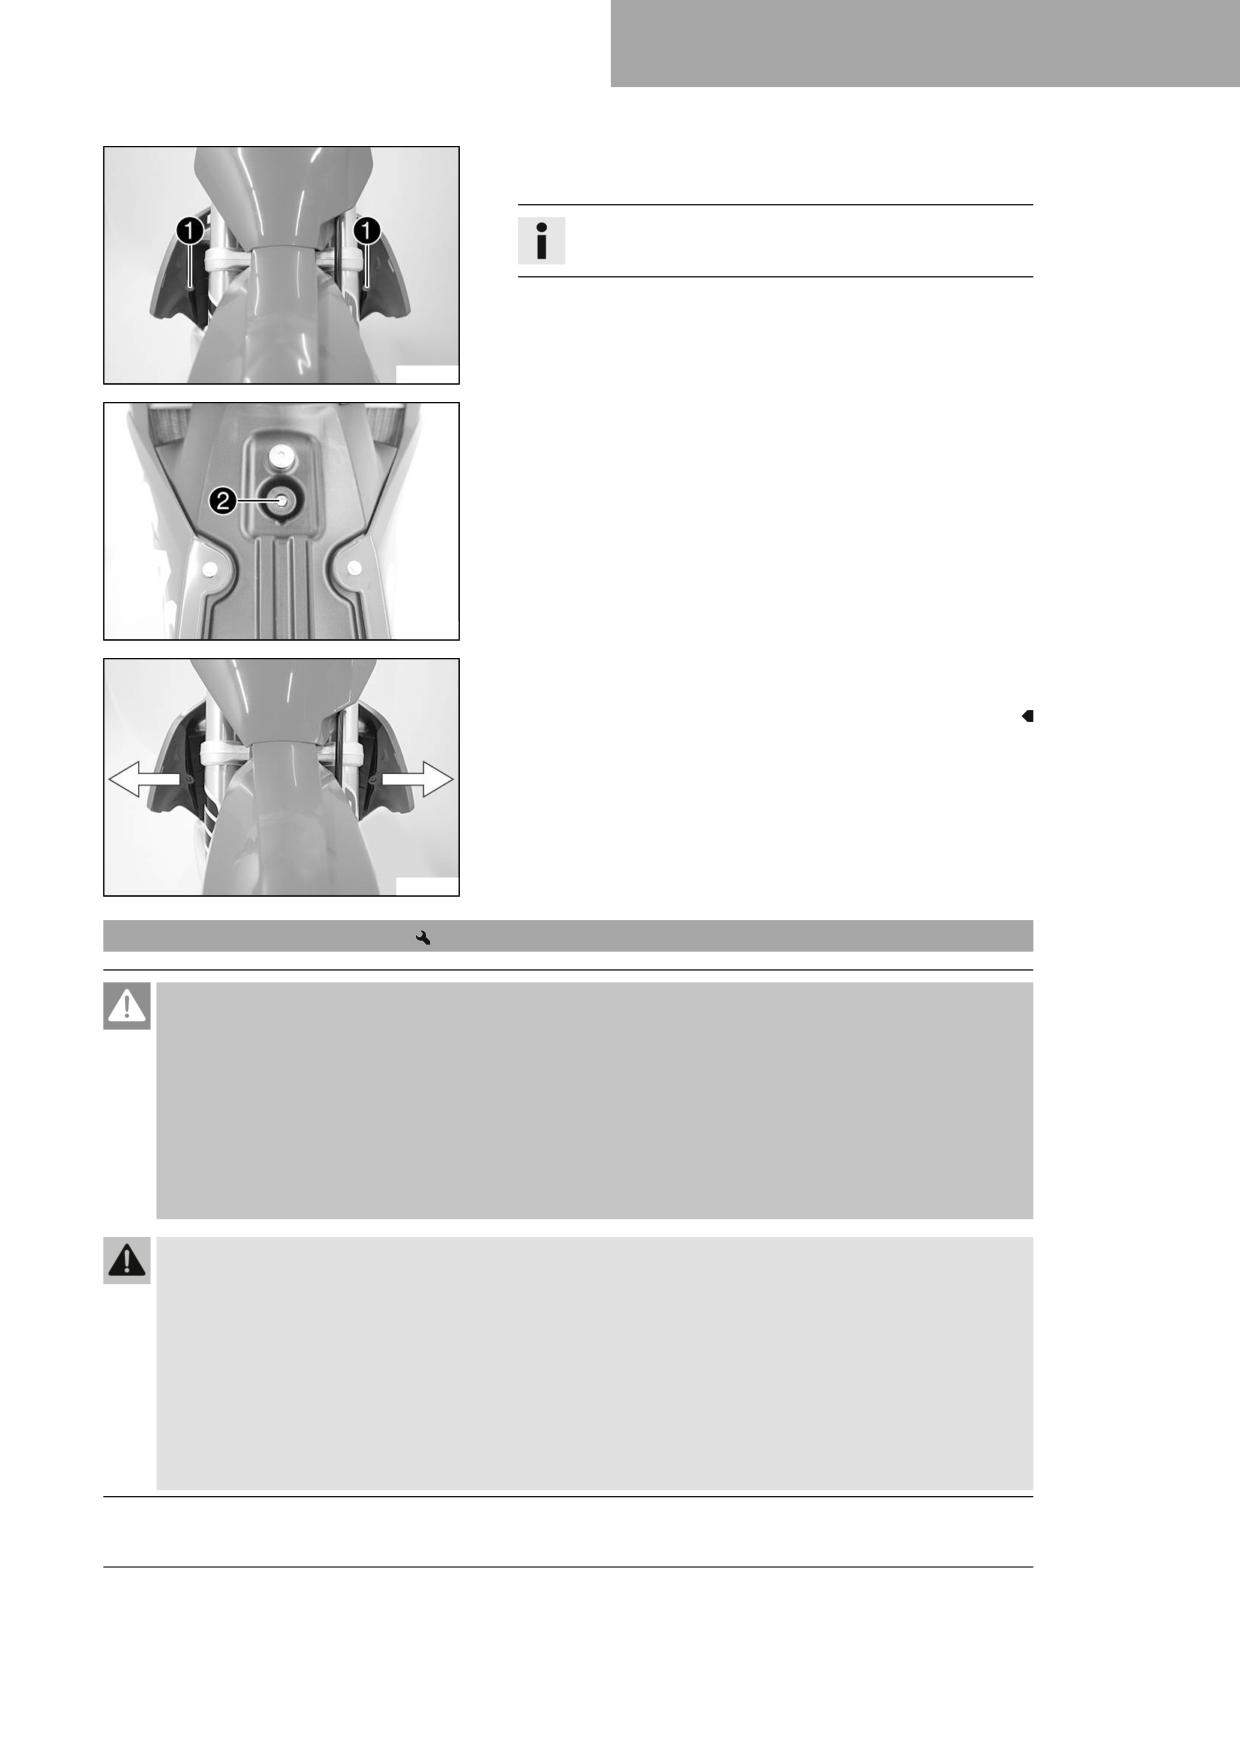
SERVICE WORK ON THE CHASSIS
11
Main work
- Pull off the fuel hose.
Info
Remaining fuel may flow out of the fuel hose.
- Remove screws 1.
S04344-10
- Remove screw 2 with the rubber bushing.
- Remove the hose from the fuel tank breather.
S04345-10
- Pull both spoilers off laterally from the radiator bracket and lift off
the fuel tank.
S04346-10
11.31
Installing the fuel tank
Danger
Fire hazard Fuel is highly flammable.
The fuel in the fuel tank expands when warm and can escape if overfilled.
- Do not fuel the vehicle in the vicinity of open flames or lit cigarettes.
- Switch off the engine for refueling.
- Make sure that no fuel is spilled; particularly not on hot parts of the vehicle.
- If any fuel is spilled, wipe it off immediately.
- Observe the specifications for refueling.
Warning
Danger of poisoning Fuel is harmful to health.
- Avoid skin, eye and clothing contact with fuel.
- Immediately consult a doctor if you swallow fuel.
- Do not inhale fuel vapors.
- Rinse the affected area immediately with plenty of water in the event of contact with the skin.
- Rinse the eyes thoroughly with water, and consult a doctor in case of fuel contact with the eyes.
- Change your clothing if fuel spills on them.
- Keep fuels correctly in a suitable canister, and out of the reach of children.
57
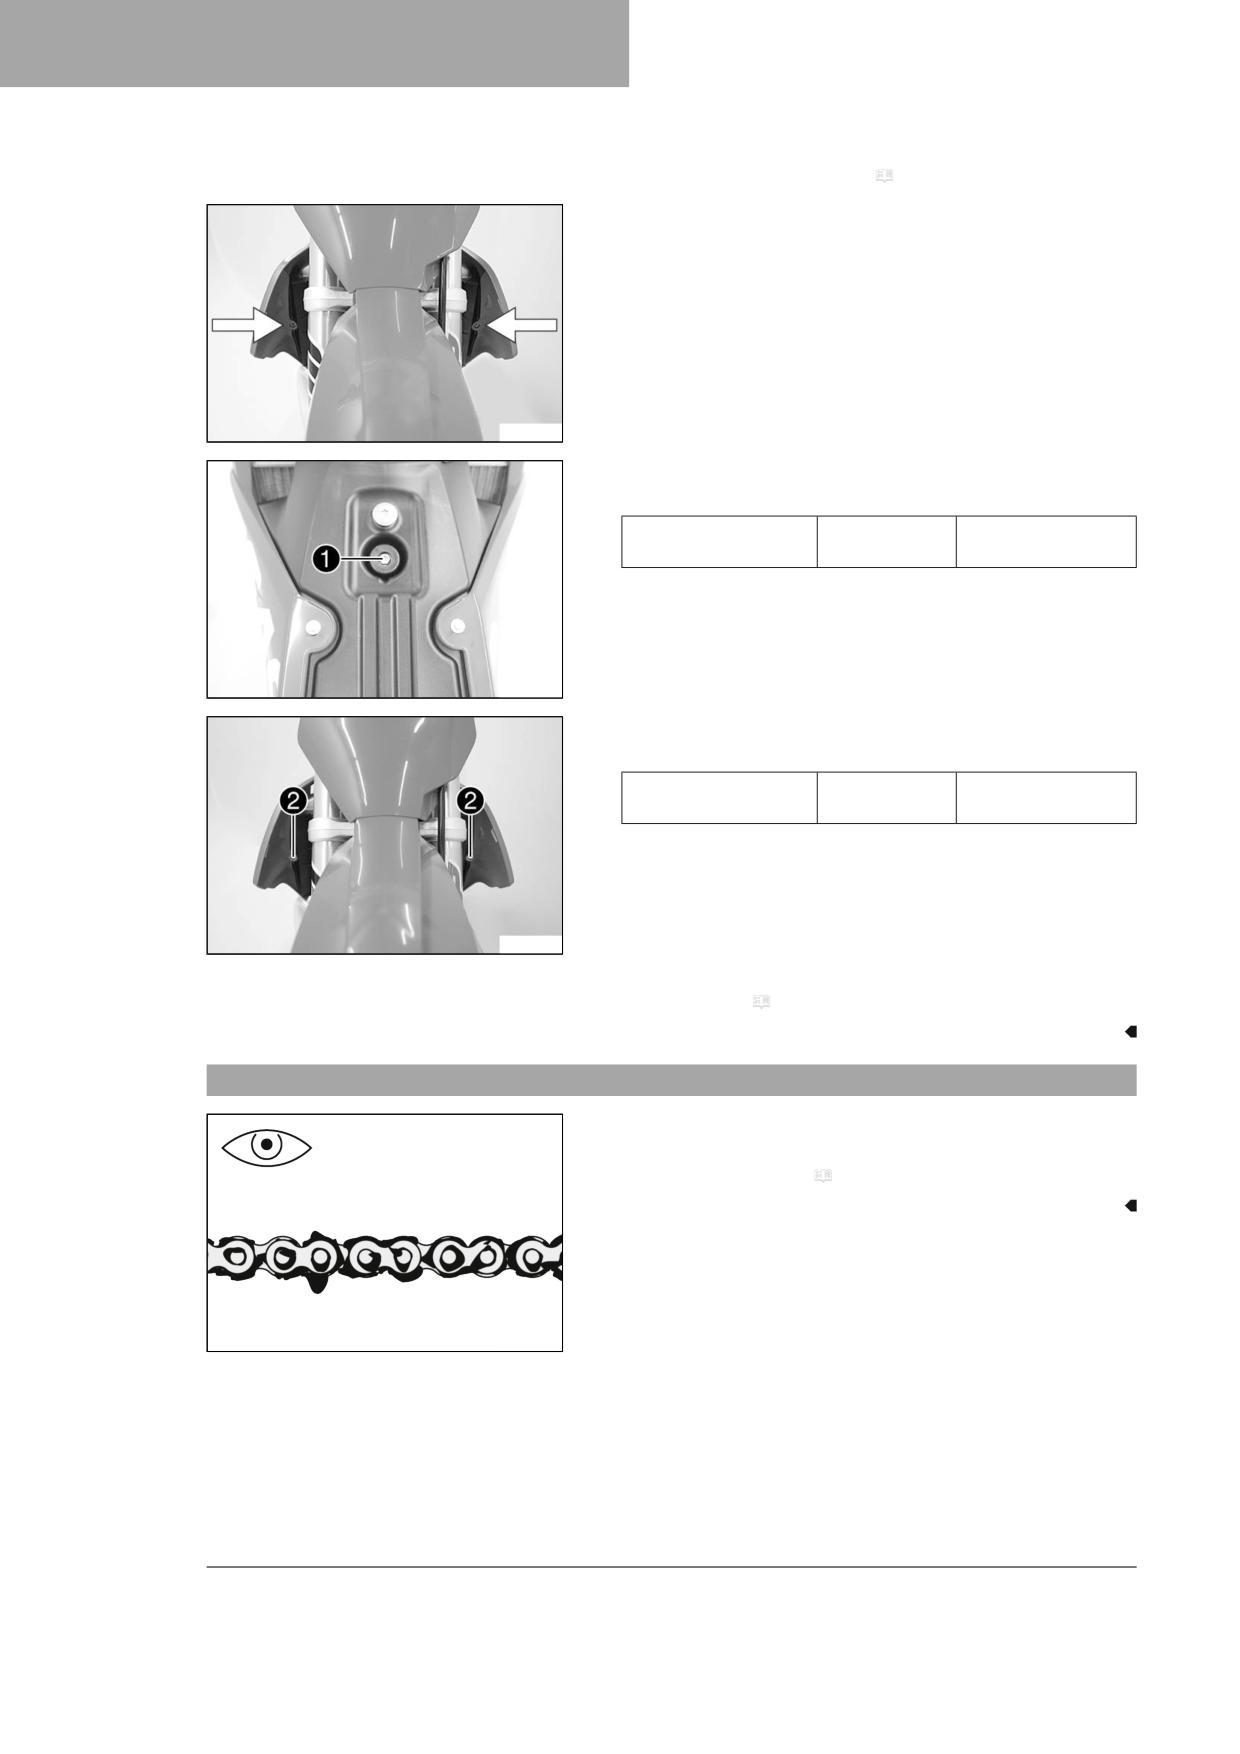
11
SERVICE WORK ON THE CHASSIS
Main work
- Check the throttle cable routing. ( p. 63)
- Position the fuel tank and fit the two spoilers to the sides of the radi-
ator mount.
- Make sure that no cables or throttle cables are trapped or damaged.
S04346-11
- Mount and tighten screw 1 with the rubber bushing.
Guideline
Remaining screws,
M6
10 Nm (7.4 lbf ft)
chassis
S04345-11
- Mount and tighten screws 2.
Guideline
Remaining screws,
M6
10 Nm (7.4 lbf ft)
chassis
- Mount fuel hose.
- Position the fuel tank breather in the steering stem.
S04344-11
Finishing work
- Mount the seat. ( p. 52)
11.32
Checking for chain dirt accumulation
- Check the chain for coarse dirt accumulation.
» If the chain is very dirty:
- Clean the chain. ( p. 59)
400678-01
58
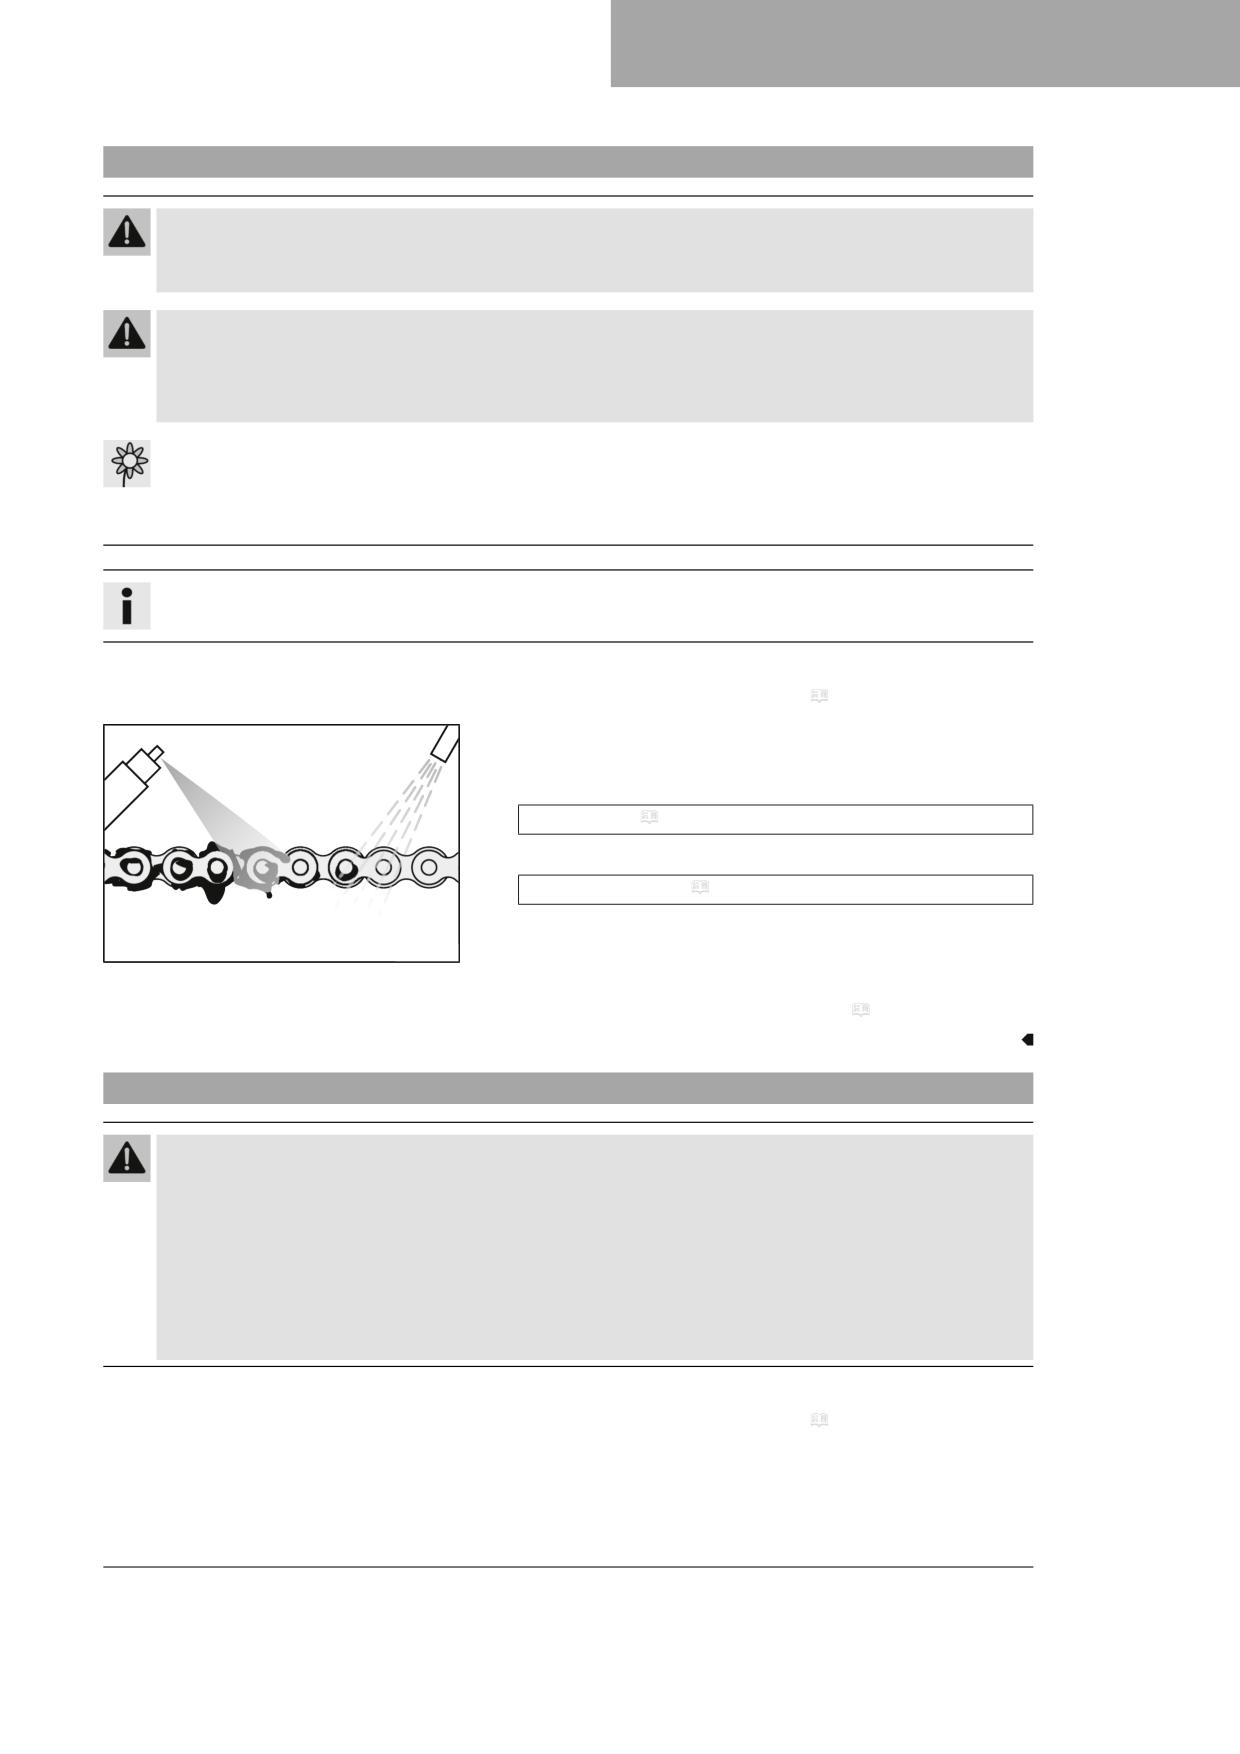
SERVICE WORK ON THE CHASSIS
11
11.33
Cleaning the chain
Warning
Danger of accidents Lubricants on the tires reduces the road grip.
- Remove lubricants from the tires using a suitable cleaning agent.
Warning
Danger of accidents Oil or grease on the brake discs reduces the braking effect.
- Always keep the brake discs free of oil and grease.
- Clean the brake discs with brake cleaner when necessary.
Note
Environmental hazard Hazardous substances cause environmental damage.
- Dispose of oils, grease, filters, fuel, cleaning agents, brake fluid, etc., correctly and in compliance with the appli-
cable regulations.
Info
The service life of the chain depends largely on its maintenance.
Preparatory work
- Raise the motorcycle with a lift stand. ( p. 41)
Main work
- Rinse off loose dirt with a soft jet of water.
- Remove old grease residue with chain cleaner.
Chain cleaner ( p. 118)
- After drying, apply chain spray.
Off-road chain spray ( p. 118)
400725-01
Finishing work
- Remove the motorcycle from the lift stand. ( p. 41)
11.34
Checking the chain tension
Warning
Danger of accidents Incorrect chain tension damages components and results in accidents.
If the chain is tensioned too much, the chain, engine sprocket, rear sprocket, transmission and rear wheel bear-
ings wear more quickly. Some components may break if overloaded.
If the chain is too loose, the chain may fall off the engine sprocket or the rear sprocket. As a result, the rear wheel
locks or the engine will be damaged.
- Check the chain tension regularly.
- Set the chain tension in accordance with the specification.
Preparatory work
- Raise the motorcycle with a lift stand. ( p. 41)
59
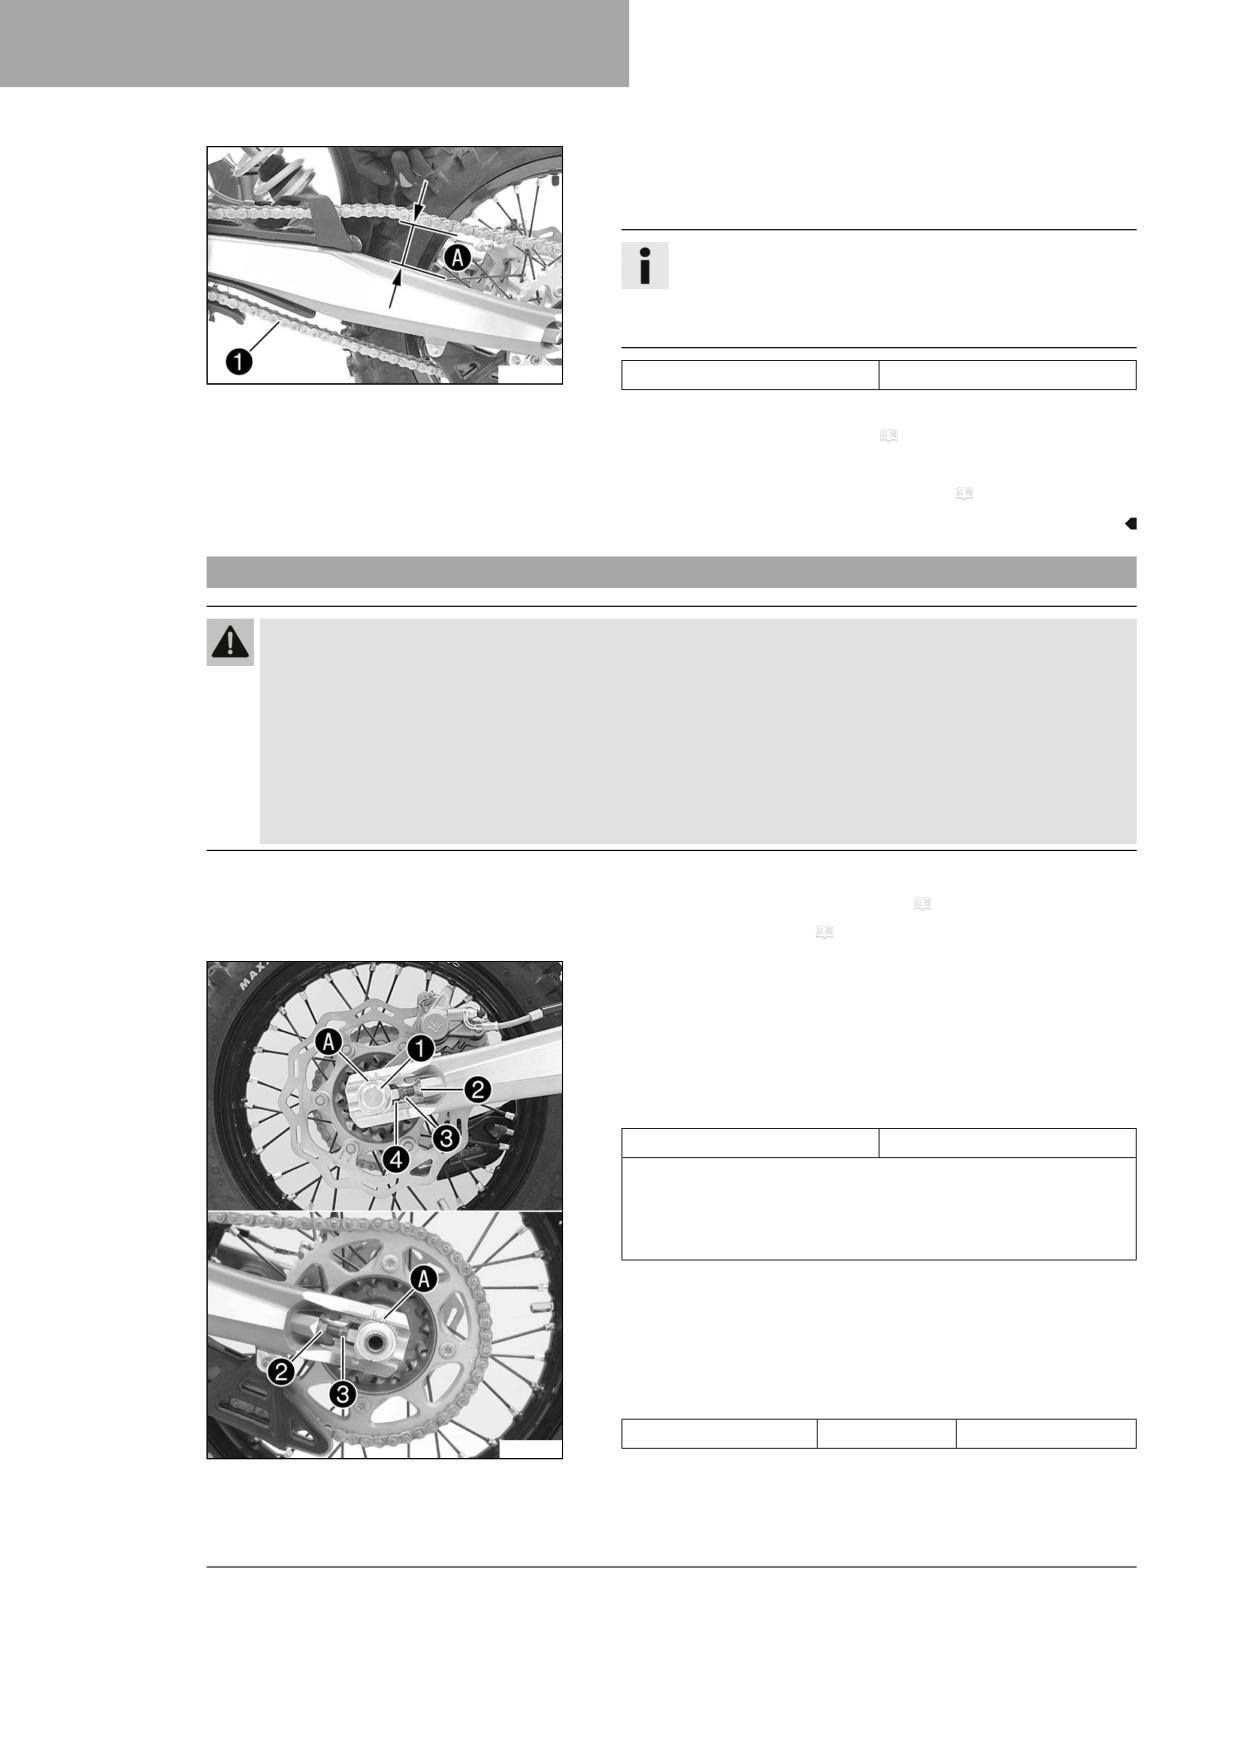
11
SERVICE WORK ON THE CHASSIS
Main work
- Pull the chain at the end of the chain sliding guard upward to mea-
sure chain tension A.
Info
Lower chain section 1 must be taut.
Chain wear is not always even, so you should repeat this
measurement at different chain positions.
V00863-10
Chain tension
46 … 49 mm (1.81 … 1.93 in)
» If the chain tension does not meet the specification:
- Adjust the chain tension. ( p. 60)
Finishing work
- Remove the motorcycle from the lift stand. ( p. 41)
11.35
Adjusting the chain tension
Warning
Danger of accidents Incorrect chain tension damages components and results in accidents.
If the chain is tensioned too much, the chain, engine sprocket, rear sprocket, transmission and rear wheel bear-
ings wear more quickly. Some components may break if overloaded.
If the chain is too loose, the chain may fall off the engine sprocket or the rear sprocket. As a result, the rear wheel
locks or the engine will be damaged.
- Check the chain tension regularly.
- Set the chain tension in accordance with the specification.
Preparatory work
- Raise the motorcycle with a lift stand. ( p. 41)
- Check the chain tension. ( p. 59)
Main work
- Loosen nut 1.
- Loosen nuts 2.
- Adjust the chain tension by turning adjusting screws 3 left and
right.
Guideline
Chain tension
46 … 49 mm (1.81 … 1.93 in)
Turn adjusting screws 3 on the left and right so that the mark-
ings on the left and right chain adjusters are in the same position
relative to reference marks A. The rear wheel is then correctly
aligned.
- Tighten nuts 2.
- Make sure that chain adjusters 4 are fitted correctly on adjusting
screws 3.
- Tighten nut 1.
Guideline
Nut, rear wheel spindle
M20x1.5
80 Nm (59 lbf ft)
S04279-10
60
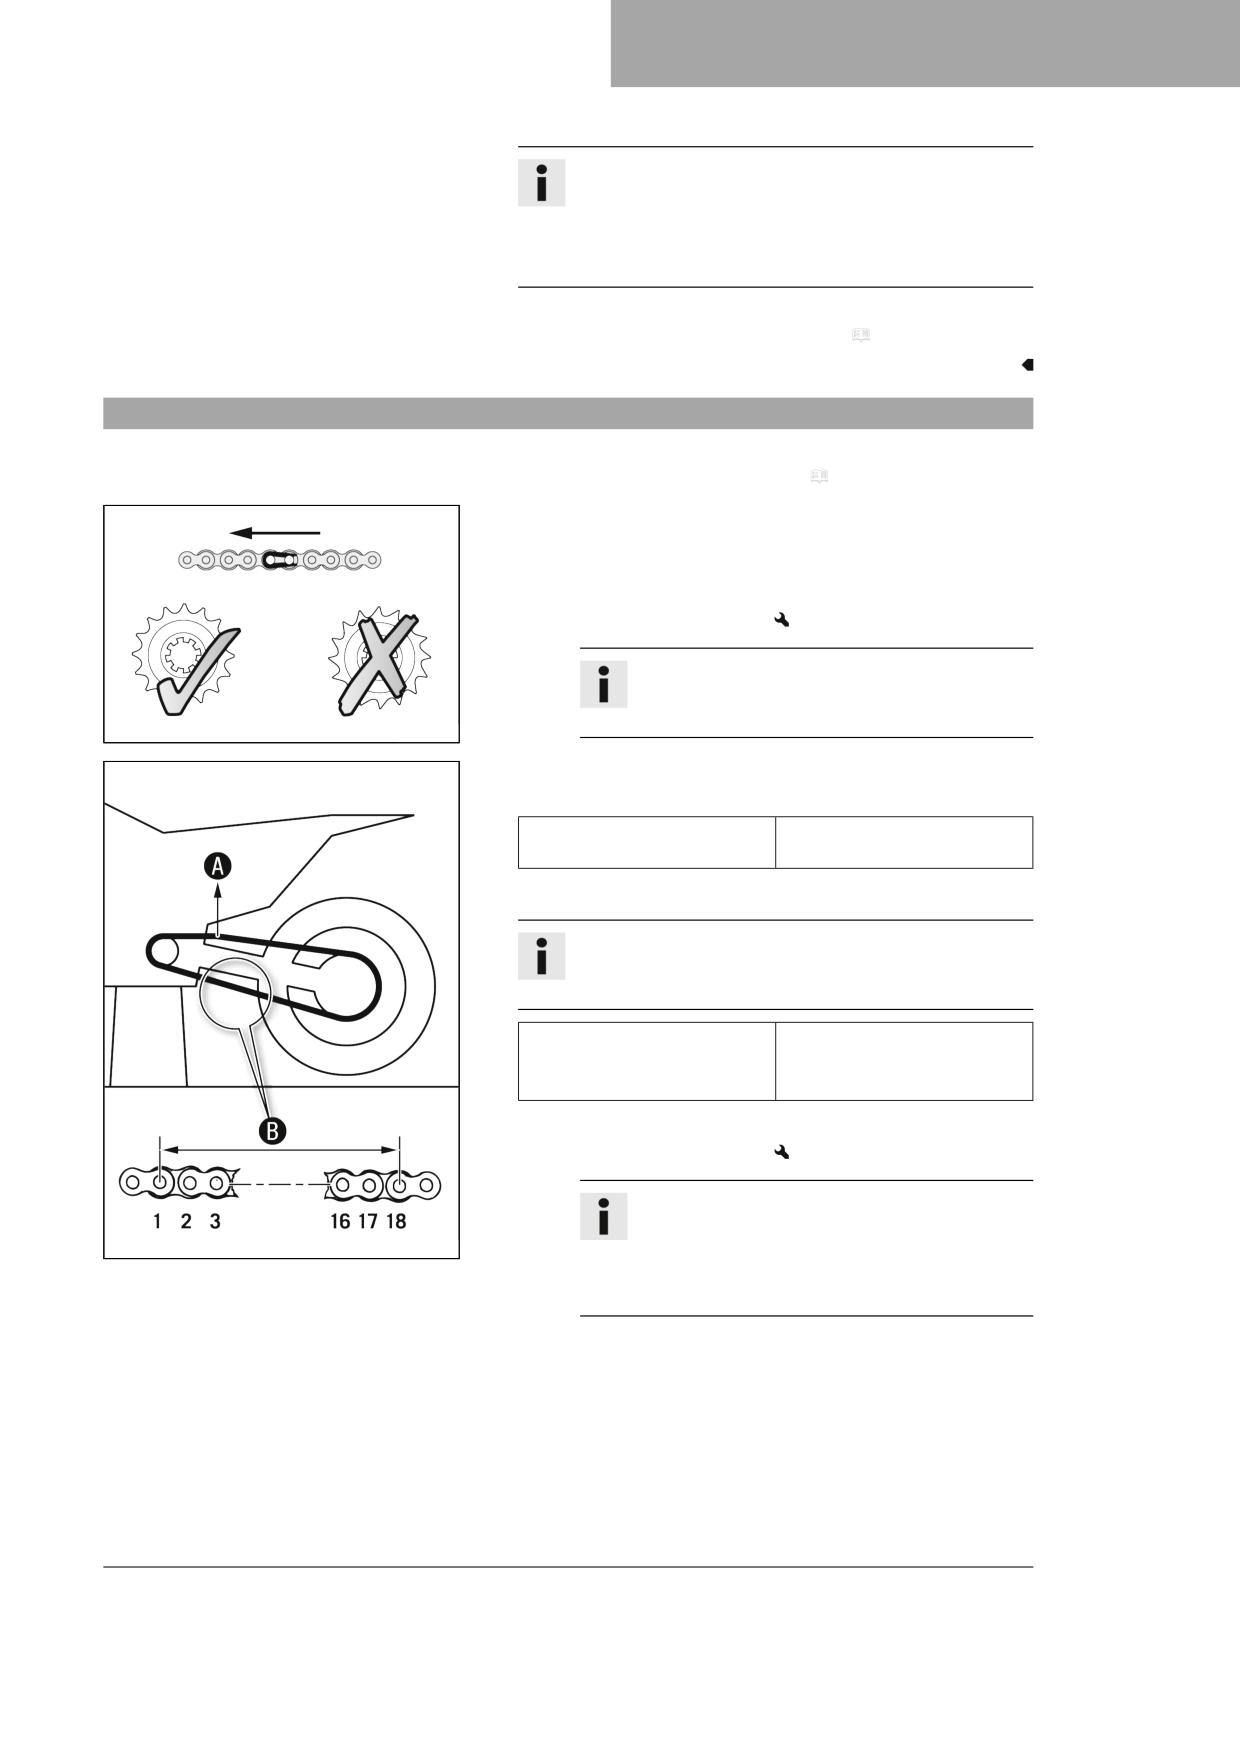
SERVICE WORK ON THE CHASSIS
11
Info
The wide adjustment range of the chain adjusters (32 mm
(1.26 in)) enables different secondary ratios with the same
chain length.
Chain adjusters 4 can be turned by 180°.
Finishing work
- Remove the motorcycle from the lift stand. ( p. 41)
11.36
Checking the chain, rear sprocket, engine sprocket, and chain guide
Preparatory work
- Raise the motorcycle with a lift stand. ( p. 41)
Main work
- Shift the transmission into neutral.
- Check the chain, rear sprocket, and engine sprocket for wear.
» If the chain, rear sprocket or engine sprocket is worn:
- Change the drivetrain kit.
Info
The engine sprocket, rear sprocket, and chain
should always be replaced together.
400227-01
- Pull on the top section of the chain with the specified weight A.
Guideline
Weight, chain wear measure-
10 … 15 kg (22 … 33 lb.)
ment
- Measure distance B of 18 chain rollers in the lower chain section.
Info
Chain wear is not always even, so you should repeat this
measurement at different chain positions.
219 mm (8.62 in)
Maximum distance B from
18 chain rollers at the longest
chain section
» If distance B is greater than the specified measurement:
- Change the drivetrain kit.
Info
When a new chain is mounted, the rear sprocket
400987-10
and engine sprocket should also be changed.
New chains wear out faster on an old, worn rear
sprocket or engine sprocket.
61
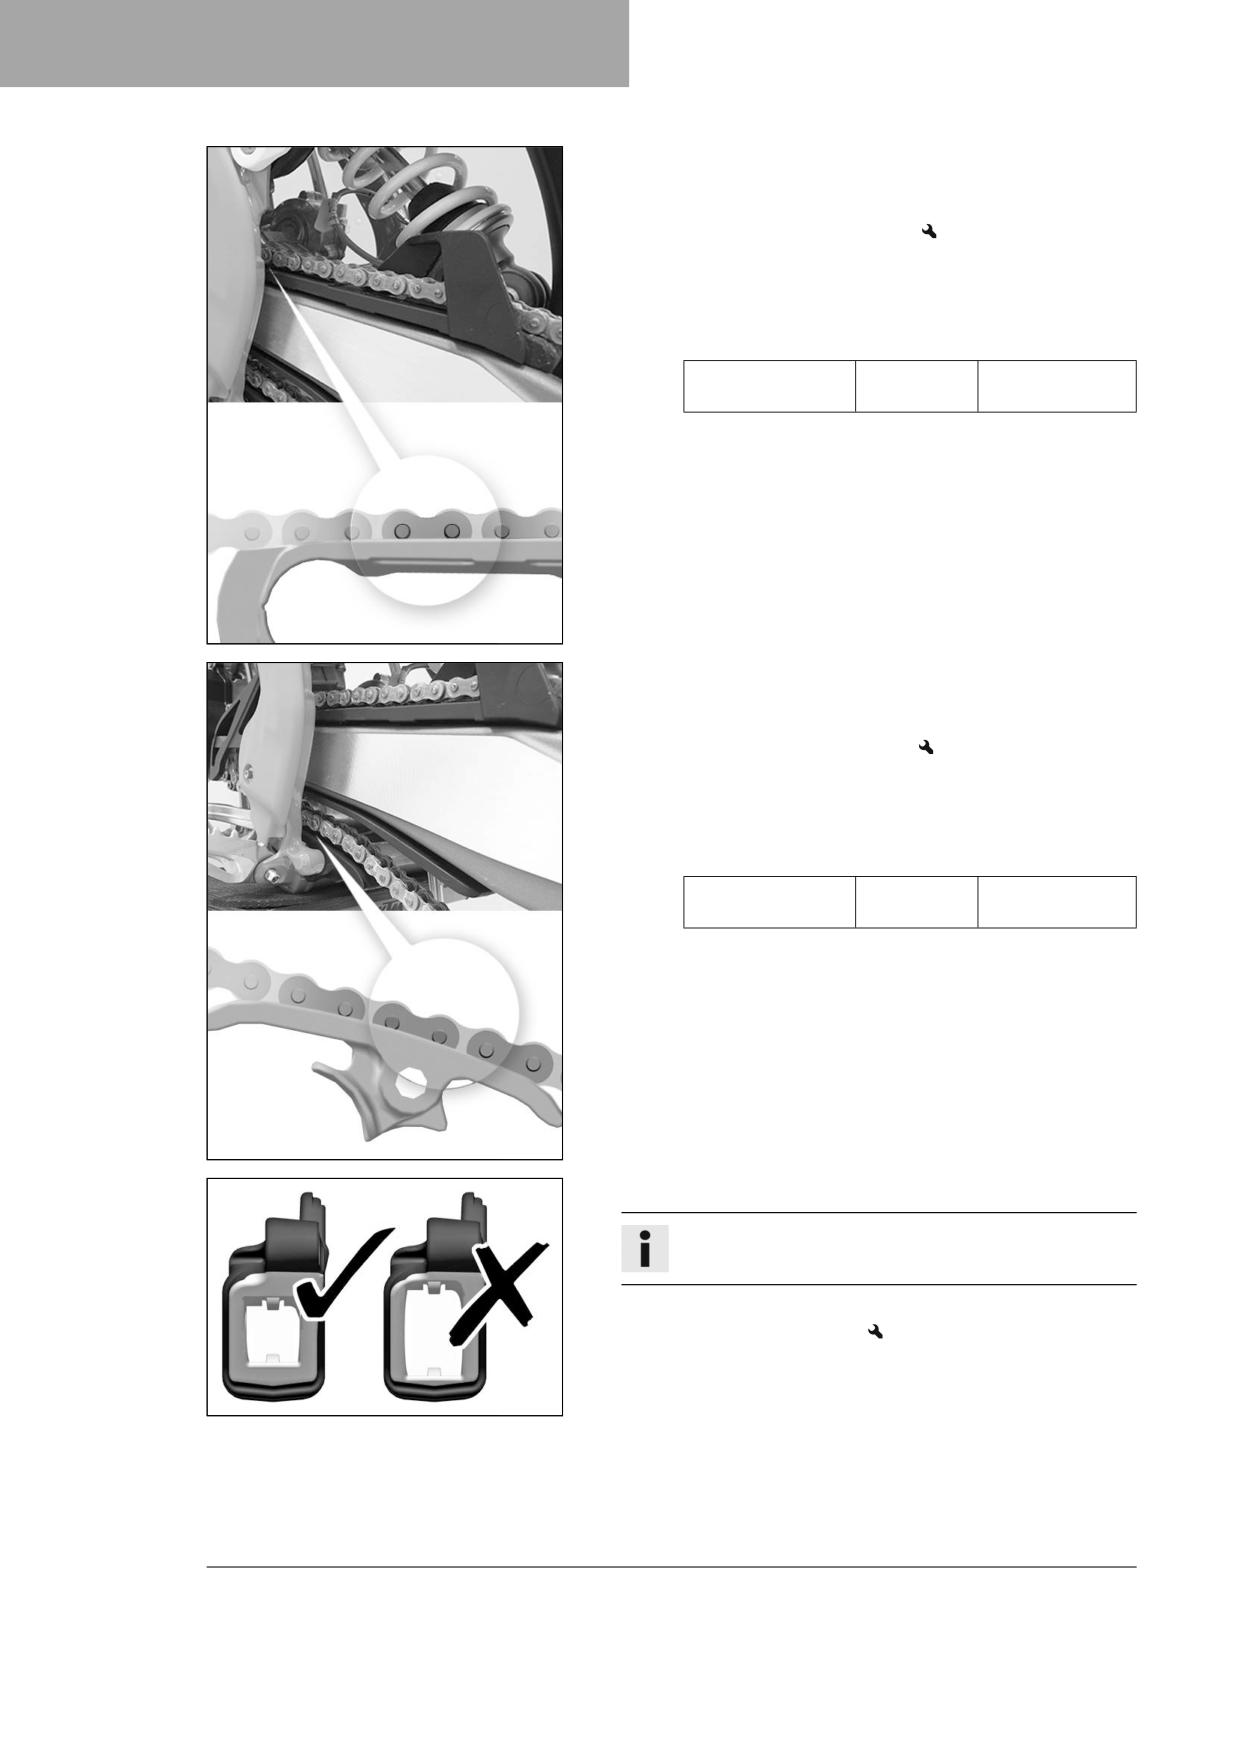
11
SERVICE WORK ON THE CHASSIS
- Check the chain sliding guard for wear.
» If the lower edge of the chain pins is in line with, or below, the
chain sliding guard:
- Change the chain sliding guard.
- Check that the chain sliding guard is firmly seated.
» If the chain sliding guard is loose:
- Tighten screws on the chain sliding guard.
Guideline
Remaining screws,
M6
10 Nm (7.4 lbf ft)
chassis
H02309-01
- Check the chain sliding piece for wear.
» If the lower edge of the chain pins is in line with or below the
chain sliding piece:
- Change the chain sliding piece.
- Check that the chain sliding piece is firmly seated.
» If the chain sliding piece is loose:
- Tighten screw on the chain sliding piece.
Guideline
Screw, chain sliding
M8
15 Nm (11.1 lbf ft)
piece
H02310-01
- Check the chain guide for wear.
Info
Wear can be seen on the front of the chain guide.
» If the light part of the chain guide is worn:
- Change the chain guide.
401760-01
62
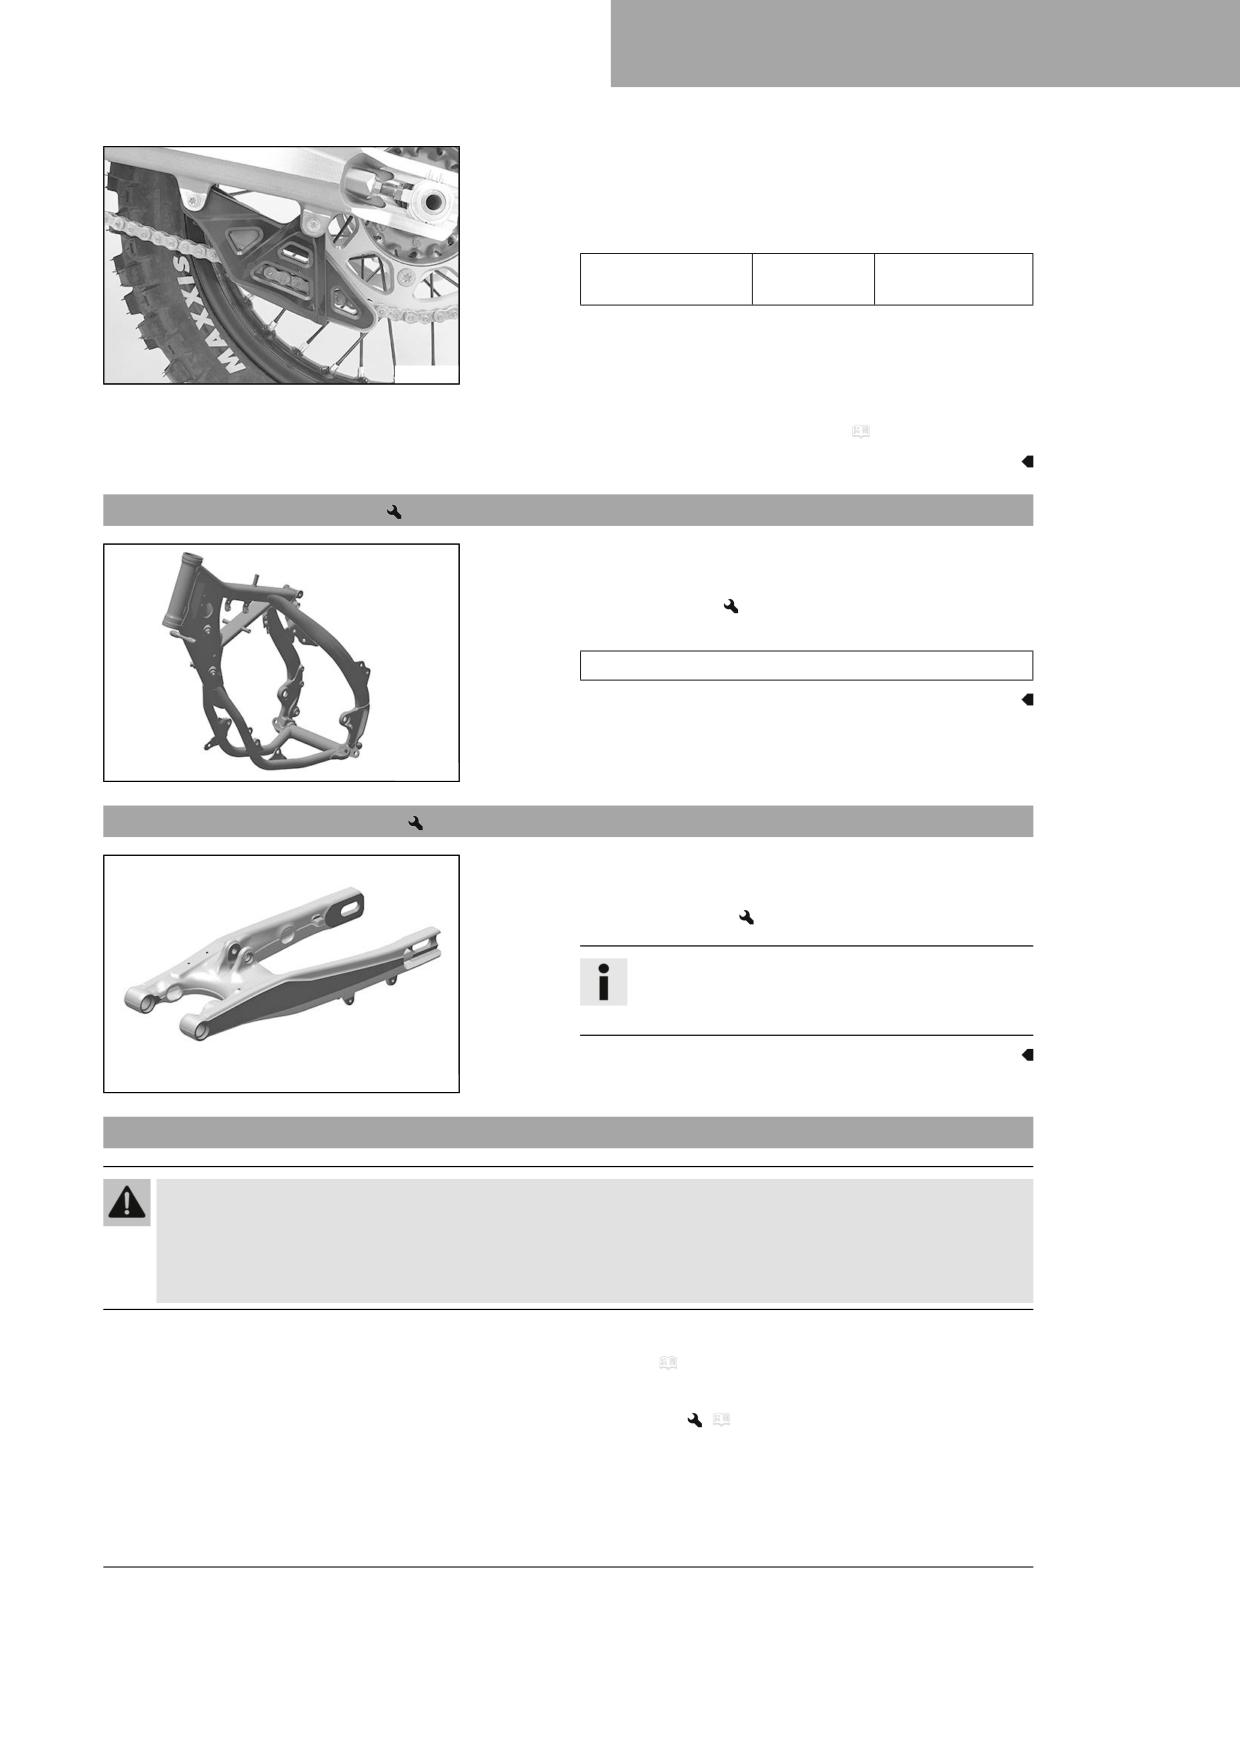
SERVICE WORK ON THE CHASSIS
11
– Check that the chain guide is firmly seated.
» If the chain guide is loose:
- Tighten the screws on the chain guide.
Guideline
Remaining screws,
M6
10 Nm (7.4 lbf ft)
chassis
V00861-01
Finishing work
- Remove the motorcycle from the lift stand. ( p. 41)
11.37
Checking the frame
- Check the frame for damage, cracks, and deformation.
» If the frame shows signs of damage, cracks, or deformation:
- Change the frame.
Guideline
Repairs on the frame are not permitted.
V00858-01
11.38
Checking the link fork
- Check the link fork for damage, cracking, and deformation.
» If the link fork shows signs of damage, cracking, or deformation:
- Change the link fork.
Info
Always replace a damaged link fork. GASGAS Motor-
cycles does not permit repairing link forks.
V00857-01
11.39
Checking the throttle cable routing
Warning
Danger of accidents The throttle cable can become kinked, trapped or blocked if it is not routed correctly.
If the throttle cable is kinked, trapped or blocked, the speed can no longer be controlled.
- Make sure that the throttle cable routing and the play in throttle cable complies with the specification.
Preparatory work
- Remove the seat. ( p. 52)
- Turn tap handle of the fuel tap to the OFF position.
- Remove the fuel tank.
(
p. 56)
63
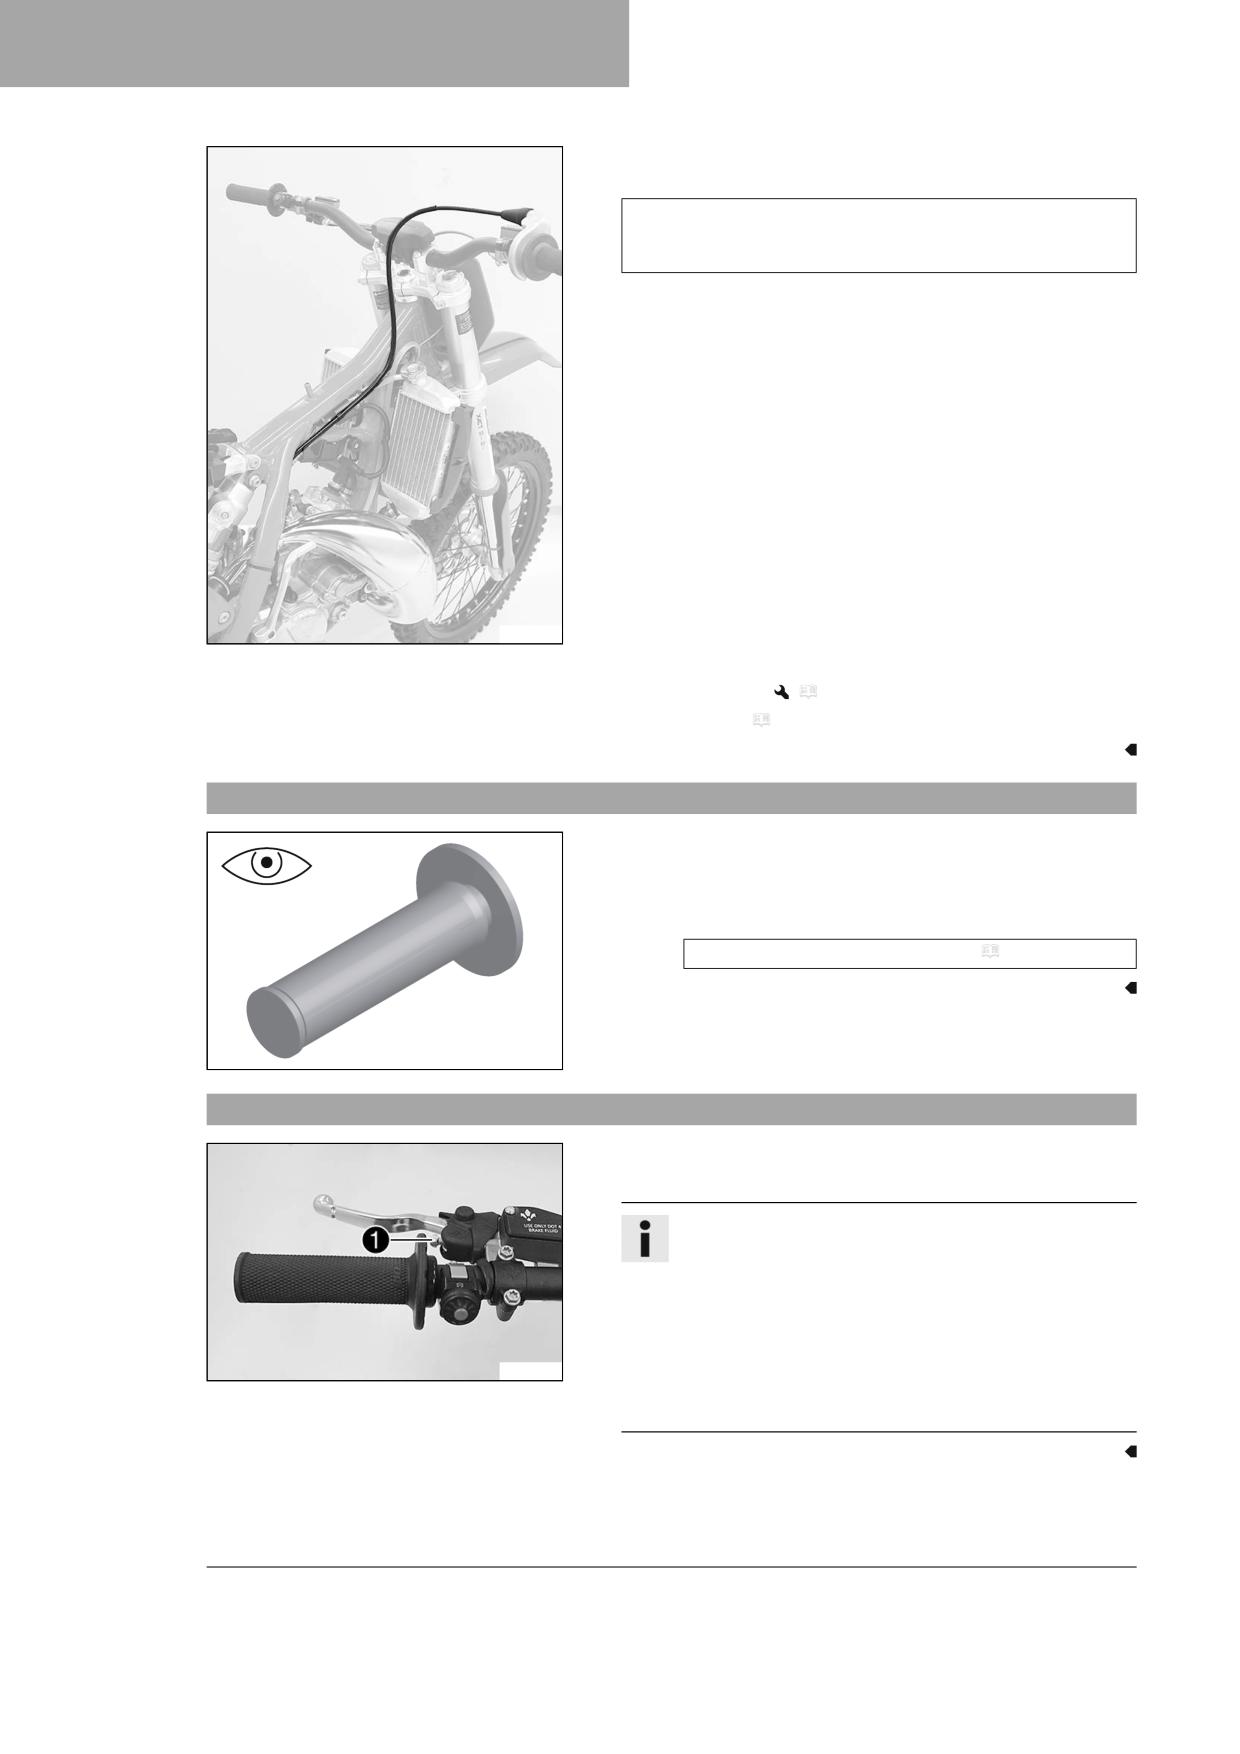
11
SERVICE WORK ON THE CHASSIS
Main work
- Check the throttle cable routing.
The throttle cable must be routed along the back of the handle-
bar, to the right of the frame, above the fuel tank roller, and to
the carburetor.
» If the throttle cable is not routed as specified:
- Correct the throttle cable routing.
S04347-10
Finishing work
- Install the fuel tank.
(
p. 57)
– Mount the seat. ( p. 52)
11.40
Checking the rubber grip
- Check the rubber grips on the handlebar for damage and wear and
to ensure they are firmly seated.
» If a rubber grip is damaged, worn or loose:
- Change and secure the rubber grip.
Rubber grip adhesive (00062030051) ( p. 118)
401197-01
11.41
Adjusting the basic position of the clutch lever
- Adjust the basic position of the clutch lever to the size of the rider's
hand using adjusting screw 1.
Info
Turn the adjusting screw clockwise to increase the distance
between the clutch lever and the handlebar.
Turn the adjusting screw counterclockwise to decrease the
distance between the clutch lever and the handlebar.
The range of adjustment is limited.
S04274-12
Turn the adjusting screw by hand only, and do not apply any
force.
Do not make any adjustments while riding.
64
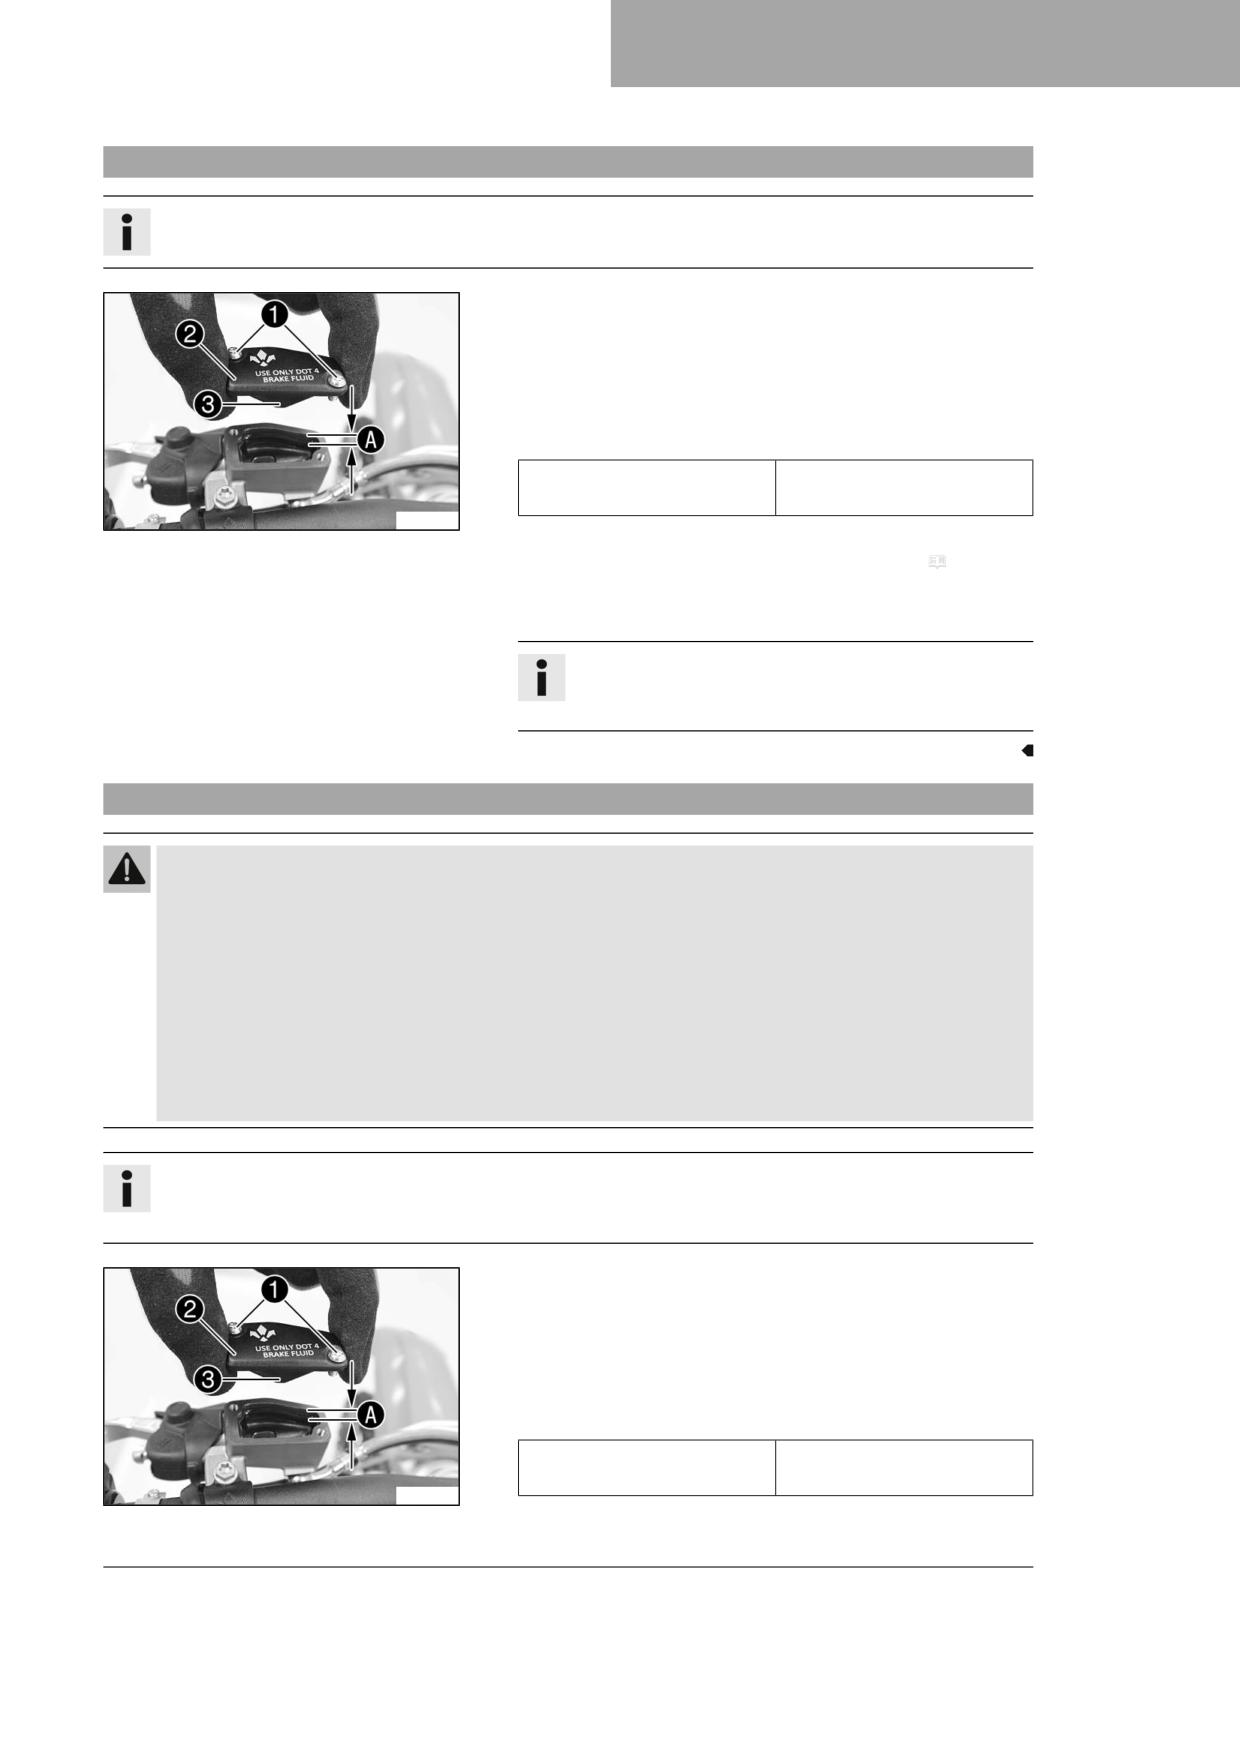
SERVICE WORK ON THE CHASSIS
11
11.42
Checking the fluid level of the hydraulic clutch
Info
The fluid level rises with increasing wear of the clutch facing discs.
- Move the hydraulic clutch fluid reservoir mounted on the handlebar
into a horizontal position.
- Remove screws 1.
- Take off cover 2 with membrane 3.
- Check the fluid level.
Guideline
4 mm (0.16 in)
Level A (fluid level below
container rim)
S04281-10
» If the fluid level does not meet specifications:
- Correct the fluid level of the hydraulic clutch. ( p. 65)
- Position the cover with the membrane. Mount and tighten the
screws.
Info
Use water to immediately clean up any brake fluid that has
overflowed or spilled.
11.43
Correcting the fluid level of the hydraulic clutch
Warning
Skin irritation Brake fluid is a harmful substance.
- Keep brake fluid out of the reach of children.
- Wear suitable protective clothing and safety glasses.
- Do not allow brake fluid to come into contact with the skin, the eyes or clothing.
- Consult a doctor immediately if brake fluid has been swallowed.
- Rinse the affected area with plenty of water in the event of contact with the skin.
- Rinse eyes thoroughly with water immediately and consult a doctor if brake fluid comes into contact with the
eyes.
- If brake fluid spills on to your clothing, change the clothing.
Info
The fluid level rises with increasing wear of the clutch facing discs.
Avoid contact between brake fluid and painted parts. Brake fluid corrodes paint.
- Move the hydraulic clutch fluid reservoir mounted on the handlebar
into a horizontal position.
- Remove screws 1.
- Take off cover 2 with membrane 3.
- Correct the fluid up to level A.
Guideline
4 mm (0.16 in)
Level A (fluid level below
container rim)
S04281-10
65
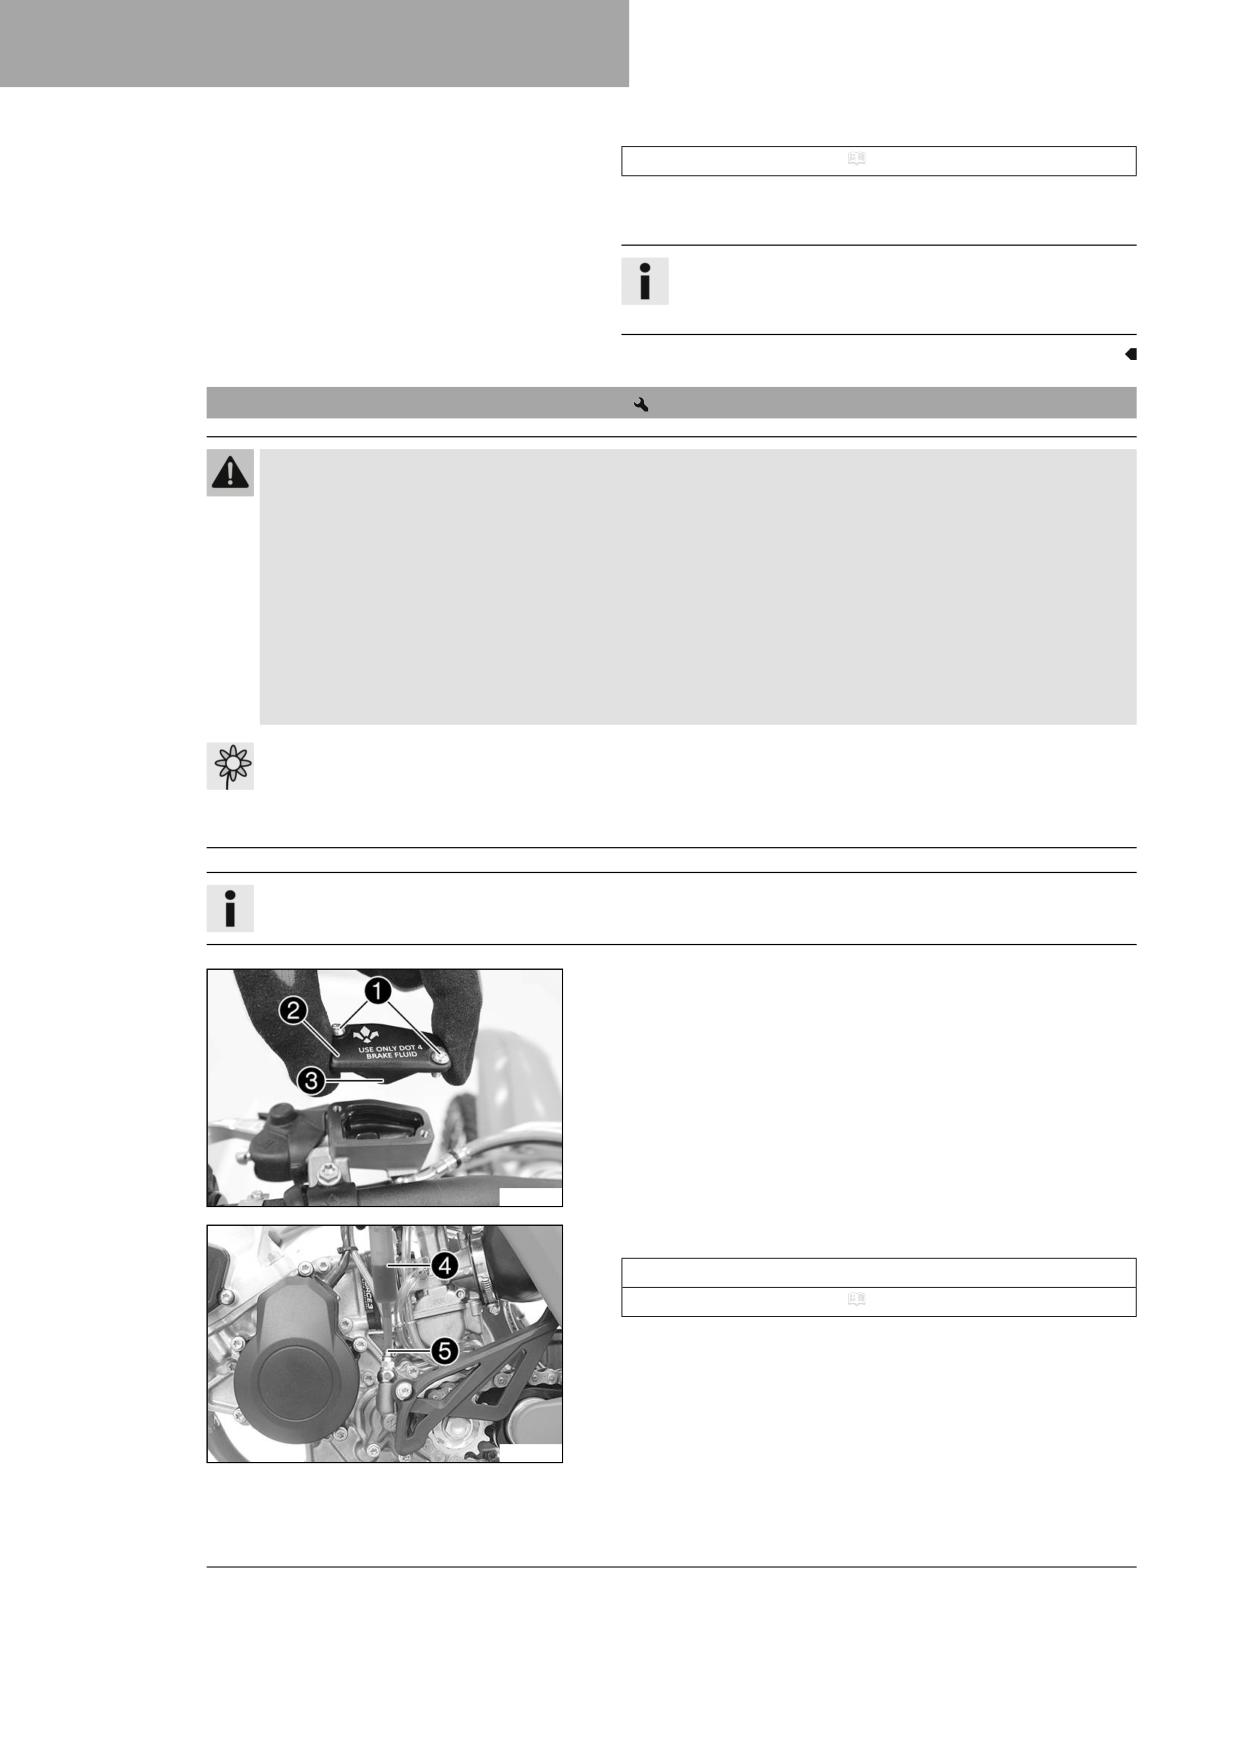
11
SERVICE WORK ON THE CHASSIS
Brake fluid DOT 4 / DOT 5.1 ( p. 116)
- Position the cover with the membrane. Mount and tighten the
screws.
Info
Use water to immediately clean up any brake fluid that has
overflowed or spilled.
11.44
Changing the hydraulic clutch fluid
Warning
Skin irritation Brake fluid is a harmful substance.
- Keep brake fluid out of the reach of children.
- Wear suitable protective clothing and safety glasses.
- Do not allow brake fluid to come into contact with the skin, the eyes or clothing.
- Consult a doctor immediately if brake fluid has been swallowed.
- Rinse the affected area with plenty of water in the event of contact with the skin.
- Rinse eyes thoroughly with water immediately and consult a doctor if brake fluid comes into contact with the
eyes.
- If brake fluid spills on to your clothing, change the clothing.
Note
Environmental hazard Hazardous substances cause environmental damage.
- Dispose of oils, grease, filters, fuel, cleaning agents, brake fluid, etc., correctly and in compliance with the appli-
cable regulations.
Info
Avoid contact between brake fluid and painted parts. Brake fluid corrodes paint.
- Move the hydraulic clutch fluid reservoir mounted on the handlebar
into a horizontal position.
- Remove screws 1.
- Take off cover 2 with membrane 3.
S04281-11
- Fill bleeding syringe 4 with the appropriate hydraulic fluid.
Syringe (50329050000)
Brake fluid DOT 4 / DOT 5.1 ( p. 116)
- On the clutch slave cylinder, remove bleeder screw 5 and mount
bleeding syringe 4.
S04348-10
66
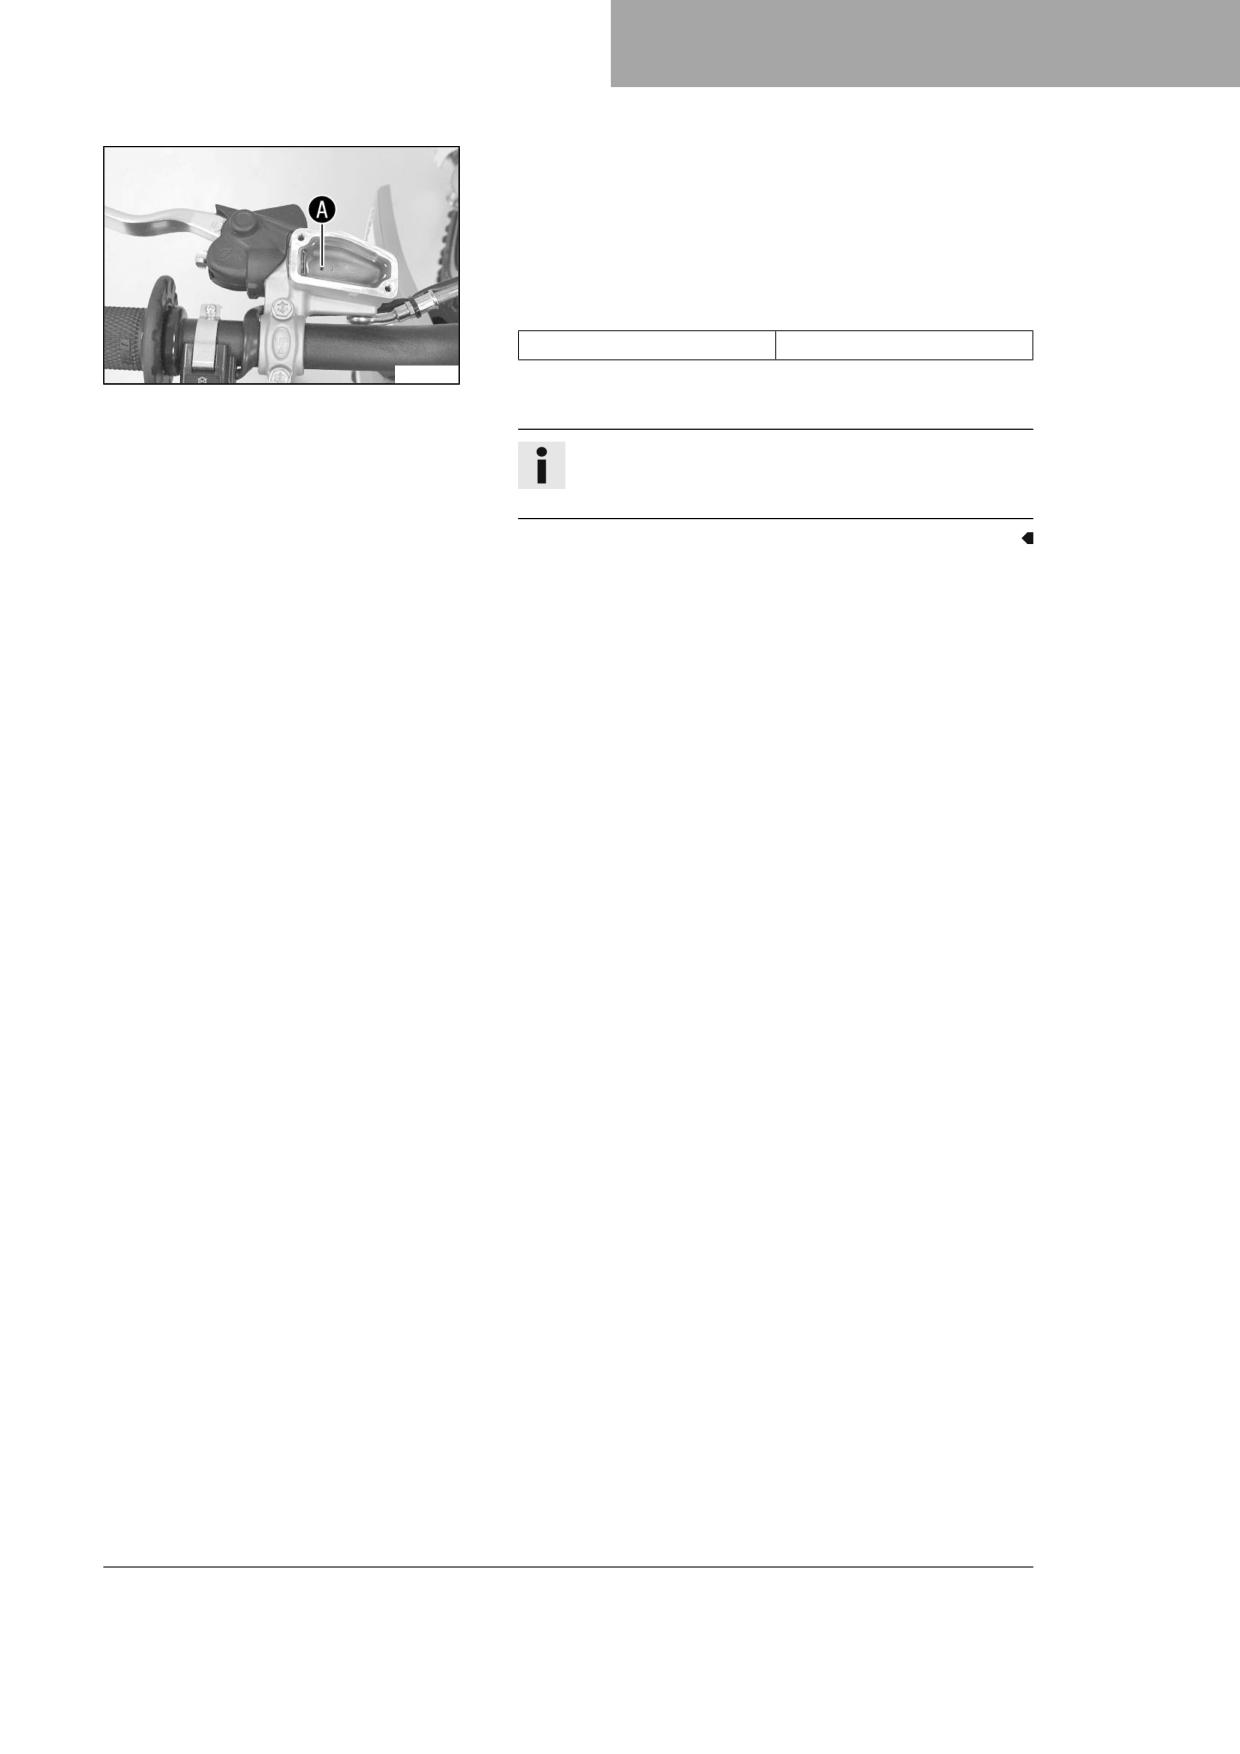
SERVICE WORK ON THE CHASSIS
11
– Inject the liquid into the system until it escapes from opening A of
the master cylinder without bubbles.
- Occasionally extract the fluid from the master cylinder reservoir to
prevent overflowing.
- Remove the bleeding syringe. Mount and tighten the bleeder screw.
- Correct the fluid level of the hydraulic clutch.
Guideline
Fluid level below container rim
4 mm (0.16 in)
V00849-10
- Position the cover with the membrane. Mount and tighten the
screws.
Info
Use water to immediately clean up any brake fluid that has
overflowed or spilled.
67
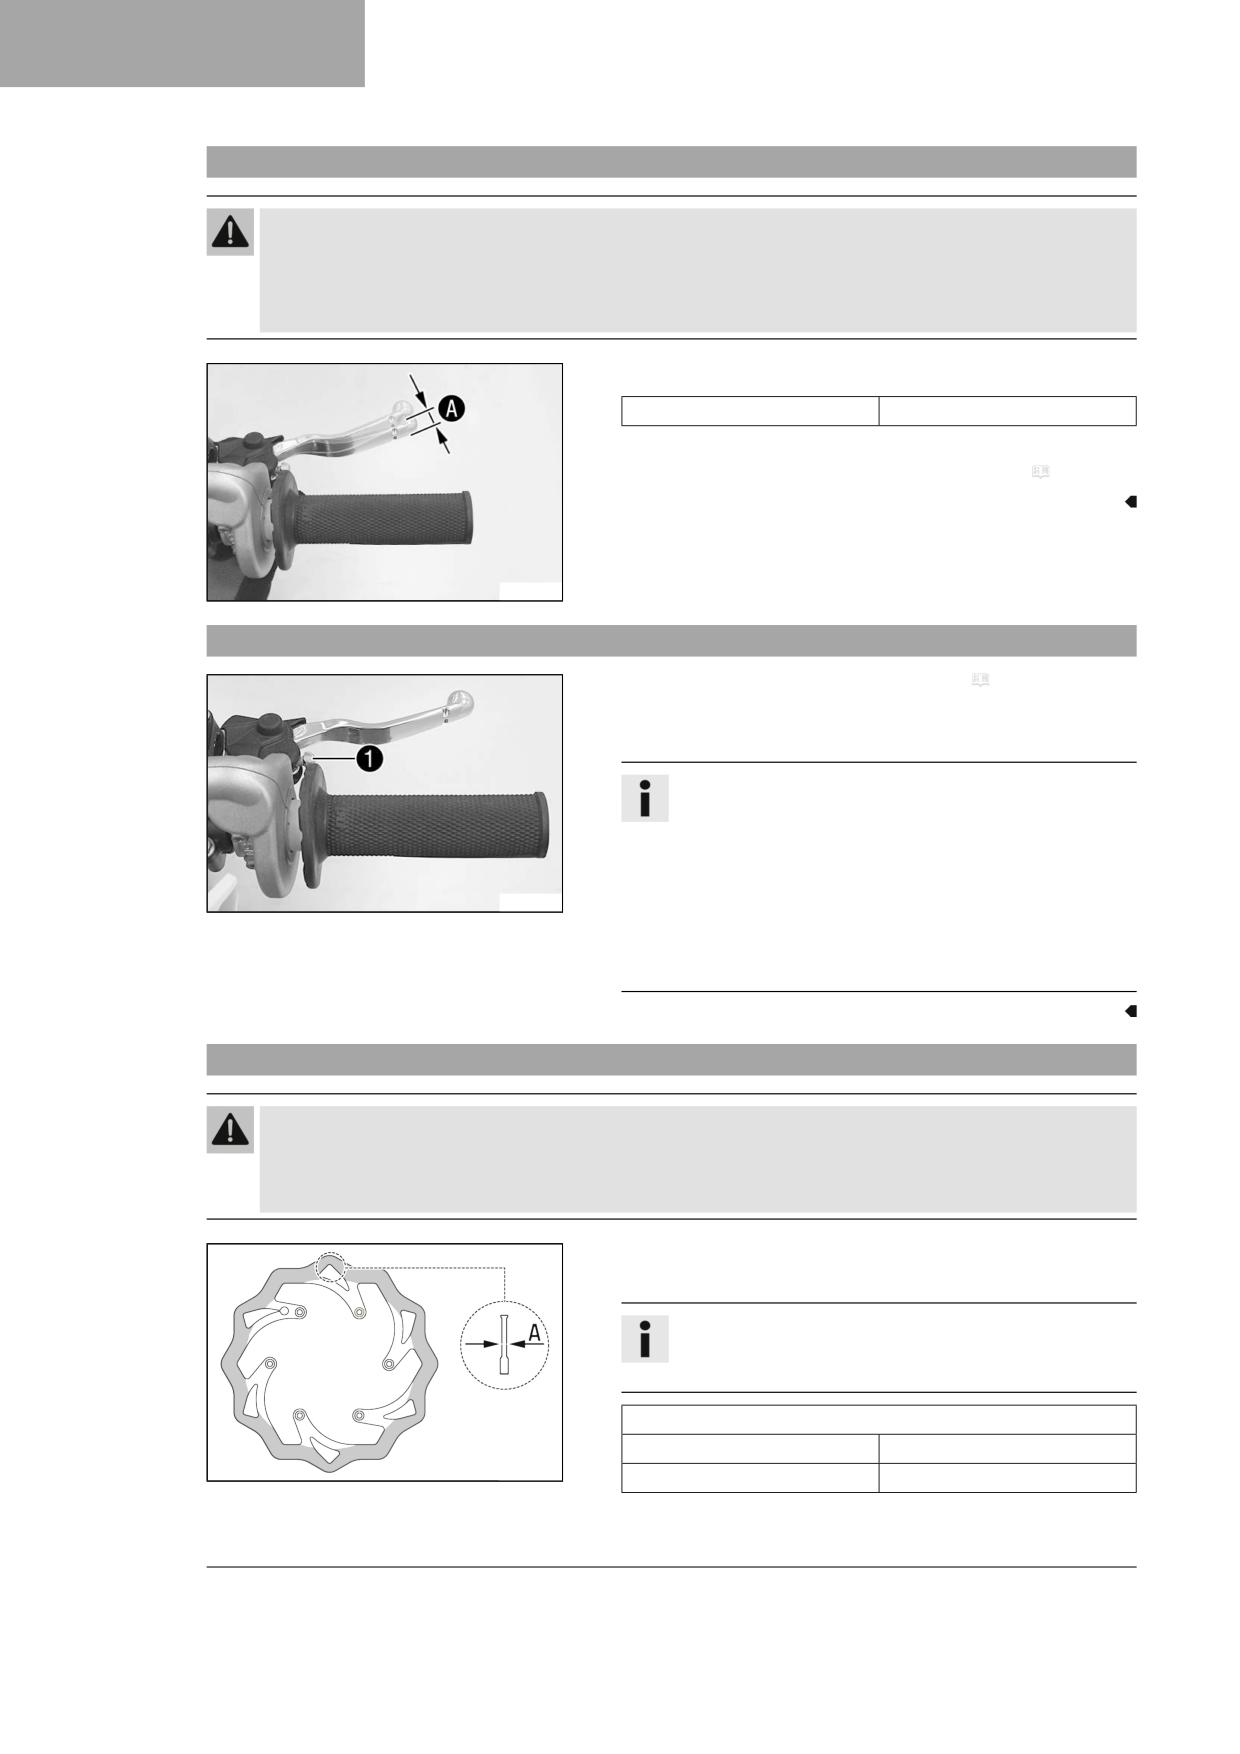
12
BRAKE SYSTEM
12.1
Checking the free travel of the hand brake lever
Warning
Danger of accidents The brake system fails in the event of overheating.
If there is no free travel on the hand brake lever, pressure builds up on the front brake circuit.
- Set the free travel on the hand brake lever in accordance with the specification.
- Push the hand brake lever forward and check free travel A.
Free travel of hand brake lever
≥ 3 mm (≥ 0.12 in)
» If the free travel does not match the specification:
- Adjust the free travel of the handbrake lever. ( p. 68)
S04282-10
12.2
Adjusting the free travel of the handbrake lever
- Check the free travel of the hand brake lever. ( p. 68)
- Adjust the free travel of the handbrake lever with adjustment
screw 1.
Info
Turn the adjusting screw clockwise to reduce free travel. The
pressure point moves away from the handlebar.
Turn the adjusting screw counterclockwise to increase free
travel. The pressure point moves towards the handlebar.
S04283-10
The range of adjustment is limited.
Turn the adjusting screw by hand only, and do not apply any
force.
Do not make any adjustments while riding.
12.3
Checking the brake discs
Warning
Danger of accidents Worn-out brake discs reduce the braking effect.
- Make sure that worn-out brake discs are replaced immediately. (Your authorized GASGAS Motorcycles work-
shop will be glad to help.)
- Check the front and rear brake disc thickness at multiple points for
the dimension A.
Info
Wear reduces the thickness of the brake disc around the
contact surface of the brake linings.
Brake discs - wear limit
front
3.5 mm (0.138 in)
400257-10
rear
3.7 mm (0.146 in)
» If the brake disc thickness is less than the specified value:
68
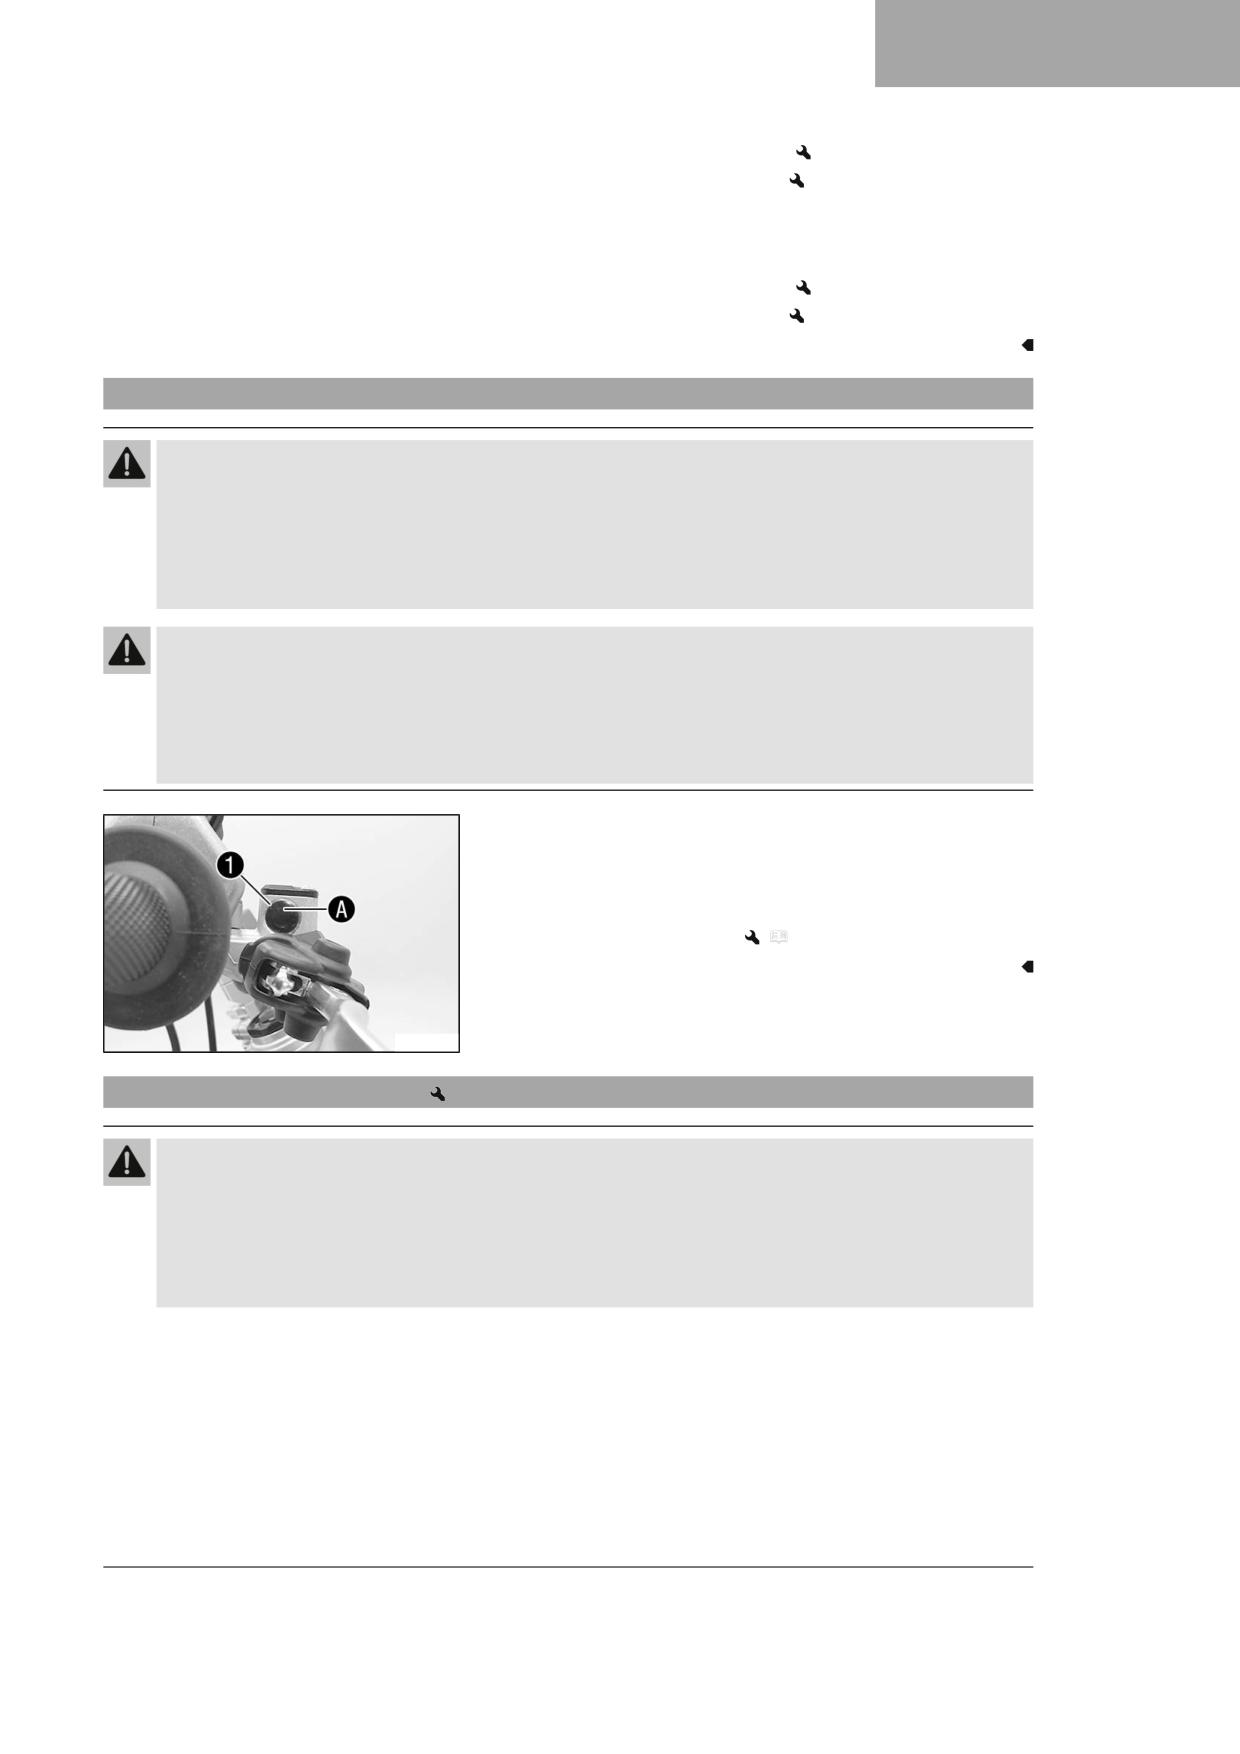
BRAKE SYSTEM
12
– Change the front brake disc.
- Change the rear brake disc.
- Check the front and rear brake discs for damage, cracking, and
deformation.
» If the brake disc exhibits damage, cracking, or deformation:
- Change the front brake disc.
- Change the rear brake disc.
12.4
Checking the front brake fluid level
Warning
Danger of accidents An insufficient brake fluid level will cause the brake system to fail.
If the brake fluid level drops below the specified marking or the specified value, the brake system is leaking or the
brake linings are worn down.
- Check the brake system and ensure that nobody drives the vehicle before the problem is eliminated. (Your
authorized GASGAS Motorcycles workshop will be glad to help.)
Warning
Danger of accidents Brake fluid which is too old or of the wrong type impairs the function of the brake system.
- Make sure that brake fluid for the front and rear brake is changed in accordance with the service schedule.
(Your authorized GASGAS Motorcycles workshop will be glad to help.)
- Make sure that only clean, approved brake fluid from a tightly sealed container is used. (Your authorized GAS-
GAS Motorcycles workshop will be glad to help.)
- Move the brake fluid reservoir mounted on the handlebar to a hori-
zontal position.
- Check the brake fluid level in level viewer 1.
» If the brake fluid level has dropped below the marking A:
- Add front brake fluid.
(
p. 69)
V00864-10
12.5
Adding front brake fluid
Warning
Danger of accidents An insufficient brake fluid level will cause the brake system to fail.
If the brake fluid level drops below the specified marking or the specified value, the brake system is leaking or the
brake linings are worn down.
- Check the brake system and ensure that nobody drives the vehicle before the problem is eliminated. (Your
authorized GASGAS Motorcycles workshop will be glad to help.)
69
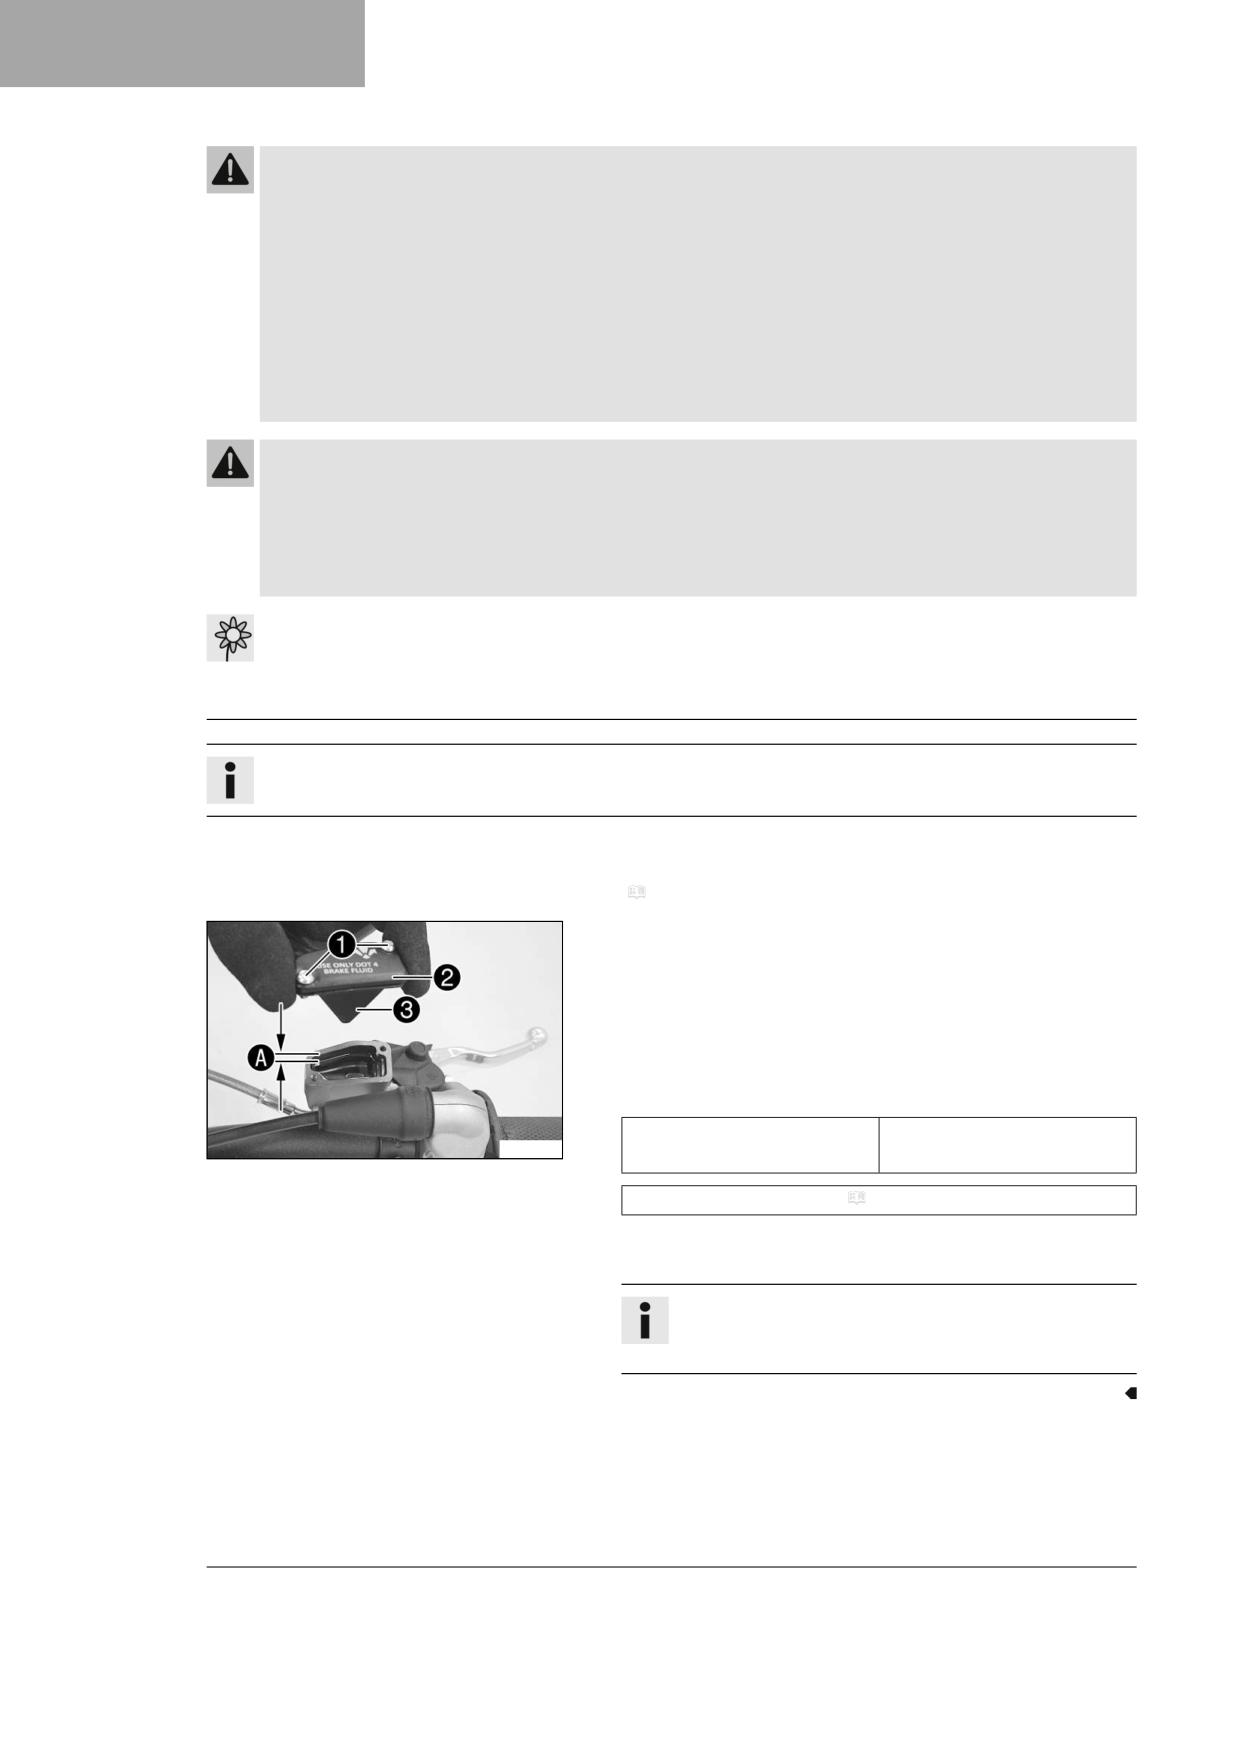
12
BRAKE SYSTEM
Warning
Skin irritation Brake fluid is a harmful substance.
- Keep brake fluid out of the reach of children.
- Wear suitable protective clothing and safety glasses.
- Do not allow brake fluid to come into contact with the skin, the eyes or clothing.
- Consult a doctor immediately if brake fluid has been swallowed.
- Rinse the affected area with plenty of water in the event of contact with the skin.
- Rinse eyes thoroughly with water immediately and consult a doctor if brake fluid comes into contact with the
eyes.
- If brake fluid spills on to your clothing, change the clothing.
Warning
Danger of accidents Brake fluid which is too old or of the wrong type impairs the function of the brake system.
- Make sure that brake fluid for the front and rear brake is changed in accordance with the service schedule.
(Your authorized GASGAS Motorcycles workshop will be glad to help.)
- Make sure that only clean, approved brake fluid from a tightly sealed container is used. (Your authorized GAS-
GAS Motorcycles workshop will be glad to help.)
Note
Environmental hazard Hazardous substances cause environmental damage.
- Dispose of oils, grease, filters, fuel, cleaning agents, brake fluid, etc., correctly and in compliance with the appli-
cable regulations.
Info
Avoid contact between brake fluid and painted parts. Brake fluid corrodes paint.
Preparatory work
- Check that the brake linings of the front brake are secured.
(
p. 71)
Main work
- Move the brake fluid reservoir mounted on the handlebar to a hori-
zontal position.
- Remove screws 1.
- Take off cover 2 with membrane 3.
- Add brake fluid to level A.
Guideline
5 mm (0.2 in)
Level A (brake fluid level
S04284-10
below reservoir rim)
Brake fluid DOT 4 / DOT 5.1 ( p. 116)
- Position the cover with the membrane. Mount and tighten the
screws.
Info
Use water to immediately clean up any brake fluid that has
overflowed or spilled.
70
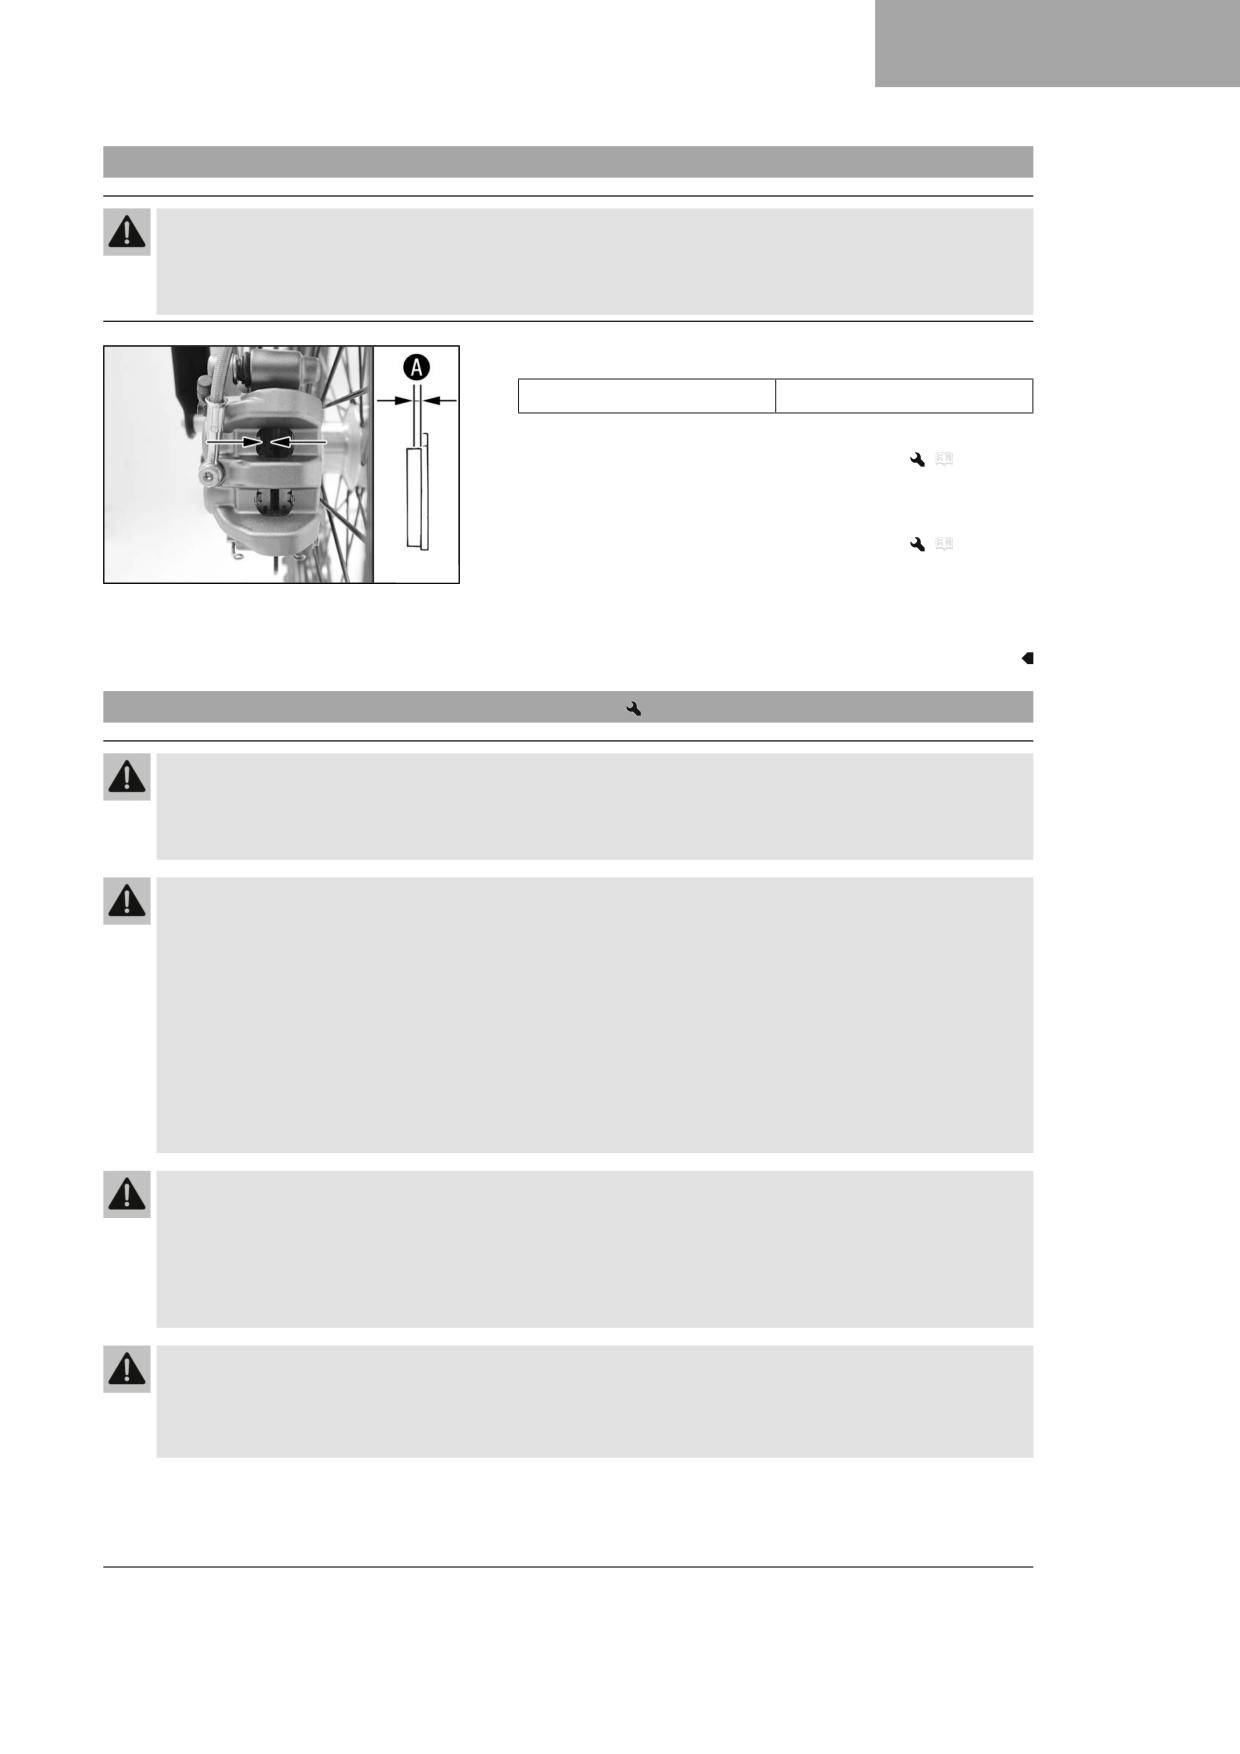
BRAKE SYSTEM
12
12.6
Checking brake linings of the front brake are secure
Warning
Danger of accidents Worn-out brake linings reduce the braking effect.
- Ensure that worn-out brake linings are replaced immediately. (Your authorized GASGAS Motorcycles workshop
will be glad to help.)
- Check the brake linings for lining thickness A.
≥ 1 mm (≥ 0.04 in)
Minimum thickness A
» If it is less than the minimum thickness:
- Change the brake linings of the front brake.
(
p. 71)
– Check the brake linings for damage and cracking.
» If there is damage or cracking:
- Change the brake linings of the front brake.
(
p. 71)
S04285-10
- Check that the brake linings are secure.
» If the brake linings are not secured correctly:
- Secure brake linings, replace with new parts if necessary.
12.7
Changing the brake linings of the front brake
Warning
Danger of accidents Incorrect servicing will cause the brake system to fail.
- Ensure that service work and repairs are performed professionally. (Your authorized GASGAS Motorcy-
cles workshop will be glad to help.)
Warning
Skin irritation Brake fluid is a harmful substance.
- Keep brake fluid out of the reach of children.
- Wear suitable protective clothing and safety glasses.
- Do not allow brake fluid to come into contact with the skin, the eyes or clothing.
- Consult a doctor immediately if brake fluid has been swallowed.
- Rinse the affected area with plenty of water in the event of contact with the skin.
- Rinse eyes thoroughly with water immediately and consult a doctor if brake fluid comes into contact with the
eyes.
- If brake fluid spills on to your clothing, change the clothing.
Warning
Danger of accidents Brake fluid which is too old or of the wrong type impairs the function of the brake system.
- Make sure that brake fluid for the front and rear brake is changed in accordance with the service schedule.
(Your authorized GASGAS Motorcycles workshop will be glad to help.)
- Make sure that only clean, approved brake fluid from a tightly sealed container is used. (Your authorized GAS-
GAS Motorcycles workshop will be glad to help.)
Warning
Danger of accidents Oil or grease on the brake discs reduces the braking effect.
- Always keep the brake discs free of oil and grease.
- Clean the brake discs with brake cleaner when necessary.
71
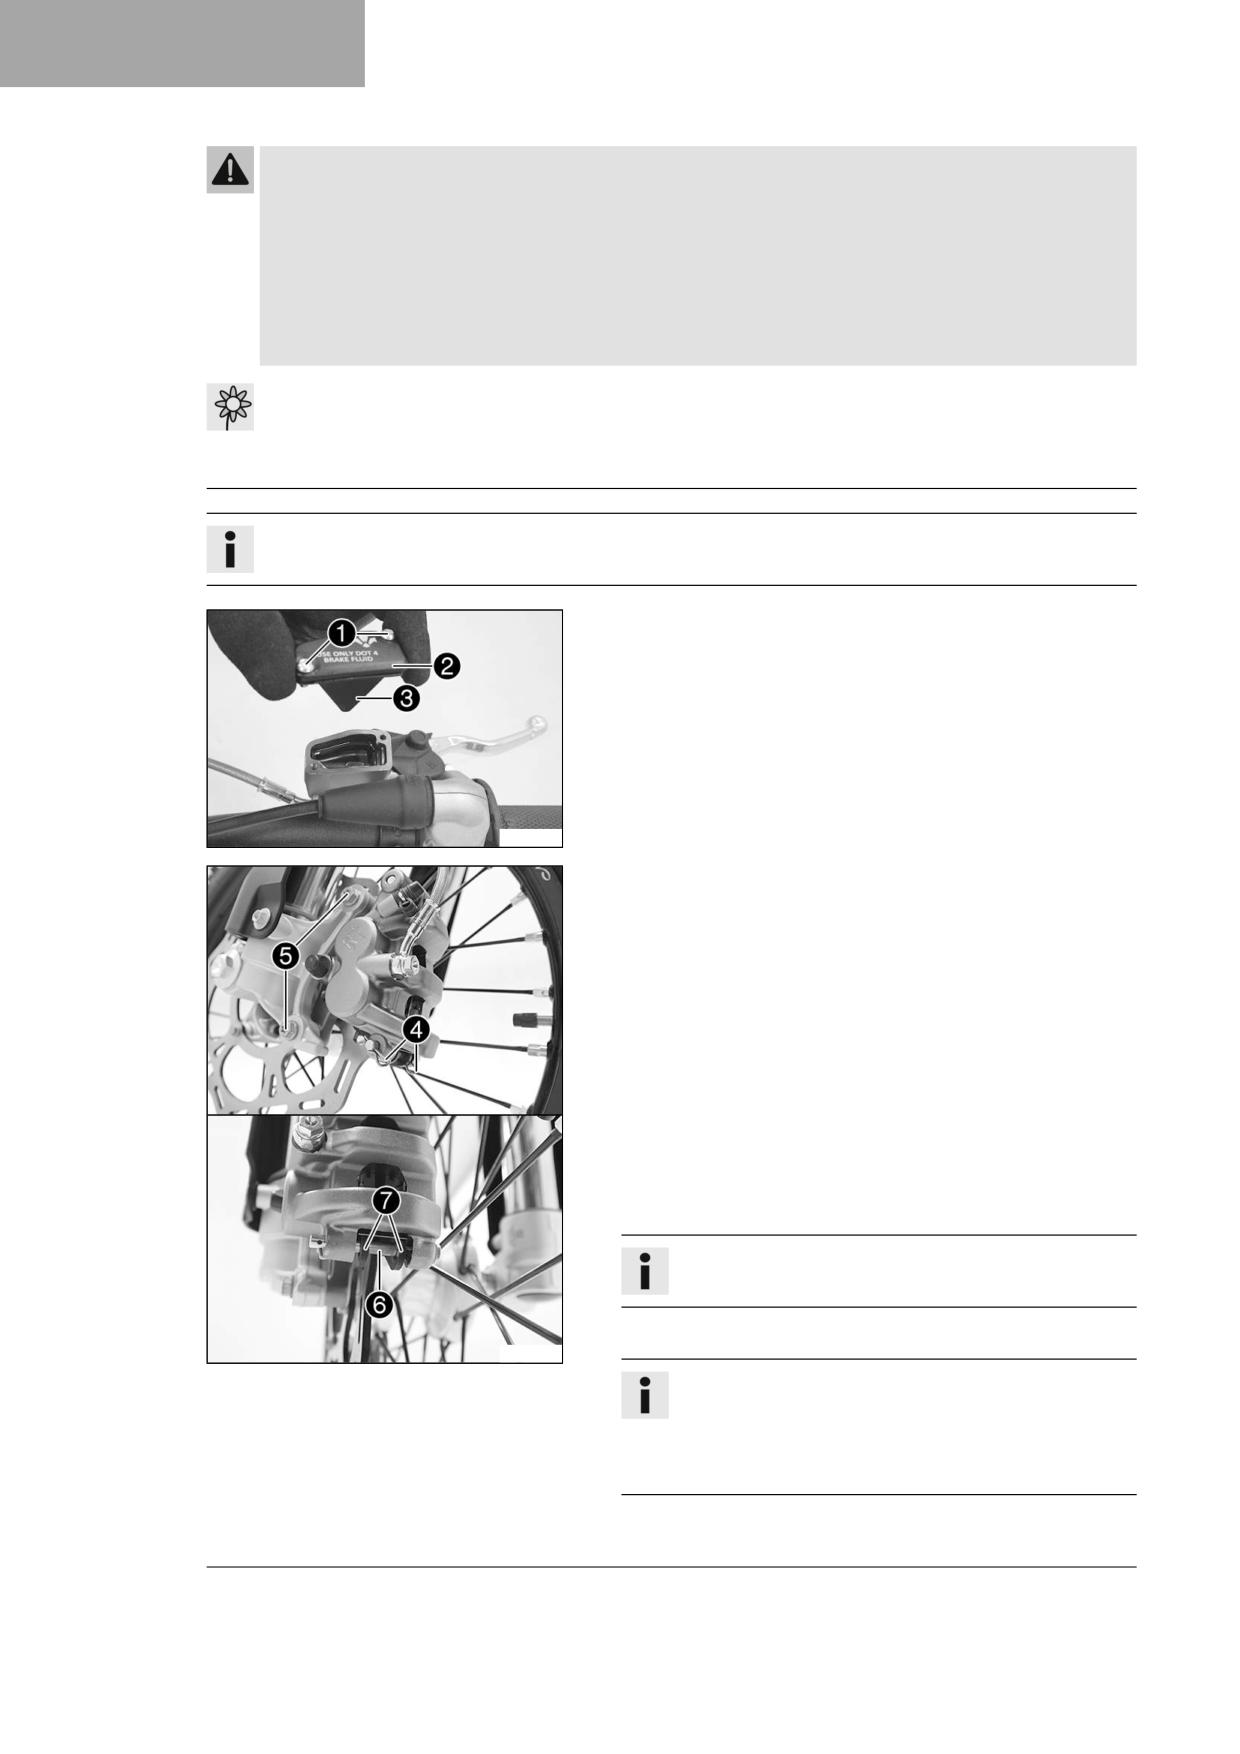
12
BRAKE SYSTEM
Warning
Danger of accidents Brake linings which have not been approved alter the braking efficiency.
Not all brake linings are tested and approved for GASGAS motorcycles. The structure and friction coefficient of the
brake linings, and thus their brake power, may vary greatly from that of original brake linings.
If brake linings are used that differ from the original equipment, compliance with the original homologation is
not guaranteed. In this case, the vehicle no longer corresponds to its condition at delivery and the manufacturer
warranty shall be void.
- Only use brake linings approved and recommended by GASGAS Motorcycles.
Note
Environmental hazard Hazardous substances cause environmental damage.
- Dispose of oils, grease, filters, fuel, cleaning agents, brake fluid, etc., correctly and in compliance with the appli-
cable regulations.
Info
Avoid contact between brake fluid and painted parts. Brake fluid corrodes paint.
- Move the brake fluid reservoir mounted on the handlebar to a hori-
zontal position.
- Remove screws 1.
- Take off cover 2 with membrane 3.
S04284-11
- Remove cotter pin 4.
- Remove screws 5.
- Press back the brake linings by slightly tilting the brake caliper later-
ally on the brake disc. Carefully pull the brake caliper backward from
the brake disc.
- Press the brake piston back into the basic position and ensure that
brake fluid does not flow out of the brake fluid reservoir; extract
some if necessary.
- Remove pin 6.
- Remove brake linings 7 and the retainer spring.
- Clean the brake caliper.
- Position the retainer spring.
- Position the new brake linings.
Info
Always change the brake linings in pairs.
- Mount pin 6.
S04286-10
Info
To make it easier to mount the pin, push the brake linings
against the retainer spring.
Make sure the brake linings and retainer spring are seated
correctly.
72
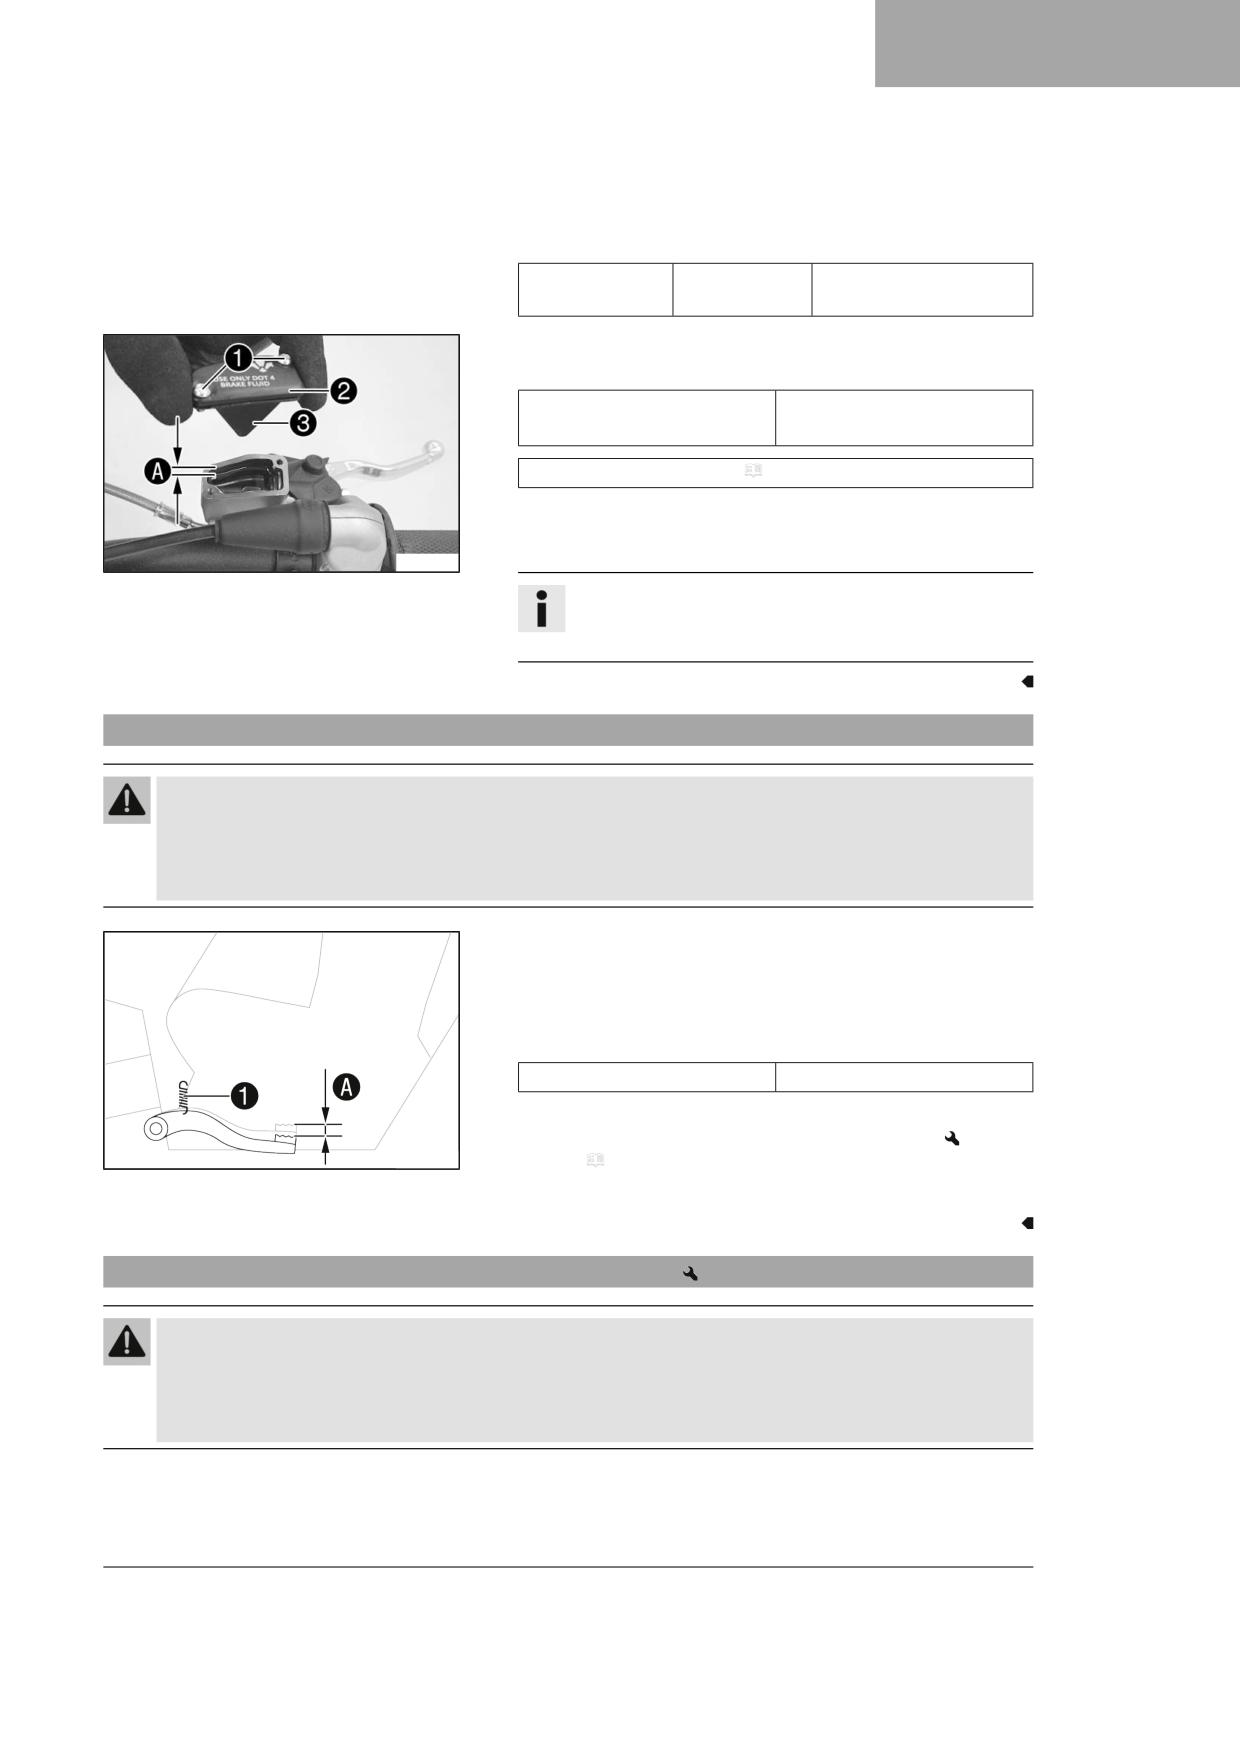
BRAKE SYSTEM
12
– Mount cotter pins 4.
- Position the brake caliper.
- Mount and tighten screws 5.
Guideline
Screw, front
M8
25 Nm (18.4 lbf ft)
brake caliper
Loctite®243™
– Correct the brake fluid up to level A.
Guideline
5 mm (0.2 in)
Level A (brake fluid level
below reservoir rim)
Brake fluid DOT 4 / DOT 5.1 ( p. 116)
- Position cover 2 with membrane 3.
- Mount and tighten screws 1.
S04284-10
Info
Use water to immediately clean up any brake fluid that has
overflowed or spilled.
12.8
Checking the free travel of foot brake lever
Warning
Danger of accidents The brake system fails in the event of overheating.
If there is no free travel on the foot brake lever, pressure builds up in the brake system on the rear brake.
- Set the free travel on the foot brake lever in accordance with the specification.
- Disconnect spring 1.
- Move the foot brake lever back and forth between the end stop
and the contact to the foot brake cylinder piston and check free
travel A.
Guideline
Free travel at foot brake lever
3 … 5 mm (0.12 … 0.2 in)
» If the free travel does not meet specifications:
- Adjust the basic position of the foot brake lever.
402026-10
(
p. 73)
– Reconnect spring 1.
12.9
Adjusting the basic position of the foot brake lever
Warning
Danger of accidents The brake system fails in the event of overheating.
If there is no free travel on the foot brake lever, pressure builds up in the brake system on the rear brake.
- Set the free travel on the foot brake lever in accordance with the specification.
73
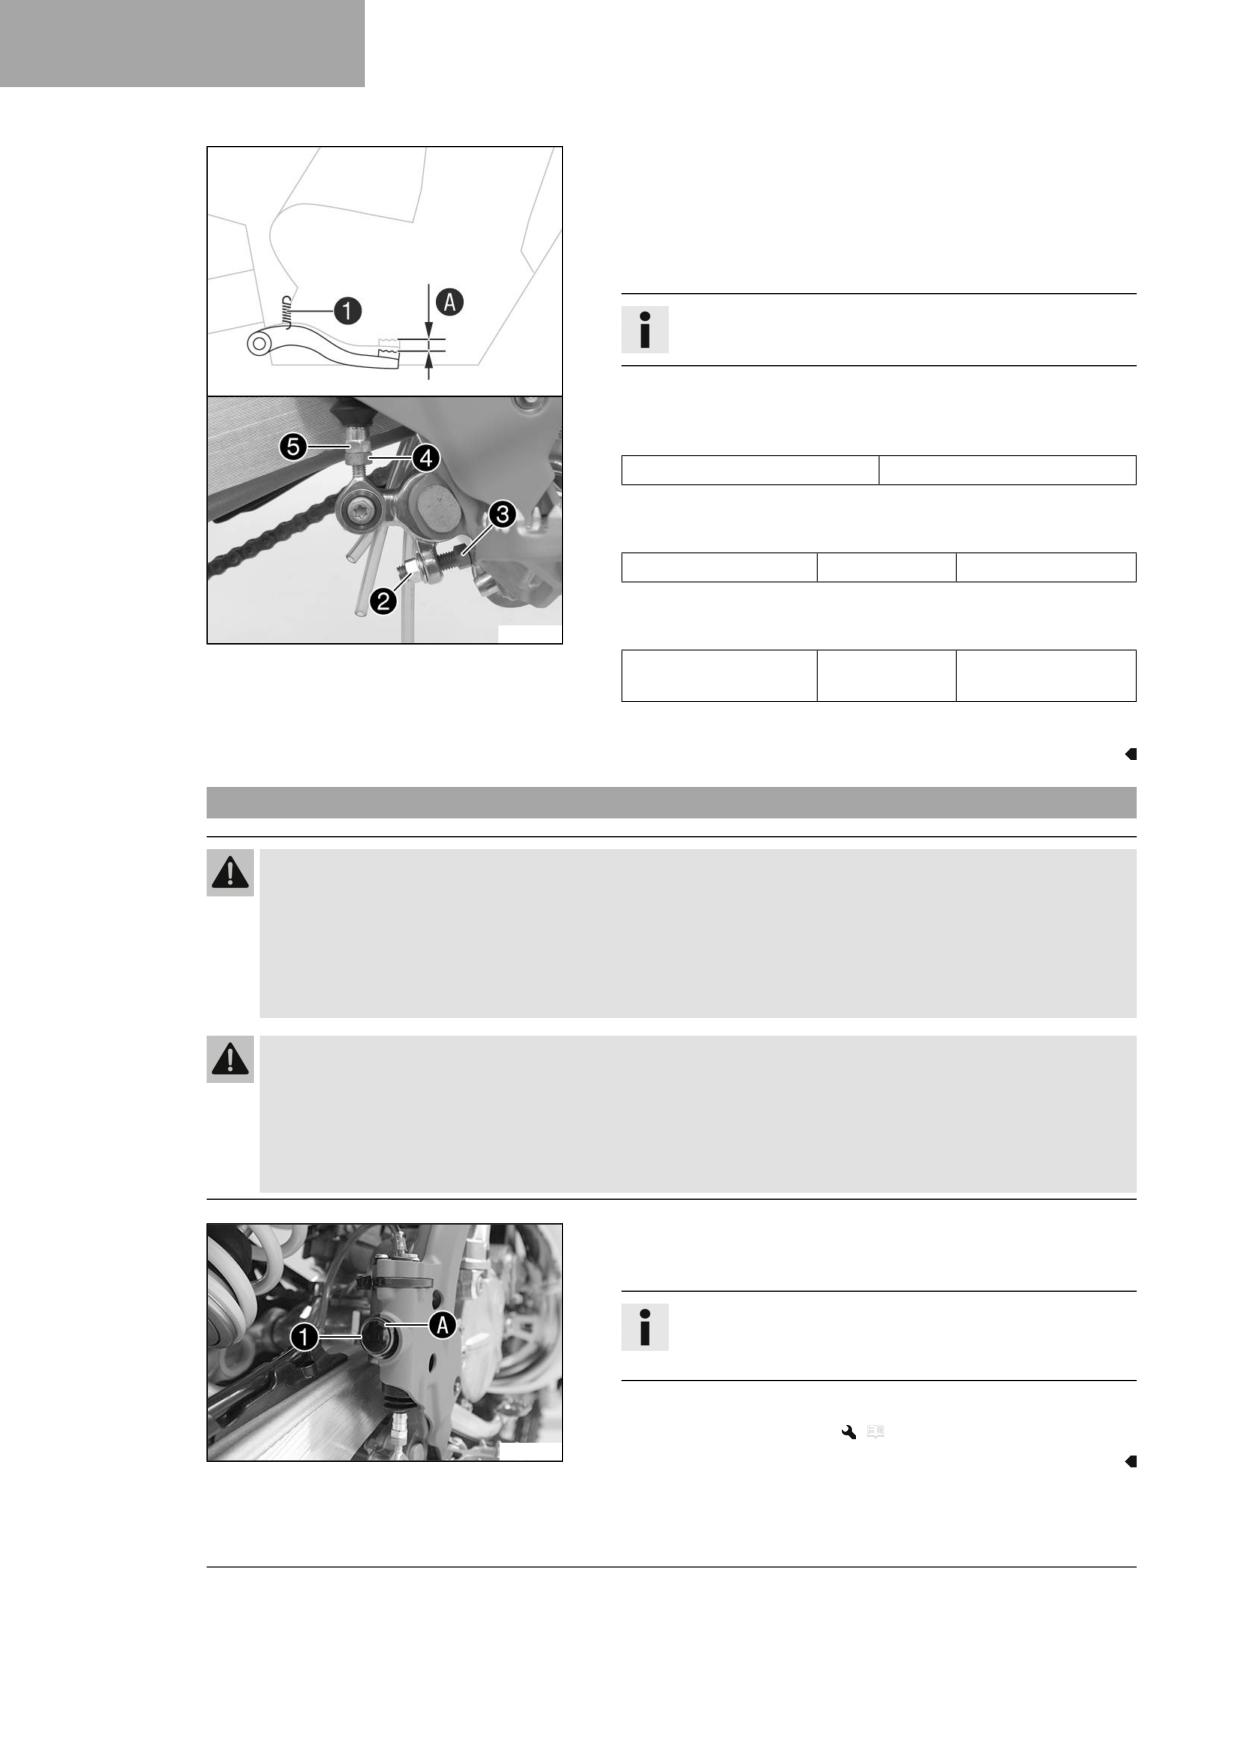
12
BRAKE SYSTEM
- Detach spring 1.
- Loosen nut 4 and, with push rod 5, turn it back until you have
maximum free travel.
- To adjust the basic position of the foot brake lever to individual
requirements, loosen nut 2 and turn screw 3 accordingly.
Info
The range of adjustment is limited.
- Turn push rod 5 accordingly until you have free travel A. If nec-
essary, adjust the basic position of the foot brake lever.
Guideline
Free travel at foot brake lever
3 … 5 mm (0.12 … 0.2 in)
– Hold screw 3 and tighten nut 2.
Guideline
Brake lever stop nut
M8
20 Nm (14.8 lbf ft)
– Hold push rod 5 and tighten nut 4.
V00866-10
Guideline
Remaining nuts, chas-
M6
10 Nm (7.4 lbf ft)
sis
- Attach spring 1.
12.10
Checking the rear brake fluid level
Warning
Danger of accidents An insufficient brake fluid level will cause the brake system to fail.
If the brake fluid level drops below the specified marking or the specified value, the brake system is leaking or the
brake linings are worn down.
- Check the brake system and ensure that nobody drives the vehicle before the problem is eliminated. (Your
authorized GASGAS Motorcycles workshop will be glad to help.)
Warning
Danger of accidents Brake fluid which is too old or of the wrong type impairs the function of the brake system.
- Make sure that brake fluid for the front and rear brake is changed in accordance with the service schedule.
(Your authorized GASGAS Motorcycles workshop will be glad to help.)
- Make sure that only clean, approved brake fluid from a tightly sealed container is used. (Your authorized GAS-
GAS Motorcycles workshop will be glad to help.)
- Stand the vehicle upright.
- Check the brake fluid level in level viewer 1.
Tip
Move the frame protector slightly to the side to make it eas-
ier to see the marking.
» If the brake fluid level has dropped below the marking A:
- Add rear brake fluid.
(
p. 75)
S04349-10
74

BRAKE SYSTEM
12
12.11
Adding rear brake fluid
Warning
Danger of accidents An insufficient brake fluid level will cause the brake system to fail.
If the brake fluid level drops below the specified marking or the specified value, the brake system is leaking or the
brake linings are worn down.
- Check the brake system and ensure that nobody drives the vehicle before the problem is eliminated. (Your
authorized GASGAS Motorcycles workshop will be glad to help.)
Warning
Skin irritation Brake fluid is a harmful substance.
- Keep brake fluid out of the reach of children.
- Wear suitable protective clothing and safety glasses.
- Do not allow brake fluid to come into contact with the skin, the eyes or clothing.
- Consult a doctor immediately if brake fluid has been swallowed.
- Rinse the affected area with plenty of water in the event of contact with the skin.
- Rinse eyes thoroughly with water immediately and consult a doctor if brake fluid comes into contact with the
eyes.
- If brake fluid spills on to your clothing, change the clothing.
Warning
Danger of accidents Brake fluid which is too old or of the wrong type impairs the function of the brake system.
- Make sure that brake fluid for the front and rear brake is changed in accordance with the service schedule.
(Your authorized GASGAS Motorcycles workshop will be glad to help.)
- Make sure that only clean, approved brake fluid from a tightly sealed container is used. (Your authorized GAS-
GAS Motorcycles workshop will be glad to help.)
Note
Environmental hazard Hazardous substances cause environmental damage.
- Dispose of oils, grease, filters, fuel, cleaning agents, brake fluid, etc., correctly and in compliance with the appli-
cable regulations.
Info
Avoid contact between brake fluid and painted parts. Brake fluid corrodes paint.
Preparatory work
- Checking that the brake linings of the rear brake are secured.
(
p. 76)
75
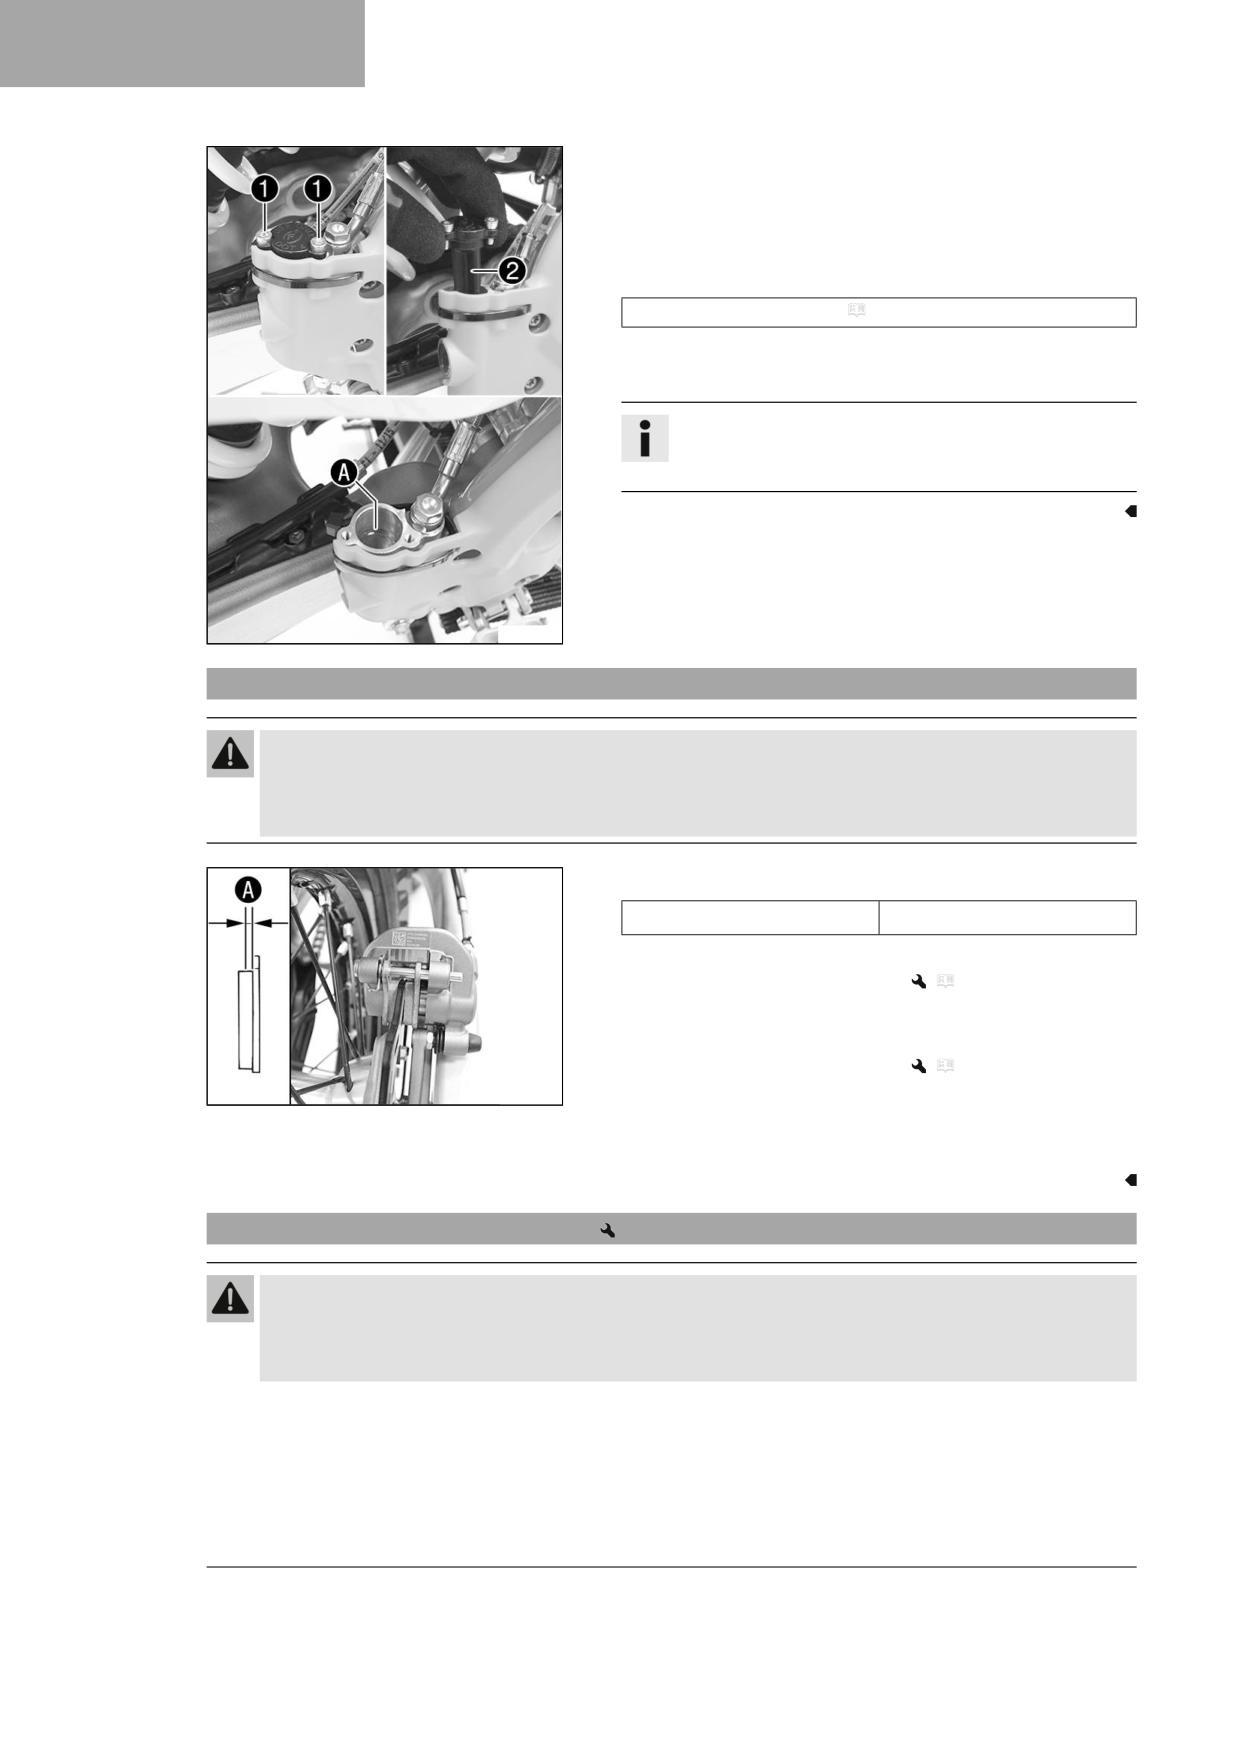
12
BRAKE SYSTEM
Main work
- Stand the vehicle upright.
- Remove screws 1.
- Take off the cover with the washer and membrane 2.
- Add brake fluid up to the marking A.
Brake fluid DOT 4 / DOT 5.1 ( p. 116)
- Mount the cover with the washer and membrane.
- Mount and tighten the screws.
Info
Use water to immediately clean up any brake fluid that has
overflowed or spilled.
A00047-10
12.12
Checking brake linings of the rear brake are secure
Warning
Danger of accidents Worn-out brake linings reduce the braking effect.
- Ensure that worn-out brake linings are replaced immediately. (Your authorized GASGAS Motorcycles workshop
will be glad to help.)
- Check the brake linings for lining thickness A.
≥ 1 mm (≥ 0.04 in)
Minimum thickness A
» If it is less than the minimum thickness:
- Change the rear brake linings.
(
p. 76)
– Check the brake linings for damage and cracking.
» If there is damage or cracking:
- Change the rear brake linings.
(
p. 76)
S04287-10
- Check that the brake linings are secure.
» If the brake linings are not secured correctly:
- Secure brake linings, replace with new parts if necessary.
12.13
Changing the rear brake linings
Warning
Danger of accidents Incorrect servicing will cause the brake system to fail.
- Ensure that service work and repairs are performed professionally. (Your authorized GASGAS Motorcy-
cles workshop will be glad to help.)
76
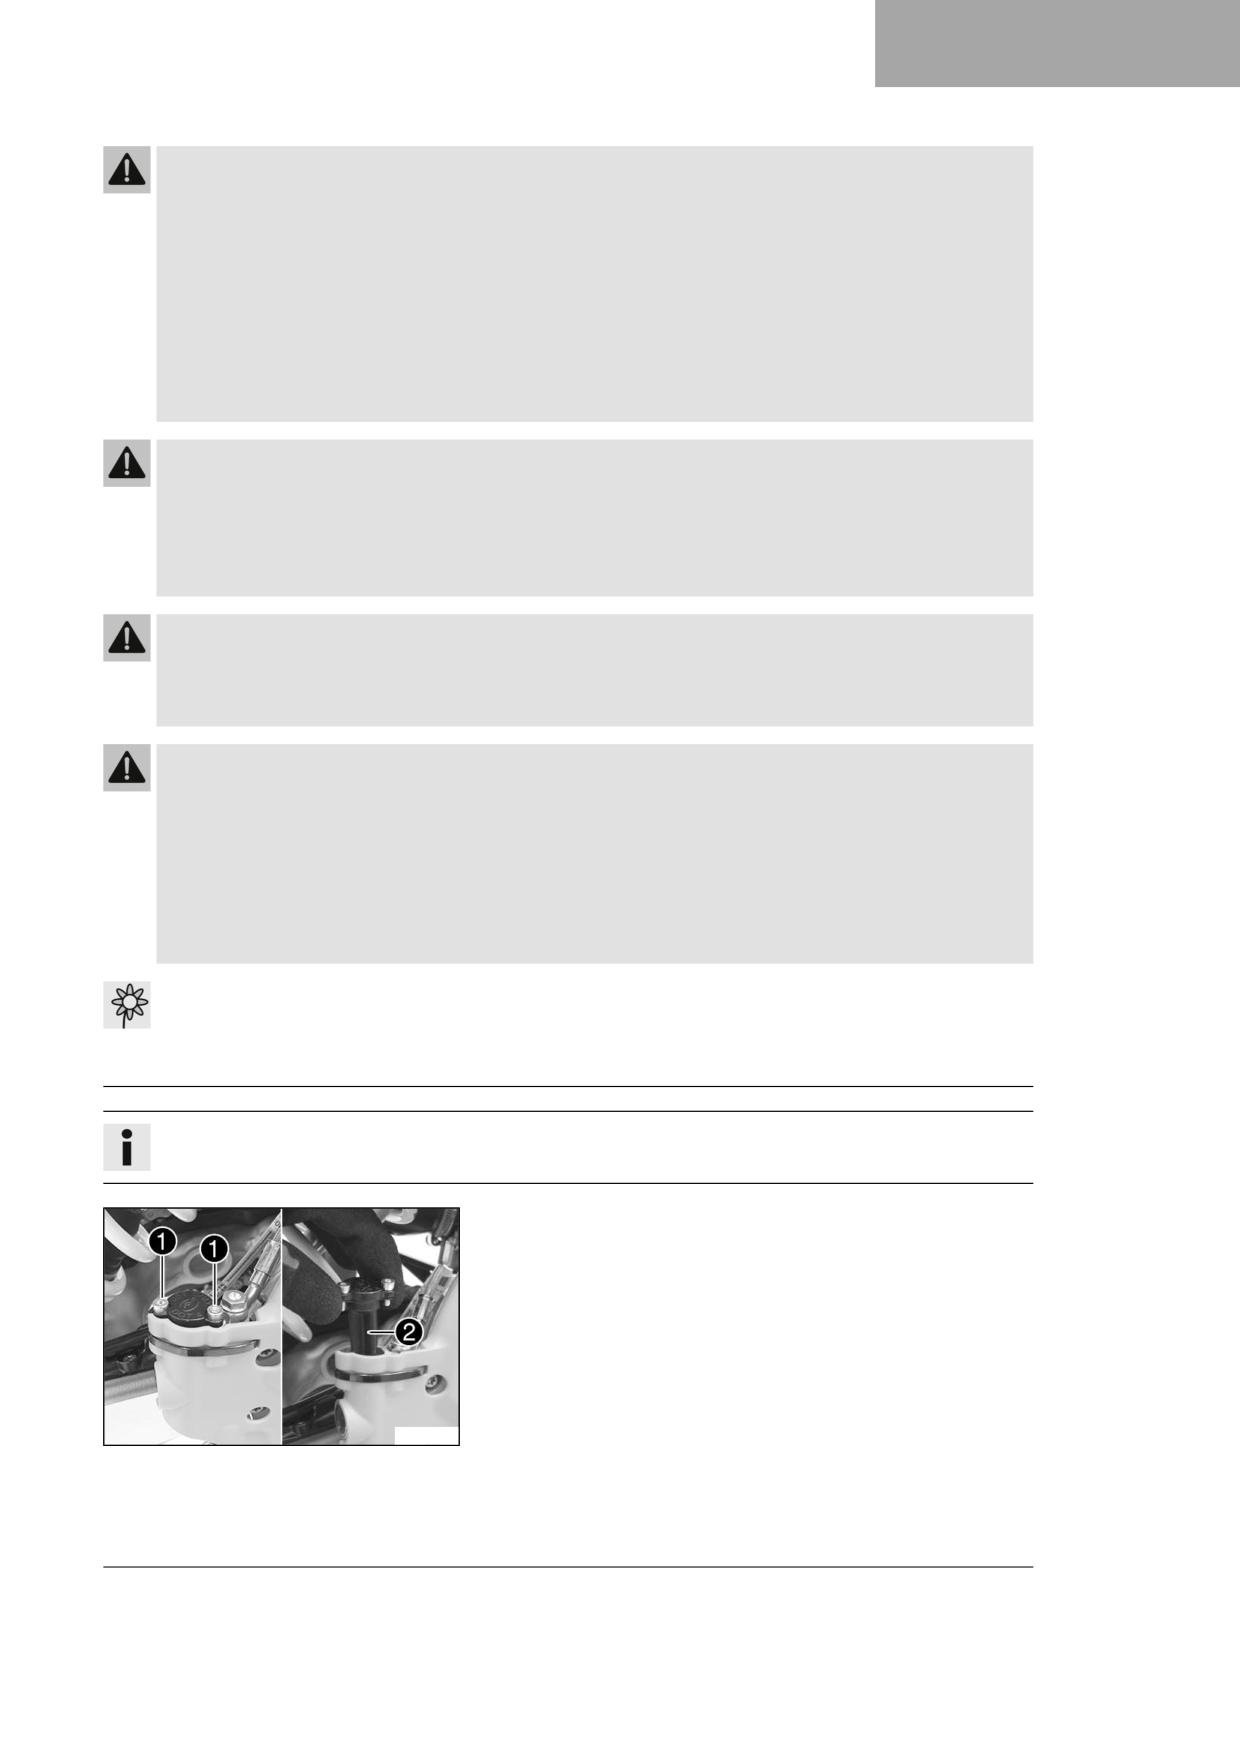
BRAKE SYSTEM
12
Warning
Skin irritation Brake fluid is a harmful substance.
- Keep brake fluid out of the reach of children.
- Wear suitable protective clothing and safety glasses.
- Do not allow brake fluid to come into contact with the skin, the eyes or clothing.
- Consult a doctor immediately if brake fluid has been swallowed.
- Rinse the affected area with plenty of water in the event of contact with the skin.
- Rinse eyes thoroughly with water immediately and consult a doctor if brake fluid comes into contact with the
eyes.
- If brake fluid spills on to your clothing, change the clothing.
Warning
Danger of accidents Brake fluid which is too old or of the wrong type impairs the function of the brake system.
- Make sure that brake fluid for the front and rear brake is changed in accordance with the service schedule.
(Your authorized GASGAS Motorcycles workshop will be glad to help.)
- Make sure that only clean, approved brake fluid from a tightly sealed container is used. (Your authorized GAS-
GAS Motorcycles workshop will be glad to help.)
Warning
Danger of accidents Oil or grease on the brake discs reduces the braking effect.
- Always keep the brake discs free of oil and grease.
- Clean the brake discs with brake cleaner when necessary.
Warning
Danger of accidents Brake linings which have not been approved alter the braking efficiency.
Not all brake linings are tested and approved for GASGAS motorcycles. The structure and friction coefficient of the
brake linings, and thus their brake power, may vary greatly from that of original brake linings.
If brake linings are used that differ from the original equipment, compliance with the original homologation is
not guaranteed. In this case, the vehicle no longer corresponds to its condition at delivery and the manufacturer
warranty shall be void.
- Only use brake linings approved and recommended by GASGAS Motorcycles.
Note
Environmental hazard Hazardous substances cause environmental damage.
- Dispose of oils, grease, filters, fuel, cleaning agents, brake fluid, etc., correctly and in compliance with the appli-
cable regulations.
Info
Avoid contact between brake fluid and painted parts. Brake fluid corrodes paint.
- Stand the vehicle upright.
- Remove screws 1.
- Take off the cover with the washer and membrane 2.
- Press the brake piston back into the basic position and ensure that
brake fluid does not flow out of the brake fluid reservoir; extract
some if necessary.
A00054-10
77
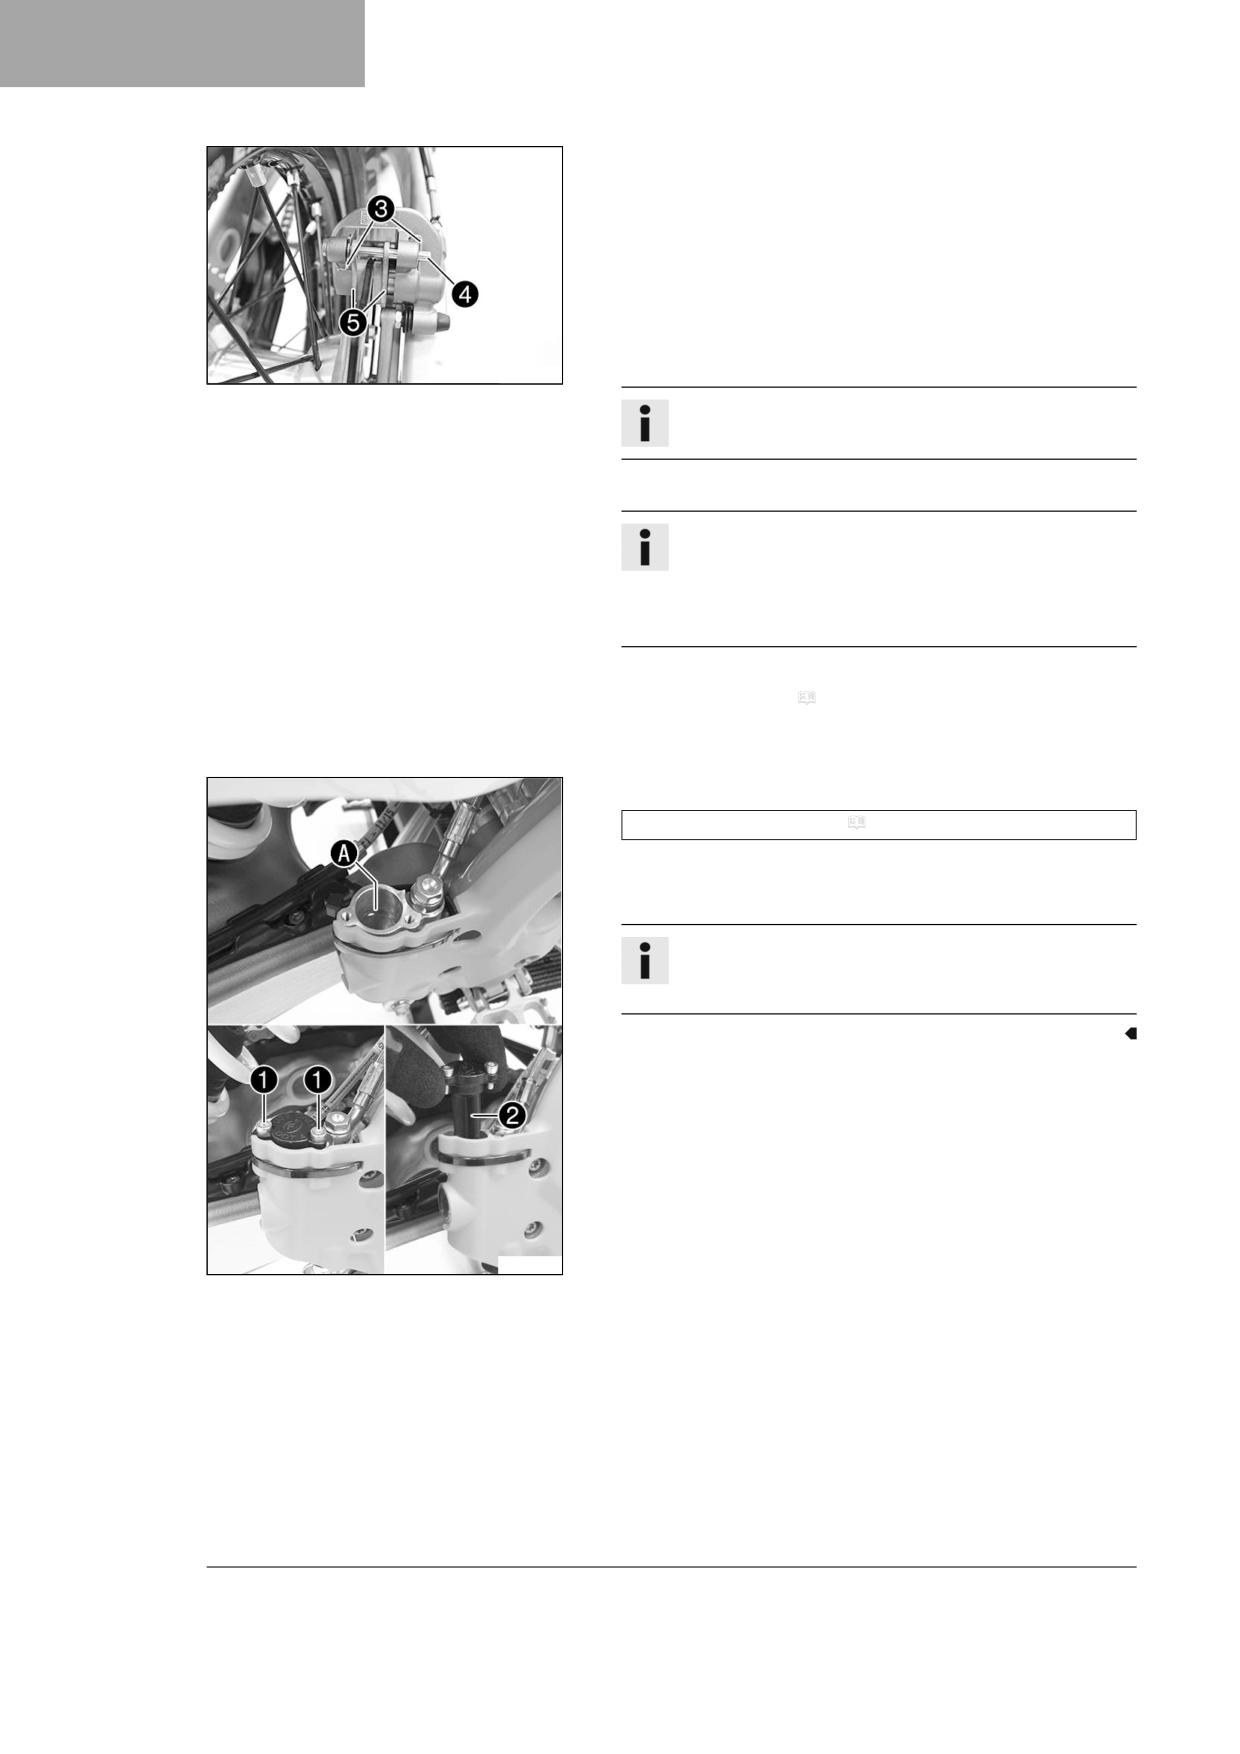
12
BRAKE SYSTEM
-
Remove cotter pin 3.
–
Press back the brake linings by slightly tilting the brake caliper later-
ally on the brake disc.
-
Remove pin 4.
–
Remove brake linings 5 and the retainer spring.
–
Clean the brake caliper.
–
Position the retainer spring.
–
Position the new brake linings.
S04288-10
Info
Always change the brake linings in pairs.
-
Mount pin 4.
Info
To make it easier to mount the pin, push the brake linings
upwards against the retainer spring.
Make sure the brake linings and retainer spring are seated
correctly.
-
Mount cotter pins 3.
–
Check the brake discs. ( p. 68)
–
Operate the foot brake lever repeatedly until the brake linings are in
contact with the brake disc and there is a pressure point.
-
Correct brake fluid level to marking A.
Brake fluid DOT 4 / DOT 5.1 ( p. 116)
-
Mount the cover with the washer and membrane 2.
–
Mount and tighten screws 1.
Info
Use water to immediately clean up any brake fluid that has
overflowed or spilled.
A00056-10
78
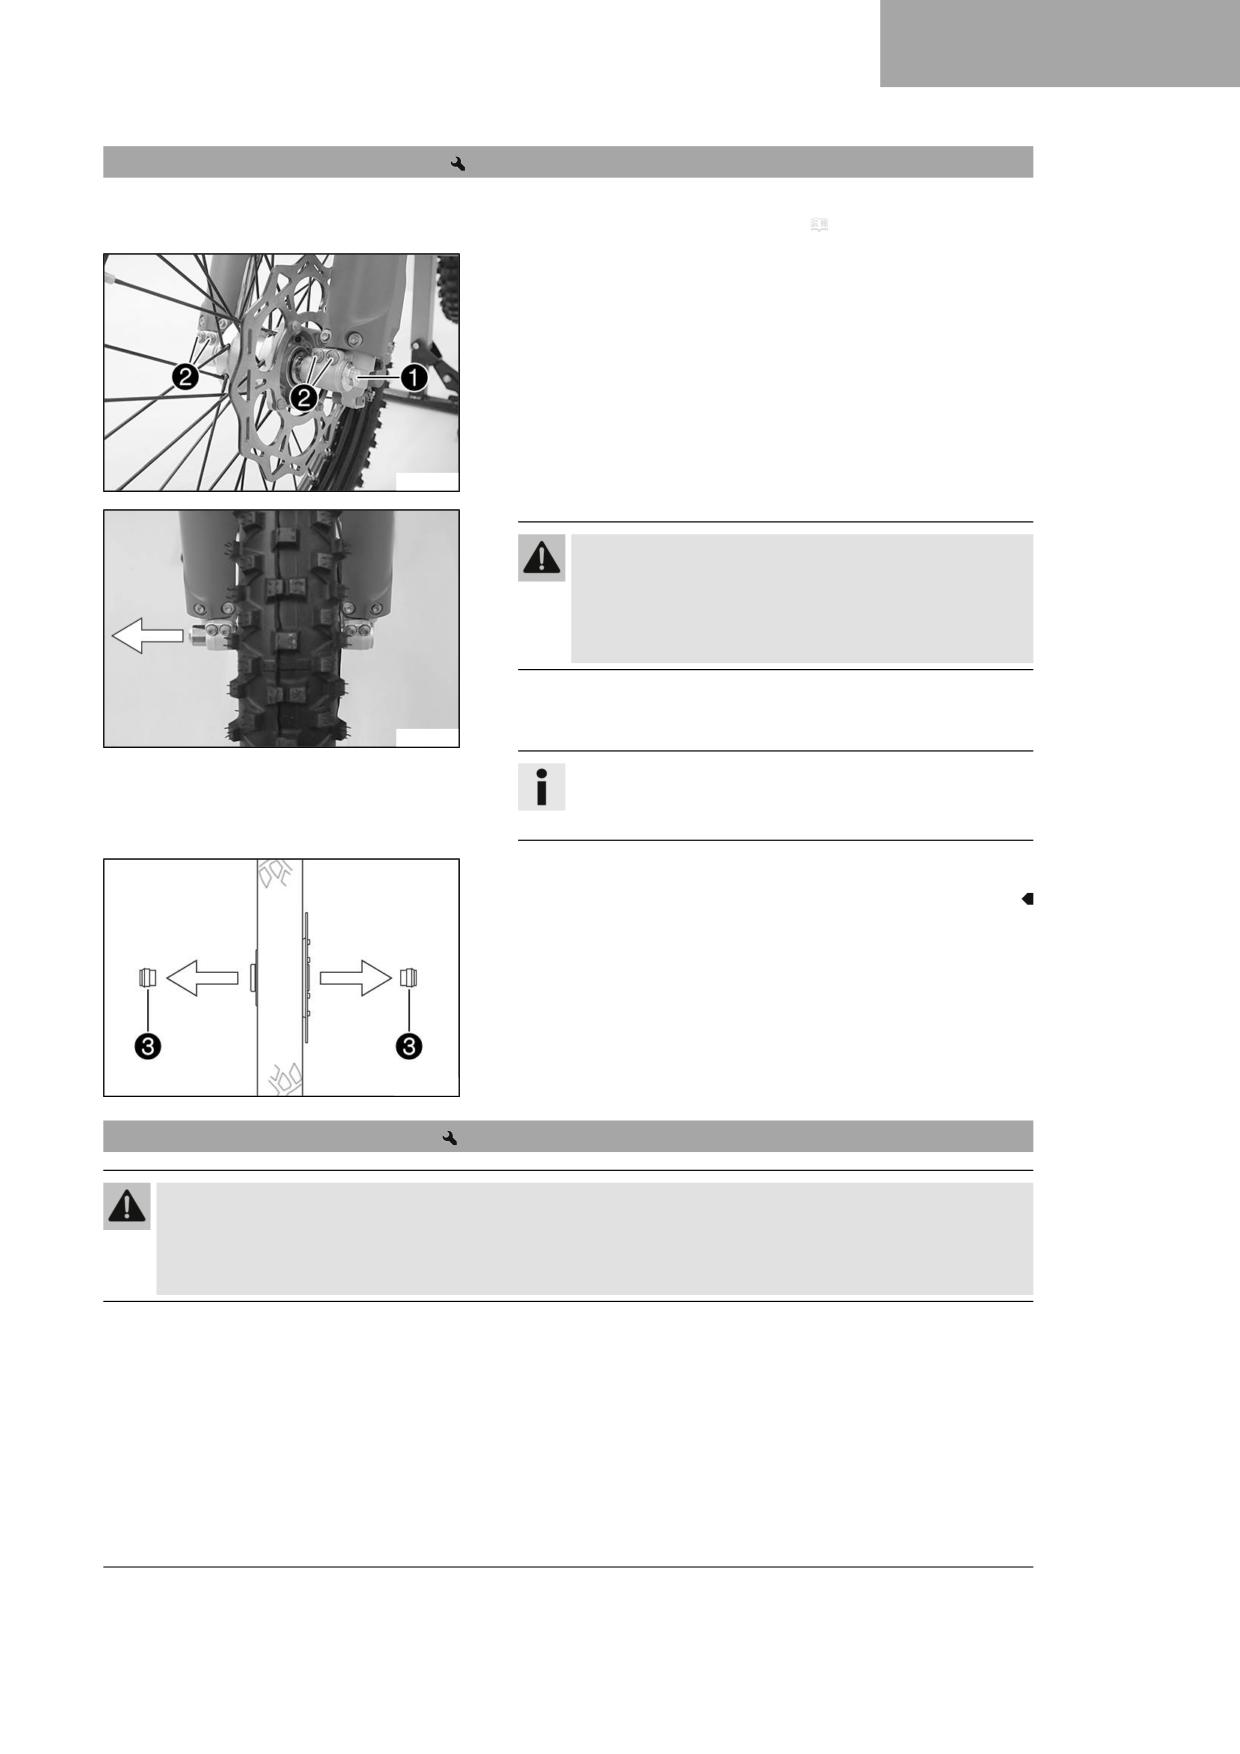
WHEELS, TIRES
13
13.1
Removing the front wheel
Preparatory work
- Raise the motorcycle with a lift stand. ( p. 41)
Main work
- Loosen screw 1 by several rotations.
- Loosen screws 2.
- Press on screw 1 to push the wheel spindle out of the axle clamp.
- Remove screw 1.
S04328-12
Warning
Danger of accidents Damaged brake discs reduce the
braking effect.
- Always lay the wheel down in such a way that the brake
disc is not damaged.
- Hold the front wheel and remove the wheel spindle. Take the front
wheel out of the fork.
S04350-10
Info
Do not actuate the hand brake lever when the front wheel is
removed.
- Remove spacers 3.
H00934-10
13.2
Installing the front wheel
Warning
Danger of accidents Oil or grease on the brake discs reduces the braking effect.
- Always keep the brake discs free of oil and grease.
- Clean the brake discs with brake cleaner when necessary.
79
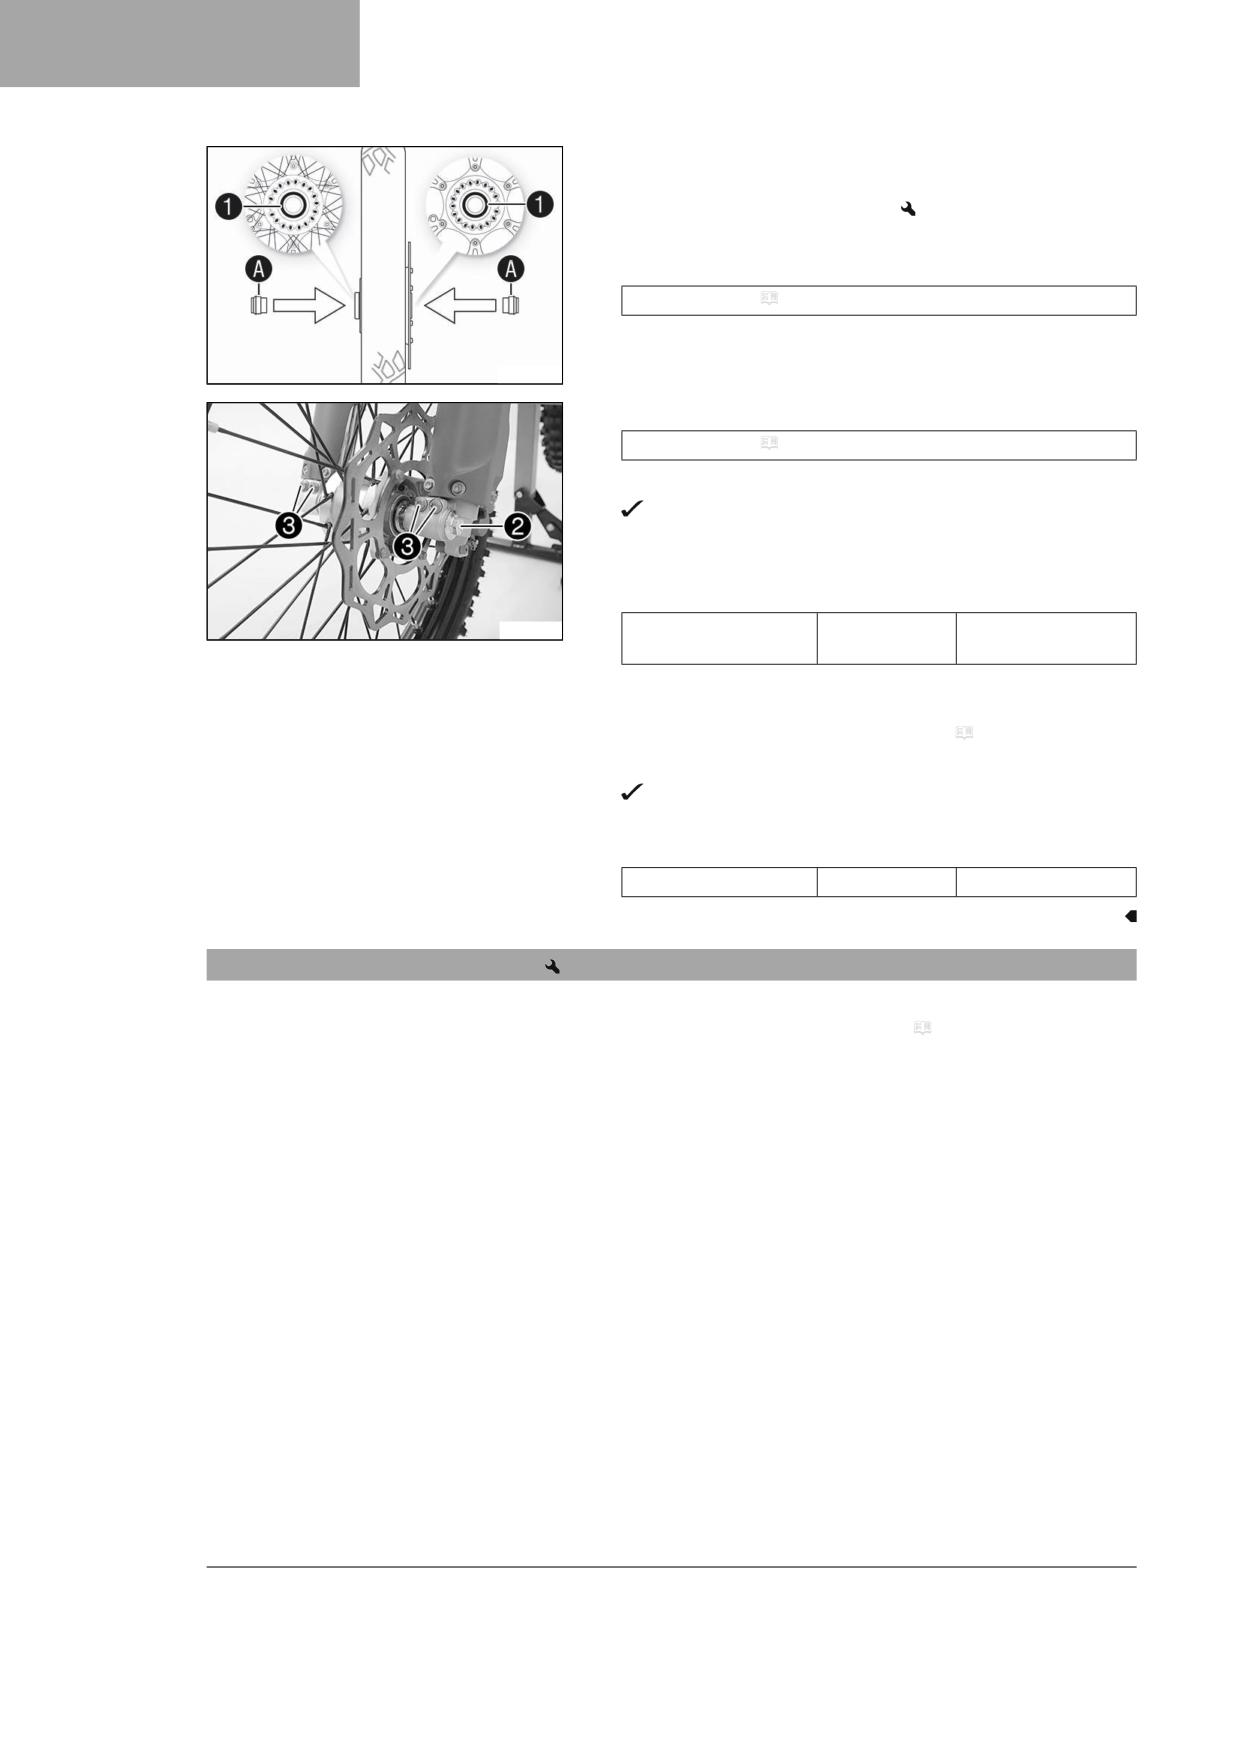
13
WHEELS, TIRES
- Check the wheel bearing for damage and wear.
» If the wheel bearing is damaged or worn:
- Change front wheel bearing.
- Clean and grease shaft seal rings 1 and contact surfaces A of the
spacers.
Long-life grease ( p. 118)
- Insert the spacers.
H00935-10
- Clean and grease the wheel spindle.
Long-life grease ( p. 118)
- Position the front wheel.
The brake linings are correctly positioned.
- Insert the wheel spindle.
- Mount and tighten screw 2.
Guideline
S04328-13
Screw, front wheel
M20x1.5
35 Nm (25.8 lbf ft)
spindle
- Operate the hand brake lever several times until the brake linings
are seated correctly against the brake disc.
- Remove the motorcycle from the lift stand. ( p. 41)
- Operate the front brake and compress the fork a few times firmly.
The fork legs straighten.
- Tighten screws 3.
Guideline
Screw, fork stub
M8
15 Nm (11.1 lbf ft)
13.3
Removing the rear wheel
Preparatory work
- Raise the motorcycle with a lift stand. ( p. 41)
80
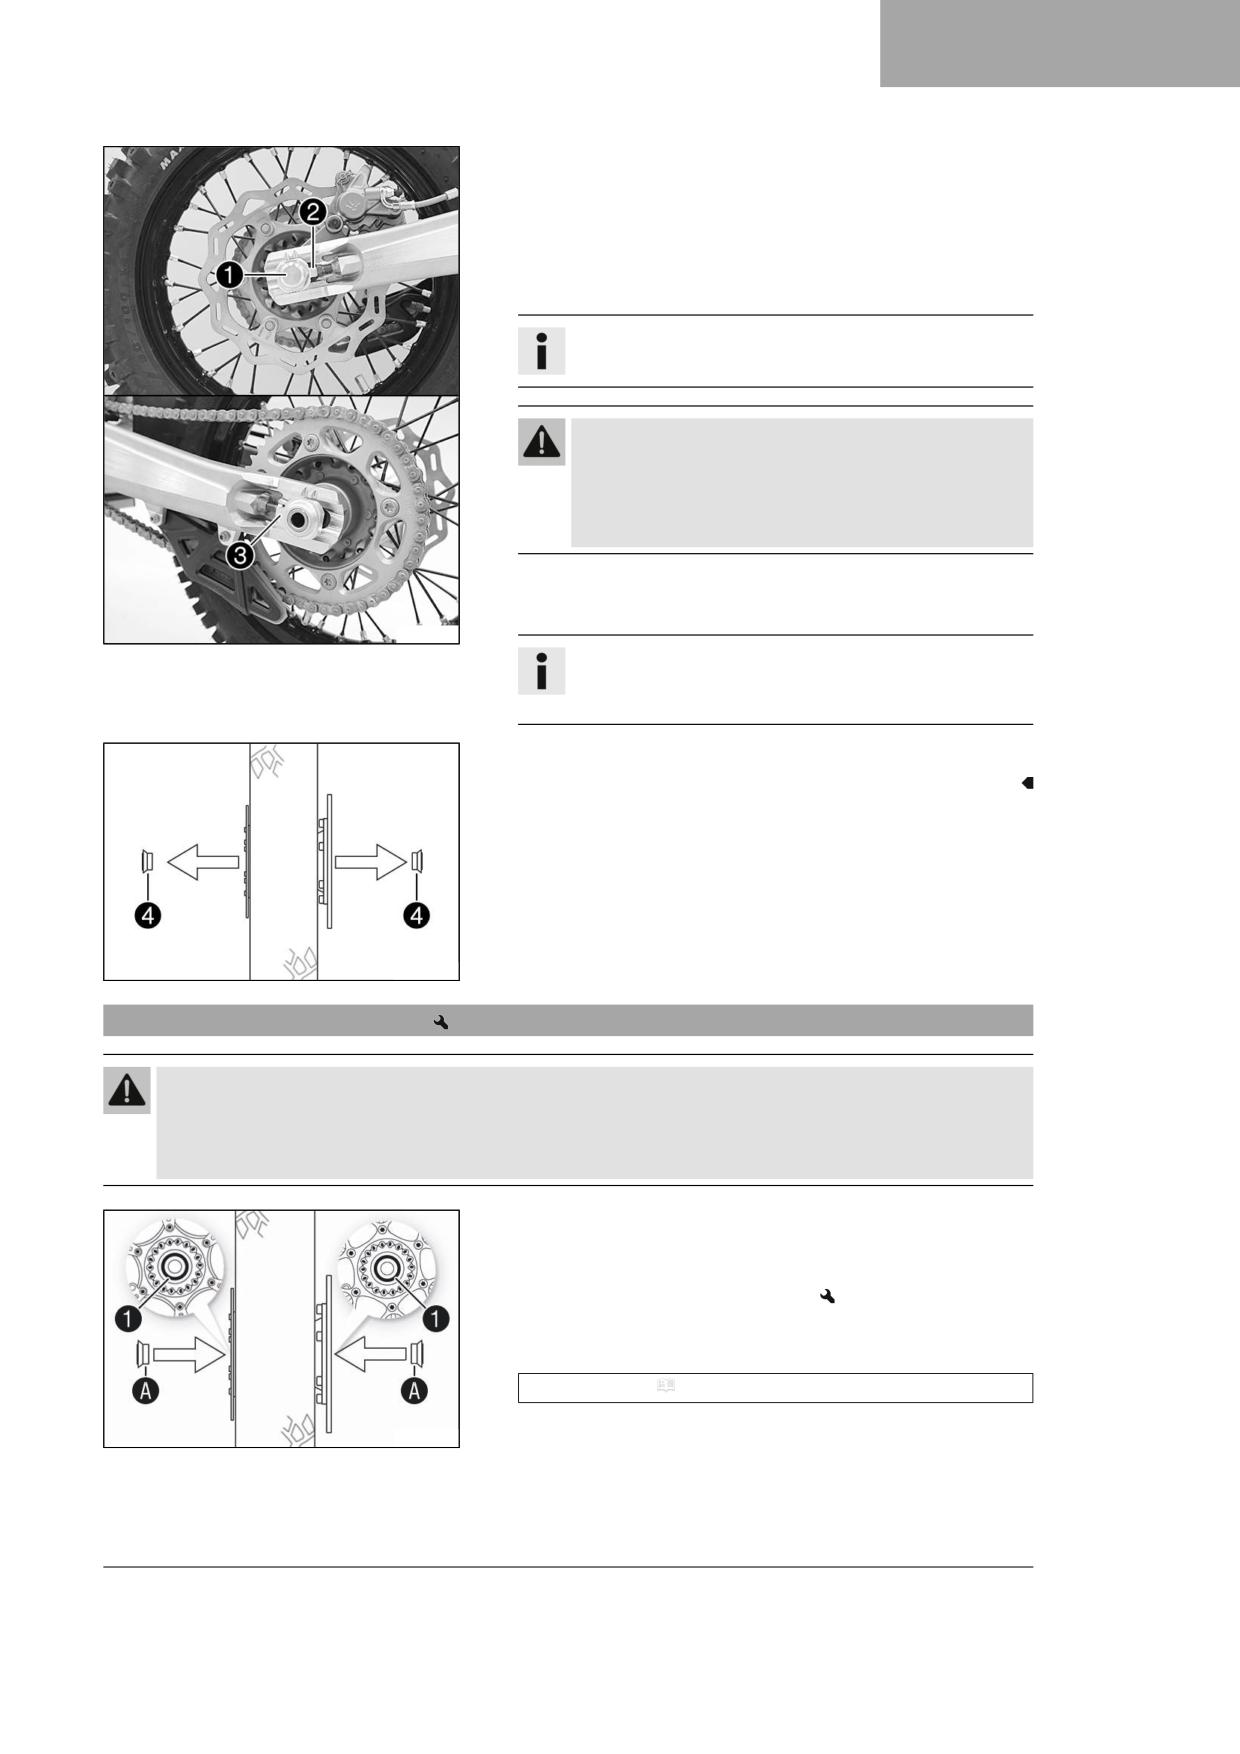
WHEELS, TIRES
13
Main work
- Remove nut 1.
- Take off chain adjuster 2. Pull out wheel spindle 3 far enough to
allow the rear wheel to be pushed forward.
- Push the rear wheel forward as far as possible. Remove the chain
from the rear sprocket.
Info
Cover the components to protect them against damage.
Warning
Danger of accidents Damaged brake discs reduce the
braking effect.
- Always lay the wheel down in such a way that the brake
disc is not damaged.
- Hold the rear wheel and remove the wheel spindle. Take the rear
wheel out of the link fork.
S04289-10
Info
Do not operate the foot brake lever when the rear wheel is
removed.
- Remove spacers 4.
H00936-10
13.4
Installing the rear wheel
Warning
Danger of accidents Oil or grease on the brake discs reduces the braking effect.
- Always keep the brake discs free of oil and grease.
- Clean the brake discs with brake cleaner when necessary.
Main work
- Check the wheel bearing for damage and wear.
» If the wheel bearing is damaged or worn:
- Change the rear wheel bearing.
- Clean and grease shaft seal rings 1 and contact surfaces A of the
spacers.
Long-life grease ( p. 118)
- Insert the spacers.
H00937-10
81
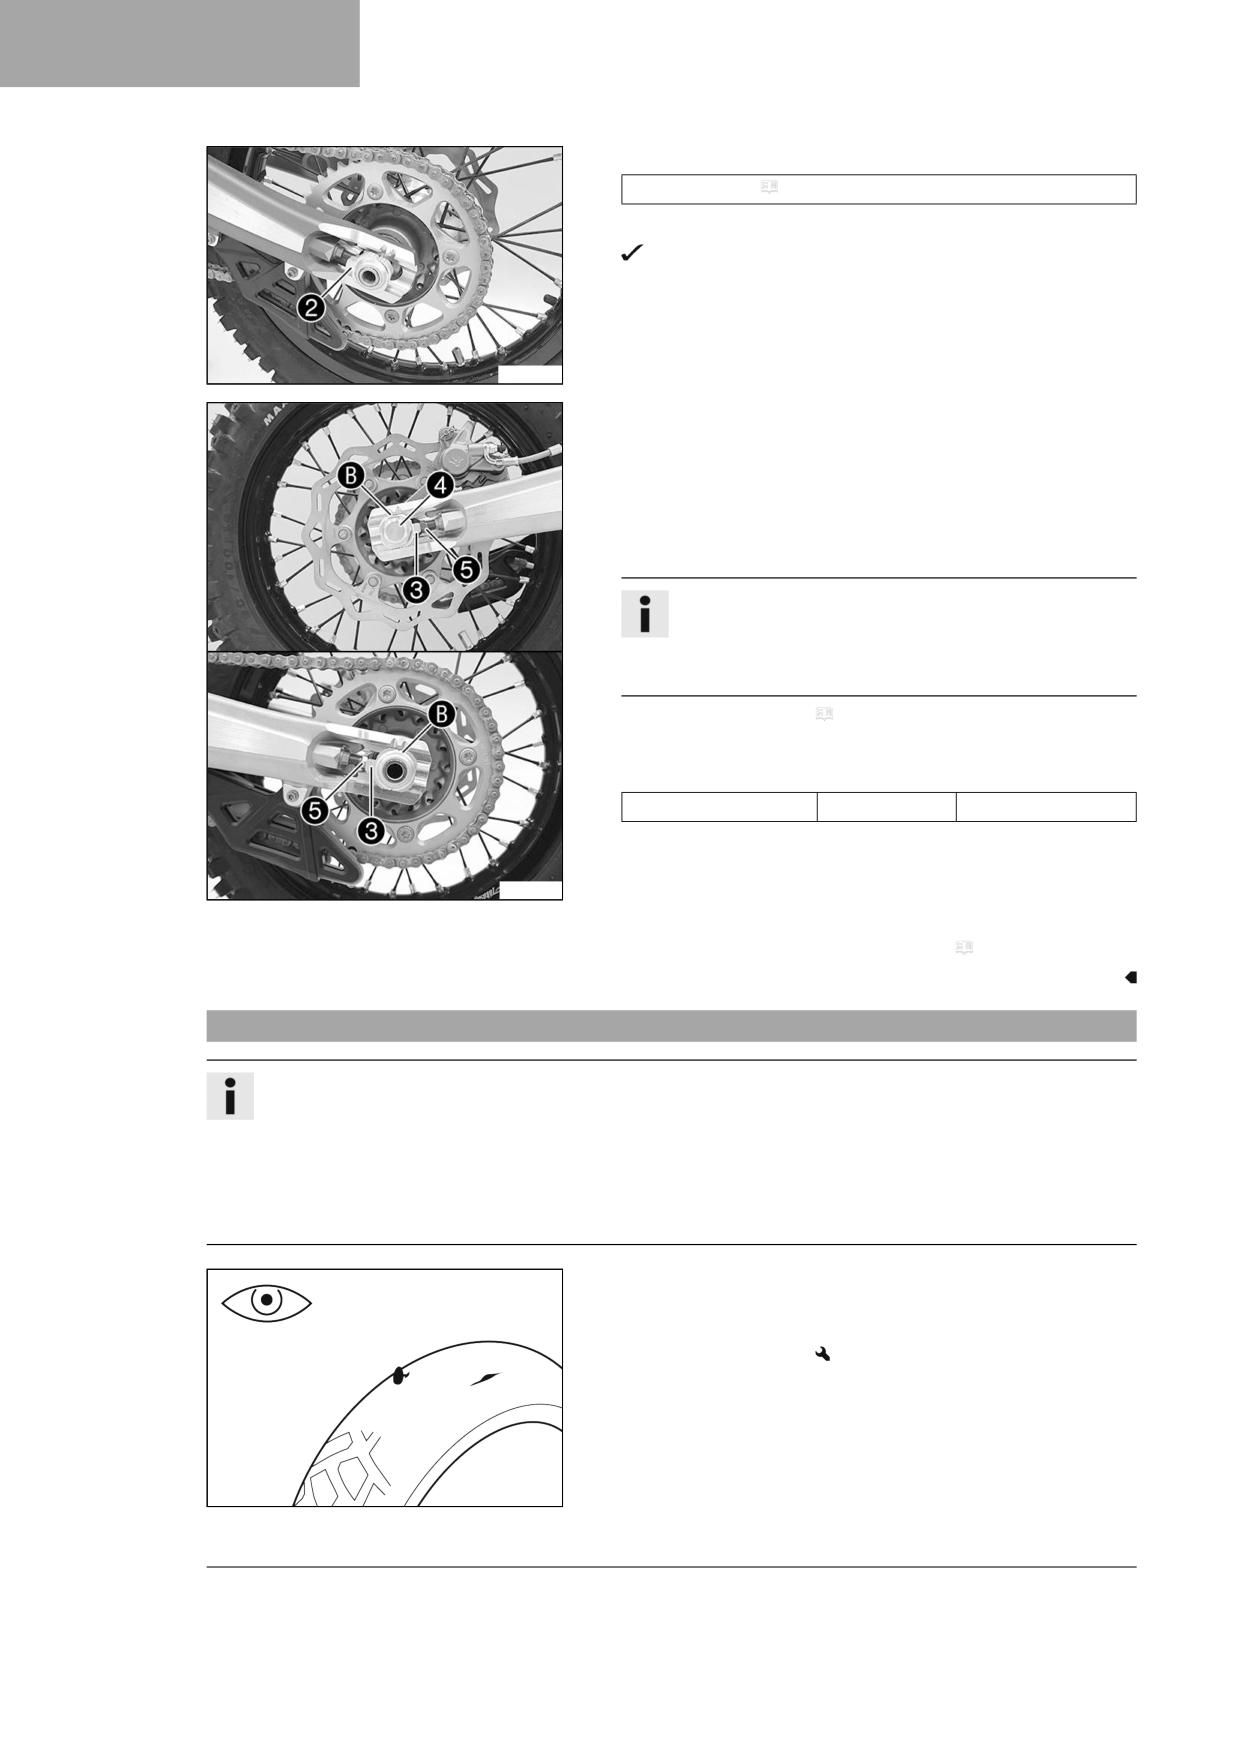
13
WHEELS, TIRES
- Clean and grease the wheel spindle.
Long-life grease ( p. 118)
- Position rear wheel and mount the chain.
The brake linings are correctly positioned.
- Insert wheel spindle 2.
V00880-10
- Position chain adjuster 3. Mount nut 4, but do not tighten it yet.
- Make sure that chain adjusters 3 are fitted correctly on adjusting
screws 5.
- Make sure that the markings on the left and right chain
adjusters 3 are in the same position relative to reference
marks B. The rear wheel is then correctly aligned.
Info
The wide adjustment range of the chain adjusters enables
different secondary ratios with the same chain length.
Chain adjusters 3 can be turned by 180°.
- Check the chain tension. ( p. 59)
- Tighten nut 4.
Guideline
Nut, rear wheel spindle
M20x1.5
80 Nm (59 lbf ft)
– Operate the foot brake lever repeatedly until the brake linings are in
contact with the brake disc and there is a pressure point.
S04291-10
Finishing work
- Remove the motorcycle from the lift stand. ( p. 41)
13.5
Checking the tire condition
Info
Only mount tires approved and/or recommended by GASGAS Motorcycles.
Other tires could have a negative effect on handling characteristics.
The type, condition, and pressure of the tires all have a major impact on the handling characteristic of the motorcy-
cle.
The tires mounted on the front and rear wheels must have a similar profile.
Worn tires have a negative effect on handling characteristics, especially on wet surfaces.
- Check the front and rear tires for cuts, embedded objects, and other
damage.
» If the tires have cuts, run-in objects, or other damage:
- Change the tires.
400602-10
82
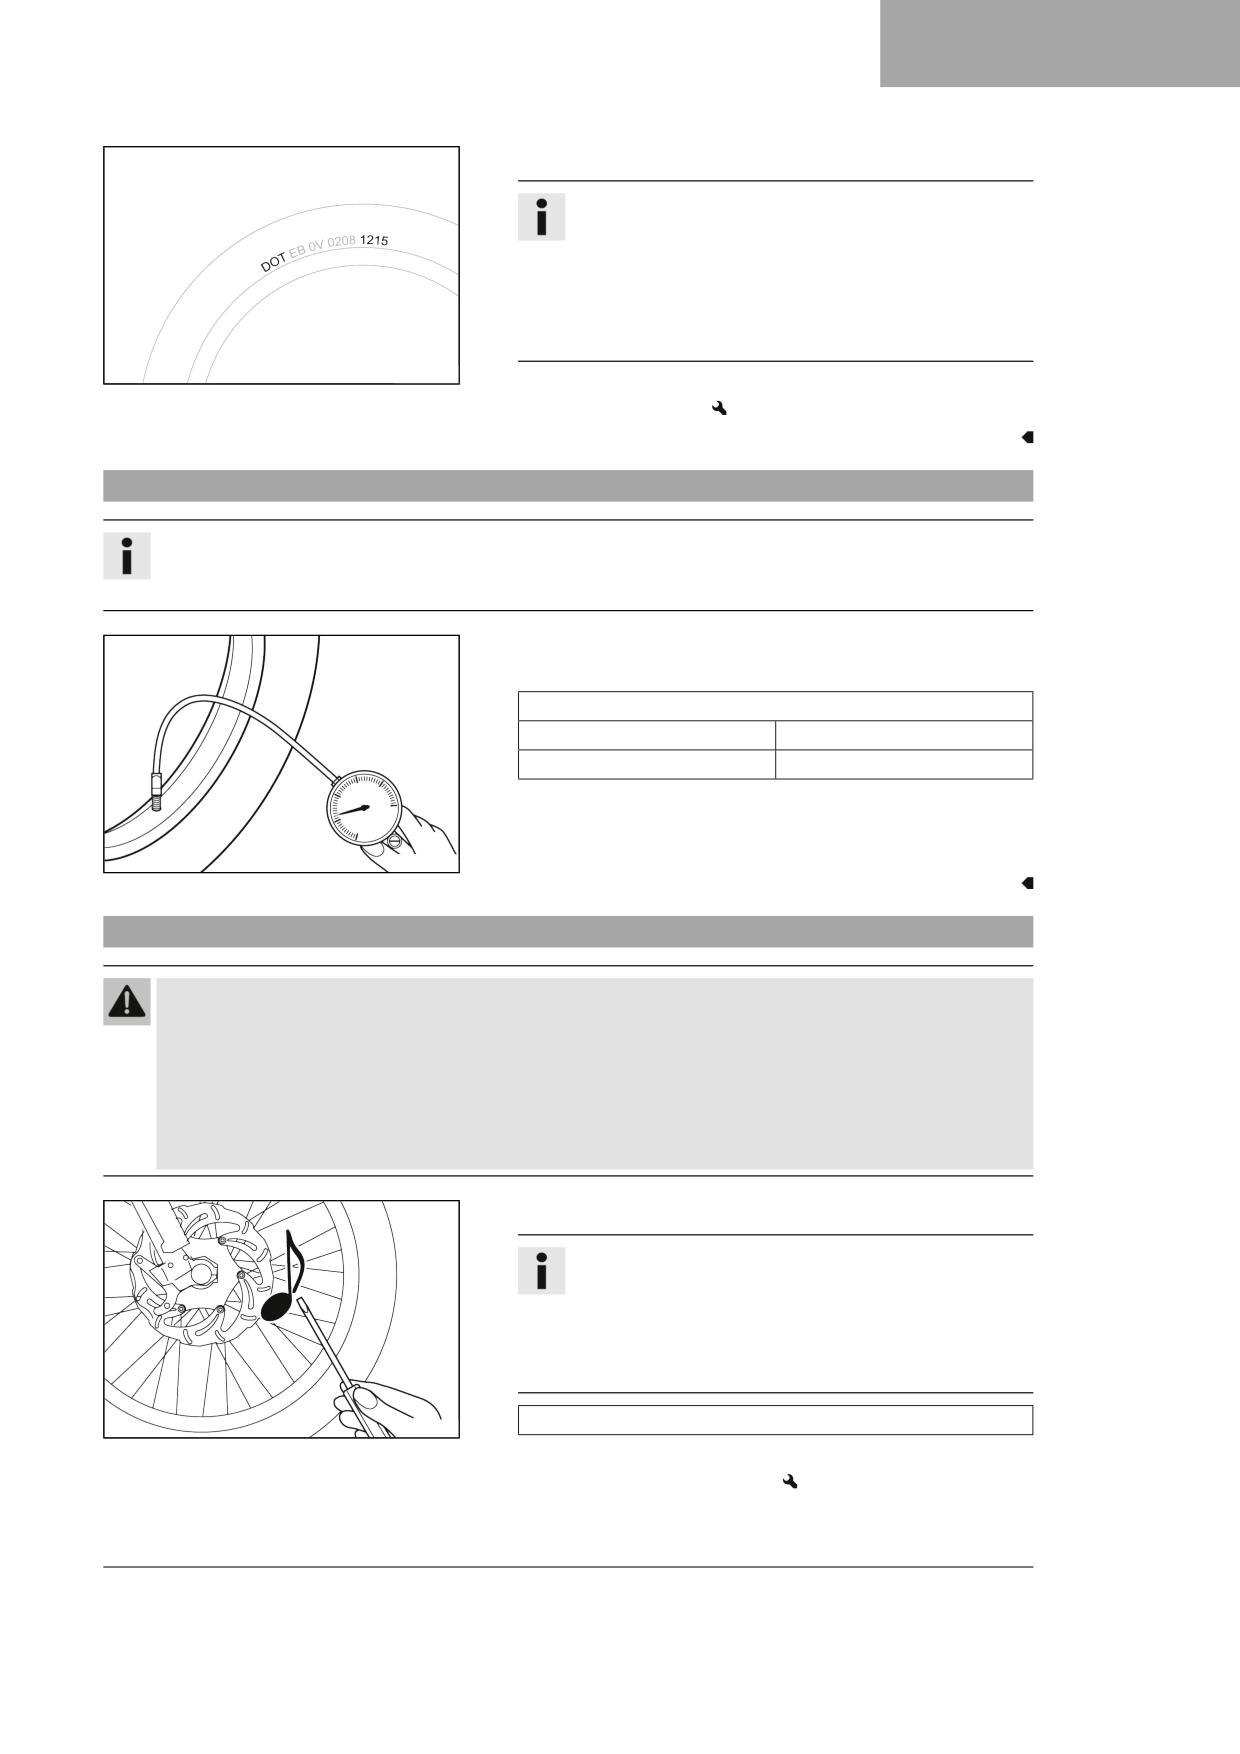
WHEELS, TIRES
13
– Check the tire age.
Info
The tire date of manufacture is usually contained in the tire
label and is indicated by the last four digits of the DOT num-
ber. The first two digits indicate the week of manufacture
and the last two digits the year of manufacture.
GASGAS Motorcycles recommends that the tires be changed
after five years at the latest, regardless of the actual wear.
H01144-01
» If the tires are more than five years old:
- Change the tires.
13.6
Checking tire pressure
Info
Low tire pressure leads to abnormal wear and overheating of the tire.
Correct tire pressure ensures optimal riding comfort and maximum tire service life.
- Remove protection cap.
- Check tire pressure when the tires are cold.
Offroad tire pressure
front
1.0 bar (15 psi)
rear
1.0 bar (15 psi)
» If the tire pressure does not meet specifications:
- Correct tire pressure.
- Mount the protection cap.
400695-01
13.7
Checking spoke tension
Warning
Danger of accidents Incorrectly tensioned spokes impair the handling characteristic and result in secondary dam-
age.
The spokes break due to being overloaded if they are too tightly tensioned. If the tension in the spokes is too low,
then lateral and radial run-out will form in the wheel. Other spokes will become looser as a result.
- Check spoke tension regularly, and in particular on a new vehicle. (Your authorized GASGAS Motorcycles work-
shop will be glad to help.)
- Strike each spoke briefly using a screwdriver blade.
Info
The frequency of the sound depends on the spoke length
and spoke diameter.
If you hear different tone frequencies from different spokes
of equal length and diameter, this is an indication of differ-
ent spoke tensions.
You should hear a high note.
400694-01
» If the spoke tension differs:
- Correct the spoke tension.
- Check the spoke torque.
83

13
WHEELS, TIRES
Guideline
Spoke nipple
M4.5
5 Nm (3.7 lbf ft)
Torque wrench kit (58429094000)
84
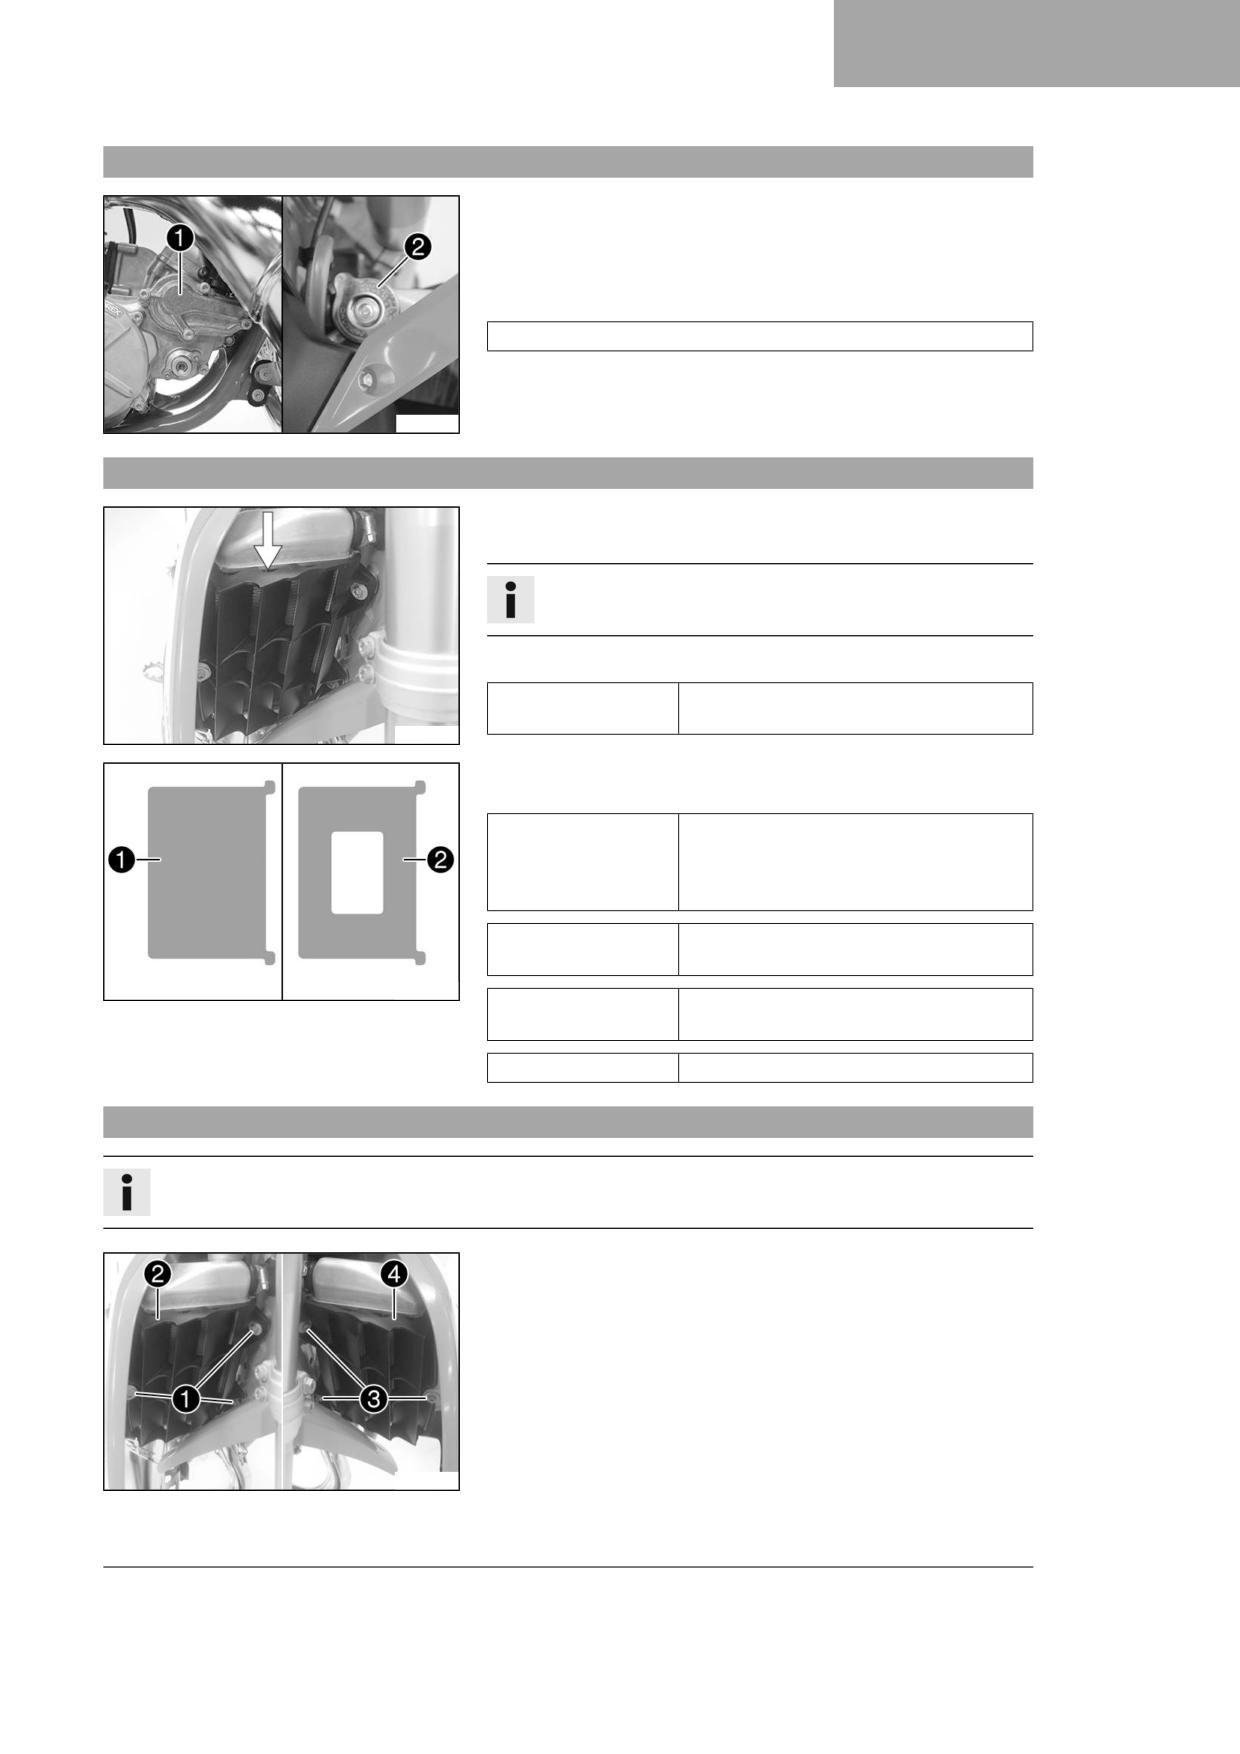
COOLING SYSTEM
14
14.1
Cooling system
Water pump 1 in the engine circulates the coolant.
The pressure resulting from the warming of the cooling system is reg-
ulated by a valve in radiator cap 2. This ensures that operating the
vehicle at the specified coolant temperature will not result in a risk of
malfunctions.
120 °C (248 °F)
Cooling is effected by the air stream.
The lower the speed, the less the cooling effect. Dirty cooling fins also
reduce the cooling effect.
S04351-10
14.2
Radiator cover
The radiator covers are mounted in front of the radiator between the
radiator shield and radiator.
Info
Do not use radiator covers in difficult operating conditions.
The radiator cover keeps the coolant temperature in the correct range.
Optimal coolant tem-
60 … 70 °C (140 … 158 °F)
perature
V00885-10
The radiator covers are installed in front of the radiator, depending on
the ambient temperature.
Full radiator cover
< 0 °C (< 32 °F)
right side 1 and half
radiator cover left
side 2
Full radiator cover
0 … 10 °C (32 … 50 °F)
right side 1
V00884-10
Half radiator cover
10 … 20 °C (50 … 68 °F)
right side 2
No radiator cover
> 20 °C (> 68 °F)
14.3
Installing the radiator cover
Info
Only remove left radiator shield if both radiator covers are mounted.
- Remove screws 1.
- Remove right radiator shield 2.
- Remove screws 3.
- Remove left radiator shield 4.
V00886-10
85
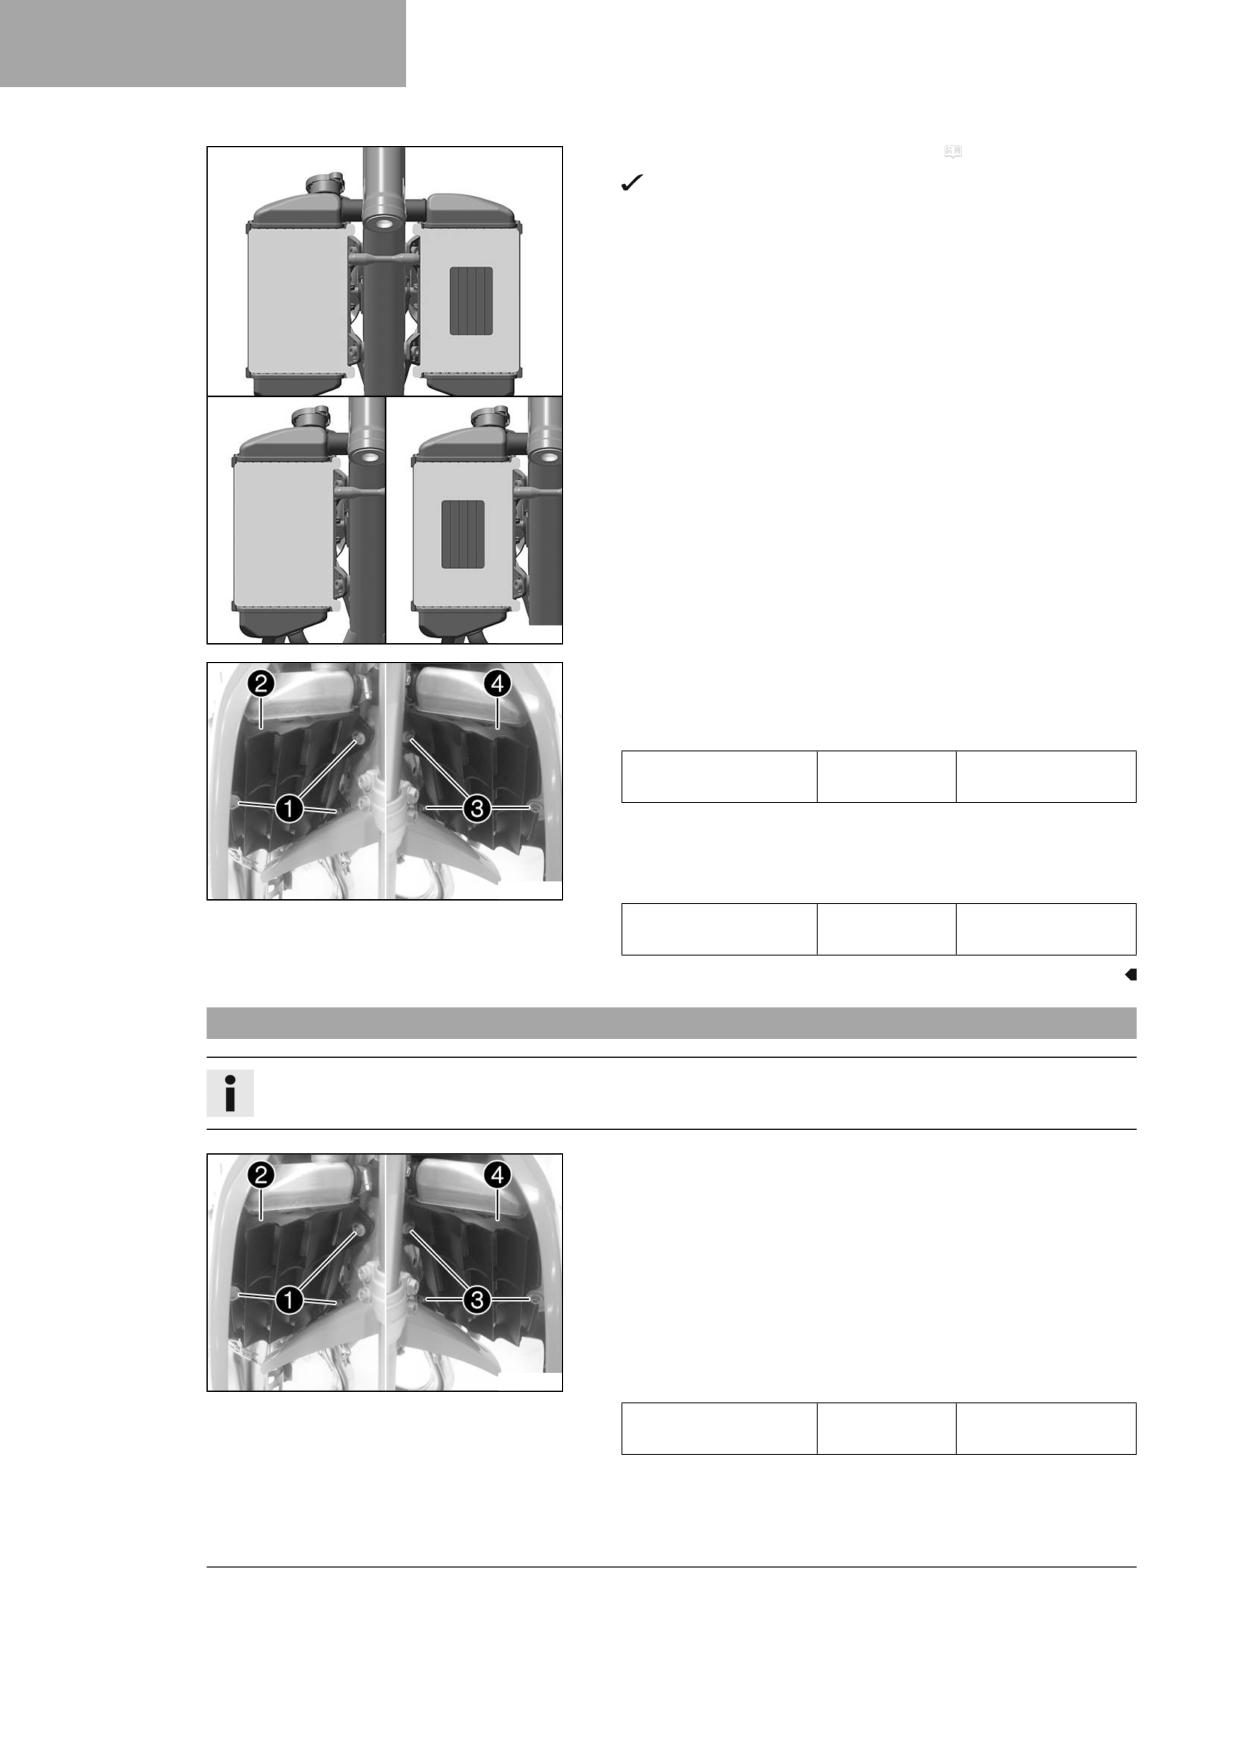
14
COOLING SYSTEM
- Position the corresponding radiator cover ( p. 85).
The holding lugs point toward the frame.
H02356-01
- Position left radiator shield 4.
- Mount and tighten screws 3.
Guideline
Remaining screws,
M6
10 Nm (7.4 lbf ft)
chassis
- Position right radiator shield 2.
- Mount and tighten screws 1.
V00886-10
Guideline
Remaining screws,
M6
10 Nm (7.4 lbf ft)
chassis
14.4
Removing the radiator cover
Info
Only remove left radiator shield if both radiator covers are mounted.
- Remove screws 1.
- Remove right radiator shield 2.
- Remove screws 3.
- Remove left radiator shield 4.
- Remove corresponding radiator cover.
- Position right radiator shield 2.
- Mount and tighten screws 1.
V00886-10
Guideline
Remaining screws,
M6
10 Nm (7.4 lbf ft)
chassis
- Position left radiator shield 4.
- Mount and tighten screws 3.
86

COOLING SYSTEM
14
Guideline
Remaining screws,
M6
10 Nm (7.4 lbf ft)
chassis
14.5
Checking the antifreeze and coolant level
Warning
Danger of scalding During motorcycle operation, the coolant gets hot and is under pressure.
- Do not open the radiator, the radiator hoses or other cooling system components if the engine or the cooling
system are at operating temperature.
- Allow the cooling system and the engine to cool down before you open the radiator, the radiator hoses or
other components of the cooling system.
- In the event of scalding, rinse the area affected immediately with lukewarm water.
Warning
Danger of poisoning Coolant is harmful to health.
- Keep coolant out of the reach of children.
- Do not allow coolant to come into contact with the skin, the eyes and clothing.
- Consult a doctor immediately if coolant is swallowed.
- Rinse the affected area immediately with plenty of water in the event of contact with the skin.
- Rinse eyes thoroughly with water and consult a doctor immediately if coolant gets into the eyes.
- Change clothing if coolant spills onto your clothing.
Condition
The engine is cold.
- Stand the motorcycle upright on a horizontal surface.
- Remove the radiator cap.
- Check the antifreeze in the coolant.
-25 … -45 °C (-13 … -49 °F)
» If the antifreeze in the coolant does not match the specified
value:
- Correct the antifreeze in the coolant.
- Check the coolant level in the radiator.
400243-10
10 mm (0.39 in)
Coolant level A above the
radiator fins
» If the coolant level does not match the specified value:
- Correct the coolant level.
Coolant ( p. 116)
- Mount the radiator cap.
87

14
COOLING SYSTEM
14.6
Checking the coolant level
Warning
Danger of scalding During motorcycle operation, the coolant gets hot and is under pressure.
- Do not open the radiator, the radiator hoses or other cooling system components if the engine or the cooling
system are at operating temperature.
- Allow the cooling system and the engine to cool down before you open the radiator, the radiator hoses or
other components of the cooling system.
- In the event of scalding, rinse the area affected immediately with lukewarm water.
Warning
Danger of poisoning Coolant is harmful to health.
- Keep coolant out of the reach of children.
- Do not allow coolant to come into contact with the skin, the eyes and clothing.
- Consult a doctor immediately if coolant is swallowed.
- Rinse the affected area immediately with plenty of water in the event of contact with the skin.
- Rinse eyes thoroughly with water and consult a doctor immediately if coolant gets into the eyes.
- Change clothing if coolant spills onto your clothing.
Condition
The engine is cold.
- Stand the motorcycle upright on a horizontal surface.
- Remove the radiator cap.
- Check the coolant level in the radiator.
10 mm (0.39 in)
Coolant level A above the
radiator fins
» If the coolant level does not match the specified value:
- Correct the coolant level.
400243-10
Coolant ( p. 116)
- Mount the radiator cap.
14.7
Draining the coolant
Warning
Danger of scalding During motorcycle operation, the coolant gets hot and is under pressure.
- Do not open the radiator, the radiator hoses or other cooling system components if the engine or the cooling
system are at operating temperature.
- Allow the cooling system and the engine to cool down before you open the radiator, the radiator hoses or
other components of the cooling system.
- In the event of scalding, rinse the area affected immediately with lukewarm water.
88
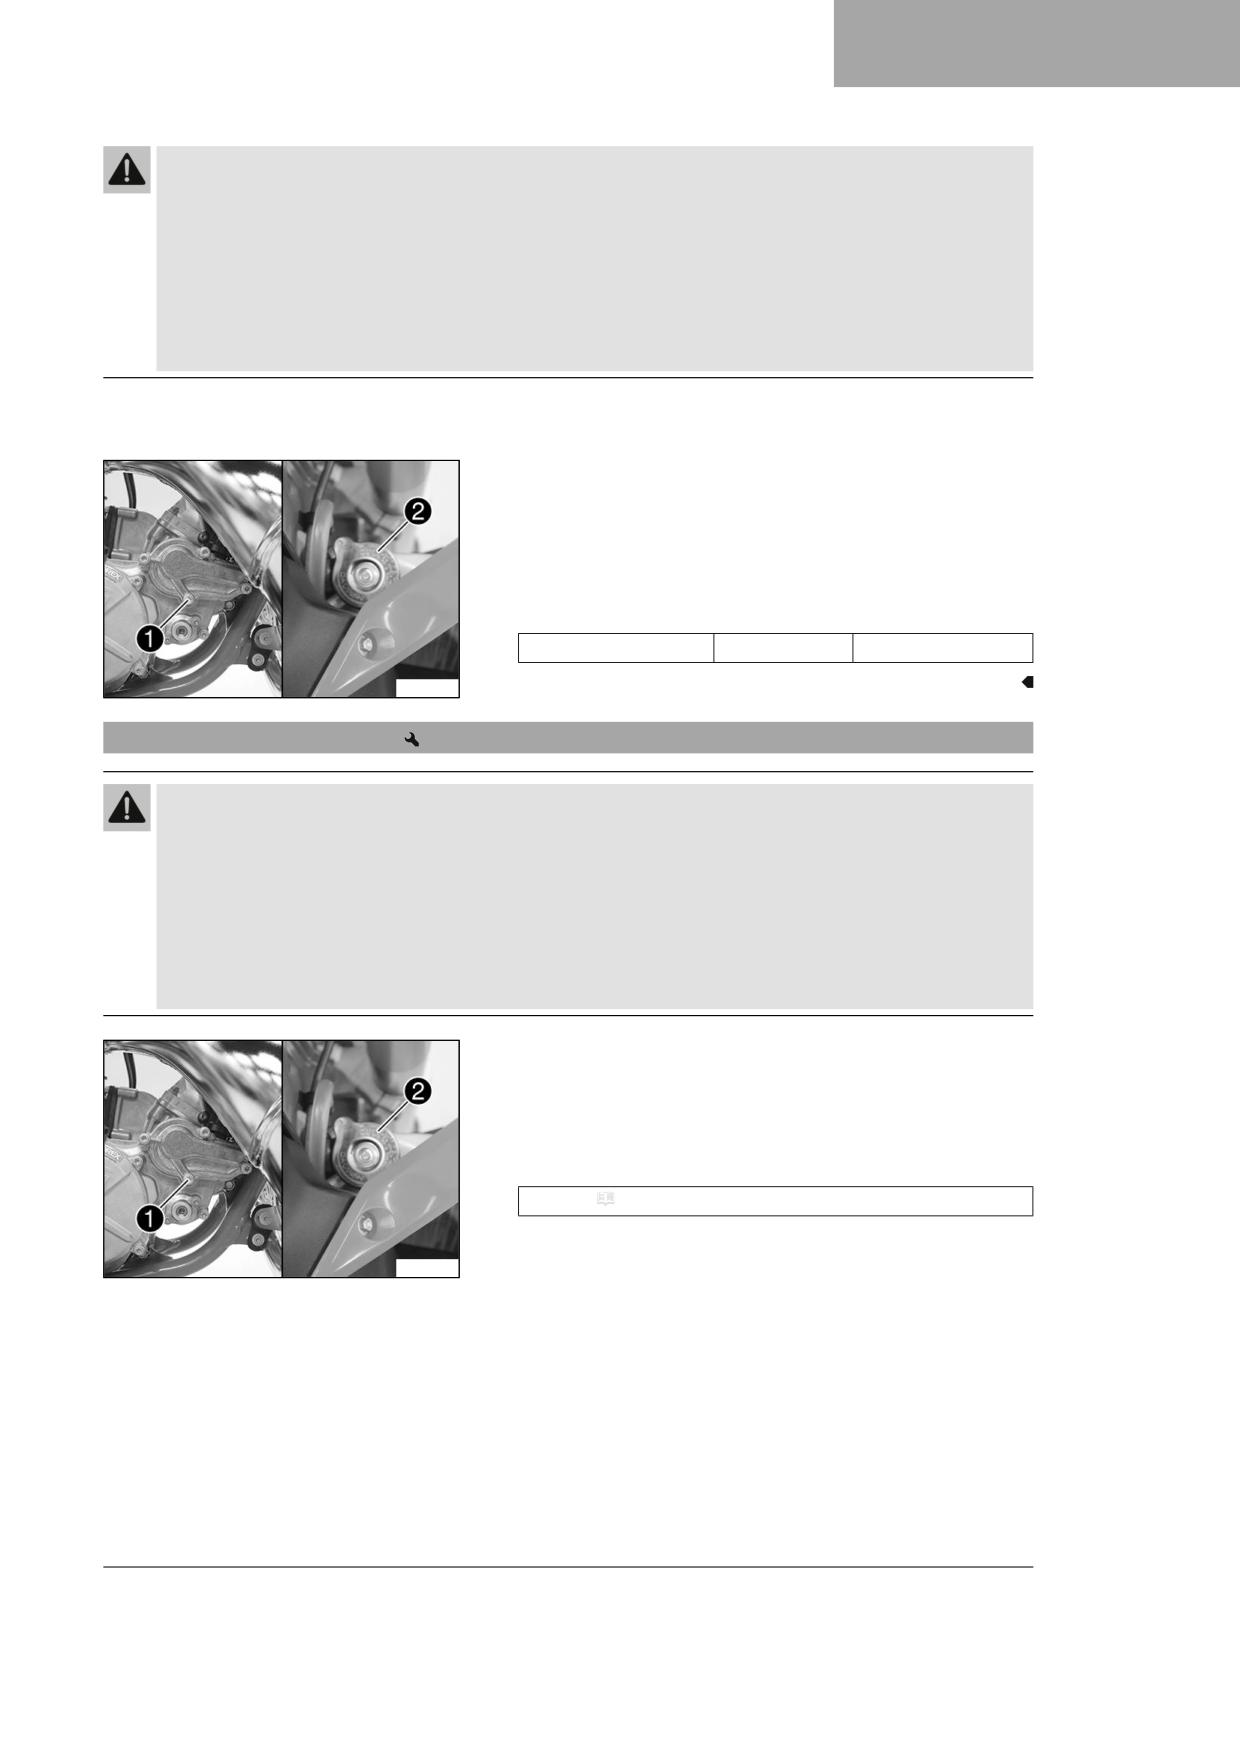
COOLING SYSTEM
14
Warning
Danger of poisoning Coolant is harmful to health.
- Keep coolant out of the reach of children.
- Do not allow coolant to come into contact with the skin, the eyes and clothing.
- Consult a doctor immediately if coolant is swallowed.
- Rinse the affected area immediately with plenty of water in the event of contact with the skin.
- Rinse eyes thoroughly with water and consult a doctor immediately if coolant gets into the eyes.
- Change clothing if coolant spills onto your clothing.
Condition
The engine is cold.
- Position the motorcycle upright.
- Place an appropriate container under the water pump cover.
- Remove screw 1. Take off radiator cap 2.
- Completely drain the coolant.
- Mount and tighten screw 1 with a new seal ring.
Guideline
Coolant drain plug
M6
8 Nm (5.9 lbf ft)
S04351-11
14.8
Refilling with coolant
Warning
Danger of poisoning Coolant is harmful to health.
- Keep coolant out of the reach of children.
- Do not allow coolant to come into contact with the skin, the eyes and clothing.
- Consult a doctor immediately if coolant is swallowed.
- Rinse the affected area immediately with plenty of water in the event of contact with the skin.
- Rinse eyes thoroughly with water and consult a doctor immediately if coolant gets into the eyes.
- Change clothing if coolant spills onto your clothing.
Main work
- Make sure that screw 1 is tightened.
- Position the motorcycle upright.
- Take off radiator cap 2.
- Completely fill the radiator with coolant.
Coolant ( p. 116)
S04351-11
89
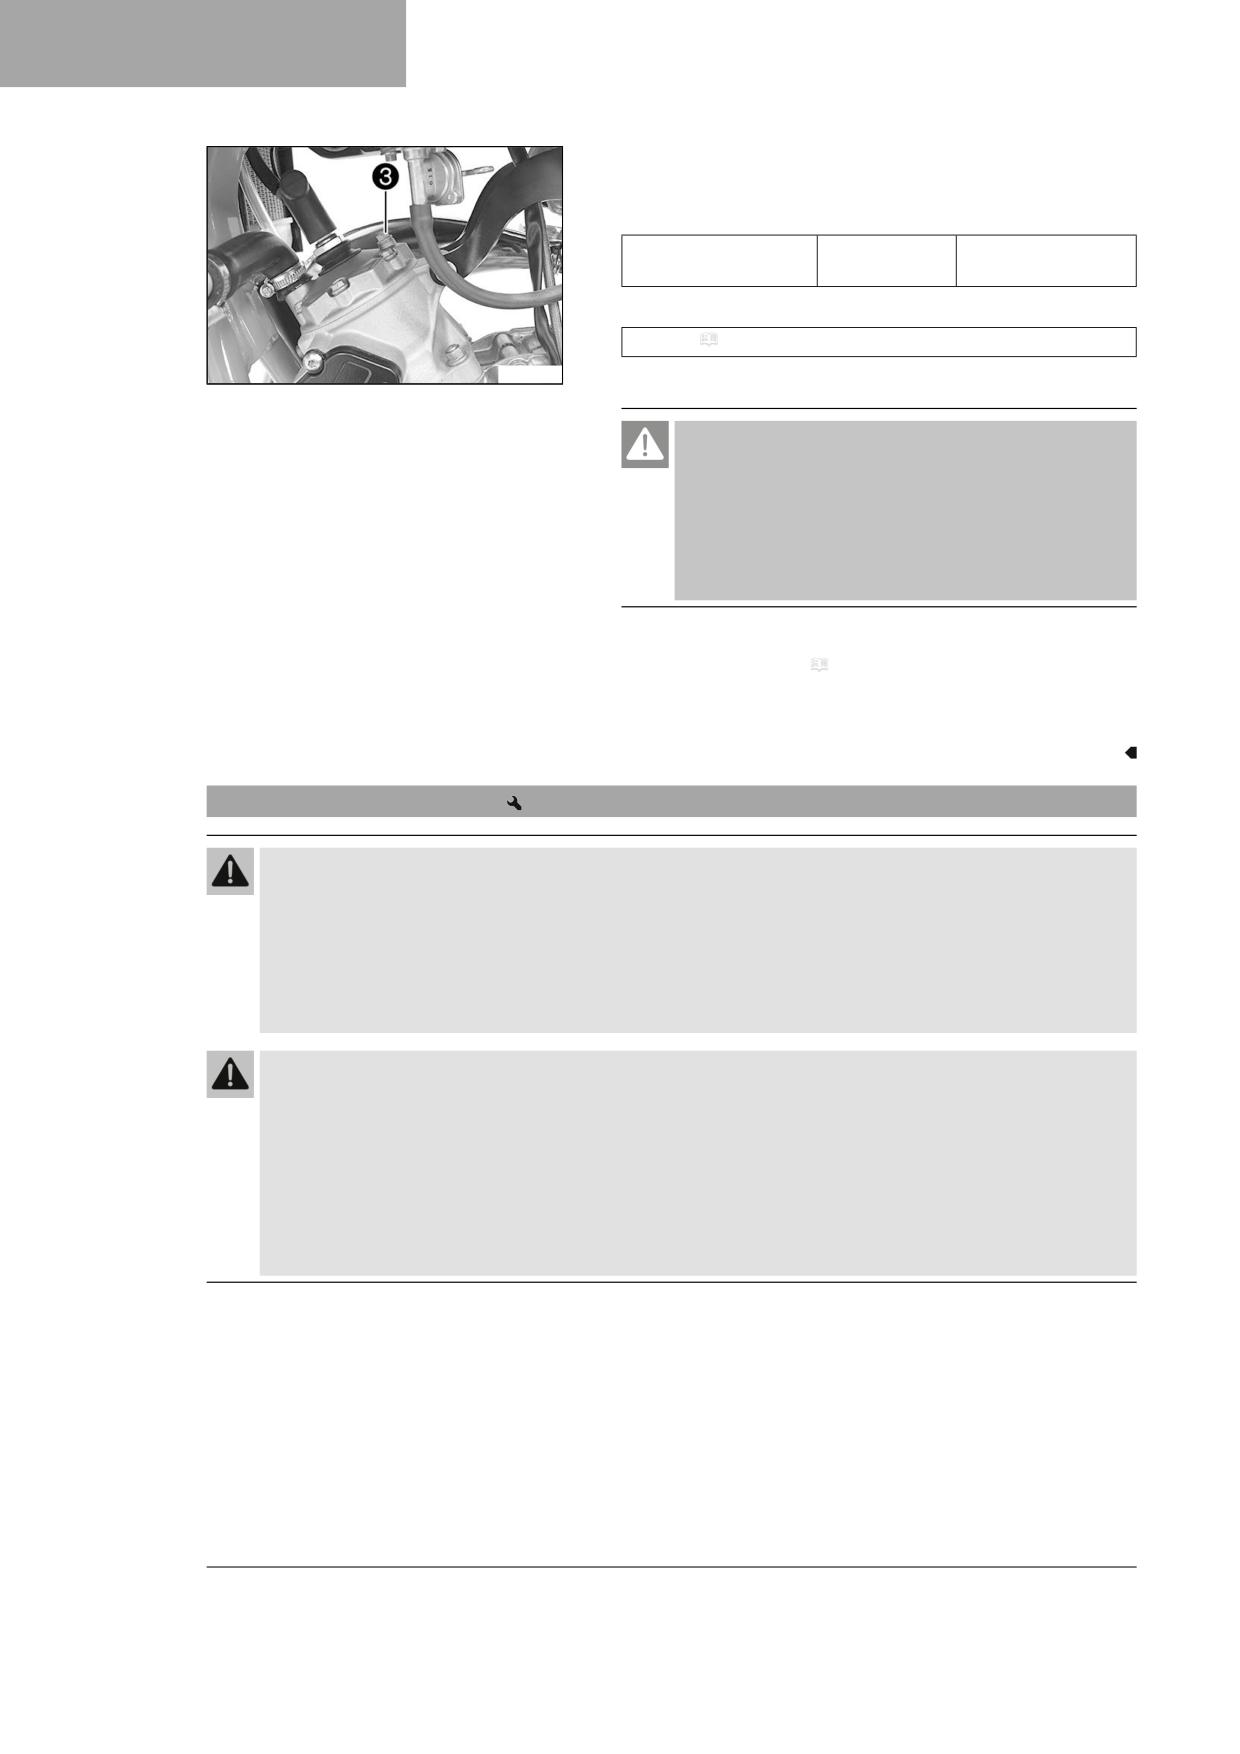
14
COOLING SYSTEM
- Loosen screw 3 until coolant escapes without bubbles.
- Mount and tighten screw 3.
Guideline
Screw, radiator bleed-
M6
8 Nm (5.9 lbf ft)
ing
- Completely fill the radiator with coolant.
Coolant ( p. 116)
V00870-10
- Mount radiator cap 2.
Danger
Danger of poisoning Exhaust gases are toxic and inhaling
them may result in unconsciousness and death.
- Always make sure there is sufficient ventilation when
running the engine.
- Use effective exhaust extraction when starting or run-
ning the engine in an enclosed space.
- Allow the engine to warm up and cool down again.
- Check the coolant level. ( p. 88)
Finishing work
- Check the cooling system for leaks.
14.9
Changing the coolant
Warning
Danger of scalding During motorcycle operation, the coolant gets hot and is under pressure.
- Do not open the radiator, the radiator hoses or other cooling system components if the engine or the cooling
system are at operating temperature.
- Allow the cooling system and the engine to cool down before you open the radiator, the radiator hoses or
other components of the cooling system.
- In the event of scalding, rinse the area affected immediately with lukewarm water.
Warning
Danger of poisoning Coolant is harmful to health.
- Keep coolant out of the reach of children.
- Do not allow coolant to come into contact with the skin, the eyes and clothing.
- Consult a doctor immediately if coolant is swallowed.
- Rinse the affected area immediately with plenty of water in the event of contact with the skin.
- Rinse eyes thoroughly with water and consult a doctor immediately if coolant gets into the eyes.
- Change clothing if coolant spills onto your clothing.
Condition
The engine is cold.
90
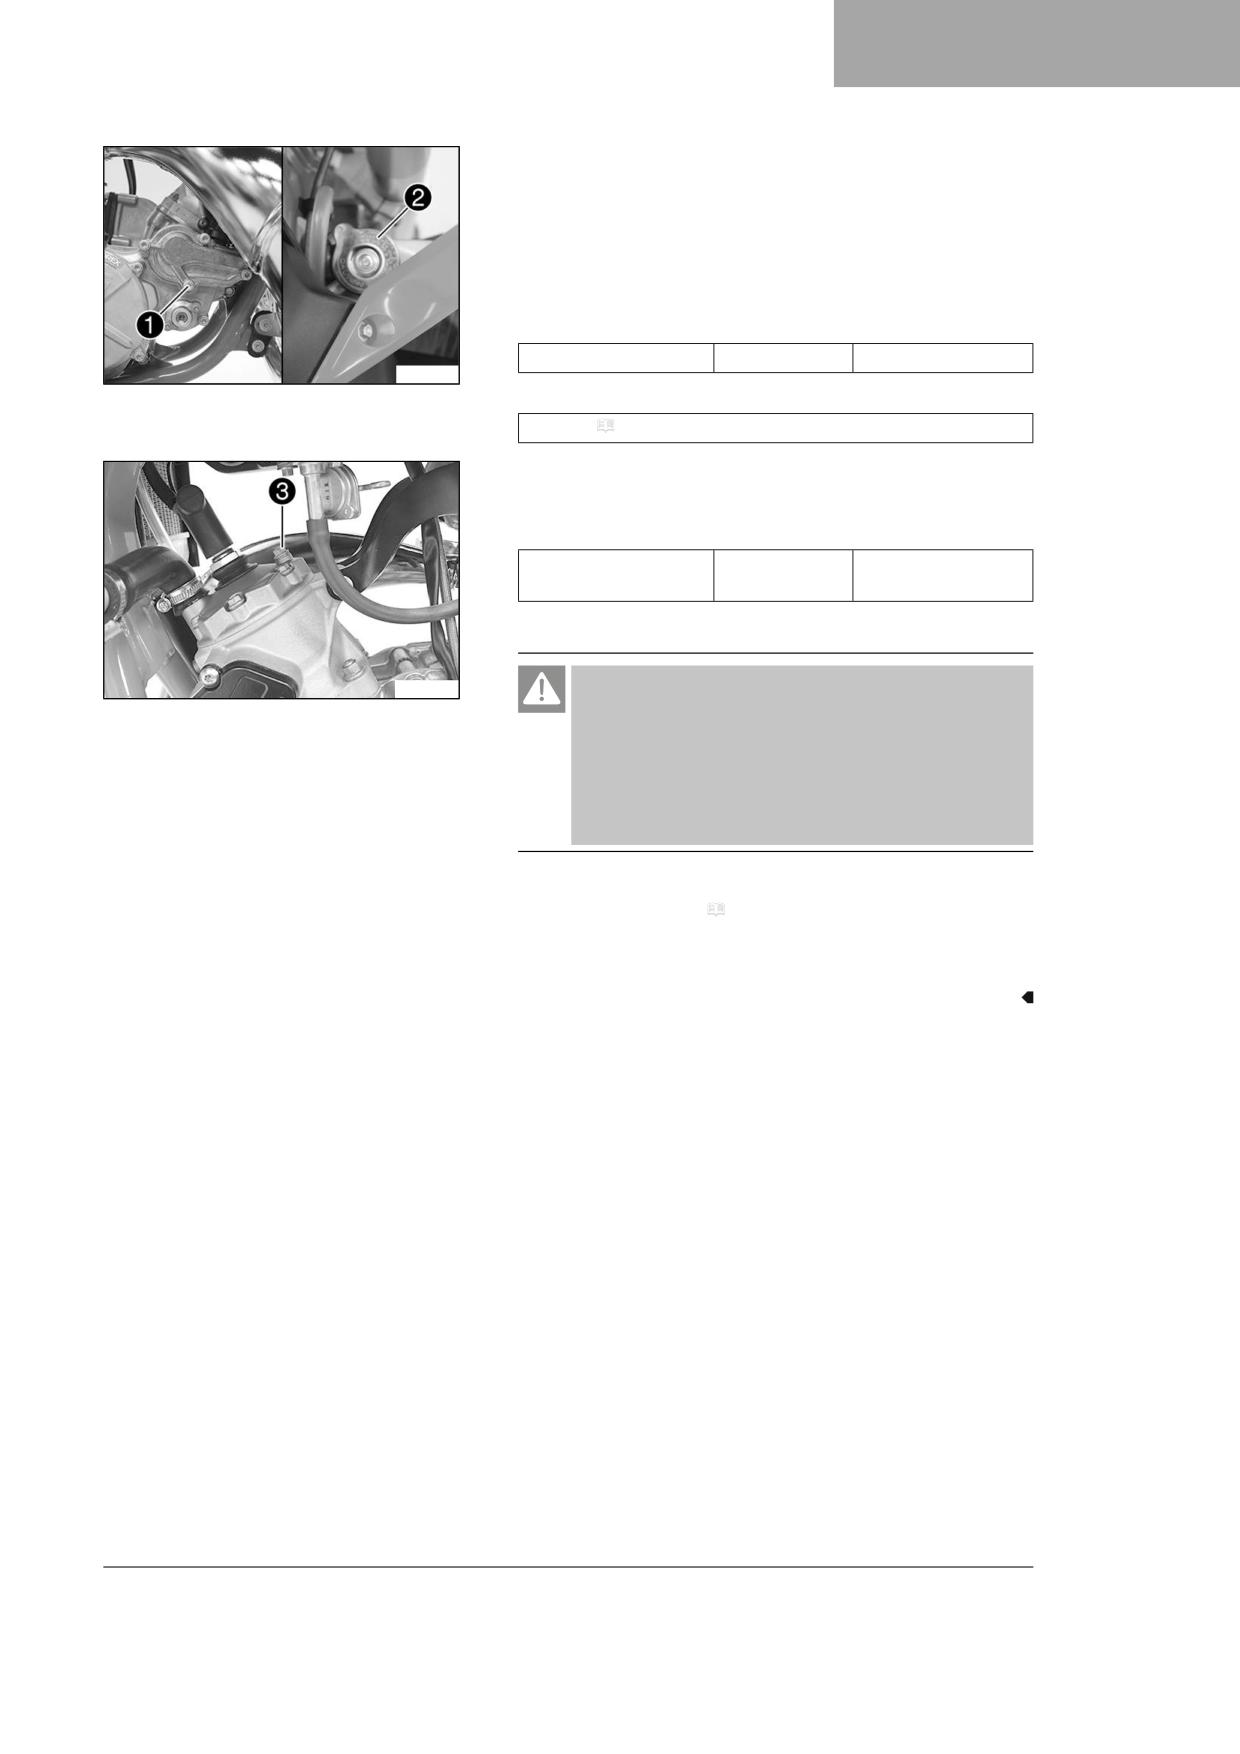
COOLING SYSTEM
14
Main work
- Position the motorcycle upright.
- Place an appropriate container under the water pump cover.
- Remove screw 1. Take off radiator cap 2.
- Completely drain the coolant.
- Mount and tighten screw 1 with a new seal ring.
Guideline
Coolant drain plug
M6
8 Nm (5.9 lbf ft)
S04351-11
- Completely fill the radiator with coolant.
Coolant ( p. 116)
- Loosen screw 3 until coolant escapes without bubbles.
- Mount and tighten screw 3.
Guideline
Screw, radiator bleed-
M6
8 Nm (5.9 lbf ft)
ing
- Mount radiator cap 2.
V00870-10
Danger
Danger of poisoning Exhaust gases are toxic and inhaling
them may result in unconsciousness and death.
- Always make sure there is sufficient ventilation when
running the engine.
- Use effective exhaust extraction when starting or run-
ning the engine in an enclosed space.
- Allow the engine to warm up and cool down again.
- Check the coolant level. ( p. 88)
Finishing work
- Check the cooling system for leaks.
91
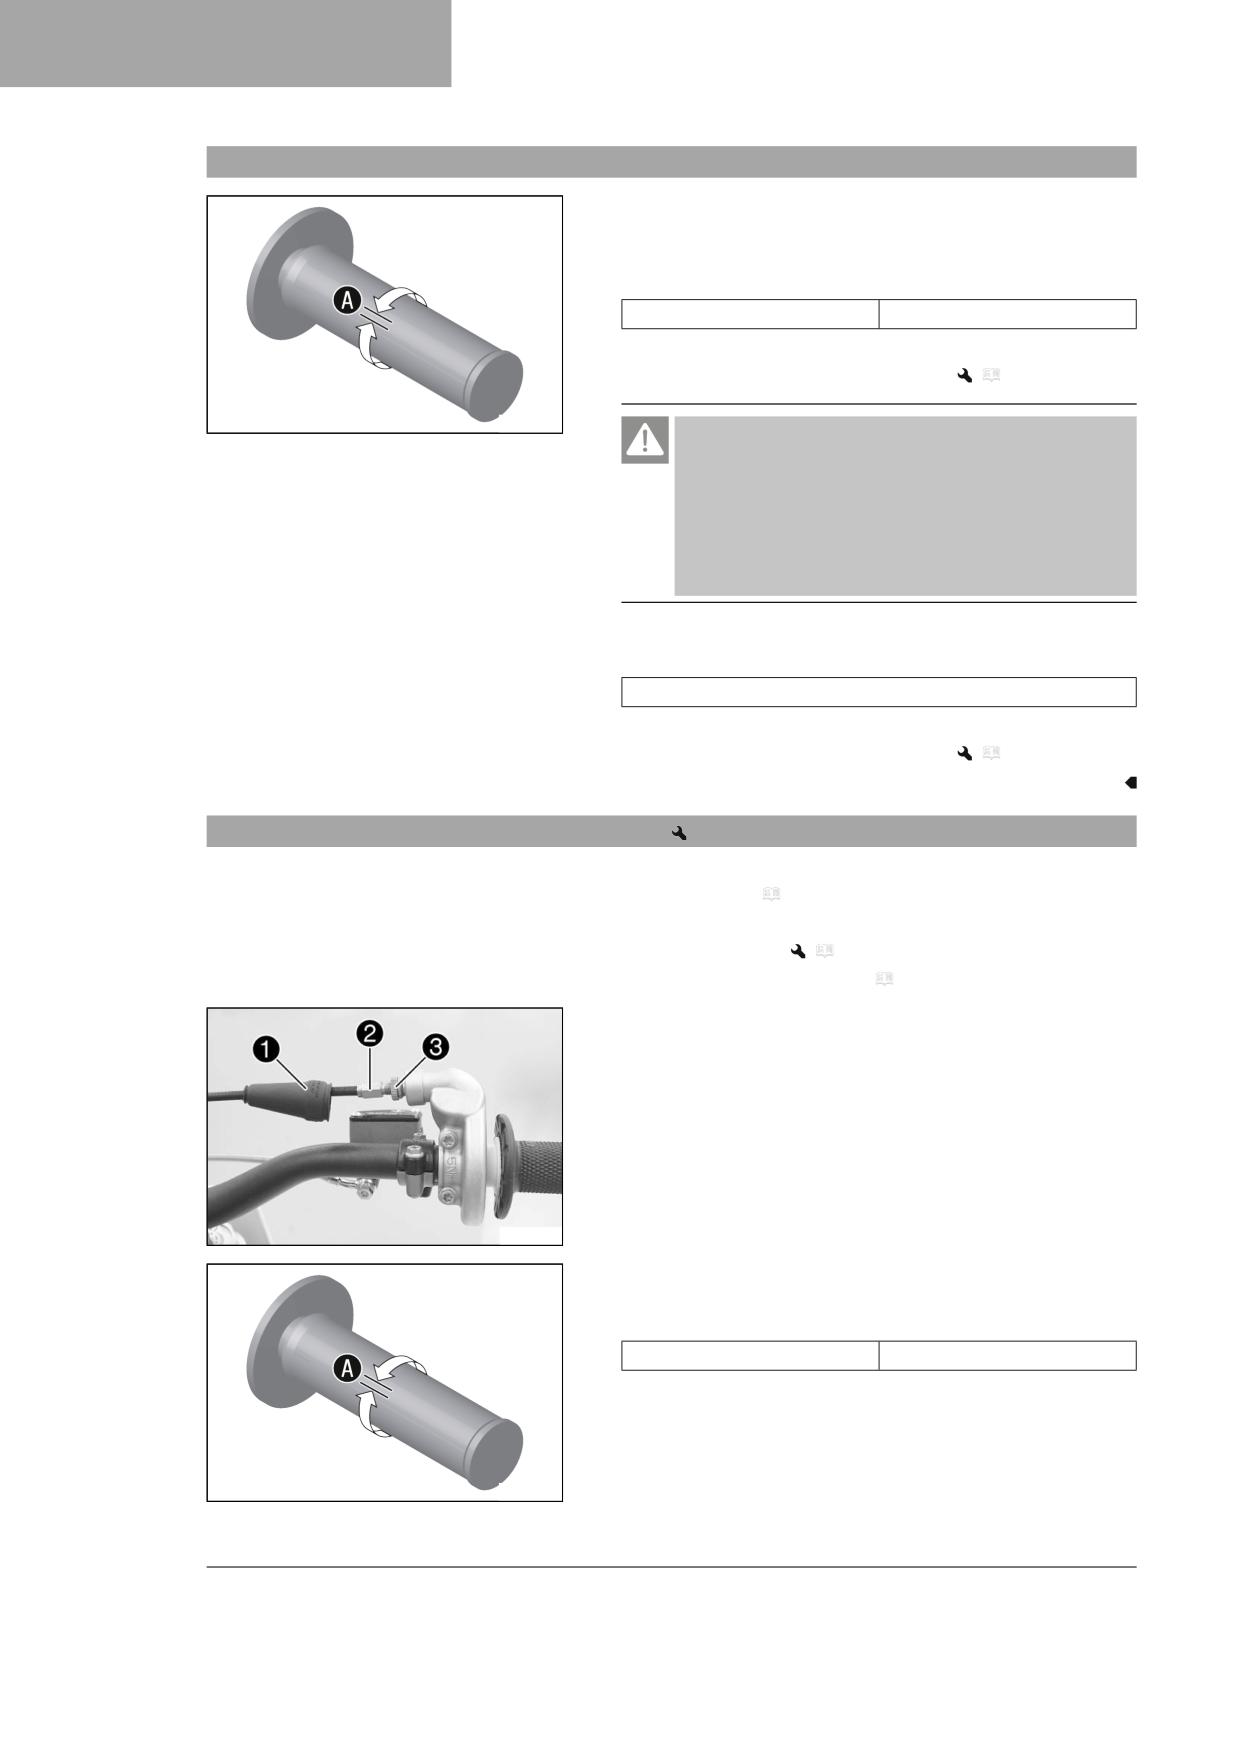
15
TUNING THE ENGINE
15.1
Checking the play in the throttle cable
- Check the throttle grip for smooth operation.
- Move the handlebar to the straight-ahead position. Turn the throt-
tle grip back and forth slightly and determine the play in throttle
cable A.
Play in throttle cable
2 … 3 mm (0.08 … 0.12 in)
» If the throttle cable play does not meet the specified value:
- Adjust the play in the throttle cable.
(
p. 92)
400192-11
Danger
Danger of poisoning Exhaust gases are toxic and inhaling
them may result in unconsciousness and death.
- Always make sure there is sufficient ventilation when
running the engine.
- Use effective exhaust extraction when starting or run-
ning the engine in an enclosed space.
- Start the engine and let it run at idle speed. Move the handlebar to
and fro over the entire steering range.
The idle speed must not change.
» If the idle speed changes:
- Adjust the play in the throttle cable.
(
p. 92)
15.2
Adjusting the play in the throttle cable
Preparatory work
- Remove the seat. ( p. 52)
- Turn tap handle of the fuel tap to the OFF position.
- Remove the fuel tank.
(
p. 56)
– Check the throttle cable routing. ( p. 63)
Main work
- Move the handlebar to the straight-ahead position.
- Push back sleeve 1.
- Ensure that the throttle cable sleeve is pushed all the way into bar-
rel adjuster 2.
- Loosen nut 3.
S04292-10
- Turn barrel adjuster 2 so that there is play A in the throttle
cable at the throttle grip.
Guideline
Play in throttle cable
2 … 3 mm (0.08 … 0.12 in)
– Tighten nut 3.
- Slide on sleeve 1.
400192-11
92

TUNING THE ENGINE
15
Finishing work
- Install the fuel tank.
(
p. 57)
– Mount the seat. ( p. 52)
- Check the play in the throttle cable. ( p. 92)
15.3
Carburetor tuning
Effects of carburetor tuning
H01400-01
The different carburetor components must be tuned both to one another and for the use intended.
Main jet MJ
The main jet MJ has the greatest influence with the throttle slide open (full throttle).
If the insulator of a new spark plug is very light or white after a brief ride at full throttle, or if the engine knocks, a larger
main jet needs to be used. If the insulator is dark brown or sooty, a smaller main jet needs to be used.
Needle position POS
The needle position has the greatest influence in the mid throttle slide range.
If the engine stutters when accelerating with a partially open throttle slide, the jet needle must be lowered. If the engine
knocks when accelerating at the full power rpm range, the jet needle must be raised.
Cylindrical part of the needle CYL
The cylindrical part of the needle has the greatest influence when the throttle slide is almost closed.
Idling jet IJ
The idling jet has the greatest influence in the low to mid throttle slide range.
If the engine stutters at idle speed or when accelerating with a partially open throttle slide, a smaller idling jet must be
used. If the engine knocks in this power range, then a larger idling jet must be used.
Idle air adjusting screw open ASO
The idle air adjusting screw has the greatest influence at idle speed.
93
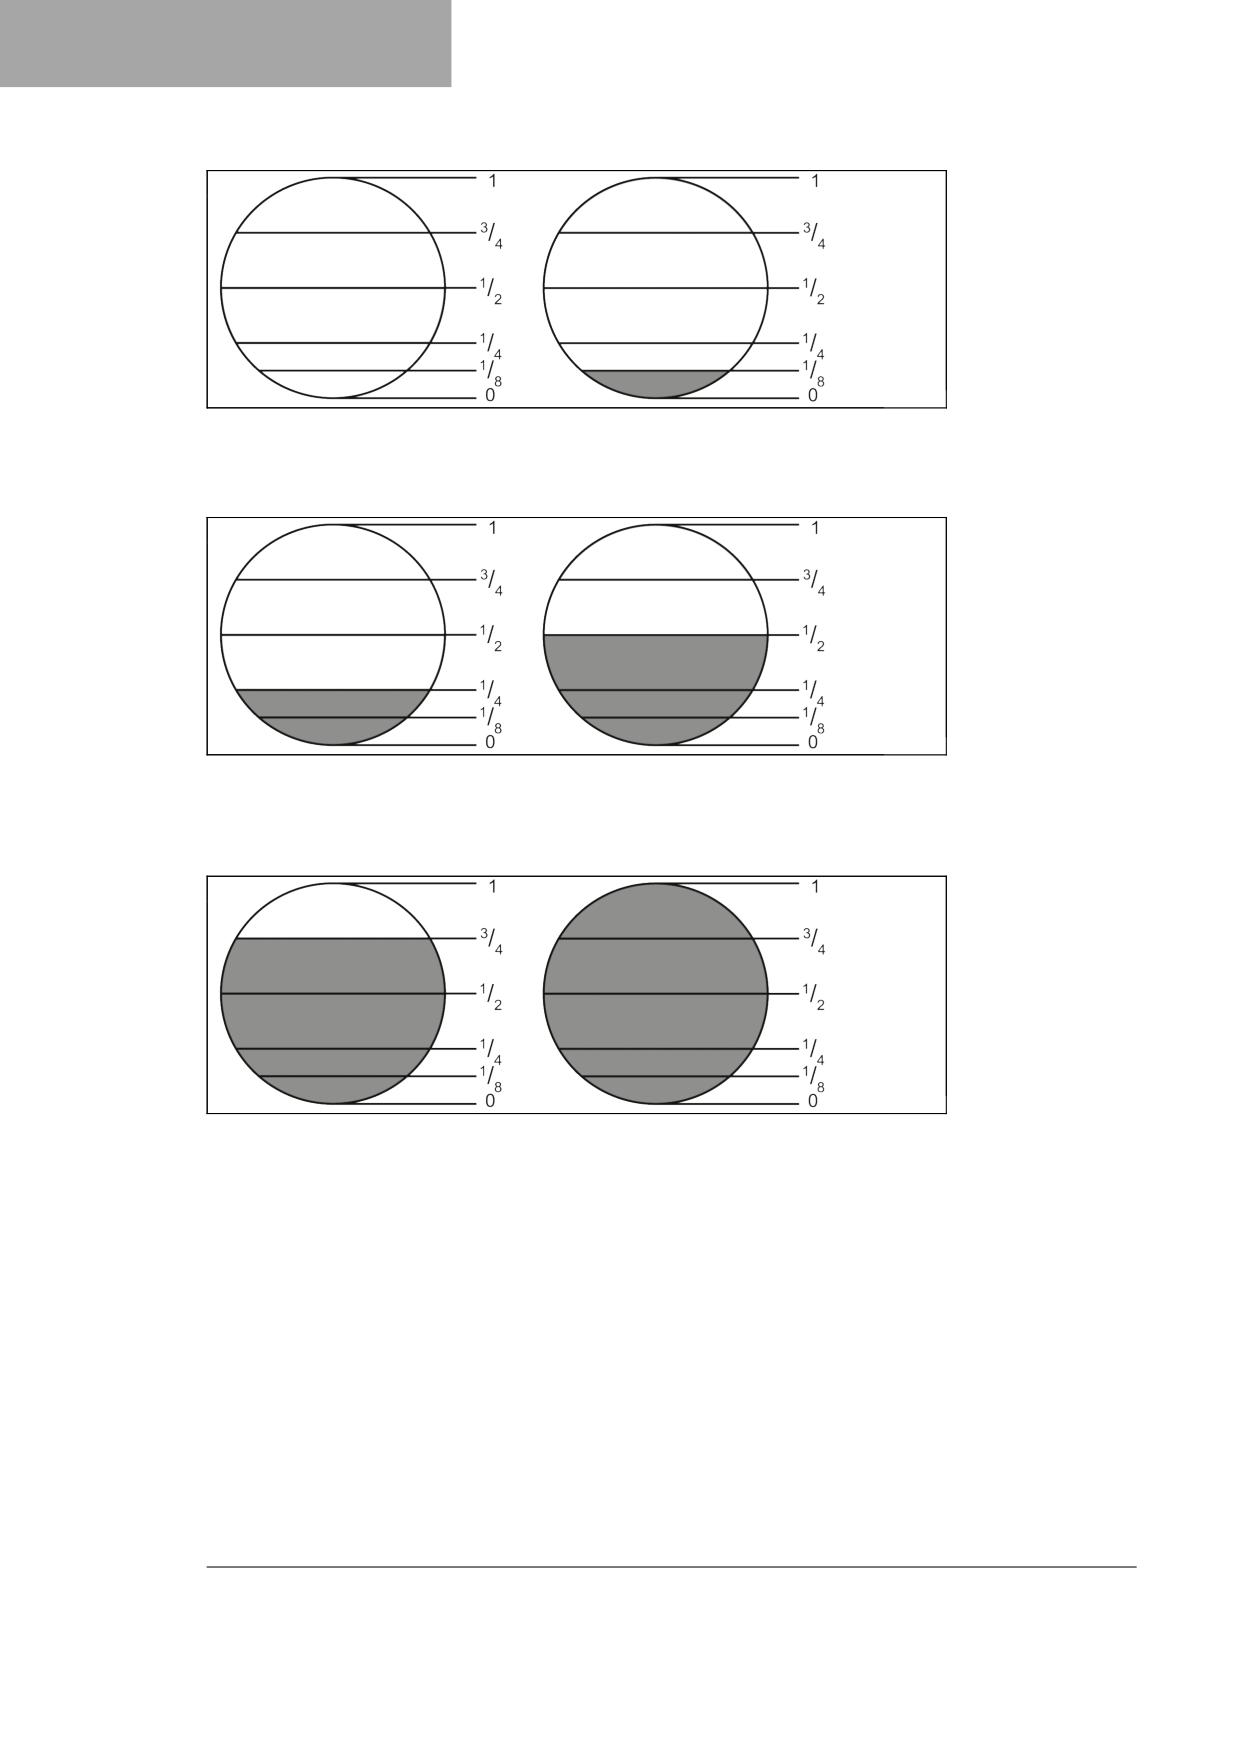
15
TUNING THE ENGINE
Influence of throttle slide adjustment
K00495-01
The idling jet has the greatest influence when the throttle slide is closed. The first cylindrical part of the needle and the clip
position have only minimal influence.
When the throttle slide is 1/8 open, the first cylindrical part of the needle, the idling jet and the clip position have the great-
est influence.
K00496-01
When the throttle slide is 1/4 open, the idling jet and the clip position have the greatest influence. The influence of the first
cylindrical part of the needle is less.
When the throttle slide is 1/2 open, the position of the needle has the greatest influence. The influence of the main jet and
the idling jet is only minimal.
K00497-01
When the throttle slide is 3/4 open, the influence of the main jet is greatest. The clip position and the idling jet have only
minimal influence.
When the throttle slide is fully open, the influence of the main jet is greatest. The clip position and the idling jet have only
minimal influence.
Needle overview
The jet needles available are shown in the following table.
94
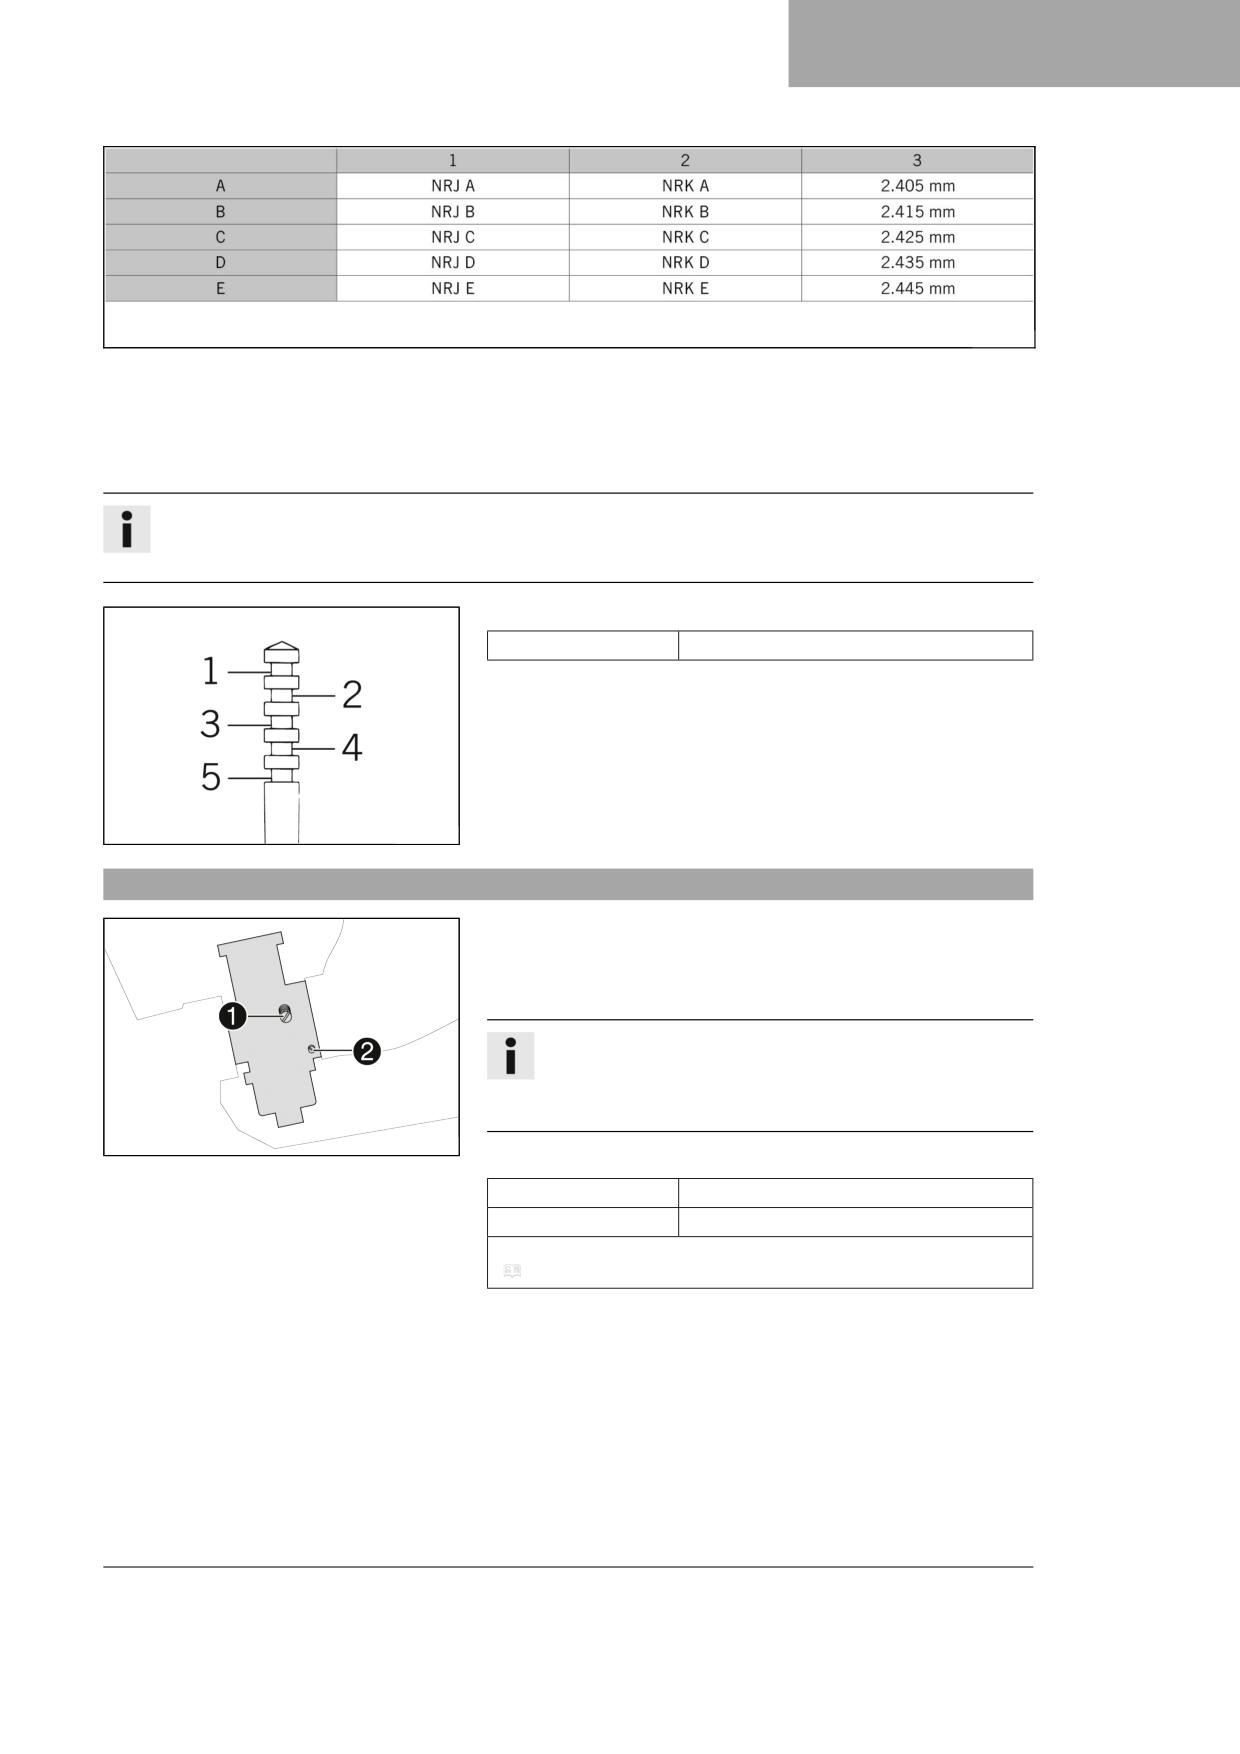
TUNING THE ENGINE
15
402797-01
Column 2 corresponds to a needle in the standard position.
Column 1 corresponds to a needle which is half a clip leaner.
Column 3 specifies the diameter of the first cylindrical part of the needle. The smaller the diameter of the first cylindrical
part of the needle, the richer the mixture. The larger the diameter of the first cylindrical part of the needle, the leaner the
mixture. The first cylindrical part of the needle has the greatest influence in the lowest load range.
Info
The top right jet needle A2 corresponds to the richest setting of the carburetor, and the bottom left jet needle E1
corresponds to the leanest. The optimal carburetor tuning is shown under the respective model.
Clip position
1 ... 5
Clip position from above
The five possible clip positions are shown here.
The carburetor tuning depends on the defined ambient and operating
conditions.
B00075-10
15.4
Carburetor - idle setting
The idle setting of the carburetor has a big influence on the starting
behavior, stable idle speed, and the response to throttle opening. This
means that an engine with a correctly set idle speed will be easier to
start than one with an incorrectly set idle speed.
Info
The carburetor and its components are subject to increased
wear caused by engine vibration. Wear can result in malfunc-
tioning.
402799-10
The factory setting for the carburetor is set for the following values.
Height above sea level
301 … 750 m (988 … 2,461 ft)
Ambient temperature
16 … 24 °C (61 … 75 °F)
Super unleaded (98 octane) mixed with 2-stroke engine oil (1:40)
(
p. 117)
The idle speed is adjusted with adjusting screw 1.
The idle mixture is adjusted using the idle air adjusting screw 2.
95

15
TUNING THE ENGINE
15.5
Carburetor - adjusting the idle speed
-
Screw in idle air adjusting screw 1 all the way and turn it to the
specified basic setting.
Guideline
Idle air adjusting screw
open
2 turns
–
Run the engine until warm.
Guideline
Warming-up phase
≥ 5 min
402799-11
Danger
Danger of poisoning Exhaust gases are toxic and inhaling
them may result in unconsciousness and death.
- Always make sure there is sufficient ventilation when
running the engine.
- Use effective exhaust extraction when starting or run-
ning the engine in an enclosed space.
-
Adjust the idle speed with adjusting screw 2.
Guideline
Choke function deactivated - The choke lever is pushed in to the
stop. ( p. 16)
Idle speed
1,400 … 1,500 rpm
–
Turn idle air adjusting screw 1 slowly in a clockwise direction until
the idle speed begins to fall.
-
Note the position and turn the idle air adjusting screw slowly coun-
terclockwise until the idle speed again begins to fall.
-
Adjust to the point between these two positions with the highest
idle speed.
Info
If there is a big engine speed rise, reduce the idle speed to a
normal level and repeat the above steps.
If the procedure described here does not lead to satisfactory
results, the cause may be a wrongly dimensioned idling jet.
If you can turn the idle air adjusting screw to the end with-
out any change of engine speed, mount a smaller idling jet.
After changing the idling jet, start from the beginning with
the adjusting steps.
Following extreme air temperature or altitude changes,
adjust the idle speed again.
96
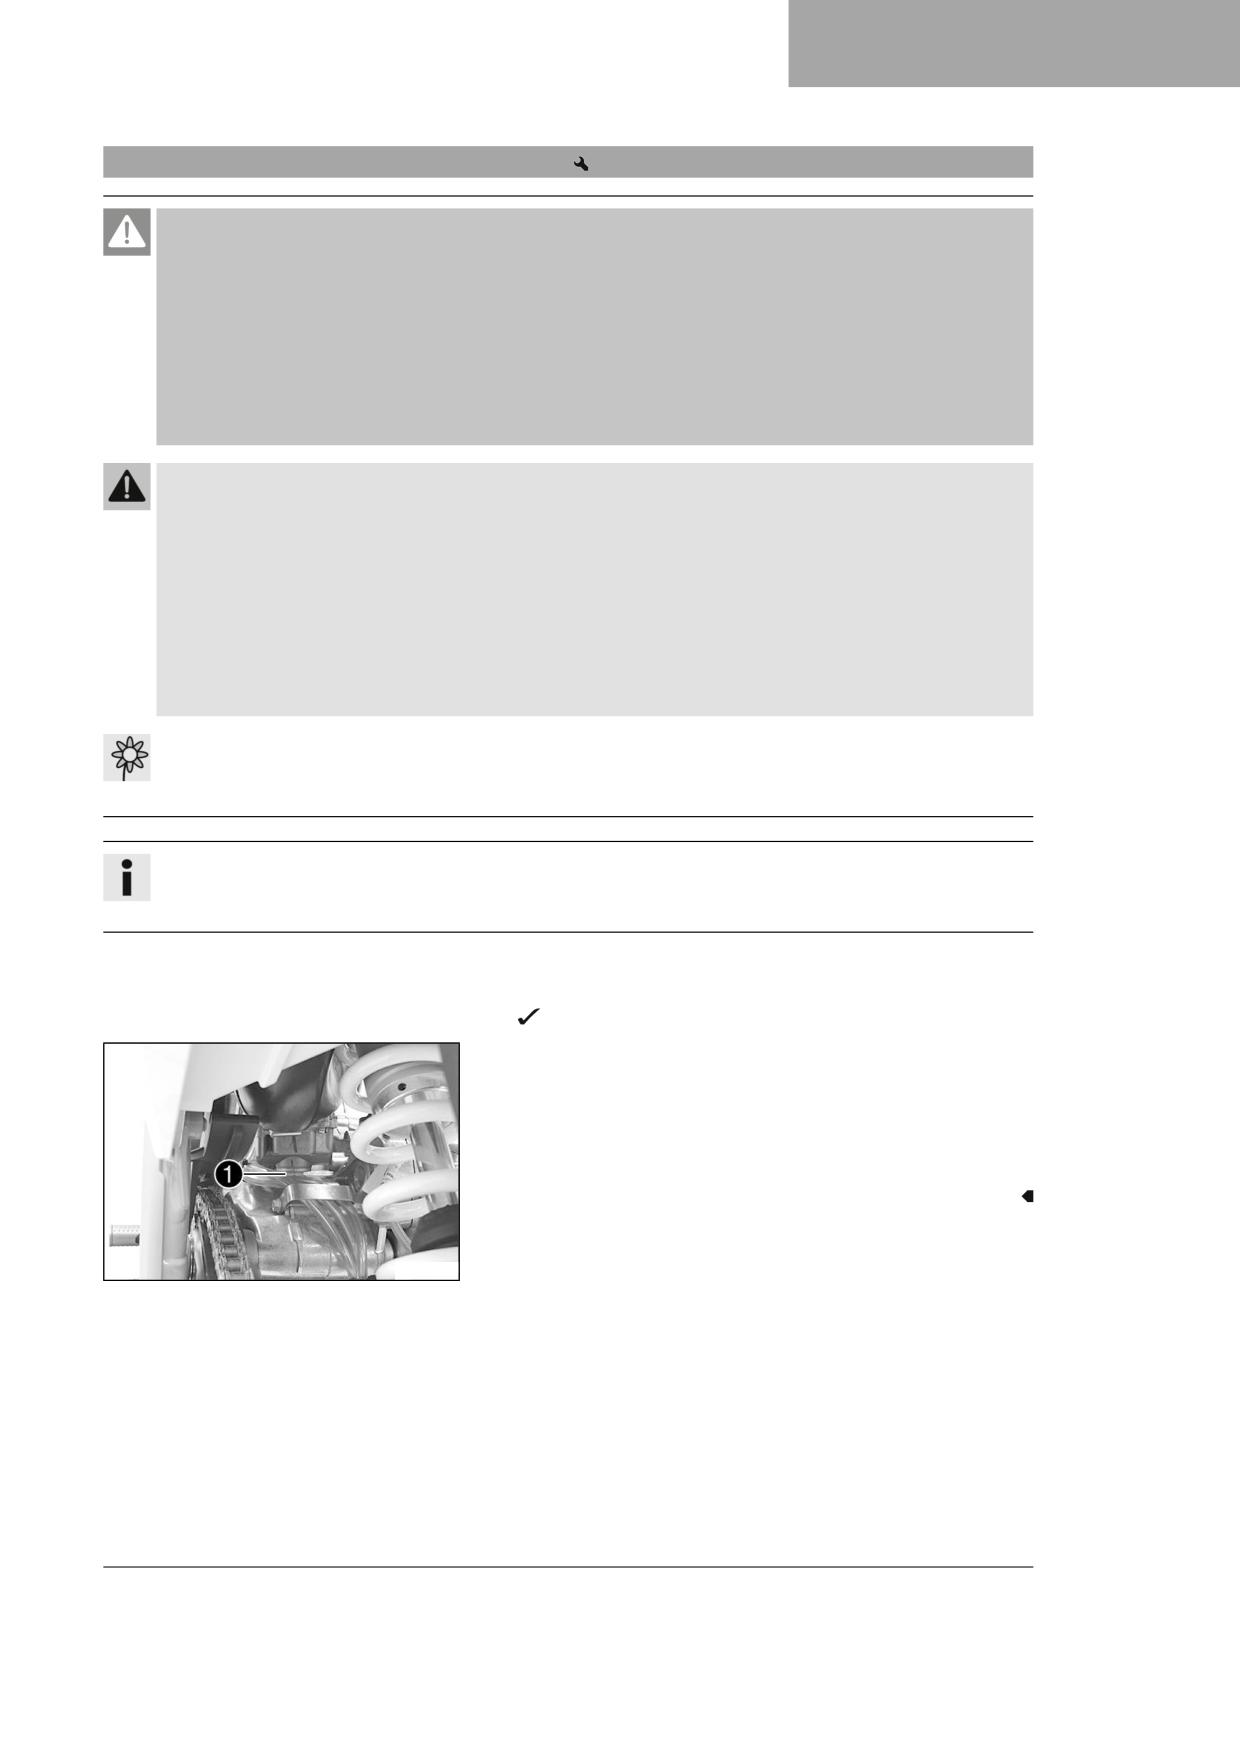
TUNING THE ENGINE
15
15.6
Emptying the carburetor float chamber
Danger
Fire hazard Fuel is highly flammable.
The fuel in the fuel tank expands when warm and can escape if overfilled.
- Do not fuel the vehicle in the vicinity of open flames or lit cigarettes.
- Switch off the engine for refueling.
- Make sure that no fuel is spilled; particularly not on hot parts of the vehicle.
- If any fuel is spilled, wipe it off immediately.
- Observe the specifications for refueling.
Warning
Danger of poisoning Fuel is harmful to health.
- Avoid skin, eye and clothing contact with fuel.
- Immediately consult a doctor if you swallow fuel.
- Do not inhale fuel vapors.
- Rinse the affected area immediately with plenty of water in the event of contact with the skin.
- Rinse the eyes thoroughly with water, and consult a doctor in case of fuel contact with the eyes.
- Change your clothing if fuel spills on them.
- Keep fuels correctly in a suitable canister, and out of the reach of children.
Note
Environmental hazard Improper handling of fuel is a danger to the environment.
- Do not allow fuel to enter the groundwater, the soil, or the sewage system.
Info
Carry out this work with a cold engine.
Water in the float chamber results in malfunctioning.
Preparatory work
- Turn tap handle of the fuel tap to the OFF position.
No more fuel flows from the fuel tank to the carburetor.
Main work
- Place a cloth beneath the carburetor to soak up emerging fuel.
- Remove plug 1.
- Completely drain the fuel.
- Mount and tighten screw plug 1.
V00835-10
97
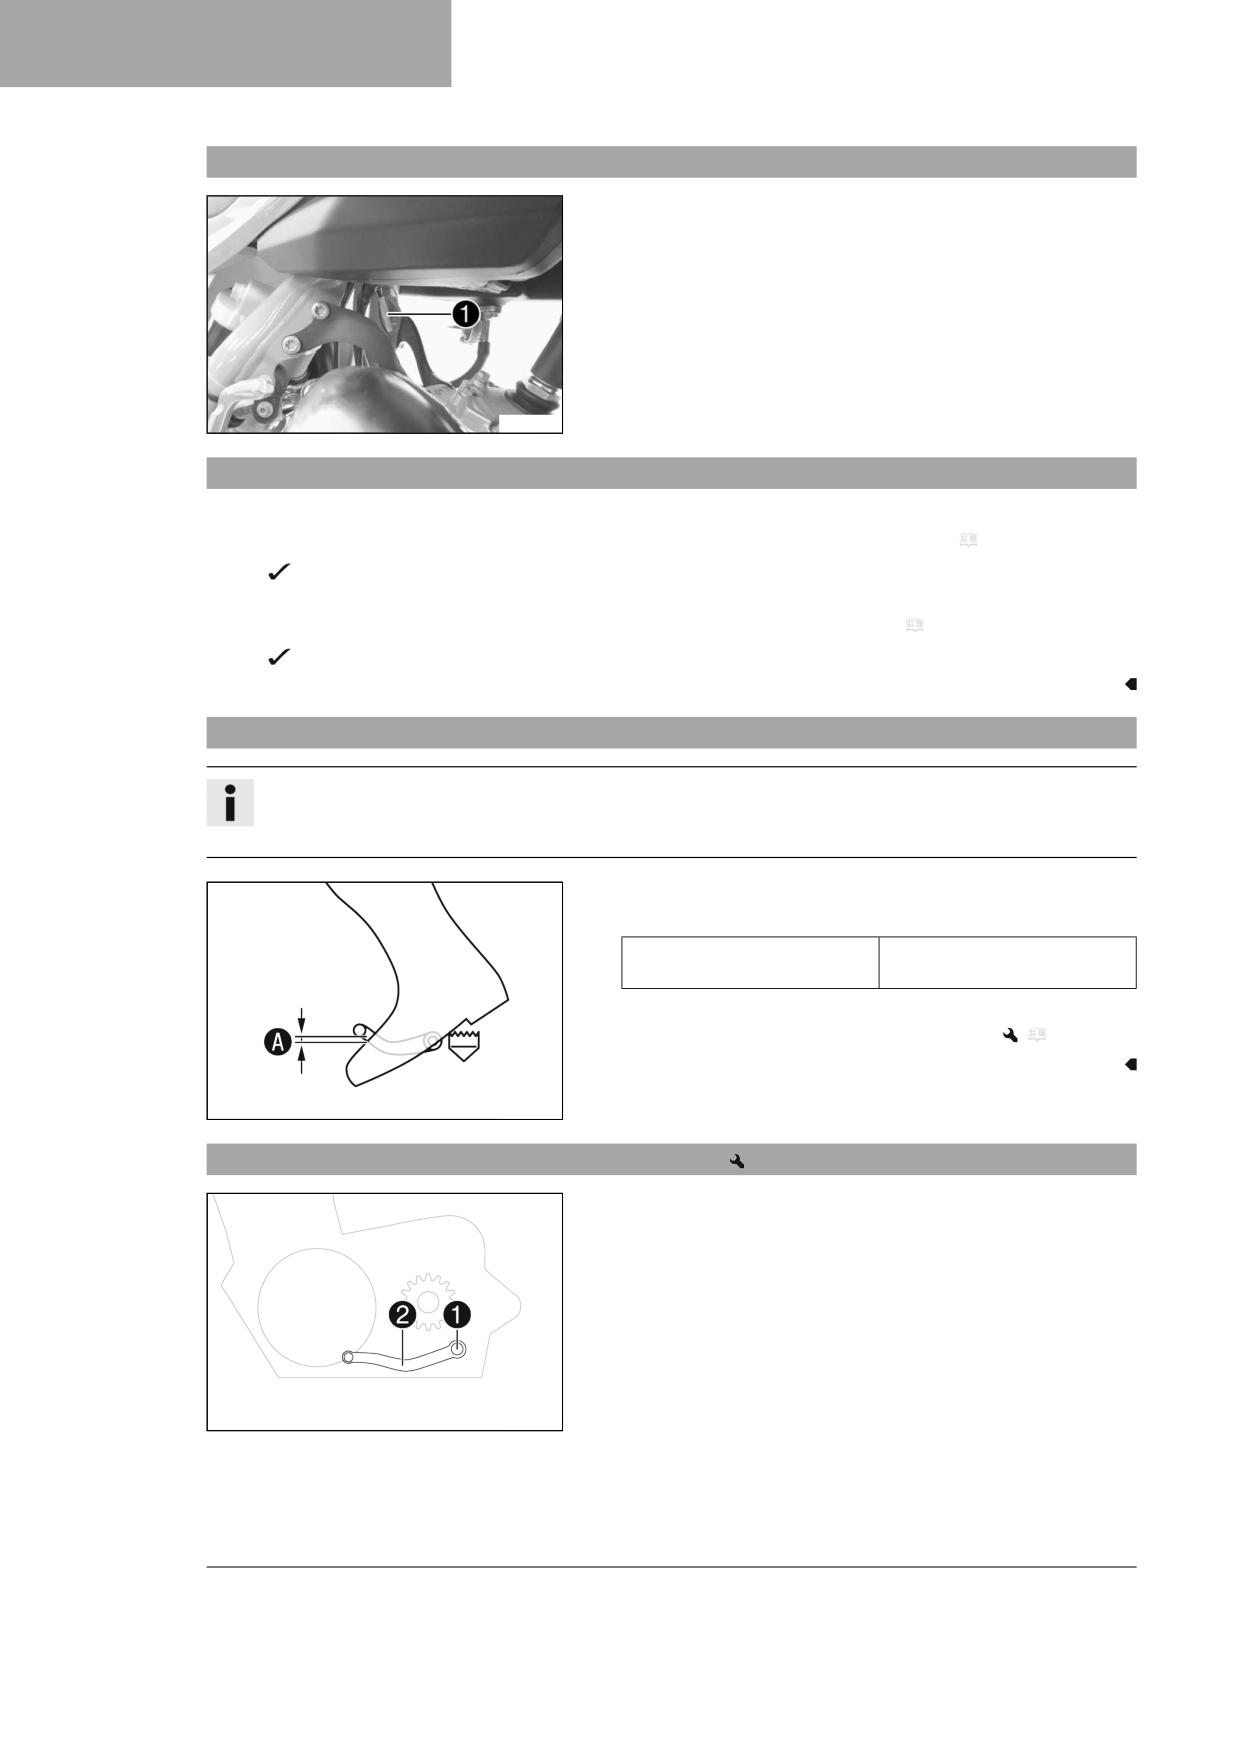
15
TUNING THE ENGINE
15.7
Plug-in connector of ignition timing map adjustment
Plug-in connector 1 of the ignition timing map adjustment is located
on the frame under the fuel tank.
Possible states
• Soft - The plug-in connector of the ignition timing map adjustment
is disconnected to achieve better rideability.
• Performance - The plug-in connector of the ignition timing map
adjustment is joined to achieve higher performance.
T01480-10
15.8
Changing the ignition timing map
Switching the ignition timing map from Performance to Soft
- Disconnect plug-in connector 1 of the ignition timing map adjustment. (Figure T01480-10
p. 98)
Soft - Better rideability
Switching the ignition timing map from Soft to Performance
- Join plug-in connector 1 of the ignition timing map adjustment. (Figure T01480-10
p. 98)
Performance - Higher performance
15.9
Checking the basic position of the shift lever
Info
When driving, the shift lever must not touch the rider's boot when in the basic position.
When the shift lever keeps touching the boot, the transmission will be subject to an excessive load.
- Sit on the vehicle in the riding position and determine distance A
between the upper edge of your boot and the shift lever.
Distance between shift lever
10 … 20 mm (0.39 … 0.79 in)
and upper edge of boot
» If the distance does not meet specifications:
- Adjust the basic position of the shift lever.
(
p. 98)
400692-10
15.10
Adjusting the basic position of the shift lever
- Remove screw 1 with the washers and take off shift lever 2.
401950-12
98

TUNING THE ENGINE
15
– Clean gear teeth A of the shift lever and shift shaft.
- Mount the shift lever on the shift shaft in the required position and
engage gearing.
Info
The range of adjustment is limited.
The shift lever must not come into contact with any other
vehicle components during the shift procedure.
401951-10
- Mount and tighten screw 1 with washers.
Guideline
Screw, shift lever
M6
14 Nm (10.3 lbf ft)
Loctite®243™
99
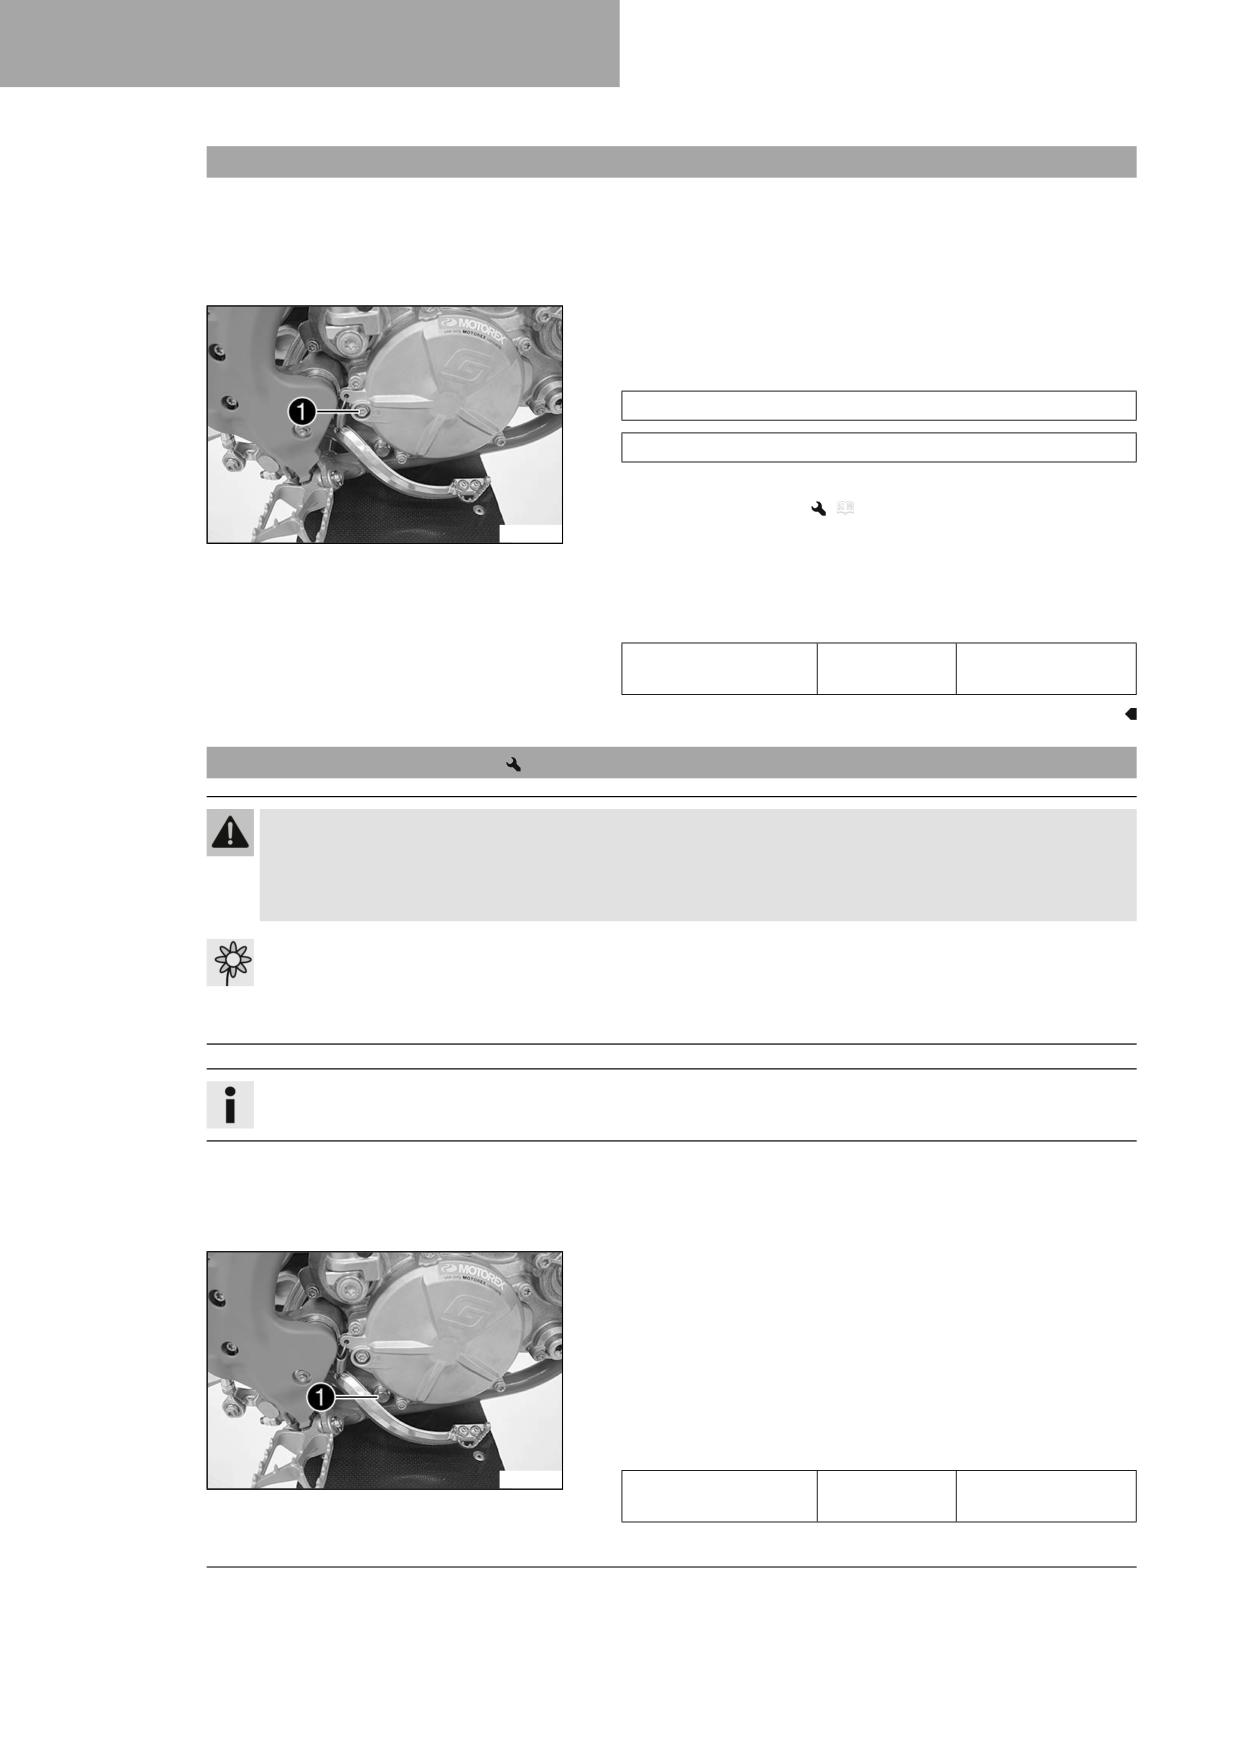
16
SERVICE WORK ON THE ENGINE
16.1
Checking the gear oil level
Condition
The engine is cold.
Preparatory work
- Stand the motorcycle upright on a horizontal surface.
Main work
- Remove screw 1 with the seal ring.
- Check the gear oil level.
Gear oil must not run out of the hole.
The gear oil level is at the lower edge of the hole.
» If the gear oil level is below the hole:
- Add the gear oil.
(
p. 101)
S04352-10
» If gear oil runs out:
- Correct the gear oil level.
- Mount and tighten screw 1 with the seal ring.
Guideline
Screw, gear oil level
M6
8 Nm (5.9 lbf ft)
monitoring
16.2
Changing the gear oil
Warning
Danger of scalding Engine and gear oil get hot when the motorcycle is operated.
- Wear suitable protective clothing and safety gloves.
- In the event of scalding, rinse the area affected immediately with lukewarm water.
Note
Environmental hazard Hazardous substances cause environmental damage.
- Dispose of oils, grease, filters, fuel, cleaning agents, brake fluid, etc., correctly and in compliance with the appli-
cable regulations.
Info
Drain the gear oil while the engine is at operating temperature.
Preparatory work
- Stand the motorcycle upright on a horizontal surface.
- Position an appropriate container under the engine.
Main work
- Remove oil drain plug 1 with the magnet.
- Let the gear oil drain fully.
- Thoroughly clean the oil drain plug with magnet.
- Clean the sealing surface on the engine.
- Mount and tighten oil drain plug 1 with the magnet and a new
seal ring.
Guideline
S04352-11
Oil drain plug with
M12
20 Nm (14.8 lbf ft)
magnet
100
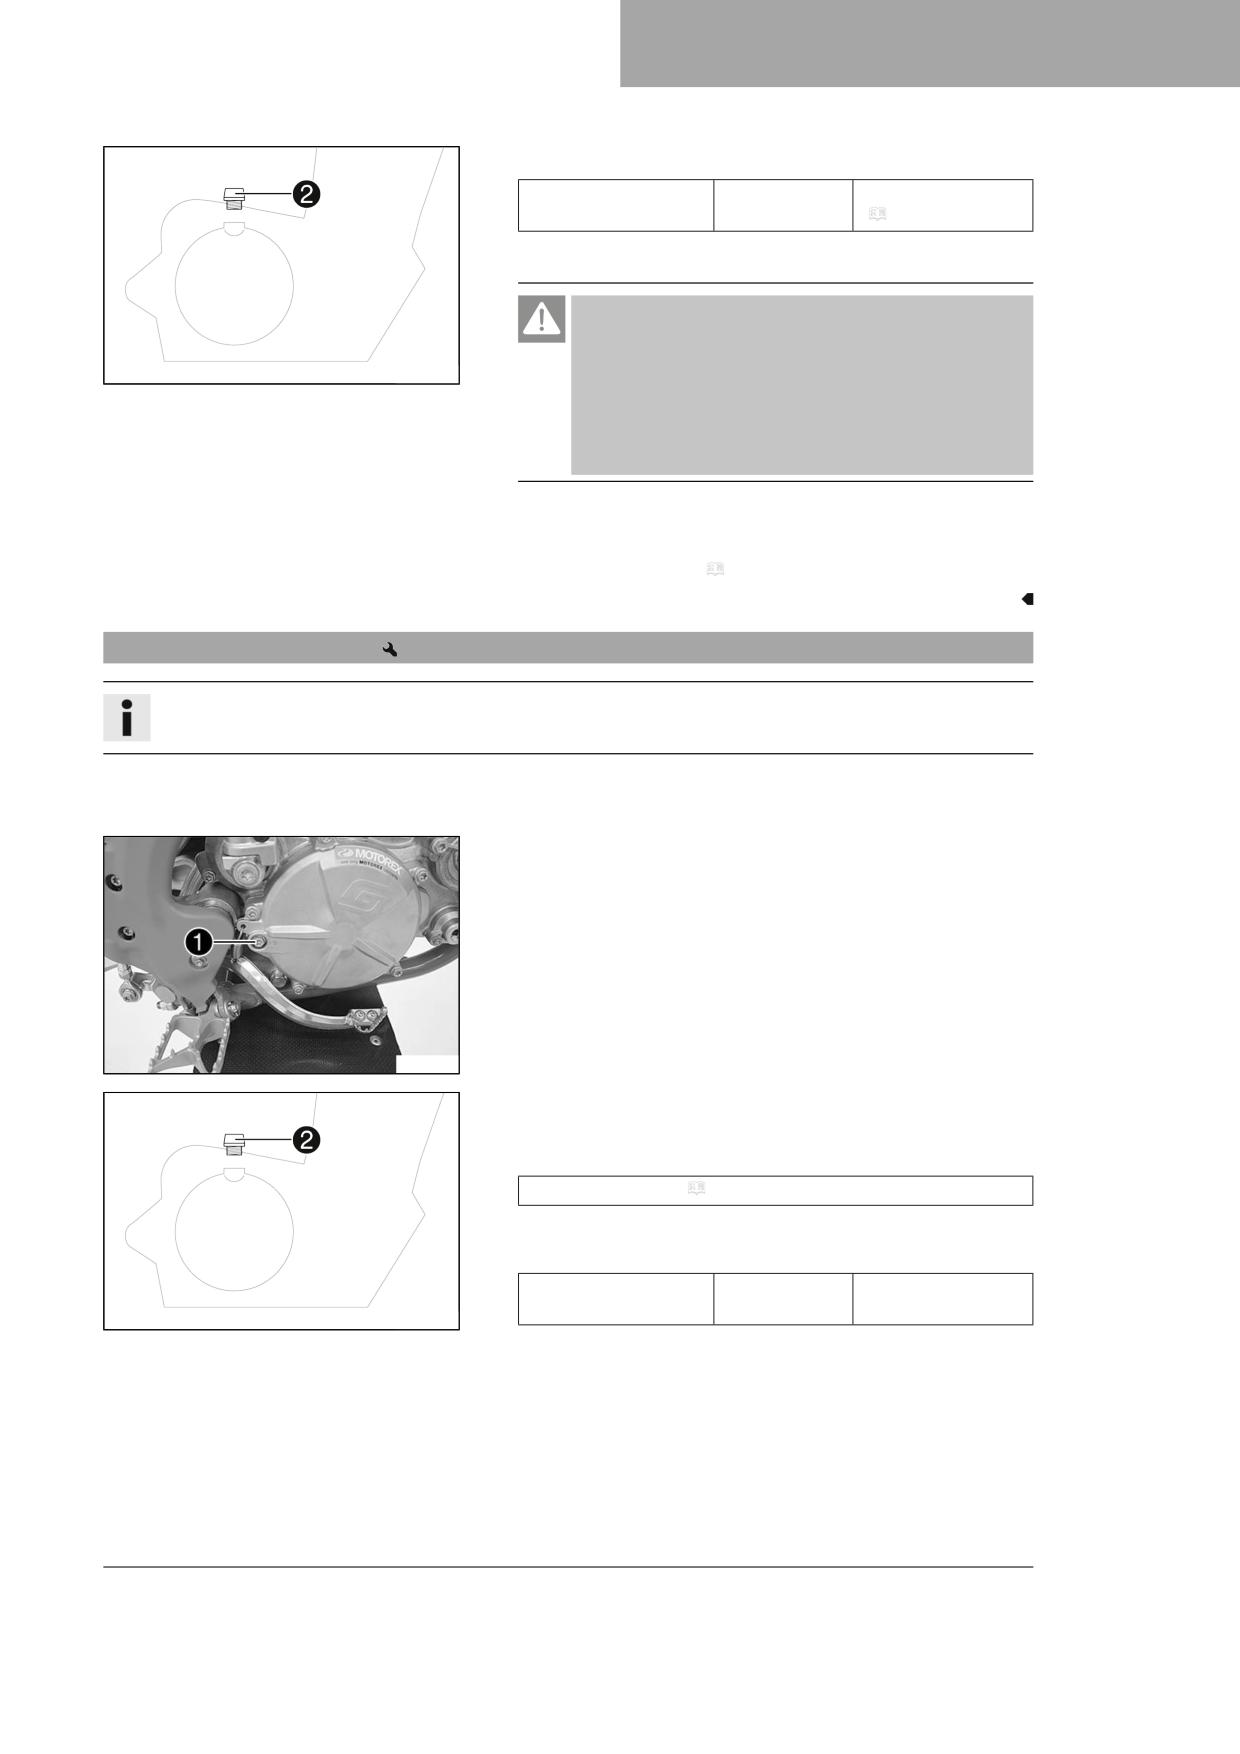
SERVICE WORK ON THE ENGINE
16
– Remove filler plug 2 with the O-ring, and fill up with gear oil.
Gear oil
0.50 l (0.53 qt.)
Engine oil (15W/50)
(
p. 116)
– Mount and tighten filler plug 2 with the O-ring.
Danger
Danger of poisoning Exhaust gases are toxic and inhaling
them may result in unconsciousness and death.
401955-11
- Always make sure there is sufficient ventilation when
running the engine.
- Use effective exhaust extraction when starting or run-
ning the engine in an enclosed space.
- Start the engine and check it for leaks.
Finishing work
- Check the gear oil level. ( p. 100)
16.3
Adding the gear oil
Info
Too little gear oil or poor-quality gear oil results in premature wear to the transmission.
Preparatory work
- Stand the motorcycle upright on a horizontal surface.
Main work
- Remove screw 1 with the seal ring.
S04352-10
- Remove filler plug 2 with the O-ring.
- Add gear oil up to the bottom edge of the hole of the gear oil level
plug.
Engine oil (15W/50) ( p. 116)
- Mount and tighten screw 1 with the seal ring.
Guideline
Screw, gear oil level
M6
8 Nm (5.9 lbf ft)
monitoring
401955-11
- Mount and tighten filler plug 2 with the O-ring.
101

16
SERVICE WORK ON THE ENGINE
Danger
Danger of poisoning Exhaust gases are toxic and inhaling
them may result in unconsciousness and death.
- Always make sure there is sufficient ventilation when
running the engine.
- Use effective exhaust extraction when starting or run-
ning the engine in an enclosed space.
- Start the engine and check it for leaks.
Finishing work
- Check the gear oil level. ( p. 100)
102

CLEANING, CARE
17
17.1
Cleaning the motorcycle
Note
Material damage Components become damaged or destroyed if a pressure cleaner is used incorrectly.
The high pressure forces water into the electrical components, connectors, throttle cables, and bearings, etc.
Pressure which is too high causes malfunctions and destroys components.
- Do not direct the water jet directly on to electrical components, connectors, throttle cables or bearings.
- Maintain a minimum distance between the nozzle of the pressure cleaner and the component.
Minimum clearance
60 cm (23.6 in)
Note
Environmental hazard Hazardous substances cause environmental damage.
- Dispose of oils, grease, filters, fuel, cleaning agents, brake fluid, etc., correctly and in compliance with the appli-
cable regulations.
Info
To maintain the value and appearance of the motorcycle over a long period, clean it regularly.
Avoid direct sunshine when cleaning the motorcycle.
-
Close off exhaust system to keep water from entering.
–
Remove loose dirt first with a soft jet of water.
–
Spray the heavily soiled parts with a normal commercial motorcycle
cleaner and clean using a brush.
Motorcycle cleaner ( p. 118)
Info
Use warm water containing normal motorcycle cleaner and
401061-01
a soft sponge.
Never apply motorcycle cleaner to a dry vehicle; always
rinse the vehicle with water first.
-
After rinsing the motorcycle with a gentle spray of water, allow it to
dry thoroughly.
-
Remove the closure of the exhaust system.
–
Empty the carburetor float chamber.
(
p. 97)
Warning
Danger of accidents Moisture and dirt impair the brake
system.
- Explain to your child that he or she must brake carefully
several times to dry out and remove dirt from the brake
linings and the brake discs.
-
After cleaning, let your child ride the vehicle a short distance until
the engine warms up and the brakes have dried due to careful appli-
cation of the brakes.
Info
The heat produced causes water at inaccessible locations in
the engine and on the brake system to evaporate.
-
Push back the protection caps on the handlebar controls to allow
water to evaporate.
103

17
CLEANING, CARE
- After the motorcycle has cooled down, lubricate all moving parts
and pivot points.
- Clean the chain. ( p. 59)
- Treat bare metal (except for brake discs and the exhaust system)
with a corrosion inhibitor.
Preserving materials for paints, metal and rubber ( p. 118)
- Treat all plastic parts and powder-coated parts with a mild cleaning
and care product.
Special cleaner for glossy and matte paint finishes, metal and
plastic surfaces ( p. 119)
104
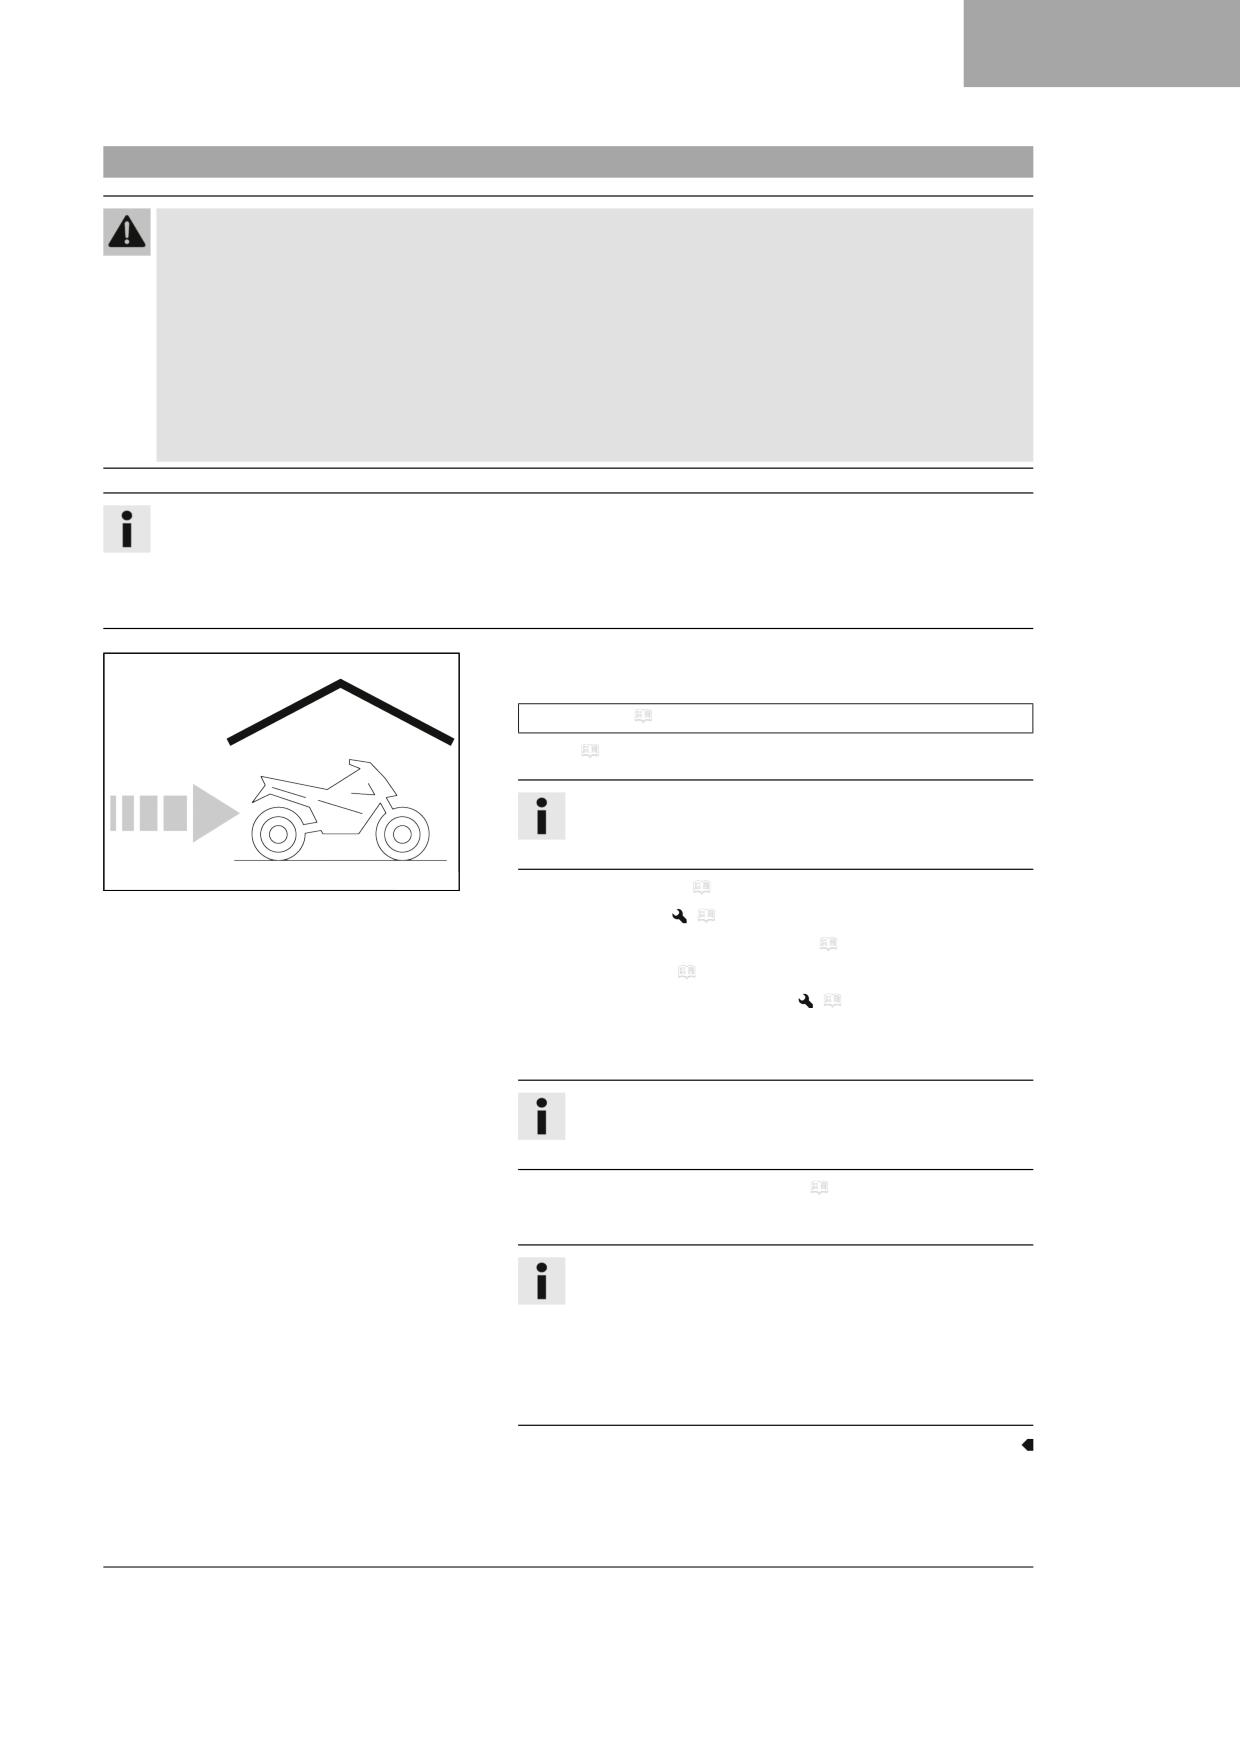
STORAGE
18
18.1
Storage
Warning
Danger of poisoning Fuel is harmful to health.
- Avoid skin, eye and clothing contact with fuel.
- Immediately consult a doctor if you swallow fuel.
- Do not inhale fuel vapors.
- Rinse the affected area immediately with plenty of water in the event of contact with the skin.
- Rinse the eyes thoroughly with water, and consult a doctor in case of fuel contact with the eyes.
- Change your clothing if fuel spills on them.
- Keep fuels correctly in a suitable canister, and out of the reach of children.
Info
If you plan to garage the motorcycle for a longer period, perform the following steps or have them performed.
Before storing the motorcycle, check all parts for function and wear. If service, repairs, or replacements are neces-
sary, you should do this during the storage period (less workshop overload). In this way, you can avoid long work-
shop waiting times at the start of the new season.
- When refueling for the last time before taking the motorcycle out of
service, add fuel additive.
Fuel additive ( p. 118)
- Refuel. ( p. 27)
Tip
Fill the fuel tank completely as specified, using fuel with the
lowest possible ethanol content.
401058-01
- Clean the motorcycle. ( p. 103)
- Change the gear oil.
(
p. 100)
– Check the antifreeze and coolant level. ( p. 87)
- Check tire pressure. ( p. 83)
- Empty the carburetor float chamber.
(
p. 97)
– Store the vehicle in a dry location that is not subject to large fluctua-
tions in temperature.
Info
GASGAS Motorcycles recommends jacking up the motorcy-
cle.
- Raise the motorcycle with a lift stand. ( p. 41)
- Cover the motorcycle with a tarp or cover that is permeable to air.
Info
Do not use non-porous materials since they prevent humid-
ity from escaping, thus causing corrosion.
Avoid running the engine for a short time only. Because the
engine will not warm up sufficiently, the water vapor pro-
duced during combustion will condense, causing engine
parts and the exhaust system to rust.
105

18
STORAGE
18.2
Preparing for use after storage
- Remove the motorcycle from the lift stand. ( p. 41)
- Perform checks and maintenance measures when preparing for use.
(
p. 24)
– Take a test ride.
401059-01
106

TROUBLESHOOTING
19
Faults
Possible cause
Action
Engine turns but does not start
Operating error
-
Carry out the start procedure. ( p. 24)
Motorcycle was out of use for a
-
Empty the carburetor float chamber.
long time and there is old fuel in
(
p. 97)
the float chamber
Fuel supply interrupted
-
Check the fuel tank breather.
–
Clean the fuel tap.
–
Check/adjust the carburetor components.
Spark plug sooty or wet
-
Clean and dry the spark plug and spark
plug connector, or change if necessary.
Plug gap of spark plug too wide
-
Adjust plug gap.
Guideline
Spark plug electrode gap
0.60 mm (0.0236 in)
Fault in ignition system
-
Check the ignition system.
–
Adjust the ignition system.
Short-circuit cable in wiring har-
-
Check the stop button.
ness frayed, stop button faulty
Water in carburetor or jets
-
Check/set the carburetor components.
blocked
The engine has no idle speed
Idling jet blocked
-
Check/set the carburetor components.
Adjusting screws on carburetor
-
Carburetor - adjust the idle speed.
distorted
(
p. 96)
Spark plug defective
-
Change the spark plug.
Ignition system defective
-
Check the ignition coil.
–
Check the spark plug connector.
Engine does not speed up
Carburetor running over because
-
Check/set the carburetor components.
float needle dirty or worn
Loose carburetor jets
-
Check/set the carburetor components.
Fault in ignition system
-
Check the ignition system.
–
Adjust the ignition system.
Engine has too little power
Fuel supply interrupted
-
Check the fuel tank breather.
–
Clean the fuel tap.
–
Check/adjust the carburetor components.
Air filter is very dirty
-
Clean the air filter and air filter box.
(
p. 54)
Exhaust system leaks, deformed
-
Check exhaust system for damage.
or too little glass fiber yarn filling
–
Change the glass fiber yarn filling of the
in main silencer
main silencer.
(
p. 55)
Fault in ignition system
-
Check the ignition system.
–
Adjust the ignition system.
Membrane or reed valve housing
-
Check the membrane and reed valve hous-
is damaged
ing.
Engine stalls or is popping into the
Lack of fuel
-
Turn tap handle of the fuel tap to the ON
carburetor
position.
-
Refuel. ( p. 27)
Engine takes in bad air
-
Check intake flange and carburetor for
tightness.
The connector or ignition coil is
-
Clean the connector and treat it with con-
loose or oxidized
tact spray.
107

19
TROUBLESHOOTING
Faults
Possible cause
Action
Engine overheats
Too little coolant in cooling system
- Check the cooling system for leaks.
- Check the coolant level. ( p. 88)
Too little air stream
- Switch off the engine when standing.
Radiator fins very dirty
- Clean the radiator fins.
Foam formation in cooling system
- Drain the coolant.
(
p. 88)
– Refill with coolant.
(
p. 89)
Damaged cylinder head or cylin-
- Check the cylinder head and cylinder head
der head gasket
gasket.
Bent radiator hose
- Change the radiator hose.
Incorrect ignition point due to
- Adjust the ignition system.
loose stator
White smoke emission (steam in
Damaged cylinder head or cylin-
- Check the cylinder head and cylinder head
exhaust gas)
der head gasket
gasket.
Gear oil exits at the vent hose
Too much gear oil added
- Check the gear oil level. ( p. 100)
Water in the gear oil
Damaged radial shaft seal ring or
- Check the radial shaft seal ring and the
water pump
water pump.
108

TECHNICAL SPECIFICATIONS
20
20.1
Motor
Design
1-cylinder 2-stroke engine, water-cooled, with reed intake
and exhaust control
Displacement
84.93 cm³ (5.1828 cu in)
Stroke
48.95 mm (1.9272 in)
Bore
47 mm (1.85 in)
Idle speed
1,400 … 1,500 rpm
Exhaust valve, beginning of adjustment
7,200 rpm
Crankshaft bearing
1 grooved ball bearing / 1 roller bearing
Conrod bearing
Needle bearing
Piston pin bearing
Needle bearing
Pistons
Aluminum cast
Piston rings
1 rectangular ring
Engine lubrication
Mixed lubrication
X distance (upper edge of piston to upper edge of cylinder)
0 … 0.10 mm (0 … 0.0039 in)
Z-distance (height of control flap)
33.2 mm (1.307 in)
Primary transmission
20:64 straight cut spur gear drive
Clutch
Multidisc clutch in oil bath/hydraulically activated
Transmission
6-gear transmission, claw shifted
Transmission ratio
1st gear
11:29
2nd gear
14:28
3rd gear
16:26
4th gear
19:26
5th gear
21:25
6th gear
20:21
Ignition
Electronic ignition
Spark plug
NGK BR9 ECMVX
Spark plug electrode gap
0.60 mm (0.0236 in)
Cooling
Water-cooled
Starting aid
Kick starter lever
20.2
Motor tightening torques
Screw, adjusting lever
M5x12
6 Nm (4.4 lbf ft)
Loctite®243™
Screw, clutch spring retainer
M5
6 Nm (4.4 lbf ft)
Screw, control lever
M5x12
6 Nm (4.4 lbf ft)
Loctite®243™
Screw, crankshaft speed sensor
M5
6 Nm (4.4 lbf ft)
Loctite®243™
Screw, exhaust control bearing sup-
M5
6 Nm (4.4 lbf ft)
port
Loctite®243™
Screw, exhaust control cap
M5
4 Nm (3 lbf ft)
Screw, exhaust control cover
M5
4 Nm (3 lbf ft)
Screw, guide piece
M5x12
6 Nm (4.4 lbf ft)
Loctite®243™
109

20
TECHNICAL SPECIFICATIONS
Screw, ignition system/stator
M5
6 Nm (4.4 lbf ft)
Loctite®243™
Screw, locking lever
M5
6 Nm (4.4 lbf ft)
Loctite®243™
Screw, power valve stop plate
M5x12
6 Nm (4.4 lbf ft)
Loctite®243™
Screw, water pump wheel
M5
6 Nm (4.4 lbf ft)
Loctite®243™
Coolant drain plug
M6
8 Nm (5.9 lbf ft)
Nut, adjusting screw, power valve
M6
8 Nm (5.9 lbf ft)
Screw, alternator cover
M6
8 Nm (5.9 lbf ft)
Screw, bearing retainer
M6
10 Nm (7.4 lbf ft)
Loctite®243™
Screw, clutch cover
M6x25
10 Nm (7.4 lbf ft)
Screw, clutch cover
M6x55
10 Nm (7.4 lbf ft)
Screw, clutch cover
M6x60
10 Nm (7.4 lbf ft)
Screw, clutch slave cylinder
M6
10 Nm (7.4 lbf ft)
Screw, cylinder head
M6
10 Nm (7.4 lbf ft)
Screw, engine case
M6x45
10 Nm (7.4 lbf ft)
Screw, engine case
M6x50
10 Nm (7.4 lbf ft)
Screw, engine sprocket cover
M6
10 Nm (7.4 lbf ft)
Screw, exhaust flange
M6
10 Nm (7.4 lbf ft)
Screw, gear oil level monitoring
M6
8 Nm (5.9 lbf ft)
Screw, intake flange
M6
6 Nm (4.4 lbf ft)
Screw, kick starter intermediate gear
M6
10 Nm (7.4 lbf ft)
Loctite®243™
Screw, kick starter lever stop plate
M6
10 Nm (7.4 lbf ft)
Loctite®243™
Screw, outer clutch cover
M6x25
8 Nm (5.9 lbf ft)
Screw, outer clutch cover
M6x55
8 Nm (5.9 lbf ft)
Screw, outer clutch cover
M6x60
8 Nm (5.9 lbf ft)
Screw, radiator bleeding
M6
8 Nm (5.9 lbf ft)
Screw, shift drum locating
M6
10 Nm (7.4 lbf ft)
Loctite®243™
Screw, shift lever
M6
14 Nm (10.3 lbf ft)
Loctite®243™
Screw, water pump cover
M6
10 Nm (7.4 lbf ft)
Vacuum connection
M6
2 Nm (1.5 lbf ft)
Nut, cylinder base
M8
23 Nm (17 lbf ft)
Screw, cylinder base
M8
10 Nm (7.4 lbf ft)
Screw, kick starter lever
M8
25 Nm (18.4 lbf ft)
Loctite®2701™
Oil drain plug with magnet
M12
20 Nm (14.8 lbf ft)
Nut, rotor
M12x1
60 Nm (44.3 lbf ft)
Nut, primary gear wheel
M14LHx1.25
60 Nm (44.3 lbf ft)
Loctite®243™
Spark plug
M14x1.25
25 Nm (18.4 lbf ft)
Nut, inner clutch hub
M16x1.5
60 Nm (44.3 lbf ft)
Loctite®243™
110
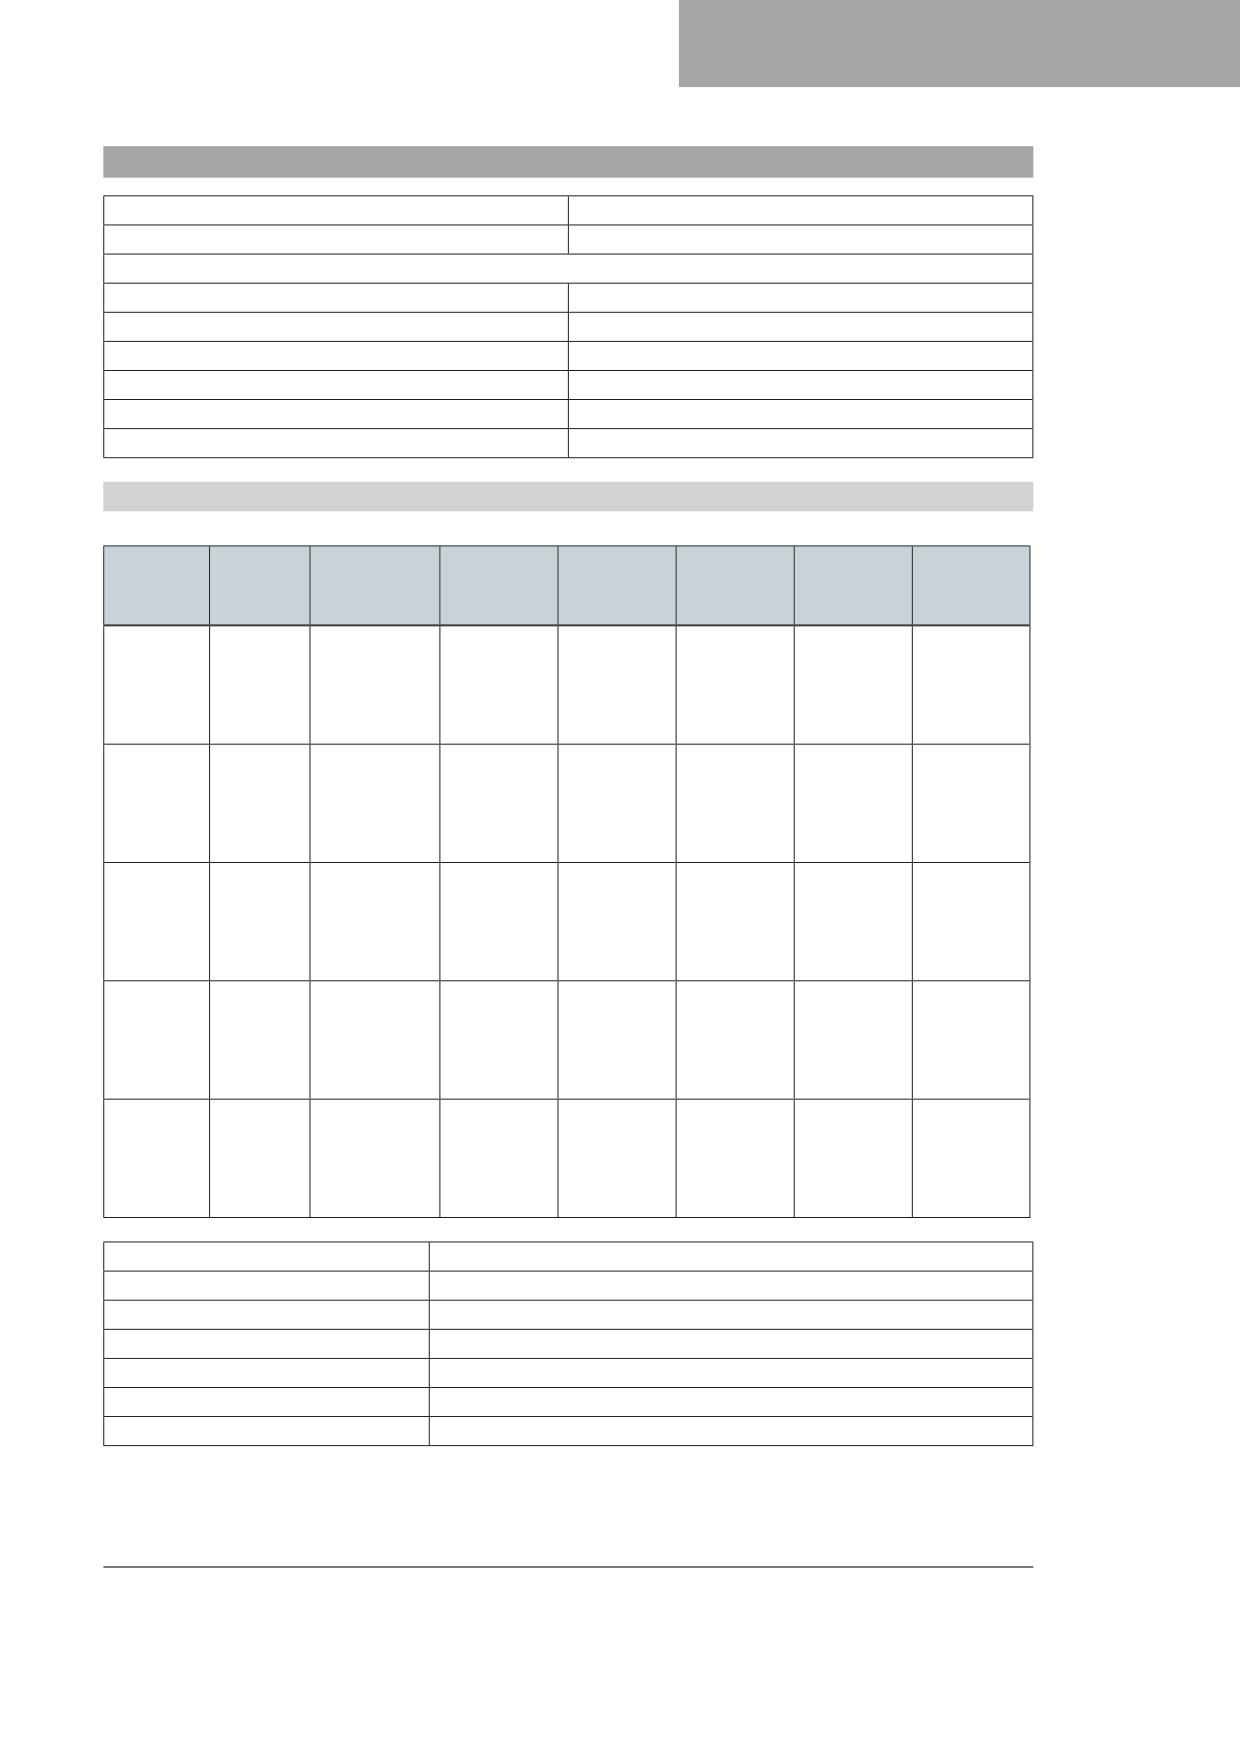
TECHNICAL SPECIFICATIONS
20
20.3
Carburetor
Carburetor type
KEIHIN PWK 28
Needle position
3rd position from top
Idle air adjusting screw
open
2 turns
Main jet
142 (140, 145, 148)
Jet needle
NRKC (NRJC)
Idling jet
48 (45, 50)
Throttle slide
3
Choke nozzle
62
20.3.1
Carburetor tuning
KEIHIN PWK 28
37 … 49 °C
-20 … -7 °C
-6 … 5 °C
6 … 15 °C (43
16 … 24 °C
25 … 36 °C
ASL
TEMP
(99 …
(-4 … 19 °F)
(21 … 41 °F)
… 59 °F)
(61 … 75 °F)
(77 … 97 °F)
120 °F)
ASO
2
2
1.5
2
1.5
2,301 …
IJ
45
42
42
42
40
3,000 m
NDL
NRK C
NRK C
NRJ C
NRJ C
NRJ C
(7,549 …
POS
3
3
3
3
3
9,843 ft)
MJ
142
142
140
138
138
ASO
2
2
2
1.5
2
1.5
1,501 …
IJ
48
45
42
42
42
40
2,300 m
NDL
NRK C
NRK C
NRK C
NRJ C
NRJ C
NRJ C
(4,925 …
POS
3
3
3
3
3
3
7,546 ft)
MJ
145
142
142
140
138
138
ASO
2
2
2
2
1.5
2
751 …
IJ
48
48
45
42
42
42
1,500 m
NDL
NRJ C
NRK C
NRK C
NRK C
NRJ C
NRJ C
(2,464 …
POS
4
3
3
3
3
3
4,921 ft)
MJ
145
145
142
142
140
138
ASO
2
1.5
2
2
2
1.5
301 …
IJ
48
48
48
45
42
42
750 m (988
NDL
NRJ C
NRK C
NRK C
NRK C
NRK C
NRJ C
… 2,461 ft)
POS
4
3
3
3
3
3
MJ
148
148
145
142
142
140
ASO
2
1.5
2
2
2
1.5
IJ
48
48
48
48
45
42
0 … 300 m
NDL
NRJ C
NRK C
NRK C
NRK C
NRK C
NRK C
(0 … 984 ft)
POS
4
3
3
3
3
3
MJ
148
148
145
142
142
140
ASL
Sea level
TEMP
Temperature
ASO
Idle air adjusting screw open
IJ
Idling jet
NDL
Needle
POS
Needle position from top
MJ
Main jet
111

20
TECHNICAL SPECIFICATIONS
Info
Do not use on sandy terrain.
20.3.2
Basic carburetor setting for sandy surfaces
Idle air adjusting screw
2 turns
Idling jet
48
Jet needle
NRJ C
Needle position
4th position from top
Main jet
148
Info
If the engine is not running smoothly, use a smaller main jet.
20.4
Capacities
20.4.1
Gear oil
Gear oil
0.50 l (0.53 qt.)
Engine oil (15W/50) ( p. 116)
20.4.2
Coolant
Coolant
0.8 l (0.8 qt.)
Coolant ( p. 116)
20.4.3
Fuel
Fuel tank capacity, approx.
5.2 l (1.37 US gal)
Super unleaded (98 octane) mixed with
2-stroke engine oil (1:40) ( p. 117)
20.5
Chassis
Frame
Central tube frame of chrome molybdenum steel tubing,
powder-coated
Fork
WP Suspension XACT 5543
Shock absorber
WP SuspensionXACT 5746
Suspension travel
front
278 mm (10.94 in)
rear
305 mm (12.01 in)
Fork offset
14 mm (0.55 in)
Brake system
front
Disc brake with 2-piston brake caliper
rear
Disc brake with 1-piston brake caliper
Brake discs - diameter
front
240 mm (9.45 in)
rear
220 mm (8.66 in)
Brake discs - wear limit
front
3.5 mm (0.138 in)
rear
3.7 mm (0.146 in)
Offroad tire pressure
front
1.0 bar (15 psi)
112

TECHNICAL SPECIFICATIONS
20
rear
1.0 bar (15 psi)
Secondary ratio (MC 85 17/14)
13:46
Secondary ratio (MC 85 19/16)
13:49
Chain
1/2 x 5/16”
Rear sprockets available
44, 45, 46, 47, 48, 49, 50, 51
Steering head angle
66°
Wheelbase
1,290 ± 10 mm (50.79 ± 0.39 in)
Seat height, unloaded (MC 85 17/14)
865 mm (34.06 in)
Seat height, unloaded (MC 85 19/16)
890 mm (35.04 in)
Ground clearance, unloaded (MC 85 17/14)
336 mm (13.23 in)
Ground clearance, unloaded (MC 85 19/16)
362 mm (14.25 in)
Weight without fuel, approx. (MC 85 17/14)
67 kg (148 lb.)
Weight without fuel, approx. (MC 85 19/16)
68 kg (150 lb.)
Maximum rider weight
75 kg (165 lb.)
20.6
Tires
Validity
Front tire
Rear tire
(MC 85 17/14)
70/100 - 17 M/C 40M TT
90/100 - 14 M/C 49M TT
MAXXIS MAXXCROSS MX-ST+
MAXXIS MAXXCROSS MX-ST+
(MC 85 19/16)
70/100 - 19 M/C 42M TT
90/100 - 16 M/C 52M TT
MAXXIS MAXXCROSS MX-ST+
MAXXIS MAXXCROSS MX-ST+
The tires specified represent one of the possible series production tires. For alternative manufacturers, if any, contact an
authorized dealer or qualified tire dealership. If local road approval regulations apply, these and the respective technical
specifications must be observed. Additional information is available in the Service section under:
20.7
Fork
Fork article number
43.18.8U.04
Fork
WP Suspension XACT 5543
Compression damping
Comfort
17 clicks
Standard
12 clicks
Sport
7 clicks
Rebound damping
Comfort
17 clicks
Standard
12 clicks
Sport
7 clicks
Air pressure
5 bar (73 psi)
Fork length
845 mm (33.27 in)
Oil capacity external mechanism right
363 ± 10 ml (12.27 ± 0.34 fl. oz.)
Fork oil (SAE 4) (48601166S1)
(
p. 117)
Oil capacity external mechanism left
100 ± 20 ml (3.38 ± 0.68 fl. oz.)
Fork oil (SAE 4) (48601166S1)
(
p. 117)
Grease capacity, left cartridge
5 g (0.18 oz)
Special grease (00062010053)
(
p. 119)
113

20
TECHNICAL SPECIFICATIONS
20.8
Shock absorber
Shock absorber article number
12.18.7U.04
Shock absorber
WP SuspensionXACT 5746
High-speed compression damping
Comfort
2.5 turns
Standard
2 turns
Sport
1.5 turns
Low-speed compression damping
Comfort
18 clicks
Standard
15 clicks
Sport
12 clicks
Rebound damping
Comfort
18 clicks
Standard
15 clicks
Sport
12 clicks
Spring preload
11 mm (0.43 in)
Spring rate
Weight of rider: < 45 kg (< 99 lb.)
35 N/mm (200 lb/in)
Weight of rider: 45 … 55 kg (99 … 121 lb.)
40 N/mm (228 lb/in)
Weight of rider: > 55 kg (> 121 lb.)
45 N/mm (257 lb/in)
Spring length
215 mm (8.46 in)
Gas pressure
10 bar (145 psi)
Static sag
30 mm (1.18 in)
Riding sag
120 mm (4.72 in)
Fitted length
397 mm (15.63 in)
Shock absorber fluid ( p. 117)
SAE 2.5
20.9
Chassis tightening torques
Screw, stop button
M3
0.4 Nm (0.3 lbf ft)
Screw, carburetor cover
M4
2 Nm (1.5 lbf ft)
Screw, fixed grip
M4
5 Nm (3.7 lbf ft)
Loctite®243™
Spoke nipple
M4.5
5 Nm (3.7 lbf ft)
Remaining nuts, chassis
M5
5 Nm (3.7 lbf ft)
Remaining screws, chassis
M5
5 Nm (3.7 lbf ft)
Screw, main silencer
M5
7 Nm (5.2 lbf ft)
Screw, shock absorber adjusting ring
M5
5 Nm (3.7 lbf ft)
Nut, push rod, foot brake lever
M6
6 Nm (4.4 lbf ft)
Remaining nuts, chassis
M6
10 Nm (7.4 lbf ft)
Remaining screws, chassis
M6
10 Nm (7.4 lbf ft)
Screw for throttle grip
M6
5 Nm (3.7 lbf ft)
Screw, ball joint of push rod on brake
M6
10 Nm (7.4 lbf ft)
cylinder
Loctite®243™
Screw, brake cylinder
M6
10 Nm (7.4 lbf ft)
Screw, clutch assembly on handlebar
M6
5 Nm (3.7 lbf ft)
114

TECHNICAL SPECIFICATIONS
20
Screw, front brake assembly on han-
M6
5 Nm (3.7 lbf ft)
dlebar
Screw, front brake disc
M6
14 Nm (10.3 lbf ft)
Loctite®243™
Screw, front fender
M6
6 Nm (4.4 lbf ft)
Screw, fuel tank spoiler on radiator
M6
6 Nm (4.4 lbf ft)
Screw, ignition coil
M6
6.4 Nm (4.72 lbf ft)
Screw, rear brake disc
M6
14 Nm (10.3 lbf ft)
Loctite®243™
Start number plate screw
M6
4 Nm (3 lbf ft)
Throttle cable wire on carburetor
M6x0.75
3 Nm (2.2 lbf ft)
cover
Nut, rim lock
M8
10 Nm (7.4 lbf ft)
Remaining nuts, chassis
M8
25 Nm (18.4 lbf ft)
Remaining screws, chassis
M8
25 Nm (18.4 lbf ft)
Screw, bottom triple clamp
M8
15 Nm (11.1 lbf ft)
Screw, chain sliding piece
M8
15 Nm (11.1 lbf ft)
Screw, engine brace
M8
25 Nm (18.4 lbf ft)
Loctite®2701™
Screw, engine sprocket cover
M8
15 Nm (11.1 lbf ft)
Screw, foot brake lever stop
M8
20 Nm (14.8 lbf ft)
Screw, fork stub
M8
15 Nm (11.1 lbf ft)
Screw, front brake caliper
M8
25 Nm (18.4 lbf ft)
Loctite®243™
Screw, handlebar clamp
M8
20 Nm (14.8 lbf ft)
Screw, rear brake caliper
M8
18 Nm (13.3 lbf ft)
Loctite®243™
Screw, rear sprocket
M8
35 Nm (25.8 lbf ft)
Loctite®2701™
Screw, subframe
M8
35 Nm (25.8 lbf ft)
Loctite®2701™
Screw, top triple clamp
M8
17 Nm (12.5 lbf ft)
Steering stem clamp screw
M8
20 Nm (14.8 lbf ft)
Engine carrying screw
M10
45 Nm (33.2 lbf ft)
Nut, foot brake lever
M10
45 Nm (33.2 lbf ft)
Loctite®243™
Remaining nuts, chassis
M10
45 Nm (33.2 lbf ft)
Remaining screws, chassis
M10
45 Nm (33.2 lbf ft)
Screw, handlebar support
M10
40 Nm (29.5 lbf ft)
Loctite®243™
Screw, bottom shock absorber
M12
60 Nm (44.3 lbf ft)
Loctite®2701™
Screw, top shock absorber
M12
60 Nm (44.3 lbf ft)
Loctite®2701™
Nut, seat fixing
M12x1
20 Nm (14.8 lbf ft)
Nut, swingarm pivot
M14x1.5
75 Nm (55.3 lbf ft)
Nut, rear wheel spindle
M20x1.5
80 Nm (59 lbf ft)
Nut, steering stem
M20x1.5
10 Nm (7.4 lbf ft)
Screw, front wheel spindle
M20x1.5
35 Nm (25.8 lbf ft)
115

21
SUBSTANCES
Brake fluid DOT 4 / DOT 5.1
Standard/classification
- DOT
Guideline
- Use only brake fluid that complies with the specified standard (see specifications on the container) and that exhibits the
corresponding properties.
Recommended supplier
Castrol
- REACT PERFORMANCE DOT 4
MOTOREX®
- Brake Fluid DOT 5.1
Coolant
Guideline
- Only use high-grade, silicate-free coolant with corrosion inhibitor additive for aluminum motors. Low grade and unsuit-
able antifreeze causes corrosion, deposits and frothing.
- Do not use pure water as only coolant is able to meet the requirements needed in terms of corrosion protection and
lubrication properties.
- Only use coolant that complies with the requirements stated (see specifications on the container) and that has the rele-
vant properties.
Antifreeze protection to at least
-25 °C (-13 °F)
The mixture ratio must be adjusted to the necessary antifreeze protection. Use distilled water if the coolant needs to be
diluted.
The use of premixed coolant is recommended.
Observe the coolant manufacturer specifications for antifreeze protection, dilution and miscibility (compatibility) with other
coolants.
Recommended supplier
MOTOREX®
- COOLANT M3.0
Engine oil (15W/50)
Standard/classification
- JASO T903 MA2 ( p. 120)
- SAE ( p. 120) (15W/50)
Guideline
- Use only engine oils that comply with the specified standards (see specifications on the container) and that possess the
corresponding properties.
Recommended supplier
MOTOREX®
- Top Speed 4T
Engine oil, 2-stroke
Standard/classification
- JASO FD ( p. 120)
Guideline
- Only use high-grade 2-stroke engine oil from a reputable brand.
fully synthetic
Recommended supplier
MOTOREX®
- Cross Power 2T
116

SUBSTANCES
21
Fork oil (SAE 4) (48601166S1)
Standard/classification
- SAE ( p. 120) (SAE 4)
Guideline
- Use only oils that comply with the specified standards (see specifications on the container) and that exhibit the corre-
sponding properties.
Shock absorber fluid (SAE 2.5) (50180751S1)
Standard/classification
- SAE ( p. 120) (SAE 2.5)
Guideline
- Use only oils that comply with the specified standards (see specifications on the container) and that exhibit the corre-
sponding properties.
Super unleaded (ROZ 98 / RON 98 / PON 94)
Standard/classification
- DIN EN 228 (ROZ 98 / RON 98 / PON 94)
Super unleaded (98 octane) mixed with 2-stroke engine oil (1:40)
Standard/classification
- DIN EN 228
- JASO FD ( p. 120) (1:40)
Mixture ratio
1:40
Engine oil, 2-stroke ( p. 116)
Super unleaded (ROZ 98 / RON 98 / PON 94) ( p. 117)
Recommended supplier
MOTOREX®
- Cross Power 2T
117

22
AUXILIARY SUBSTANCES
Air filter cleaner
Recommended supplier
MOTOREX®
- Racing Bio Dirt Remover
Chain cleaner
Recommended supplier
MOTOREX®
- Chain Clean
Fuel additive
Recommended supplier
MOTOREX®
- Fuel Stabilizer
High viscosity grease
Recommended supplier
SKF®
- LGHB 2
Long-life grease
Recommended supplier
MOTOREX®
- Bike Grease 2000
Motorcycle cleaner
Recommended supplier
MOTOREX®
- Moto Clean
Off-road chain spray
Recommended supplier
MOTOREX®
- Chainlube Offroad
Oil for foam air filter
Recommended supplier
MOTOREX®
- Racing Bio Liquid Power
Preserving materials for paints, metal and rubber
Recommended supplier
MOTOREX®
- Moto Protect
Rubber grip adhesive (00062030051)
Recommended supplier
KTM AG
- GRIP GLUE
118

AUXILIARY SUBSTANCES
22
Special cleaner for glossy and matte paint finishes, metal and plastic surfaces
Recommended supplier
MOTOREX®
- Quick Cleaner
Special grease (00062010053)
Recommended supplier
Klüber Lubrication®
- Klüberfood NH1 34-401
Universal oil spray
Recommended supplier
MOTOREX®
- Joker 440 Synthetic
119

23
STANDARDS
JASO T903 MA2
Different technical development directions required a separate specification for motorcycles - the JASO T903 MA2 stan-
dard.
Earlier, engine oils from the automobile industry were used for motorcycles because there was no separate motorcycle
specification.
Whereas long service intervals are demanded for automobile engines, the focus for motorcycle engines is on high perfor-
mance at high engine speeds.
In most motorcycle engines, the transmission and clutch are lubricated with the same oil.
The JASO T903 MA2 standard meets these special requirements.
SAE
The SAE viscosity classes were defined by the Society of Automotive Engineers and are used for classifying oils according to
their viscosity. The viscosity describes only one property of oil and says nothing about quality.
JASO FD
JASO FD is a classification for a 2-stroke engine oil that was specifically developed for the extreme demands of racing.
Thanks to first-rate synthetic esters and specially designed additives, superb combustion is achieved even under extreme
operating conditions.
120

LIST OF ABBREVIATIONS
24
Art. no.
Article number
ca.
circa
cf.
compare
e.g.
for example
etc.
et cetera
i.a.
inter alia
no.
number
poss.
possibly
121