Perkins 2506F-E15TA and 2506J-E15TA Industrial Engine. Operation and Maintenance Manual (2000)
M0076814-03 (en-us)
December 2020
Operation and
Maintenance
Manual
2506F-E15TA and 2506J-E15TA
Industrial Engine
PP5 (Engine)
M0076814-03
3
Table of Contents
Table of Contents
Maintenance Section
Refill Capacities
57
Foreword
4
Maintenance Recommendations
73
Safety Section
Maintenance Interval Schedule
76
Safety Messages
6
Warranty Section
Additional Messages
7
Warranty Information
111
General Hazard Information
8
Reference Information Section
Burn Prevention
12
Reference Materials
112
Fire Prevention and Explosion Prevention
13
Index Section
Crushing Prevention and Cutting Prevention.. 15
Index
115
Mounting and Dismounting
15
Before Starting Engine
15
Engine Starting
16
Engine Stopping
16
Electrical System
16
Engine Electronics
17
Product Information Section
Model Views
18
Product Identification Information
24
Operation Section
Lifting and Storage
26
Features and Controls
32
Engine Diagnostics
43
Engine Starting
44
Engine Operation
49
Engine Stopping
53
Cold Weather Operation
55
4
M0076814-03
Foreword
Foreword
Some photographs or illustrations in this manual
show details or attachments that may be different
from your engine. Guards and covers may have been
California Proposition 65 Warning
removed for illustrative purposes. Continuing
improvement and advancement of product design
may have caused changes to your engine which are
Diesel engine exhaust and some of its
not included in this manual. Whenever a question
constituents are known to the State of
arises regarding your engine, or this manual, please
California to cause cancer, birth defects,
consult with your Perkins dealer or your Perkins
distributor for the latest available information.
and other reproductive harm.
WARNING - This product can
Safety
expose you to chemicals
including ethylene glycol, which
This safety section lists basic safety precautions. In
is known to the State of California to
addition, this section identifies hazardous, warning
cause birth defects or other reproductive
situations. Read and understand the basic
precautions listed in the safety section before
harm. For more information go to:
operating or performing lubrication, maintenance,
and repair on this product.
Operation
Do not ingest this chemical. Wash hands
after handling to avoid incidental
Operating techniques outlined in this manual are
ingestion.
basic. The operating techniques assist with
developing the skills and techniques required to
WARNING - This product can
operate the engine more efficiently and economically.
expose you to chemicals
Skill and techniques develop as the operator gains
including lead and lead
knowledge of the engine and the capabilities of the
engine.
compounds, which are known to the
State of California to cause cancer, birth
The operation section is a reference for operators.
defects, or other reproductive harm. For
Photographs and illustrations guide the operator
more information go to:
through procedures of inspecting, starting, operating,
and stopping the engine. This section also includes a
discussion of electronic diagnostic information.
Wash hands after handling components
Maintenance
that may contain lead.
The maintenance section is a guide to engine care.
The illustrated, step-by-step instructions are grouped
Literature Information
by service hours and/or calendar time maintenance
intervals. Items in the maintenance schedule are
This manual contains safety, operation instructions,
referenced to detailed instructions that follow.
lubrication, and maintenance information. This
manual should be stored in or near the engine area in
Recommended service should be performed at the
a literature holder or literature storage area. Read,
appropriate intervals as indicated in the Maintenance
study, and keep the manual with the literature and
Interval Schedule. The actual operating environment
engine information.
of the engine also governs the Maintenance Interval
Schedule. Therefore, under severe, dusty, wet, or
English is the primary language for all Perkins
freezing cold operating conditions, more frequent
publications. The English used facilitates translation
lubrication, and maintenance than is specified in the
and consistency.
Maintenance Interval Schedule may be necessary.
M0076814-03
5
Foreword
The maintenance schedule items are organized for a
preventive maintenance management program. If the
preventive maintenance program is followed, a
periodic tune-up is not required. The implementation
of a preventive maintenance management program
should minimize operating costs through cost
avoidances resulting from reductions in unscheduled
downtime and failures.
Maintenance Intervals
Perform maintenance on items at multiples of the
original requirement. Each level and/or individual
items in each level should be shifted ahead or back
depending upon your specific maintenance practices,
operation, and application. Perkins recommends that
the maintenance schedules be reproduced and
displayed near the engine as a convenient reminder.
Perkins also recommends that a maintenance record
be maintained as part of the permanent record of the
engine.
Your authorized Perkins dealer or your Perkins
distributor can assist you in adjusting your
maintenance schedule to meet the needs of your
operating environment.
Overhaul
Major engine overhaul details are not covered in the
Operation and Maintenance Manual except for the
interval and the maintenance items in that interval.
Major repairs are best left to trained personnel or an
authorized Perkins distributor or dealer. Your Perkins
dealer or your Perkins distributor offers various
options regarding overhaul programs. If you
experience a major engine failure, there are also
numerous after failure overhaul options available.
Consult with your Perkins dealer or your Perkins
distributor for information regarding these options.
6
M0076814-03
Safety Section
Safety Messages
Safety Section
i06821618
Safety Messages
There may be several specific safety messages on
your engine. The exact location and a description of
the safety messages are reviewed in this section.
Become familiar with all safety messages.
Ensure that all the safety messages are legible.
Clean the safety messages or replace the safety
messages if the words cannot be read or if the
illustrations are not visible. Use a cloth, water, and
soap to clean the safety messages. Do not use
solvents, gasoline, or other harsh chemicals.
Solvents, gasoline, or harsh chemicals could loosen
the adhesive that secures the safety messages. The
safety messages that are loosened could drop off the
engine.
Replace any safety message that is damaged or
missing. If a safety message is attached to a part of
the engine that is replaced, install a new safety
message on the replacement part. Your Perkins
distributor can provide new safety messages.
Illustration 1
g06129232
Typical example
(1) Universal warning label
(2) Sulfuric Acid Burn label
8
M0076814-03
Safety Section
General Hazard Information
This notice should be located next to the battery
• When working around an engine, the engine must
disconnect switch.
not be in operation. You may only be near a
running engine to carry out maintenance
NOTICE
procedures that require the engine to be in
Do not turn the battery power disconnect switch off
operation.
until indicator lamp has turned off. If the switch is
turned off when the light is illuminated then the DEF
• Do not wear loose clothing or jewelry that can
system will not purge and DEF could freeze and
snag on controls or on other parts of the engine.
cause damage to the pump and lines.
• Ensure that all protective guards and all covers
are secured in place on the engine.
i08312804
• Never put maintenance fluids into glass
containers. Glass containers can break.
General Hazard Information
• Use all cleaning solutions with care.
• Report all necessary repairs.
Unless other instructions are provided, perform the
maintenance under the following conditions:
•
The engine is stopped. Ensure that the engine
cannot be started.
•
The protective locks or the controls are in the
applied position.
•
Engage the secondary brakes or parking brakes.
•
Block the vehicle or restrain the vehicle before
maintenance or repairs are performed.
•
Disconnect the batteries when maintenance is
Illustration 5
g00104545
performed or when the electrical system is
Attach a “Do Not Operate” warning tag or a similar
serviced. Disconnect the battery ground leads.
warning tag to the start switch or to the controls
Tape the leads to help prevent sparks. If equipped,
before the engine is serviced or before the engine is
allow the diesel exhaust fluid to be purged before
repaired. Attach the warning tags to the engine and
disconnecting the battery.
to each operator control station. When appropriate,
disconnect the starting controls.
•
If equipped, disconnect the connectors for the unit
injectors that are on the valve cover base. This
Do not allow unauthorized personnel on the engine,
action will help prevent personal injury from the
or around the engine when the engine is being
high voltage to the unit injectors. Do not come in
serviced.
contact with the unit injector terminals while the
engine is operating.
• Tampering with the engine installation or
tampering with the OEM supplied wiring can be
•
Do not attempt any repairs or any adjustments to
dangerous. Personal injury, death and/or engine
the engine while the engine is operating.
damage could result.
•
Do not attempt any repairs that are not
• Vent the engine exhaust to the outside when the
understood. Use the proper tools. Replace any
engine is operated in an enclosed area.
equipment that is damaged or repair the
equipment.
• If the engine is not running, do not release the
secondary brake or the parking brake systems
•
For initial start-up of a new engine or for starting
unless the vehicle is blocked or unless the vehicle
an engine that has been serviced, make
is restrained.
provisions to stop the engine if an overspeed
occurs. The stopping of the engine may be
• Wear a hard hat, protective glasses, and other
accomplished by shutting off the fuel supply and/
protective equipment, as required.
or the air supply to the engine. Ensure that only
the fuel supply line is shut off. Ensure that the fuel
return line is open.
M0076814-03
9
Safety Section
General Hazard Information
• Start the engine from the operators station (cab).
• Never put maintenance fluids into glass
Never short across the starting motor terminals or
containers. Glass containers can break.
the batteries. This action could bypass the engine
neutral start system and/or the electrical system
• Use all cleaning solutions with care.
could be damaged.
• Report all necessary repairs.
Engine exhaust contains products of combustion
Unless other instructions are provided, perform
which may be harmful to your health. Always start the
the maintenance under the following conditions:
engine and operate the engine in a well ventilated
area. If the engine is in an enclosed area, vent the
• The engine is stopped. Ensure that the engine
engine exhaust to the outside.
cannot be started.
Cautiously remove the following parts. To help
• Disconnect the batteries when maintenance is
prevent spraying or splashing of pressurized fluids,
hold a rag over the part that is being removed.
performed or when the electrical system is
serviced. Disconnect the battery ground leads.
• Filler caps
Tape the leads to help prevent sparks.
• Grease fittings
• Do not attempt any repairs that are not
understood. Use the proper tools. Replace any
• Pressure taps
equipment that is damaged or repair the
equipment.
• Breathers
• Drain plugs
Pressurized Air and Water
Use caution when cover plates are removed.
Pressurized air and/or water can cause debris and/or
Gradually loosen, but do not remove the last two
hot water to be blown out. This action could result in
personal injury.
bolts or nuts that are at opposite ends of the cover
plate or the device. Before removing the last two
When pressurized air and/or pressurized water is
bolts or nuts, pry the cover loose to relieve any spring
used for cleaning, wear protective clothing, protective
pressure or other pressure.
shoes, and eye protection. Eye protection includes
goggles or a protective face shield.
The maximum air pressure for cleaning purposes
must be below 205 kPa (30 psi). The maximum
water pressure for cleaning purposes must be below
275 kPa (40 psi).
Fluid Penetration
Pressure can be trapped in the hydraulic circuit long
after the engine has been stopped. The pressure can
cause hydraulic fluid or items such as pipe plugs to
escape rapidly if the pressure is not relieved
correctly.
Do not remove any hydraulic components or parts
Illustration 6
g00702020
until pressure has been relieved or personal injury
may occur. Do not disassemble any hydraulic
• Wear a hard hat, protective glasses, and other
components or parts until pressure has been relieved
protective equipment, as required.
or personal injury may occur. Refer to the OEM
information for any procedures that are required to
• Perkins recommend that you do not stand next to
relieve the hydraulic pressure.
an exposed running engine unless it is necessary
when carrying out daily checks or maintenance
procedures. The appropriate Personal Protective
Equipment (PPE) must be worn when standing
next to an exposed running engine.
• Do not wear loose clothing or jewelry that can
snag on controls or on other parts of the engine.
• Ensure that all protective guards and all covers
are secured in place on the engine.
10
M0076814-03
Safety Section
General Hazard Information
Avoid static electricity risk when fueling. Ultra-
low sulfur diesel fuel (ULSD fuel) poses a greater
static ignition hazard than earlier diesel formula-
tions with a higher sulfur contents. Avoid death
or serious injury from fire or explosion. Consult
with your fuel or fuel system supplier to ensure
the delivery system is in compliance with fueling
standards for proper grounding and bonding
practices.
Inhalation
Illustration 7
g00687600
Always use a board or cardboard when you check for
a leak. Leaking fluid that is under pressure can
penetrate body tissue. Fluid penetration can cause
serious injury and possible death. A pin hole leak can
cause severe injury. If fluid is injected into your skin,
you must get treatment immediately. Seek treatment
from a doctor that is familiar with this type of injury.
Containing Fluid Spillage
Care must be taken to ensure that fluids are
contained during performance of inspection,
maintenance, testing, adjusting, and repair of the
product. Be prepared to collect the fluid with suitable
containers before opening any compartment or
Illustration 8
g00702022
disassembling any component containing fluids.
Exhaust
Dispose of all fluids according to local regulations
and mandates.
Use caution. Exhaust fumes can be hazardous to
health. If you operate the equipment in an enclosed
Static Electricity Hazard when
area, adequate ventilation is necessary.
Fueling with Ultra-low Sulfur Diesel
Hexavalent Chromium
Fuel
Perkins equipment and replacement parts comply
The removal of sulfur and other compounds in ultra-
with applicable regulations and requirements where
low sulfur diesel fuel (ULSD fuel) decreases the
originally sold. Perkins recommends the use of only
conductivity of ULSD and increases the ability of
genuine Perkins replacement parts.
ULSD to store static charge. Refineries may have
treated the fuel with a static dissipating additive.
Hexavalent chromium has occasionally been
detected on exhaust and heat shield systems on
Many factors can reduce the effectiveness of the
Perkins engines. Although laboratory testing is the
additive over time. Static charges can build up in
only accurate way to know if hexavalent chromium is,
ULSD fuel while the fuel is flowing through fuel
in fact, present, the presence of a yellow deposit in
delivery systems. Static electricity discharge when
areas of high heat (for example, exhaust system
combustible vapors are present could result in a fire
components or exhaust insulation) may be an
or explosion. Ensure that the entire system used to
indication of the presence of hexavalent chromium.
refuel your machine (fuel supply tank, transfer pump,
transfer hose, nozzle, and others) is properly
Use caution if you suspect the presence of
grounded and bonded. Consult with your fuel or fuel
hexavalent chromium. Avoid skin contact when
system supplier to ensure that the delivery system
handling items that you suspect may contain
complies with fueling standards for proper grounding
hexavalent chromium, and avoid inhalation of any
and bonding.
dust in the suspect area. Inhalation of, or skin contact
with, hexavalent chromium dust may be hazardous to
your health.
M0076814-03
11
Safety Section
General Hazard Information
If such yellow deposits are found on the engine,
• Use exhaust ventilation on permanent machining
engine component parts, or associated equipment or
jobs.
packages, Perkins recommends following local
health and safety regulations and guidelines, utilizing
• Wear an approved respirator if there is no other
good hygiene, and adhering to safe work practices
way to control the dust.
when handling the equipment or parts. Perkins also
recommends the following:
• Comply with applicable rules and regulations for
the work place. In the United States, use
• Wear appropriate Personal Protective Equipment
Occupational Safety and Health Administration
(PPE)
(OSHA) requirements. These OSHA requirements
can be found in “29 CFR 1910.1001”.
• Wash your hands and face with soap and water
prior to eating, drinking, or smoking, and also
• Obey environmental regulations for the disposal of
during rest room breaks, to prevent ingestion of
asbestos.
any yellow powder
• Stay away from areas that might have asbestos
• Never use compressed air for cleaning areas
particles in the air.
suspected of containing hexavalent chromium
Dispose of Waste Properly
• Avoid brushing, grinding, or cutting materials
suspected of containing hexavalent chromium
• Obey environmental regulations for the disposal of
all materials that may contain or have come into
contact with hexavalent chromium
• Stay away from areas that might have hexavalent
chromium particles in the air.
Asbestos Information
Perkins equipment and replacement parts that are
shipped from Perkins engine company limited are
asbestos free. Perkins recommends the use of only
genuine Perkins replacement parts. Use the following
guidelines when you handle any replacement parts
that contain asbestos or when you handle asbestos
Illustration 9
g00706404
debris.
Improperly disposing of waste can threaten the
Use caution. Avoid inhaling dust that might be
environment. Potentially harmful fluids should be
generated when you handle components that contain
disposed of according to local regulations.
asbestos fibers. Inhaling this dust can be hazardous
to your health. The components that may contain
asbestos fibers are brake pads, brake bands, lining
material, clutch plates, and some gaskets. The
asbestos that is used in these components is usually
bound in a resin or sealed in some way. Normal
handling is not hazardous unless airborne dust that
contains asbestos is generated.
If dust that may contain asbestos is present, there
are several guidelines that should be followed:
• Never use compressed air for cleaning.
• Avoid brushing materials that contain asbestos.
• Avoid grinding materials that contain asbestos.
• Use a wet method to clean up asbestos materials.
• A vacuum cleaner that is equipped with a high
efficiency particulate air filter (HEPA) can also be
used.
12
M0076814-03
Safety Section
Burn Prevention
Always use leakproof containers when you drain
Cooling system conditioner contains alkali. Alkali can
fluids. Do not pour waste onto the ground, down a
cause personal injury. Do not allow alkali to contact
drain, or into any source of water.
the skin, the eyes, or the mouth.
Diesel Exhaust Fluid
Oils
Skin may be irritated following repeated or prolonged
exposure to mineral and synthetic base oils. Refer to
your suppliers Material Safety Data Sheets for
DEF is an aqueous solution of urea which can re-
detailed information. Hot oil and lubricating
lease ammonia vapors. Always wear the appro-
components can cause personal injury. Do not allow
priate Personal Protective Equipment (PPE) that
hot oil to contact the skin. Appropriate personal
is noted on a material safety data sheet (MSDS)
protective equipment should be used.
for Diesel Exhaust Fluid (DEF).
• Do not inhale ammonia vapor or mist
Diesel Fuel
• Do not eat, drink, or smoke in presence of DEF
Diesel may be irritating to the eyes, respiratory
system, and skin. Prolonged exposure to diesel may
• Avoid DEF contact with eyes, skin, and
cause various skin conditions. Appropriate personal
protective equipment should be used. Refer to
clothing
supplier Material safety Data sheets for detailed
• Wash thoroughly after handling DEF
information.
Always follow the directions for first aid that are
Batteries
noted on a material safety data sheet (MSDS) for
Diesel Exhaust Fluid (DEF).
The liquid in a battery is an electrolyte. Electrolyte is
an acid that can cause personal injury. Do not allow
DEF is not expected to produce significant adverse
electrolyte to contact the skin or the eyes.
health effects when the recommended instructions
for use are followed.
Do not smoke while checking the battery electrolyte
levels. Batteries give off flammable fumes which can
• Draining DEF must be carried out in a well
explode.
ventilated area.
Always wear protective glasses when you work with
• Do not allow the DEF to be spilled onto hot
batteries. Wash hands after touching batteries. The
surfaces.
use of gloves is recommended.
i06086863
Engine and Aftertreatment System
Burn Prevention
Do not touch any part of an operating engine or
engine aftertreatment system. Allow the engine or the
engine aftertreatment system to cool before any
maintenance is performed on the engine or the
Coolant
engine aftertreatment system. Relieve all pressure in
the appropriate system before any lines, fittings, or
When the engine is at operating temperature, the
related items are disconnected.
engine coolant is hot. The coolant is also under
pressure. The radiator and all lines to the heaters or
to the engine contain hot coolant. Any contact with
hot coolant or with steam can cause severe burns.
Allow cooling system components to cool before the
cooling system is drained.
Check that the coolant level after the engine has
stopped and the engine has been allowed to cool.
Ensure that the filler cap is cool before removing the
filler cap. The filler cap must be cool enough to touch
with a bare hand. Remove the filler cap slowly in
order to relieve pressure.
M0076814-03
13
Safety Section
Fire Prevention and Explosion Prevention
Aftertreatment System and Diesel
Store fuels and lubricants in correctly marked
containers away from unauthorized persons. Store
Exhaust Fluid
oily rags and any flammable materials in protective
containers. Do not smoke in areas that are used for
Diesel Exhaust Fluid (DEF) temperatures can reach
storing flammable materials.
65° to 70°C (149.° to 126°F) during normal engine
operation. Stop the engine. Wait for 15 minutes in
Do not expose the engine to any flame.
order to allow the DEF system to be purged and the
DEF to cool before service or repair is performed.
Exhaust shields (if equipped) protect hot exhaust
components from oil or fuel spray in case of a line, a
i05945996
tube, or a seal failure. Exhaust shields must be
installed correctly.
Fire Prevention and Explosion
Do not weld on lines or tanks that contain flammable
Prevention
fluids. Do not flame cut lines or tanks that contain
flammable fluid. Clean any such lines or tanks
thoroughly with a nonflammable solvent prior to
welding or flame cutting.
Wiring must be kept in good condition. Ensure that all
electrical wires are correctly installed and securely
attached. Check all electrical wires daily. Repair any
wires that are loose or frayed before you operate the
engine. Clean all electrical connections and tighten
all electrical connections.
Eliminate all wiring that is unattached or
unnecessary. Do not use any wires or cables that are
smaller than the recommended gauge. Do not
bypass any fuses and/or circuit breakers.
Arcing or sparking could cause a fire. Secure
connections, recommended wiring, and correctly
maintained battery cables will help to prevent arcing
or sparking.
Illustration 10
g00704000
Ensure that the engine is stopped. Inspect all lines
All fuels, most lubricants, and some coolant mixtures
and hoses for wear or for deterioration. Ensure that
are flammable.
the hoses are correctly routed. The lines and hoses
must have adequate support and secure clamps.
Flammable fluids that are leaking or spilled onto hot
surfaces or onto electrical components can cause a
Oil filters and fuel filters must be installed correctly.
fire. Fire may cause personal injury and property
The filter housings must be tightened to the correct
damage.
torque. Refer to the Disassembly and Assembly
manual for more information.
After the emergency stop button is operated, ensure
that you allow 15 minutes, before the engine covers
are removed.
Determine whether the engine will be operated in an
environment that allows combustible gases to be
drawn into the air inlet system. These gases could
cause the engine to overspeed. Personal injury,
property damage, or engine damage could result.
If the application involves the presence of
combustible gases, consult your Perkins dealer and/
or your Perkins distributor for additional information
about suitable protection devices.
Remove all flammable combustible materials or
conductive materials such as fuel, oil, and debris
from the engine. Do not allow any flammable
combustible materials or conductive materials to
accumulate on the engine.
14
M0076814-03
Safety Section
Fire Prevention and Explosion Prevention
Illustration 11
g00704059
Illustration 12
g00704135
Use caution when you are refueling an engine. Do
Gases from a battery can explode. Keep any open
not smoke while you are refueling an engine. Do not
flames or sparks away from the top of a battery. Do
refuel an engine near open flames or sparks. Always
not smoke in battery charging areas.
stop the engine before refueling.
Never check the battery charge by placing a metal
Avoid static electricity risk when fueling. Ultra-low
object across the terminal posts. Use a voltmeter or a
Sulfur Diesel fuel (ULSD fuel) poses a greater static
hydrometer.
ignition hazard than earlier diesel formulations with a
higher sulfur content. Avoid death or serious injury
Incorrect jumper cable connections can cause an
from fire or explosion. Consult your fuel or fuel
explosion that can result in injury. Refer to the
system supplier to ensure that the delivery system is
Operation Section of this manual for specific
in compliance with fueling standards for proper
instructions.
grounding and bonding practices.
Do not charge a frozen battery. A frozen battery may
cause an explosion.
The batteries must be kept clean. The covers (if
equipped) must be kept on the cells. Use the
recommended cables, connections, and battery box
covers when the engine is operated.
Fire Extinguisher
Make sure that a fire extinguisher is available. Be
familiar with the operation of the fire extinguisher.
Inspect the fire extinguisher and service the fire
extinguisher regularly. Obey the recommendations
on the instruction plate.
Ether
Ether is flammable and poisonous.
Do not smoke while you are replacing an ether
cylinder or while you are using an ether spray.
M0076814-03
15
Safety Section
Crushing Prevention and Cutting Prevention
Do not store ether cylinders in living areas or in the
i05768982
engine compartment. Do not store ether cylinders in
direct sunlight or in temperatures above 49° C
Mounting and Dismounting
(120° F). Keep ether cylinders away from open
flames or sparks.
Do not climb on the engine or the engine
Lines, Tubes, and Hoses
aftertreatment system. The engine and
aftertreatment system have not been designed with
Do not bend high-pressure lines. Do not strike high-
mounting or dismounting locations.
pressure lines. Do not install any lines that are
damaged.
Refer to the OEM for the location of foot and hand
holds for your specific application.
Leaks can cause fires. Consult your Perkins dealer or
your Perkins distributor for replacement parts.
i04257031
Replace the parts if any of the following conditions
are present:
Before Starting Engine
• End fittings are damaged or leaking.
• Outer coverings are chafed or cut.
NOTICE
For initial start-up of a new or rebuilt engine, and for
• Wires are exposed.
start-up of an engine that has been serviced, make
provision to shut the engine off should an overspeed
• Outer coverings are ballooning.
occur. This may be accomplished by shutting off the
air and/or fuel supply to the engine.
• Flexible parts of the hoses are kinked.
• Outer covers have embedded armoring.
• End fittings are displaced.
Engine exhaust contains products of combustion
Make sure that all clamps, guards, and heat shields
which may be harmful to your health. Always
are installed correctly. During engine operation,
start and operate the engine in a well ventilated
correct installation will help to prevent vibration,
area and, if in an enclosed area, vent the exhaust
rubbing against other parts, and excessive heat.
to the outside.
Inspect the engine for potential hazards.
i02143194
Do not start the engine or move any of the controls if
Crushing Prevention and
there is a “DO NOT OPERATE” warning tag or similar
warning tag attached to the start switch or to the
Cutting Prevention
controls.
Before starting the engine, ensure that no one is on,
underneath, or close to the engine. Ensure that the
Support the component correctly when work beneath
the component is performed.
area is free of personnel.
Unless other maintenance instructions are provided,
If equipped, ensure that the lighting system for the
never attempt adjustments while the engine is
engine is suitable for the conditions. Ensure that all
running.
lights work properly, if equipped.
Stay clear of all rotating parts and of all moving parts.
All protective guards and all protective covers must
Leave the guards in place until maintenance is
be installed if the engine must be started in order to
performed. After the maintenance is performed,
perform service procedures. To help prevent an
reinstall the guards.
accident that is caused by parts in rotation, work
around the parts carefully.
Keep objects away from moving fan blades. The fan
blades will throw objects or cut objects.
Do not start an engine when the governor linkage is
disconnected.
When objects are struck, wear protective glasses in
Do not bypass the automatic shutoff circuits. Do not
order to avoid injury to the eyes.
disable the automatic shutoff circuits. The circuits are
provided in order to help prevent personal injury. The
Chips or other debris may fly off objects when objects
circuits are also provided in order to help prevent
are struck. Before objects are struck, ensure that no
engine damage.
one will be injured by flying debris.
16
M0076814-03
Safety Section
Engine Starting
i07828827
i06822945
Engine Starting
Engine Stopping
Do not stop the engine immediately after the engine
has been operated under load. Abrupt stopping of the
engine can cause overheating and accelerated wear
Do not use aerosol types of starting aids such as
of engine components. Allow the engine to run for 5
ether. Such use could result in an explosion and
minutes before engine shutdown. Running the
personal injury.
engine allows hot areas of the engine to cool
gradually.
i06088340
Engine exhaust contains products of combustion
Electrical System
which may be harmful to your health. Always
start and operate the engine in a well ventilated
area and, if in an enclosed area, vent the exhaust
to the outside.
Never disconnect any charging unit circuit or battery
circuit cable from the battery when the charging unit
If a warning tag is attached to the engine start switch
is operating. A spark can cause the combustible
or to the controls, DO NOT start the engine or move
gases that are produced by some batteries to ignite.
the controls. Consult with the person that attached
the warning tag before the engine is started.
To help prevent sparks from igniting combustible
gases that are produced by some batteries, the
All protective guards and all protective covers must
negative “-” jump-start cable should be connected
be installed if the engine must be started to perform
last from the external power source to the negative
service procedures. To help prevent an accident that
“-” terminal of the starting motor. If the starting motor
is caused by parts in rotation, work around the parts
is not equipped with a negative “-” terminal, connect
carefully.
the jump-start cable to the engine block.
Start the engine from the operator's compartment or
Check the electrical wires daily for wires that are
from the engine start switch.
loose or frayed. Tighten all loose electrical wires
before the engine is started. Repair all frayed
Always start the engine according to the procedure
electrical wires before the engine is started. Refer to
that is described in the Operation and Maintenance
the “Engine Starting” section of this Operation and
Manual, “Engine Starting” topic in the Operation
Maintenance Manual for specific starting instructions.
Section. Knowing the correct procedure will help to
prevent major damage to the engine components.
Grounding Practices
Knowing the procedure will also help to prevent
personal injury.
Proper grounding for the engine electrical system is
To ensure that the jacket water heater (if equipped) is
necessary for optimum engine performance and
working correctly, check the water temperature
reliability. Improper grounding will result in
gauge and/or the oil temperature gauge during the
uncontrolled electrical circuit paths and in unreliable
heater operation.
electrical circuit paths.
Note: The engine may be equipped with a device for
Uncontrolled electrical circuit paths can result in
cold starting. If the engine will be operated in very
damage to main bearings, to crankshaft bearing
cold conditions, then an extra cold starting aid may
journal surfaces, and to aluminum components.
be required. Normally, the engine will be equipped
Engines that are installed without engine-to-frame
with the correct type of starting aid for your region of
ground straps can be damaged by electrical
operation.
discharge.
To ensure that the engine and the engine electrical
systems function properly, an engine-to-frame
ground strap with a direct path to the battery must be
used. This path may be provided by way of a starting
motor ground, a starting motor ground to the frame,
or a direct engine ground to the frame.
M0076814-03
17
Safety Section
Engine Electronics
All grounds should be tight and free of corrosion. The
engine alternator must be grounded to the negative
“-” battery terminal with a wire that is adequate to
handle the full charging current of the alternator.
i06091234
Engine Electronics
Tampering with the electronic system installation
or the OEM wiring installation can be dangerous
and could result in personal injury or death and/
or engine damage.
This engine has a comprehensive, programmable
Engine Monitoring System. The Engine Control
Module (ECM) will monitor the engine operating
conditions. If any of the engine parameters extend
outside an allowable range, the ECM will initiate an
immediate action.
The following actions are available for engine
monitoring control: WARNING, DERATE and
SHUTDOWN. These engine monitoring modes can
limit engine speed and/or the engine power.
Many of the parameters that are monitored by the
ECM can be programmed for the engine monitoring
functions. The following parameters can be
monitored as a part of the Engine Monitoring System:
• Operating Altitude
• Engine Coolant Level
• Engine Coolant Temperature
• Engine Oil Pressure
• Engine Speed
• Fuel Temperature
• Intake Manifold Air Temperature
• System Voltage
The Engine Monitoring package can vary for different
engine models and different engine applications.
However, the monitoring system and the engine
monitoring control will be similar for all engines.
Note: Many of the engine control systems and
display modules that are available for Perkins
Engines will work in unison with the Engine
Monitoring System. Together, the two controls will
provide the engine monitoring function for the specific
engine application. Refer to the Troubleshooting
Manual for more information.
18
M0076814-03
Product Information Section
Model Views
Product Information
Section
Model Views
i06822953
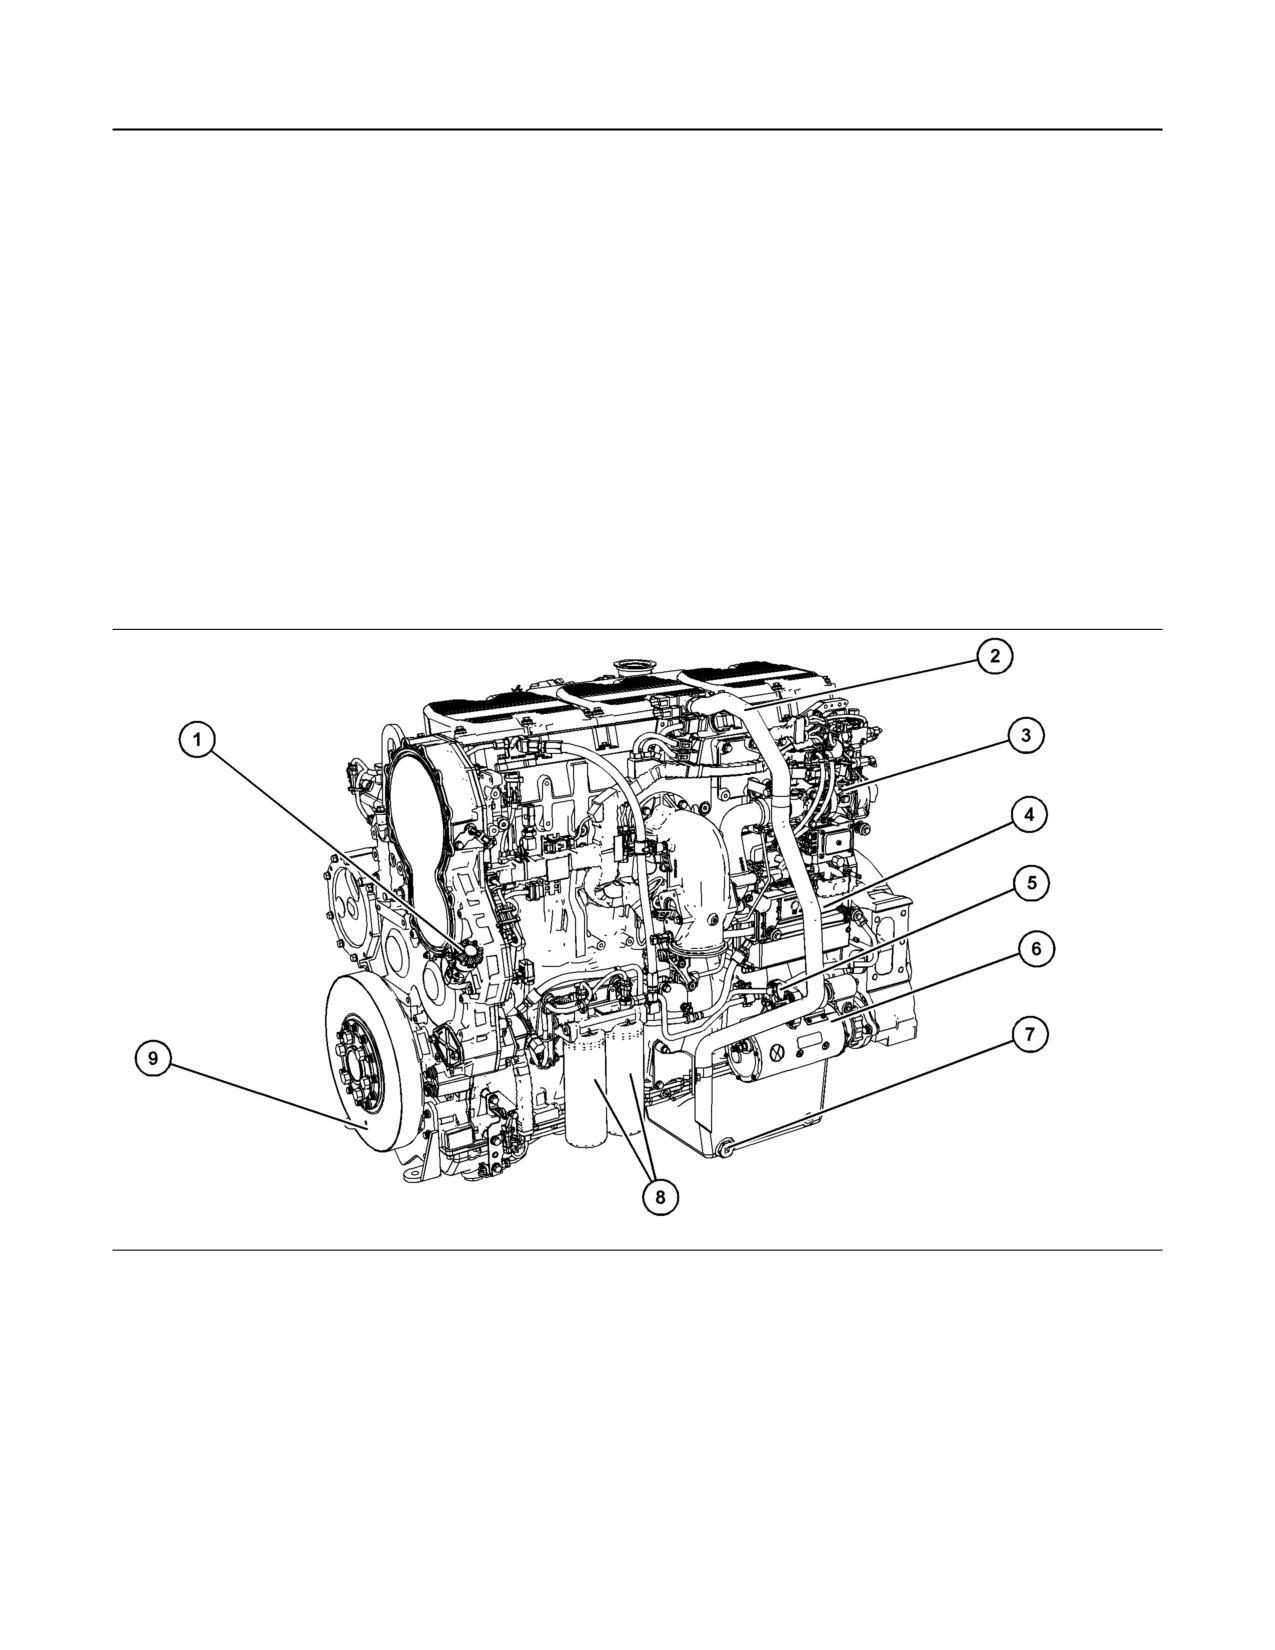
Model View Illustrations
The following model views show typical features of
the engine. Due to individual applications, your
engine may appear different from the illustrations.
Engine Views
Illustration 13
g06134993
Typical example
(1) Oil filler
(4) Engine-mounted ECM
(7) Oil drain plug
(2) Breather hose
(5) Oil gauge (Dipstick)
(8) Twin fuel filters
(3) NRS valve
(6) Starting motor
(9) Damper
M0076814-03
19
Product Information Section
Model View Illustrations
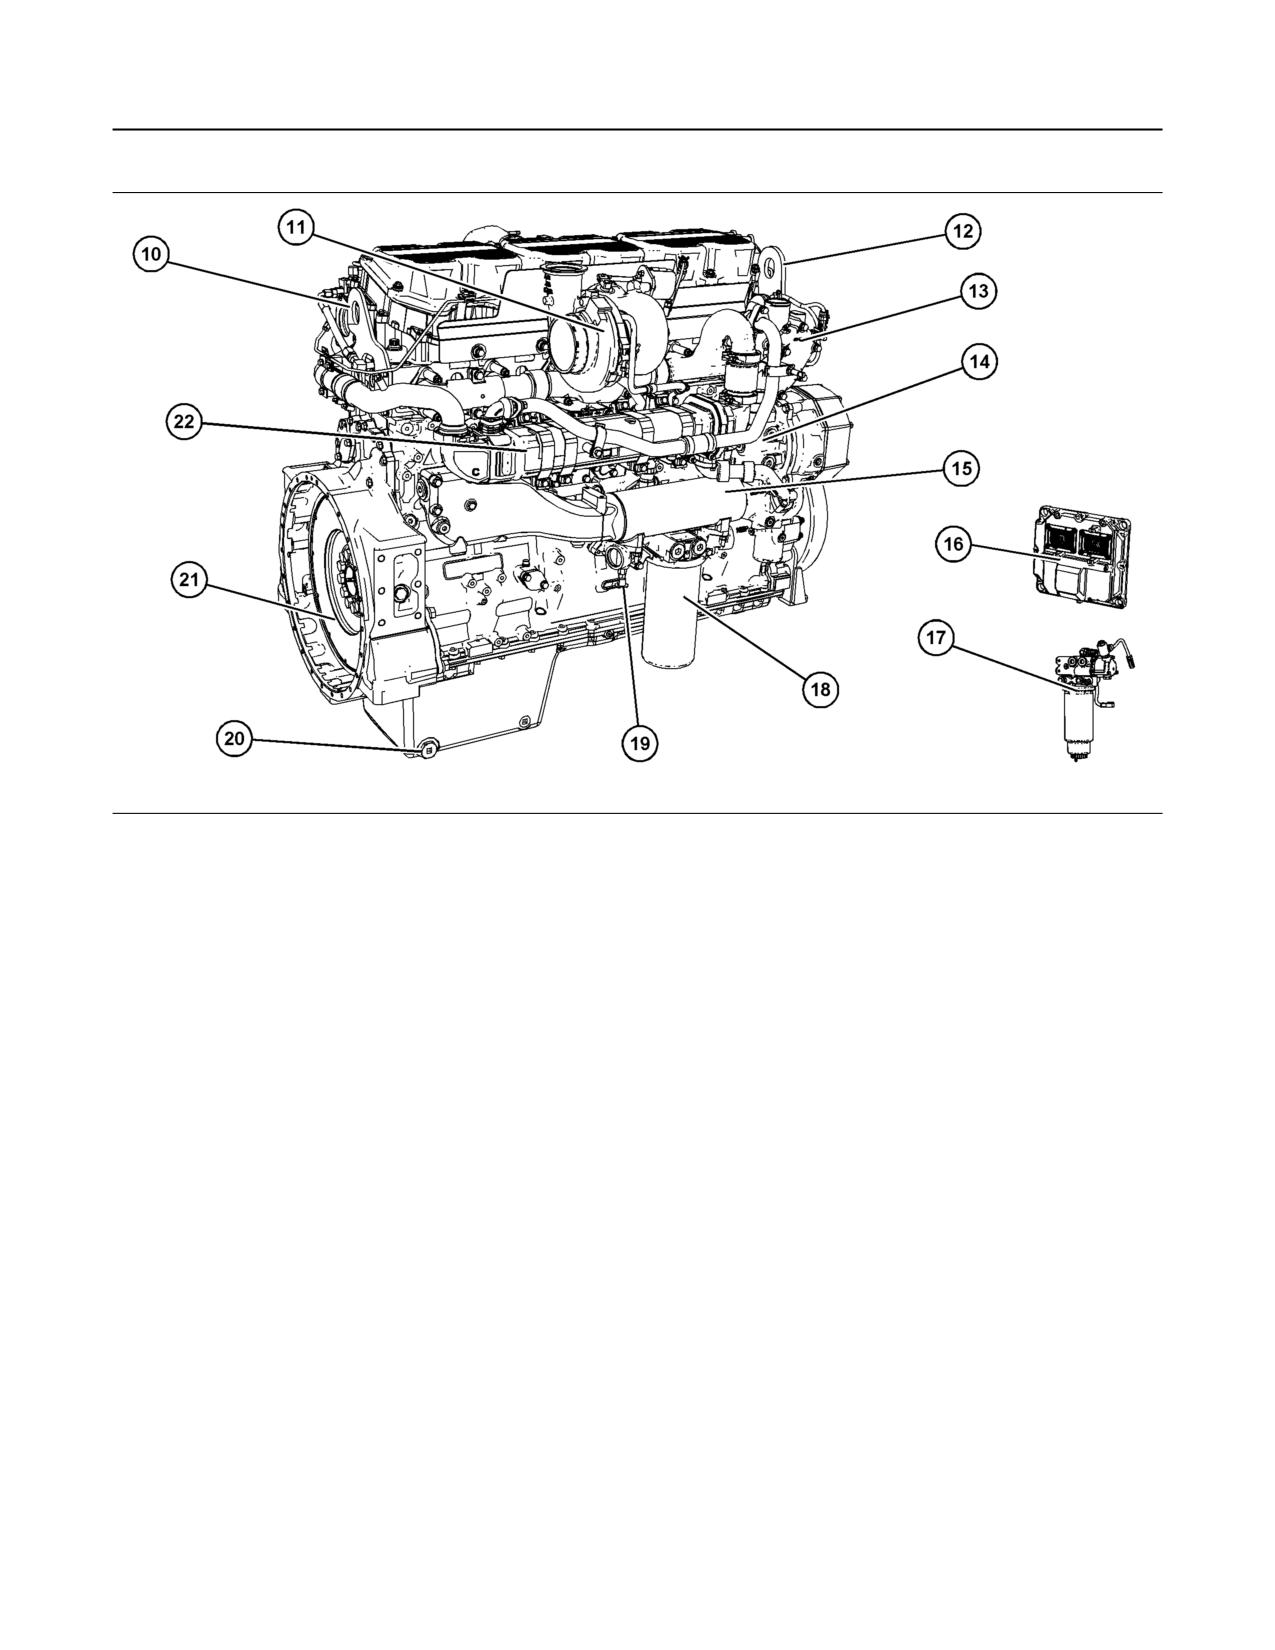
Illustration 14
g06135026
Typical example
(10) Rear lifting eye
(14) Coolant pump
(19) Oil sample valve
(11) Turbocharger
(15) Oil cooler
(20) Oil drain plug
(12) Front lifting eye
(16) ECM for aftertreatment
(21) Flywheel
(13) Water temperature regulator housing
(17) Primary fuel filter/priming pump
(22) Exhaust cooler
(Thermostat housing)
(18) Oil filter
20
M0076814-03
Product Information Section
Model View Illustrations
The ECM (16) will be supplied loose.
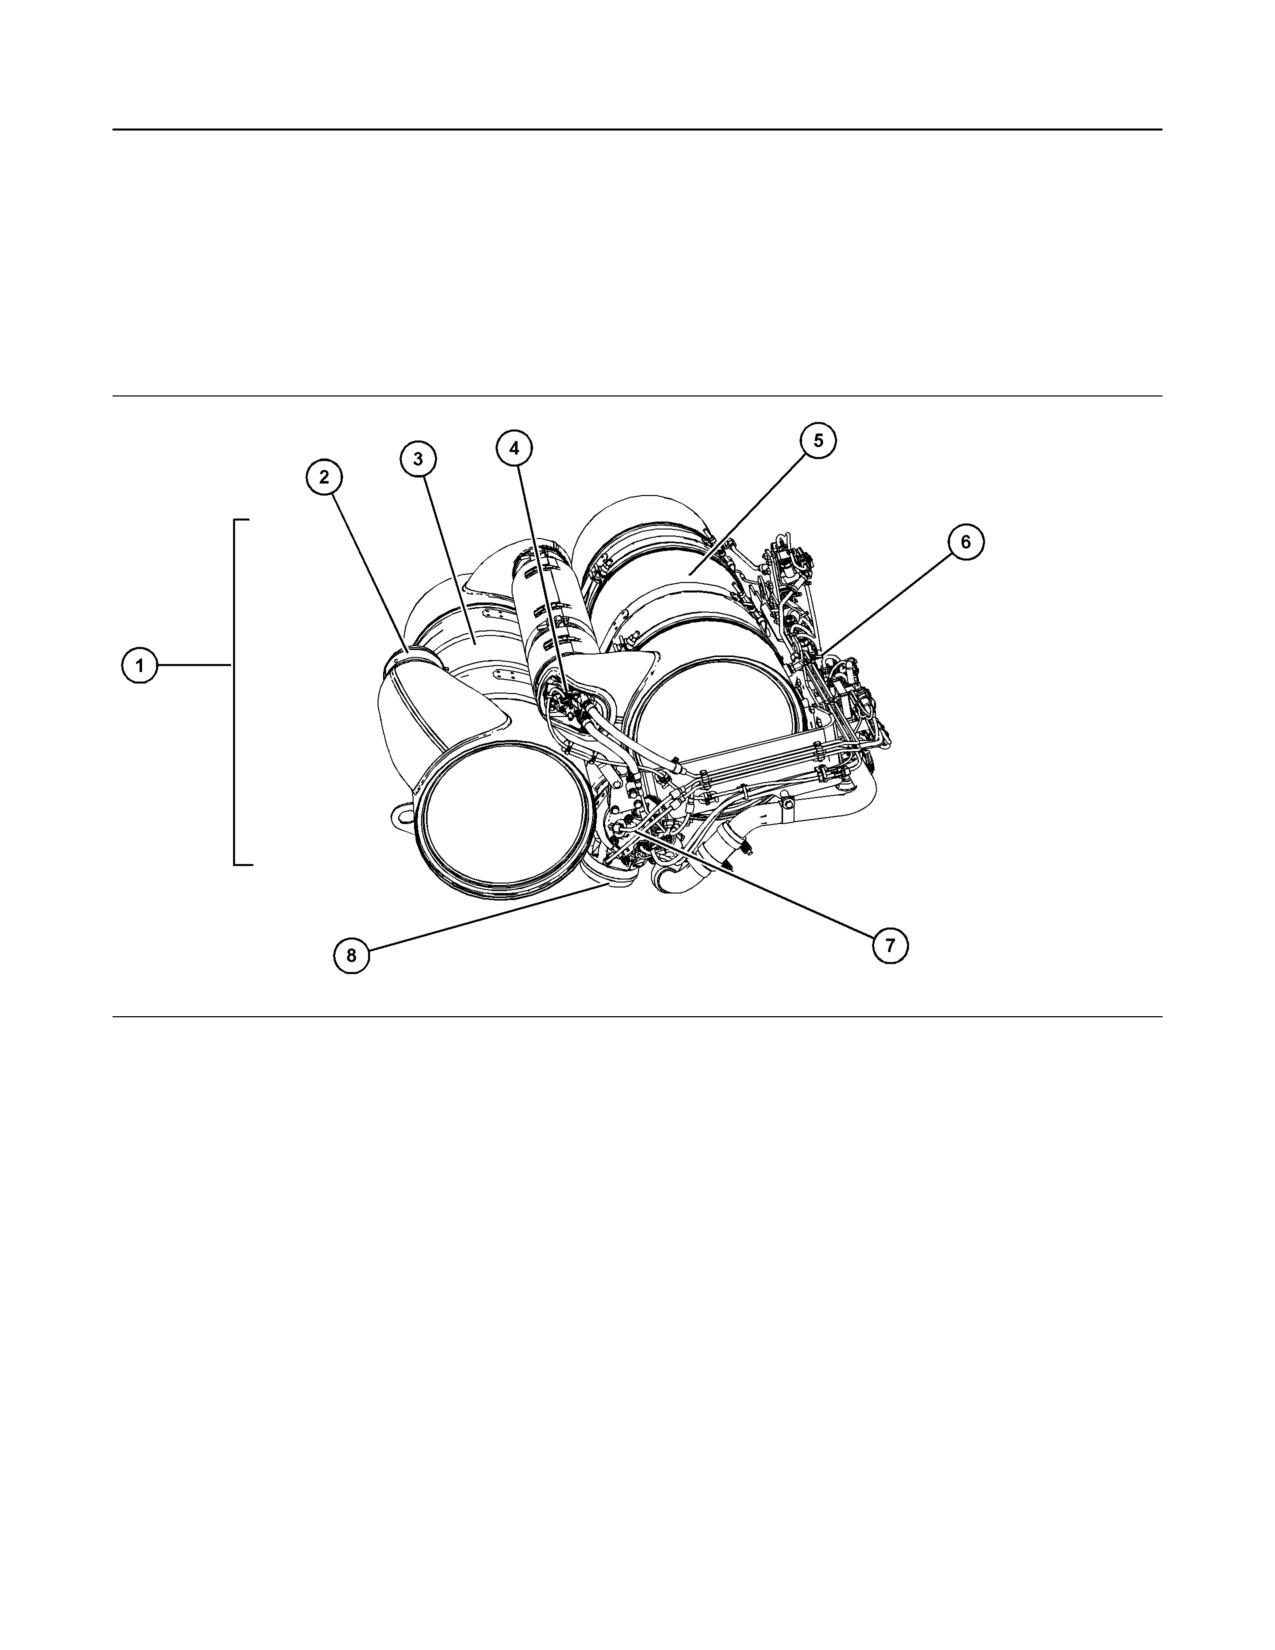
Aftertreatment System
The aftertreatment items are supplied loose by
Perkins.
Clean Emission Module
Illustration 15
g06044166
Typical example
(1) Clean Emission Model (CEM)
(4) DEF Injector
(7) Aftertreatment Regeneration Device
(2) Exhaust outlet
(5) Diesel Particulate Filter (DPF).
(ARD)
(3) Selective Catalytic Reduction (SCR)
(6) CEM sensors and fuel system
(8) Exhaust Inlet
M0076814-03
21
Product Information Section
Product Description
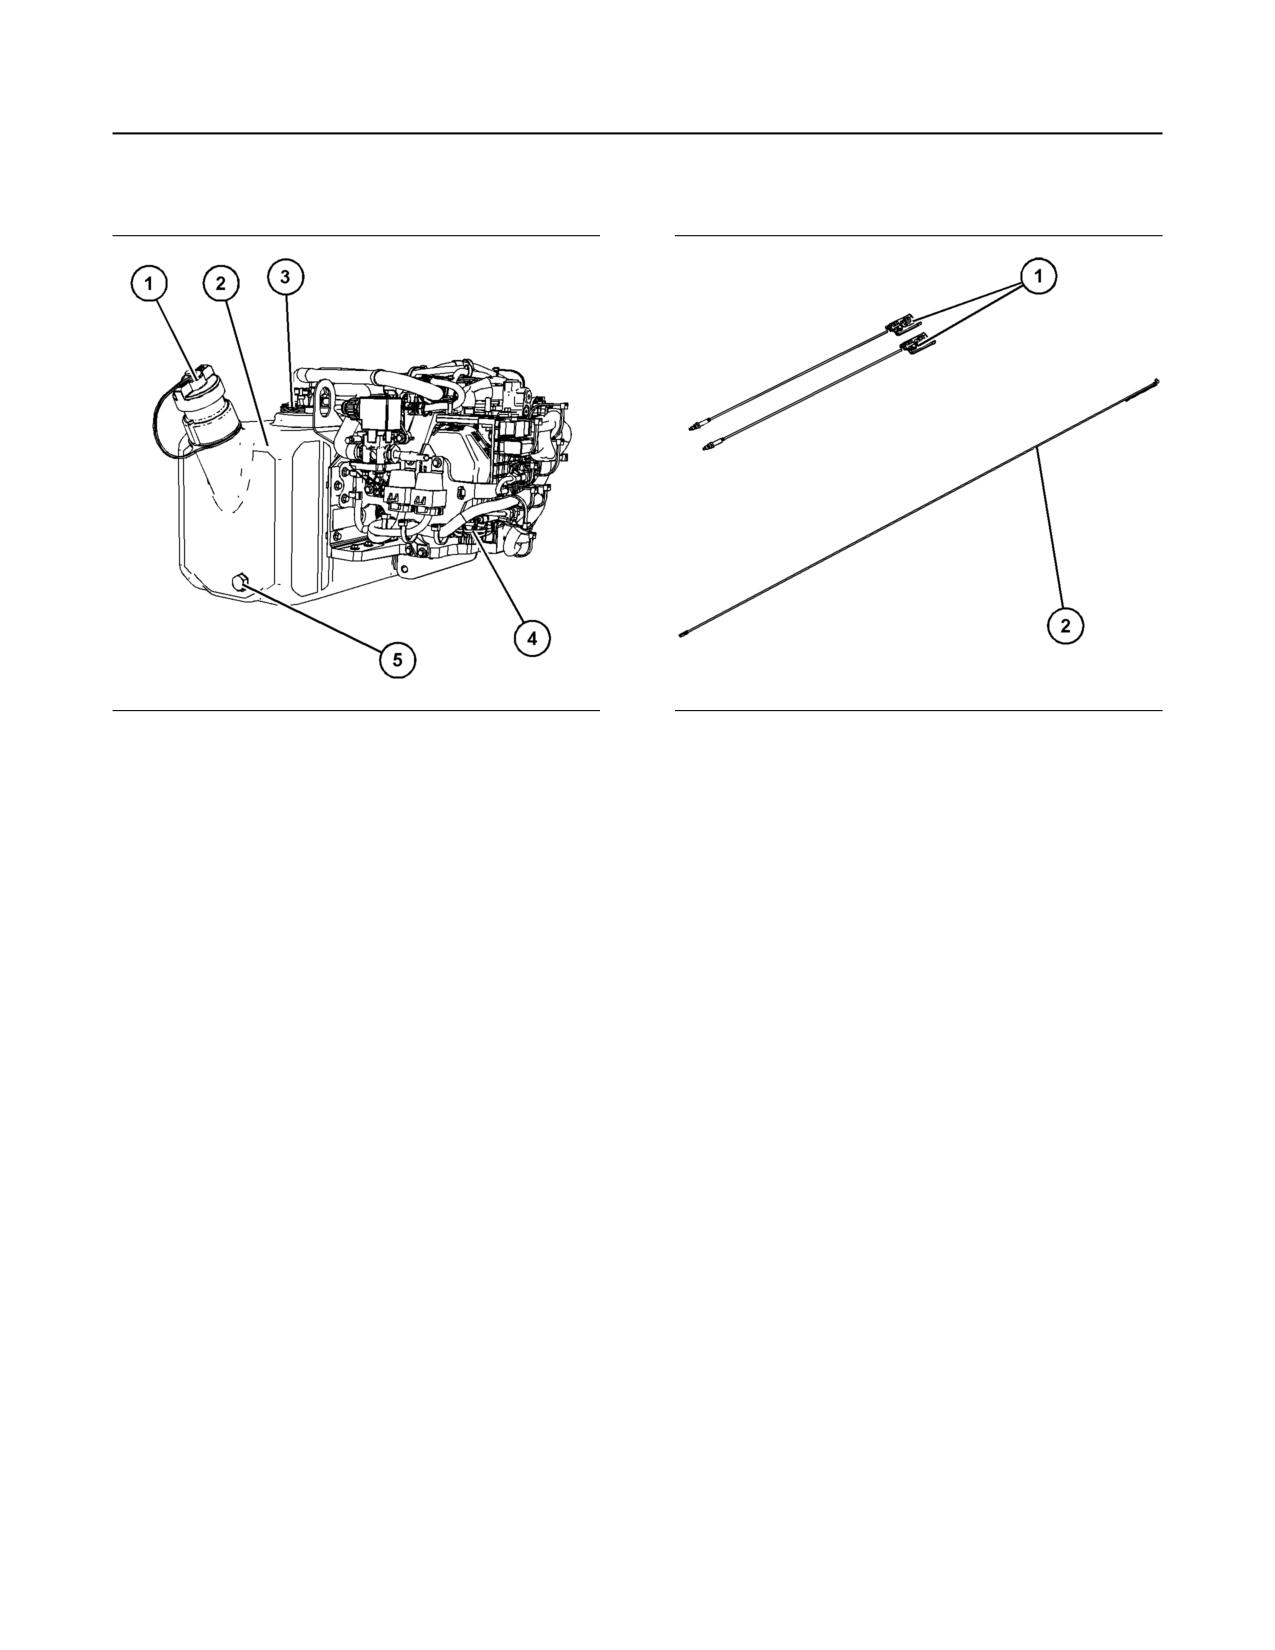
Pump Electronic Tank Unit (PETU)
NOx Sensors and DEF Heated line
Illustration 16
g06129412
Illustration 17
g06044238
Typical example
Typical example
(1) DEF filler cap
(1) NOx sensors
(2) DEF tank
(2) DEF heated line
(3) DEF tank header
(4) DEF pump filter
i06823092
(5) DEF tank drain
Product Description
The Perkins 2506F-E15TA Industrial Engine has the
following characteristics:
• Four-stroke cycle
• Mechanically actuated, electronically controlled
fuel injection system
• Turbocharged
• Air to air charged cooled
• Aftertreatment system
The Clean Emissions Module (CEM) is constructed
of four main items, the diesel Aftertreatment
Regeneration Device (ARD) oxidation catalyst, the
diesel particulate filter, and the Selective Catalytic
Reduction (SCR). The SCR requires the use of
Diesel Exhaust Fluid (DEF) to be injected into the
system to lower the emissions from the engine. The
(DEF) is stored and controlled by the pump electronic
tank unit. The DEF tank can be installed separate
from the electronic pump unit.
22
M0076814-03
Product Information Section
Product Description
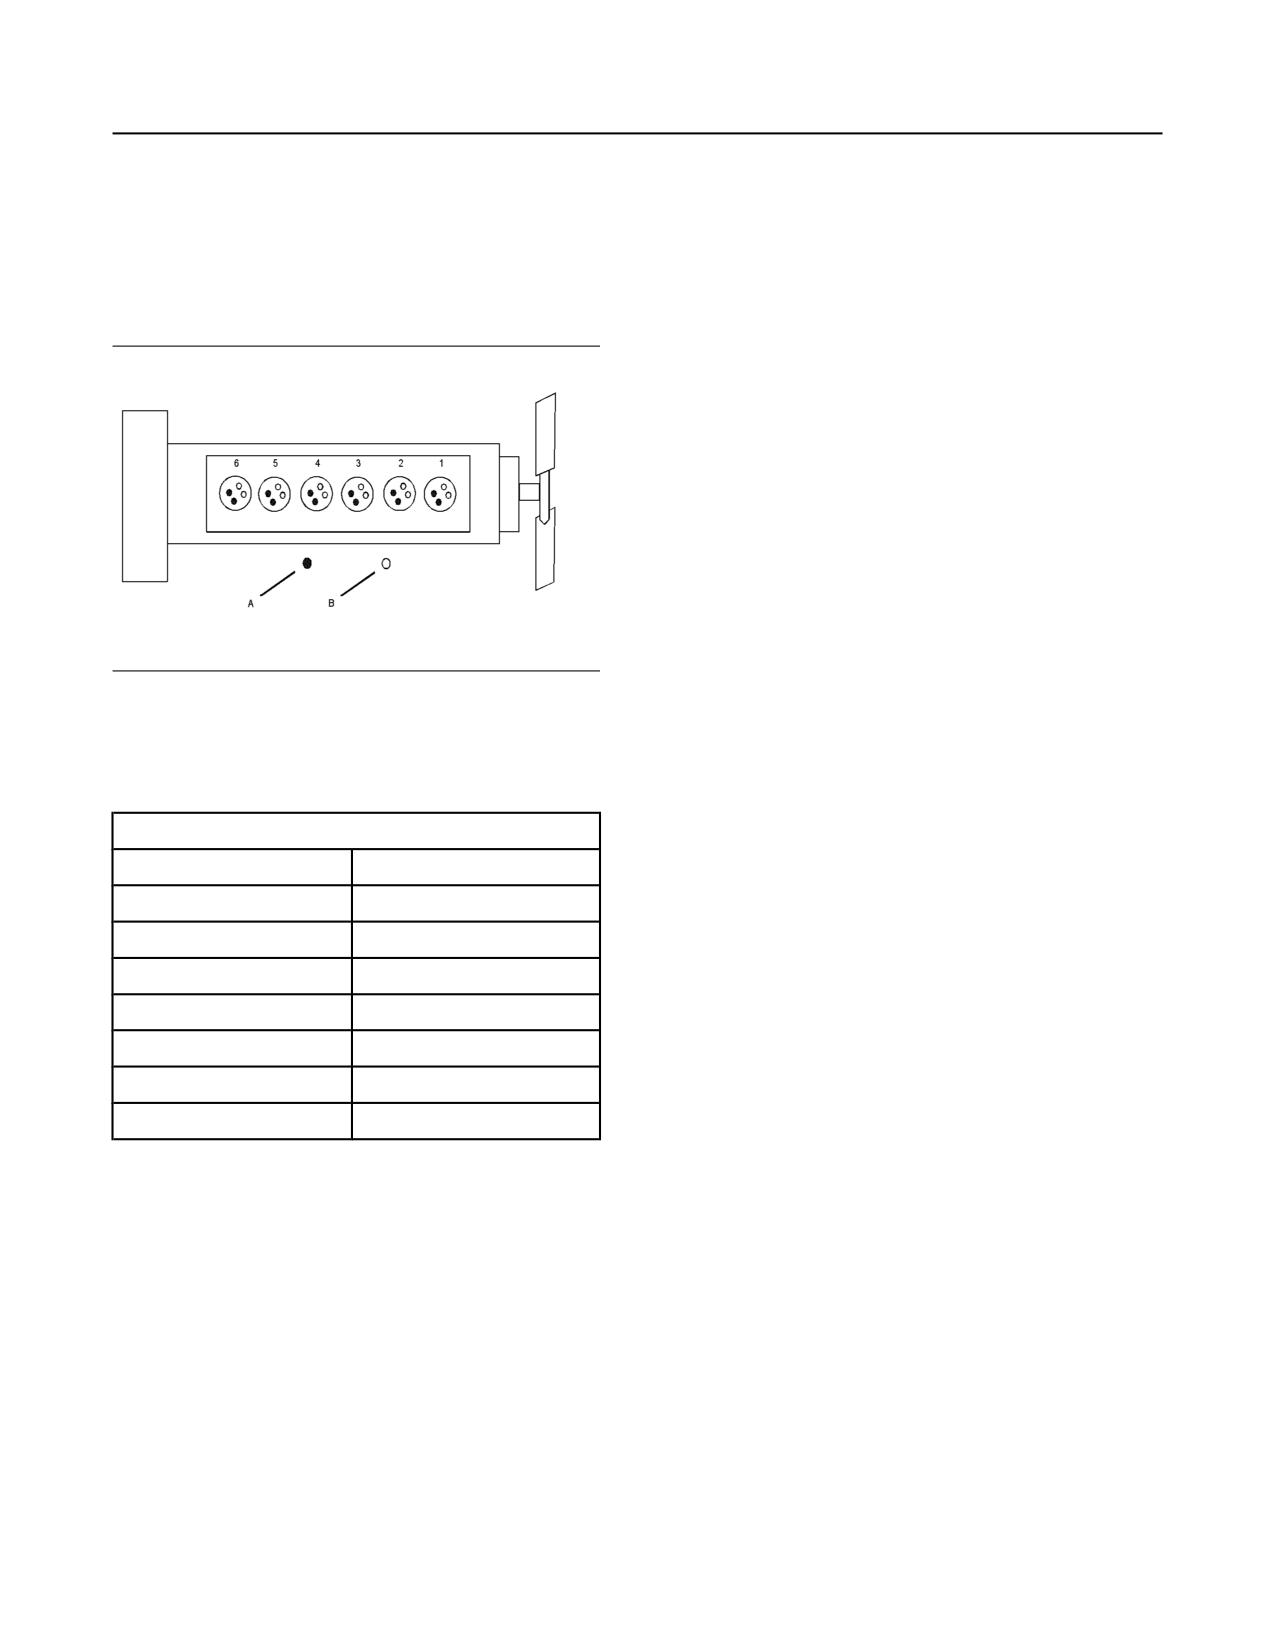
Engine Specifications
• Torque rise shaping
Note: The front end of the engine is opposite the
• Injection timing control
flywheel end of the engine. The left and the right
• System diagnostics
sides of the engine are determined from the flywheel
end. The number 1 cylinder is the front cylinder.
• Aftertreatment regeneration control
• NOX reduction system control
Extra Features
The following extra features provide increased
engine fuel economy and serviceability:
• Cold starting capability
• Tampering detection
• Diagnostics
Engine Diagnostics
Illustration 18
g01387009
The engine has built-in diagnostics to ensure that all
Cylinder and valve location
the components are functioning properly. Under
certain conditions, the engine horsepower and the
(A) Exhaust valve
vehicle speed may be limited. An electronic service
(B) Inlet valve
tool may be used to display the diagnostic code.
Table 1
There are two categories of codes: diagnostic code
Engine Specifications
and event code. These two categories of codes may
be in two different states: active and logged.
Engine
2506F-E15TA
Most of the diagnostic codes are logged and stored in
Arrangement and Cylinders
In-Line 6 cylinder
the ECM. For additional information, refer to
Bore
137 mm (5.4 inch)
theOperation and Maintenance Manual, Engine
Diagnostictopic (Operation Section).
Stroke
171 mm (6.7 inch)
Aspiration
ATAAC(1)
Engine Service Life
Displacement
15.2 L (927 cubic inch)
Engine efficiency and maximum utilization of engine
performance depend on the adherence to proper
Firing Order
1-5-3-6-2-4
operation and maintenance recommendations. In
Rotation (flywheel end)
Counterclockwise
addition, use recommended fuels, coolants, and
lubricants. Use the Operation and Maintenance
(1) Air-to-air aftercooled
Manual as a guide for required engine maintenance.
Expected engine life is predicted by the average
Electronic Engine Features
power that is demanded. The average power that is
demanded is based on fuel consumption of the
The engine is designed for electronic controls. The
engine over a time. Reduced hours of operation at
integral on board computer controls the operation of
full throttle and/or operating at reduced throttle
the engine. Current operating conditions are
settings result in a lower average power demand.
monitored. The Electronic Control Module (ECM)
Reduced hours of operation will increase the length
controls the response of the engine to these
of operating time before an engine overhaul is
conditions and to the demands of the operator. These
required. For more information, refer to the Operation
conditions and operator demands determine the
and Maintenance Manual, “Overhaul Considerations”
precise control of fuel injection by the ECM. The
topic.
electronic engine control system provides the
following features:
Aftermarket Products and Perkins
• Engine speed governor
Engines
• Automatic air/fuel ratio control
Perkins does not warrant the quality or performance
of non-Perkins fluids and filters.
M0076814-03
23
Product Information Section
Product Description
When auxiliary devices, accessories, or
consumables (filters, additives, catalysts) which are
made by other manufacturers are used on Perkins
products, the Perkins warranty is not affected simply
because of such use.
However, failures that result from the installation
or use of other manufacturers devices,
accessories, or consumables are NOT Perkins
defects. Therefore, the defects are NOT covered
under the Perkins warranty.
24
M0076814-03
Product Information Section
Product Identification Information
Product Identification
Information
i06823820
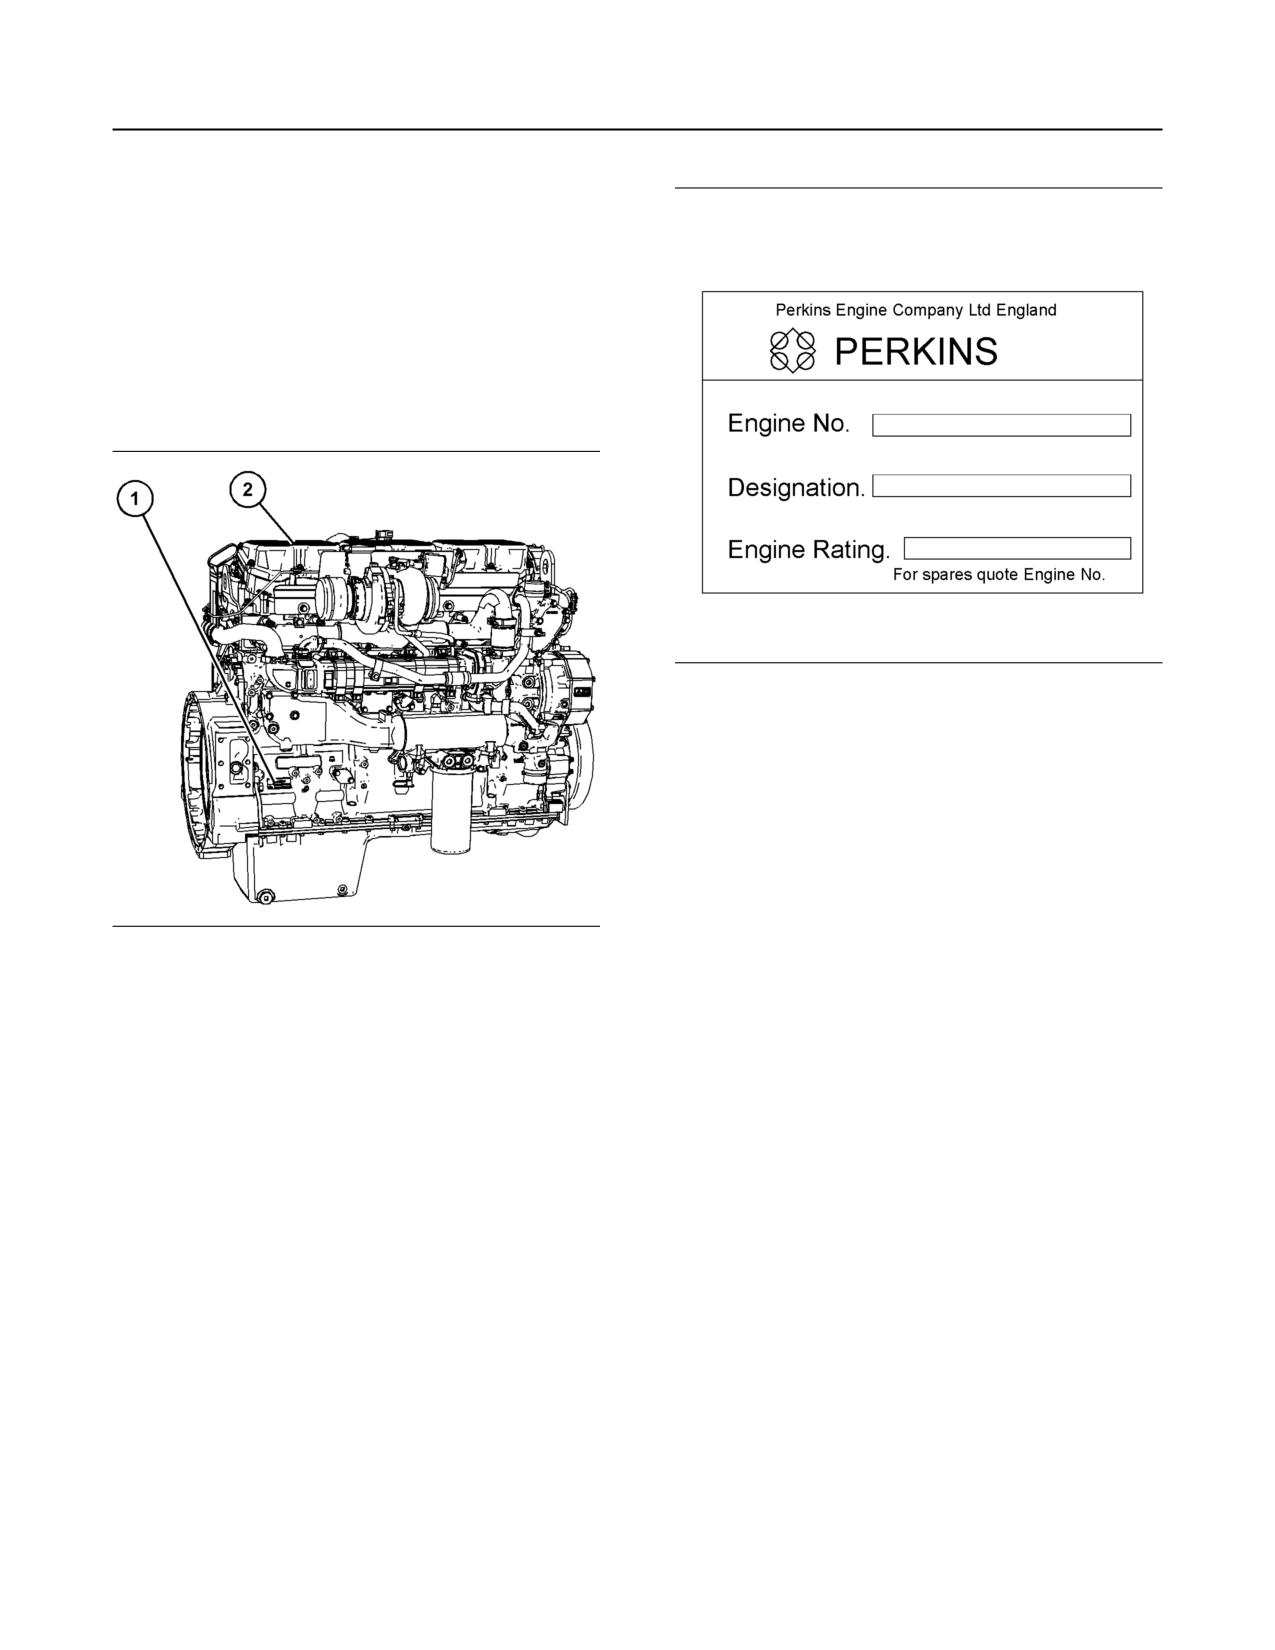
Plate Locations and Film
Locations
Illustration 20
g01403841
Serial number plate
The following information is stamped on the serial
number plate: engine serial number, engine model,
and arrangement number.
The engine information plate is on top of the valve
cover near the middle of the engine.
The following information is on the information plate:
Engine serial number, engine model, engine
Illustration 19
g06129791
arrangement number, maximum altitude of the
engine that is necessary to achieve the rated power,
(1) Serial number plate
horsepower, high idle, full load rpm, fuel settings, and
(2) Information plate
other information.
The engine serial number plate is on the right side of
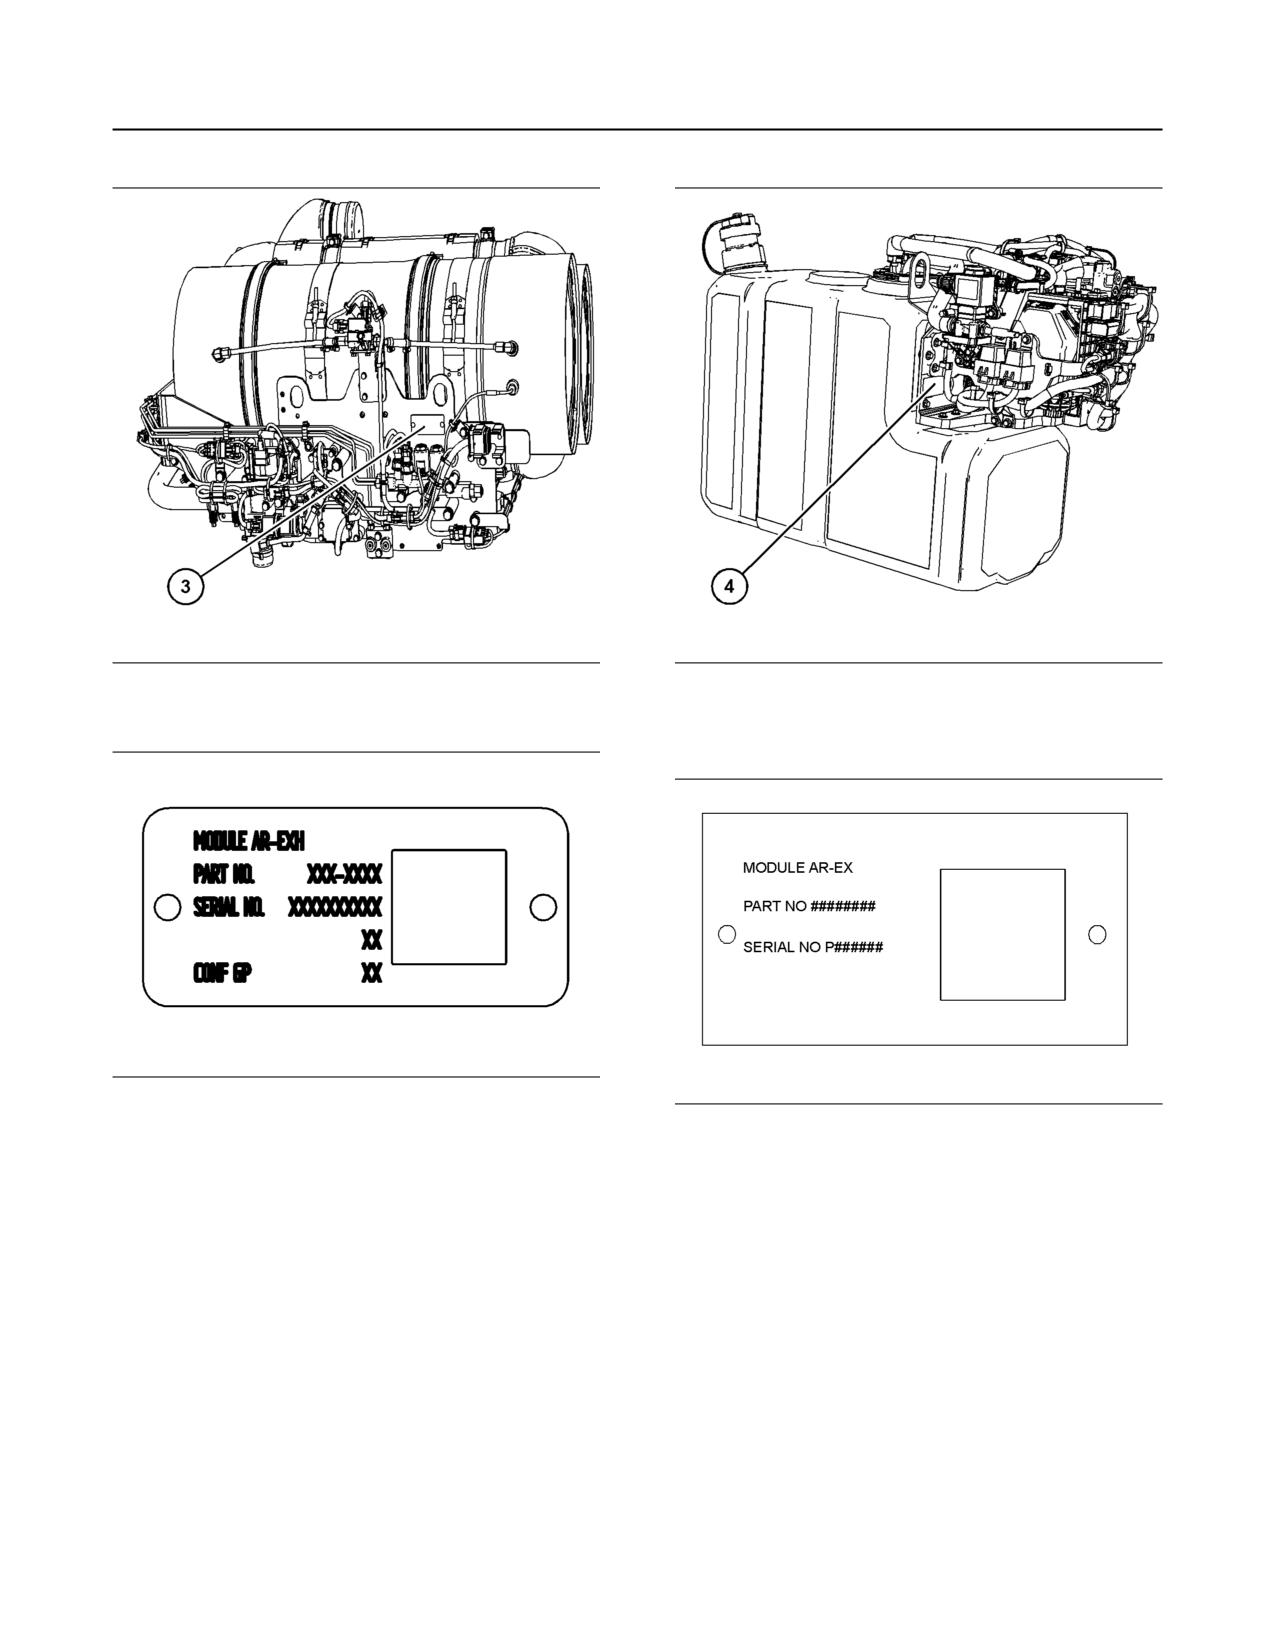
The Clean Emission Module (CEM) identification
the engine block, toward the back.
plate is on the bracket assembly on the CEM.
M0076814-03
25
Product Information Section
Emissions Certification Film
Illustration 21
g06040627
Illustration 23
g06040642
(3) CEM Identification plate
Typical example
(4) PETU Plate location
Illustration 22
g02236574
CEM identification plate
Illustration 24
g03049116
Typical example PETU serial plate
The CEM identification plate contains the following
information: part number, serial number, change
Record the information on the CEM and PETU serial
level, and configuration ID code. This information
plates. The information will be required by your
may be needed by the Perkins distributor when
Perkins distributor to identify replacement part
inquiries are being made on the CEM.
numbers.
Pump Electronic Tank Unit (PETU)
i05951816
and Pump Electronic Unit (PEU)
Emissions Certification Film
Note: Some applications may not have a diesel
exhaust fluid tank installed into to the electronic unit.
Note: This information is pertinent in the United
States, in Canada and in Europe.
The emissions label is located on the top of the valve
mechanism cover.
26
M0076814-03
Operation Section
Lifting and Storage
Operation Section
Lifting and Storage
i07433042
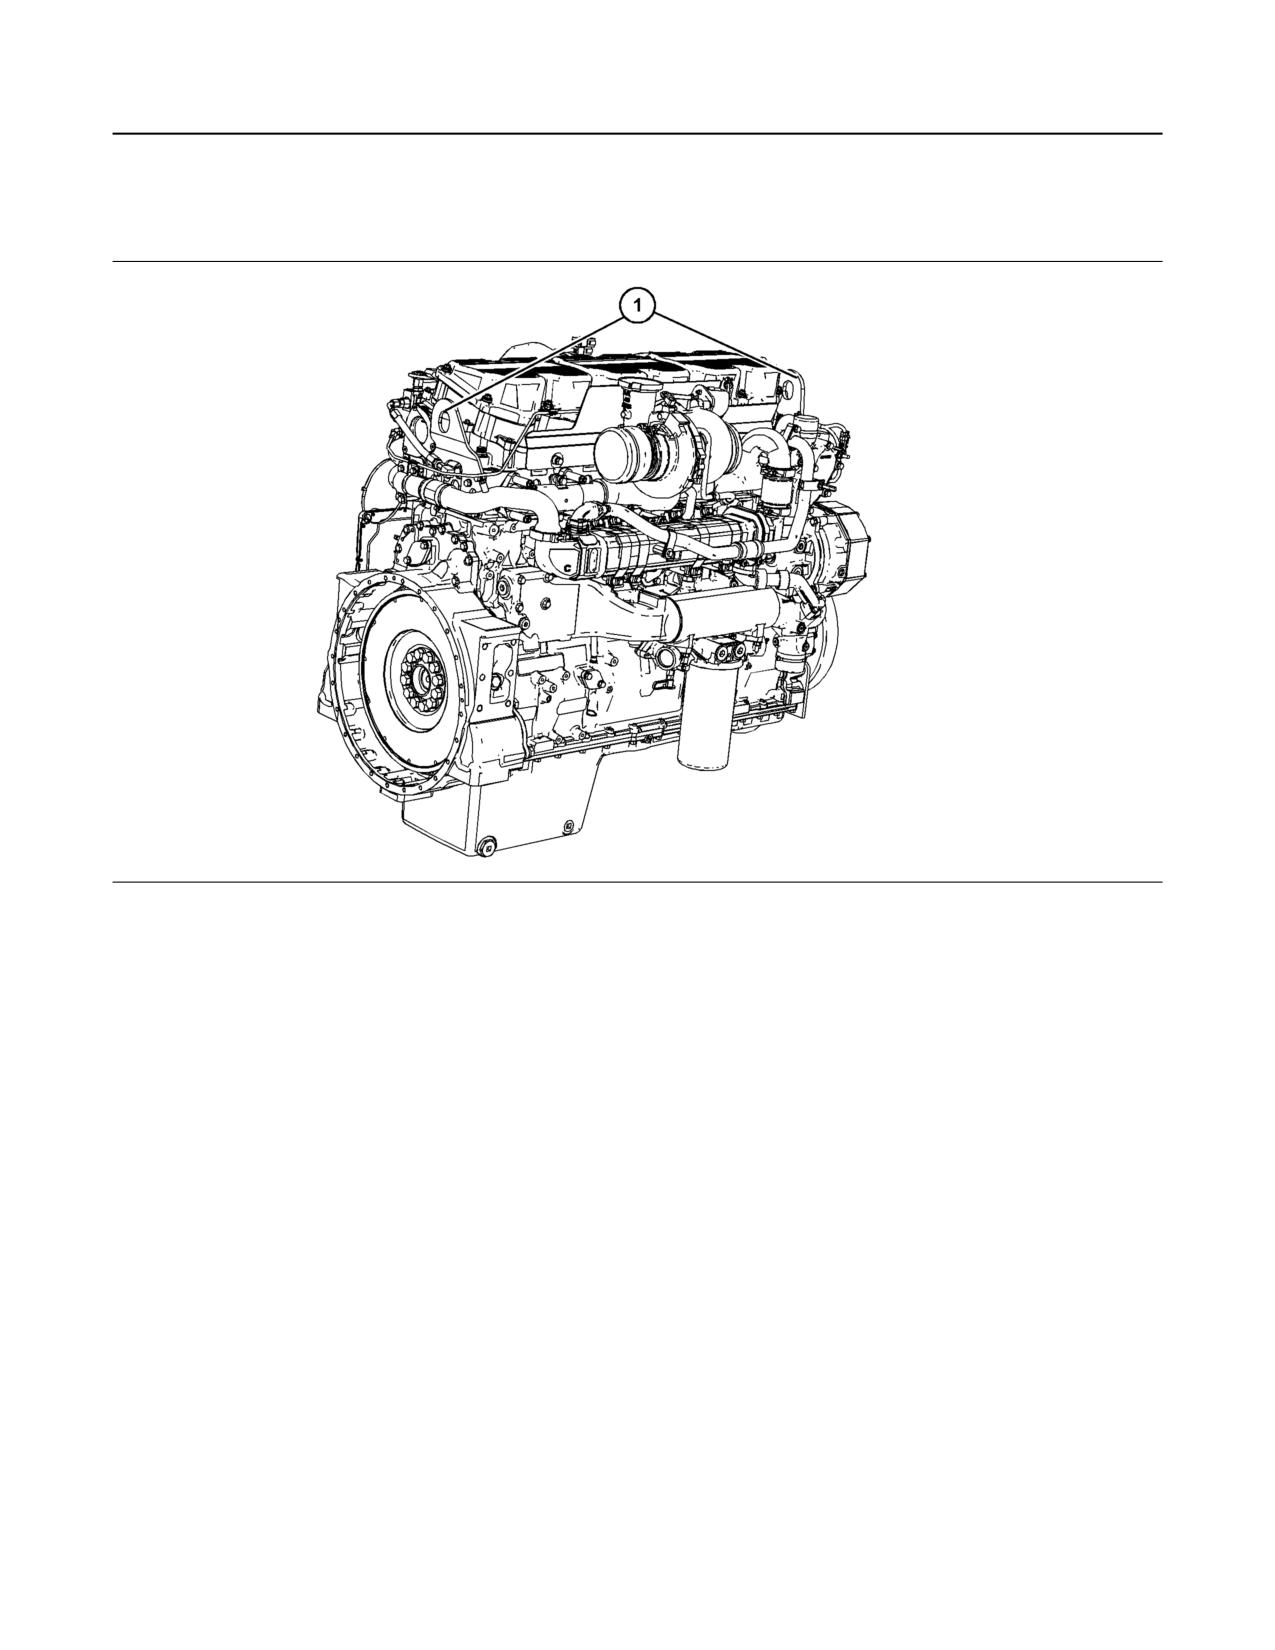
Product Lifting
Illustration 25
g00103219
NOTICE
Always inspect lifting eyebolts and all other lifting
equipment for damage before performing any lifting.
Never bend the eyebolts and the brackets. Never
perform product lifting if components are damaged.
Only load the eyebolts and the brackets under ten-
sion. Remember that the capacity of an eyebolt is
less as the angle between the supporting members
and the object becomes less than 90 degrees.
Use a hoist to remove heavy components. Use an
adjustable lifting beam to lift the engine. All
supporting members (chains and cables) should be
parallel to each other. The chains and cables should
be perpendicular to the top of the object that is being
lifted.
Some removals require lifting the fixtures to obtain
proper balance and safety.
To remove the engine ONLY, use the lifting eyes that
are on the engine.
Lifting eyes are designed and installed for the
specific engine arrangement. Alterations to the lifting
eyes and/or the engine make the lifting eyes and the
lifting fixtures obsolete. If alterations are made,
ensure that proper lifting devices are provided.
Consult your Perkins distributor for information
regarding fixtures for proper engine lifting.
M0076814-03
27
Operation Section
Product Lifting
Engine Lifting
Illustration 26
g06129841
Typical example
(1) Engine lifting eyes
Engines with a factory-mounted CEM and radiator (or
combination thereof) can be lifted by the engine lifting
eyes using a certified spreader bar, assuming a less
than 5 degree tilt angle can be maintained. For most
packages,Perkins recommended the spreader bar be
set at 142 cm (56 inch). The lift hook locations
should be approximately 25 mm (1 inch) from
spreader bar stop toward the front of the engine.
28
M0076814-03
Operation Section
Product Storage
Remove any ATAAC lines, air cleaners, or other
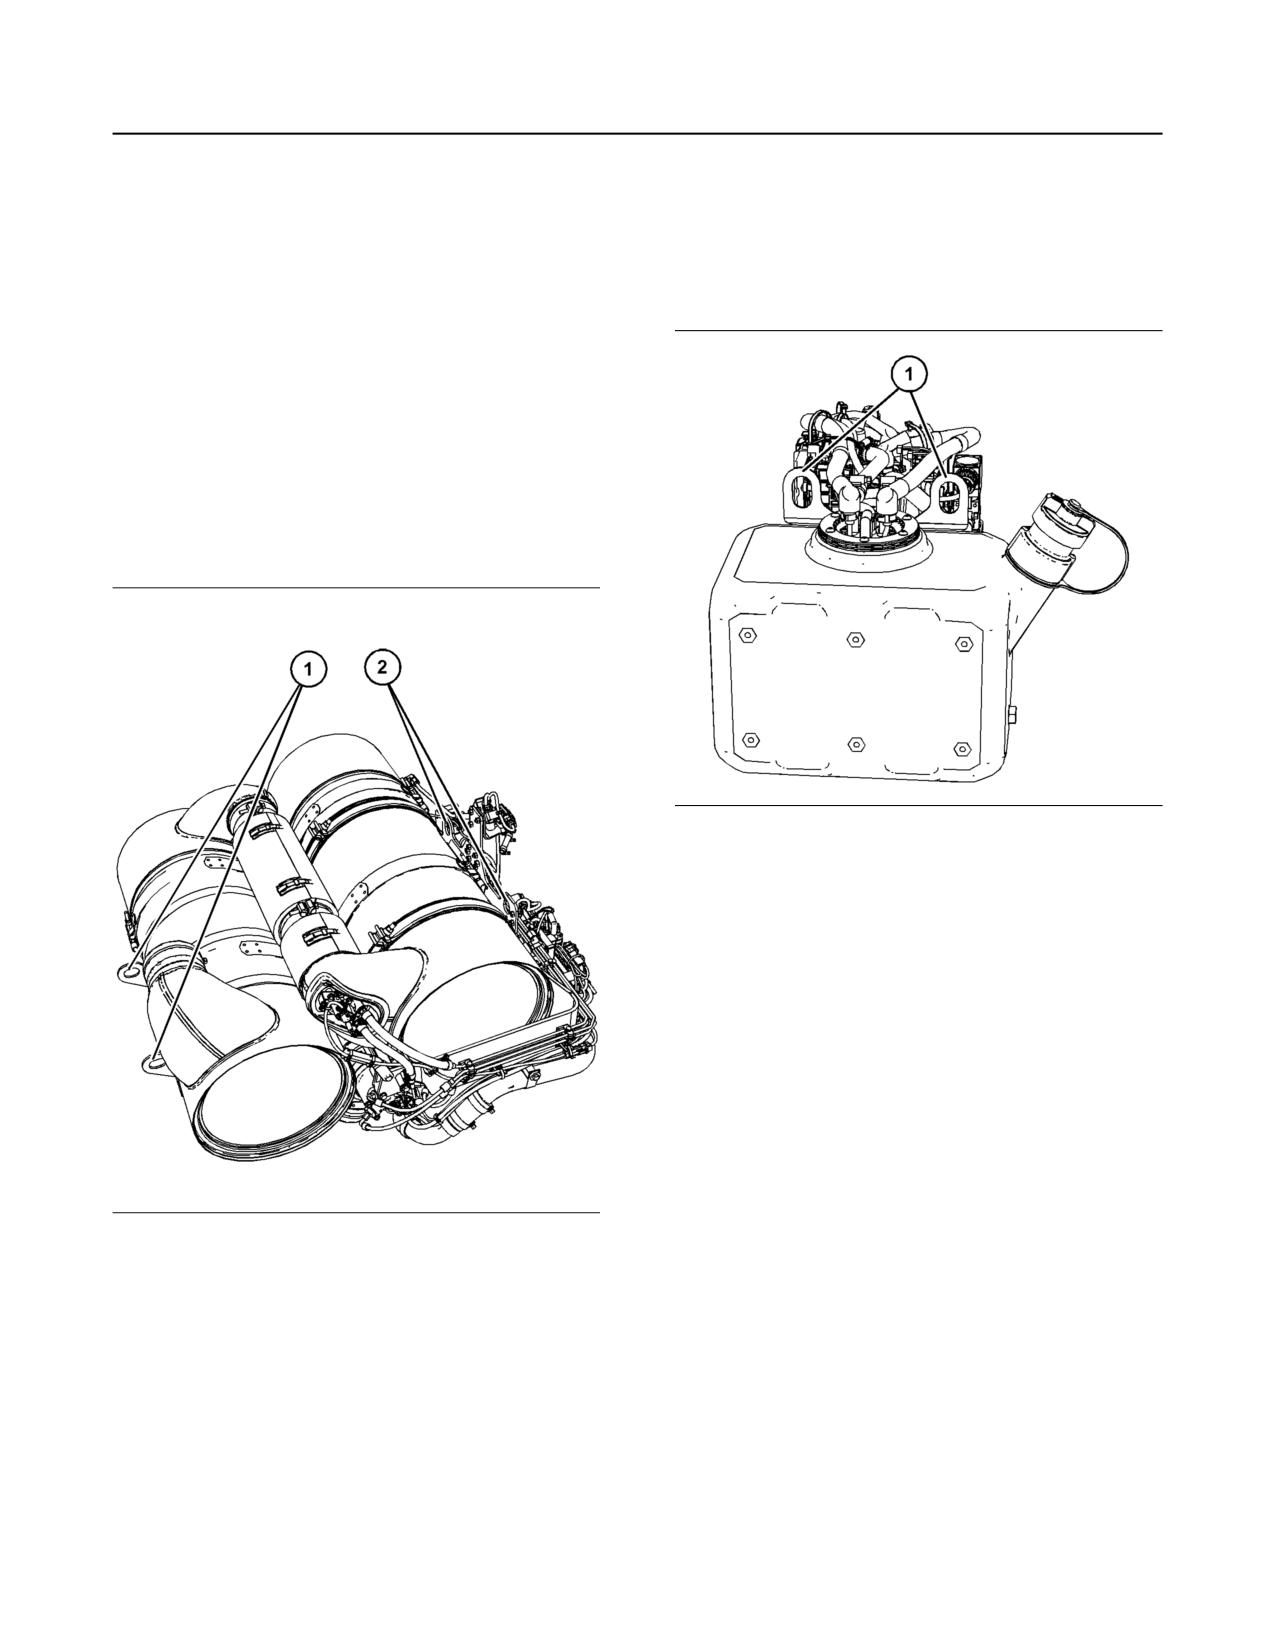
Ensure that all 4 lifting eyes are used when lifting the
attachments that would otherwise interfere with the
CEM. Only use the lifting eyes (1) and lifting eyes (2)
lift chains or other lifting devises. The engine
for lifting the CEM, refer to illustration 27 .
package center of gravity will change depending on
the engine attachments. Adjust the spreader bar and
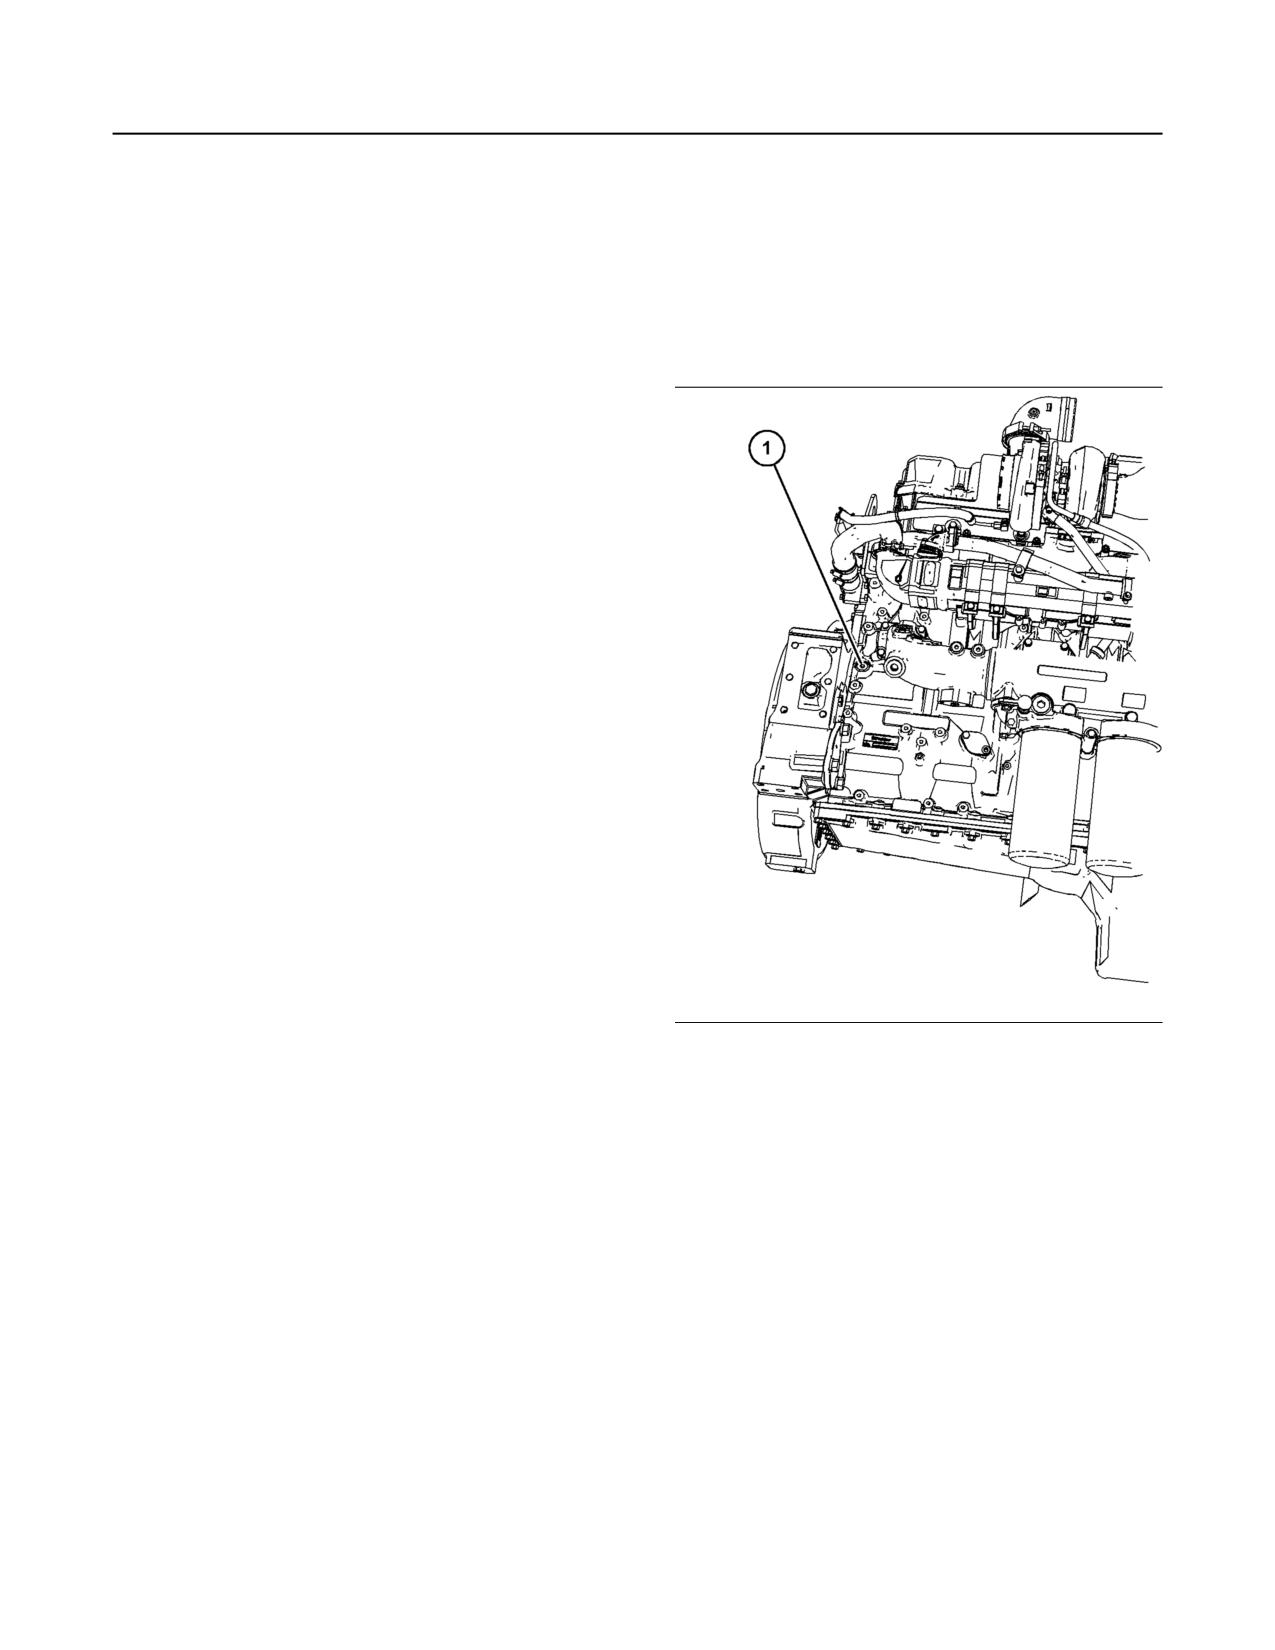
Pump Electronic Tank Unit (PETU)
chains as necessary to maintain a lift within 5
degrees of horizontal in all directions.
Radiator Only
Detach the radiator, and mounting bracket at the
engine front support. Add eyebolts or lifting brackets
to the threaded holes marked for lifting.
Clean Emission Module (CEM)
Lifting
Illustration 28
g06129926
Typical example
(1 PETU lifting eyes
i06605082
Product Storage
(Engine and Aftertreatment)
Your Perkins distributor can help in preparing the
engine for extended storage periods.
Some applications, the engine can be equipped with
delayed engine shutdown. Allow at least 2 minutes
after the engine has stopped before you turn the
battery disconnect switch to OFF. Disconnecting the
Illustration 27
g06042325
battery power too soon will prevent purging of the
Typical example
DEF fluid lines after the engine is shut down. Also,
during the 2 minutes the engine electronic control
(1) CEM lifting eyes
module is active storing information from the engine
(2) CEM lifting eyes
and aftertreatment sensors.
Condition for Storage
An engine can be stored for up to 6 months provided
all the recommendation are adhered to.
M0076814-03
29
Operation Section
Engine and Aftertreatment
Engine
Open the fuel tank drain valve to drain any water
and dirt from the fuel tank. Apply a spray of
1. Clean the engine of any dirt, rust, grease, and oil.
calibration fluid or kerosene at the rate of
Inspect the exterior. Paint areas that contain paint
30 mL per 30 L (1 oz per 7.50 gal US) of fuel tank
damage with a good quality paint.
capacity to prevent rust in the fuel tank. Add
0.15 mL per L (.02 oz per 1 gal US) of commercial
2. Remove dirt from the air cleaners. Check all seals,
biocide such as Biobor JF to the fuel.
gaskets, and the filter element for damage.
Apply a small amount of oil to the threads on the
3. Apply lubricant to all points in this Operation and
fuel tank filler neck and install the cap. Seal all
Maintenance Manual, “Maintenance Interval
openings to the tank to prevent evaporation of the
Schedule”.
fuel and as a preservative.
4. Drain the crankcase oil. Replace the crankcase oil
9. Remove the fuel injectors. Apply 30 mL (1 oz) of
and change the oil filters. For the proper
the mixture of oils (50 percent VCI oil and 50
procedure, refer to this Operation and
percent engine oil) into each cylinder.
Maintenance Manual.
Use a bar or a turning tool to turn over the engine
5. Add Volatile Corrosion Inhibitor (VCI) oil to the
slowly. This procedure puts the oil on the cylinder
crankcase oil. The volume of VCI oil in the
walls. Install all fuel injectors and tighten to the
crankcase oil should be 3 to 4 percent.
correct torque. Refer to Disassembly and
Note: If the engine crankcase is full, drain enough
Assembly Manual for more information.
engine oil so the mixture can be added.
10. Spray a thin amount of a mixture of 50 percent
VCI oil and 50 percent engine oil onto the following
6. Remove the air filter elements. Turn the engine at
components: flywheel, ring gear teeth, and starter
cranking speed with the throttle control in FUEL
pinion. Install the covers to prevent evaporation of
OFF position. Use a sprayer to add a mixture of 50
the vapors from the VCI oil.
percent VCI oil and 50 percent engine oil into the
air inlet or turbocharger inlet.
11. Apply a heavy amount of Multipurpose Grease to
all outside parts that move, such as rod threads,
Note: The mixture of VCI oil can be added to the inlet
ball joints, linkage.
by removing the plug for checking turbocharger boost
pressure. The minimum application rate for the VCI
Note: Install all covers. Ensure that tape has been
oil mixture is 5.5 mL per L (3 oz per 1000 cu in) of
installed over all openings, air inlets, exhaust
engine displacement.
openings, the flywheel housing, the crankcase
breathers, the dipstick tubes.
7. Use a sprayer to apply a mixture of 50 percent VCI
oil and 50 percent crankcase oil into the exhaust
Ensure that all covers are airtight and
openings. The minimum application rate for the oil
weatherproof. Use a waterproof weather resistant
mixture is 5.5 mL per L (3 oz per 1000 cu in) of
tape such as Kendall No. 231 or an equivalent. Do
engine displacement. Seal the exhaust pipe and
not use duct tape. Duct tape will only seal for a
seal any drain holes in the muffler.
short time.
8. Remove the fuel from the secondary fuel filter
12. Under most conditions, removing the batteries is
housing. Alternately, empty and reinstall the spin-
the best procedure. As an alternative, place the
on fuel filter element to remove any dirt and water.
batteries in storage. As needed, periodically
Drain any sleeve metering fuel pump.
charge the batteries whilst the batteries are in
Clean the primary fuel filter. Fill with calibration
storage.
fluid or kerosene. Install the primary fuel filter and
If the batteries are not removed, wash the tops of
operate the priming pump. This procedure will
the batteries until the tops are clean. Apply an
send clean oil to the secondary filter and the
electrical charge to the batteries to obtain a
engine.
specific gravity of 1.225.
Disconnect the battery terminals. Place a plastic
cover over the batteries.
13. Remove the drive belts from the engine
30
M0076814-03
Operation Section
Engine and Aftertreatment
14. Place a waterproof cover over the engine. Ensure
6. Use a bar or a turning tool to turn the engine in the
that the engine cover is secure. The cover should
normal direction of rotation. The procedure
be loose enough to allow air to circulate around
ensures that no hydraulic locks or resistance exist.
the engine to prevent damage from condensation.
7. Before starting the engine, remove the valve cover
15. Attach a tag with the storage date to the engine.
or covers. Put a large amount of engine oil on the
camshaft, cam followers, and valve mechanism to
16. Remove the waterproof cover at 2 month or 3-
prevent damage to the mechanism.
month intervals to check the engine for corrosion.
If the engine has signs of corrosion, repeat the
protection procedure.
Coolant System
Completely fill the cooling system before storage.
Refer to this Operation and Maintenance Manual,
“Fluid Recommendations” for more information about
coolants.
Aftertreatment
The engine must be allowed to perform a Diesel
Exhaust Fluid (DEF) purge before the battery
disconnect switch is turned off. Some applications,
the engine can be equipped with delayed engine
shutdown. Allow 2 minutes after the engine has
stopped before disconnecting the battery disconnect
switch.
The exhaust outlet of the aftertreatment must be
capped. To prevent damage to the exhaust outlet
connection during storage, the weight of the CEM
must not act on the exhaust outlet.
1. Ensure normal engine shutdown, allow the DEF to
be purged. Do not disconnect the battery
disconnect switch, allow 2 minutes after key off
before disconnection.
Illustration 29
g06042459
2. Fill the tank with DEF that meets all the
Typical example
requirement defined in ISO 22241-1.
(1) Plug
3. Ensure that all DEF lines and electrical connection
are connected prior to prevent crystal from
8. If an engine is stored for more than 1 year, Perkins
forming.
recommends Pre lubrication of the engine to avoid
dry starting. Use a suitable pump to put engine oil
4. Ensure that the DEF filler cap is correctly installed.
into the engine oil system.
Remove Engine from Storage
The pump will need to create a minimum pressure
within the engine of 0.25 bar (3.6 psi). This
1. Remove all outside protective covers.
pressure is needed for 15 seconds to lubricate the
internal surfaces.
2. Change the oil and filters.
3. Check the condition of the fan and alternator belts.
Replace the belts, if necessary. Refer to this
Operation and Maintenance Manual, “Belts -
Inspect/Adjust/Replace” for the correct procedure.
4. Replace the fuel filter elements.
5. Remove the plastic covers from the air cleaner
elements.
M0076814-03
31
Operation Section
Engine and Aftertreatment
Remove one of the plugs shown in illustration 29
4. If the fault continues to stay active, refer to
to connect to the engine oil system. The
Troubleshooting for more information.
connection required is 9/16" x 18 tpi. Ensure that
Table 2
the correct oil specification is used, refer to this
DEF Storage
Operation and Maintenance Manual, “Fluid
Recommendations” for more information. After the
Temperature
Duration
engine internal surfaces have been lubricated,
10° C (50° F)
36 months
remove connector and install plug (1). Tighten plug
25° C (77° F)
18 months
to a torque of 30 N·m (265 lb in). Perkins
recommends that the procedure must be
30° C (86° F)
12 months
performed in a minimum ambient temperature of
35° C (95° F)(1)
6 months
10° C (50° F).
(1) At 35° C, significant degradation can occur. Check every batch
9. Check the condition of all rubber hoses. Replace
before use.
any worn hoses. Replace any damaged hoses.
10. Before start-up, test the cooling system for a 3
percent to a 6 percent concentration of coolant
conditioner. Add liquid coolant conditioner or a
coolant conditioner element, if equipped.
Test the coolant mixture for proper nitrite level. If
necessary, adjust the coolant mixture.
Prime the engine with clean diesel fuel before
starting.
11. Ensure that the cooling system is clean. Ensure
that the system is full. Ensure that the system has
the correct amount of supplemental cooling
system conditioner.
12. On the first day of operation, check the entire
engine several times for leaks and correct
operation.
Remove Aftertreatment from Storage
DEF has a limited life, refer to table 2 for the time and
temperature range. DEF that is outside this range
MUST be replaced.
On removal from storage the DEF quality in the tank
must be tested with a refractometer. The DEF in the
tank must meet the requirements defined in ISO
22241-1 and comply with table 2 .
1. If necessary, drain the tank and fill with DEF that
meets ISO 22241-1.
2. Replace the DEF filter, refer to this Operation, and
Maintenance Manual, “Diesel Exhaust Fluid Filter-
Clean/Replace”.
3. Ensure that the drive belt is correctly installed.
Ensure that all engine coolant and engine oil has
the correct specification and grade. Ensure that
the coolant and the engine oil are at the correct
level. Start the engine. If a fault becomes active
turn off the engine, allow 2 minutes for the DEF
system to purge, then restart the engine.
32
M0076814-03
Operation Section
Features and Controls
Note: Some items have been removed from engine
Features and Controls
for clarity.
i06163203
Monitoring System
The monitoring system is designed to alert the
operator to an immediate problem with any of the
engine systems that are monitored. The monitoring
system is also designed to alert the operator to an
impending problem with any of the engine systems
that are monitored. The monitoring system can be
accessed by the electronic service tool. For more
information on the electronic service tool, refer to
Troubleshooting , “Electronic Tools”.
Monitoring System Indicators
Engine Malfunction - This indicator
illuminates when there is a fault with the
engine or after treatment system.
Engine STOP - This indicator will
illuminate solid when a level 3 warning
fault has been detected by the
monitoring system.
Diesel Particulate Filter (DPF) - This
indicator will illuminate in order to show
that a regeneration is needed.
Regeneration Active - This indicator will
illuminate in order to show that a
regeneration is active and exhaust
temperatures are elevated.
Diesel Exhaust Fluid (DEF) Level - This
gauge shows the amount of DEF in the
DEF tank.
Emission Malfunction Indicator - This
indicator will illuminate when an
emissions system related to DEF or SCR
has failed. Refer to Operation and Maintenance
Manual, “Selective Catalytic Reduction Warning
System” for more information.
i06825072
Sensors and Electrical
Components
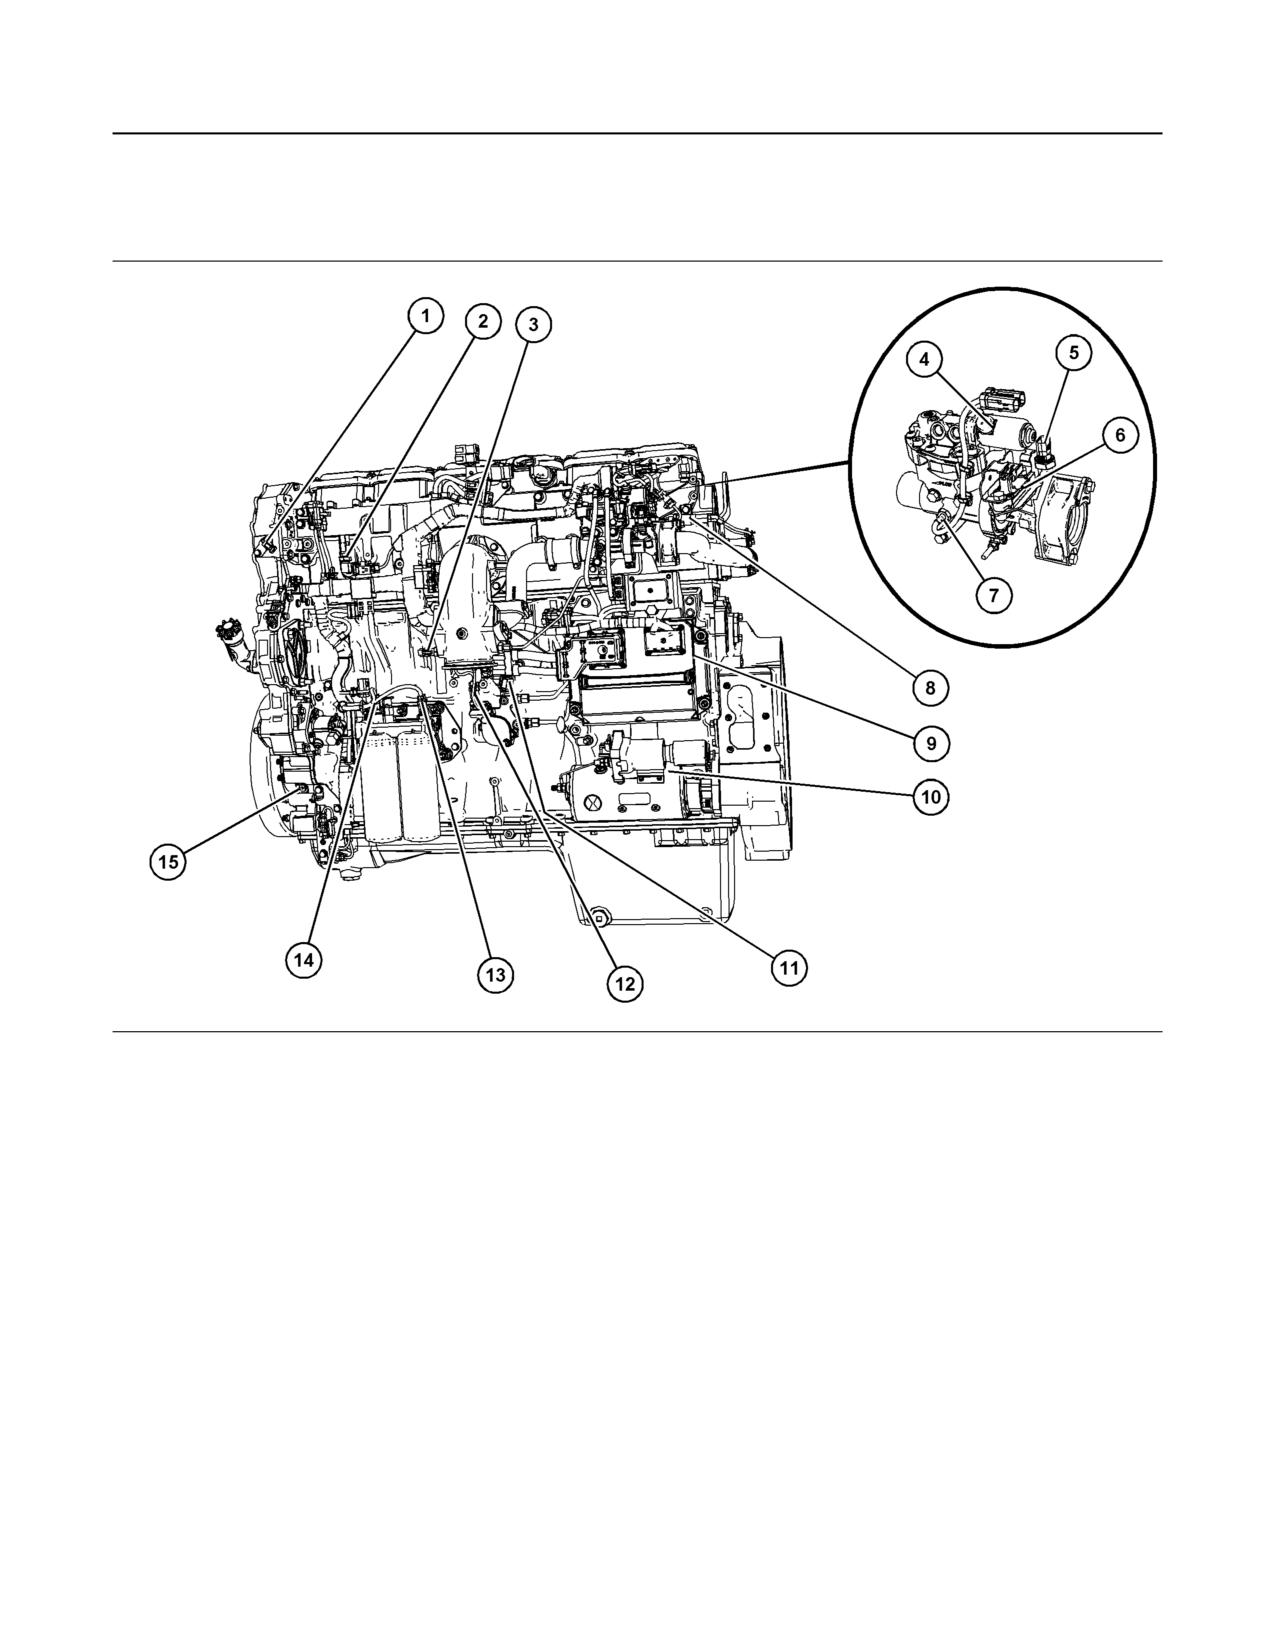
The illustrations within the following sections are
typical location of the sensors or electrical
components for an industrial engine. Specific
engines may appear different due to differences in
applications.
M0076814-03
33
Operation Section
Sensors and Electrical Components
Engine
Illustration 30
g06130474
Typical example
(1) Secondary Speed/timing sensor
(6) NRS differential pressure sensor
(11) Oil pressure sensor
(2) Boost pressure sensor
(7) NRS temperature sensor
(12) Barometer pressure sensor
(3) Inlet air temperature sensor
(8) Air control solenoid valve
(13) Fuel pressure sensor
(4) NOx Reduction System (NRS) solenoid
(9) Electronic control module
(14) Fuel temperature sensor
(5) NRS pressure sensor
(10) Starter solenoid and starting motor
(15) Primary speed/timing sensor
34
M0076814-03
Operation Section
Sensors and Electrical Components
Illustration 31
g06130477
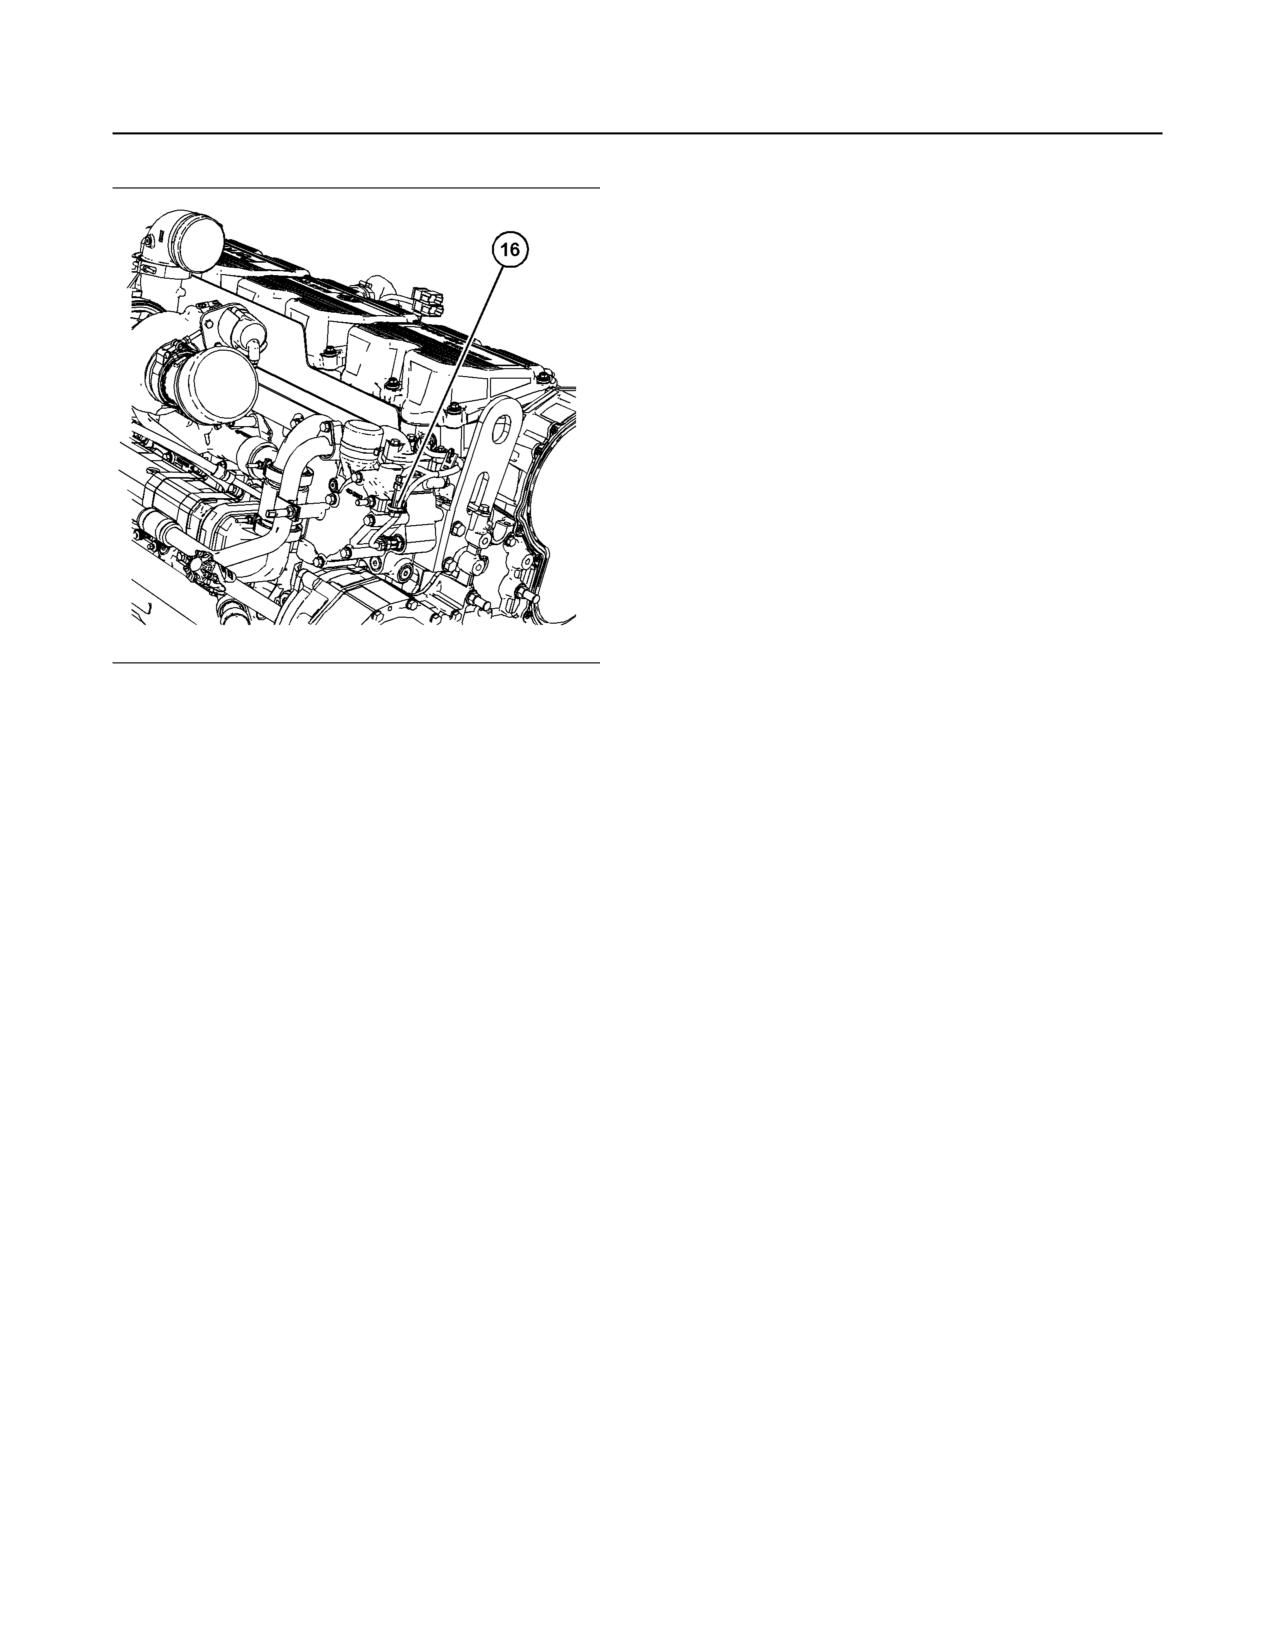
Typical example
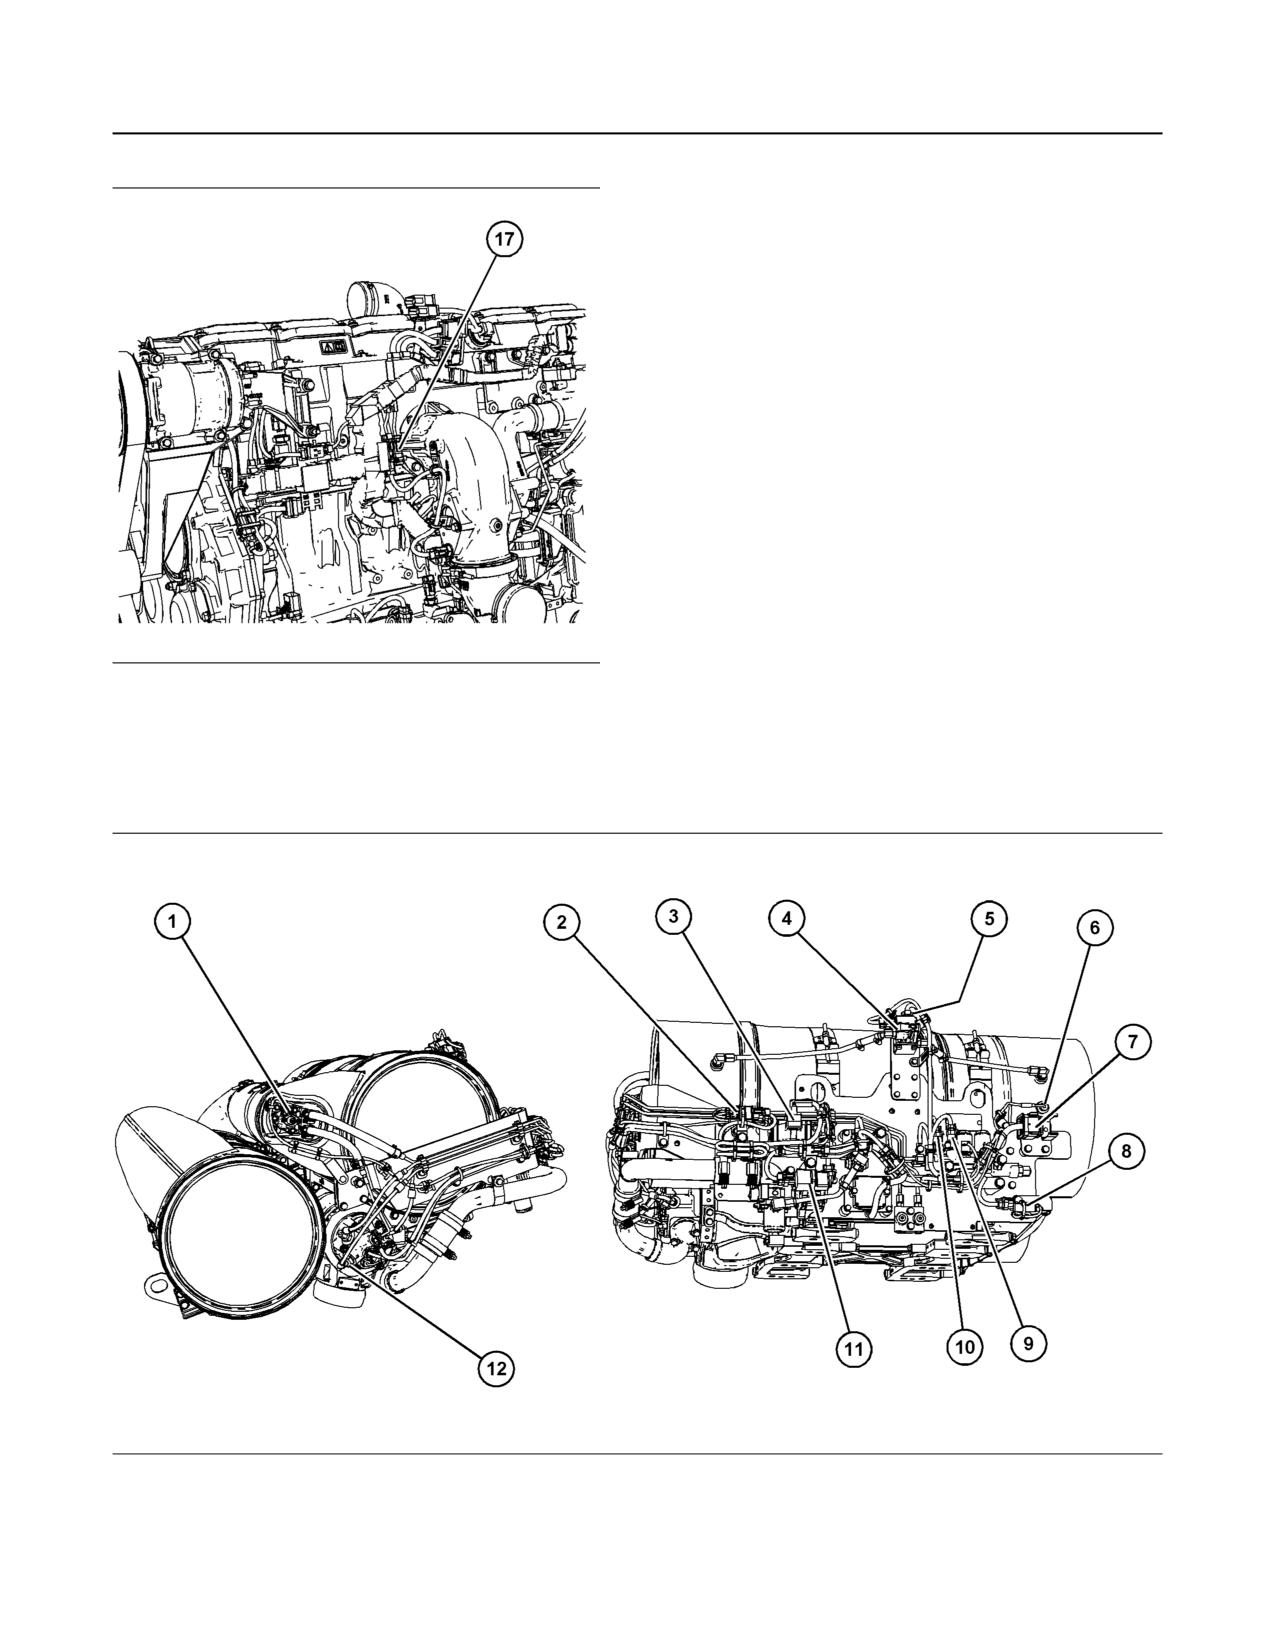
(16) Coolant temperature sensor
M0076814-03
35
Operation Section
Sensors and Electrical Components
Illustration 32
g06130480
Typical example
(17) Location for Top Dead Center (TDC) probe
Aftertreatment System
Illustration 33
g06048751
Typical example
(1) Diesel Exhaust Fluid (DEF) injector
(3) Coil for spark plug
(2) Temperature sensor
36
M0076814-03
Operation Section
Sensors and Electrical Components
(4) Diesel Particulate Filter (DPF) differential
(7) 40-Pin connector
(10) Fuel main pressure sensor
pressure sensor
(8) Selective Catalytic Reduction (SCR)
(11) Identification Module
(5) DPF pressure sensor
temperature sensor
(12) Temperature sender for Aftertreatment
(6) Temperature sender
(9) Fuel pilot pressure sensor
Regeneration Device (ARD)
Pump Electronic Tank Unit (PETU)
Illustration 34
g06130516
Typical example
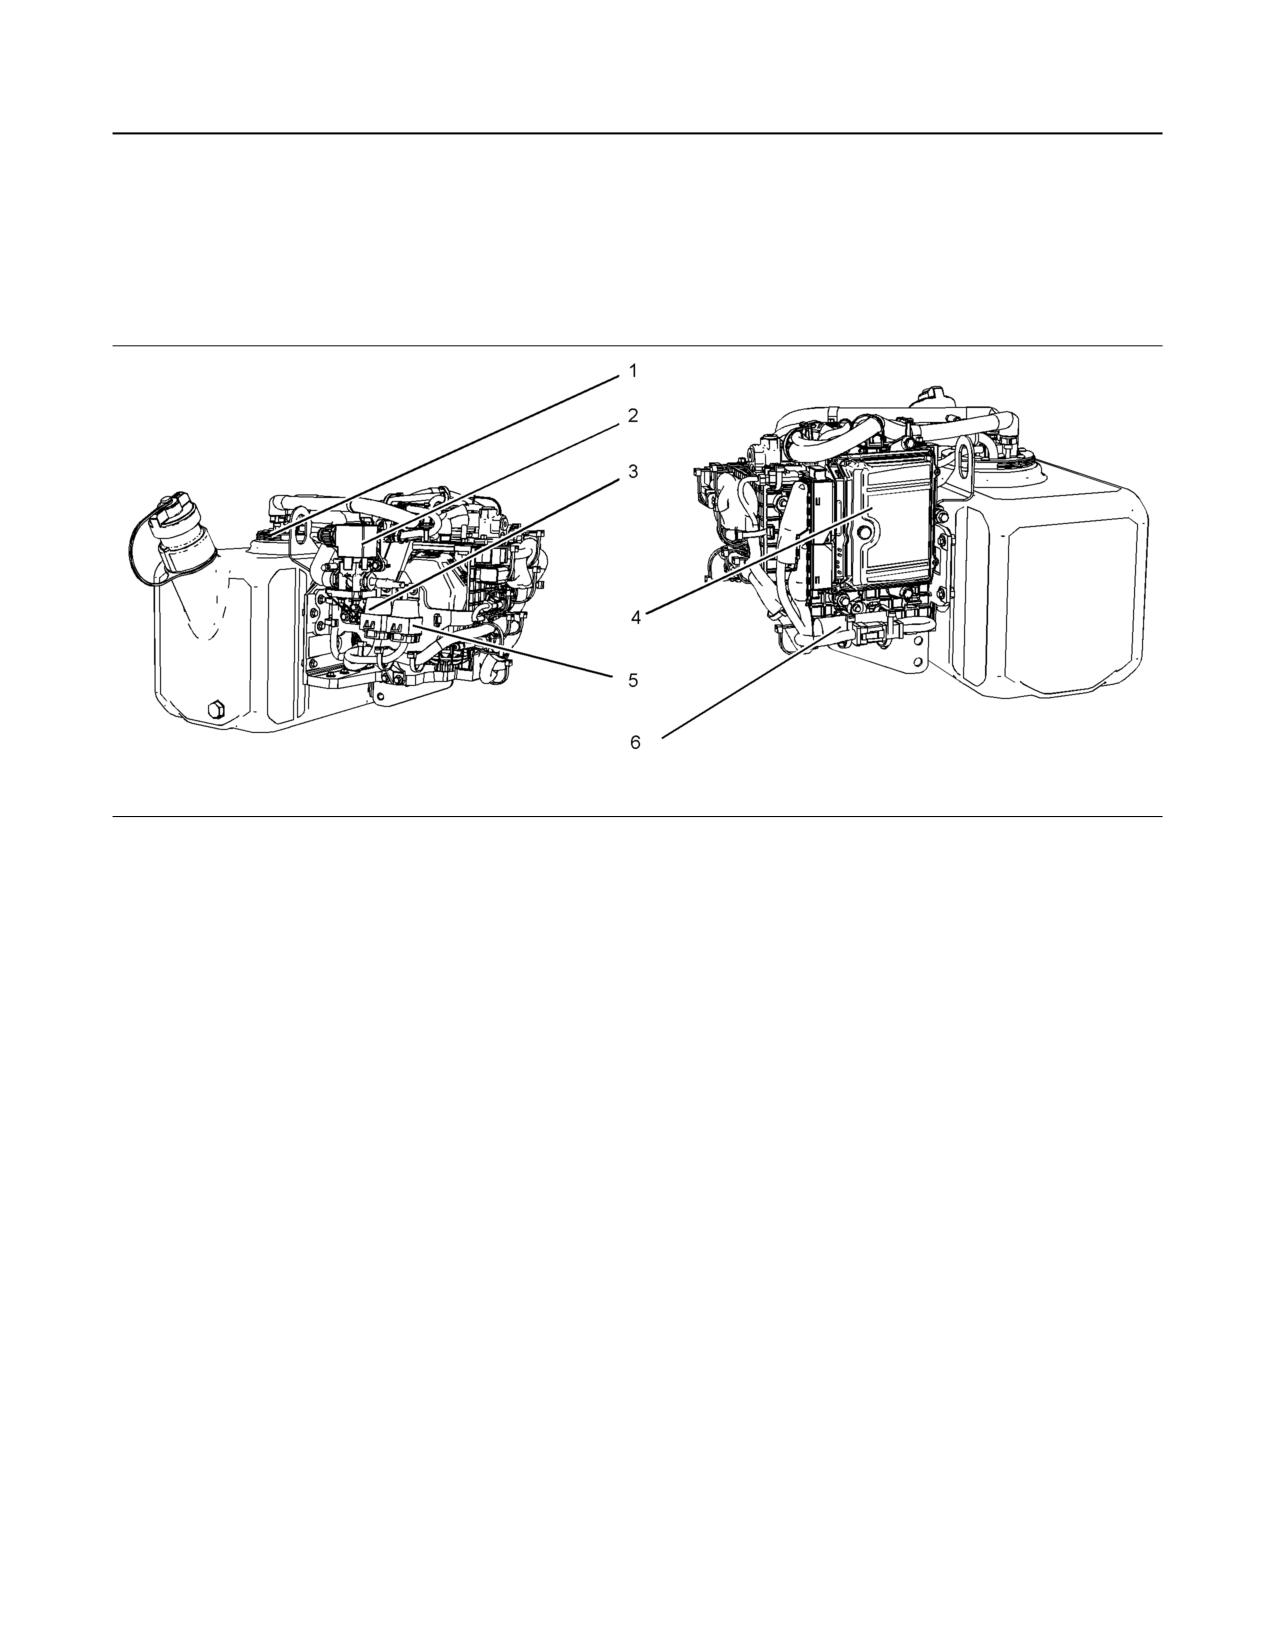
(1) DEF header
(3) Customer Connections
(5) Relays
(2) Coolant Diverter Valve
(4) Dosing Control Module
(6) Voltage Limiting Protection Module
M0076814-03
37
Operation Section
Battery Disconnect Switch
DEF header (1) contains level sensor temperature
The battery disconnect switch and the engine start
sensor and quality sensor.
switch perform different functions. The entire
electrical system is disabled when you turn the
battery disconnect switch to the OFF position. The
i05422613
battery remains connected to the electrical system
when you turn the engine start switch to the OFF
Battery Disconnect Switch
position.
(If Equipped)
Turn the battery disconnect switch to the OFF
position and remove the key when you service the
electrical system or any other engine components.
Turn the battery disconnect switch to the OFF
position and remove the disconnect switch key after
you operate the engine. This will prevent the battery
from being discharged. The following problems can
cause battery discharge:
• short circuits
• current draw via some components
• vandalism
i07507902
Selective Catalytic Reduction
Illustration 35
g03422039
Warning System
NOTICE
Do not turn off the battery disconnect switch until the
The selective catalytic reduction (SCR system is a
indicator lamp has turned off. If the switch is turned
system used to reduce NOx emissions from the
off when the indicator lamp is illuminated the Diesel
engine. Diesel exhaust fluid (DEF is pumped from
Exhaust Fluid (DEF) system will not purge the DEF. If
the DEF tank and is sprayed into the exhaust stream.
the DEF does not purge, DEF could freeze and dam-
The DEF reacts with the SCR catalyst to reduce NOx
age the pump and lines.
and leaves a nitrogen and water vapor. The Exhaust
Gas Recirculation (EGR system cools, measures,
and introduces recalculated exhaust gas into the
NOTICE
intake manifold to aid in NOx reduction.
Never move the battery disconnect switch to the OFF
position while the engine is operating. Serious dam-
The engine and emissions control system shall be
age to the electrical system could result.
operated, used, and maintained in accordance with
the instructions provided to the end user to maintain
the emissions performance of the engine within the
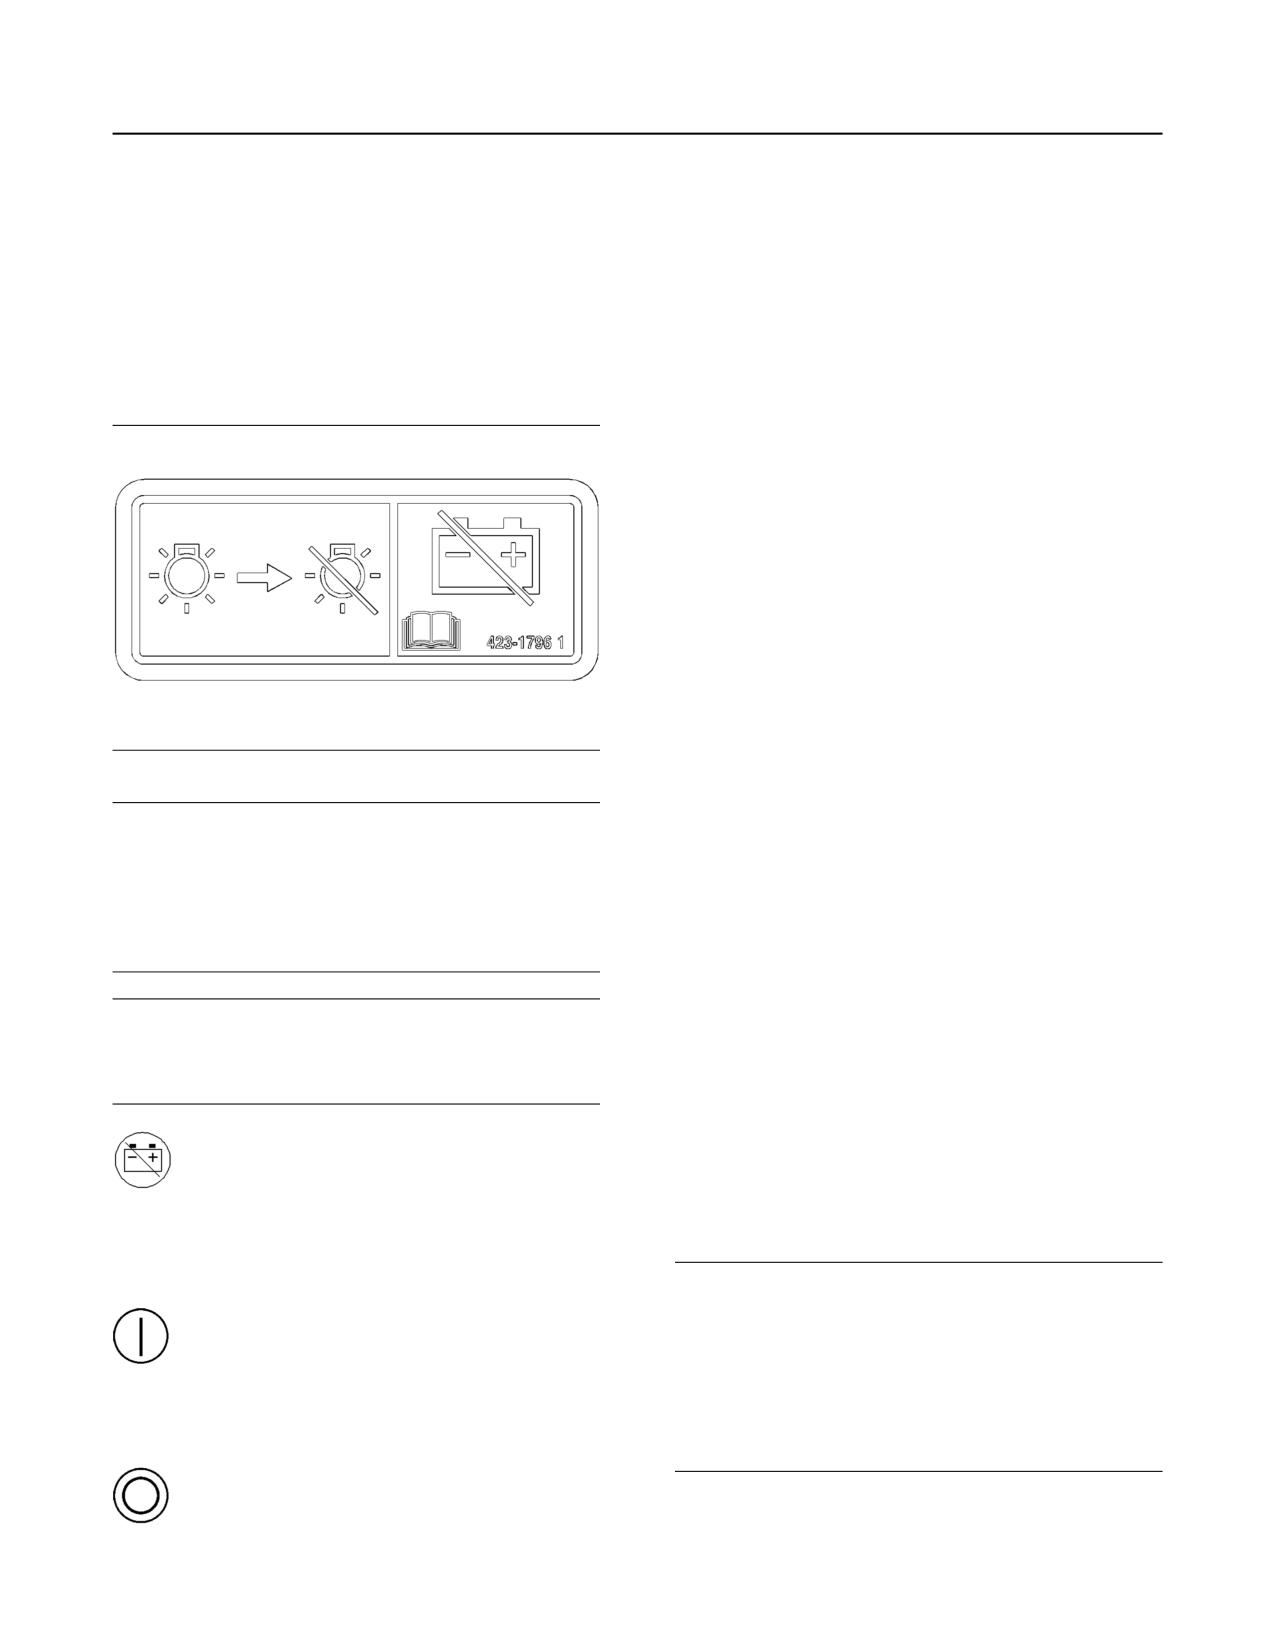
Battery Disconnect Switch - The battery
requirements applicable to the category of the
disconnect switch can be used in order
engine. No deliberate tampering with, or misuse of
to disconnect the battery from the
the engine emissions control system should take
engines electrical system. The key must be
place. In particular regarding deactivating, or not
inserted into the battery disconnect switch
maintaining the SCR system.
before the battery disconnect switch can be
turned.
NOTICE
Stopping the engine immediately after the engine has
ON - To activate the electrical system,
been working under load can result in overheating of
insert the disconnect switch key and
SCR components.
turn the battery disconnect switch
Refer to the Operation and Maintenance Manual,
clockwise. The battery disconnect switch must
“Engine Stopping” procedure to allow the engine to
be turned to the ON position before you start the
cool and to prevent excessive temperatures in the
engine.
turbocharger housing and the DEF injector.
OFF - To deactivate the electrical
system, turn the battery disconnect
switch counterclockwise to the OFF
position.
38
M0076814-03
Operation Section
Selective Catalytic Reduction Warning System
Safe Harbor Mode (European Union) - Safe
NOTICE
Harbor Mode is a 30 minute engine run time period
Allow at least 2 minutes after shutting down the en-
that the engine can be operated with full power after
gine before you turn the battery disconnect switch to
reaching a level 3 inducement. Once in level 3
OFF. Disconnecting the battery power too soon will
inducement, the operator can perform a key cycle
prevent purging of the DEF lines after the engine is
and the engine will enter Safe Harbor Mode. Safe
shut down.
Harbor Mode can only be implemented up to three
times.
Definitions
NOTICE
Observe the following definitions.
It is essential to take prompt action to rectify any in-
correct operation, use, or maintenance of the emis-
Self-correct - Fault condition no longer exists. An
sions SCR control system in accordance with the
active fault code will no longer be active.
rectification measures indicated by the warnings
listed on the following pages.
Notification - Action taken by the system to alert the
operator of pending Inducement.
Inducement - Engine derates, vehicle speed limits,
or other actions intended to prompt the operator to
repair or maintain the emission control system.
Inducement Categories - The Inducements are
separated into categories. DEF Level has its own
inducement fault codes and is separate from the
other inducement categories. Whilst DEF level
inducements are simplybased on the DEF level, the
other inducement categories are based on escalating
time. The escalating time inducements will always
have an associated fault code along with the
inducement fault code. The associated fault is the
root cause. The escalating time inducement fault
code is just an indicator of what level of inducement
the engine is in and how much time remains until the
next level of inducement. There are three inducement
Illustration 36
g03676102
categories (two for European Union) that will trigger
DEF Level Normal
an escalating time inducement fault code.
Inducement Strategy for DEF Level
Note: The associated codes for each of the
(European Union)
escalating time categories can be found in the
Troubleshooting Guide under SCR Warning System
Problem.
First occurrence - When an escalating time
inducement fault code becomes active for the first
time.
Repeat occurrence - When any escalating time
inducement fault code becomes active again within
40 hours of the first occurrence. Engine must run for
40 hours without tripping any escalating time
inducement fault before it can get back on first
occurrence times.
Safe Harbor Mode (Worldwide) - Safe Harbor
Mode is a 20 minute engine run time period that the
engine can be operated with full power after reaching
a level 3 inducement. Once in level 3 inducement, the
Illustration 37
g03676107
operator can perform a key cycle and the engine will
enter Safe Harbor Mode. Safe Harbor Mode can only
If the DEF level falls below 20%, an amber indicator
be implemented once. Safe Harbor Mode is not
will illuminate next to the DEF level gauge on the
allowed for DEF level inducements with Worldwide
dash. To avoid further inducements, turn the key to
configuration.
the OFF position and add DEF to the DEF tank.
M0076814-03
39
Operation Section
Selective Catalytic Reduction Warning System
Illustration 38
g03676111
Illustration 40
g03676127
If the DEF level falls below 13.5%, a level 1
Reduced Time
inducement event will occur. The check engine lamp
and the emissions malfunction indicator lamp will
If the ECM is configured to “Reduced Time” and the
illuminate. The amber indicator next to the DEF level
DEF level is 0%, the engine will be in level 3
gauge on the dash will remain lit.
inducement. The check engine lamp and emissions
malfunction indicator lamp will illuminate and flash at
a fast rate. A red stop lamp will illuminate solid. The
DEF level gauge amber lamp will remain lit. The
engine will have a 100% derate and be limited to
1000 rpm or low idle, whichever is greater. If the final
inducement action in ET is set to “Idle Down” , then
the engine will continue to idle at derated condition. If
set to “Shutdown” , engine will shut down after 5
minutes. Safe Harbor Mode is allowed for three key
cycles. After Safe Harbor Mode is completed, the
engine will return to idle or shut down. If in shutdown
configuration, the engine may be restarted, but will
only run for 5 minutes at derated condition before
shutting down again. This action will continue until
the issue is resolved.
Illustration 39
g03676123
Note: Turn the key to the OFF position and add DEF
to the DEF tank to reset the DEF level inducement.
Reduced Performance
Inducement Strategy for Escalating
When the ECM is configured to "Reduced
Performance" and the DEF level is below 1%, the
Time Inducement Faults (European
engine will be in level 2 inducement. The check
engine lamp and emissions malfunction indicator
Union)
lamp will illuminate and flash slowly. The DEF level
gauge amber lamp will remain lit. The engine will
have a 50% derate. When the DEF tank has been
emptied of all DEF, the engine will have a 100%
derate and be limited to 1000 rpm or low idle,
whichever is greater. No further inducement action
will occur for "Reduced Performance" configuration.
Safe Harbor Mode is allowed for three key cycles.
Reduced Time
Illustration 41
g03677836
When the ECM is configured to “Reduced Time” and
the DEF level is below 7.5%, the engine will be in
Reduced Performance
level 2 inducement. The check engine lamp and
emissions malfunction indicator lamp will illuminate
and flash slowly. The DEF level gauge amber lamp
will remain lit.
40
M0076814-03
Operation Section
Selective Catalytic Reduction Warning System
The check engine and emissions malfunction
If the inducement is a result of a category 2 fault, then
indicator lamp will illuminate for a level 1 inducement-
a level 2 inducement will occur for a duration of 5
related fault. There are two inducement categories. If
hours. For repeat occurrence, a category 2 level 2
the inducement is a result of a category 1 fault, then a
inducement fault will occur for a duration of 1 hour.
level 1 inducement will occur for a duration of 36
hours. If the inducement is a result of a category 2
fault, then a level 1 inducement will occur for a
duration of 10 hours. There is no repeat occurrence
for level 1 faults.
Reduced Time
The check engine and emissions malfunction
indicator lamp will illuminate for a level 1 inducement-
Illustration 43
g03676141
related fault. There are two inducement categories. If
the inducement is a result of a category 1 fault, then a
Reduced Time
level 1 inducement will occur for a duration of 18
hours. If the inducement is a result of a category 2
If configured to “Reduced Time” and a fault condition
fault, then a level 1 inducement will occur for a
exists for the entire duration of inducement level 2,
duration of 5 hours. There is no repeat occurrence for
the strategy advances to inducement level 3.
level 1 faults.
Inducement level 3 has the same actions for all
categories. The check engine lamp and emissions
malfunction indicator lamp will flash at a fast rate. A
red stop lamp will also illuminate solid. The engine
will have a 100% derate and be limited to 1000 rpm
or low idle, whichever is greater. If the final
inducement action in ET is set to “Idle Down” , then
engine will continue to idle at derated condition. If set
to “Shutdown” , engine will shut down after 5 minutes.
A key cycle will allow safe harbor mode to initiate.
Illustration 42
g03676138
Safe harbor is allowed up to three times. After safe
harbor, the engine will be in level 3 final inducement.
Reduced Performance
If set to “Shutdown” , the engine may be restarted,
but will only run for 5 minutes at derated condition
If a fault condition exists for the entire duration of
before shutting down again. This action will continue
inducement level 1, the strategy advances to
until the issue is resolved.
inducement level 2. The check engine lamp and the
emissions malfunction indicator lamp will illuminate
Note: Contact your Perkins dealer for repairs if a fault
and flash slowly. If the inducement is a result of a
occurs.
category 1 fault, then a level 2 inducement will occur
for a duration of 64 hours for first occurrence. For
repeat occurrence, a category 1 level 2 inducement
Inducement Strategy for DEF Level
fault will occur for a duration of 5 hours.
(Worldwide)
If the inducement is a result of a category 2 fault, then
a level 2 inducement will occur for a duration of 10
hours. For repeat occurrence, a category 2 level 2
inducement fault will occur for a duration of 2 hours.
The engine will have a 50% derate. If the fault is not
corrected before the inducement duration ends, the
engine will become 100% derated and be limited to
1000 rpm or low idle, whichever is greater. No further
inducements will occur for “Reduced Performance”
configuration. Safe Harbor Mode is allowed for three
key cycles.
Reduced Time
If a fault condition exists for the entire duration of
inducement level 1, the strategy advances to
inducement level 2. The check engine lamp and the
emissions malfunction indicator lamp will illuminate
Illustration 44
g03676164
and flash slowly. If the inducement is a result of a
category 1 fault, then a level 2 inducement will occur
If the DEF level falls below 20%, an amber indicator
for a duration of 18 hours for first occurrence. For
will illuminate next to the DEF level gauge on the
repeat occurrence, a category 1 level 2 inducement
dash. To avoid inducements, turn the key to the OFF
fault will occur for a duration of 108 minutes.
position and add DEF to the DEF tank.
M0076814-03
41
Operation Section
Selective Catalytic Reduction Warning System
Illustration 45
g03676169
Illustration 47
g03676210
If the DEF level falls below 13.5%, a level 1
If the ECM is configured to “Reduced Performance”
inducement event will occur. The check engine lamp
and the DEF tank has been emptied of all DEF, the
and the emissions malfunction indicator lamp will
engine will be in a level 3 final inducement. If the
illuminate. The amber indicator next to the DEF level
ECM is configured to “Reduced Time” and the DEF
gauge on the dash will remain lit.
level is 3%, the engine will be in a level 3 final
inducement. The check engine lamp and the
emissions malfunction indicator lamp will flash at a
fast rate and a red stop lamp will illuminate solid. The
engine will be taken too low idle or will be shut down.
Once shut down, the engine can be restarted for 5
minute periods at reduced speed and torque. If set to
idle, the engine will idle indefinitely at reduced torque.
The amber indicator next to the DEF level gauge on
the dash will remain lit.
Note: Turn the key to the OFF position and add DEF
to the DEF tank to reset the DEF level inducement.
Inducement Strategy for Escalating
Time Inducement Faults
Illustration 46
g03676174
(Worldwide)
If the DEF level is below 7.5%, a level 2 inducement
event will occur. The check engine lamp and the
emissions malfunction indicator lamp will illuminate
and flash slowly. The amber indicator next to the DEF
level gauge on the dash will remain lit. If the ECM is
configured to “Reduced Performance” and the DEF
level has reached 1%, the machine will be limited to
75% torque.
Illustration 48
g03676215
Reduced Performance
The check engine and emissions malfunction
indicator lamp will illuminate for a level 1 inducement-
related fault. There are three inducement categories.
If the inducement is a result of a category 1 fault, then
a level 1 inducement will occur for a duration of 2.5
hours for first occurrence. For repeat occurrence, a
category 1 level 1 inducement fault will occur for a
duration of 5 minutes.
42
M0076814-03
Operation Section
Selective Catalytic Reduction Warning System
If the inducement is a result of a category 2 fault, then
The check engine and emissions malfunction
a level 1 inducement will occur for a duration of 10
indicator lamp will illuminate for an inducement-
hours. There is no repeat occurrence for category 2,
related fault. There are three inducement categories.
level 1 inducement faults.
If the inducement is a result of a category 1 fault, then
a level 1 inducement will occur for a duration of 2.5
If the inducement is a result of a category 3 fault, then
hours for first occurrence. For repeat occurrence, a
a level 1 inducement will occur for a duration of 36
category 1 level 1 inducement fault will occur for a
hours. There is no repeat occurrence for category 3,
duration of 5 minutes.
level 1 inducement faults.
If the inducement is a result of a category 2 fault, then
Reduced Time The check engine and emissions
a level 1 inducement will occur for a duration of 5
malfunction indicator lamp will illuminate for a level 1
hours. There is no repeat occurrence for category 2,
inducement-related fault. There are three inducement
level 1 inducement faults.
categories. If the inducement is a result of a category
1 fault, then a level 1 inducement will occur for a
If the inducement is a result of a category 3 fault, then
duration of 2.5 hours for first occurrence. For repeat
a level 1 inducement will occur for a duration of 18
occurrence, a category 1 level 1 inducement fault will
hours. There is no repeat occurrence for category 3,
occur for a duration of 5 minutes.
level 1 inducement faults.
If the inducement is a result of a category 2 fault, then
a level 1 inducement will occur for a duration of 5
hours. There is no repeat occurrence for category 2,
level 1 inducement faults.
If the inducement is a result of a category 3 fault, then
a level 1 inducement will occur for a duration of 18
hours. There is no repeat occurrence for category 3,
level 1 inducement faults.
Illustration 50
g03676218
If a fault condition exists for the entire duration of
inducement level 2, the strategy advances to
inducement level 3. Inducement level 3 has the same
actions for all categories. The check engine lamp and
the emissions malfunction indicator lamp will flash at
a fast rate. A red stop lamp will illuminate solid. The
engine will have a 100% derate and be limited to
1000 rpm or low idle, whichever is greater. If the final
Illustration 49
g03676215
inducement action in ET is set to "Idle Down", then
engine will continue to idle at derated condition. If set
Reduced Performance If a fault condition exists for
to "Shutdown" , engine will shut down after 5
the entire duration of inducement level 1, the strategy
minutes. A key cycle will allow safe harbor mode to
advances to inducement level 2. The check engine
initiate. Safe harbor is only allowed once. After safe
and emissions malfunction indicator lamp will
harbor, the engine will be in level 3 final inducement.
illuminate and flash slowly for a level 2 inducement-
If set to "Shutdown", the engine may be restarted, but
related fault. The engine will have a 50% derate. If
will only run for 5 minutes at derated condition before
the inducement is a result of a category 1 fault, then a
shutting down again. This action will continue until
level 2 inducement will occur for a duration of 70
minutes for first occurrence. For repeat occurrence, a
the issue is resolved.
category 1 level 2 inducement fault will occur for a
Note: Contact your Perkins dealer for repairs if a fault
duration of 5 minutes.
occurs.
If the inducement is a result of a category 2 fault, then
a level 2 inducement will occur for a duration of 10
hours. For repeat occurrence, a category 2 level 2
inducement fault will occur for a duration of 2 hours.
If the inducement is a result of a category 3 fault, then
a level 2 inducement will occur for a duration of 64
hours. For repeat occurrence, a category 3 level 2
inducement fault will occur for a duration of 5 hours.
Reduced Time
M0076814-03
43
Operation Section
Engine Diagnostics
Engine Diagnostics
i05194988
Self-Diagnostics
Perkins Electronic Engines have the capability to
perform a self-diagnostics test. When the system
detects an active problem, a diagnostic lamp is
activated. Diagnostic codes will be stored in
permanent memory in the Electronic Control Module
(ECM. The diagnostic codes can be retrieved by
using Perkins electronic service tools.
Some installations have electronic displays that
provide direct readouts of the engine diagnostic
codes. Refer to the manual that is provided by the
OEM for more information on retrieving engine
diagnostic codes.
Active codes represent problems that currently exist.
These problems should be investigated first.
Logged codes represent the following items:
• Intermittent problems
• Recorded events
• Performance history
The problems may have been repaired since the
logging of the code. These codes do not indicate that
a repair is needed. The codes are guides or signals
when a situation exists. Codes may be helpful to
troubleshoot problems.
When the problems have been corrected, the
corresponding logged fault codes should be cleared.
i05406659
Fault Logging
The system provides the capability of Fault Logging.
When the Electronic Control Module (ECM
generates an active diagnostic code, the code will be
logged in the memory of the ECM. The codes that
have been logged by the ECM can be identified by
the electronic service tool. The active codes that
have been logged will be cleared when the fault has
been rectified or the fault is no longer active. The
following logged faults cannot be cleared from the
memory of the ECM without using a factory
password: Overspeed, low engine oil pressure, high
engine coolant temperature, and aftertreatment
codes.
44
M0076814-03
Operation Section
Engine Starting
•
Do not start the engine or move any of the controls
Engine Starting
if there is a “DO NOT OPERATE” warning tag or
similar warning tag attached to the start switch or
i02109067
to the controls.
Before Starting Engine
•
Ensure that the areas around the rotating parts are
clear.
•
All of the guards must be put in place. Check for
Perform the required daily maintenance and other
damaged guards or for missing guards. Repair
periodic maintenance before the engine is started.
any damaged guards. Replace damaged guards
Inspect the engine compartment. This inspection can
and/or missing guards.
help prevent major repairs at a later date. Refer to
the Operation and Maintenance Manual,
•
Disconnect any battery chargers that are not
“Maintenance Interval Schedule” for more
protected against the high current drain that is
information.
created when the electric starting motor (if
• For the maximum service life of the engine, make
equipped) is engaged. Check electrical cables and
a thorough inspection before the engine is started.
check the battery for poor connections and for
Look for the following items: oil leaks, coolant
corrosion.
leaks, loose bolts and trash buildup. Remove trash
•
Reset all of the shutoffs or alarm components.
buildup and arrange for repairs, as needed.
•
Check the engine lubrication oil level. Maintain the
• Inspect the aftercooler for loose connections and
oil level between the “ADD” mark and the “FULL”
for debris buildup.
mark on the oil level gauge.
• Inspect the cooling system hoses for cracks and
•
Check the coolant level. Observe the coolant level
for loose clamps.
in the coolant recovery tank (if equipped). Maintain
• Inspect the alternator and accessory drive belts for
the coolant level to the “FULL” mark on the coolant
cracks, breaks, and other damage.
recovery tank.
• Inspect the wiring for loose connections and for
•
If the engine is not equipped with a coolant
worn wires or frayed wires.
recovery tank maintain the coolant level within
13 mm (0.5 inch) of the bottom of the filler pipe. If
• Check the fuel supply. Drain water from the water
the engine is equipped with a sight glass, maintain
separator (if equipped). Open the fuel supply
the coolant level in the sight glass.
valve.
•
Observe the air cleaner service indicator (if
equipped). Service the air cleaner when the yellow
NOTICE
diaphragm enters the red zone, or when the red
All valves in the fuel return line must be open before
and during engine operation to help prevent high fuel
piston locks in the visible position.
pressure. High fuel pressure may cause filter housing
•
Ensure that any driven equipment has been
failure or other damage.
disengaged. Minimize electrical loads or remove
any electrical loads.
If the engine has not been started for several weeks,
fuel may have drained from the fuel system. Air may
i06092648
have entered the filter housing. Also, when fuel filters
have been changed, some air pockets will be trapped
Starting the Engine
in the engine. In these instances, prime the fuel
system. Refer to the Operation and Maintenance
Manual, “Fuel System - Prime” for more information
on priming the fuel system.
Engine exhaust contains products of combustion
which may be harmful to your health. Always
Engine exhaust contains products of combustion
start and operate the engine in a well ventilated
which may be harmful to your health. Always
area and, if in an enclosed area, vent the exhaust
start and operate the engine in a well ventilated
to the outside.
area and, if in an enclosed area, vent the exhaust
to the outside.
M0076814-03
45
Operation Section
Starting the Engine
Starting the Engine
Note: Oil pressures and fuel pressures should be in
the normal range on the instrument panel. Engines
Refer to the Owners Manual of the OEM for your type
that are equipped with “WARNING” lamps do not
of controls. Use the following procedure to start the
have an operating range. The “WARNING and
engine.
DIAGNOSTIC” lamp (if equipped) will flash while the
engine is cranking. The lamp should turn off after
1. Place the transmission in NEUTRAL. Disengage
proper engine oil pressure or fuel pressure is
the flywheel clutch in order to allow the engine to
achieved. Do not apply a load to the engine or
start faster, and to reduce the draining of the
increase engine rpm until the oil pressure gauge
battery.
indicates at least normal pressure. Inspect the engine
for leaks and/or unusual noises.
2. Turn the ignition switch to the ON position.
If the engine is operated with a low load, the engine
During the key on, all warning lamps will illuminate
will reach normal operating temperature sooner than
for a few seconds, in order to test the circuits. If
idling the engine with no load. When the engine is
any lamps do not illuminate, check the bulbs and
idled in cold weather, increase the engine rpm to
replace as necessary.
approximately 1000 to 1200 rpm in order to raise
engine temperature. Do not exceed the
NOTICE
recommended rpm in order to increase the speed of
Do not engage the starting motor when flywheel is
the warm-up. Limit unnecessary idle time to 10
turning. Do not start the engine under load.
minutes.
If the engine fails to start within 30 seconds, release
Starting Problems
the starter switch or button and wait two minutes to
allow the starting motor to cool before attempting to
An occasional starting problem may be caused by
start the engine again.
one of the following items:
3. Push the start button or turn the ignition switch to
• Low battery charge
the START position in order to crank the engine.
• Lack of fuel
Do not push down or hold the throttle down while
• Problem with the wiring harness
the engine is cranked. The system will
automatically provide the correct amount of fuel
If the engine fuel system has been run dry, fill the fuel
that is needed to start the engine.
tank and prime the fuel system. Refer to the
Operation and Maintenance Manual, “Fuel System -
4. If the engine fails to start within 30 seconds,
Prime” topic (Maintenance Section).
release the start button, or the ignition switch. Wait
for 2 minutes in order to allow the starting motor to
cool before attempting to start the engine again.
NOTICE
Oil pressure should rise within 15 seconds after the
engine starts. Do not increase engine rpm until the oil
pressure gauge indicates normal. If oil pressure is
not indicated on the gauge within 15 seconds, DO
NOT operate the engine. STOP the engine, investi-
gate and correct the cause.
5. Allow the engine to idle for approximately 3
minutes. Idle the engine until the water
temperature gauge has begun to rise. Check all
gauges during the warm-up period.
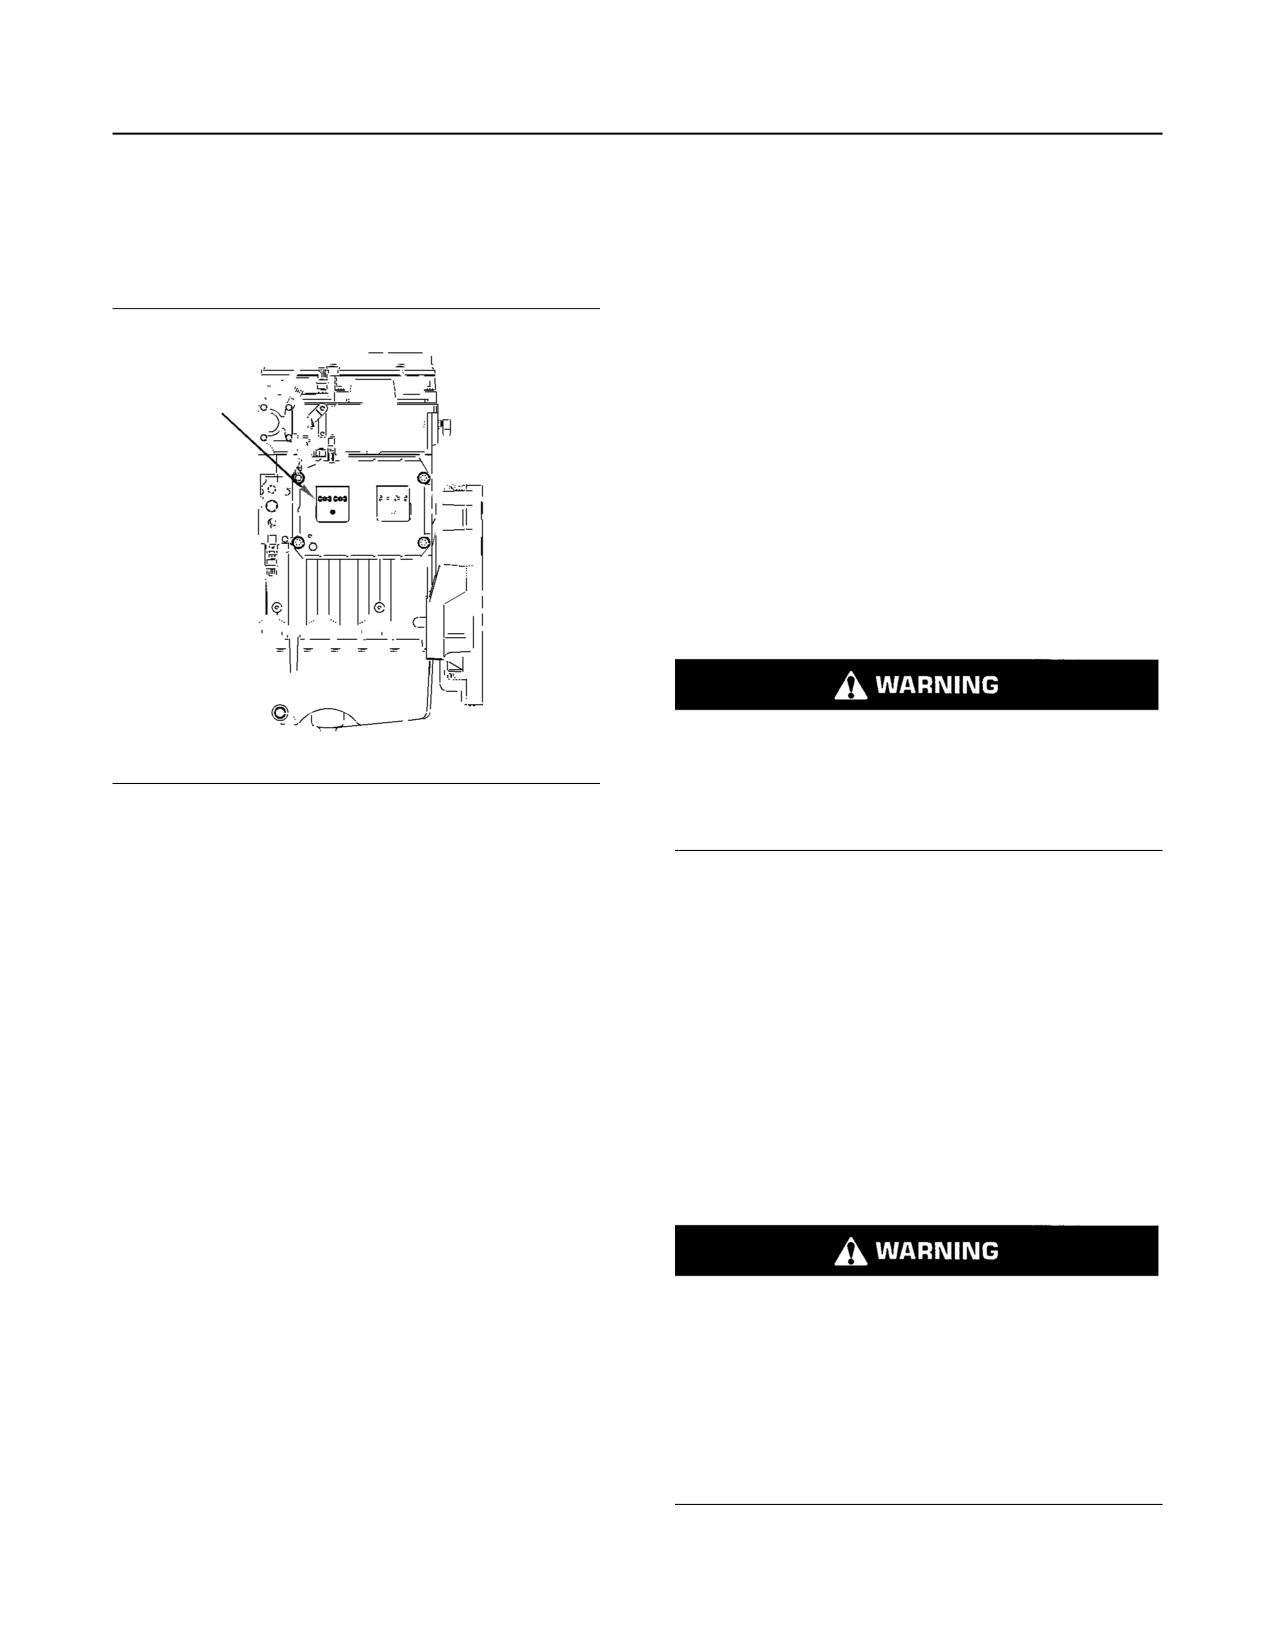
46
M0076814-03
Operation Section
Cold Weather Starting
If the other problems are suspected, perform the
Note: If the engine has not been run for several
appropriate procedure in order to start the engine.
weeks, fuel may have drained. Air may have moved
into the filter housing. Also, when fuel filters have
Problems with the Wiring Harness
been changed, some air will be left in the filter
housing. Refer to the Operation and Maintenance
Manual, “Fuel System - Prime” (Maintenance
Section) for more information on priming the fuel
system.
Ether Injection System (If
Equipped)
The ether injection system is controlled by the ECM.
The ECM monitors the coolant temperature, intake
air temperature, ambient air temperature, and
barometric pressure to determine when ether
injection is needed. At sea level, ether will be used if
any of the temperatures fails to exceed 0° C (32° F).
This temperature is subject to an increase as
barometric pressure increases.
Personal injury or property damage can result
from alcohol or starting fluids.
Alcohol or starting fluids are highly flammable
Illustration 51
g01248812
and toxic and if improperly stored could result in
ECM Connector J2/P2
injury or property damage.
Locate the ECM. Check the connector in order to
ensure that the connector is secure. Lightly pull each
Follow the procedure in this Operation and
of the wires in the chassis harness.
Maintenance Manual, “Starting the Engine”.
1. Pull each wire with approximately 4.5 kg (10 lb) of
i08134367
force. The wire should remain in the connector.
2. If a wire is loose, push the wire back into the
Starting with Jump Start
connector. Pull the wire again in order to ensure
Cables
that the wire is secure.
(Do Not Use This Procedure in
3. Start the engine. If the engine does not start, check
for a diagnostic code and consult your Perkins
Hazardous Locations that have
distributor.
Explosive Atmospheres)
i04132731
Cold Weather Starting
The connection of battery cables to a battery and
Startability will be improved at temperatures below
the disconnection of battery cables from a battery
10°C (50°F from the use of a cylinder block coolant
may cause an explosion which may result in in-
heater or from other means that are used to heat the
jury or death. The connection and the disconnec-
crankcase oil. Some engine applications use a jacket
tion of other electrical equipment may also cause
water heater to improve startability. Use of a jacket
an explosion which may result in injury or death.
water heater will help reduce white smoke and
The procedures for the connection and the dis-
misfire during start-up in cold weather.
connection of battery cables and other electrical
equipment should only be performed in a nonex-
plosive atmosphere.
M0076814-03
47
Operation Section
After Starting Engine
3. Connect one negative end of the jump-start cable
to the negative cable terminal of the electrical
Improper jump start cable connections can cause
source. Connect the other negative end of the
an explosion resulting in personal injury.
jump-start cable to the engine block or to the
chassis ground. This procedure helps to prevent
Prevent sparks near the batteries. Sparks could
potential sparks from igniting the combustible
cause vapors to explode. Do not allow jump start
gases that are produced by some batteries.
cable ends to contact each other or the engine.
Note: The engine ECM must be powered before the
starting motor is operated or damage can occur.
Note: If possible, first diagnose the reason for the
starting failure. Refer to Troubleshooting, “Engine
4. Start the engine in the normal operating
Will Not Crank and Engine Cranks But Will Not Start”
procedure. Refer to this Operation and
for further information. Make any necessary repairs.
Maintenance Manual, “Starting the Engine”.
If the engine will not start only due to the condition of
the battery, either charge the battery, or start the
5. Immediately after the engine is started, disconnect
engine by using another battery with jump-start
the jump-start cables in reverse order.
cables. The condition of the battery can be
rechecked after the engine has been switched OFF.
After jump starting, the alternator may not be able to
recharge fully batteries that are severely discharged.
The batteries must be replaced or charged to the
NOTICE
Never attempt to start an engine from an external
proper voltage with a battery charger after the engine
power source such as electric welding equipment,
is stopped. Many batteries which are considered
which has a voltage that is unsuitable for engine
unusable are still rechargeable. Refer to Operation
starting and will damage the electrical system.
and Maintenance Manual, “Battery - Replace” and
Testing and Adjusting Manual, “Battery - Test”.
For 904D-E28T industrial engines, use a 12 VDC bat-
tery source to start the engine.
i05359363
For 904D-E36TA industrial engines, ensure that a 12
VDC or 24 VDC battery source is used to start the
After Starting Engine
engine.
Note: In temperatures from 0 to 60°C (32 to 140°F,
NOTICE
the warm-up time is approximately 3 minutes. In
Using a battery source with the same voltage as the
temperatures below 0°C (32°F, additional warm-up
electric starting motor. Use ONLY equal voltage for
time may be required.
jump starting. The use of higher voltage will damage
the electrical system.
When the engine is idling during warm-up, observe
the following conditions:
Do not reverse the battery cables. The alternator can
be damaged. Attach ground cable last and remove
• Check for fluid or air leaks at idle rpm and at one-
first.
half full rpm (no load on the engine) before
Turn all electrical accessories OFF before attaching
operating the engine under load. Operating the
the jump start cables.
engine at idle and at one-half full rpm with no load
is not possible in some applications.
Ensure that the main power switch is in the OFF posi-
tion before attaching the jump start cables to the en-
• Operate the engine at low idle until all systems
gine being started.
achieve operating temperatures. Check all gauges
during the warm-up period.
1. Turn the start switch on the stalled engine to the
Note: Gauge readings should be observed and the
OFF position. Turn off all the engines accessories.
data should be recorded frequently while the engine
is operating. Comparing the data over time will help
2. Connect one positive end of the jump-start cable to
to determine normal readings for each gauge.
the positive cable terminal of the discharged
Comparing data over time will also help detect
battery. Connect the other positive end of the
abnormal operating developments. Significant
jump-start cable to the positive cable terminal of
changes in the readings should be investigated.
the electrical source.
48
M0076814-03
Operation Section
After Starting Engine
Extended Idle at Cold Ambient
Temperature
The engine may automatically change speeds when
the engine is idling in cold ambient temperatures
(typically less than 0° C (32° F) for extended periods.
The purpose of the automatic speed change is
threefold: to maintain the desired operation of the
NOx reduction system, to maintain the desired
operation of the regeneration system and to keep the
engine coolant warm. The engine speed may rise to
1600 rpm for as long as 20 minutes.
The high exhaust system temperature lamp may
illuminate during extended idling conditions. This
illumination signals that a diesel particulate filter
(DPF) regeneration is in progress. Regenerations
during cold ambient extended idling may only last up
to 10 minutes.
M0076814-03
49
Operation Section
Engine Operation
This design of DPF will require a service
Engine Operation
maintenance interval. Refer to this Operation and
Maintenance Manual, “Maintenance Interval
i06603162
Schedule” for more information. The DPF can be
expected to function properly for the useful life of the
engine (emissions durability period), as defined by
Engine Operation
regulation, subject to prescribed maintenance
requirements being followed.
Proper operation and maintenance are key factors in
i07512817
obtaining the maximum life and economy of the
engine. If the directions in the Operation and
Diesel Particulate Filter
Maintenance Manual are followed, costs can be
minimized and engine service life can be maximized.
Regeneration
The time that is needed for the engine to reach
normal operating temperature can be less than the
time taken for a walk-around inspection.
Regeneration
The engine can be operated at the rated rpm after
the engine is started and after the engine reaches
Regeneration is to increase the exhaust temperature
operating temperature. The engine will reach normal
for a given time. The Aftertreatment Regeneration
operating temperature sooner during a low engine
Device (ARD creates the heat which makes
speed (rpm and during a low-power demand. This
regeneration possible. The regeneration process is
procedure is more effective than idling the engine at
used to remove soot from the DPF, and warmup the
no load. The engine should reach operating
Selective Catalyst Reduction (SCR system. The
temperature in a few minutes.
DPF traps both soot and ash. The ash is removed
through a manual cleaning process. Refer to
Avoid excess idling. Excessive idling causes carbon
Operation and Maintenance Manual, “Diesel
buildup, engine slobber and, soot loading of the
Particulate Filter - Clean” for more information on the
Diesel Particulate Filter (DPF. These issues are
service of the DPF.
harmful to the engine.
Regeneration Indicators
Gauge readings should be observed and the data
should be recorded frequently whilst the engine is
Regeneration Active - When
operating. Comparing the data over time will help to
illuminated, this indicator shows that
determine normal readings for each gauge.
the system is active. This indicator
Comparing data over time will also help detect
shows that elevated emission temperatures are
abnormal operating developments. Significant
changes in the readings should be investigated.
possible. This indicator will turn off when
regeneration is complete.
Engine Operation and the
DPF - This indicator will illuminate to
Aftertreatment System
show that regeneration is required. This
indicator will illuminate when “Time to
The exhaust gases and hydrocarbon particles from
Regen” is less than a pre-determined amount of
the engine first pass through the Diesel Oxidation
time.
Catalyst (DOC. Some of the gases and hydrocarbon
particles are oxidized as they pass through the DOC.
Regeneration Disabled - This indicator
The gases then pass through the Diesel Particulate
will illuminate to show that regeneration
Filter (DPF. The DPF collects the soot and any ash
has been disabled.
that is produced by the combustion in the engine.
During regeneration, the soot is converted into a gas
Regeneration Switch
and the ash remains in the DPF. The gases finally
pass through the Selective Catalytic Reduction
Force Regeneration - Press in the top
(SCR. Before the gases pass through the SCR,
switch for 2 seconds to begin
Diesel Exhaust Fluid (DEF is injected into the gas
regeneration.
stream. The DEF is controlled by the Pump
Electronic Unit (PEU. The mixtures of DEF and the
Disable Regeneration - Press in the
exhaust gas pass through the SCR reducing the NOx
bottom switch for 2 seconds to disable
in the exhaust emissions.
regeneration.
The engine software will control the amount of DEF
that will be required to keep the exhaust emission
Note: If equipped with a rocker style switch, the
compliant.
MIDDLE position of the regeneration switch is the
default position for automatic regeneration.
50
M0076814-03
Operation Section
Diesel Particulate Filter Regeneration
Note: If the engine start switch key is cycled or the
Disabled: When the regeneration system is in
“Force Regeneration” switch is pressed for longer
disabled mode, automatic regenerations will not be
than 2 seconds the system will no longer be disabled.
performed. The DPF indicator will illuminate if manual
When the “Force Regeneration” switch is pressed
regeneration is required. The “Time to Regen”
displayed on the performance screen will indicate
and “Time to Regen” is less than 8 hours,
that the time until the next regeneration will be
regeneration will begin if the machine is at low idle
required. However, the DPF indicator may illuminate
and is parked.
with time remaining on the display. When the DPF
indicator illuminates, the operator must perform
Note: If the engine start switch key is cycled whilst
manual regeneration.
the regeneration system is disabled via the “Disable
Regeneration” switch, press and hold the “Disable
Regeneration” switch for 2 seconds to reinitiate.
Regeneration Triggers
Regeneration may be required for the following
Modes of Regeneration
reasons:
Automatic: The Electronic Control Module (ECM)
Soot: The DPF will collect soot produced by the
uses multiple inputs from the engine and the machine
engine. Automatic regeneration will become active to
to determine the best time to perform automatic
reduce soot level.
regeneration. Automatic regenerations can take
place throughout the operating cycle of the engine.
Start-Up Regeneration: Start-up regeneration is
The regeneration active indicator will be illuminated
initiated by the ECM after a cold engine start. This
when regeneration is being performed. Interruptions
regeneration is performed to heat the system to a
of the regeneration are acceptable. If regeneration is
required temperature for Diesel Exhaust Fluid (DEF)
in progress and the regeneration needs to be
dosing to begin.
stopped, it is permissible to press the “Disable
SCR Maintenance: Regeneration is performed to
Regeneration” switch.
maintain the SCR system.
Note: Automatic adjustments of engine speed may
ARD Maintenance: Regeneration is performed to
be noticed during regenerations. If regeneration is
maintain the CRS system.
taking place and the engine is taken to low idle, the
engine speed may remain elevated to maintain the
regeneration.
Regeneration System Warning
Indicators
Note: If the machine returns to work whilst automatic
regeneration is active, the regeneration may be
stopped. The ECM will continue to monitor inputs to
determine the best time to restart the regeneration.
Manual: Manual regeneration is initiated by pressing
the “Force Regeneration” switch. Manual
regeneration will only be allowed if the “Time to
Regen” is less than 8 hours. If the “Force
Regeneration” switch is pressed before “Time to
Regen” is less than 8 hours, then “Regen not
Illustration 52
g02117258
Required” will be displayed. The machine must be
stationary, the parking brake must be applied, and
The DPF Indicator will illuminate solid when
the engine must be at low idle to perform manual
regeneration is required. Regeneration should be
regeneration.
performed as soon as possible.
Note: In some situations, the DPF indicator may stay
illuminated after regeneration ends. The illuminated
DPF indicator indicates that complete regeneration
has not been performed. Complete regeneration is
when the soot has been depleted or all the criteria for
one of the other regeneration types have been met. If
the DPF indicator stays illuminated, perform,
regeneration without interruption. The DPF indicator
will shut off when regeneration is complete.
M0076814-03
51
Operation Section
Engaging the Driven Equipment
If the soot load is above a threshold or “Time to
NOTICE
Regen” is 0 hours, then regeneration is required. The
The engine and emissions control system shall be
DPF indicator will illuminate and flash slowly. Engine
operated, used, and maintained in accordance with
power will be slightly derated. If the machine
the instructions provided. Failure to follow the instruc-
continues to operate without regeneration, derate will
tions could result in emissions performance that does
eventually reach 100%. Stop the machine and apply
not meet the requirements applicable to the category
the parking brake. With the engine at low idle, initiate
of the engine. No deliberate tampering with, or mis-
manual regeneration.
use of the engine emissions control system should
take place. Prompt action is critical to rectify any in-
correct operation, use, or maintenance of the emis-
sions control system.
Carbon Dioxide (CO2) Emissions
Statement
Illustration 53
g03679876
Emissions regulations require that the value of the
CO2 emissions be reported to the end user. For this
Once the amount of soot collected in the DPF has
engine, 760 g/kWh, was determined to be the CO2
reached a threshold or “Time to Regen” has been at
value during the EU type approval process. This
0 hours for a pre-determined time, the DPF indicator
value was recorded in EU type approval certificate.
will illuminate and flash at a fast rate. A red stop lamp
will illuminate solid.
This CO2 measurement results from testing over a
fixed test cycle, under laboratory conditions, with a
10 minutes after the illumination of the DPF indicator
parent engine representative of the engine family.
and red stop lamp the engine will Shut down. The
This value shall not imply or express any guarantee
engine can be restarted by cycling the engine start
of the performance of a particular engine.
switch key. The engine will return to the previous
derate state before shutdown.
i04038637
Once the amount of soot collected reaches a
threshold level or 6.4 hours of run time has passed
Engaging the Driven
since the red stop lamp was illuminated without
successful regeneration, the engine will have a 100%
Equipment
derate.
Once the amount of soot collected reaches a critical
threshold level, the regeneration will be locked out.
1. Operate the engine at one-half of the rated rpm,
Now, regeneration can only be performed by
when possible.
usingelectronic service tool (ET). The engine may be
restarted, but will only run for 3 minutes before
2. Engage the driven equipment without a load on the
shutting down again.
equipment, when possible.
A fault code will be active for any DPF system-related
Interrupted starts put excessive stress on the drive
issue. Follow the troubleshooting guide to rectify the
train. Interrupted starts also waste fuel. To get the
issue.
driven equipment in motion, engage the clutch
smoothly with no load on the equipment. This
If the DPF loses function, or is tampered with in any
method should produce a start that is smooth and
way, the check engine lamp, and an amber action (if
equipped) will illuminate. A fault code will also
easy. The engine rpm should not increase and the
annunciate. The lamps and fault code will remain
clutch should not slip.
active until the problem is rectified.
3. Ensure that the ranges of the gauges are normal
when the engine is operating at one-half of the
rated rpm. Ensure that all gauges operate
properly.
4. Increase the engine rpm to the rated rpm. Always
increase the engine rpm to the rated rpm before
the load is applied.
52
M0076814-03
Operation Section
Fuel Conservation Practices
5. Apply the load. Begin operating the engine at low
•
Ensure that the driven equipment is in good
load. Check the gauges and equipment for proper
working order.
operation. After normal oil pressure is reached and
•
Cold engines consume excess fuel. Utilize heat
the temperature gauge begins to move, the engine
from the jacket water system and the exhaust
may be operated at full load. Check the gauges
system, when possible. Keep cooling system
and equipment frequently when the engine is
components clean and keep cooling system
operated under load.
components in good repair. Never operate the
engine without water temperature regulators. All
Extended operation at low idle or at reduced load
these items will help maintain operating
may cause increased oil consumption and carbon
temperatures.
buildup in the cylinders. This carbon buildup
results in a loss of power and/or poor
performance.
i07677865
Fuel Conservation Practices
The efficiency of the engine can affect the fuel
economy. Perkins design and technology in
manufacturing provides maximum fuel efficiency in
all applications. Follow the recommended procedures
to attain optimum performance for the life of the
engine.
• Avoid spilling fuel.
Fuel expands when it is warmed up. The fuel may
overflow from the fuel tank. Inspect fuel lines for
leaks. Repair the fuel lines, as needed.
• Be aware of the properties of different fuels. Use
only the recommended fuels. Refer to the
Operations and Maintenance Manual, “Fuel
Recommendations” for further information.
• Avoid unnecessary idling.
Shut off the engine rather than allowing the engine to
idle for long periods of time.
• Observe the service indicator frequently. Keep the
air cleaner elements clean.
• Ensure that the turbocharger is operating
correctly. For more information refer to this
Operation and Maintenance Manual,
“Turbocharger - Inspect”
• Maintain a good electrical system.
One faulty battery cell will overwork the alternator.
This fault will consume excess power and excess
fuel.
• The belt should be in good condition. Refer to the
Systems Operation, Testing and Adjusting, “V-Belt
Test” for further information.
• Ensure that all the connections of the hoses are
tight. The connections should not leak.
M0076814-03
53
Operation Section
Engine Stopping
Engine Stopping
Leaving the machine unattended when the engine
i05798719
is running may result in personal injury or death.
Before leaving the machine operator station, neu-
Stopping the Engine
tralize the travel controls, lower the work tools to
the ground and deactivate all work tools, and
place the lever for the hydraulic lockout control
in the LOCKED position.
NOTICE
Stopping the engine immediately after it has been
working under load, can result in overheating and ac-
Note: Leaving the engine unattended while running
celerated wear of the engine components.
may result in property damage in the event of a
malfunction.
See the following stopping procedure, to allow the
engine to cool, and to prevent excessive tempera-
Turn the engine start switch to the OFF position.
tures in the turbocharger center housing, which could
cause oil coking problems.
Delayed Engine Shutdown - The
delayed engine shutdown indicator will
illuminate or the following text will be
1. While the machine is stopped, run the engine for 5
displayed, ENGINE COOLDOWN ACTIVE.
minutes at low idle. Idling the engine allows hot
areas of the engine to cool gradually.
Delayed engine shutdown will run whenever the
exhaust temperature is above a threshold at engine
Note: If the “Regen Active” indicator is illuminated,
shutdown. Delayed engine shutdown will run for a
do not shut off the engine. Refer to Operation and
minimum of 76 seconds and will continue to run until
the engine and system components are cooled. The
Maintenance Manual, “Monitoring System” for more
default maximum run time is 7 minutes.
information on indicators. (if equipped)
Note: An authorized dealer can change the
2. Turn the engine start switch to the OFF position
maximum run time value up to 30 minutes, but the
and remove the key.
default setting is 7 minutes.
Note: The engine may delay before completely
Note: To override delayed engine shutdown and stop
shutting down. Delayed engine shutdowns aid in
the engine, turn the engine start switch to the STOP
cooling the engine and after-treatment (if equipped)
position. Overriding delayed engine shutdown may
components.
reduce engine and system component life. A warning
message and/or audible alarm will be initiated and a
Delayed Engine Shutdown (If
fault code will be logged for improper engine
shutdown.
Enabled)
The Delayed Engine Shutdown allows the engine to
run for a time after the engine start switch key is
turned to the OFF position to cool the engine and
system components. The engine start switch key
may be removed.
Note: The DEF purge process will run for 2 minutes
once the engine is shut down and must complete.
The purge process may occur during delayed engine
shutdown. Do not turn off battery disconnect switch
during the purge process. Do not turn off the battery
power disconnect switch until the battery disconnect
switch indicator lamp has turned off. If the purge
process does not complete, a diagnostic code will
become active.
Note: There may be regulations that define the
requirements for the operator and/or support
personnel to be present when the engine is running.
54
M0076814-03
Operation Section
Manual Stop Procedure
i01465494
After Stopping Engine
Note: Before you check the engine oil, do not
operate the engine for at least 10 minutes in order to
allow the engine oil to return to the oil pan.
• Check the crankcase oil level. Maintain the oil
level between the “ADD” mark and the “FULL”
mark on the oil level gauge.
• If necessary, perform minor adjustments. Repair
any leaks and tighten any loose bolts.
Illustration 54
g02362719
• Note the service hour meter reading. Perform the
Note: At any time during a delayed engine shutdown,
maintenance that is in the Operation and
the engine start switch may be turned to the ON
Maintenance Manual, “Maintenance Interval
position. The engine may be placed back into
Schedule”.
service.
• Fill the fuel tank in order to help prevent
i05812522
accumulation of moisture in the fuel. Do not overfill
the fuel tank.
Manual Stop Procedure
NOTICE
Only use antifreeze/coolant mixtures recommended
in the Coolant Specifications that are in the Operation
NOTICE
and Maintenance Manual. Failure to do so can cause
Stopping the engine immediately after it has been
engine damage.
working under load can result in overheating and ac-
celerated wear of the engine components.
• Allow the engine to cool. Check the coolant level.
If the engine has been operating at high rpm and/or
high loads, run at low idle for at least three minutes to
• If freezing temperatures are expected, check the
reduce and stabilize internal engine temperature be-
coolant for proper antifreeze protection. The
fore stopping the engine.
cooling system must be protected against freezing
to the lowest expected outside temperature. Add
Avoiding hot engine shutdowns will maximize turbo-
the proper coolant/water mixture, if necessary.
charger shaft and bearing life.
• Perform all required periodic maintenance on all
driven equipment. This maintenance is outlined in
Note: Individual applications have different control
the instructions from the OEM.
systems. Ensure that the shutoff procedures are
understood. Use the following general guidelines in
order to stop the engine.
1. Remove the load from the engine so that the
engine has no more than 30% power.
2. Run the engine at the programmed low idle speed
for at least 3 minutes.
3. After the cool down period, turn the start switch to
the OFF position.
M0076814-03
55
Operation Section
Cold Weather Operation
• Cloud point
Cold Weather Operation
• Pour point
i07622821
• Cold Filter Plugging Point (CFPP)
Radiator Restrictions
The cloud point of the fuel is the temperature at
which waxes naturally found in the diesel fuel begin
to form crystals. The cloud point of the fuel must be
Perkins discourages the use of airflow restriction
below lowest ambient temperature to prevent filters
devices that are mounted in front of radiators. Airflow
from plugging.
restriction can cause the following conditions:
Pour point is the last temperature before the fuel flow
• High exhaust temperatures
stops and waxing of the fuel will start.
• Power loss
Cold Filter Plugging Point (CFPP) is a temperature at
which a particular fuel will pass through a
• Excessive fan usage
standardized filtration device. This CFPP gives an
estimate of the lower operability temperature of fuel
• Reduction in fuel economy
Be aware of these properties when diesel fuel is
Reducing air flow over components will also affect
purchased. Consider the average ambient air
under hood temperatures. Reducing air flow can
temperature for the engines application. Engines that
increase surface temperatures during an
are fueled in one climate may not operate well if the
aftertreatment regeneration and could affect
engines are shipped to colder climate. Problems can
component reliability.
result due to changes in temperature.
If an airflow restriction device must be used, the
Before troubleshooting for low power or for poor
device should have a permanent opening directly in
performance in the winter, check the fuel for waxing
line with the fan hub. The device must have a
minimum opening dimension of at least 770 cm2
The following components can provide a means of
(120 in2).
minimizing fuel waxing problems in cold weather:
A centered opening that is directly in line with the fan
• Fuel heaters, which may be an OEM option
hub is specified to prevent an interrupted airflow on
the fan blades. Interrupted airflow on the fan blades
• Fuel line insulation, which may be an OEM option
could cause a fan failure.
Winter and arctic grades of diesel fuel are available in
Perkins recommends a warning device for the inlet
the countries and territories with severe winters. For
manifold temperature and/or the installation of an
more information refer to the Operation and
inlet air temperature gauge. The warning device for
Maintenance Manual, “Fuel For Cold-Weather
the inlet manifold temperature should be set at 75 °C
Operation”
(167 °F). The inlet manifold air temperature should
not exceed 75 °C (167 °F). Temperatures that
Another important fuel property which can affect cold
exceed this limit can cause power loss and potential
start and operation of diesel engine is Cetane
engine damage.
number. Detail and requirements of this property are
given in this Operation and Maintenance Manual,
“Fluid Recommendations”.
i07818744
i06093465
Fuel and the Effect from Cold
Weather
Fuel Related Components in
Cold Weather
Note: Only use grades of fuel that are recommended
by Perkins. Refer to this Operation and Maintenance
Manual, “Fluid Recommendations”.
Fuel Tanks
Properties of the diesel fuel can have a significant
Condensation can form in partially filled fuel tanks.
effect on the engine cold start capability. It is critical
Top off the fuel tanks after operating the engine.
that the low temperature properties of diesel fuel are
acceptable for the minimum ambient temperature the
engine is expected to see in operation.
Following properties are used to define fuels low
temperature capability:
56
M0076814-03
Operation Section
Fuel Related Components in Cold Weather
Fuel tanks should contain some provision for draining
water and sediment from the bottom of the tanks.
Some fuel tanks use supply pipes that allow water
and sediment to settle below the end of the fuel
supply pipe.
Some fuel tanks use supply lines that take fuel
directly from the bottom of the tank. If the engine is
equipped with this system, regular maintenance of
the fuel system filter is important.
Drain the water and sediment from any fuel storage
tank at the following intervals:
• Weekly
• Oil changes
• Refueling of the fuel tank
This draining will help prevent water and/or sediment
from being pumped from the fuel storage tank and
into the engine fuel tank.
Fuel Heaters
Fuel heaters help to prevent fuel filters from plugging
in cold weather due to waxing. A fuel heater should
be installed in order for the fuel to be heated before
the fuel enters the primary fuel filter.
Select a fuel heater that is mechanically simple, yet
adequate for the application. The fuel heater should
also help to prevent overheating of the fuel. High fuel
temperatures reduce engine performance and the
availability of engine power. Choose a fuel heater
with a large heating surface. The fuel heater should
be practical in size. Small heaters can be too hot due
to the limited surface area.
Disconnect the fuel heater in warm weather.
Note: Fuel heaters that are controlled by the water
temperature regulator or self-regulating fuel heaters
should be used with this engine. Fuel heaters that are
not controlled by the water temperature regulator can
heat the fuel in excess of 65° C (149° F). A loss of
engine power can occur if the fuel supply
temperature exceeds 37° C (100° F).
Note: Heat exchanger type fuel heaters should have
a bypass provision in order to prevent overheating of
the fuel in warm-weather operation.
For further information on fuel heaters, consult your
Perkins distributor .
M0076814-03
57
Maintenance Section
Refill Capacities
Maintenance Section
NOTICE
These recommendations are subject to change with-
out notice. Contact your local Perkins distributor for
the most up-to-date recommendations.
Refill Capacities
i07490664
Diesel Fuel Requirements
Fluid Recommendations
Perkins is not in a position to continuously evaluate
and monitor all worldwide distillate diesel fuel
(General Fuel Information)
specifications that are published by governments and
technological societies.
The "Perkins Specification for Distillate Diesel Fuel"
•
Glossary
provides a known reliable baseline to judge the
expected performance of distillate diesel fuels that
•
ISO
International Standards Organization
are derived from conventional sources.
•
ASTM
American Society for Testing and
Satisfactory engine performance depends on the use
Materials
of a good quality fuel. The use of a good quality fuel
will give the following results: long engine life and
•
HFRR
High Frequency Reciprocating Rig
acceptable exhaust emissions levels. The fuel must
for Lubricity testing of diesel fuels
meet the minimum requirements that are stated in
the table 3 .
•
FAME
Fatty Acid Methyl Esters
NOTICE
•
CFR
Co-ordinating Fuel Research
The footnotes are key part of the Perkins "Specifica-
tion for Distillate Diesel Fuel" Table. Read ALL of the
•
ULSD
Ultra Low Sulfur Diesel
footnotes.
•
RME
Rape Methyl Ester
•
SME
Soy Methyl Ester
•
EPA
Environmental Protection Agency of
the United States
•
PPM
Parts Per Million
•
DPF
Diesel Particulate Filter
•
v/v
(volume of solute)/(volume of solution)
•
CFPP
Cold Filter Plugging Point
•
BTL
Biomass to liquid
•
GTL
Gas to liquid
•
CTL
Coal to liquid
•
HVO
Hydrotreated Vegetable Oil
General Information
NOTICE
Every attempt is made to provide accurate, up-to-
date information. By use of this document you agree
that Perkins Engines Company Limited is not respon-
sible for errors or omissions.
58
M0076814-03
Maintenance Section
General Fuel Information
Table 3
"Perkins Specification for Distillate Diesel Fuel"
Property
UNITS
Requirements
“ASTM”Test
“ISO/Other”Test
Aromatics
%Volume
35% maximum
“D1319”
“ISO 3837”
Ash
%Weight
0.01% maximum
“D482”
“ISO 6245”
Carbon Residue on 10%
%Weight
0.20% maximum
“D524”
“ISO 4262”
Bottoms
Cetane Number(1)
-
40 minimum in North
“D613 or D6890”
“ISO 5165”
America
45 minimum in European
Union
Cloud Point
°C
The cloud point must not
“D2500”
“ISO 3015”
exceed the lowest expected
ambient temperature.
Copper Strip Corrosion
-
No. 3 maximum
“D130”
“ISO 2160”
Distillation
°C
50% at 250° C (482° F)
“D86”
“ISO 3405”
minimum
90% at 350° C (662° F)
maximum
Density at 15 °C (59 °F)(2)
kg/M3
800 minimum and 860
No equivalent test
“ISO 3675”“ISO 12185”
maximum
Flash Point
°C
legal limit
“D93”
“ISO 2719”
Thermal Stability
-
Minimum of 80% reflec-
“D6468”
No equivalent test
tance after aging for 180 mi-
nutes at 150 °C (302 °F)
Pour Point
°C
6 °C (42.8 °F) minimum be-
“D97”
“ISO 3016”
low ambient temperature
Sulfur(3)
%mass
0.0015 % maximum
“D5453”
“ISO 20846”
Kinematic Viscosity(4)
MM2/S (cSt)
The viscosity of the fuel that
“D445”
“ISO 3405”
is delivered to the fuel injec-
tion pump. 1.4 minimum
and 4.5 maximum
Water and sediment
% weight
0.05% maximum
“D1796”
“ISO 3734”
Water
% weight
0.02% maximum
“D1744”
No equivalent test
Sediment
% weight
0.05% maximum
“D473”
“ISO 3735”
Gums and Resins(5)
mg/100mL
10 mg per 100 mL
“D381”
“ISO 6246”
maximum
Lubricity correctedwear
mm
0.52 maximum
“D6079”
“ISO 12156-1”
scar diameter at 60 °C
(140 °F).(6)
Fuel Cleanliness(7)
-
“ISO 18/16/13”
“D7619”
“ISO 4406”
Trace Metals(8)
mg/mg
Max 1 or non-detectable
“D7111”
Oxidation Stability
g/m^3
Max 25
“D2274”
“ISO 12205”
Hours(9)
Min 20
“EN 15751”
(1) A fuel with a higher cetane number than 45 is recommended to operate at a higher altitude in cold weather
(2) Density range allowed includes summer and winter diesel fuel grades.
(continued)
M0076814-03
59
Maintenance Section
General Fuel Information
(Table 3, contd)
(3) Ultra Low Sulfur Diesel Fuel with sulphur content less than 0.0015 percent 15 PPM (mg/kg) must be used. Use of diesel fuel with higher than
15 PPM sulphur limit in these engines will harm or permanently damage emissions control systems. Also, use of diesel fuel with higher than
15 PPM sulphur limit can shorten service interval.
(4) The values of the fuel viscosity are the values as the fuel is delivered to the fuel injection pumps. Fuel should also meet the minimum viscos-
ity requirement and the fuel should meet the maximum viscosity requirements at 40 °C (104 °F) of either the “ASTM D445” test method or
the “ISO 3104” test method. If a fuel with a low viscosity is used, cooling of the fuel may be required to maintain “1.4 cSt”or greater viscosity
at the fuel injection pump. Fuels with a high viscosity might require fuel heaters to lower the viscosity to “1.4 cSt” at the fuel injection pump.
(5) Follow the test conditions and procedures for gasoline (motor).
(6) The lubricity of a fuel is a concern with low sulfur and ultra low sulfur fuel. Fuel with higher wear scar diameter than 0.52 mm (0.0205 inch)
will lead to reduced service life and premature failure of the fuel system. Refer to the lubricity section of this “Operation and Maintenance
Manual” Fluid Recommendations for more information.
(7) Recommended cleanliness level for fuel as dispensed into machine or engine fuel tank is“ISO 18/16/13”or cleaner as per “ISO 4406”. Refer
to the “Contamination Control Recommendations for Fuels.
(8) Examples of trace metals include but not limited to Cu, Fe, Mn, Na, P, Pb, Si, and Zn. Use of metal-based additives is not allowed.
(9) Additional limit for fuel containing FAME. Fuel containing more than 2% v/v FAME must meet both tests.
Note: The owner and the operator of the engine has
the responsibility of using the fuel that is prescribed
by the EPA and other appropriate regulatory
agencies.
NOTICE
Operating with fuels that do not meet the Perkins rec-
ommendations can cause the following effects: Start-
ing difficulty, reduced fuel filter service life, poor
combustion, deposits in the fuel injectors, signifi-
cantly reduce service life of the fuel system. Also, the
creation of deposits in the combustion chamber and
reduced service life of the engine.
NOTICE
Illustration 55
g02157153
The Perkins 2000 series of diesel engine must be op-
erated using Ultra Low Sulfur Diesel. The sulphur
Illustration 55 is a representation of the label that will
content of this fuel must be lower than 15 PPM. This
be installed next to the fuel filler cap on the fuel tank
fuel complies with the emissions regulations that are
of the application.
prescribed by the Environmental Protection Agency
of the United States.
The fuel specifications that are listed in the table 4
are released as acceptable to use on all 2000 series
European ULSD 0.0010 percent (≤10ppm (mg/kg))
of engine.
sulfur fuel is required by regulation for use in engines
certified to European nonroad Stage V type-approved
nonroad engines. Additionally, the Cetane number
should be less than 45, and the bio-diesel content
should be greater than 20% volume/volume.
Table 4
Acceptable Fuel Specification for the 2000 Series of Engines(1)
Fuel Specification
Comments
EN590
European Automotive Diesel Fuel (DERV)
“ASTM D975 GRADE 1D S15”
“North American Light Distillate Diesel fuel with less than 15 PPM sul-
fur level”
“ASTM D975 GRADE 2D S15”
“North American Middle Distillate general-purpose Diesel fuel with less
than 15 PPM sulfur level”
“JIS K2204”
“Japanese Diesel Fuel” Must meet the requirements that are stated in
the lubricity section of this “Operation and Maintenance Manual” Fluid
Recommendations.
(continued)
60
M0076814-03
Maintenance Section
General Fuel Information
(Table 4, contd)
“BS 2869: 2010 CLASS A2 or EU equivalent”
UK Off-Road Diesel fuel
“CEN TS15940”
“Paraffinic diesel fuel from synthesis or hydrotreatment”, “Biomass-to-
liquid” (BTL), “Gas-to-liquid” (GTL), called Hydrotreated Vegetable Oil
(HVO). Refer to the Renewable and Alternative Fuels section of this
“Operation and Maintenance Manual” Fluid Recommendations for
more information.
B20 Biodiesel Blend
Refer to the Recommendation for Biodiesel and Using B20 section of
this “Operation and Maintenance Manual” Fluid Recommendations for
more information.
(1) All the fuels must comply with the specification in the table for the Perkins Specification Distillate Diesel Fuel.
Diesel Fuel Characteristics
Perkins recommends kinematic viscosities of 1.4 and
4.5 mm2/sec that is delivered to the fuel injection
Cetane Number
pump. If a fuel with a low viscosity is used, cooling of
the fuel may be required to maintain 1.4 cSt or
Cetane number is a measure of the ignition quality of
greater viscosity at the fuel injection pump. Fuels with
diesel fuel. Fuel that has a higher cetane number will
a high viscosity might require fuel heaters to lower
give a shorter ignition delay and will produce a better
the viscosity to 4.5 cSt at the fuel injection pump.
ignition quality. Cetane numbers are derived for fuels
against proportions of cetane and
Density
heptamethylnonane in the standard CFR engine.
Refer to “ISO 5165” for the test method.
Density is the mass of the fuel per unit volume at a
In Europe for non-road Stage V emissions
specific temperature. This parameter has a direct
regulations require minimum cetane number of 45. In
influence on engine performance and a direct
influence on emissions. This influence determines
the North America, minimum cetane number
requirement is 40.
from a heat output given injected volume of fuel. This
parameter is quoted in the following kg/m3 at 15 °C
Cetane number affect engine cold start ability,
(59 °F).
exhaust emissions, combustion noise, and altitude
performance. Fuel with a higher cetane number is
Perkins recommends a density of 841 kg/m3 to
desirable and recommended. This is particularly
obtain the correct power output. Lighter fuels are
important for operations in cold weather and at high
acceptable but these fuels will not produce the rated
altitude.
power.
Viscosity
Sulfur
The level of sulfur is governed by emissions
Viscosity is the property of a liquid of offering
legislations. Regional regulation, national
resistance to shear or flow. Viscosity decreases with
regulations, or international regulations can require a
increasing temperature. This decrease in viscosity
fuel with a specific sulfur limit. The sulfur content of
follows a logarithmic relationship for normal fossil
the fuel and the fuel quality must comply with all
fuel. The common reference is to kinematic viscosity.
existing local regulations for emissions.
Kinematic viscosity is the quotient of the dynamic
viscosity that is divided by the density. The
Perkins 2000 series diesel engines have been
determination of kinematic viscosity is normally by
designed to operate only with Ultra Low Sulfur Diesel
readings from gravity flow viscometers at standard
(ULSD) fuel. By using the test methods “ASTM
temperatures. Refer to “ISO 3104” for the test
D5453, or ISO 20846”, the content of sulfur in ULSD
method.
fuel must be below 15 PPM (mg/kg) or 0.0015%
mass.
The viscosity of the fuel is significant because fuel
serves as a lubricant for the fuel system components.
In the USA, EPA regulations require the use ULSD
Fuel must have sufficient viscosity to lubricate the
fuel with less than 0.0015 percent (15 PPM) (mg/kg))
fuel system in both extremely cold temperatures and
sulfur content.
extremely hot temperatures. If the kinematic viscosity
of the fuel is lower than “1.4 cSt” at the fuel injection
In Europe, sulfur free diesel fuels with sulphur
pump, damage to the fuel injection pump can occur.
content less than 0.0010 percent (10 PPM) (mg/kg))
This damage can be excessive scuffing and seizure.
is required by regulation for use in engines certified to
Low viscosity may lead to difficult hot restarting,
EU nonroad Stage V emissions.
stalling, and loss of performance. High viscosity may
result in seizure of the pump.
M0076814-03
61
Maintenance Section
General Fuel Information
Raw pressed vegetable oils are NOT acceptable for
NOTICE
use as a fuel in any concentration in compression
Use of diesel fuel with higher than 15 PPM sulphur
engines. Without esterification, these oils solidify in
limit in these engines will harm or permanently dam-
the crankcase and the fuel tank. These fuels may not
age emissions control systems and/or shorten serv-
be compatible with many of the elastomers that are
ice interval.
used in engines that are manufactured today. In
original forms, these oils are not suitable for use as a
fuel in compression engines. Alternate base stocks
Lubricity
for biodiesel may include animal tallow, waste
cooking oils, or various other feedstocks. To use any
Lubricity is the capability of the fuel to prevent pump
of the products that are listed as fuel, the oil must be
wear. The fluids lubricity describes the ability of the
esterified.
fluid to reduce the friction between surfaces that are
under load. This ability reduces the damage that is
Fuel made of 100 percent FAME is generally referred
caused by friction. Fuel injection systems rely on the
to as B100 biodiesel or neat biodiesel.
lubricating properties of the fuel. Until fuel sulfur limits
were mandated, the fuels lubricity was generally
Biodiesel can be blended with distillate diesel fuel.
The blends can be used as fuel. The most commonly
believed to be a function of fuel viscosity.
available biodiesel blends are B5, which is 5 percent
biodiesel and 95 percent distillate diesel fuel. B20,
The lubricity has particular significance to the current
which is 20 percent biodiesel and 80 percent distillate
ultra low sulfur fuel, and low aromatic fossil fuels.
These fuels are made to meet stringent exhaust
diesel fuel.
emissions.
Note: The percentages given are volume-based.
The lubricity of these fuels must not exceed wear
scar diameter of 0.52 mm (0.0205 inch). The fuel
The U.S. distillate diesel fuel specification “ASTM
lubricity test must be performed on an HFRR,
D975” includes up to B5 (5 percent) biodiesel.
operated at 60 °C (140 °F). Refer to “ISO 12156-1”.
European distillate diesel fuel specification EN590
includes up B7 (7 percent) biodiesel.
NOTICE
The fuels system has been qualified with fuel having
Note: Engines that are manufactured by Perkins are
lubricity up to 0.52 mm (0.0205 inch) wear scar diam-
certified by use of the prescribed Environmental
eter as tested by “ISO 12156-1”. Fuel with higher
Protection Agency (EPA) and European Certification
wear scar diameter than 0.52 mm (0.0205 inch) will
lead to reduced service life and premature failure of
fuels. Perkins does not certify engines on any other
the fuel system.
fuel. The user of the engine has the responsibility of
using the correct fuel that is recommended by the
manufacturer and allowed by the EPA and other
Fuel additives can enhance the lubricity of a fuel.
appropriate regulatory agencies.
Contact your fuel supplier for those circumstances
when fuel additives are required. Your fuel supplier
Specification Requirements
can make recommendations for additives to use, and
for the proper level of treatment.
The neat biodiesel must conform to the latest
“EN14214 or ASTM D6751” (in the USA). The
Distillation
biodiesel can only be blended in mixture of up to 20%
by volume in acceptable mineral diesel fuel meeting
Distillation is an indication of the mixture of different
latest edition of “EN590 or ASTM D975 S15”
hydrocarbons in the fuel. A high ratio of lightweight
designation.
hydrocarbons can affect the characteristics of
combustion.
In United States Biodiesel blends of B6 to B20 must
meet the requirements listed in the latest edition of
“ASTM D7467” (B6 to B20) and must be of an API
Recommendation for Biodiesel and
gravity of 30-45.
Using B20
In North America biodiesel and biodiesel blends must
Biodiesel is a fuel that can be defined as mono-alkyl
be purchased from the BQ-9000 accredited
esters of fatty acids. Biodiesel is a fuel that can be
producers and BQ-9000 certified distributors.
made from various feedstocks. The most commonly
available biodiesel in Europe is Rape Methyl Ester
European distillate diesel fuel specification “EN
16709:2015” includes up to B20 (20 percent)
(RME). This biodiesel is derived from rapeseed oil.
biodiesel. Any diesel fuel in Europe may contain up to
Soy Methyl Ester (SME) is the most common
biodiesel in the United States. This biodiesel is
B20.
derived from soybean oil. Soybean oil or rapeseed oil
are the primary feedstocks. These fuels are together
known as Fatty Acid Methyl Esters (FAME).
62
M0076814-03
Maintenance Section
General Fuel Information
In other areas of the world, the use of biodiesel that is
Note: Perkins Fuel Cleaner (part number T400012)
BQ-9000 accredited and certified, or that is
is most effective in cleaning and preventing the
accredited and certified by a comparable biodiesel
formation of deposits. Perkins Diesel Fuel
quality body to meet similar biodiesel quality
Conditioner helps to limit deposit issues by improving
standards is required.
the stability of biodiesel and biodiesel blends. For
more information refer to Perkins Diesel Fuel
Engine Service Requirements
Cleaner.
Aggressive properties of biodiesel fuel may cause
Biodiesel fuel contains metal contaminants (sodium,
debris in the fuel tank and fuel lines. The aggressive
potassium, calcium, and/or magnesium) that form
properties of biodiesel will clean the fuel tank and fuel
ash products upon combustion in the diesel engine.
lines. This cleaning of the fuel system can
The ash can have an impact on the life and
prematurely block the fuel filters. Perkins recommend
performance of aftertreatment emissions control
that after the initial usage of B20 biodiesel blended
devices and can accumulate in DPF. The ash
fuel the fuel filters must be replaced at 50 hours.
accumulation may cause the need for more frequent
ash service intervals and cause loss of performance
Glycerides present in biodiesel fuel will also cause
fuel filters to become blocked more quickly. Therefore
General Requirements
the regular service interval should be reduced to 250
hours.
Biodiesel has poor oxidation stability, which can
result in long-term problems in the storage of
When biodiesel fuel is used, crank case oil and
aftertreatment systems may be influenced. This
biodiesel. Biodiesel fuel should be used within 6
months of manufacture. Equipment should not be
influence is due to the chemical composition and
stored with the B20 biodiesel blends in the fuel
characteristics of biodiesel fuel, such as density and
system for longer than 3 months.
volatility, and to chemical contaminants that can be
present in this fuel, such as alkali and alkaline metals
Due to poor oxidation stability and other potential
(sodium, potassium, calcium, and magnesium).
issues, it is strongly recommended that engines with
limited operational time either not use B20 biodiesel
• Crankcase oil fuel dilution can be higher when
blends or, whilst accepting some risk, limit biodiesel
biodiesel or biodiesel blends are used. This
blend to a maximum of B5. Examples of applications
increased level of fuel dilution when using
that should limit the use of biodiesel are the following:
biodiesel or biodiesel blends is related to the
Standby Generator sets and certain emergency
typically lower volatility of biodiesel. In-cylinder
vehicles.
emissions control strategies utilized in many of the
industrial latest engine designs may lead to a
For standby generator sets and emergency vehicles
that cannot avoid use of biodiesel blends fuel quality
higher level of biodiesel concentration in the
in the engine fuel tank must be sampled and checked
sump. The long-term effect of biodiesel
monthly. Test should include acid number
concentration in crankcase oil is unknown
(EN14104), oxidation stability (EN 15751 commonly
currently.
know as the Rancimant test), and sediment
(ISO12937). For standby generator sets oxidation
• Perkins recommend the use of oil analysis to
stability of biodiesel blend must be 20 hours or more
check the quality of the engine oil if biodiesel fuel
as per EN 15751. If the test shows that the fuel has
is used. Ensure that the level of biodiesel in the
degraded, fuel tank must be drained and engine
fuel is noted when the oil sample is taken.
flashed by running with the fresh high-quality diesel
fuel.
Performance Related Issues
Perkins strongly recommended that seasonally
Due to the lower energy content than the standard
operated engines have the fuel systems, including
distillate fuel B20 will cause a power loss in order of 2
fuel tanks, flashed with conventional diesel fuel
to 4 percent. In addition, over time the power may
before prolonged shutdown periods. An example of
deteriorate further due to deposits in the fuel
an application that should seasonally flush the fuel
injectors.
system is a combine harvester.
Biodiesel and biodiesel blends are known to cause
Microbial contamination and growth can cause
an increase in fuel system deposits, most significant
corrosion in the fuel system and premature plugging
of which are deposits within the fuel injector. These
of the fuel filter. Consult your supplier of fuel for
deposits can cause a loss in power due to restricted
assistance in selecting appropriate anti-microbial
or modified fuel injection or cause other functional
additive.
issues associated with these deposits.
Water accelerates microbial contamination and
growth. When biodiesel is compared to distillate
fuels, water is naturally more likely to exist in the
biodiesel. Therefore check frequently and if
necessary, drain the water separator.
M0076814-03
63
Maintenance Section
General Fuel Information
Materials such as brass, bronze, copper, lead, tin,
Fuel that complies with “EN590” CLASS 4 can be
and zinc accelerate the oxidation process of the
used at temperatures as low as -44 °C (-47.2 °F).
biodiesel fuel. The oxidation process can cause
Refer to “EN590” for a detailed discretion of the
deposits formation therefore these materials must not
physical properties of the fuel.
be used for fuel tanks and fuel lines.
The diesel fuel “ASTM D975 1-D” used in the United
States of America may be used in very cold
Renewable and Alternative Fuels
temperatures that are below -18 °C (-0.4 °F).
Perkins supports development and use of renewable
Aftermarket Fuel Additives
fuels through sustainability initiatives. In recent years
various forms of renewable and alternative
(synthetic) diesel fuels have started to emerge.
NOTICE
Perkins does not warrant the quality or performance
Synthetic diesel fuels are produced by gasification of
of non-Perkins fluids and filters.
various feedstock and then synthesis to liquid to
obtain paraffinic diesel fuel. Based on the feedstock
When auxiliary devices, accessories, or consum-
used these fuels are commonly referred to as
ables (filters, additives) which are made by other
Biomass to liquid (BTL), Gas to liquid (GTL) and Coal
manufacturers are used on Perkins products, the
to liquid (CTL). Hydrotreating of vegetable oils and
Perkins warranty is not affected simply because of
animal fats is another emerging process for
such use.
production of bio based diesel fuel called
Hydrotreated Vegetable Oil (HVO).
However, failures that result from the installation
or use of other manufacturers devices, accesso-
BTL and HVO fuels are considered to be low carbon
ries, or consumables are NOT Perkins defects.
fuels as they reduce carbon foot print compared to
Therefore, the defects are NOT covered under the
Perkins warranty.
fossil fuels and are commonly referred to as
renewable fuels. These fuels must not be confused
with biodiesel FAME which is fundamentally different
Supplemental diesel fuel additives are not generally
fuel and is discussed in a separate section in this
recommended. This recommendation is due to
potential damage to the fuel system or the engine.
manual.
Your fuel supplier or the fuel manufacturer will add
These paraffinic diesel fuels have virtually no sulphur
the appropriate supplemental diesel fuel additives.
or aromatics and have very high cetane numbers
which enable very clean burning and efficient engine
Perkins recognizes the fact that additives may be
operation. Chemically these fuels are similar to diesel
required in some special circumstances.
fuel derived from petroleum.
Note: Some anti-corrosion additives can lead to
Paraffinic diesel fuels are considered as acceptable
injector fouling, this fouling can cause the injector to
to use as a directed replacement to petroleum diesel
operate incorrectly.
or as a blendstock for petroleum diesel fuel in Perkins
diesel engines provided they meet latest edition of
Contact your fuel supplier for those circumstances
the paraffinic diesel fuel specification “CENTS
when fuel additives are required. Your fuel supplier
15940”. The fuel should also meet requirements
can recommend the appropriate fuel additive and the
described in table 3 , Perkins Specification for
correct level of treatment.
Distillate Diesel Fuel, EN590, or latest ASTM D975
specification with the exception of density, which is
Note: For the best results, your fuel supplier should
inherently lower for paraffinic fuels. Due to lower
treat the fuel when additives are required. The
density, some rated power loss might be
treated fuel must meet the requirements that are
noticeable.
stated in table 3 .
Ensure that the fuel has got appropriate cold flow
Perkins Diesel Fuel System Cleaner
properties (cloud point and CFPP) for the minimum
statistical ambient temperature the engine is
Perkins Fuel Cleaner (part number T400012) is the
expected to see in the operation. The fuel must also
only fuel cleaner that is recommended by Perkins.
meet lubricity requirements as specified in the
lubricity section of this “Operation and Maintenance
If biodiesel or biodiesel blends of fuel are to be used,
Manual” Fluid Recommendations
Perkins require the use of Perkins fuel cleaner. The
use of the fuel is to remove deposits within the fuel
Fuel for Cold-Weather Operation
system that is created with the use of biodiesel. For
more information on the use of biodiesel and
The European standard “EN590” contains climate
biodiesel blends refer to Recommendation for
Biodiesel and Using B20.
dependant requirements and a range of options. The
options can be applied differently in each country.
There are five classes that are given to arctic
climates and severe winter climates. 0, 1, 2, 3 and 4.
64
M0076814-03
Maintenance Section
General Fuel Information
Perkins fuel cleaner will remove deposits that can
•
Fill fuel tanks with fuels of “ISO 18/16/13”
form in the fuel system with the use of biodiesel and
cleanliness level or cleaner, in particular for
biodiesel blends. These deposits can create a loss of
engines with common rail and unit injection
power and engine performance.
systems. When you refuel the tank, filter the fuel
through a 4 µm absolute filter (Beta 4 = 75 up to
Once the fuel cleaner has been added to the fuel, the
200) to reach the recommended cleanliness level.
deposits within the fuel system are removed after 30
This filtration should be installed at the device that
hours of engine operation. For maximum results,
dispenses the fuel to the fuel tank. In addition,
continue to use the fuel cleaner for up to 80 hours.
Perkins fuel cleaner can be used on an on-going
filtration at the dispensing point should remove
basis with no adverse impact on engine or fuel
water to ensure that fuel is dispensed at 500 ppm
system durability.
water or less.
Details instruction on the rate of which the fuel
•
Perkins recommends the use of bulk fuel filter /
cleaner is to be used are on the container.
coalescer units which clean the fuel of both
particulate contamination and water in a single
Note: Perkins fuel cleaner is compatible with existing
pass.
and U.S. EPA Tier 4 nonroad certified diesel engine
emission control catalysts and particulate filters.
•
Ensure that you use Perkins Advanced Efficiency
Perkins fuel system cleaner contains less than 15
Fuel Filters. Change your fuel filters per
ppm of sulfur and is acceptable for use with ULSD
recommended service requirements or as needed.
fuel.
•
Drain your water separators daily.
Contamination Control
•
Drain your fuel tanks of sediment and water per
Recommendations for Fuels
the Operation and Maintenance Manual
instructions.
Fuels of “ISO 18/16/13” cleanliness level or cleaner
as dispensed into the engine or application fuel tank
•
Install and maintain a properly designed bulk filter
should be used. This action will reduce risk of power
/ coalescer filtration system. Continuous bulk
loss, fuel system failures, and related down time of
filtration systems may be required to ensure that
engines. This cleanliness level is important for new
dispensed fuel meets the cleanliness target.
fuel system designs such as common rail injection
Consult your Perkins distributor for availability of
systems and unit injectors. These fuels systems
bulk filtration products.
utilize higher fuel injection pressures and have tight
clearances between moving parts to meet required
•
Centrifugal filters may need to be used as a pre-
stringent emissions regulations. Peak injection
filter with fuel that is severely contaminated with
pressures in current fuel injection systems may
gross amounts of water and/or large particulate
exceed 2000 bar (29000 psi). Clearances in these
contaminants. Centrifugal filters can effectively
systems are less than 5 µm. As a result, particle
remove large contaminants. Centrifugal filters may
contaminants as small as 4 µm can cause scoring
and scratching of internal pump and injector surfaces
not be able to remove the small abrasive particles
and of injector nozzles.
required to achieve the recommended “ISO”
cleanliness level. Bulk filter / coalescers are
Water in the fuel causes cavitation, corrosion of fuel
necessary as a final filter to achieve the
system parts, and provides an environment where
recommended cleanliness level.
microbial growth in the fuel can flourish. Other
sources of fuel contamination are soaps, gels, or
•
Install desiccant type breathers of 4 µm or less
other compounds that may result from undesirable
absolute efficiency with the ability to remove water
chemical interactions in the fuels, particularly in
on bulk storage tanks.
ULSD. Gels and other compounds can also form in
biodiesel fuel at low temperatures or if biodiesel is
•
Follow proper practices of fuel transportation.
stored for extended periods. The best indication of
Filtration from the storage tank to the application
microbial contamination, fuel additives, or cold
promotes the delivery of clean fuel. Fuel filtration
temperature gel is rapid filter plugging of bulk fuel
can be installed at each transport stage to keep
filters or application fuel filters.
the fuel clean.
To reduce downtime due to contamination, follow
these fuel maintenance guidelines.
•
Cover, protect, and ensure cleanliness of all
connection hoses, fittings, and dispensing
• Use high-quality fuels per recommended and
nozzles.
required specifications
M0076814-03
65
Maintenance Section
Fluid Recommendations
Consult your local Perkins distributor for additional
Note: The water must be used with an inhibitor to
information on Perkins designed and produced
protect the engine.
filtration products.
Distilled water or deionized water is
recommended for use in engine cooling systems.
i07675883
DO NOT use the following types of water in cooling
Fluid Recommendations
systems: Hard water, softened water that has been
conditioned with salt and sea water.
If distilled water or deionized water is not available,
use water with the properties that are listed in Table 5
General Coolant Information
Table 5
NOTICE
Acceptable Water
Never add coolant to an overheated engine. Engine
damage could result. Allow the engine to cool first.
Property
Maximum Limit
Chloride (Cl)
40 mg/L
NOTICE
Sulfate (SO4)
100 mg/L
If the engine is to be stored in, or shipped to an area
with below freezing temperatures, the cooling system
Total Hardness
170 mg/L
must be either protected to the lowest outside tem-
perature or drained completely to prevent damage.
Total Solids
340 mg/L
Acidity
pH of 5.5 to 9.0
NOTICE
Frequently check the specific gravity of the coolant
For a water analysis, consult one of the following
for proper freeze protection or for anti-boil protection.
sources:
Clean the cooling system for the following reasons:
• Local water utility company
• Contamination of the cooling system
• Agricultural agent
• Overheating of the engine
• Independent laboratory
• Foaming of the coolant
Additives
Additives help to protect the metal surfaces of the
NOTICE
cooling system. A lack of coolant additives or
Never operate an engine without water temperature
insufficient amounts of additives enable the following
regulators in the cooling system. Water temperature
conditions to occur:
regulators help to maintain the engine coolant at the
proper operating temperature. Cooling system prob-
• Corrosion
lems can develop without water temperature
regulators.
• Formation of mineral deposits
• Rust
Many engine failures are related to the cooling
system. The following problems are related to cooling
• Scale
system failures: Overheating, leakage of the water
pump and plugged radiators or heat exchangers.
• Foaming of the coolant
These failures can be avoided with correct cooling
Many additives are depleted during engine operation.
system maintenance. Cooling system maintenance is
These additives must be replaced periodically.
as important as maintenance of the fuel system and
the lubrication system. Quality of the coolant is as
Additives must be added at the correct concentration.
important as the quality of the fuel and the lubricating
Over concentration of additives can cause the
oil.
inhibitors to drop out-of-solution. The deposits can
enable the following problems to occur:
Coolant is normally composed of three elements:
Water, additives, and glycol.
• Formation of gel compounds
Water
• Reduction of heat transfer
Water is used in the cooling system to transfer heat.
• Leakage of the water pump seal
66
M0076814-03
Maintenance Section
Fluid Recommendations
• Plugging of radiators, coolers, and small passages
Note: Some commercially available coolants are
based on alternative fluids, such as 1, 3-propanediol
Glycol
(beta-propylene glycol, PDO), glycerin (glycerol) or
mixtures of these alternatives with ethylene/
Glycol in the coolant helps to provide protection
propylene glycols. At the time of publication of this
against the following conditions:
document no industry standard exists for coolants
based on these chemicals. Until such standard/
• Boiling
specifications are published and evaluated by
Perkins, use of PDO, glycerine or other alternative
• Freezing
coolants is not recommended in Perkins diesel
engines.
• Cavitation of the water pump
For optimum performance, Perkins recommends a
Coolant Recommendations
1:1 mixture of a water/glycol solution.
• ELC
Extended Life Coolant
Note: Use a mixture that will provide protection
against the lowest ambient temperature.
• SCA
Supplement Coolant Additive
Note: 100 percent pure glycol will freeze at a
• ASTM
American Society for Testing and
temperature of -13 °C (8.6 °F).
Materials
Most conventional antifreezes use ethylene glycol.
ELC - extended life coolant. A coolant that relies on
organic inhibitors for corrosion and cavitation
Propylene glycol may also be used. In a 1:1 mixture
protection. Also called OAT coolant (Organic Acid
with water, ethylene and propylene glycol provide
Technology).
similar protection against freezing and boiling. Refer
to Table 6 and refer to table 7 .
SCA - supplemental coolant additive, concentrated
Table 6
inorganic inhibitor package.
Ethylene Glycol
Extender - concentrated organic inhibitor package.
Concentration
Freeze Protection
Conventional Coolant - a coolant that relies on
50 Percent
-36 °C (-33 °F)
inorganic inhibitors for corrosion and cavitation
protection.
60 Percent
-51 °C (-60 °F)
Hybrid Coolant - a coolant in which the corrosion and
cavitation protection is based on a mixture of organic
NOTICE
and inorganic inhibitors.
Do not use propylene glycol in concentrations that
exceed 50 percent glycol because of the reduced
The following coolants are recommended for used in
heat transfer capability of propylene glycol. Use ethyl-
Perkins diesel engines:
ene glycol in conditions that require additional protec-
tion against boiling or freezing.
Preferred - Perkins ELC
Table 7
Acceptable - A commercial heavy-duty antifreeze
Propylene Glycol
that meets “ASTM D6210” or “ASTM D4985”
specifications.
Concentration
Freeze Protection
50 Percent
-29 °C (-20 °F)
NOTICE
The Perkins industrial engines with a NOx reduc-
tion system must be operated with a minimum
To check the concentration of glycol in the coolant,
30% volume glycol-water mixture, Perkins recom-
measure the specific gravity of the coolant.
mends 50% volume glycol-water mixture of water
and glycol. The 50% concentration allows the
NOx reduction system to operate correctly at
high ambient temperatures.
M0076814-03
67
Maintenance Section
Fluid Recommendations
Containers of several sizes are available. Consult
NOTICE
your Perkins distributor for the part numbers.
Do not use a commercial coolant/antifreeze that only
meets the ASTM D3306 specification. This type of
coolant/antifreeze is made for light automotive
ELC Cooling System Maintenance
applications.
Correct additions to the Extended Life
Perkins recommends a 50% mixture of water and
Coolant
glycol. This mixture of water and glycol will provide
optimum heavy-duty performance as an antifreeze.
NOTICE
This ratio may be changed to 40% water to 60%
Use only Perkins products for pre-mixed coolants.
glycol if extra freezing protection is required.
Mixing Extended Life Coolant with other products re-
A mixture of SCA inhibitor and water is acceptable
duces the Extended Life Coolant service life. Failure
but will not give the same level of corrosion, boiling
to follow the recommendations can reduce cooling
and, freezing protection as ELC. Perkins
system components life unless appropriate corrective
recommends a 6 percent to 8 percent concentration
action is performed.
of SCA in those cooling systems. Distilled water or
deionized water is preferred.
To maintain the correct balance between the
Table 8
antifreeze and the additives, you must maintain the
recommended concentration of ELC. Lowering the
Coolant Service Life
proportion of antifreeze lowers the proportion of
Coolant Type
Service Life(1)
additive. Lowering the ability of the coolant to protect
the system will form pitting, from cavitation, from
6,000 Service Hours or Three
erosion, and from deposits.
Perkins ELC
Years
Commercial Heavy-Duty Anti-
NOTICE
freeze that meets “ASTM
3000 Service Hours or Two Year
Do not use a conventional coolant to top-off a cooling
D6210”
system that is filled with Extended Life Coolant
(ELC).
Commercial SCA inhibitor and
3000 Service Hours or One Year
Water
Do not use supplemental coolant additive (SCA).
(1) Use the interval that occurs first. The cooling system must also
be flushed out at this time.
ELC Cooling System Cleaning
Perkins ELC
Note: If the cooling system is already using ELC,
Perkins provides ELC for use in the following
cleaning agents are not required to be used at the
applications:
specified coolant change interval. Cleaning agents
are only required if the system has been
• Heavy-duty spark ignited gas engines
contaminated by the addition of some other type of
coolant or by cooling system damage.
• Heavy-duty diesel engines
Clean water is the only cleaning agent that is
• Automotive applications
required when ELC is drained from the cooling
system.
The anti-corrosion package for ELC is different from
the anti-corrosion package for other coolants. ELC is
Before the cooling system is filled, the heater control
an ethylene glycol base coolant. However, ELC
(if equipped) must be set to the HOT position. Refer
contains organic corrosion inhibitors and antifoam
to the OEM to set the heater control. After the cooling
agents with low amounts of nitrite. Perkins ELC has
system is drained and the cooling system is refilled,
been formulated with the correct amount of these
operate the engine until the coolant level reaches the
additives to provide superior corrosion protection for
normal operating temperature and until the coolant
all metals in engine cooling systems.
level stabilizes. As needed, add the coolant mixture
to fill the system to the specified level.
ELC is available in a premixed cooling solution with
distilled water. ELC is a 1:1 mixture. The Premixed
ELC provides freeze protection to -36 °C (-33 °F).
Changing to Perkins ELC
The Premixed ELC is recommended for the initial fill
of the cooling system. The Premixed ELC is also
To change from heavy-duty antifreeze to the Perkins
recommended for topping off the cooling system.
ELC, perform the following steps:
68
M0076814-03
Maintenance Section
Fluid Recommendations
• Drain the cooling system into a suitable container.
NOTICE
Dispose of the coolant according to local
Care must be taken to ensure that all fluids are con-
tained during performance of inspection, mainte-
regulations. Flush the system with a 5 to 10
nance, testing, adjusting and the repair of the
percent solution of Perkins ELC. Fill the system
product. Be prepared to collect the fluid with suitable
with the Perkins ELC.
containers before opening any compartment or disas-
sembling any component containing fluids.
• Maintain the system as a conventional Heavy-
Duty Coolant. Treat the system with an SCA.
Dispose of all fluids according to local regulations
Change the coolant at the interval that is
and mandates.
recommended for the conventional Heavy-Duty
Coolant.
1. Drain the coolant into a suitable container.
Commercial Heavy-Duty Antifreeze and
2. Dispose of the coolant according to local
SCA
regulations.
3. Fill the cooling system with a 33 percent solution of
NOTICE
Perkins ELC and operate the engine, ensure that
Commercial Heavy-Duty Coolant which contains
Amines as part of the corrosion protection system
the thermostat opens. Stop the engine and allow
must not be used.
the engine to cool. Drain the coolant.
Note: Use distilled or deionized water in the solution.
NOTICE
Never operate an engine without water temperature
4. Again, fill the cooling system with a 33 percent
regulators in the cooling system. Water temperature
solution of Perkins ELC and operate the engine
regulators help to maintain the engine coolant at the
ensure that the thermostat opens. Stop the engine
correct operating temperature. Cooling system prob-
and allow to cool.
lems can develop without water temperature
regulators.
5. Drain the cooling system.
Check the glycol concentration to ensure adequate
NOTICE
protection against boiling or freezing. Perkins
Incorrect or incomplete flushing of the cooling system
recommends the use of a refractometer for checking
can result in damage to copper and other metal
the glycol concentration. A hydrometer should not be
components.
used.
Perkins engine cooling systems should be tested at
500 hour intervals for the concentration of SCA.
NOTICE
Most commercial cooling system cleaning agents are
Additions of SCA are based on the results of the test.
corrosive and their use is not recommended by
An SCA that is liquid may be needed at 500 hour
Perkins.
intervals.
6. Fill the cooling system with the Perkins Premixed
NOTICE
Do not mix types and brands of coolant.
ELC. Operate the engine. Ensure that all coolant
valves open then stop the engine. When cool
Do not mix brands and types of SCAs.
check the coolant level.
Do not mix SCAs and Extenders.
ELC Cooling System Contamination
Only use SCAs or Extender approved by coolant
manufacturer and compatible with coolant.
NOTICE
Mixing ELC with other products reduces the effective-
ness of the ELC and shortens the ELC service life.
Adding the SCA to Heavy-Duty Coolant
Failure to follow these recommendations can result in
shortened cooling system component life.
at the Initial Fill
ELC cooling systems can withstand contamination to
Coolants conforming to ASTM D4985 and not
a maximum of 10 percent of conventional heavy-duty
conforming D6210 require the addition of SCA at
antifreeze or SCA. If the contamination exceeds 10
initial fill.
percent of the total system capacity, perform ONE of
Use the equation that is in Table 9 to determine the
the following procedures:
amount of SCA that is required when the cooling
system is initially filled.
M0076814-03
69
Maintenance Section
Fluid Recommendations
Table 9
Equation For Adding The SCA To The Heavy-Duty Coolant At
Cleaning the System of Heavy-Duty
The Initial Fill
Antifreeze
V × 0.07 = X
V is the total volume of the cooling system.
Note: Before corrosion inhibitors can be effective the
cooling system must be free from rust, scale and
X is the amount of SCA that is required.
deposits.
• Drain the cooling system.
Table 10 is an example for using the equation that is
in Table 9 .
• Before filling the cooling system with acceptable
Table 10
quality water, pre-dissolve the cleaning agent in
Example Of The Equation For Adding The SCA To The Heavy-
the water. Use a non-foaming detergent to clean
Duty Coolant At The Initial Fill
oil contamination, consult your Perkins dealer for
suitable product.
Total Volume of the
Multiplication
Amount of SCA
Cooling System (V)
Factor
that is Required
(X)
NOTICE
Most commercial cooling system cleaning agents are
15 L (4 US gal)
× 0.07
1.05 L (35.5 oz)
corrosive and their use is not recommended by
Perkins.
Adding The SCA to The Heavy-Duty
The cooling system must be thoroughly flushed with
clean water after using cleaning agents.
Coolant For Maintenance
Cleaning agents for marine or industrial cooling sys-
Heavy-duty antifreeze of all types REQUIRE periodic
tem must not be used, these areveryaggressiveand
additions of an SCA.
can cause damage to cooling system components.
Test the antifreeze periodically for the concentration
of SCA. For the interval, refer to the Operation and
Maintenance Manual, “Maintenance Interval
• Run the engine for approximately 30 minutes and
Schedule” (Maintenance Section). Cooling System
then leave the engine to cool down.
Supplemental Coolant Additive (SCA) Test/Add.
• Take a sample of the solution from the cooling
Additions of SCA are based on the results of the test.
system, drain the system.
The size of the cooling system determines the
amount of SCA that is needed.
• Allow the sample to sit for at least 30 minutes and
check for signs of oil and deposits. If oil and
Use the equation that is in Table 11 to determine the
deposits are still present repeat the procedure.
amount of SCA that is required, if necessary:
Table 11
• Flush the system with clean water.
Equation For Adding The SCA To The Heavy-Duty Coolant
• Fill the system with new coolant.
For Maintenance
V × 0.023 = X
i08273319
V is the total volume of the cooling system.
Fluid Recommendations
X is the amount of SCA that is required.
Table 12 is an example for using the equation that is
in Table 11 .
General Lubricant Information
Table 12
Because of government regulations regarding the
Example Of The Equation For Adding The SCA To The Heavy-
certification of exhaust emissions from the engine,
Duty Coolant For Maintenance
the lubricant recommendations must be followed.
Total Volume of the
Multiplication
Amount of SCA
• API
American Petroleum Institute
Cooling System (V)
Factor
that is Required
(X)
• SAE
Society Of Automotive Engineers Inc.
15 L (4 US gal)
× 0.023
0.35 L (11.7 oz)
• ACEA
Association des Constructers
European Automobiles.
• ECF-3
Engine Crankcase Fluid
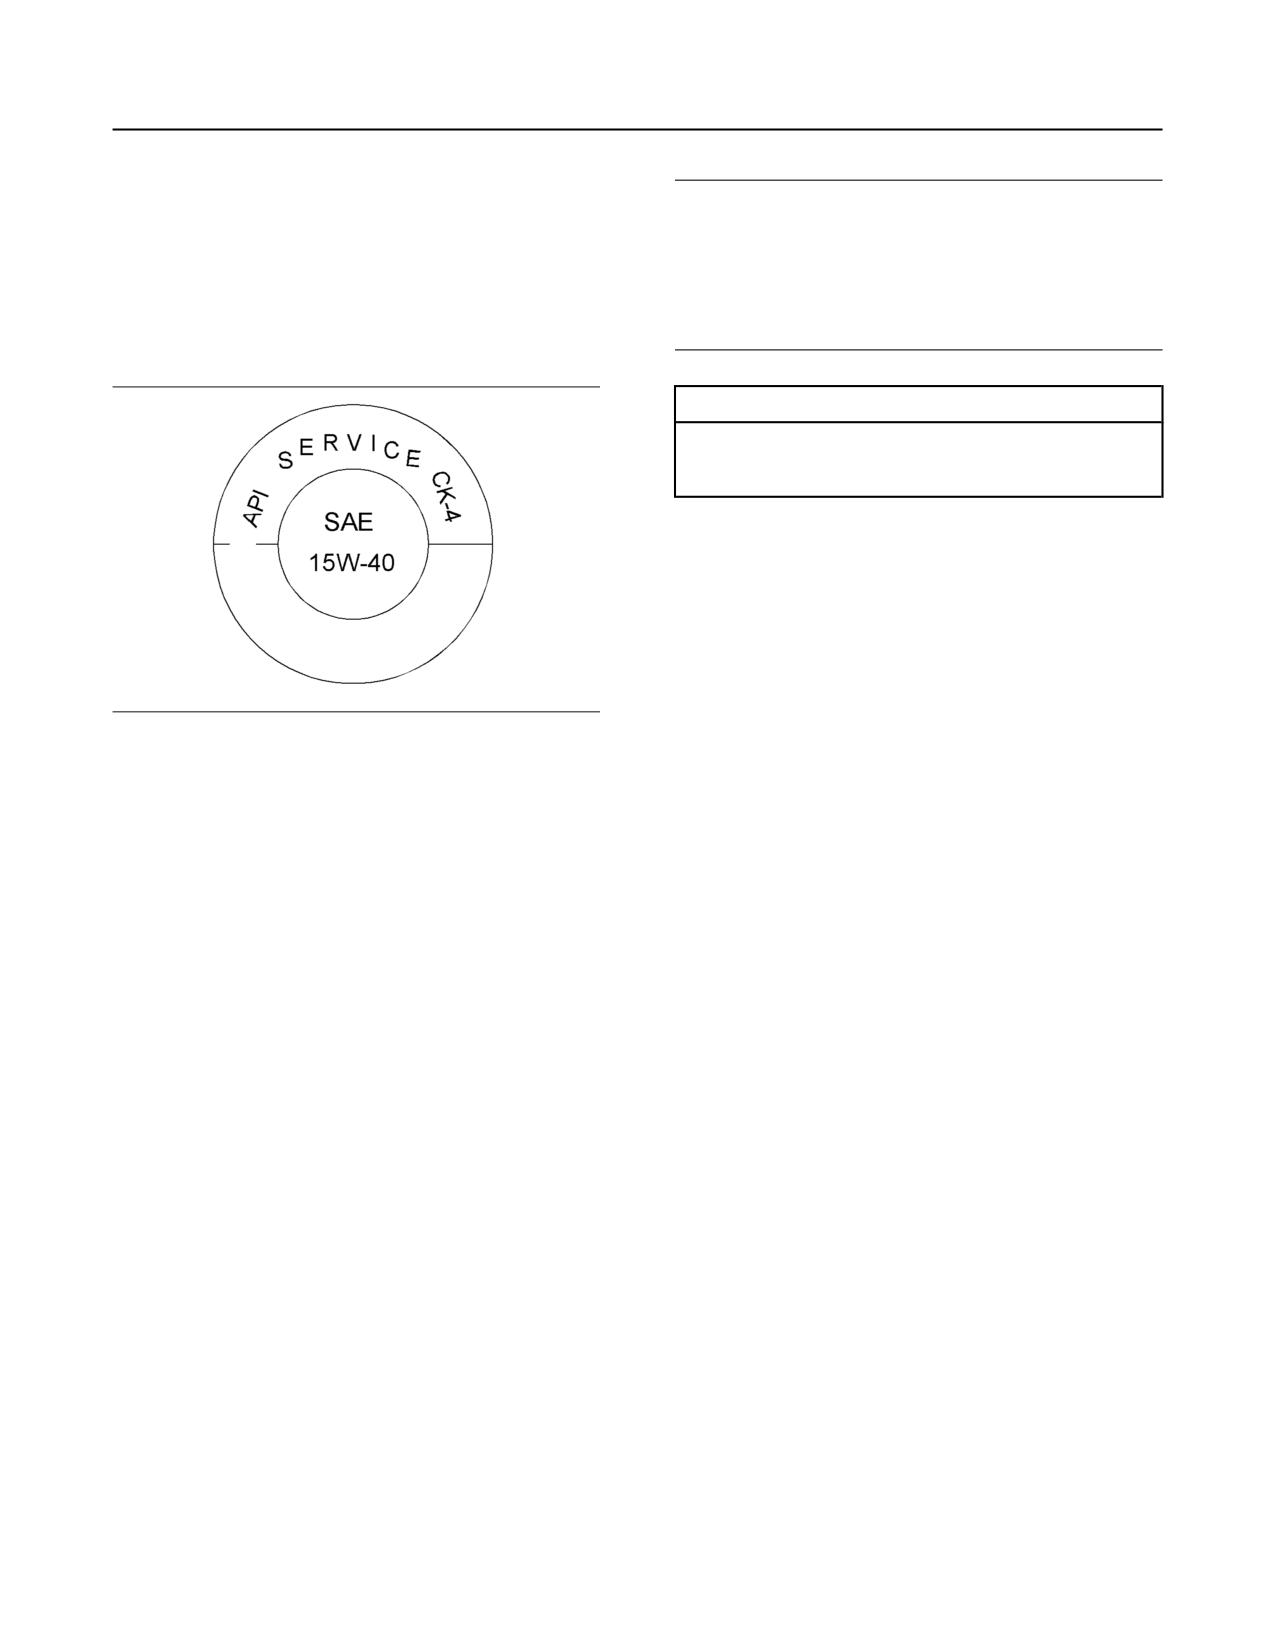
70
M0076814-03
Maintenance Section
Fluid Recommendations
Licensing
NOTICE
Perkins require the use of the following specifica-
The Engine Oil Licensing and Certification System by
tion of engine oil. Failure to use the appropriate
the American Petroleum Institute (API) and the
specification of engine oil will reduce the life of
Association des Constructers European Automobiles
your engine. Failure to use the appropriate speci-
and (ACRA) is recognized by Perkins. For detailed
fication of engine oil will also reduce the life of
information about this system, see the latest edition
your aftertreatment system.
of the “API publication No. 1509”. Engine oils that
bear the API symbol are authorized by API.
Table 13
Oil Specification
API CK-4
ACEA E9
ECF-3
API CK-4 and ACEA E9 oil categories have the
following chemical limits:
•
0.1 percent maximum sulfated ash
•
0.12 percent maximum phosphorous
•
0. 4 percent maximum sulfur
The chemical limits were developed to maintain the
Illustration 56
g06183768
expected life of the engine aftertreatment system.
Typical API symbol
The performance of the engine aftertreatment system
can be adversely affected if oil that is not specified in
Terminology
table 13 is used.
The life of your Aftertreatment system is defined by
Certain abbreviations follow the nomenclature of
“SAE J754”. Some classifications follow “SAE J183”
the accumulation of ash on the surface of the filter.
Ash is the inert part of the particulate matter. The
abbreviations, and some classifications follow the
“EMA Recommended Guideline on Diesel Engine
system is designed to collect this particulate matter.
Oil”. In addition to Perkins definitions, there are other
There is a small percentage of particulate matter that
definitions that will be of assistance in purchasing
is left behind as the soot is burnt. This matter will
lubricants.
eventually block the filter, causing loss of
performance and increased fuel consumption. Most
Refer to Perkins Diesel Engines Fluids
of the ash comes from the engine oil which is
Recommendations, M0113102 for additional
gradually consumed during normal operation. This
information that relates to oil.
ash is passes through the exhaust. To meet the
designed life of the product, the use of the
Engine Oil
appropriate engine oil is essential. The oil
specification that is listed in table 13 has low ash
content.
Commercial Oils
Maintenance intervals for engines that use
Perkins recommends use of Perkins Diesel Engine
biodiesel - The oil change interval can be adversely
Oil for all Perkins engines. Perkins unique oil
affected by the use of biodiesel. Use oil analysis to
formulations have been developed to provide full
monitor the condition of the engine oil. Use oil
performance and maximum service life of your
analysis also to determine the oil change interval that
engine, and in tests have been shown to provide
is optimum.
superior protection. Available in suitable API
classifications to meet the emissions requirements
and performance of your engine, Refer to 13 for the
Note: API FA-4 oil is designed for use in selected
correct oil specification for your engine. Consult your
on-highway applications and is NOT designed to
Perkins distributor for more information on these
support off-road applications, including Perkins
multi-grade oils.
Engines. DO NOT use API FA-4 oil for Perkins
engines. These engine oils are not approved by
Perkins and these engine oils must not be used:
CC, CD, CD-2, CF-4, CG-4, CH-4, and CI-4.

M0076814-03
71
Maintenance Section
Fluid Recommendations
Lubricant Viscosity Recommendations
Aftermarket Oil Additives
for Direct Injection (DI) Diesel Engines
Perkins does not recommend the use of aftermarket
additives in oil. Aftermarket additives are not
The correct SAE viscosity grade of oil is determined
necessary to achieve the engines maximum service
by the minimum ambient temperature during cold
life or rated performance. Fully formulated, finished
engine start-up, and the maximum ambient
oils consist of base oils and of commercial additive
temperature during engine operation.
packages. These additive packages are blended into
the base oils at precise percentages to help provide
Refer to illustration 57 (minimum temperature) to
finished oils with performance characteristics that
determine the required oil viscosity for starting a cold
meet industry standards.
engine.
There are no industry standard tests that evaluate
Refer to illustration 57 (maximum temperature) to
the performance or the compatibility of aftermarket
select the oil viscosity for engine operation at the
additives in finished oil. Aftermarket additives may
highest ambient temperature that is anticipated.
not be compatible with the finished oils additive
package, which could lower the performance of the
Generally, use the highest oil viscosity that is
finished oil. The aftermarket additive could fail to mix
available to meet the requirement for the temperature
with the finished oil. This failure could produce sludge
at start-up.
in the crankcase. Perkins discourages the use of
aftermarket additives in finished oils.
To achieve the best performance from a Perkins
engine, conform to the following guidelines:
• See the appropriate “Lubricant Viscosities” . Refer
to the illustration 57 to find the correct oil viscosity
grade for your engine.
• At the specified interval, service the engine. Use
new oil and install a new oil filter.
• Perform maintenance at the intervals that are
specified in the Operation and Maintenance
Manual, “Maintenance Interval Schedule”.
Oil analysis
Some engines may be equipped with an oil sampling
valve. If oil analysis is required, the oil sampling valve
is used to obtain samples of the engine oil. The oil
analysis will complement the preventive maintenance
program.
Illustration 57
g03329707
Lubricant Viscosities
The oil analysis is a diagnostic tool that is used to
Supplemental heat is recommended for cold soaked
determine oil performance and component wear
starts below the minimum ambient temperature.
rates. Contamination can be identified and measured
by using oil analysis. The oil analysis includes the
Supplemental heat may be required for cold soaked
following tests:
starts that are above the minimum temperature that
is stated, depending on the parasitic load and other
• The Wear Rate Analysis monitors the wear of the
factors. Cold soaked starts occur when the engine
engines metals. The amount of wear metal and
has not been operated for a period of time. This
interval will allow the oil to become more viscous due
type of wear metal that is in the oil is analyzed.
to cooler ambient temperatures.
The increase in the rate of engine wear metal in
the oil is as important as the quantity of engine
wear metal in the oil.
• Tests are conducted to detect contamination of the
oil by water, glycol, or fuel.
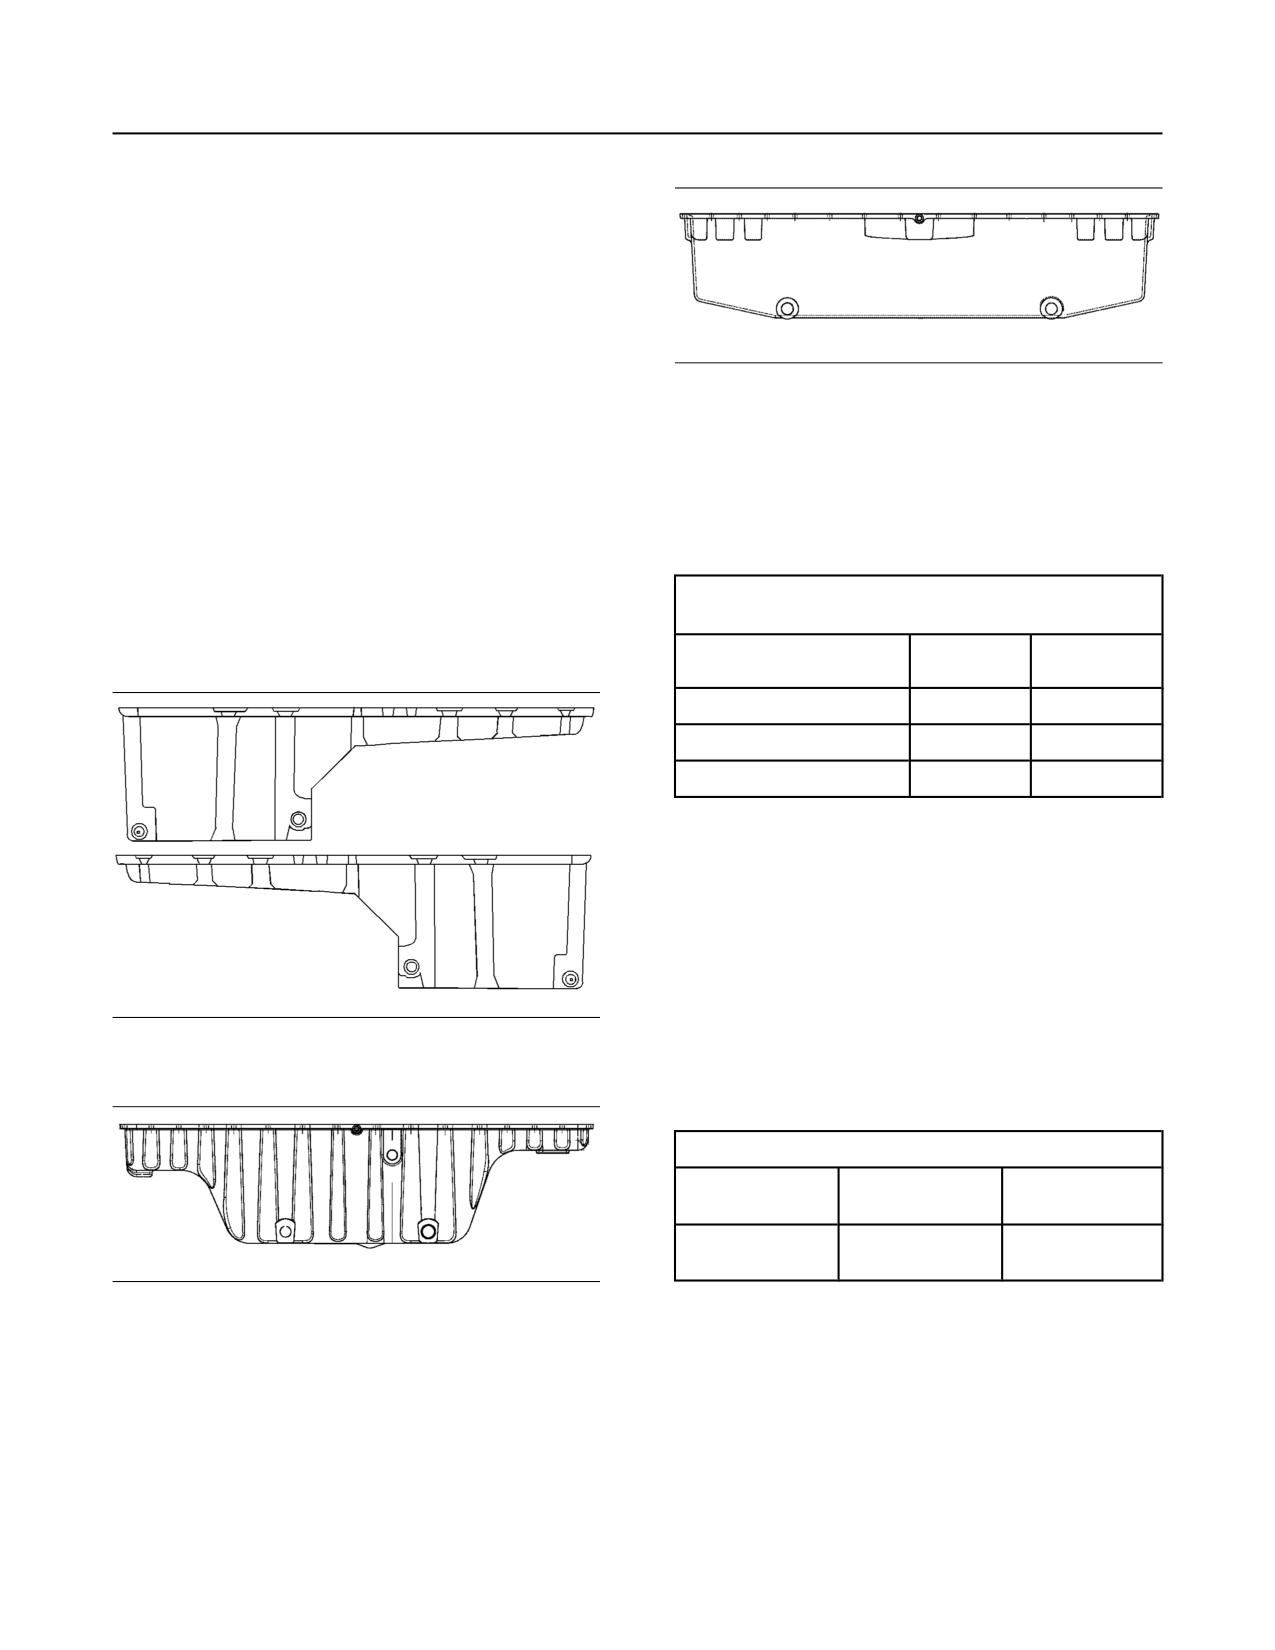
72
M0076814-03
Maintenance Section
Refill Capacities and Recommendations
• The Oil Condition Analysis determines the loss of
the oils lubricating properties. An infrared analysis
is used to compare the properties of new oil to the
properties of the used oil sample. This analysis
allows technicians to determine the amount of
deterioration of the oil during use. This analysis
also allows technicians to verify the performance
of the oil according to the specification during the
entire oil change interval.
Illustration 60
g02300474
Deep pan
i06937316
The refill capacities for the engine crankcase reflect
Refill Capacities and
the approximate capacity of the crankcase or sump
plus standard oil filters. Auxiliary oil filter systems will
Recommendations
require extra oil. Refer to the OEM specifications for
the capacity of the auxiliary oil filter.
Table 14
Refill Capacities
2000 Series Industrial Engines
Approximate Refill Capacities
Lubricant Refill Capacity
Engine with 1
Engine with 2
Oil Sump(1)
Filter
Filters
Standard pan
34 L (36 qt)
43 L (45 qt)
Center pan
60 L (63 qt)
62 L (66 qt)
Deep pan
68 L (72 qt)
70 L (74 qt)
(1) These values are approximate capacities for the crankcase oil
sump which include the standard oil filters that are installed at
the factory. Engines with auxiliary oil filters will require extra oil.
Refer to the OEM specifications for the capacity of the auxiliary
oil filter.
Coolant Refill Capacity
To maintain the cooling system, the total cooling
system capacity must be known. The capacity of the
total cooling system will vary. The capacity will
Illustration 58
g02300456
depend on the size of the radiator (capacity). Table
Standard pan
15 should be completed by the customer for the
maintenance of the cooling system.
Table 15
Approximate Capacity of the Cooling System
Compartment or
Liters
Quarts
System
Total Cooling System
(1)
Illustration 59
g02300473
(1) The total cooling system capacity includes the following compo-
nents: The engine block, the radiator, and all coolant hoses and
Center pan
lines.
Recommendation
Refer to this Operation and Maintenance Manual,
“Fluid Recommendations” for information about the
fluids which are acceptable for this engine.
M0076814-03
73
Maintenance Section
Maintenance Recommendations
Do not loosen the high-pressure fuel lines to remove
Maintenance
air pressure from the fuel system.
Recommendations
Engine Oil
i08186078
To relieve pressure from the lubricating system, turn
System Pressure Release
off the engine.
i07915408
Coolant System
Welding on Engines with
Electronic Controls
Pressurized system: Hot coolant can cause seri-
ous burn. To open cap, stop engine, wait until ra-
NOTICE
diator is cool. Then loosen cap slowly to relieve
Because the strength of the frame may decrease,
the pressure.
some manufacturers do not recommend welding onto
a chassis frame or rail. Consult the OEM of the equip-
To relieve the pressure from the coolant system, turn
ment or your Perkins dealer regarding welding on a
off the engine. Allow the cooling system pressure cap
chassis frame or rail.
to cool. Remove the cooling system pressure cap
slowly to relieve pressure.
Correct welding procedures are necessary to avoid
damage to the engines ECM, sensors, and
associated components. When possible, remove the
Fuel System
component from the unit and then weld the
component. If removal of the component is not
To relieve the pressure from the fuel system, turn off
possible, the following procedure must be followed
the engine.
when you weld on a unit equipped with an Electronic
Engine. The following procedure is considered to be
High-Pressure Fuel Lines (If Equipped)
the safest procedure to weld on a component. This
procedure should provide a minimum risk of damage
to electronic components.
NOTICE
Contact with high pressure fuel may cause fluid
Do not ground the welder to electrical components
penetration and burn hazards. High pressure fuel
such as the ECM or sensors. Improper grounding
spray may cause a fire hazard. Failure to follow
can cause damage to the drive train bearings, hy-
these inspection, maintenance and service in-
draulic components, electrical components, and oth-
structions may cause personal injury or death.
er components.
The high-pressure fuel lines are between the high-
Clamp the ground cable from the welder to the com-
pressure fuel pump and the high-pressure fuel
ponent that will be welded. Place the clamp as close
manifold. The high-pressure fuel lines are also
as possible to the weld. This will help reduce the pos-
between the fuel manifold and cylinder head. These
sibility of damage.
fuel lines are different from fuel lines on other fuel
systems.
Note: Perform the welding in areas that are free from
The following are the differences:
explosive hazards.
• The high-pressure fuel lines are constantly
1. Stop the engine. Turn the switched power to the
charged with high pressure.
OFF position.
• The internal pressures of the high-pressure fuel
2. Ensure that the fuel supply to the engine is turned
lines are higher than other types of fuel system.
off.
Before any service or repair is performed on the
3. Disconnect the negative battery cable from the
engine fuel lines, perform the following tasks:
battery. If a battery disconnect switch is provided,
1. Stop the engine.
open the switch.
2. Wait for 10 minutes.
4. Disconnect all electronic components from the
wiring harnesses. Include the following
components:
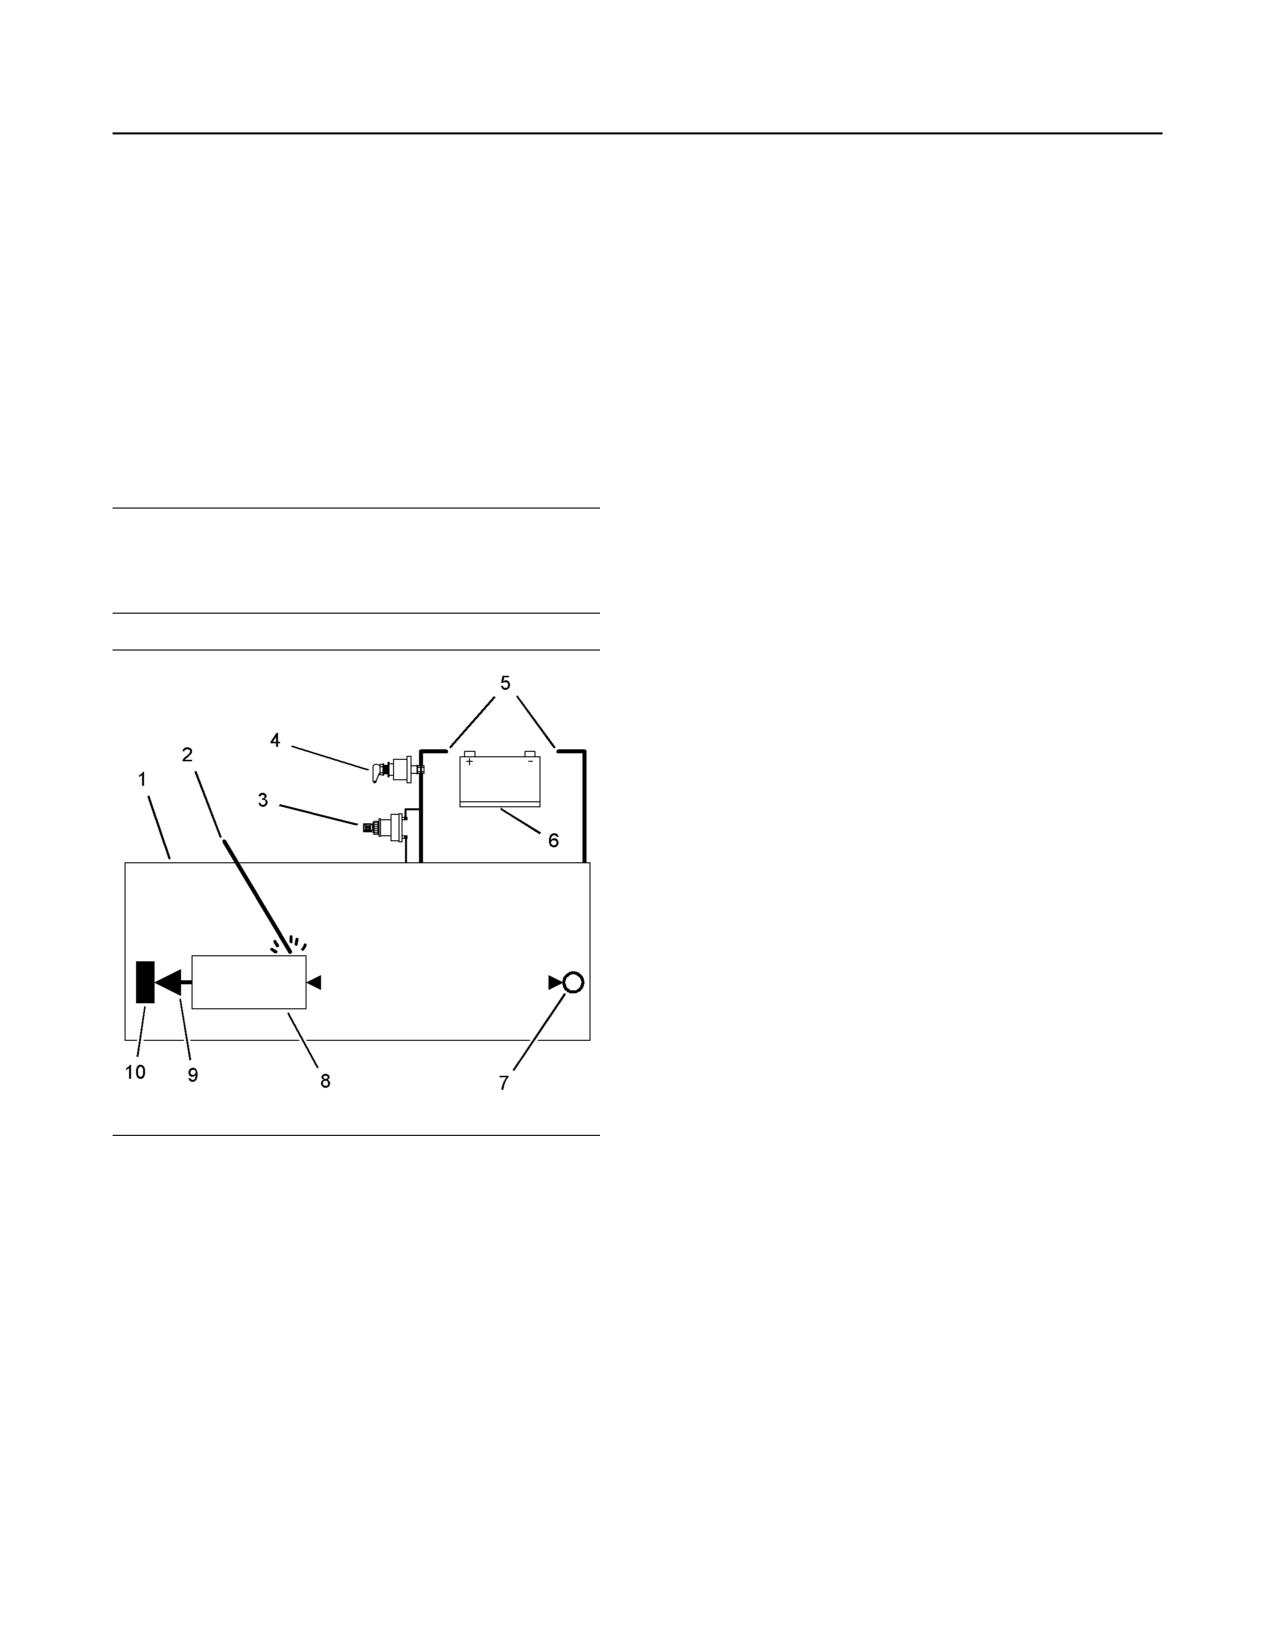
74
M0076814-03
Maintenance Section
Severe Service Application
• Electronic components for the driven
5. Connect the welding ground cable directly to the
equipment
part that will be welded. Place the ground cable as
close as possible to the weld to reduce the
• ECM
possibility of welding current damage to the
following components. Bearings, hydraulic
• Sensors
components, electrical components, and ground
straps.
• Electric operated fuel pump
Note: If electrical/electronic components are used as
• Electronically controlled valves
a ground for the welder, or electrical/electronic
components are located between the welder ground
• Relays
and the weld, current flow from the welder could
• Aftertreatment ID module
severely damage the component.
6. Protect the wiring harness from welding debris and
NOTICE
spatter.
Do not use electrical components (ECM or ECM sen-
sors) or electronic component grounding points for
7. Use standard welding practices to weld the
grounding the welder.
materials.
i07014325
Severe Service Application
Severe service is the application of an engine that
either exceeds the current published standards for
that engine range. Or results in the engine being
used at the extremes of certain operating conditions.
• Performance such as power range, speed range,
and fuel consumption
• Fuel quality
• Operational Altitude
• Maintenance intervals
• Oil selection and maintenance
• Coolant type and maintenance
Illustration 61
g06477753
• Environmental qualities
Use the example above. The current flow from the
welder to the ground clamp of the welder will not
• Installation
damage any associated components.
• The temperature of the fluid in the engine
(1) Engine
(2) Welding electrode
Refer to the standards for the engine or consult your
(3) Keyswitch in the OFF position
(4) Battery disconnect switch in the open position
Perkins distributor to determine if the engine is
(5) Disconnected battery cables
operating within the defined parameters.
(6) Battery
(7) Electrical/Electronic component
Severe service operation can accelerate component
(8) The component that is being welded
wear. Engines that operate under severe conditions
(9) Current path of the welder
may need more frequent maintenance intervals to
(10) Ground clamp for the welder
ensure maximum reliability and retention of full
service life.
M0076814-03
75
Maintenance Section
Severe Service Application
Due to individual applications, identification is not
possible for all the factors which can contribute to
severe service operation. Consult your Perkins
distributor for the unique maintenance that is
necessary for the engine.
The operating environment, incorrect operating
procedures, and incorrect maintenance procedures
can be factors which contribute to a severe service
application.
Environmental Factors
Ambient temperatures - The engine may be
exposed to extended operation in extremely cold
environments or hot environments. Valve
components can be damaged by carbon buildup if
the engine is frequently started and stopped in very
cold temperatures. Extremely hot intake air reduces
engine performance.
Quality of the air - The engine may be exposed to
extended operation in an environment that is dirty or
dusty, unless the equipment is cleaned regularly.
Mud, dirt, and dust can encase components.
Maintenance can be very difficult. The buildup can
contain corrosive chemicals.
Buildup - Compounds, elements, corrosive
chemicals, and salt can damage some components.
Altitude - Problems can arise when the engine is
operated at altitudes that are higher than the
intended settings for that application. Necessary
adjustments should be made.
Incorrect Operating Procedures
• Extended operation at low idle
• Frequent hot shutdowns
• Operating at excessive loads
• Operating at excessive speeds
• Operating outside the intended application
Incorrect Maintenance Procedures
• Extending the maintenance intervals
• Failure to use recommended fuel, lubricants, and
coolant/antifreeze
76
M0076814-03
Maintenance Section
Maintenance Interval Schedule
i07509666
“ Belts - Inspect/Replace”
83
“ Cooling System Supplemental Coolant Additive
Maintenance Interval Schedule
(SCA) - Test/Add”
88
“ Engine Oil and Filter - Change”
98
When Required
“ Fuel System Primary Filter (Water Separator)
Element - Replace”
104
“ Battery - Recycle”
“ Fuel System Secondary Filter - Replace”
105
“ Battery - Replace”
80
“ Hoses and Clamps - Inspect/Replace”
107
“ Battery or Battery Cable - Disconnect”
81
Every 500 Service Hours or 3
“DEF Filler Screen (Emission Related Component) -
Clean”
89
Months
“Diesel Exhaust Fluid (Emission Related Component)
“ Belts - Inspect/Adjust/Replace”
81
- Fill”
92
“ Engine - Clean”
Every 2500 Service Hours
“ Engine Air Cleaner Element - Replace”
95
“ Engine Valve Lash - Check”
103
“ Engine Storage Procedure - Check”
100
Every 3000 Service Hours or 3
“ Fuel System - Prime”
103
Years
“ Fuel Tank Water and Sediment - Drain”
106
“ Cooling System Coolant (DEAC) - Change”
84
“ Radiator - Clean”
Every 4000 Service Hours
Daily
“ Air Compressor - Check”
79
“ Air Tank Moisture and Sediment - Drain”
79
“ Engine Mounts - Inspect”
“ Cooling System Coolant Level - Check”
87
“ Starting Motor - Inspect”
109
“ Driven Equipment - Check”
94
Every 5000 Service Hours
“ Engine Air Cleaner Service Indicator - Inspect”. . 96
“ Engine Oil Level - Check”
97
“ARD Spark Plug (Emission Related Component) -
Clean”
78
“ Fuel System Primary Filter/Water Separator -
“Diesel Exhaust Fluid Filter (Emission Related
Drain”
105
Component) - Replace”
92
“ Power Take-Off Clutch - Check”
108
“Diesel Particulate Filter (Emission Related
“Walk-Around Inspection”
110
Component) - Clean”
94
Every 250 Service Hours
“ Engine Oil Sample - Obtain”
97
“Grounding Stud - Inspect/Clean/Tighten”
107
Initial 500 Service Hours
“ Engine Valve Lash - Check”
103
Every 500 Service Hours
“ Battery Electrolyte Level - Check”
80
M0076814-03
77
Maintenance Section
Maintenance Interval Schedule
“Diesel Exhaust Fluid Injector (Emission Related
Component) - Replace”
94
Every 6000 Service Hours or 3
Years
“ Cooling System Coolant Extender (ELC) -
Add”
87
Every 10 000 Service Hours
“DEF Manifold Filters (Emission Related Component)
- Replace”
89
Every 585 000 L (154 540 US gal) of
Fuel or 10 000 Service Hours
“ Overhaul Considerations”
108
Every 12 000 Service Hours or 6
Years
“ Cooling System Coolant (ELC) - Change”
86
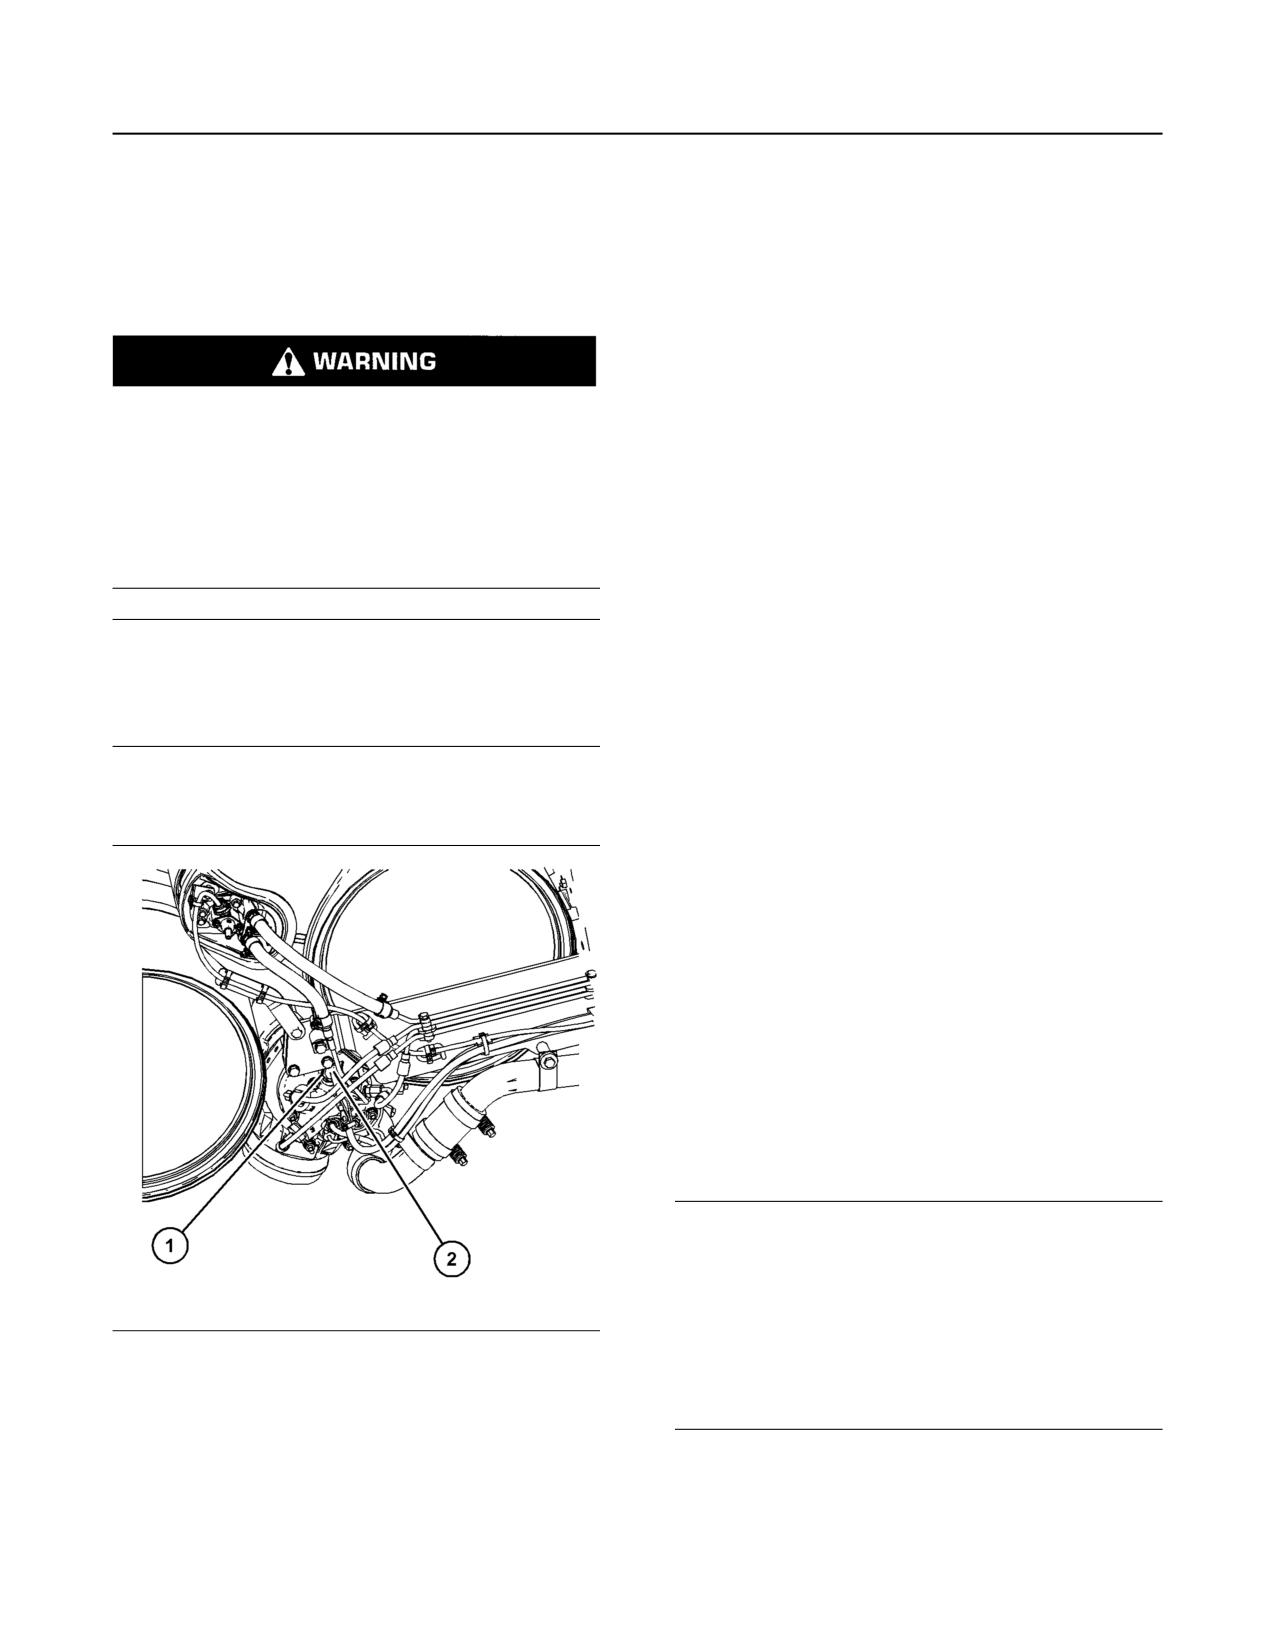
78
M0076814-03
Maintenance Section
ARD Spark Plug (Emission Related Component) - Clean
i07508570
2. Debris may have collected in the spark plug well.
Thoroughly remove any debris. Use compressed
ARD Spark Plug (Emission
air. The maximum air pressure for cleaning
purposes must be below 205 kPa (30 psi). Ensure
Related Component) - Clean
that the area around the spark plug is clean and
free of dirt and debris.
3. Use a 22 mm (0.86 inch)22mm spark plug socket
and a breaker bar to loosen the spark plug. After
Personal injury can result from air pressure.
the spark plug has been loosened, use the spark
plug socket to remove the spark plug by hand to
Personal injury can result without following prop-
detect problems with the threads. After the spark
er procedure. When using pressure air, wear a
plug has been removed, inspect the used spark
protective face shield and protective clothing.
plug and the gasket.
The maximum air pressure for cleaning purposes
4. After removing the spark plug, clean the ground
must be reduced to 205 kPa (30 psi) when the air
probe inside the ARD combustion head by running
nozzle is deadheaded.
a T400005 Plug Bore Brush through the hole in
the ARD combustion head. This tool scrapes
NOTICE
debris from the seat and from the threads. Run the
If the engine is running or the key is in the ON posi-
brush through the hole several times.
tion the Aftertreatment Regeneration Device (ARD)
plug will continue to fire. Turn the key to the OFF po-
Note: The spark plug may be damaged if the spark
sition before servicing the ARD plug.
plug is dropped. Do not install a spark plug that has
been dropped or a spark plug that is damaged.
5. Carefully clean the spark plug using a nonmetallic
Removing the Spark Plug
cleaning pad. If the probe appears to be bent,
replace the spark plug. Do not use a thread tap. A
thread tap will remove metal unnecessarily. The
threads could be stripped and the combustion
group could be damaged.
Installing the Spark Plug
Note: Do not use anti-seize compound on the spark
plug. Most of the heat is transferred through the
threads and the seat area of the spark plug. Contact
of the metal surfaces must be maintained to provide
the heat transfer that is required.
1. Ensure that the spark plug is clean and free of dirt
and oil.
NOTICE
Do not overtighten the spark plug. The shell can be
cracked and the gasket can be deformed. The metal
can deform and the gasket can be damaged. The
shell can be stretched. This will loosen the seal that
is between the shell and the insulator, allowing com-
Illustration 62
g06046854
bustion pressure to blow past the seal. Serious dam-
Typical example
age to the engine can occur.
(1) Spark plug
Use the proper torque.
(2) Wiring harness
1. Remove wire harness (2) from spark plug (1).
2. Install the spark plug (1) by hand until the spark
plug contacts the ARD. Tighten the spark plug to a
torque of 47 N·m (34 lb ft)
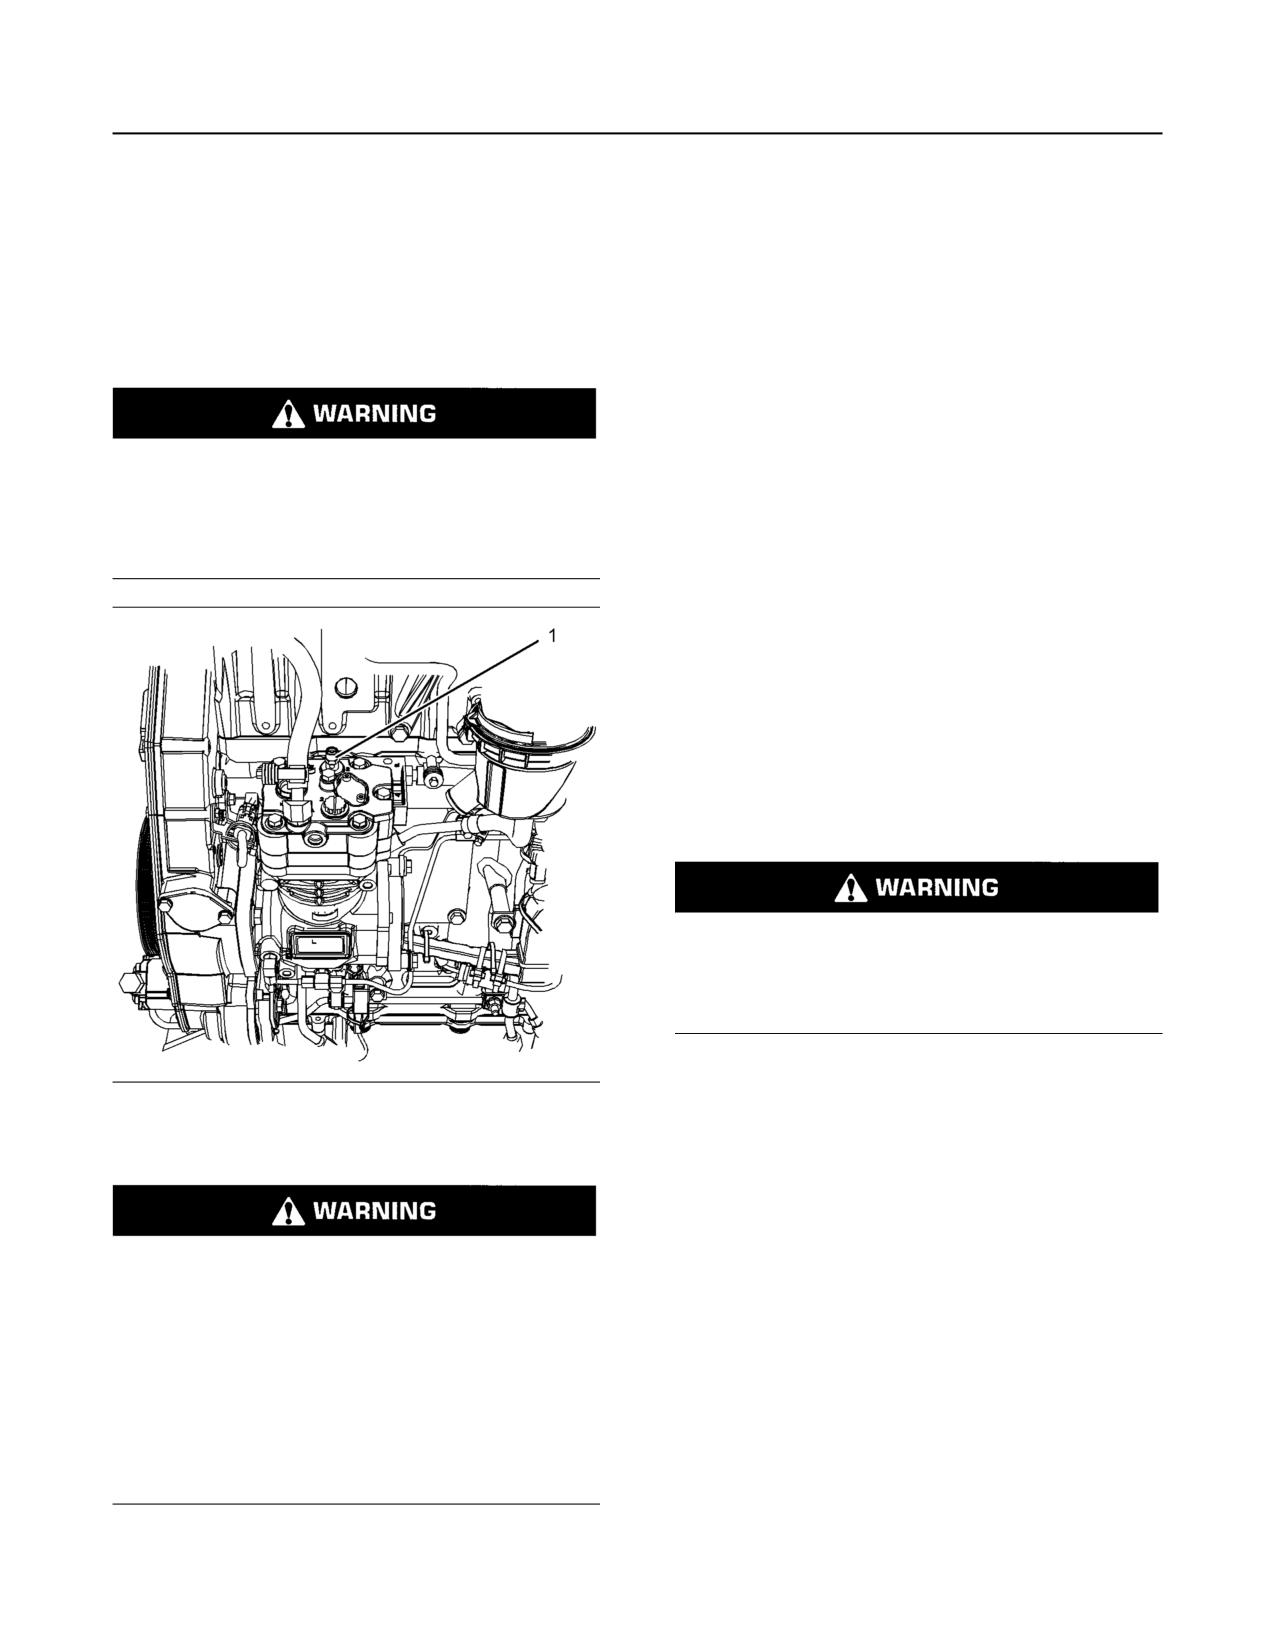
M0076814-03
79
Maintenance Section
Air Compressor - Check
3. Connect the wiring harness (2.
The function of the pressure relief valve is to bypass
air when there is a malfunction in the system for the
air compressor.
i06111571
The pressure relief valve for the air compressor
Air Compressor - Check
releases air at 1723 kPa (250 psi). If the pressure
relief valve for the air compressor exhausts, all
(If Equipped)
personnel should be at a safe distance away from the
air compressor. All personnel should also stay clear
of the air compressor when the engine is operating
and the air compressor is exposed.
Consult your Perkins distributor for assistance.
Do not disconnect the air line from the air com-
pressor governor without purging the air brake
and the auxiliary air systems. Failure to purge the
i00847451
air brake and the auxiliary air systems before re-
moving the air compressor and/or the air lines
Air Tank Moisture and
could cause personal injury.
Sediment - Drain
(If Equipped)
Moisture and sediment in the air starting system can
cause the following conditions:
• Freezing
• Corrosion of internal parts
• Malfunction of the air starting system
When opening the drain valve, wear protective
gloves, a protective face shield, protective cloth-
ing, and protective shoes. Pressurized air could
cause debris to be blown and result in personal
injury.
1. Open the drain valve that is on the bottom of the
Illustration 63
g03813903
air tank. Allow the moisture and sediment to drain.
Typical example
2. Close the drain valve.
(1) Pressure relief valve
3. Check the air supply pressure. The air starting
motor requires a minimum of 620 kPa (90 psi) of
air pressure to operate properly. The maximum air
If the air compressor pressure relief valve that is
pressure must not exceed 1550 kPa (225 psi).
mounted in the air compressor cylinder head is
The normal air pressure will be 758 to 965 kPa
bypassing compressed air, there is a malfunction
(110 to 140 psi).
in the air system, possibly ice blockage. Under
these conditions, your engine may have insuffi-
i08232552
cient air for normal brake operation.
Do not operate the engine until the reason for the
Battery - Recycle
air bypass is identified and corrected. Failure to
heed this warning could lead to property damage,
personal injury, or death to the operator or
Always recycle a battery. Never discard a battery.
bystanders.
Return used batteries to one of the following
locations:
• Abatterysupplier
80
M0076814-03
Maintenance Section
Battery - Replace
• An authorized battery collection facility
7. Connect the cable from the starting motor to the
POSITIVE “+” battery terminal.
• A recycling facility
8. Connect the cable from the NEGATIVE “-” terminal
i01878164
on the starter motor to the NEGATIVE “-” battery
terminal.
Battery - Replace
i02747977
Battery Electrolyte Level -
Check
Batteries give off combustible gases which can
explode. A spark can cause the combustible
gases to ignite. This can result in severe personal
When the engine is not run for long periods of time or
injury or death.
when the engine is run for short periods, the batteries
may not fully recharge. Ensure a full charge in order
Ensure proper ventilation for batteries that are in
to help prevent the battery from freezing. If batteries
an enclosure. Follow the proper procedures in or-
are correctly charged, the ammeter reading should
der to help prevent electrical arcs and/or sparks
be very near zero, when the engine is in operation.
near batteries. Do not smoke when batteries are
serviced.
All lead-acid batteries contain sulfuric acid which
can burn the skin and clothing. Always wear a
face shield and protective clothing when working
The battery cables or the batteries should not be
on or near batteries.
removed with the battery cover in place. The bat-
tery cover should be removed before any servic-
ing is attempted.
1. Remove the filler caps. Maintain the electrolyte
level to the “FULL” mark on the battery.
Removing the battery cables or the batteries with
the cover in place may cause a battery explosion
If the addition of water is necessary, use distilled
resulting in personal injury.
water. If distilled water is not available use clean
water that is low in minerals. Do not use artificially
1. Switch the engine to the OFF position. Remove all
softened water.
electrical loads.
2. Check the condition of the electrolyte with a
2. Turn off any battery chargers. Disconnect any
suitable battery tester.
battery chargers.
3. Install the caps.
3. The NEGATIVE “-” cable connects the NEGATIVE
4. Keep the batteries clean.
“-” battery terminal to the NEGATIVE “-” terminal
on the starter motor. Disconnect the cable from the
Clean the battery case with one of the following
NEGATIVE “-” battery terminal.
cleaning solutions:
4. The POSITIVE “+” cable connects the POSITIVE
• Use a solution of 0.1 kg (0.2 lb) baking soda
“+” battery terminal to the POSITIVE “+” terminal
and 1 L (1 qt) of clean water.
on the starting motor. Disconnect the cable from
the POSITIVE “+” battery terminal.
• Use a solution of ammonium hydroxide.
Note: Always recycle a battery. Never discard a
Thoroughly rinse the battery case with clean
battery. Return used batteries to an appropriate
water.
recycling facility.
5. Remove the used battery.
6. Install the new battery.
Note: Before the cables are connected, ensure that
the engine start switch is OFF.
M0076814-03
81
Maintenance Section
Battery or Battery Cable - Disconnect
i05424317
i06940875
Battery or Battery Cable -
Belts - Inspect/Adjust/Replace
Disconnect
(Vee Belt General Information)
The information within this section may be used as a
guide to adjust the tension of the belt. If the Original
Equipment Manufacture (OEM has installed the belt
The battery cables or the batteries should not be
system, then refer to OEM information.
removed with the battery cover in place. The bat-
tery cover should be removed before any servic-
Ensure that the engine cannot start when servicing or
ing is attempted.
repairs are performed.
Removing the battery cables or the batteries with
the cover in place may cause a battery explosion
Alternator Belt and Fan Belt
resulting in personal injury.
Inspect
1. Turn the start switch to the OFF position. Turn the
Slippage of loose belts can reduce the efficiency of
ignition switch (if equipped) to the OFF position
the driven components. Vibration of loose belts can
and remove the key and all electrical loads.
cause unnecessary wear on the following
components:
Note: After the engine has stopped, allow 2 minutes
in order for the diesel exhaust fluid lines to be purged
• Belts
before disconnecting the power.
• Pulleys
2. Disconnect the negative battery terminal. Ensure
that the cable cannot contact the terminal. When
• Bearings
four 12 V batteries are involved, 2 negative
If the belts are too tight, unnecessary stress is placed
connections must be disconnected.
on the components and reduces the service life of the
components.
3. Remove the positive connection.
To maximize the engine performance, inspect the
4. Clean all disconnected connection and battery
belts for wear splitting and for cracking. Replace belts
terminals.
that are worn or damaged
5. Use a fine grade of sandpaper to clean the
Adjust
terminals and the cable clamps. Clean the items
until the surfaces are bright or shiny. DO NOT
The section shows two different types of adjuster
remove material excessively. Excessive removal
used to adjust the alternator belt tension.
of material can cause the clamps to fit incorrectly.
Coat the clamps and the terminals with a suitable
silicone lubricant or petroleum jelly.
6. Tape the cable connections in order to help
prevent accidental starting.
7. Proceed with necessary system repairs.
8. In order to connect the battery, connect the
positive connection before the negative connector.
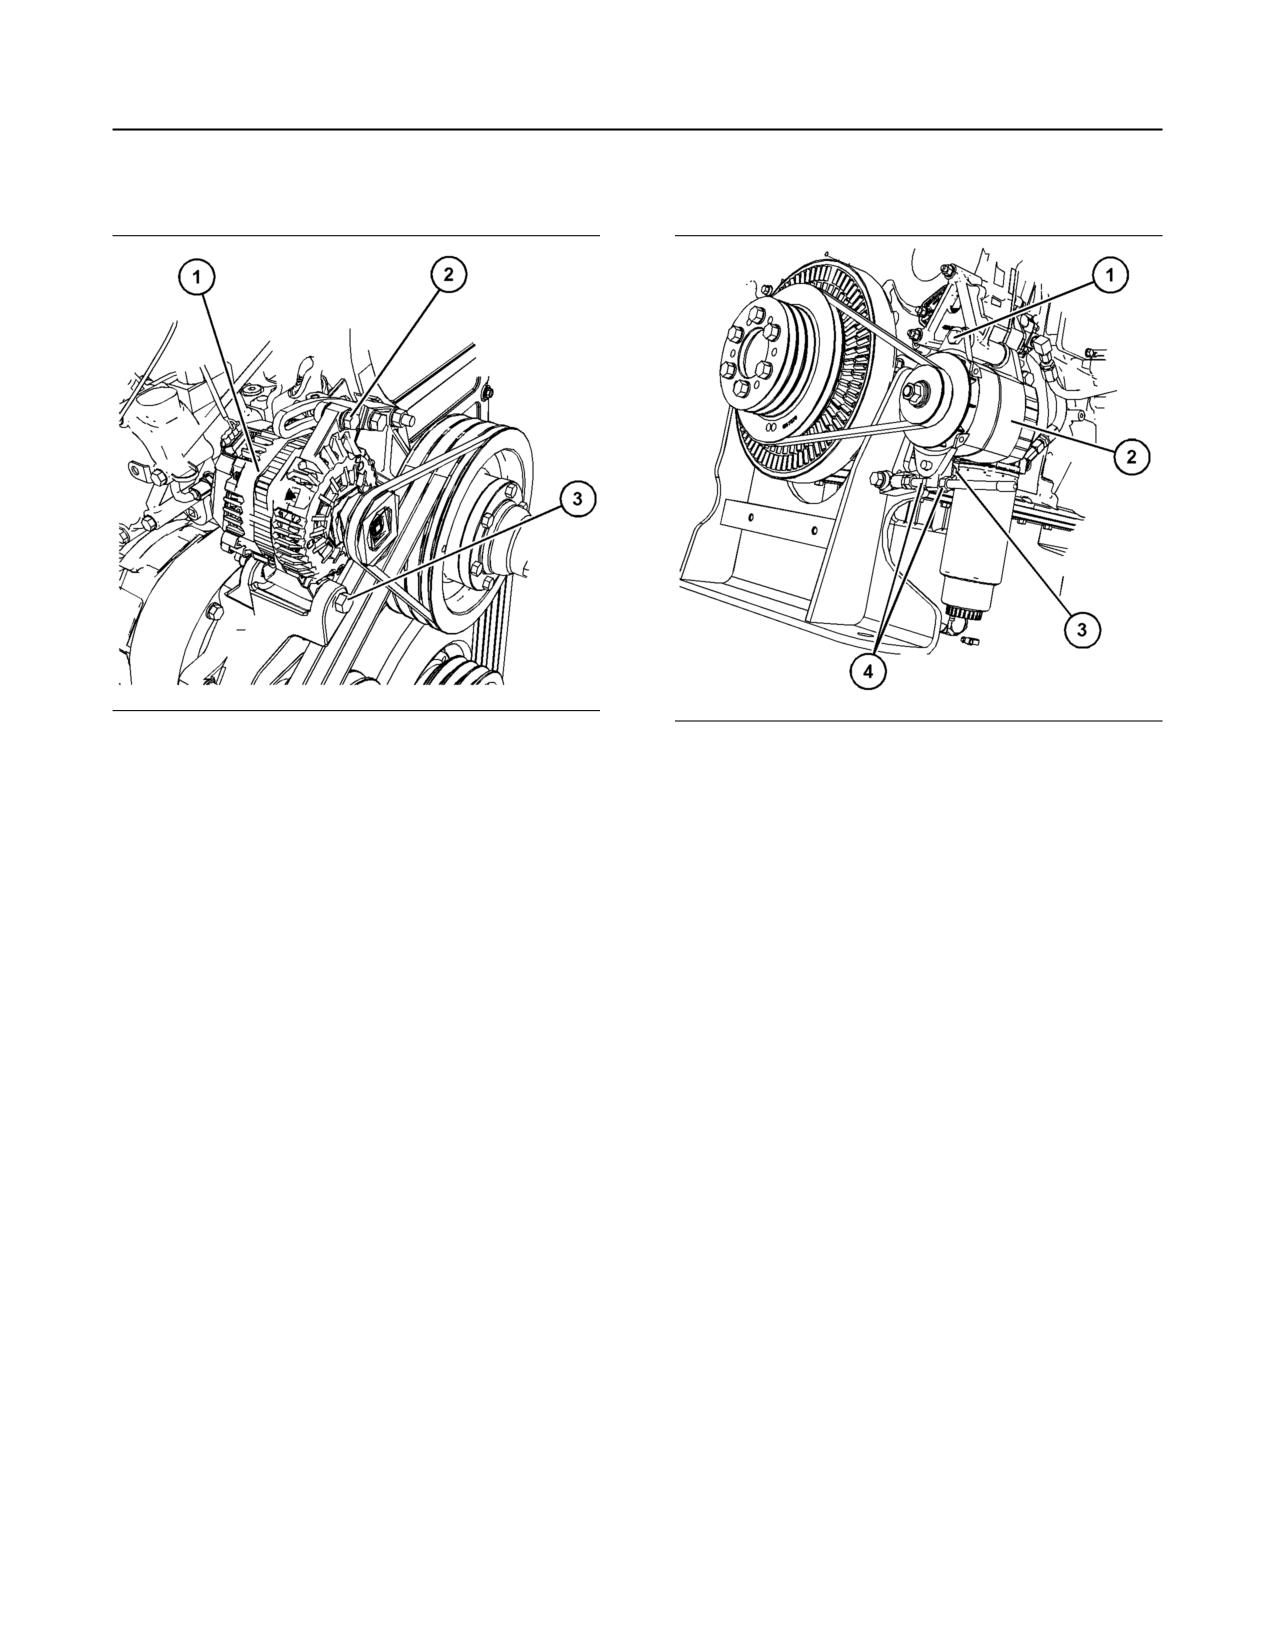
82
M0076814-03
Maintenance Section
Vee Belt General Information
Link adjuster
Rod adjuster
Illustration 64
g06108813
Illustration 65
g06109400
Typical example
Typical example
1. Remove guards, refer to the OEM for the correct
1. Remove the belt guard, refer to OEM for the
procedure.
correct procedure.
2. Loosen nut and bolt (2) and loosen nut and bolt
2. Loosen nut and bolt (1) and loosen bolt (3).
(3).
3. Loosen one of the nuts (4). Adjusting nuts (4) will
3. Adjust alternator (1) to obtain the correct tension
move the alternator (2).
on the belt. Use a suitable belt tension tool to set
4. Adjust nuts (4) for the correct tension on the belt.
the belt tension.
Use a suitable belt tension tool to set the belt
4. Tighten nut and bolt (2) and tighten nut and bolt
tension.
(3).
5. With the correct tension set, tighten nut and bolt
5. Tighten nut and bolt (2) to a torque of 47 N·m
(1) and tighten bolt (3).
(34 lb ft). Tighten nut and bolt (3) to a torque of
6. Tighten nut and bolt (1) to a torque of 105 N·m
70 N·m (51 lb ft).
(77 lb ft).
7. Tighten bolt (3) to a torque of 105 N·m (77 lb ft).
8. Tighten nuts (4) to a torque of 105 N·m (77 lb ft).
9. Reinstall the belt guard, refer to OEM for the
correct procedure.
If new drive belts are installed, check the drive belt
tension again after 30 minutes of engine operation
at the rated rpm.
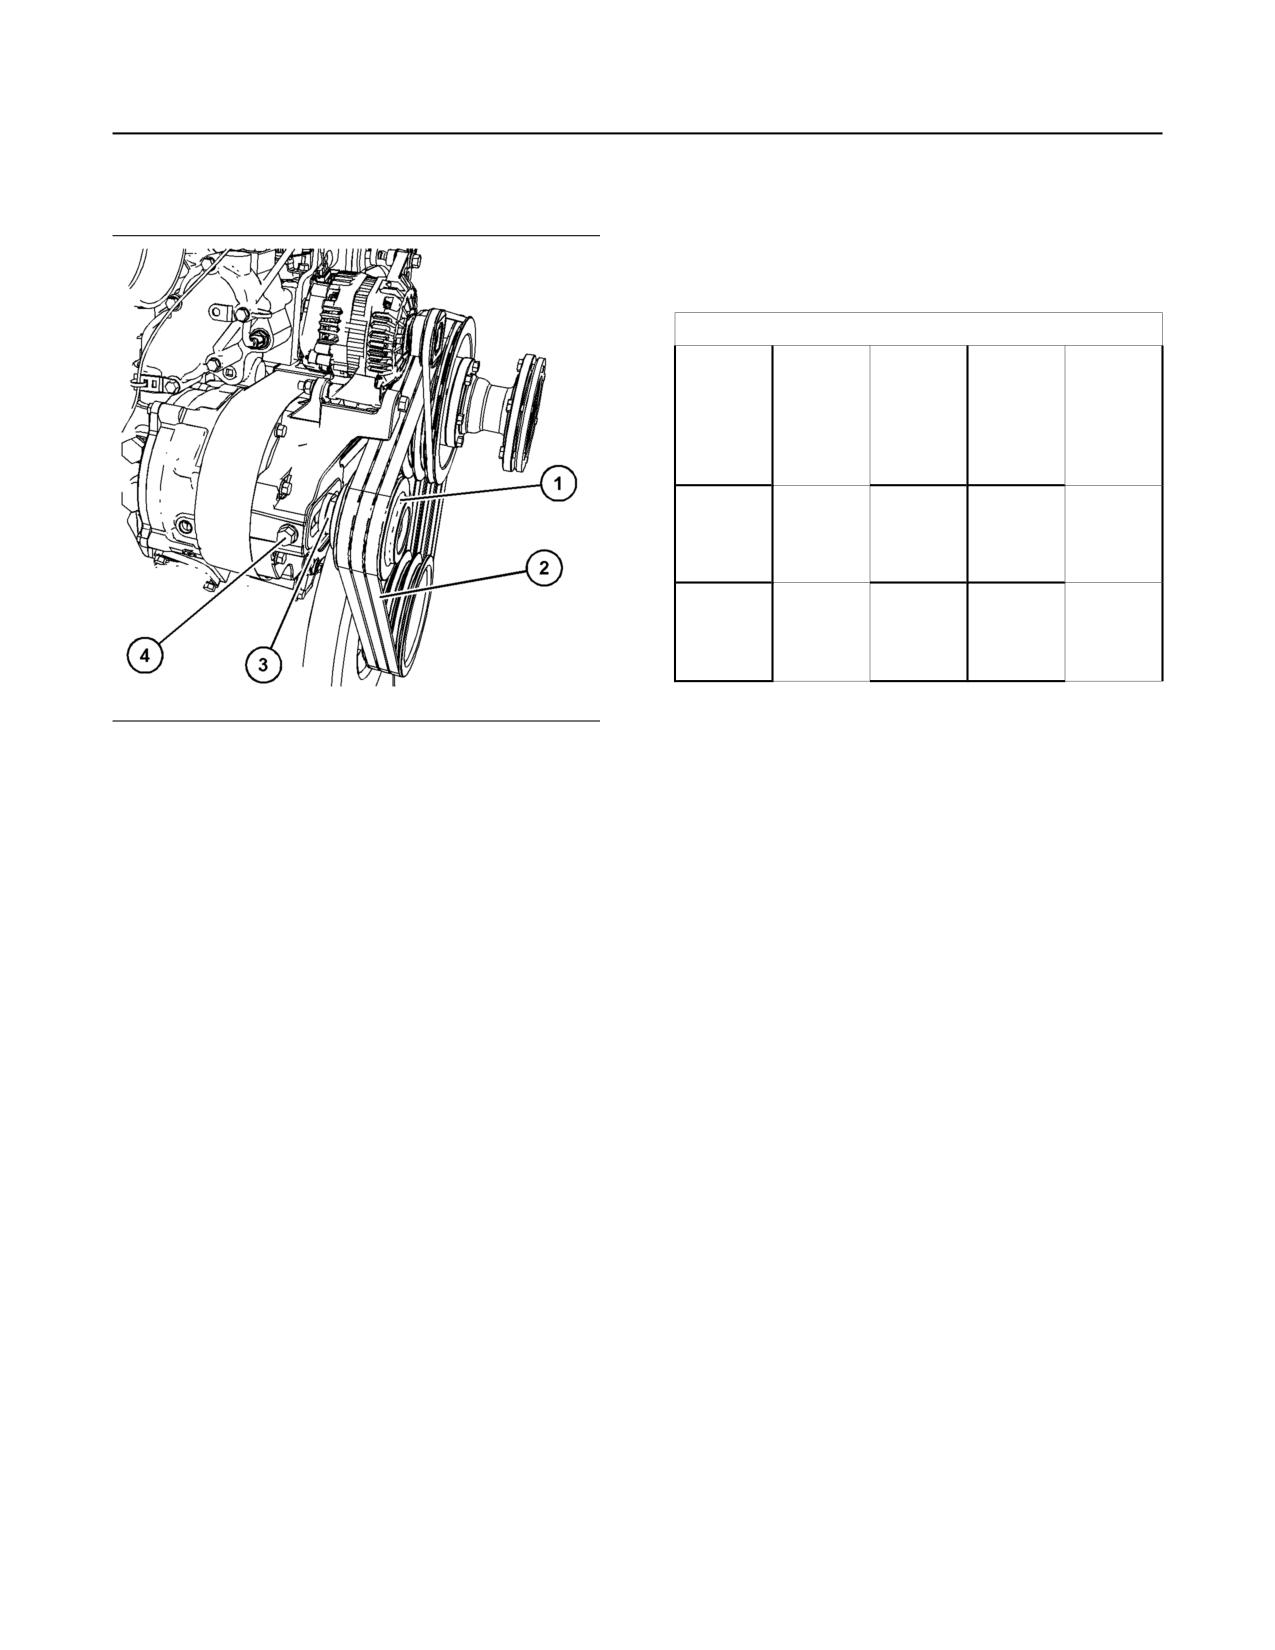
M0076814-03
83
Maintenance Section
Belts - Inspect/Replace
Fan Belt Adjustment
To replace the fan belts, refer to Disassembly and
Assembly, V-Belts- Remove and Install.
Belt Tension
Table 16
Alternator and Fan Belt Tension
Belt Type
Belt Size
New Belt
Used Belt
Reset Belt
Tension
Tension
Tension
with fewer
than 10
Hours in
Operation
Alternator
10 mm
645 ± 44
512 ± 44
311 ± 44
belt
(0.39370
N
N
N
inch)
(145 ± 10
(115 ± 10.
(70 ± 10
lb)
lb)
lb)
Fan Belt
5V/5VX
801 ± 44
645 ± 44
378 ± 44
15 mm
N
N
N
(0.59055
(180 ± 10
(145 ± 10
(85 ± 10
inch)
lb)
lb)
lb)
Note: Do not set the belt tension when the belts are
Illustration 66
g06109234
hot.
Typical example
i06942621
1. Remove the belt guard, refer to OEM for the
correct procedure.
Belts - Inspect/Replace
2. Loosen lock nut (3). Rotating nut (4) counter-
(General Information for Poly
clockwise will move pulley (1) and loosen belts (2).
Rotating nut (4) clockwise will move pulley (1) and
Vee Belts)
tighten belts (2).
3. With the correct tension set, tighten nut (3).
The polly vee belt may also be called the micro rib
Tighten nut (3) to a torque of 102 N·m (75 lb ft).
belt.
4. Use a suitable belt tension tool to set the belt
tension.
5. Reinstall the belt guard, refer to OEM for the
correct procedure.
If new drive belts are installed, check the drive belt
tension again after 30 minutes of engine operation
at the rated rpm.
Replace
For applications that require multiple drive belts,
replace the drive belts in matched sets. Replacing
one drive belt of a matched set will cause the new
drive belt to carry more load because the older drive
belts are stretched. The additional load on the new
drive belt could cause the new drive belt to fail.
To replace the alternator belt, refer to Disassembly
and Assembly, Alternator Belt - Remove and Install.
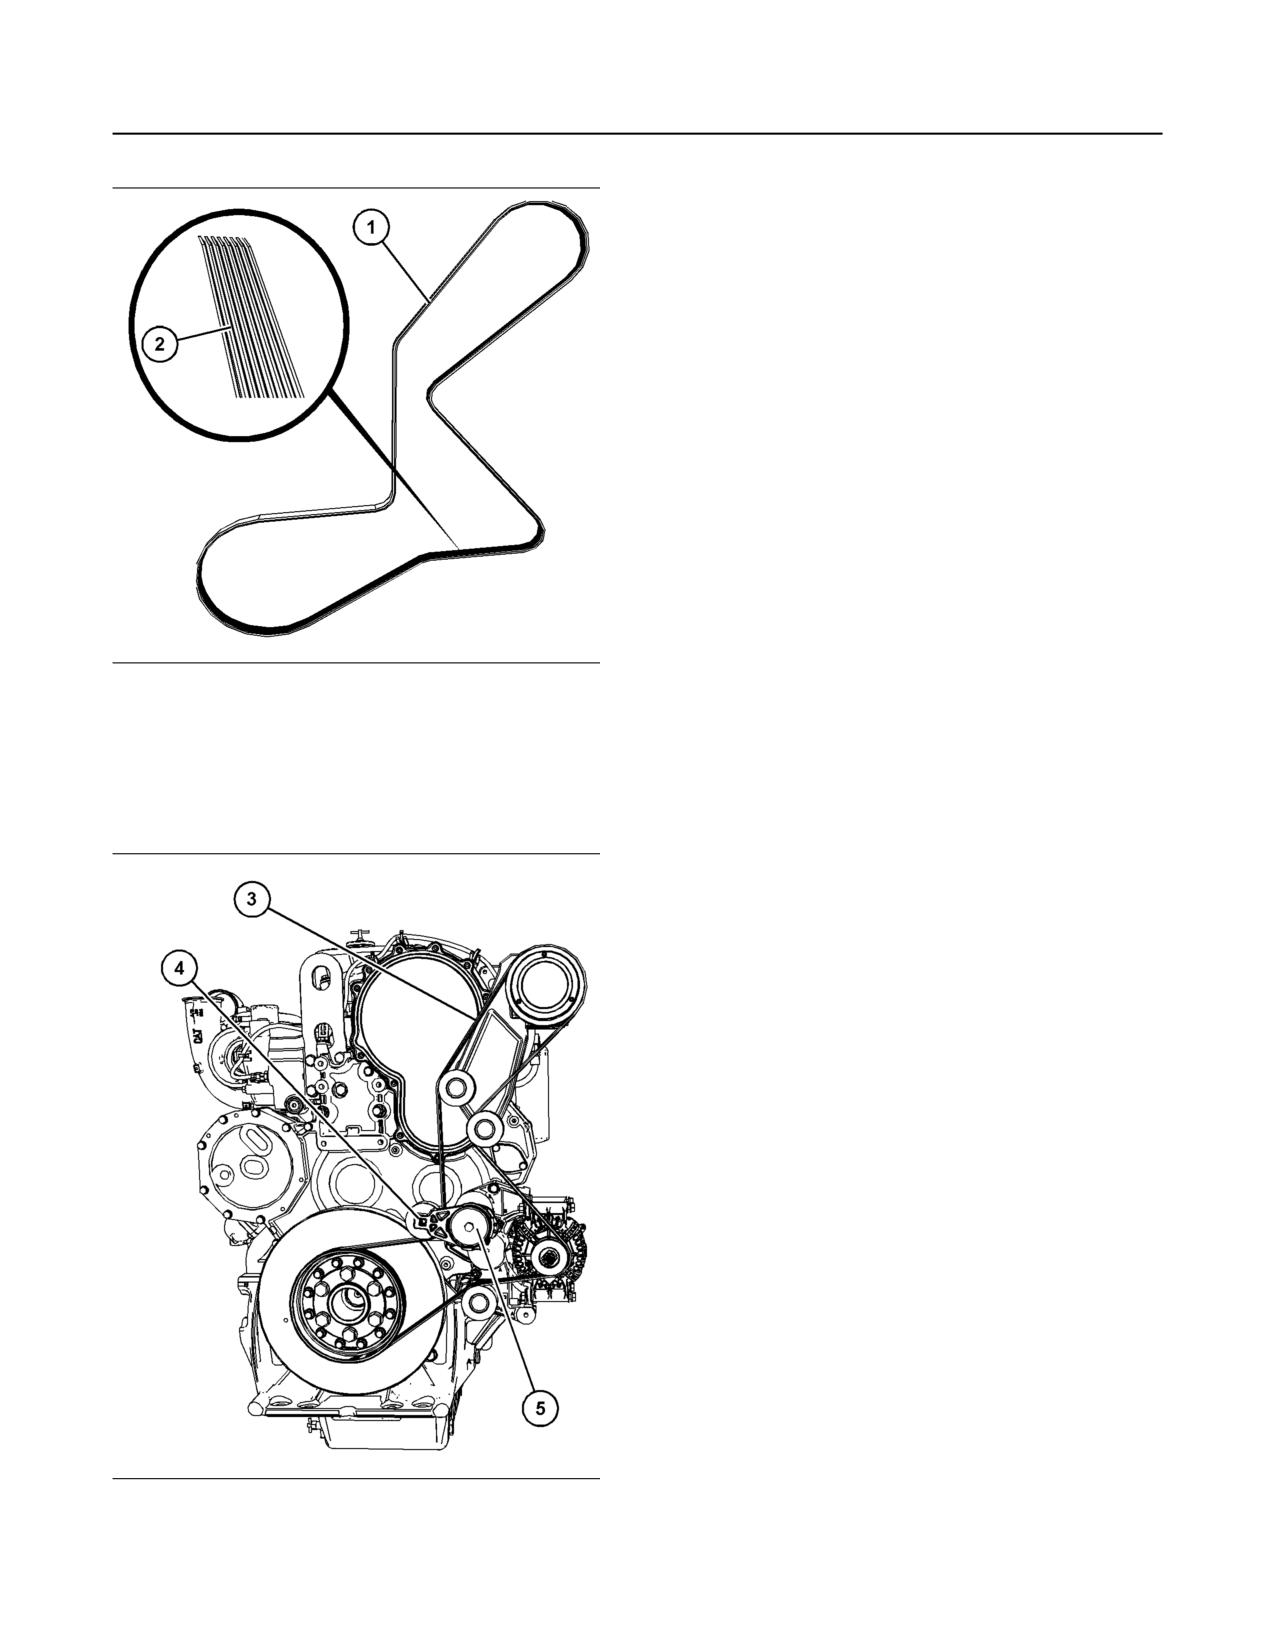
84
M0076814-03
Maintenance Section
Cooling System Coolant (DEAC) - Change
To maximize the engine performance, inspect the
belt for wear and for cracking. Replace the belt if the
belt is worn or damaged.
• Inspect the belt for cracks, splits, glazing, grease,
displacement of the cord and evidence of fluid
contamination.
The belt must be replaced if the following conditions
are present.
• The belt has a crack in more than one rib.
• More than one section of the belt is displaced in
one rib of a maximum length of 50.8 mm (2 inch)
Replace
1. Before the belt has been removed, ensure that rout
of the belt from crankshaft across and around the
other pulley and idlers is understood.
2. The tensioner (5) has a square drive (2) that can
Illustration 67
g06177182
be used to remove the tension from the belt,
Typical example
allowing the belt to be removed.
(1) Polly vee belt
(2) Ribs of the belt
3. When the belt has been removed, ensure that any
idler or pulley that supports the belt is clean and
Inspect
the idler or pulley rotates freely.
For a full description on replacing the belt refer to
Disassembly and Assembly, Alternator Belt -
Remove and Install.
i06606846
Cooling System Coolant
(DEAC) - Change
Clean the cooling system and flush the cooling
system before the recommended maintenance
interval if the following conditions exist:
• The engine overheats frequently.
• Foaming is observed.
• The oil has entered the cooling system and the
coolant is contaminated.
• The fuel has entered the cooling system and the
coolant is contaminated.
Note: Inspect the water pump and the water
temperature regulator after the cooling system has
been drained.
Illustration 68
g06177194
Typical example
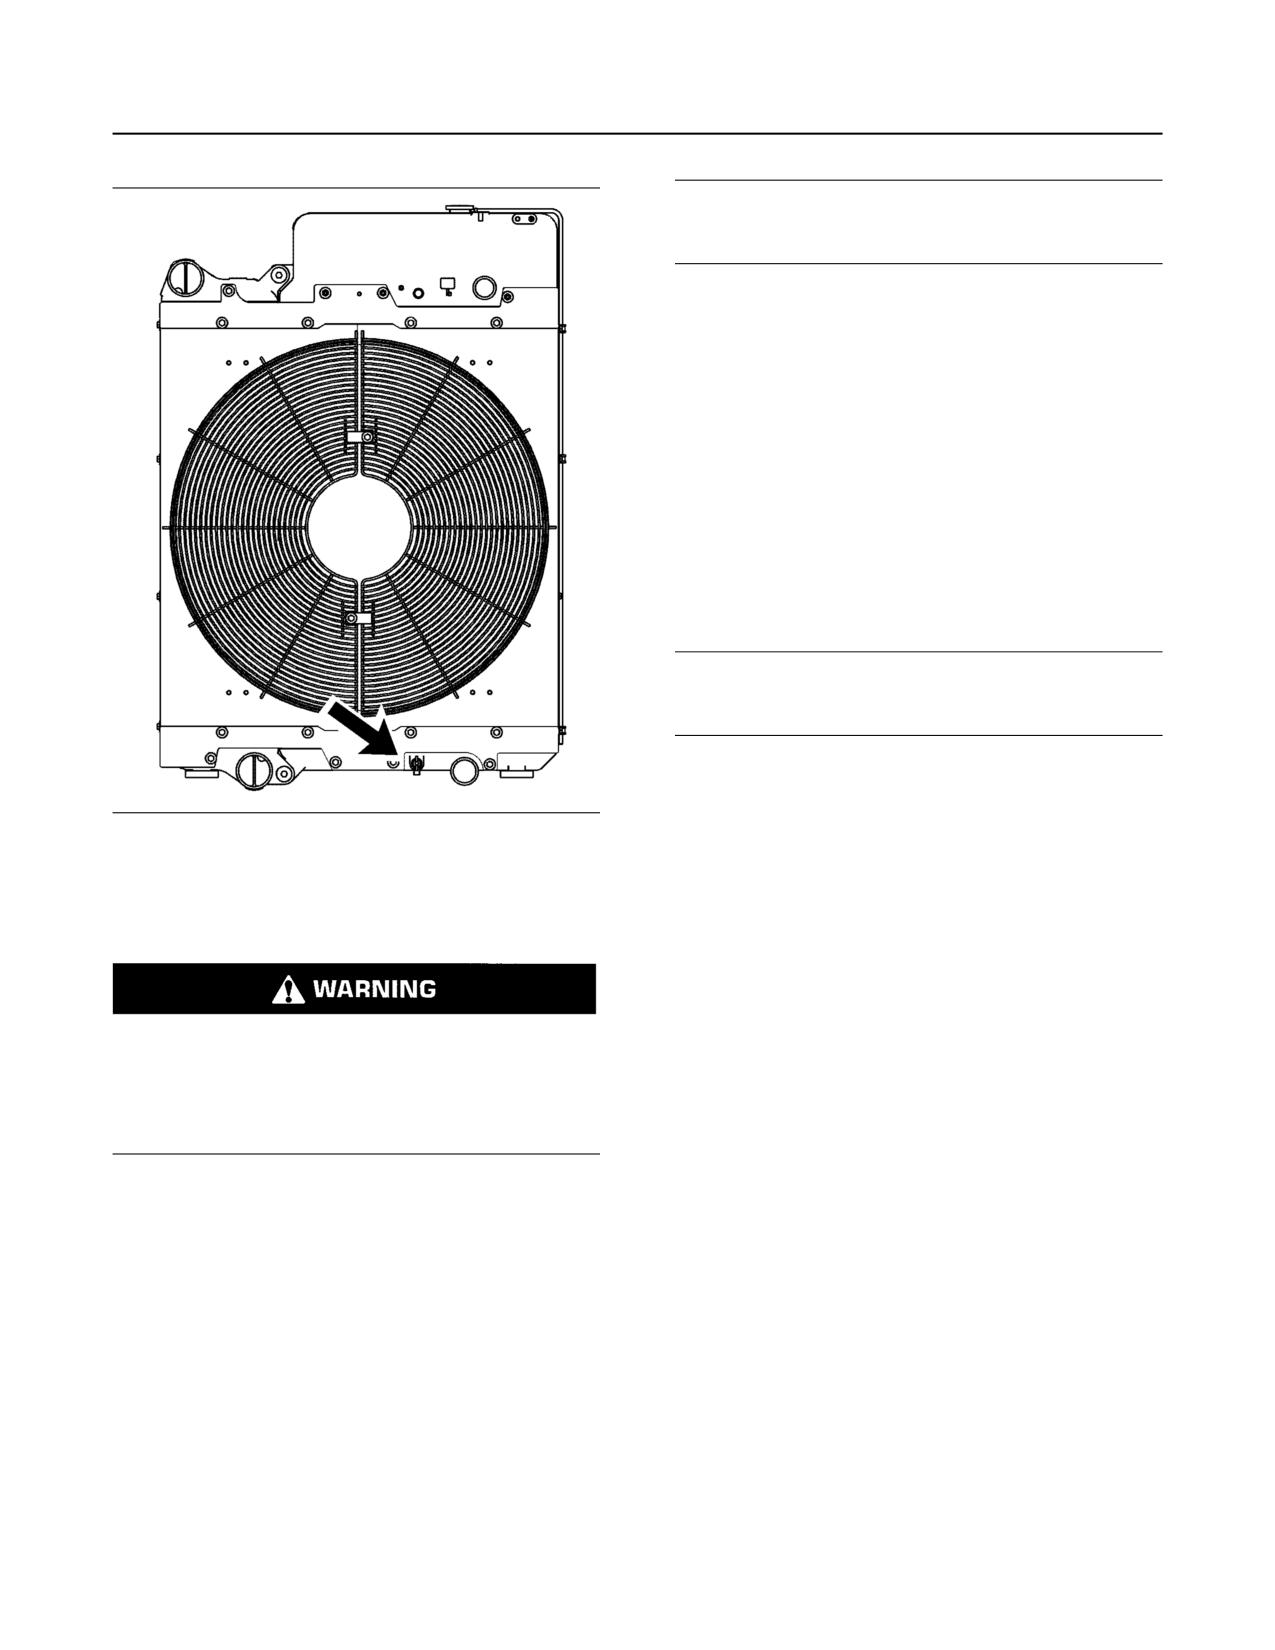
M0076814-03
85
Maintenance Section
Cooling System Coolant (DEAC) - Change
NOTICE
Fill the cooling system no faster than 19 L (5 US gal)
per minute to avoid air locks.
3. Fill the cooling system with clean water and
operate the engine, ensure that the thermostat
opens. Stop the engine and allow the engine to
cool.
4. Drain the cooling system.
5. Fill the cooling system with clean water and
operate the engine until the engine is warmed to
82 °C (180 °F).
6. Stop the engine and allow the engine to cool. Drain
the cooling system.
Fill
NOTICE
Fill the cooling system no faster than 19 L (5 US gal)
per minute to avoid air locks.
1. Fill the cooling system with coolant/antifreeze.
Refer to this Operation and Maintenance Manual,
“Fluid Recommendations” topic for more
Illustration 69
g02351659
information on cooling system specifications. Do
The cooling system drain valve is towards the bottom
of the radiator.
not install the cooling system filler cap.
2. Start and run the engine at low idle. Increase the
Drain
engine rpm to 1500 rpm. Run the engine at high
idle for 1 minute to purge the air from the cavities
of the engine block. Stop the engine.
3. Check the coolant level. Maintain the coolant level
Pressurized System: Hot coolant can cause seri-
within 13 mm (0.5 inch) below the bottom of the
ous burns. To open the cooling system filler cap,
stop the engine and wait until the cooling system
pipe for filling. Maintain the coolant level within
components are cool. Loosen the cooling system
13 mm (0.5 inch) to the proper level on the sight
pressure cap slowly in order to relieve the
glass.
pressure.
4. Clean the cooling system filler cap. Inspect the
gasket that is on the cooling system filler cap. If
1. Stop the engine and allow the engine to cool.
the gasket that is on the cooling system filler cap is
Loosen the cooling system filler cap slowly in
damaged, discard the old filler cap and install a
order to relieve any pressure. Remove the cooling
new filler cap. If the gasket that is on the cooling
system filler cap.
system filler cap is not damaged, perform a
2. Open the cooling system drain valve.
pressure test. The correct pressure for the cooling
system filler cap is stamped on the face of the
Allow the coolant to drain.
cooling system filler cap. If the cooling system filler
cap does not retain the correct pressure, install a
Flush
new cooling system filler cap.
1. Flush the cooling system with clean water in order
to remove any debris.
2. Close the drain valve.
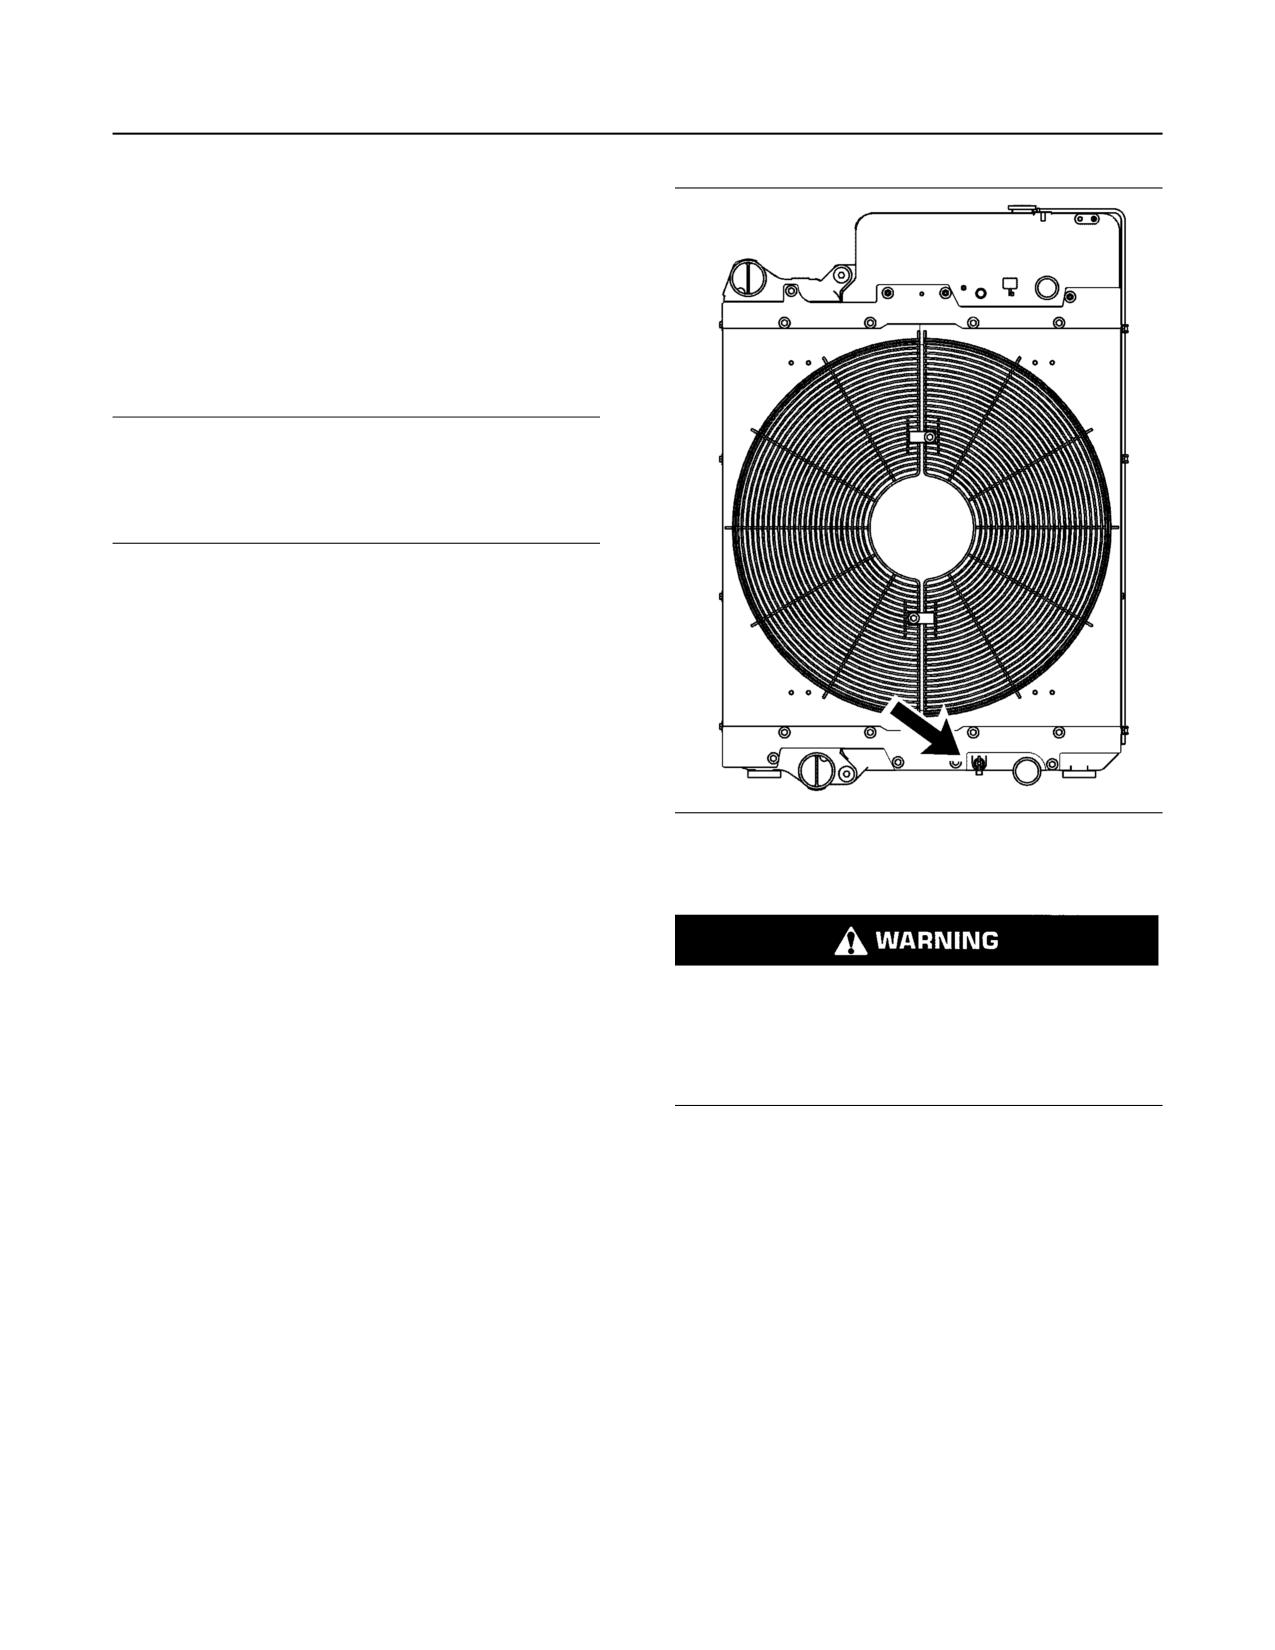
86
M0076814-03
Maintenance Section
Cooling System Coolant (ELC) - Change
5. Start the engine and inspect the cooling system for
leaks and for proper operating temperature.
i06606848
Cooling System Coolant (ELC
- Change
NOTICE
Perkins ELC must be using with an extender in order
to achieve 12000 hours operation. For more informa-
tion on a suitable extender contact your Perkins
distributor.
Clean the cooling system and flush the cooling
system before the recommended maintenance
interval if the following conditions exist:
• The engine overheats frequently.
• Foaming is observed.
• The oil has entered the cooling system and the
coolant is contaminated.
• The fuel has entered the cooling system and the
coolant is contaminated.
Illustration 70
g02351659
Note: When the cooling system is cleaned, only
clean water is needed when the ELC is drained and
Drain
replaced.
Note: Inspect the water pump and the water
temperature regulator after the cooling system has
Pressurized System: Hot coolant can cause seri-
been drained.
ous burns. To open the cooling system filler cap,
stop the engine and wait until the cooling system
components are cool. Loosen the cooling system
pressure cap slowly in order to relieve the
pressure.
1. Stop the engine and allow the engine to cool.
Loosen the cooling system filler cap slowly to
relieve any pressure. Remove the cooling system
filler cap.
2. Open the cooling system drain valve.
Allow the coolant to drain.
Flush
1. Flush the cooling system with clean water to
remove any debris.
2. Close the drain valve.
M0076814-03
87
Maintenance Section
Cooling System Coolant Extender (ELC) - Add
5. Start the engine and Inspect the cooling system for
NOTICE
leaks and for proper operating temperature.
Fill the cooling system no faster than 19 L (5 US gal)
per minute to avoid air locks.
i06606850
3. Fill the cooling system with clean water. Install the
Cooling System Coolant
cooling system filler cap.
Extender (ELC) - Add
4. Start and run the engine at low idle until the
temperature reaches 49 °C to 66 °C
(120 °F to 150 °F).
For Perkins ELC to achieve 12000 hours an extender
must be added at 6000 hours. For a suitable
5. Stop the engine and allow the engine to cool.
extender, contact your Perkins distributor.
Loosen the cooling system filler cap slowly to
relieve any pressure. Remove the cooling system
i06606851
filler cap. Open the drain valve. Allow the water to
drain. Flush the cooling system with clean water.
Cooling System Coolant Level
Close the drain valve.
- Check
Fill
Check the coolant level when the engine is stopped
NOTICE
and cool.
Fill the cooling system no faster than 19 L (5 US gal)
per minute to avoid air locks.
1. Fill the cooling system with Extended Life Coolant
(ELC). Refer to this Operation and Maintenance
Manual, “Fluid Recommendations” for more
information on cooling system specifications. Do
not install the cooling system filler cap.
2. Start and run the engine at low idle. Increase the
engine rpm to high idle. Run the engine at high
idle for 1 minute to purge the air from the cavities
of the engine block. Stop the engine.
3. Check the coolant level. Maintain the coolant level
Illustration 71
g00285520
within 13 mm (0.5 inch) below the bottom of the
Cooling system filler cap
pipe for filling. Maintain the coolant level within
13 mm (0.5 inch) to the proper level on the sight
glass.
4. Clean the cooling system filler cap. Inspect the
Pressurized System: Hot coolant can cause seri-
gasket that is on the cooling system filler cap. Only
ous burns. To open the cooling system filler cap,
install the used filler cap if the gasket is not
stop the engine and wait until the cooling system
damaged. Test the cap for the correct pressure.
components are cool. Loosen the cooling system
The correct pressure for the cooling system filler
pressure cap slowly in order to relieve the
pressure.
cap is stamped on the face of the cooling system
filler cap. If the cooling system filler cap does not
retain the correct pressure, install a new cooling
1. Remove the cooling system filler cap slowly to
system filler cap.
relieve pressure.
2. Maintain the coolant level within 13 mm (0.5 inch)
of the bottom of the filler pipe. If the engine is
equipped with a sight glass, maintain the coolant
level to the proper level in the sight glass.
88
M0076814-03
Maintenance Section
Cooling System Supplemental Coolant Additive (SCA) - Test/Add
Use a Coolant Conditioner Test Kit in order to check
the concentration of the SCA.
Add the SCA, If Necessary
NOTICE
Do not exceed the recommended amount of supple-
mental coolant additive concentration. Excessive
supplemental coolant additive concentration can form
deposits on the higher temperature surfaces of the
cooling system, reducing the engine's heat transfer
characteristics. Reduced heat transfer could cause
cracking of the cylinder head and other high tempera-
ture components. Excessive supplemental coolant
additive concentration could also result in radiator
tube blockage, overheating, and/or accelerated water
Illustration 72
g00103639
pump seal wear. Never use both liquid supplemental
Typical filler cap gaskets
coolant additive and the spin-on element (if
equipped) at the same time. The use of those addi-
3. Clean the cooling system filler cap and check the
tives together could result in supplemental coolant
additive concentration exceeding the recommended
condition of the filler cap gaskets. Replace the
maximum.
cooling system filler cap if the filler cap gaskets are
damaged. Reinstall the cooling system filler cap.
4. Inspect the cooling system for leaks.
Pressurized System: Hot coolant can cause seri-
i03644948
ous burns. To open the cooling system filler cap,
stop the engine and wait until the cooling system
Cooling System Supplemental
components are cool. Loosen the cooling system
Coolant Additive (SCA - Test/
pressure cap slowly in order to relieve the
pressure.
Add
NOTICE
When any servicing or repair of the engine cooling
system is performed the procedure must be per-
formed with the engine on level ground. This will al-
Cooling system coolant additive contains alkali.
low you to accurately check the coolant level. This
To help prevent personal injury, avoid contact
will also help in avoiding the risk of introducing an air
with the skin and the eyes. Do not drink cooling
lock into the coolant system.
system coolant additive.
1. Slowly loosen the cooling system filler cap in order
to relieve the pressure. Remove the cooling
Test for SCA Concentration
system filler cap.
Heavy-Duty Coolant/Antifreeze and SCA
Note: Always discard drained fluids according to
local regulations.
NOTICE
2. If necessary, drain some coolant from the cooling
Do not exceed the recommended six percent supple-
mental coolant additive concentration.
system into a suitable container in order to allow
space for the extra SCA.
3. Add the correct amount of SCA. Refer to the
Operation and Maintenance Manual, “Refill
Capacities and Recommendations” for more
information on SCA requirements.
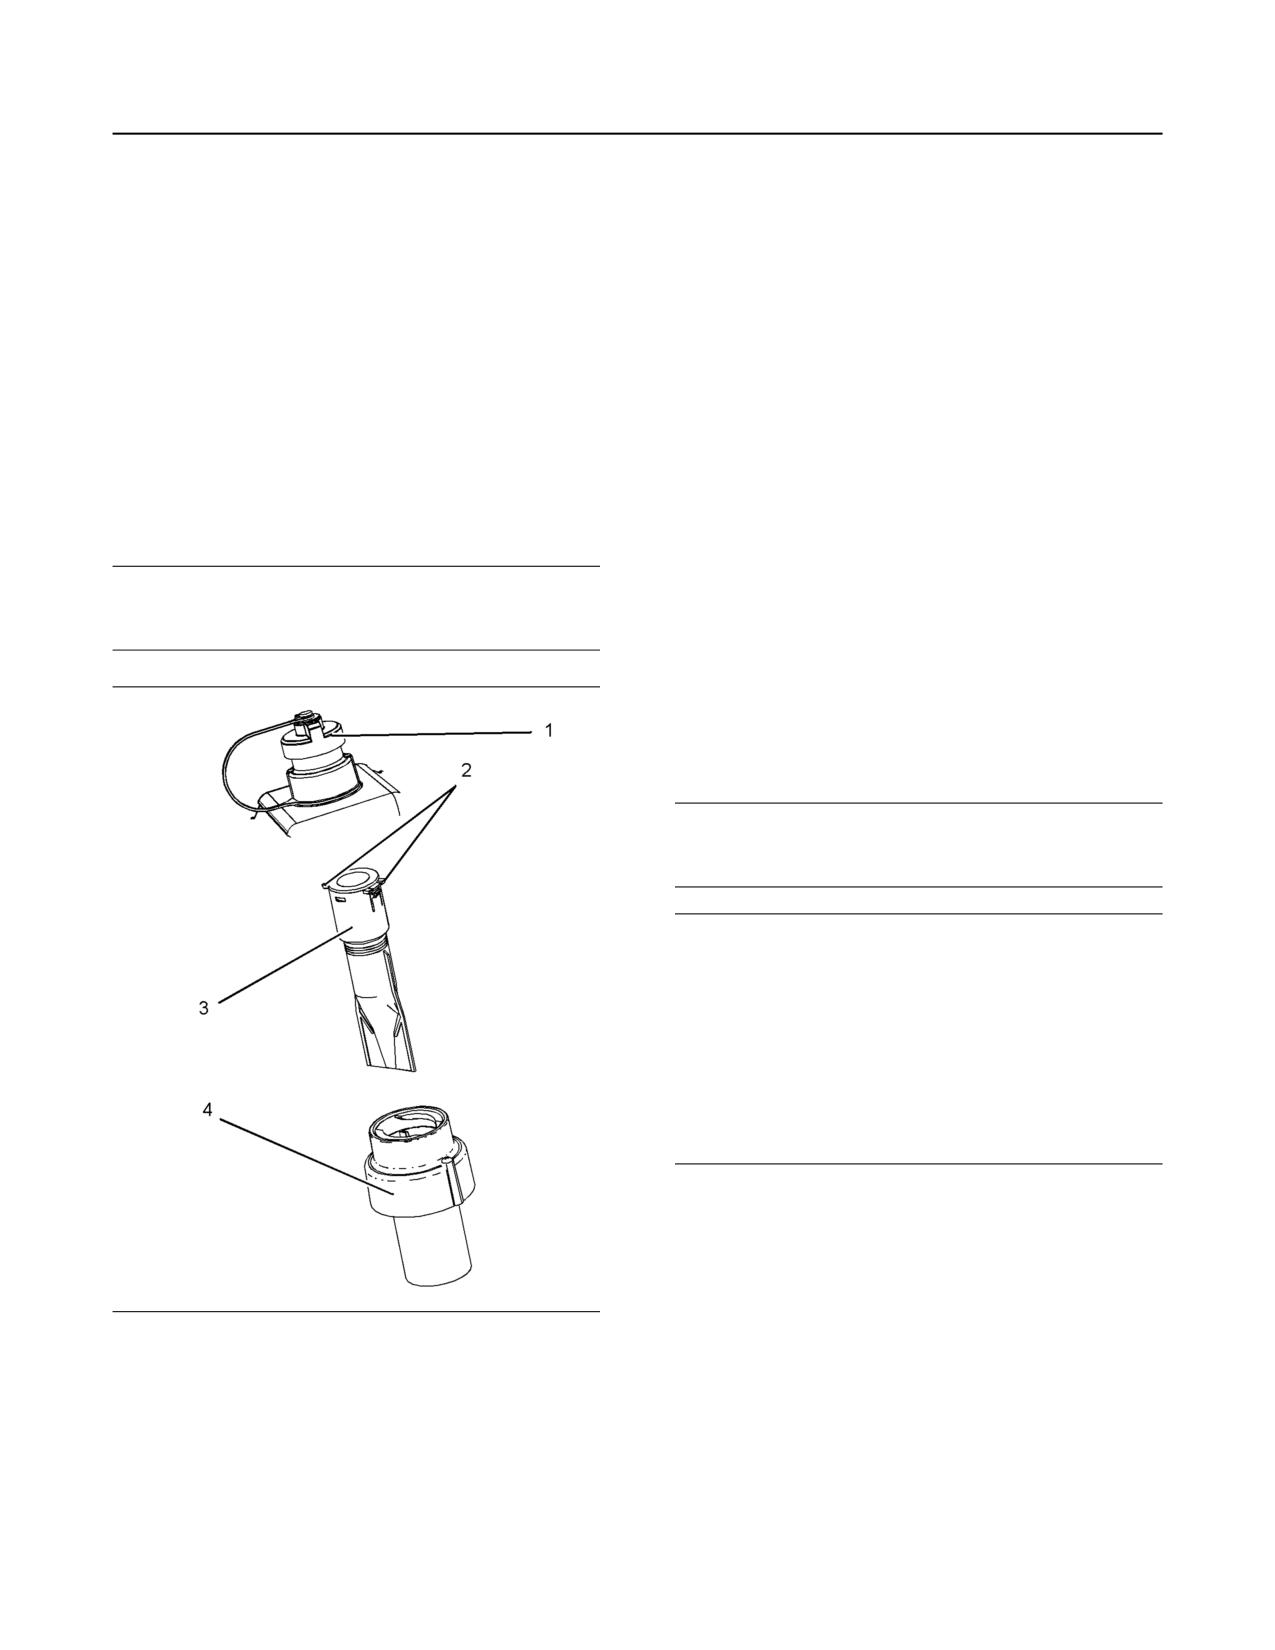
M0076814-03
89
Maintenance Section
DEF Filler Screen (Emission Related Component) - Clean
4. Clean the cooling system filler cap and inspect the
2. Using a suitable tool, press the tabs (2) in order to
gasket. If the gasket is damaged, discard the old
release the tabs. With the tabs released remove
filler cap and install a new filler cap. If the gasket is
the filter screen (3) from DEF tank neck adapter
not damaged, use a suitable pressurizing pump in
(4).
order to pressure test the filler cap. The correct
3. The filter screen can be cleaned in clean water and
pressure is stamped on the face of the filler cap. If
dried using compressed air. Refer to this
the filler cap does not retain the correct pressure,
Operation and Maintenance Manual, “General
install a new filler cap.
Hazard Information” for information on using
compressed air.
i07508033
4. If the filter screen cannot be cleaned or the filter
DEF Filler Screen (Emission
screen is damaged, then the filter screen must be
replaced.
Related Component) - Clean
5. Install filter screen (3) into DEF tank neck adapter
(4). Press filter screen into neck adapter and
ensure that tabs (2) are located correctly. Install
NOTICE
cap (1).
Ensure that the engine is stopped before any servic-
ing or repair is performed.
i07508564
DEF Manifold Filters (Emission
Related Component) - Replace
NOTICE
Ensure that the engine is stopped before any servic-
ing or repair is performed.
NOTICE
Care must be taken to ensure that Diesel Exhaust
Fluid (DEF) for the system are contained during per-
formance of inspection, maintenance, testing, adjust-
ing, and repair of the product. Be prepared to collect
the fluid with suitable containers before opening any
compartment or disassembling any component con-
taining fluids.
Dispose of all fluids according to local regulations
and mandates.
Ensure that the area around the DEF manifold is free
from contamination before any servicing or repair is
performed.
There are two different designs of manifold that could
be installed on your application.
Illustration 73
g03725939
Type 1 Manifold
Typical example
1. Remove the manifold, refer to Disassembly and
1. Ensure that the area around cap on the Diesel
Assembly, “Manifold (DEF Heater) - Remove and
Exhaust Fluid (DEF) tank is clean. Remove cap
Install” for the correct procedure.
(1).
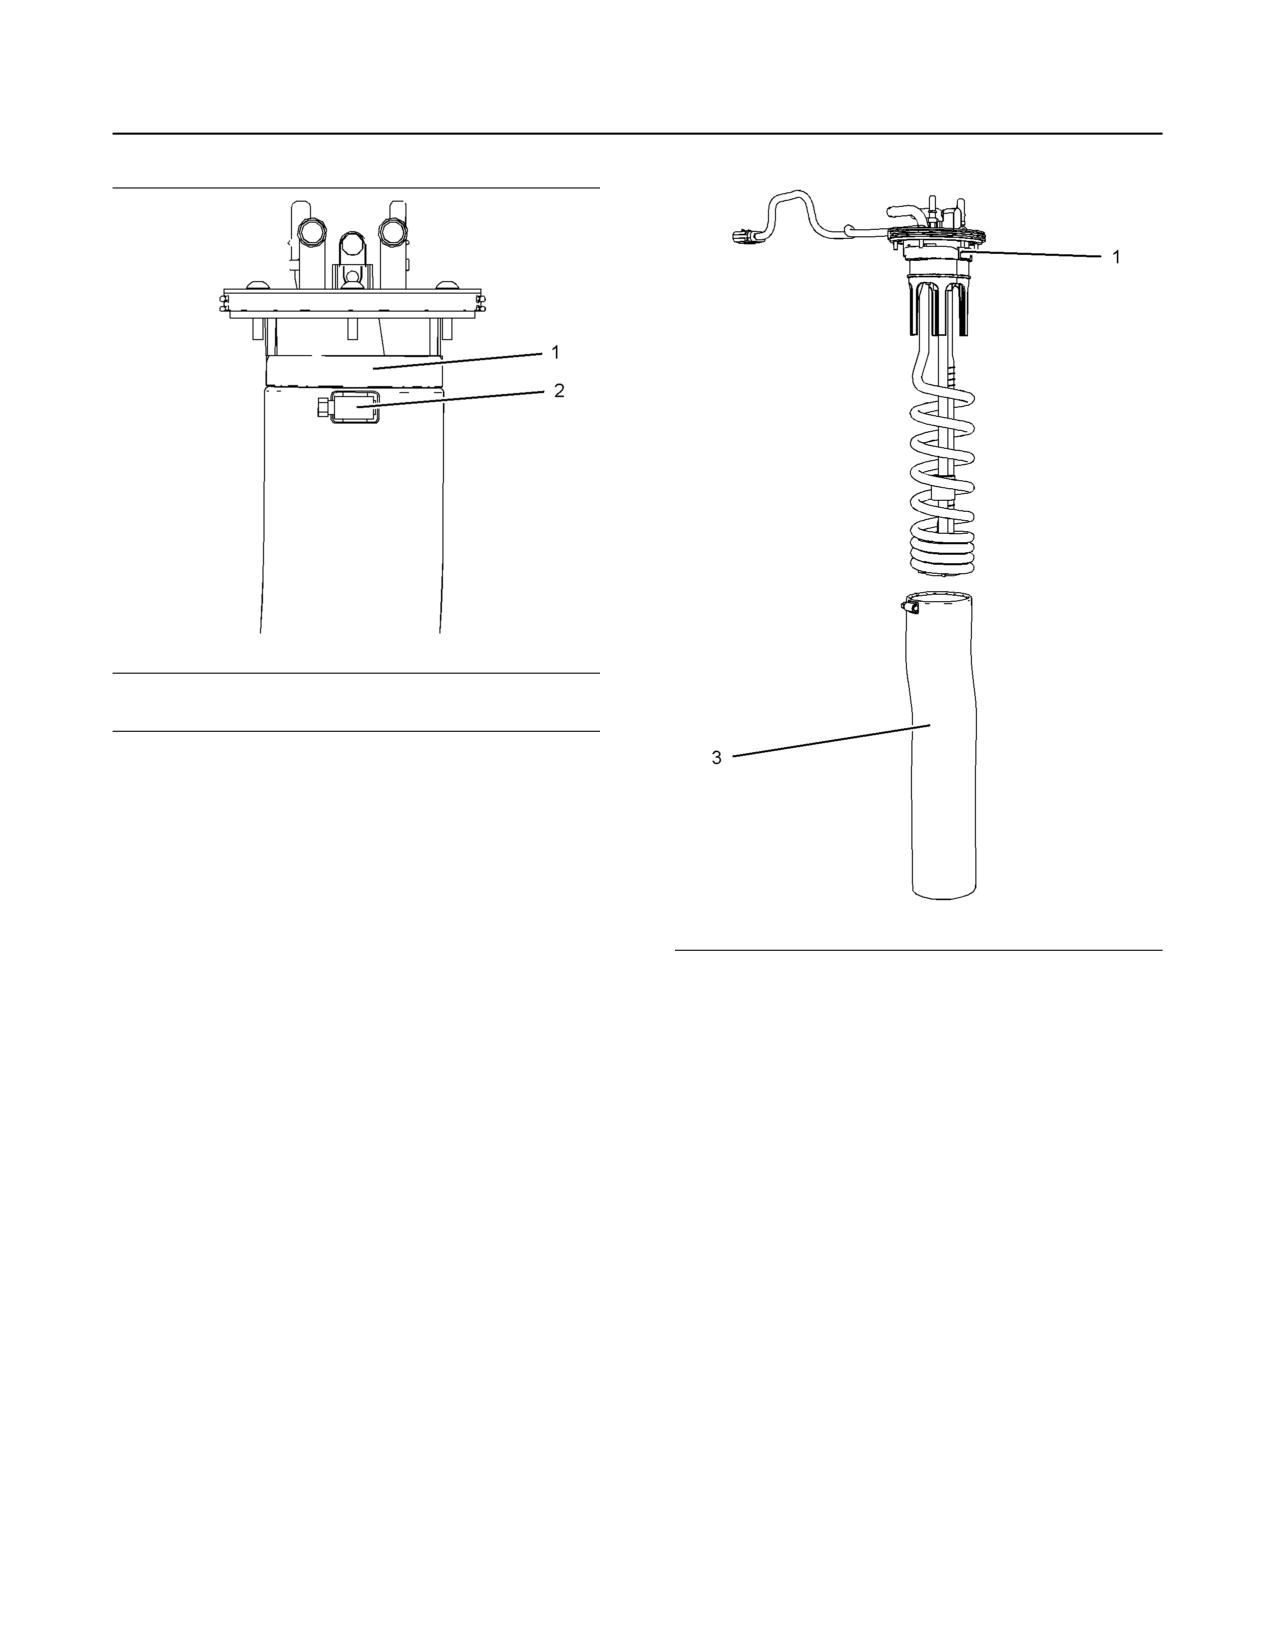
90
M0076814-03
Maintenance Section
DEF Manifold Filters (Emission Related Component) - Replace
Illustration 74
g03806578
Illustration 75
g03806580
2. Remove band clamp (2) from filter base (1).
3. Remove filter (3) from filter base (1).
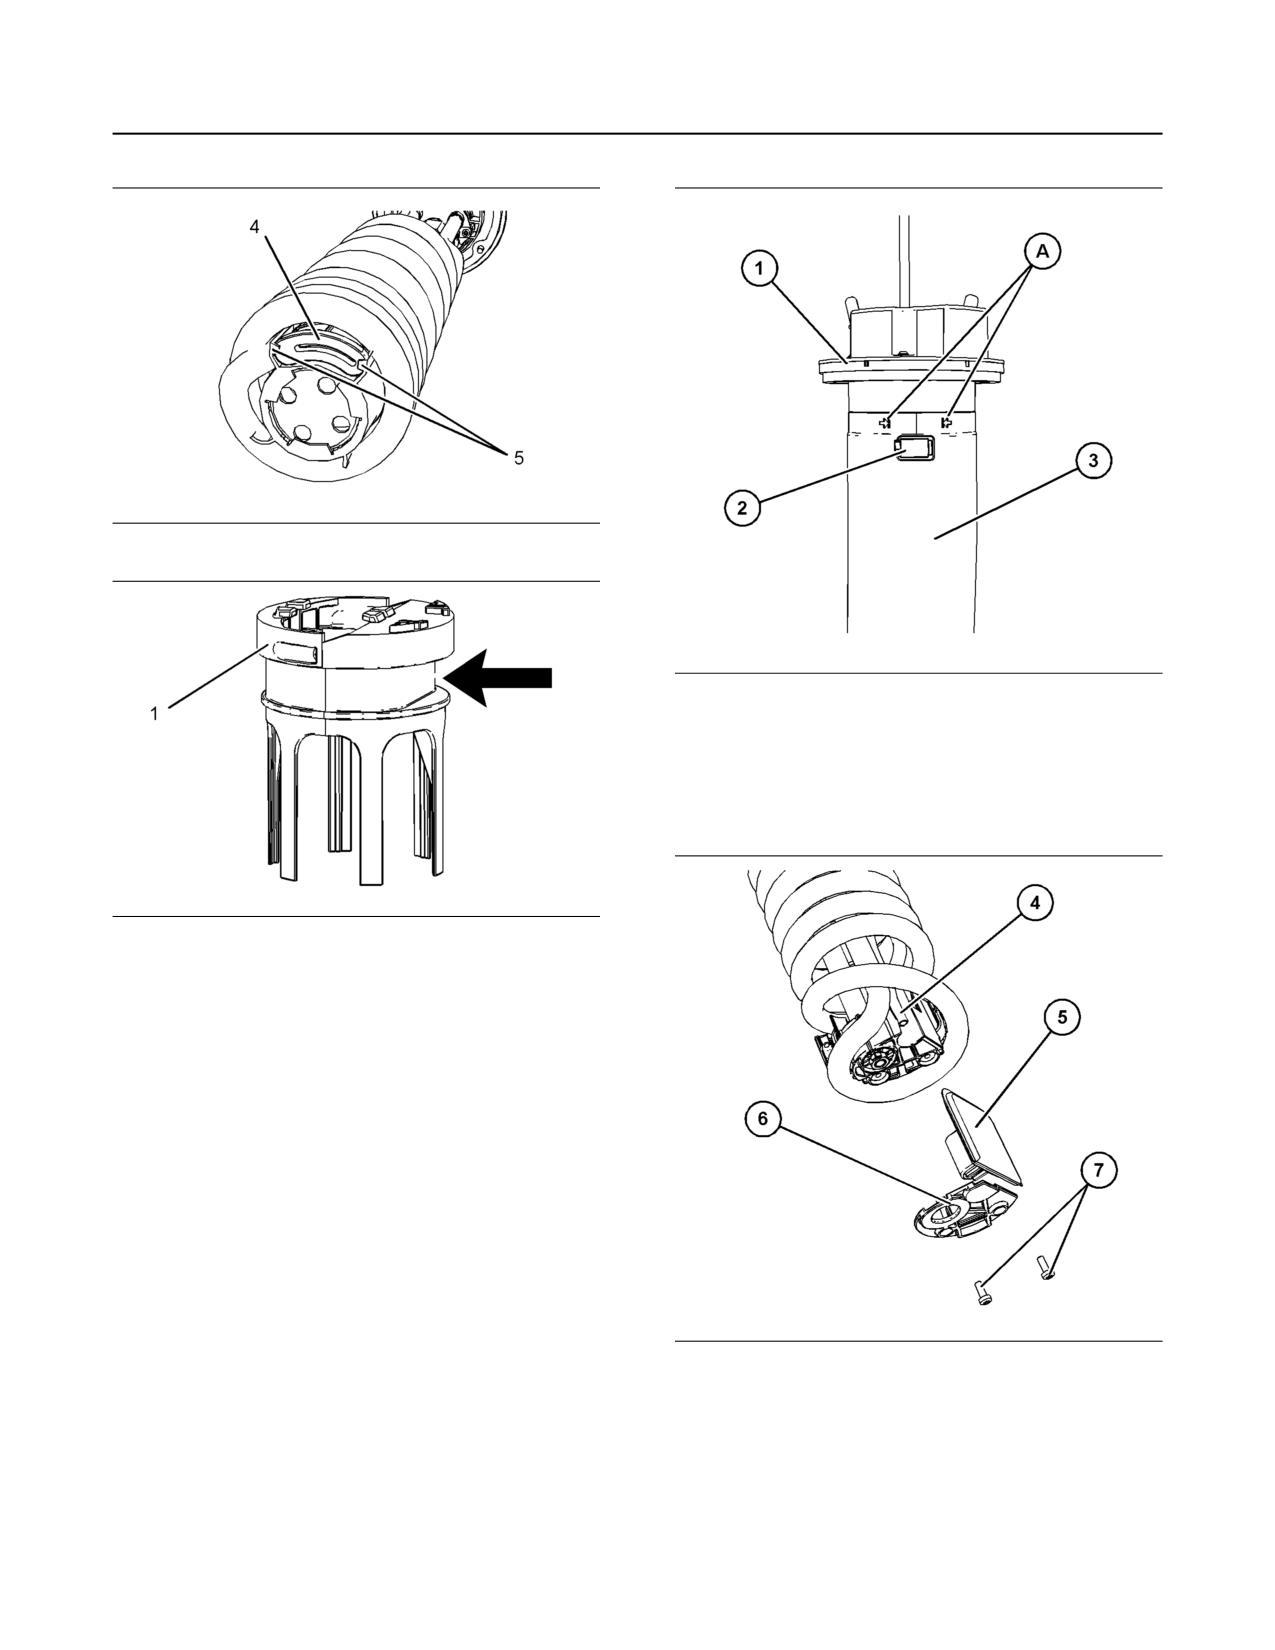
M0076814-03
91
Maintenance Section
DEF Manifold Filters (Emission Related Component) - Replace
Illustration 76
g03806581
Illustration 78
g06159487
1. Note the location of clamp (2). The clamp (2) must
be between the marked location (A).
2. Loosen clamp (2) and remove outer filter (3) from
DEF tank header (1) and discard outer filter (3).
Illustration 77
g03806583
4. Remove the suction filter (4) at the bottom of the
header coils by pulling tabs (5). Replace with a
new suction filter.
5. Install new filter by pulling filter over the manifold
coils up to the bottom of the assembled filter base.
6. Ensure that the band clamp is aligned, as shown in
illustration 77 , to the flat section on the filter base.
Tighten the band clamp to 4.5 ± 0.7 N·m
(40 ± 6 lb in) (1). Ensure that the filter does not
bunch when tightening the band clamp.
7. Install the manifold, refer to Disassembly and
Assembly, “Manifold (DEF Heater) - Remove and
Install” for the correct procedure.
Illustration 79
g06159580
Type 2 Manifold
3. Remove screws (7) and remove retaining plate (6).
To remove the DEF manifold and the hoses
connections from the DEF tank, refer to Disassembly
4. Remove DEF filter (5) from pickup tube (4) and
and Assembly, Manifold (DEF Heater) - Remove and
discard the used filter (5).
Install.
5. Install new filter (5) onto pickup tube (4).
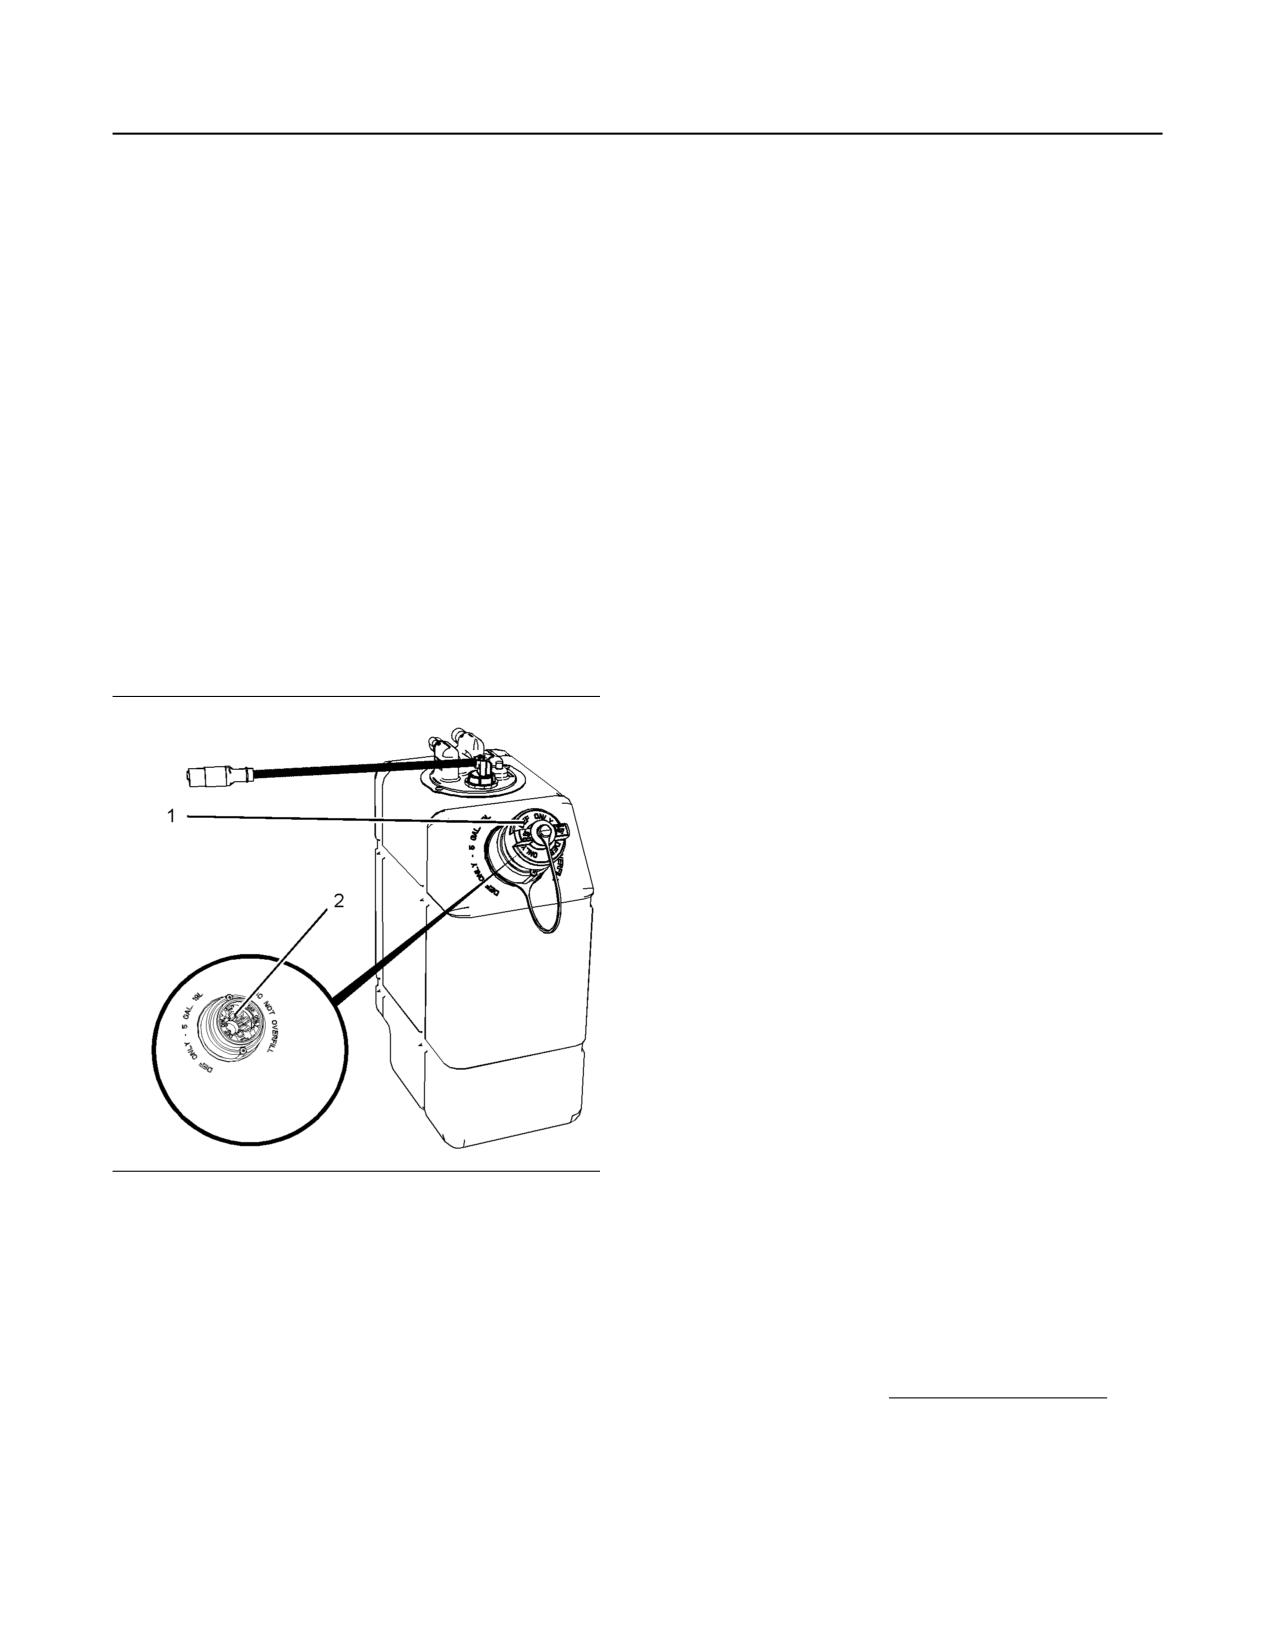
92
M0076814-03
Maintenance Section
Diesel Exhaust Fluid (Emission Related Component) - Fill
6. Install the retaining plate (6) and install screws (7).
Caution should be used when dispensing DEF near
Tighten screws (7) to a torque of 1.1 N·m
an engine that has recently been running. Spilling
DEF onto hot components may cause the release of
(9.8 lb in).
ammonia vapors. Do not breathe ammonia vapors.
7. Install new outer filter (3) onto DEF tank header
Do not clean up any spills with bleach.
(1). Ensure that the clamp (2) is located between
Ensure that the DEF tank is full before starting work.
the location points (A).
1. Before filling the DEF tank, ensure that the DEF
8. Tighten clamp (2) to a torque of 4.5 N·m (40 lb in).
lines have been purged. Purging of the DEF lines
9. Install the DEF tank header, refer to Disassembly
will take place, after the engine has stopped. Only
and Assembly, Manifold (DEF Heater) - Remove
after purging the DEF lines should the DEF tank
and Install.
be filled. For more information on the time taken
for purging the DEF lines, refer to this Operation
i07508011
and Maintenance Manual, “Battery Disconnect
Switch”.
Diesel Exhaust Fluid
2. Ensure the DEF cap (1) and the surrounding area
(Emission Related
is clean and free from dirt. Ensure that all
Component) - Fill
equipment use in filling the tank is clean and free
from dirt.
3. Remove the DEF cap from the tank.
4. Fill the tank with the required amount of DEF.
Ensure that dirt is not introduced into the tank
during filling. Do not over fill the tank. The DEF will
require room for expansion.
Note: Always fill the DEF tank on level ground. Cold
weather can affect DEF, refer to this Operation, and
Maintenance Manual, “Diesel Exhaust Fluid in cold
Weather” for more information.
5. The opening on the DEF tank (2) is a special
diameter. Ensure that the correct nozzle is used
when filling the DEF tank.
Note: At key on the DEF level gauge will show the
last known DEF level and will transition to the new
DEF level value.
6. Install the DEF cap. Check visually the DEF tank
for leakage.
Illustration 80
g03714036
i07508565
Typical example
Diesel Exhaust Fluid Filter
Ensure that the correct specification Diesel Exhaust
Fluid (DEF) is used. Ensure the cleanliness of the
(Emission Related
DEF, refer to this Operation and Maintenance
Component) - Replace
Manual, “Fluid Recommendations” for more
information.
Care should be taken when dispensing DEF. Spills
• Diesel Exhaust Fluid
(DEF)
should be cleaned immediately. All surfaces should
be wiped clean and rinsed with water.
DEF that has been split will crystallize when the
water within the liquid evaporates. Split DEF will
attack paint and metal. If DEF is split, wash the area
with water.
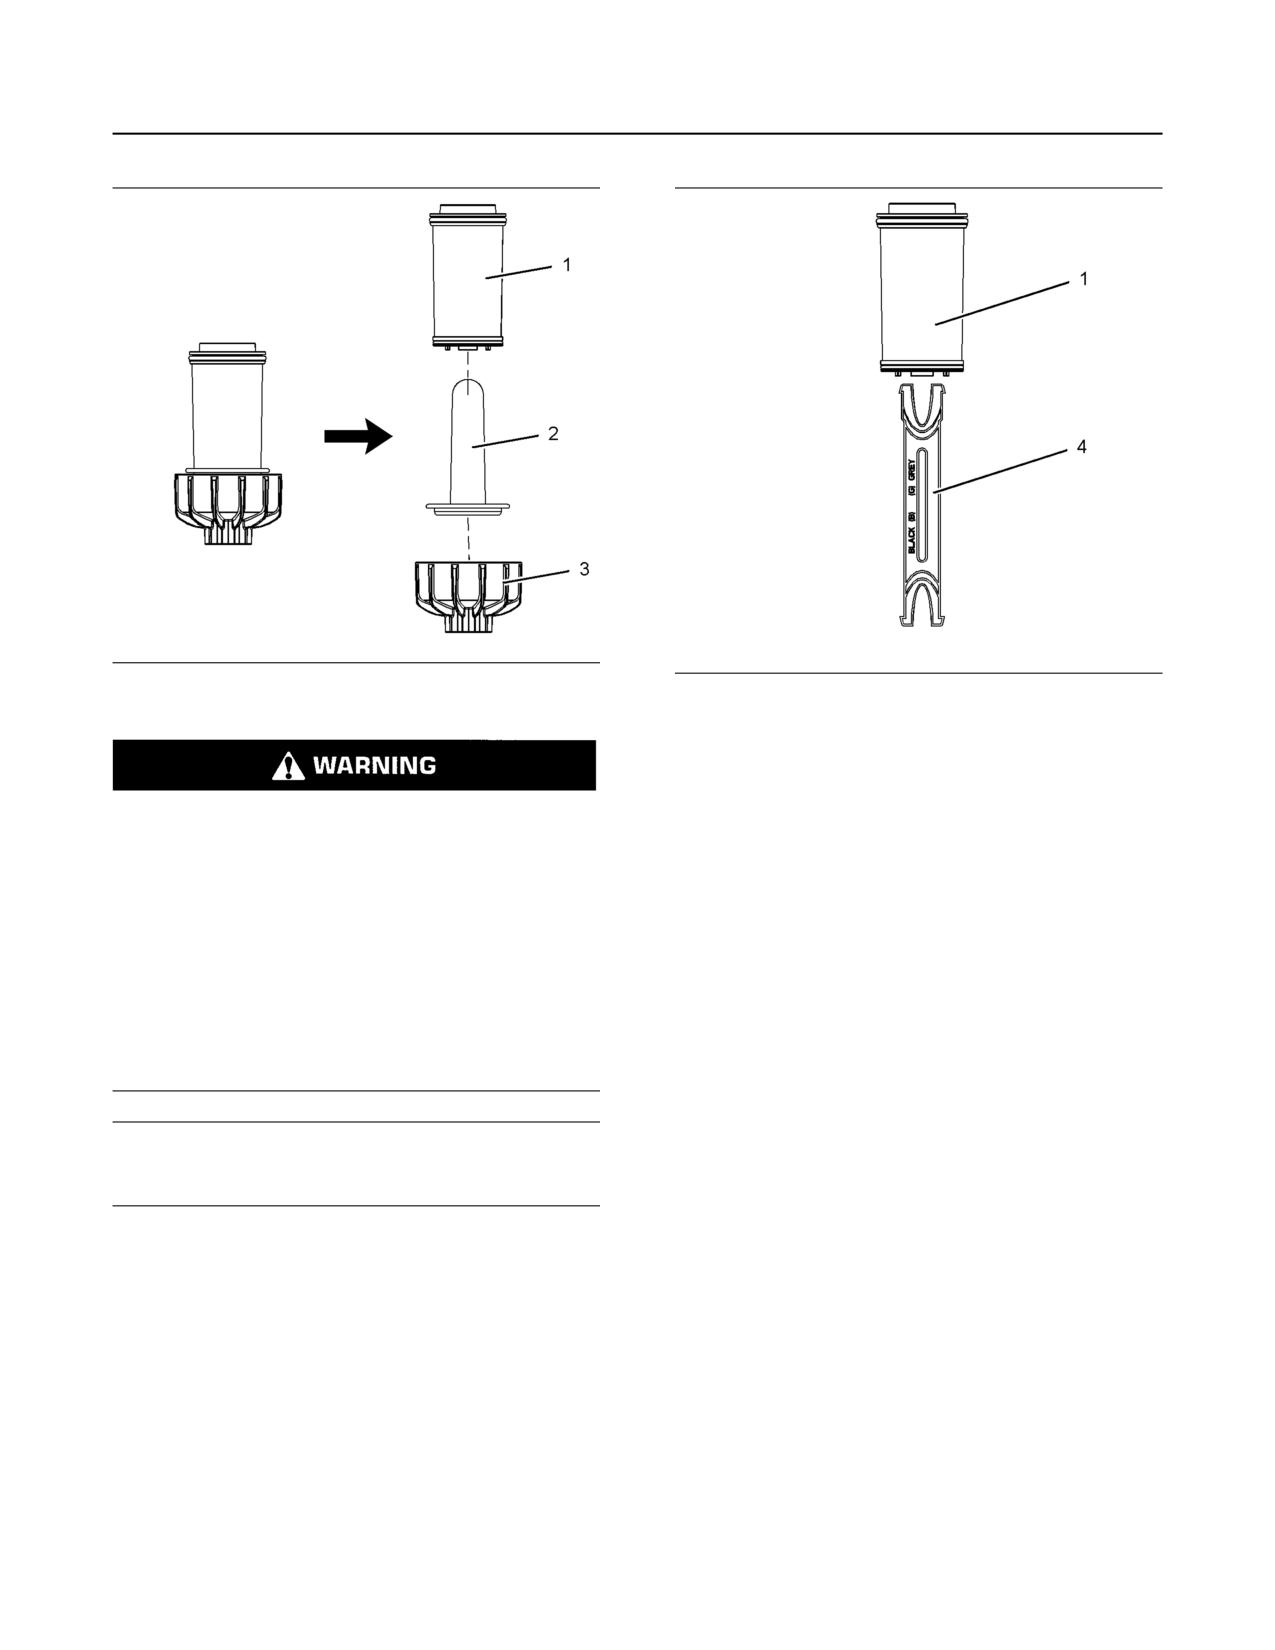
M0076814-03
93
Maintenance Section
Diesel Exhaust Fluid Filter (Emission Related Component) - Replace
Illustration 81
g03332612
Illustration 82
g03332637
Typical Example
Typical Example
3. Insert the DEF filter removal tool (4) into the DEF
filter (1) and remove the DEF filter (1).
Personal injury can result from improper han-
dling of chemicals.
Note: Avoid twisting the DEF filter (1) upon removal.
Twisting may cause a tear.
Make sure you use all the necessary protective
equipment required to do the job.
4. Clean the area around the filter housing.
Make sure that you read and understand all direc-
5. Lubricate the seals of the new DEF filter (1) with
tions and hazards described on the labels and
diesel exhaust fluid or distilled water.
material safety data sheet of any chemical that is
used.
6. Install new DEF filter (1) and rubber cone insert.
Observe all safety precautions recommended by
Note: Avoid twisting the DEF filter (1) upon
the chemical manufacturer for handling, storage,
installation. Twisting may cause a tear.
and disposal of chemicals.
7. Install the cap (3). Torque the cap to 20 N·m
(177 lb in).
NOTICE
Ensure that the engine is stopped before any servic-
ing or repair is performed.
1. Remove the DEF filter cap (3) with a 27mm Bi-Hex
socket.
2. Remove the rubber cone insert (2) from the DEF
filter (1).
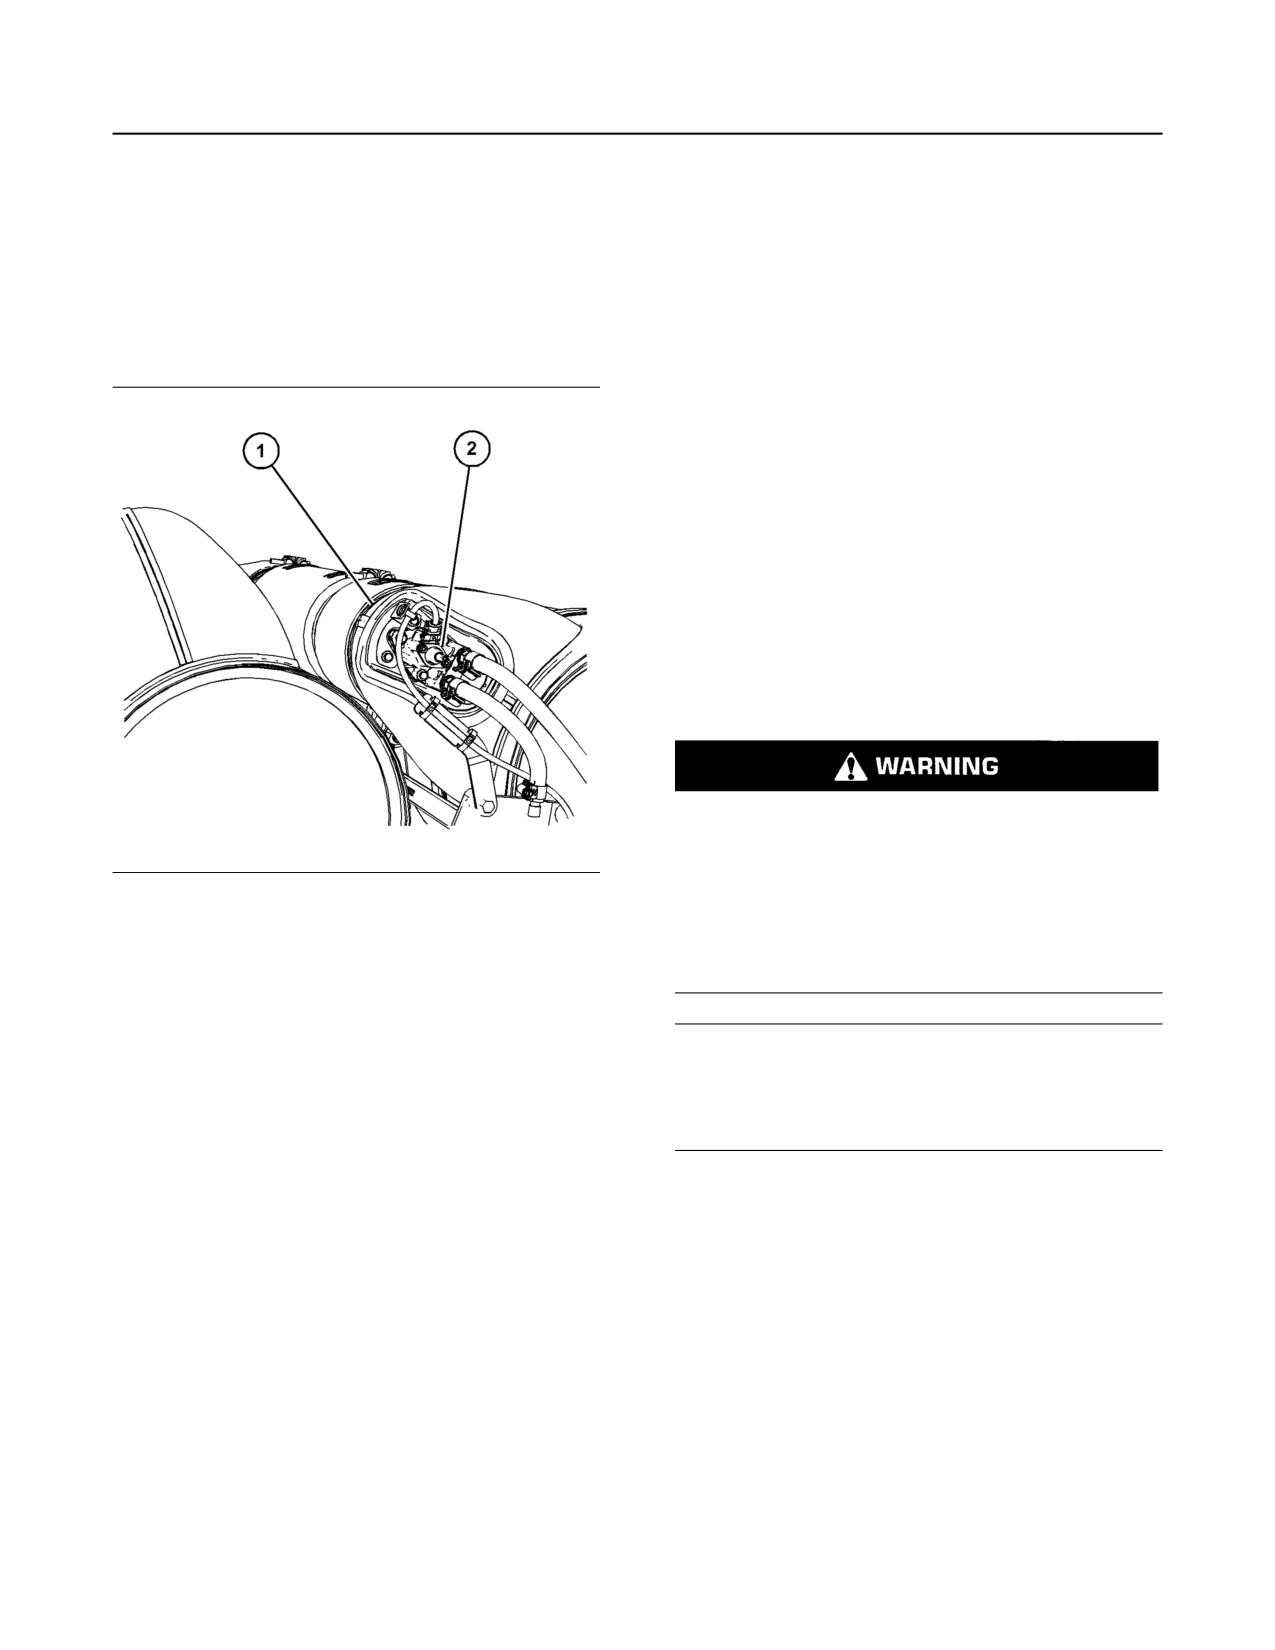
94
M0076814-03
Maintenance Section
Diesel Exhaust Fluid Injector (Emission Related Component) - Replace
i07508568
i02151646
Diesel Exhaust Fluid Injector
Driven Equipment - Check
(Emission Related
Component) - Replace
Refer to the OEM specifications for more information
on the following maintenance recommendations for
the driven equipment:
• Inspection
• Adjustment
• Lubrication
• Other maintenance recommendations
Perform any maintenance for the driven equipment
which is recommended by the OEM.
i07819515
Engine - Clean
Personal injury or death can result from high
voltage.
Moisture
can
create
paths
of
electrical
Illustration 83
g06043006
conductivity.
Typical example
Make sure that the electrical system is OFF. Lock
1. The Diesel Exhaust Fluid (DEF) injector (2) must
out the starting controls and tag the controls “DO
NOT OPERATE” .
be removed from the body of the aftertreatment
regeneration device (1) and a new DEF injector
installed. The DEF lines, coolant lines, and the
NOTICE
electrical connection will need to be removed to
Accumulated grease and oil on an engine is a fire
replace the DEF injector. For more information
hazard. Keep the engine clean. Remove debris and
refer to Disassembly and Assembly, DEF Injector
fluid spills whenever a significant quantity accumu-
and Mounting Remove and Install.
lates on the engine.
Periodic cleaning of the engine is recommended.
i07508573
Steam cleaning the engine will remove accumulated
oil and grease. A clean engine provides the following
Diesel Particulate Filter
benefits:
(Emission Related
• Easy detection of fluid leaks
• Maximum heat transfer characteristics
Consult your Perkins distributor when the diesel
particulate filter needs to be cleaned for the options
• Ease of maintenance
that are available.
The ash monitoring system within the electric control
module will require a reset.
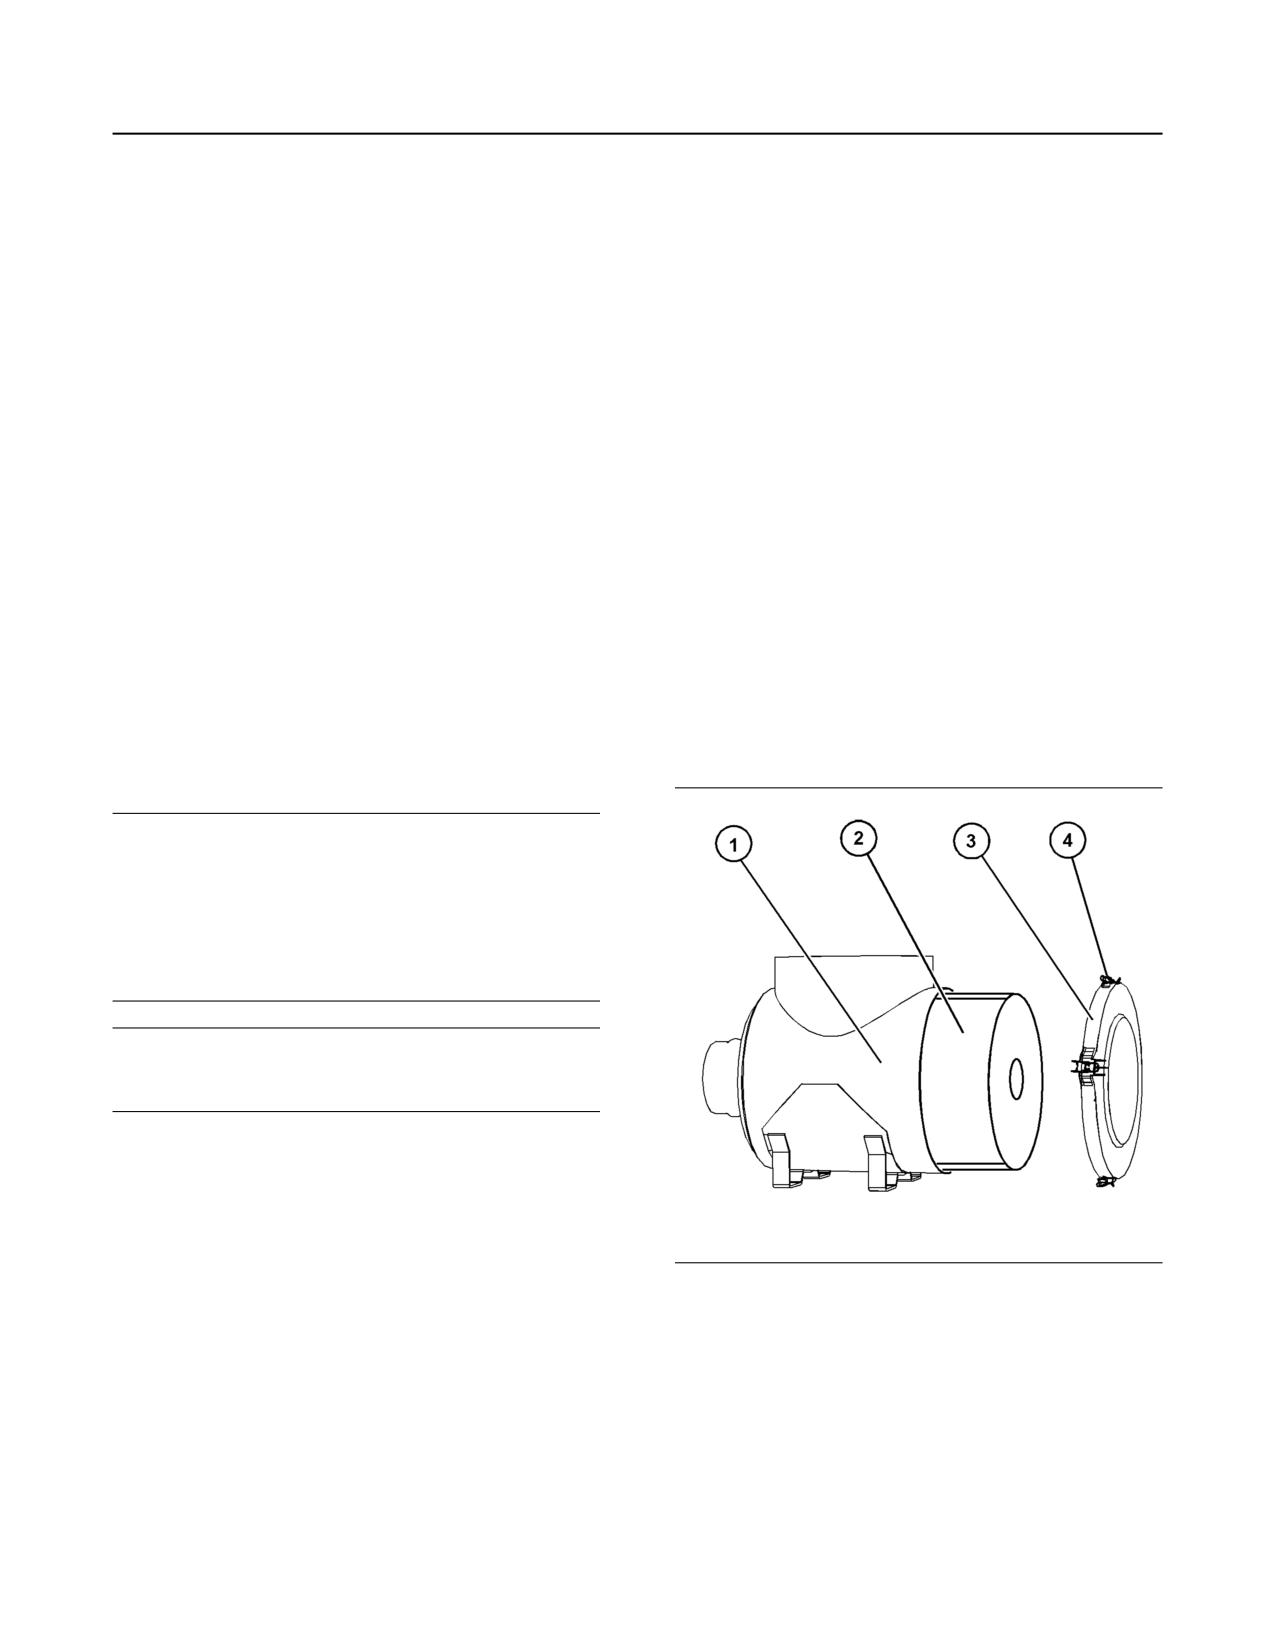
M0076814-03
95
Maintenance Section
Engine Air Cleaner Element - Replace
Note: Caution must be used to prevent electrical
• Check the pre-cleaner (if equipped) and the dust
components from being damaged by excessive water
bowl daily for accumulation of dirt and debris.
when the engine is cleaned. Pressure washers and
Remove any dirt and debris, as needed.
steam cleaners should not be directed at any
electrical connectors or the junction of cables into the
• Operating in dirty conditions may require more
rear of the connectors. Avoid electrical components
frequent service of the air cleaner element.
such as the alternator, the starter, and the ECM.
Replace the dirty air cleaner elements with new air
Protect the fuel injection pump from fluids to wash the
cleaner elements. Before installation, the air cleaner
engine.
elements should be thoroughly checked for tears
and/or holes in the filter material. Inspect the gasket
Ensure that care is taken that the safety labels,
or the seal of the air cleaner element for damage.
emission label, and all other information labels are
Maintain a supply of suitable air cleaner elements for
not removed during engine cleaning.
replacement purposes.
Aftertreatment
Dual Element Air Cleaner
During the engine cleaning process, ensure that
The dual element air cleaner contains a primary air
water or cleaning fluids cannot enter the
cleaner element and a secondary air cleaner
aftertreatment system. If cleaning fluids enters the
element.
aftertreatment system, damage could occur.
When the engine is operating in environments that
i07003542
are dusty or dirty, air cleaner elements may require
more frequent replacement.
Engine Air Cleaner Element -
If equipped, perform maintenance on the pre-cleaner
Replace
or the dust bowl before performing maintenance on
the air filter elements.
NOTICE
Never run the engine without an air cleaner element
installed. Never run the engine with a damaged air
cleaner element. Do not use air cleaner elements
with damaged pleats, gaskets or seals. Dirt entering
the engine causes premature wear and damage to
engine components. Air cleaner elements help to pre-
vent airborne debris from entering the air inlet.
NOTICE
Never service the air cleaner element with the engine
running since this will allow dirt to enter the engine.
Ensure that the engine cannot start before any
service or repair is performed.
Servicing the Air Cleaner Element
Note: The air filter system may not have been
provided by Perkins. The procedure that follows is for
Illustration 84
g06043462
a typical air filter system. Refer to the OEM
Typical example
information for the correct procedure.
Note: Do not allow dirt to enter the air system during
If the air cleaner element becomes plugged, the air
replacement of the air filter elements.
can split the material of the air cleaner element.
Unfiltered air will drastically accelerate internal
engine wear. Refer to the OEM information for the
1. Clean the outer casing of the air cleaner before
correct air cleaner elements for your application.
removing the end cover (3).
• Check the air cleaner service indicator daily.
Note: Before removal, check the orientation of the
end cover (3). Some air cleaners the end cover must
be installed in the correctly aligned position.
96
M0076814-03
Maintenance Section
Engine Air Cleaner Service Indicator - Inspect
2. Release the clips (4) and remove the end cover (3)
• The yellow diaphragm enters the red zone.
from air cleaner body (1).
• The red piston locks in the visible position.
3. Remove the primary air filter element (2) and
remove the secondary air filter element (not
Test the Service Indicator
shown) from air cleaner body (1). Ensure that the
inner body of the air cleaner is clean and free from
Service indicators are important instruments.
dirt. Ensure that the inner of the air cleaner cover ,
• Check for ease of resetting. The service indicator
(3) is clean and free from dirt.
should reset in less than three pushes.
4. Install a new secondary air filter element (not
• Check the movement of the service indicator core
shown). Install a new primary air filter element (2)
when the engine is run at full load speed. The core
and install end cover (3). Ensure that the clips (4)
should latch approximately at the greatest vacuum
are located securely.
that is attained.
i06103548
If the service indicator does not reset easily, or if the
core does not latch at the greatest vacuum, the
service indicator should be replaced. If the new
Engine Air Cleaner Service
service indicator will not reset, the hole for the service
Indicator - Inspect
indicator may be plugged.
(If Equipped)
If necessary, replace the service indicator more
frequently in environments that are severely dusty.
Replace the service indicator annually regardless of
the operating conditions. Replace the service
Some engines may be equipped with a different
indicator when the engine is overhauled, and
service indicator.
whenever major engine components are replaced.
Some engines are equipped with a differential gauge
for inlet air pressure. The differential gauge for inlet
Note: When a new service indicator is installed,
air pressure displays the difference in the pressure
excessive force may crack the top of the service
that is measured before and after the air cleaner
indicator. Tighten the service indicator to a torque of
element. As the air cleaner element becomes dirty,
2 N·m (18 lb in).
the pressure differential rises. If your engine is
equipped with a different type of service indicator,
i07819538
follow the OEM recommendations in order to service
the air cleaner service indicator.
Engine Mounts - Inspect
The service indicator may be mounted on the clean
side of the air cleaner housing or in a remote
location.
Note: The engine mounts may not have been
supplied by Perkins. Refer to the Original Equipment
Manufacturer (OEM information for further details on
the engine mounts and the correct bolt torque.
Inspect the engine mounts for deterioration and for
correct bolt torque. Excessive engine vibration can
be caused by the following conditions:
• Incorrect mounting of the engine
• Deterioration of the engine mounts
• Loose engine mounts
Any engine mount that shows deterioration should be
replaced. Refer to the OEM information for the
Illustration 85
g00103777
recommended torques.
Typical service indicator
When the engine mounts are supplied by Perkins the
Observe the service indicator. The air cleaner
maintenance procedure will be supplied in the
element should be cleaned or the air cleaner element
Disassembly and Assembly manual for your engine.
should be replaced when one of the following
conditions occur:
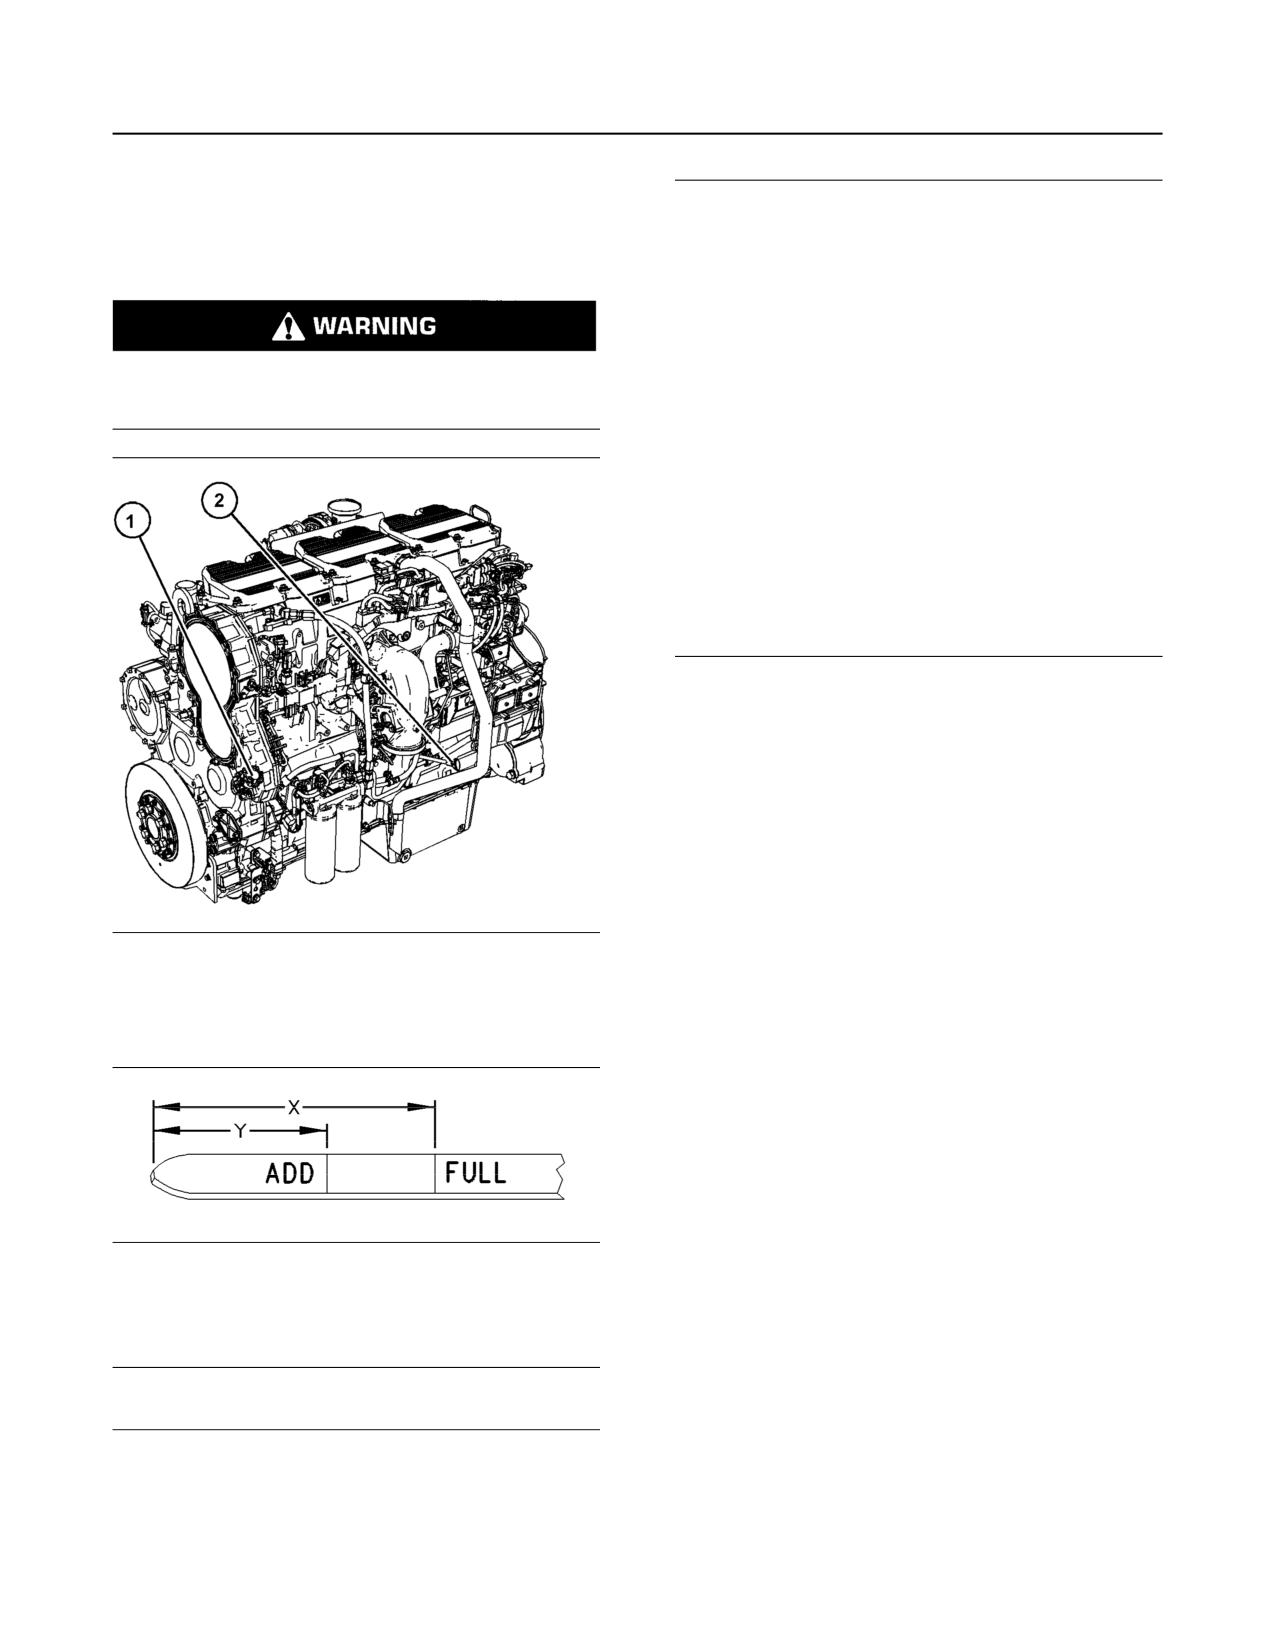
M0076814-03
97
Maintenance Section
Engine Oil Level - Check
i06826917
NOTICE
Engine damage can occur if the crankcase is filled
Engine Oil Level - Check
above the “FULL” mark on the oil level gauge
(dipstick).
An overfull crankcase can cause the crankshaft to dip
into the oil. This will reduce the power that is devel-
oped and also force air bubbles into the oil. These
Hot oil and hot components can cause personal
bubbles (foam) can cause the following problems: re-
injury. Do not allow hot oil or hot components to
duction of the oil's ability to lubricate, reduction of oil
contact the skin.
pressure, inadequate cooling, oil blowing out of the
crankcase breathers and excessive oil consumption.
Excessive oil consumption will cause deposits to form
on the pistons and in the combustion chamber. De-
posits in the combustion chamber lead to the follow-
ing problems: guttering of the valves, packing of
carbon under the piston rings and wear of the cylin-
der liner.
If the oil level is above the “FULL” mark on the oil lev-
el gauge, drain some of the oil immediately.
1. Remove the oil level gauge to check engine oil
level. Maintain the oil level between the “ADD”
mark (Y) and the “FULL” mark (X) on the oil level
gauge (2). Do not fill the crankcase above “FULL”
mark (X).
2. If engine oil is required, remove oil filler cap to add
engine oil.
3. To choose the correct type of oil for this engine,
refer to this Operation and Maintenance Manual,
Illustration 86
g06131517
“Fluid Recommendations”.
Typical example
4. Clean the oil filler cap and install the oil filler cap.
(1) Oil filler cap
(2) Oil level gauge (Dipstick)
5. Record the amount of oil that is added. For the
next oil sample and analysis, include the total
amount of oil that has been added since the
previous sample. Recording this information helps
to provide the most accurate oil analysis.
i01907674
Engine Oil Sample - Obtain
Illustration 87
g00110310
Partial view of the oil level gauge
The condition of the engine lubricating oil may be
(Y) “ADD” mark
checked at regular intervals as part of a preventive
(X) “FULL” mark
maintenance program. Perkins include an oil
sampling valve as an option. The oil sampling valve
(if equipped) is included in order to regularly sample
NOTICE
the engine lubricating oil. The oil sampling valve is
Perform this maintenance with the engine stopped.
positioned on the oil filter head or the oil sampling
valve is positioned on the cylinder block.
98
M0076814-03
Maintenance Section
Engine Oil and Filter - Change
Perkins recommends using a sampling valve in order
The sample can be checked for the following: the
to obtain oil samples. The quality and the consistency
quality of the oil, the existence of any coolant in the
of the samples are better when a sampling valve is
oil, the existence of any ferrous metal particles in the
used. The location of the sampling valve allows oil
oil and the existence of any nonferrous metal
that is flowing under pressure to be obtained during
particles in the oil.
normal engine operation.
i06826973
Obtain the Sample and the
Engine Oil and Filter - Change
Analysis
Hot oil and hot components can cause personal
injury. Do not allow hot oil or hot components to
Hot oil and hot components can cause personal
contact the skin.
injury. Do not allow hot oil or hot components to
contact the skin.
In order to help obtain the most accurate analysis,
record the following information before an oil sample
is taken:
Oil and Filter Change Intervals
• The date of the sample
The standard engine oil and filter change period is
• Engine model
500 hours. There are several other factors that can
alter the standard engine oil and filter change of 500
• Engine number
hours.
• If the engine is using engine oil analysis to
• Service hours on the engine
determine oil and filter change period.
• The number of hours that have accumulated since
• The engine is working in a severe service
the last oil change
environment/Load Factor
• The amount of oil that has been added since the
• Infrequent operation of the engine
last oil change
Ensure that the container for the sample is clean and
Refer to this Operation and Maintenance Manual,
dry. Also ensure that the container for the sample is
“Severe Service Application” for more information on
clearly labelled.
reducing the engine oil and filter change period. For
severe service applications the recommended oil and
To ensure that the sample is representative of the oil
filter change period is 250 hours.
in the crankcase, obtain a warm, well mixed oil
sample.
If the engine is operated in severe service conditions,
Perkins recommends the use of engine oil sampling.
To avoid contamination of the oil samples, the tools
Refer to this Operation and Maintenance Manual,
and the supplies that are used for obtaining oil
Engine Oil sample - Obtain for more information.
samples must be clean.
If the engine is operated infrequently less than 500
hours in a 12-month period, then the engine oil and
filter change should be conducted yearly.
Drain the Engine Lubricating Oil
NOTICE
Care must be taken to ensure that fluids are con-
tained during performance of inspection, mainte-
nance, testing, adjusting and repair of the product.
Be prepared to collect the fluid with suitable contain-
ers before opening any compartment or disassem-
bling any component containing fluids.
Dispose of all fluids according to local regulations
and mandates.
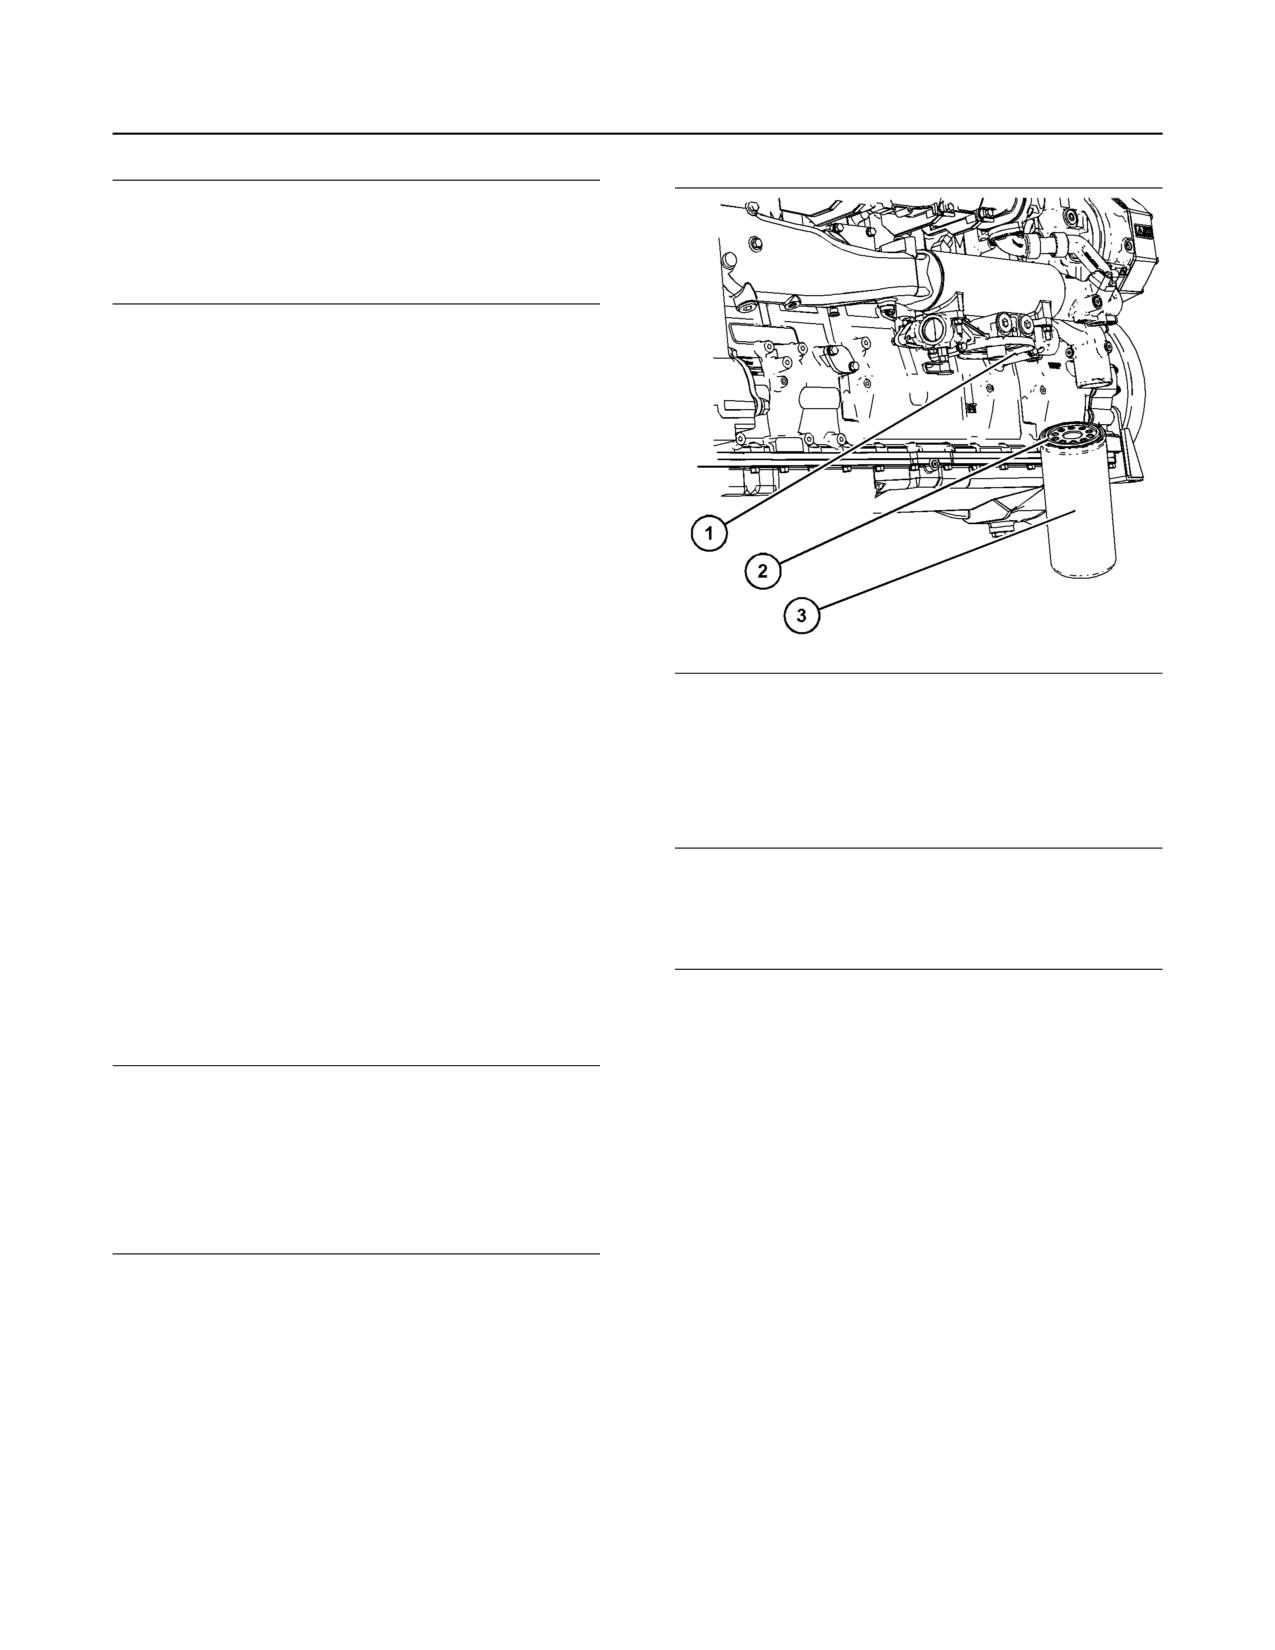
M0076814-03
99
Maintenance Section
Engine Oil and Filter - Change
NOTICE
Keep all parts clean from contaminants.
Contaminants may cause rapid wear and shortened
component life.
Do not drain the engine lubricating oil when the
engine is cold. As the engine lubricating oil cools,
suspended waste particles settle on the bottom of the
oil pan. The waste particles are not removed with
draining cold oil. Drain the oil pan with the engine
stopped. Drain the oil pan with the oil warm. This
draining method allows the waste particles that are
suspended in the oil to be drained properly.
Failure to follow this recommended procedure will
cause the waste particles to be recirculated through
the engine lubrication system with the new oil.
Note: Ensure that the vessel that will be used is large
enough to collect the waste oil.
After the engine has been run at the normal
operating temperature, stop the engine. Use one of
Illustration 88
g06131554
the following methods to drain the engine oil pan:
Typical example
• If the engine is equipped with a drain valve, turn
2. Clean sealing surface (1).
the drain valve knob counterclockwise to drain the
oil. After the oil has drained, turn the drain valve
3. Apply clean engine oil to O ring seal (2) for the new
knob clockwise to close the drain valve.
oil filter (3).
• If the engine is not equipped with a drain valve,
NOTICE
remove the oil drain plug to allow the oil to drain.
Do not fill the oil filter with oil before installing. This oil
would not be filtered and could be contaminated.
After the oil has drained, the oil drain plug should be
Contaminated oil can cause accelerated wear to en-
cleaned. If necessary, replace the O ring seal and
gine components.
install the plug. Tighten the drain plug to 35 N·m
(26 lb ft).
4. Install the new oil filter (3). Spin on the oil filter until
Replace the Oil Filter
the O ring contacts the sealing surface (1). Then
rotate the oil filter 1 full turn. Remove the container
NOTICE
and disposal of the waste oil in accordance with
Perkins oil filters are manufactured to Perkins specifi-
local regulations.
cations. Use of an oil filter that is not recommended
by Perkins could result in severe damage to the en-
Fill the Oil Pan
gine bearings, and crankshaft. As a result of the larg-
er waste particles from unfiltered oil entering the
engine lubricating system. Only use oil filters recom-
1. Remove the oil filler cap. Refer to this Operation
mended by Perkins.
and Maintenance Manual, “Fluid
Recommendations” for more information on
suitable oils. Fill the oil pan with the correct
1. Remove the oil filter with a suitable tool.
amount of new engine lubricating oil. Refer to this
Operation and Maintenance Manual, “Refill
Capacities” for more information on refill
capacities.
2. Start the engine and run the engine at LOW IDLE
for 2 minutes. Perform this procedure to ensure
that the lubrication system has filled the oil filter.
Inspect the oil filter for oil leaks.
3. Stop the engine and allow the oil to drain back to
the oil pan for a minimum of 10 minutes.
100
M0076814-03
Maintenance Section
Engine Storage Procedure - Check
4. .Remove the oil level gauge to check the oil level.
4. Drain the crankcase oil. Replace the crankcase oil
Maintain the oil level between the ADD and FULL
and change the oil filters. For the proper
marks on the side of the oil level gauge.
procedure, refer to this Operation and
Maintenance Manual.
i06836189
5. Add Volatile Corrosion Inhibitor (VCI) oil to the
crankcase oil. The volume of VCI oil in the
Engine Storage Procedure -
crankcase oil should be 3 to 4 percent.
Check
Note: If the engine crankcase is full, drain enough
engine oil so the mixture can be added.
The oil change interval may be extended to 12
6. Remove the air filter elements. Turn the engine at
months for a vehicle that is operated seasonally and
cranking speed with the throttle control in FUEL
placed in storage for the remainder of the year by
using the required storage procedures and the
OFF position. Use a sprayer to add a mixture of 50
required start-up procedures. This extension is
percent VCI oil and 50 percent engine oil into the
permitted if the following categories for oil change
air inlet or turbocharger inlet.
intervals in the Operation and Maintenance Manual,
Maintenance Interval Schedule have not been
Note: The mixture of VCI oil can be added to the inlet
reached:
by removing the plug for checking turbocharger boost
pressure. The minimum application rate for the VCI
• Mileage
oil mixture is 5.5 mL per L (3 oz per 1000 cu in) of
engine displacement.
• Operating hours
• Fuel consumption
7. Use a sprayer to apply a mixture of 50 percent VCI
oil and 50 percent crankcase oil into the exhaust
If an engine is out of operation and if use of the
openings. The minimum application rate for the oil
engine is not planned, special precautions should be
mixture is 5.5 mL per L (3 oz per 1000 cu in) of
made. If the engine will be stored for more than 3
engine displacement. Seal the exhaust pipe and
months, a complete protection procedure is
recommended.
seal any drain holes in the muffler.
8. Remove the fuel from the secondary fuel filter
Special Precautions
housing. Alternately, empty and reinstall the spin-
on fuel filter element to remove any dirt and water.
Your Perkins distributor can help in preparing the
Drain any sleeve metering fuel pump.
engine for extended storage periods.
Clean the primary fuel filter. Fill with calibration
Some applications, the engine can be equipped with
fluid or kerosene. Install the primary fuel filter and
delayed engine shutdown. Allow at least 2 minutes
operate the priming pump. This procedure will
after the engine has stopped before you turn the
send clean oil to the secondary filter and the
battery disconnect switch to OFF. Disconnecting the
battery power too soon will prevent purging of the
engine.
DEF fluid lines after the engine is shut down. Also,
Open the fuel tank drain valve to drain any water
during the 2 minutes the engine electronic control
module is active storing information from the engine
and dirt from the fuel tank. Apply a spray of
and aftertreatment sensors.
calibration fluid or kerosene at the rate of
30 mL per 30 L (1 oz per 7.50 gal US) of fuel tank
The OEM condition of storage for the application that
capacity to prevent rust in the fuel tank. Add
the engine is installed must be followed.
0.15 mL per L (.02 oz per 1 gal US) of commercial
biocide such as Biobor JF to the fuel.
Engine
Apply a small amount of oil to the threads on the
1. Clean the engine of any dirt, rust, grease, and oil.
fuel tank filler neck and install the cap. Seal all
Inspect the exterior. Paint areas that contain paint
openings to the tank to prevent evaporation of the
damage with a good quality paint.
fuel and as a preservative.
2. Remove dirt from the air cleaners. Check all seals,
9. Remove the fuel injectors. Apply 30 mL (1 oz) of
gaskets, and the filter element for damage.
the mixture of oils (50 percent VCI oil and 50
percent engine oil) into each cylinder.
3. Apply lubricant to all points in this Operation and
Maintenance Manual, “Maintenance Interval
Schedule”.
M0076814-03
101
Maintenance Section
Engine Storage Procedure - Check
Use a bar or a turning tool to turn over the engine
Refer to this Operation and Maintenance Manual,
slowly. This procedure puts the oil on the cylinder
“Fluid Recommendations” for more information about
coolants.
walls. Install all fuel injectors and tighten to the
correct torque. Refer to Disassembly and
Aftertreatment
Assembly Manual for more information.
10. Spray a thin amount of a mixture of 50 percent
The engine must be allowed to perform a Diesel
Exhaust Fluid (DEF) purge before the battery
VCI oil and 50 percent engine oil onto the following
disconnect switch is turned off. Some applications,
components: flywheel, ring gear teeth, and starter
the engine can be equipped with delayed engine
pinion. Install the covers to prevent evaporation of
shutdown. Allow 2 minutes after the engine has
the vapors from the VCI oil.
stopped before disconnecting the battery disconnect
switch.
11. Apply a heavy amount of Multipurpose Grease to
all outside parts that move, such as rod threads,
The exhaust outlet of the aftertreatment must be
ball joints, linkage.
capped. To prevent damage to the exhaust outlet
connection during storage, the weight of the CEM
Note: Install all covers. Ensure that tape has been
must not act on the exhaust outlet.
installed over all openings, air inlets, exhaust
1. Ensure normal engine shutdown, allow the DEF to
openings, the flywheel housing, the crankcase
be purged. Do not disconnect the battery
breathers, the dipstick tubes.
disconnect switch, allow 2 minutes after key off
Ensure that all covers are airtight and
before disconnection.
weatherproof. Use a waterproof weather resistant
2. Fill the tank with DEF that meets all the
tape such as Kendall No. 231 or an equivalent. Do
requirement defined in ISO 22241-1.
not use duct tape. Duct tape will only seal for a
short time.
3. Ensure that all DEF lines and electrical connection
are connected prior to prevent crystal from
12. Under most conditions, removing the batteries is
forming.
the best procedure. As an alternative, place the
batteries in storage. As needed, periodically
4. Ensure that the DEF filler cap is correctly installed.
charge the batteries whilst the batteries are in
storage.
Removing Application from
Storage
If the batteries are not removed, wash the tops of
the batteries until the tops are clean. Apply an
Follow the OEM recommendation for application
electrical charge to the batteries to obtain a
removal from storage.
specific gravity of 1.225.
Disconnect the battery terminals. Place a plastic
Remove Engine from Storage
cover over the batteries.
1. Remove all outside protective covers.
13. Remove the drive belts from the engine
2. Change the oil and filters.
14. Place a waterproof cover over the engine. Ensure
that the engine cover is secure. The cover should
3. Check the condition of the fan and alternator belts.
be loose enough to allow air to circulate around
Replace the belts, if necessary. Refer to this
the engine to prevent damage from condensation.
Operation and Maintenance Manual, “Belts -
Inspect/Adjust/Replace” for the correct procedure.
15. Attach a tag with the storage date to the engine.
4. Replace the fuel filter elements.
16. Remove the waterproof cover at 2 month or 3-
month intervals to check the engine for corrosion.
5. Remove the plastic covers from the air cleaner
If the engine has signs of corrosion, repeat the
elements.
protection procedure.
6. Use a bar or a turning tool to turn the engine in the
normal direction of rotation. The procedure
Coolant System
ensures that no hydraulic locks or resistance exist.
Completely fill the cooling system before storage.
7. Before starting the engine, remove the valve cover
or covers. Put a large amount of engine oil on the
camshaft, cam followers, and valve mechanism to
prevent damage to the mechanism.
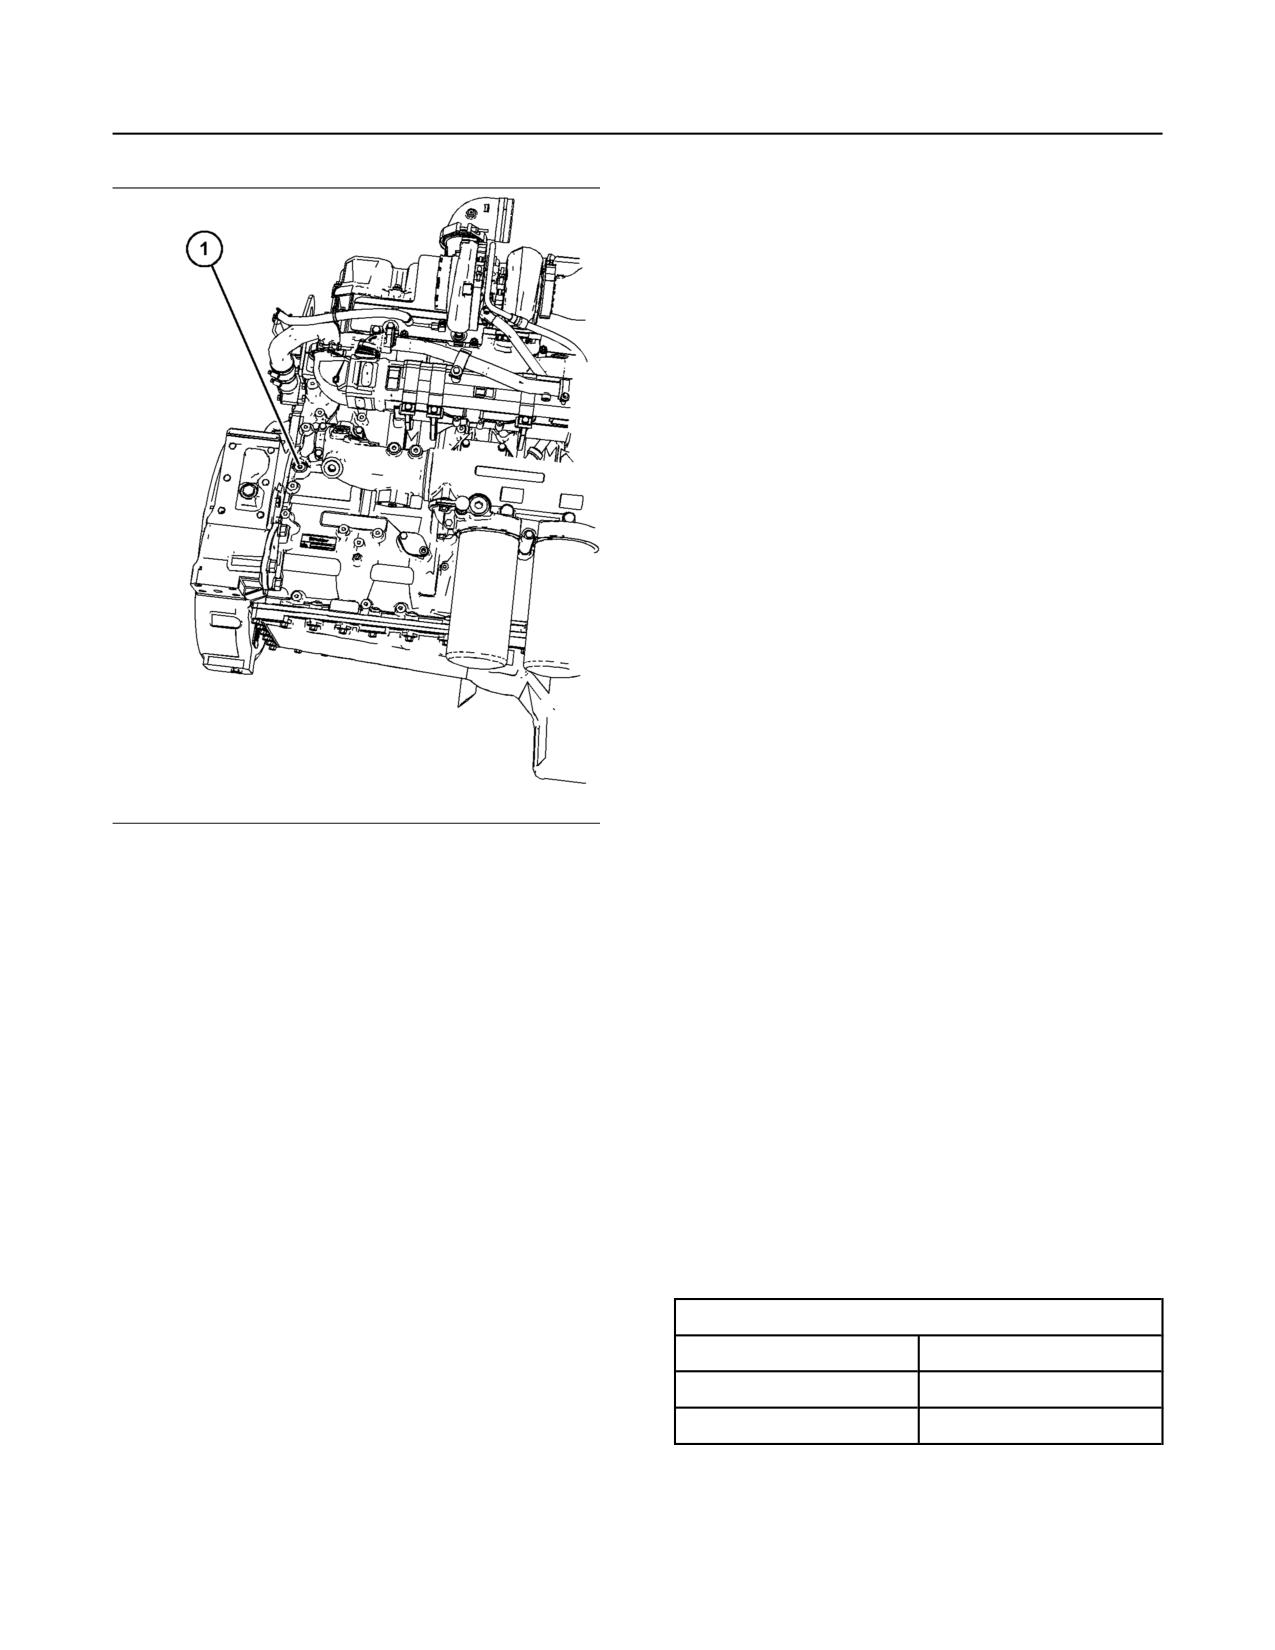
102
M0076814-03
Maintenance Section
Engine Storage Procedure - Check
10. Before start-up, test the cooling system for a 3
percent to a 6 percent concentration of coolant
conditioner. Add liquid coolant conditioner or a
coolant conditioner element, if equipped.
Test the coolant mixture for proper nitrite level. If
necessary, adjust the coolant mixture.
Prime the engine with clean diesel fuel before
starting.
11. Ensure that the cooling system is clean. Ensure
that the system is full. Ensure that the system has
the correct amount of supplemental cooling
system conditioner.
12. On the first day of operation, check the entire
engine several times for leaks and correct
operation.
Remove Aftertreatment from
Storage
DEF has a limited life, refer to table 17 for the time
and temperature range. DEF that is outside this
range MUST be replaced.
On removal from storage the DEF quality in the tank
must be tested with a refractometer. The DEF in the
Illustration 89
g06042459
tank must meet the requirements defined in ISO
Typical example
22241-1 and comply with table 17 .
(1) Plug
1. If necessary, drain the tank and fill with DEF that
meets ISO 22241-1.
8. If an engine is stored for more than 1 year, Perkins
recommends Pre lubrication of the engine to avoid
2. Replace the DEF filter, refer to this Operation, and
dry starting. Use a suitable pump to put engine oil
Maintenance Manual, “Diesel Exhaust Fluid Filter-
into the engine oil system.
Clean/Replace”.
The pump will need to create a minimum pressure
3. Ensure that the drive belt is correctly installed.
within the engine of 0.25 bar (3.6 psi). This
Ensure that all engine coolant and engine oil has
pressure is needed for 15 seconds to lubricate the
the correct specification and grade. Ensure that
internal surfaces.
the coolant and the engine oil are at the correct
level. Start the engine. If a fault becomes active
Remove one of the plugs shown in illustration 89
turn off the engine, allow 2 minutes for the DEF
to connect to the engine oil system. The
system to purge, then restart the engine.
connection required is 9/16" x 18 tpi. Ensure that
the correct oil specification is used, refer to this
4. If the fault continues to stay active, refer to
Operation and Maintenance Manual, “Fluid
Troubleshooting for more information.
Recommendations” for more information. After the
Table 17
engine internal surfaces have been lubricated,
DEF Storage
remove connector and install plug (1). Tighten plug
Temperature
Duration
to a torque of 30 N·m (265 lb in). Perkins
recommends that the procedure must be
10° C (50° F)
36 months
performed in a minimum ambient temperature of
25° C (77° F)
18 months
10° C (50° F).
9. Check the condition of all rubber hoses. Replace
any worn hoses. Replace any damaged hoses.
(continued)
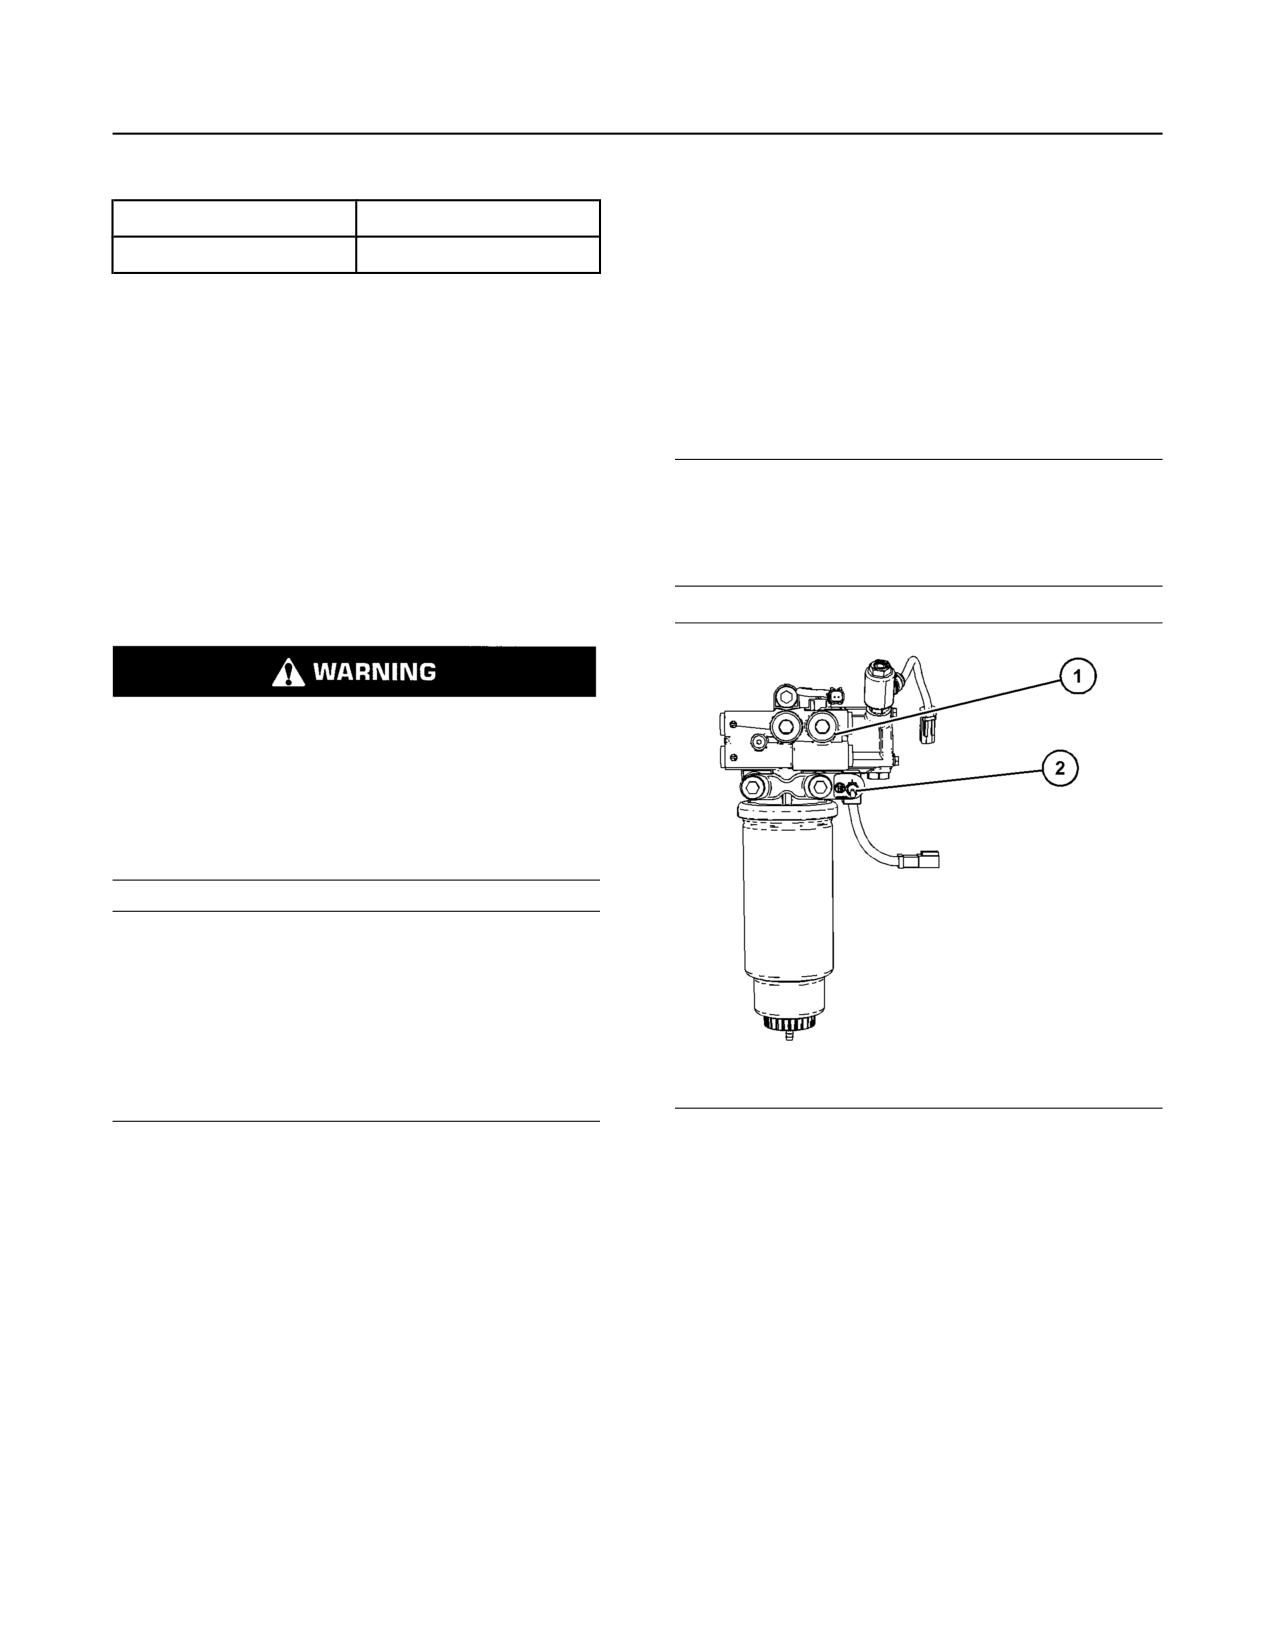
M0076814-03
103
Maintenance Section
Engine Valve Lash - Check
(Table 17, contd)
During valve adjustment, visibly inspect the valve
train of wear or damage.
30° C (86° F)
12 months
35° C (95° F)(1)
6 months
Refer to Systems Operation, Testing and Adjusting,
“Engine Valve Lash - Inspect/Adjust” for more
(1) At 35° C, significant degradation can occur. Check every batch
information.
before use.
i06827467
Additional Information
Fuel System - Prime
The volatile vapors are removed by running the
engine to operating temperature. A mineral oil base
is left behind after the volatile vapors are removed.
The oil should then be drained, and new oil and filters
NOTICE
installed.
Do not allow dirt to enter the fuel system. Thoroughly
clean the area around a fuel system component that
i07192202
will be disconnected. Fit a suitable cover over any
disconnected fuel system components.
Engine Valve Lash - Check
Ensure that the engine cannot be started while
this maintenance is being performed. To help pre-
vent possible injury, do not use the starting motor
to turn the flywheel.
Hot engine components can cause burns. Allow
additional time for the engine to cool before
measuring/adjusting valve lash clearance.
NOTICE
Only qualified service personel should perform this
maintenance. Refer to the Service Manual or your au-
thorized Perkins dealer or your Perkins distributor for
the complete valve lash adjustment procedure.
Operation of Perkins engines with incorrect valve
lash can reduce engine efficiency, and also reduce
engine component life.
Illustration 90
g06046130
The initial valve lash adjustment on new engines,
(1) Fuel priming pump
rebuilt engines, or remanufactured engines is
(2) Fuel priming switch
recommended only on engine ratings 432 kW
(580 hp) and greater. The adjustment is necessary
1. The fuel system can be primed from the keyswitch
due to the initial wear of the valve train components
or from a remote mounted switch (2).
and to the seating of the valve train components.
2. Turn the fuel priming switch (2) to the ON position.
This maintenance is recommended as part of a
Hold the fuel priming switch in the ON position for
lubrication and preventive maintenance schedule to
2 minutes. If the fuel system is being primed from
help provide maximum engine life. For engine ratings
less than 432 kW (580 hp), the initial valve lash
empty, then turn the switch off and then on again
adjustment is not necessary.
for 2 minutes.
Note: All engine ratings must have the engine valve
3. After 2 minutes the fuel system should be primed
lash performed at 2500 hours.
and the engine ready to start.
Ensure that the engine is stopped before measuring
4. Start the engine, refer to this Operation and
the valve lash. To obtain an accurate measurement,
Maintenance Manual, Starting the Engine or refer
allow the valves to cool before this maintenance is
to the OEM for instructions on starting the engine.
performed.
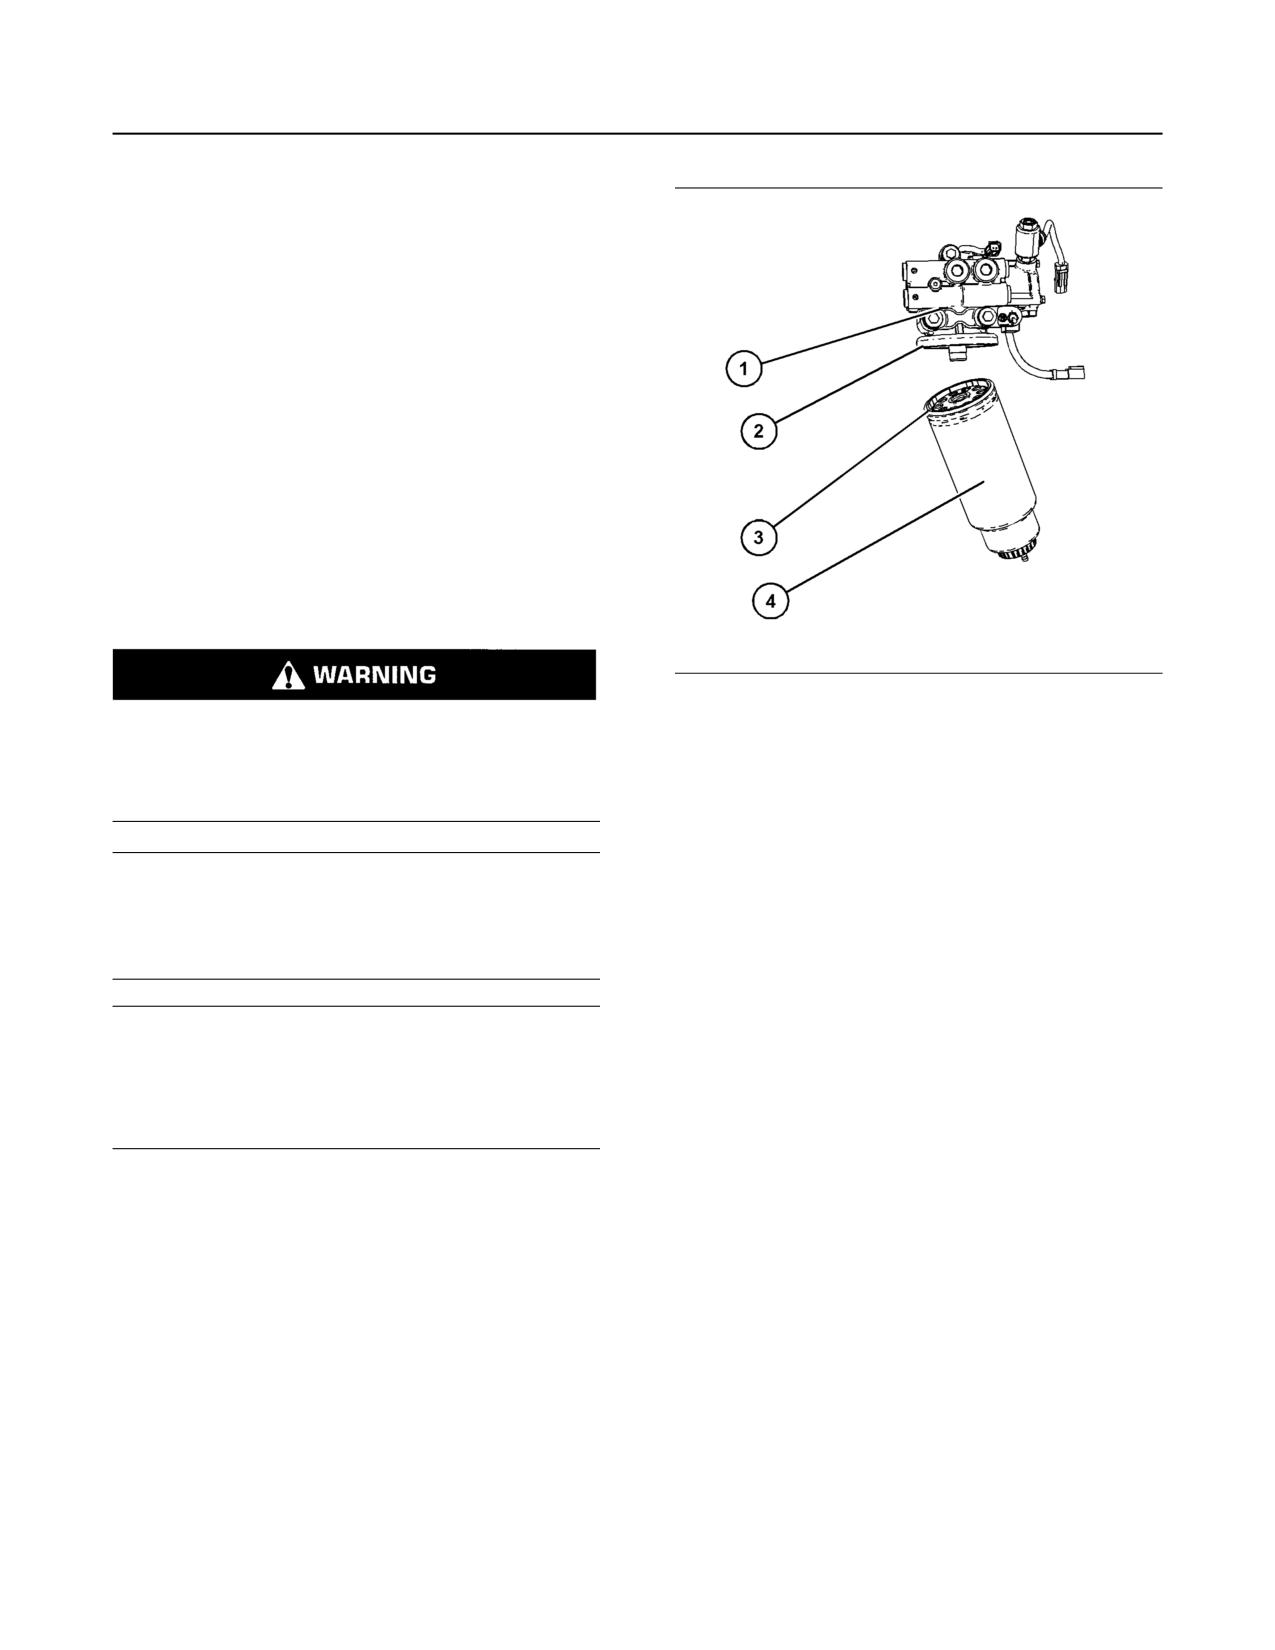
104
M0076814-03
Maintenance Section
Fuel System Primary Filter (Water Separator) Element - Replace
5. If the engine starts and the engine runs rough or
the engine misfires, operate at low idle until the
engine is running smoothly. If the engine cannot
be started, or if the engine continues to misfire or
smoke, repeat Step 2.
The fuel system can also be primed by using the key
switch. Turn the key to the ON position for 2 minutes.
After 2 minutes the fuel system should be primed. If
necessary, by cycling the key switch the system will
prime again for 2 minutes.
i06614133
Fuel System Primary Filter
(Water Separator Element -
Replace
Illustration 91
g06046186
Fuel leaked or spilled onto hot surfaces or electri-
1. Close the main fuel supply valve.
cal components can cause a fire. To help prevent
possible injury, turn the start switch off when
2. Place a suitable container below the primary fuel
changing fuel filters or water separator elements.
filter to catch any fluid that may spill. Clean any
Clean up fuel spills immediately.
split fluid.
3. Clean the outside of the primary fuel filter.
NOTICE
Do not allow dirt to enter the fuel system. Thoroughly
4. Using a suitable tool, remove the spin on filter (4)
clean the area around a fuel system component that
from filter base (1). Discard old filter element.
will be disconnected. Fit a suitable cover over any
disconnected fuel system components.
5. Ensure the seal surface (2) is clean. Apply clean
diesel fuel to the O ring seal (3) on the new spin on
filter.
NOTICE
Do not fill fuel filters with fuel before installing
6. Install the new spin on filter to the filter base (1).
them. The fuel will not be filtered and could be
Spin on the filter until the O ring seal (3) contact
contaminated. Contaminated fuel will cause ac-
the sealing surface (2). Then, rotate the spin on
celerated wear to fuel system parts. The fuel sys-
filter ¾ of a full turn.
tem should be primed prior to starting the engine.
7. The secondary fuel filter should be replaced when
Water in the fuel can cause the engine to run rough.
the primary fuel filter is replaced. For more
Water in the fuel may cause an electronic unit injector
to fail. If the fuel has been contaminated with water,
information refer to this Operation and
the element should be changed before the regularly
Maintenance Manual, “Fuel System Secondary
scheduled interval.
Filter - Replace”.
The primary filter/water separator also provides
8. Dispose of the fluid and old filter in accordance
filtration to help extend the life of the secondary fuel
with local regulations.
filter. The element should be changed regularly. If a
vacuum gauge is installed, the primary filter/water
separator should be changed at 50 kPa to 70 kPa
(7.25 psi to 10.15 psi).
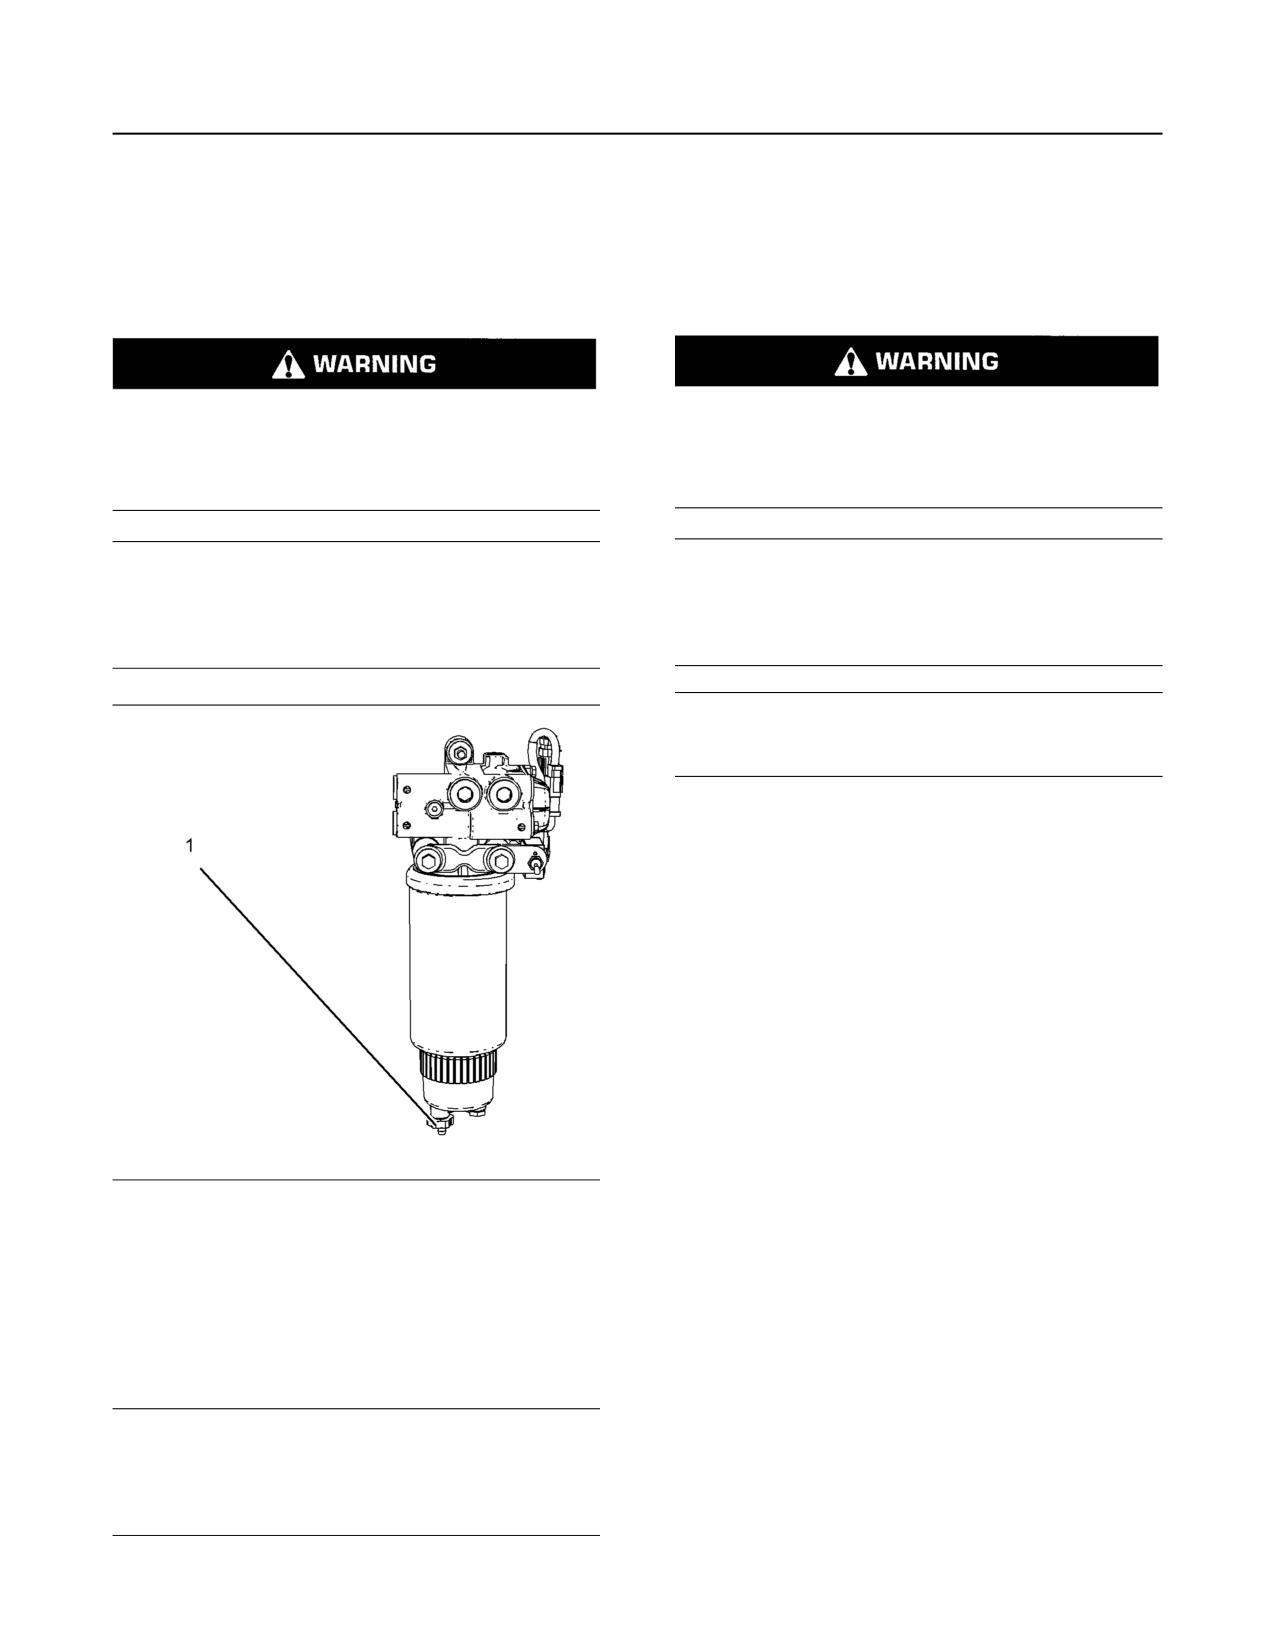
M0076814-03
105
Maintenance Section
Fuel System Primary Filter/Water Separator - Drain
i06616051
i06605835
Fuel System Primary Filter/
Fuel System Secondary Filter -
Water Separator - Drain
Replace
Fuel leaked or spilled onto hot surfaces or electri-
Fuel leaked or spilled onto hot surfaces or electri-
cal components can cause a fire. To help prevent
cal components can cause a fire. To help prevent
possible injury, turn the start switch off when
possible injury, turn the start switch off when
changing fuel filters or water separator elements.
changing fuel filters or water separator elements.
Clean up fuel spills immediately.
Clean up fuel spills immediately.
NOTICE
NOTICE
Do not allow dirt to enter the fuel system. Thoroughly
Do not allow dirt to enter the fuel system. Thoroughly
clean the area around a fuel system component that
clean the area around a fuel system component that
will be disconnected. Fit a suitable cover over any
will be disconnected. Fit a suitable cover over any
disconnected fuel system components.
disconnected fuel system components.
NOTICE
Ensure that the engine is stopped before any servic-
ing or repair is performed.
Refer to Systems Operation, Testing, and
Adjusting, “Cleanliness of Fuel System
Components” for detailed information on the
standards of cleanliness that must be observed
during ALL work on the fuel system.
1. Turn the fuel supply valve (if equipped) OFF before
performing this maintenance.
2. Place a suitable container under the fuel filters to
catch any fuel that might spill. Clean up any spilled
fuel. Clean the outside body of both fuel filters.
Illustration 92
g03807817
Typical example
1. Ensure that the engine is stopped. Open drain (1).
The drain is a self-ventilated drain. Catch the
draining water in a suitable container. Dispose of
the water properly.
2. Close drain (3).
NOTICE
The water separator is under suction during normal
engine operation. Ensure that the drain valve is tight-
ened securely to help prevent air from entering the
fuel system.
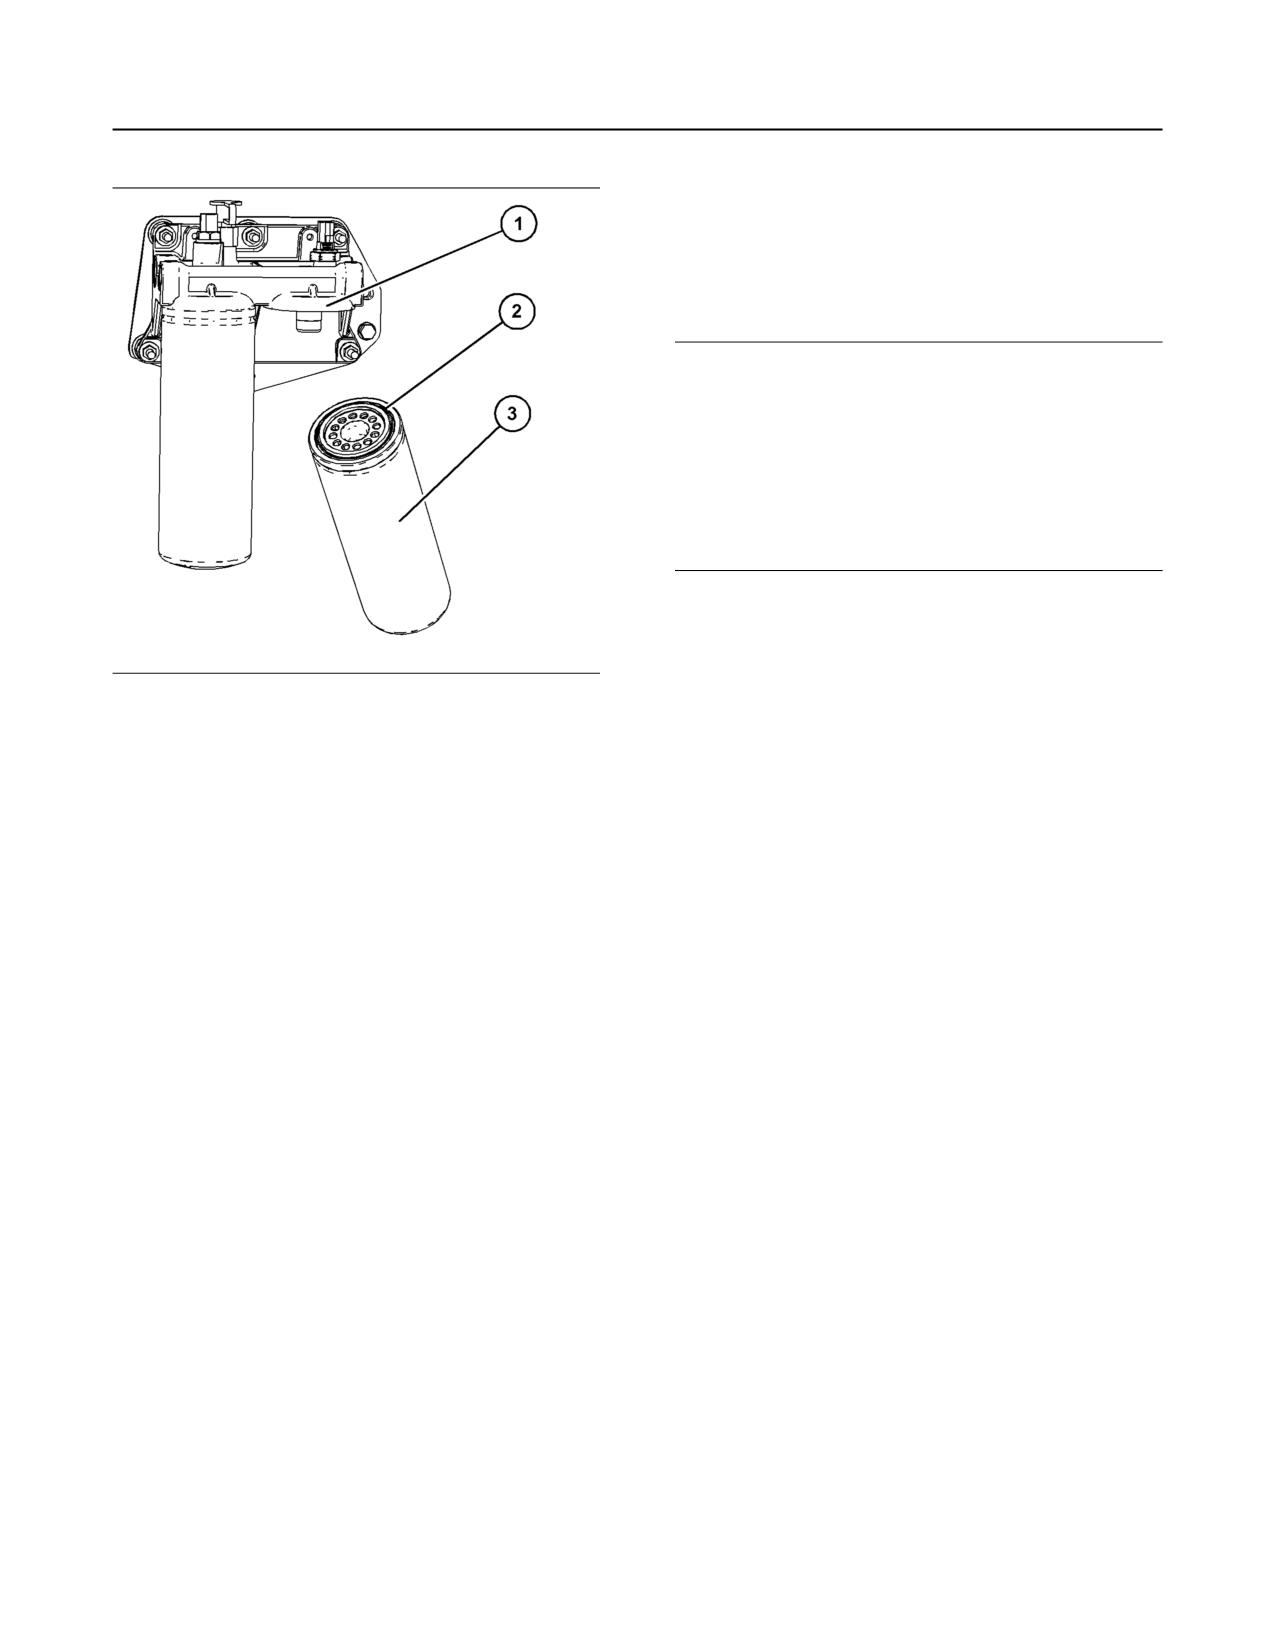
106
M0076814-03
Maintenance Section
Fuel Tank Water and Sediment - Drain
i02348492
Fuel Tank Water and Sediment
- Drain
NOTICE
Care must be taken to ensure that fluids are con-
tained during performance of inspection, mainte-
nance, testing, adjusting and repair of the product.
Be prepared to collect the fluid with suitable contain-
ers before opening any compartment or disassem-
bling any component containing fluids.
Dispose of all fluids according to local regulations
and mandates.
Fuel Tank
Fuel quality is critical to the performance and to the
Illustration 93
g06042986
service life of the engine. Water in the fuel can cause
Typical example
excessive wear to the fuel system.
Water can be introduced into the fuel tank when the
Note: The fuel system has two secondary filters, both
fuel tank is being filled.
must be replaced.
Condensation occurs during the heating and cooling
3. The residual fuel pressure in the fuel system may
of fuel. The condensation occurs as the fuel passes
need relieving. Wait from 1 minute to 5 minutes
through the fuel system and the fuel returns to the
until the fuel pressure has lowered.
fuel tank. This causes water to accumulate in fuel
tanks. Draining the fuel tank regularly and obtaining
4. Use a suitable tool remove the spin on fuel filter
fuel from reliable sources can help to eliminate water
(3).
in the fuel.
5. Ensure the sealing surface (1) is clean. Lubricate
Drain the Water and the Sediment
the O ring seal (2) on the new spin on filter with
clean diesel fuel.
Fuel tanks should contain some provision for draining
water and draining sediment from the bottom of the
6. Install the new spin on filter (3) to the filter base.
fuel tanks.
Spin on the filter until the O ring seal (2) contact
the sealing surface (1). Then, rotate the spin on
Open the drain valve on the bottom of the fuel tank in
order to drain the water and the sediment. Close the
filter 1 full turn.
drain valve.
7. Replace the other secondary fuel filter, refer to
Check the fuel daily. Allow five minutes after the fuel
step 2 through to step 6.
tank has been filled before draining water and
sediment from the fuel tank.
8. Turn on the fuel supply valve. Dispose of the fluid
and old filters in accordance with local regulations.
Fill the fuel tank after operating the engine in order to
drive out moist air. This will help prevent
9. The primary fuel filter the secondary fuel filter must
condensation. Do not fill the tank to the top. The fuel
be replaced at the same time. Refer to the
expands as the fuel gets warm. The tank may
Operation and Maintenance Manual, “Fuel System
overflow.
Primary Filter (Water Separator) Element -
Replace”. The engine will need to be purged of air.
With primary and secondary fuel filters replace,
Refer to Operation and Maintenance Manual,
“Fuel System Prime”.
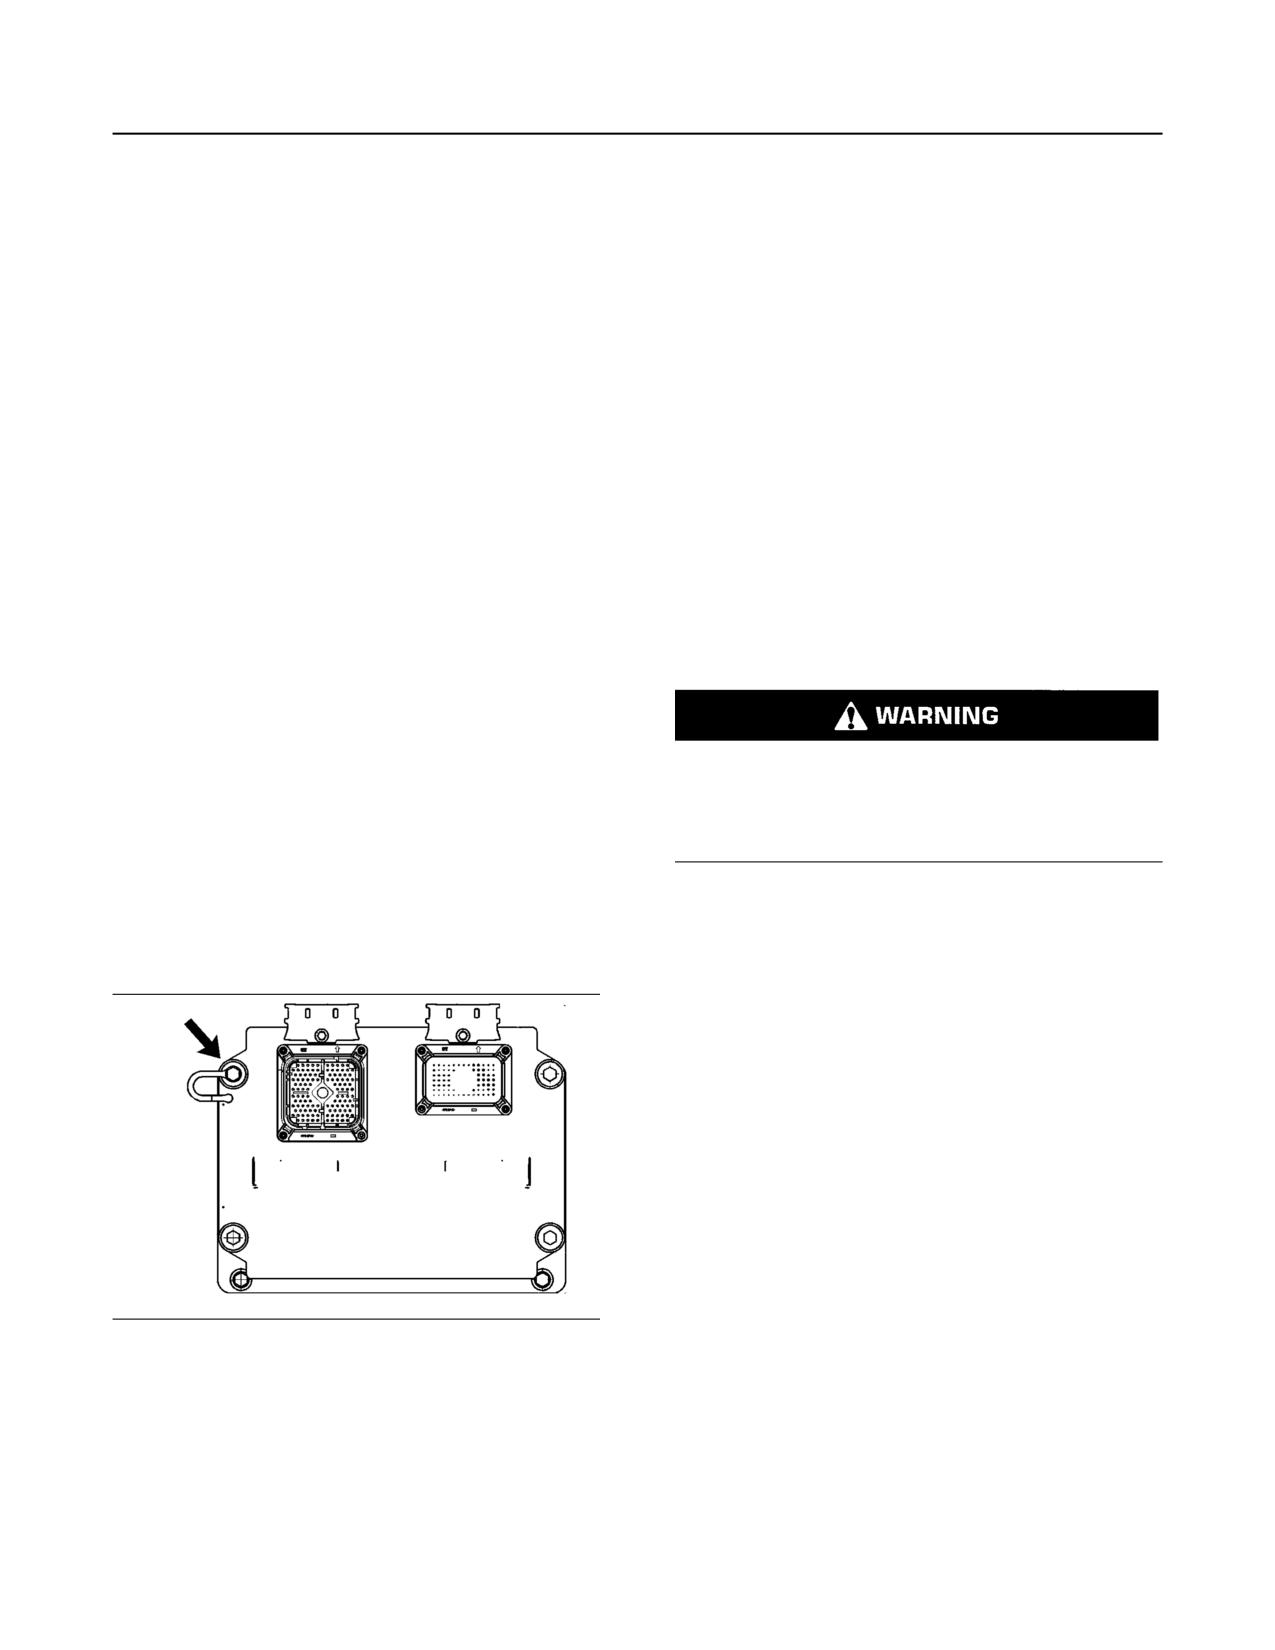
M0076814-03
107
Maintenance Section
Grounding Stud - Inspect/Clean/Tighten
Some fuel tanks use supply pipes that allow water
The grounding stud must have a wire ground to the
and sediment to settle below the end of the fuel
battery. Tighten the grounding stud at every oil
supply pipe. Some fuel tanks use supply lines that
change. Ground wires and straps should be
take fuel directly from the bottom of the tank. If the
combined at engine grounds. All grounds should be
engine is equipped with this system, regular
tight and free of corrosion.
maintenance of the fuel system filter is important.
• Clean the grounding stud and the terminals for the
ground strap with a clean cloth.
Fuel Storage Tanks
• If the connections are corroded, clean the
Drain the water and the sediment from the fuel
connections with a solution of baking soda and
storage tank at the following intervals:
water.
• Weekly
• Keep the grounding stud and the strap clean and
• Service intervals
coated with MPGM grease or petroleum jelly.
• Refill of the tank
i06103230
This will help prevent water or sediment from being
pumped from the storage tank into the engine fuel
Hoses and Clamps - Inspect/
tank.
Replace
If a bulk storage tank has been refilled or moved
recently, allow adequate time for the sediment to
settle before filling the engine fuel tank. Internal
baffles in the bulk storage tank will also help trap
sediment. Filtering fuel that is pumped from the
storage tank helps to ensure the quality of the fuel.
Contact with high pressure fuel may cause fluid
When possible, water separators should be used.
penetration and burn hazards. High pressure fuel
spray may cause a fire hazard. Failure to follow
these inspection, maintenance and service in-
i03965989
structions may cause personal injury or death.
Grounding Stud - Inspect/
If you inspect the engine in operation, always use the
proper inspection procedure in order to avoid a fluid
Clean/Tighten
penetration hazard. Refer to Operation and
Maintenance Manual, “General hazard Information”.
Inspect all hoses for leaks that are caused by the
following conditions:
• Cracking
• Softness
• Loose clamps
Replace hoses that are cracked or soft. Tighten any
loose clamps.
Check for the following conditions:
• End fittings that are damaged or leaking
• Outer covering that is chafed or cut
Illustration 94
g01376112
The grounding stud is located on the upper left corner
• Exposed wire that is used for reinforcement
of the engine control module.
• Outer covering that is ballooning locally
Inspect the OEM harness for good connections.
• Flexible part of the hose that is kinked or crushed
Inspect the condition of the OEM harness.
• Armoring that is embedded in the outer covering
108
M0076814-03
Maintenance Section
Overhaul Considerations
A constant torque hose clamp can be used in place
8. Refill the cooling system. Refer to the OEM
of any standard hose clamp. Ensure that the constant
information for further information on refilling the
torque hose clamp is the same size as the standard
cooling system.
clamp.
9. Clean the cooling system filler cap. Inspect the
Due to extreme temperature changes, the hose will
cooling system filler caps seals. Replace the
harden. Hardening of the hoses will cause hose
cooling system filler cap if the seals are damaged.
clamps to loosen. This hardening can result in leaks.
A constant torque hose clamp will help to prevent
Install the cooling system filler cap.
loose hose clamps.
10. Start the engine. Inspect the cooling system for
Each installation application can be different. The
leaks.
differences depend on the following factors:
Fuel System
• Type of hose
The fuel system is split into two different sections,
• Type of fitting material
high pressure, and low pressure. Ensure that the fuel
pressure has been purged before any parts are
• Anticipated expansion and contraction of the hose
removed loosened or replaced.
• Anticipated expansion and contraction of the
Check that connections and hoses are secure, check
fittings
for leaks. If parts are to be removed or tightened,
refer to the Disassembly and Assembly manual for
Replace the Hoses and the Clamps
more information.
Refer to the OEM information for further information
i05971077
on removing and replacing fuel hoses (if equipped).
Overhaul Considerations
The following text describes a typical method of
replacing coolant hoses. Refer to the OEM
information for further information on the coolant
system and the hoses for the coolant system.
For an overhaul solution, contact your Perkins
distributor.
i03901481
Pressurized System: Hot coolant can cause seri-
ous burns. To open the cooling system filler cap,
Power Take-Off Clutch - Check
stop the engine and wait until the cooling system
components are cool. Loosen the cooling system
pressure cap slowly in order to relieve the
pressure.
NOTICE
New power take-offs should have the clutch adjust-
ment checked before being placed into service. The
1. Stop the engine. Allow the engine to cool.
clutch adjustment should be checked again after the
first ten hours of operation. New clutch plates have a
2. Loosen the cooling system filler cap slowly in order
“wear in” period, and the clutch may require several
to relieve any pressure. Remove the cooling
adjustments until the new plates are “worn in”.
system filler cap.
Note: Drain the coolant into a suitable, clean
container. The coolant can be reused.
3. Drain the coolant from the cooling system to a
level that is below the hose that is being replaced.
4. Remove the hose clamps.
5. Disconnect the old hose.
6. Replace the old hose with a new hose.
7. Install the hose clamps with a torque wrench.
Note: For the correct coolant, see this Operation and
Maintenance Manual, “Fluid Recommendations”.
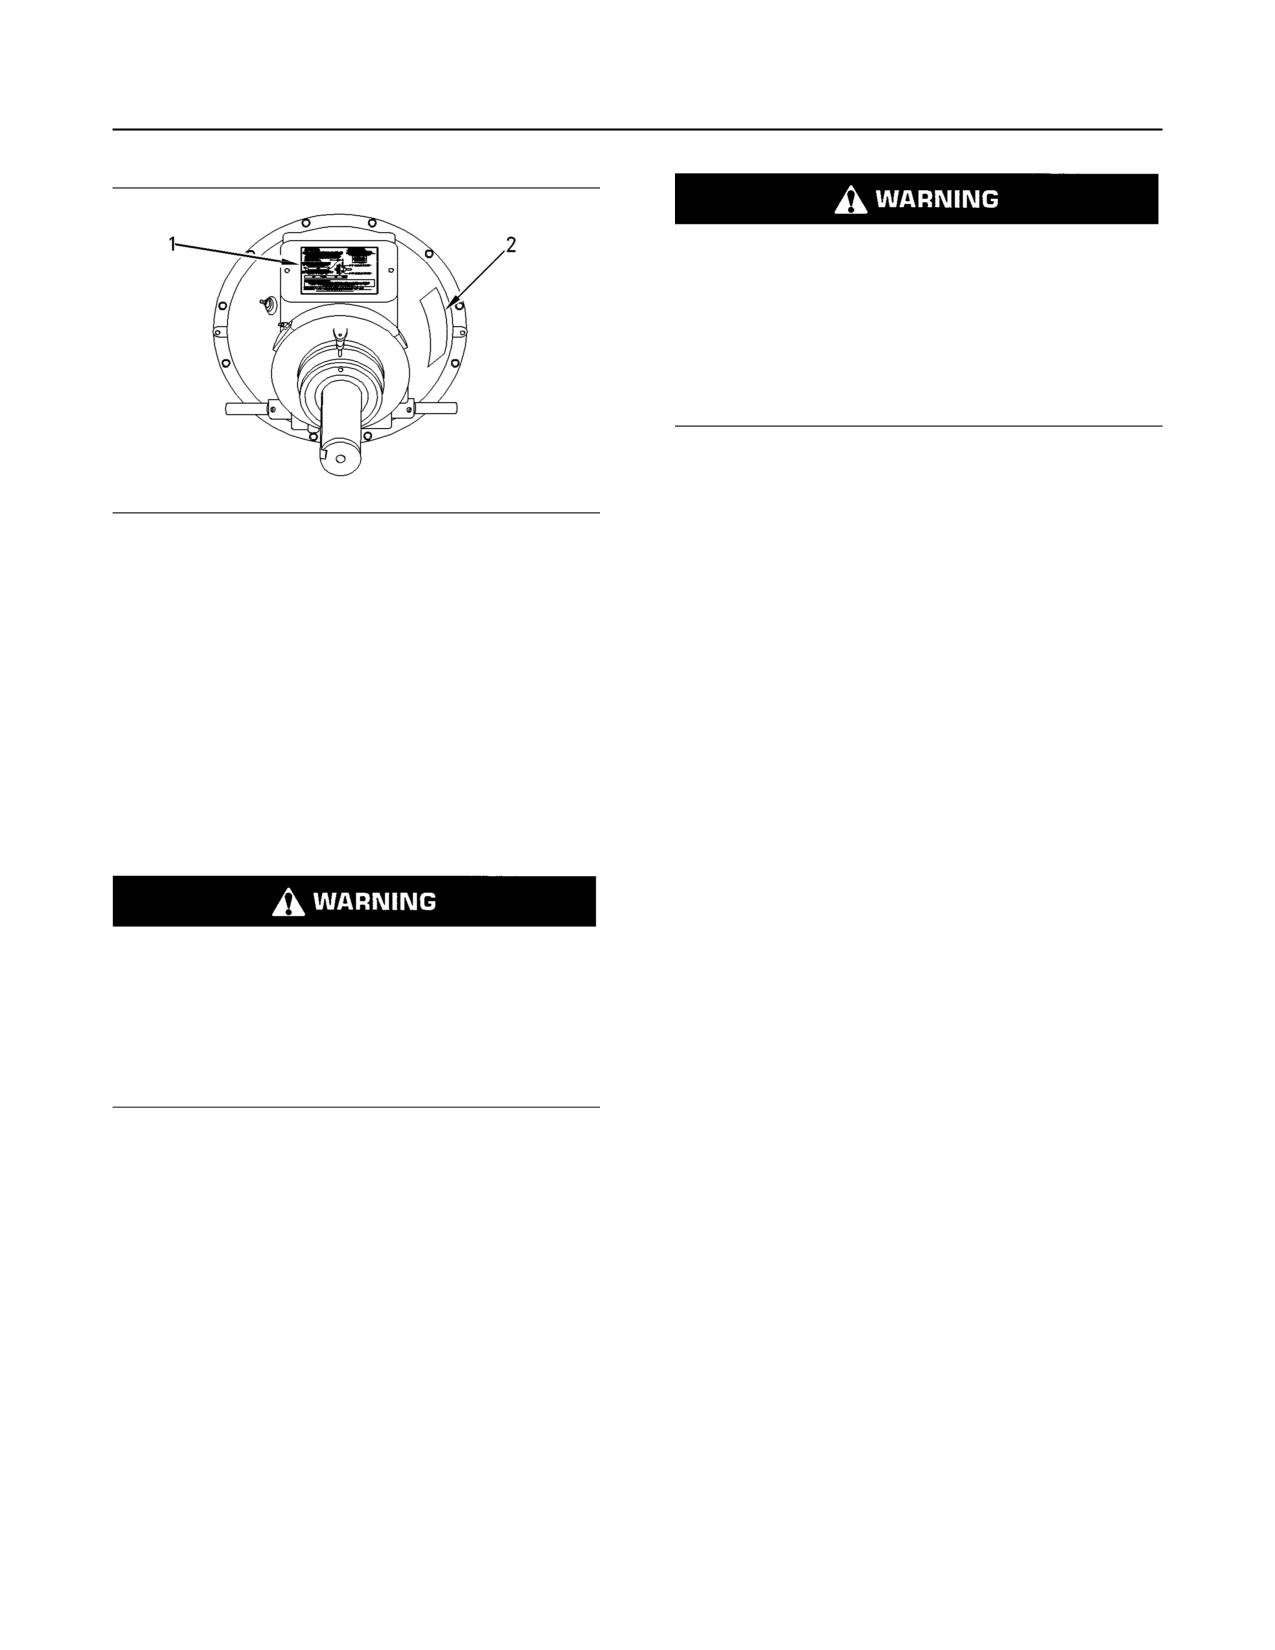
M0076814-03
109
Maintenance Section
Radiator - Clean
Personal injury can result from air pressure.
Personal injury can result without following prop-
er procedure. When using pressure air, wear a
protective face shield and protective clothing.
The maximum air pressure for cleaning purposes
must be reduced to 205 kPa (30 psi) when the air
nozzle is deadheaded.
Pressurized air is the preferred method for removing
loose debris. Direct the air in the opposite direction of
the air flow. Hold the nozzle approximately 6 mm
Illustration 95
g00781502
(0.25 inch) away from the fins. Slowly move the air
(1) Instruction plate
nozzle in a direction that is parallel with the tubes.
(2) Serial number plate
This movement will remove debris that is between
the tubes.
Check the clutch adjustment regularly after “wear in”.
Pressurized water may also be used for cleaning.
Heavy-duty applications which have engagements
The maximum water pressure for cleaning purposes
that are frequent and relatively long periods of clutch
must be less than 275 kPa (40 psi). Use pressurized
slippage require more frequent adjustment than light-
water to soften mud. Clean the core from both sides.
duty applications. The operating torque should be
measured in order to determine if a clutch adjustment
Use a degreaser and steam for removal of oil and
is required.
grease. Clean both sides of the core. Wash the core
with detergent and hot water. Thoroughly rinse the
Refer to the OEM information and instruction plate
core with clean water.
(1) for instructions on lubrication, adjustment, and
other recommendations for service. Perform the
After cleaning, start the engine and bring the engine
maintenance that is specified on the instruction plate.
to high idle. This procedure will help in the removal of
debris and drying of the core. Stop the engine. Use a
light bulb behind the core to inspect the core for
cleanliness. Repeat the cleaning, if necessary.
Do not operate the engine with the Instruction
Inspect the fins for damage. Bent fins may be opened
Plate cover removed from the clutch. Personal in-
jury may result.
with a “comb”. Inspect these items for good condition:
welds, mounting brackets, air lines, connections,
If the clutch is damaged to the point of burst fail-
clamps, and seals. Make repairs, if necessary.
ure, expelled pieces can cause personal injury to
anyone in the immediate area. Proper safeguards
i02568202
must be followed to help prevent accidents.
Starting Motor - Inspect
i08254039
Perkins recommends a scheduled inspection of the
Radiator - Clean
starting motor. If the starting motor fails, the engine
may not start in an emergency situation.
Check the starting motor for proper operation. Check
Note: Adjust the frequency of cleaning according to
the electrical connections and clean the electrical
the effects of the operating environment.
connections. Refer to the Service Manual for more
information on the checking procedure and for
Inspect the radiator for these items: damaged fins,
specifications or consult your Perkins distributors for
corrosion, dirt, grease, insects, leaves, oil, and other
assistance.
debris. Clean the radiator, if necessary.
110
M0076814-03
Maintenance Section
Walk-Around Inspection
i06101140
• Inspect the fuel system for leaks. Look for loose
fuel line clamps or for loose fuel line tie-wraps.
Walk-Around Inspection
• Inspect the piping for the air inlet system and the
elbows for cracks and for loose clamps. Ensure
that hoses and tubes are not contacting other
Inspect the Engine for Leaks and
hoses, tubes, and wiring harnesses.
for Loose Connections
• Inspect the alternator belt and the accessory drive
belts for cracks, breaks, or other damage.
A walk-around inspection should only take a few
minutes. When the time is taken to perform these
Belts for multiple groove pulleys must be replaced as
checks, costly repairs and accidents can be avoided.
matched sets. If only one belt is replaced, the belt will
carry more load than the belts that are not replaced.
For maximum engine service life, make a thorough
The older belts are stretched. The additional load on
inspection of the engine compartment before starting
the new belt could cause the belt to break.
the engine. Look for items such as oil leaks or
coolant leaks, loose bolts, worn belts, loose
• Drain the water and the sediment from fuel tanks
connections, and trash buildup. Make repairs, as
on a daily basis in order to ensure that only clean
needed:
fuel enters the fuel system.
• The guards must be in the proper place. Repair
• Inspect the wiring and the wiring harnesses for
damaged guards or replace missing guards.
loose connections and for worn wires or frayed
wires.
• Wipe all caps and plugs before the engine is
serviced in order to reduce the chance of system
• Inspect the ground strap for a good connection
contamination.
and for good condition.
NOTICE
• Inspect the ECM to the cylinder head ground strap
For any type of leak (coolant, lube, or fuel) clean up
for a good connection and for good condition.
the fluid. If leaking is observed, find the source and
correct the leak. If leaking is suspected, check the flu-
• Disconnect any battery chargers that are not
id levels more often than recommended until the leak
protected against the current drain of the starting
is found or fixed, or until the suspicion of a leak is
motor. Check the condition and the electrolyte
proved to be unwarranted.
level of the batteries, unless the engine is
equipped with a maintenance free battery.
NOTICE
• Check the condition of the gauges. Replace any
Accumulated grease and/or oil on an engine or deck
gauges that are cracked. Replace any gauge that
is a fire hazard. Remove this debris with steam clean-
cannot be calibrated.
ing or high pressure water.
Aftertreatment System
• Ensure that the cooling lines are properly clamped
Check the condition of the coolant lines, Diesel
and that the cooling lines are tight. Check for
Exhaust Fluid (DEF) lines, and electrical
leaks. Check the condition of all pipes.
connections. Check that all clamps, clips, and tie-
wraps are secure and in good condition. Check that
• Inspect the water pumps for coolant leaks.
the DEF filler cap is secure and that the cap is clean
and free from dirt.
Note: The water pump seal is lubricated by coolant in
the cooling system. It is normal for a small amount of
Check the level of DEF in the tank is adequate for
leakage to occur as the engine cools down and the
operational purpose, if necessary fill the DEF tank.
parts contract.
Excessive coolant leakage may indicate the need to
replace the water pump seal. For the removal of
water pumps and the installation of water pumps and/
or seals, refer to the Service Manual for the engine or
consult your Perkins distributor .
• Inspect the lubrication system for leaks at the front
crankshaft seal, the rear crankshaft seal, the oil
pan, the oil filters, and the valve cover.
M0076814-03
111
Warranty Section
Warranty Information
3. New non-road diesel engines installed in
Warranty Section
construction machines conforming to theSouth
Korean regulations for construction machines
manufactured after January 1, 2015, and operated
Warranty Information
and serviced inSouth Korea, including all parts of
their emission control systems (“emission related
i07304835
components”), are:
Emissions Warranty
a. Designed, built, and equipped so as to conform,
at the time of sale, with applicable emission
Information
standards prescribed in the Enforcement Rule
of the Clean Air Conservation Act promulgated
by South Korea MOE.
The certifying engine manufacturer warrants to the
ultimate purchaser and each subsequent purchaser
b. Free from defects in materials and
that:
workmanship in emission-related components
that can cause the engine to fail to conform to
1. New non-road diesel engines and stationary diesel
applicable emission standards for the warranty
engines less than 10 L per cylinder (including Tier
period.
1 and Tier 2 marine engines < 37 kW, but
excluding locomotive and other marine engines)
The aftertreatment system can be expected to
operated and serviced in the United States and
function properly for the lifetime of the engine
Canada, including all parts of their emission
(emissions durability period) subject to prescribed
control systems (“emission-related components”),
maintenance requirements being followed.
are:
For a detailed explanation of the Emission Control
a. Designed, built, and equipped so as to conform,
Warranty, contact your authorized Perkins dealer or
your authorized Perkins distributor.
at the time of sale, with applicable emission
standards prescribed by the United States
Environmental Protection Agency (EPA) by way
of regulation.
b. Free from defects in materials and
workmanship in emission-related components
that can cause the engine to fail to conform to
applicable emission standards for the warranty
period.
2. New non-road diesel engines (including Tier 1 and
Tier 2 marine propulsion engines < 37 kW and Tier
1 through Tier 4 marine auxiliary engines < 37 kW,
but excluding locomotive and other marine
engines) operated and serviced in the state of
California, including all parts of their emission
control systems (“emission-related components”),
are:
a. Designed, built, and equipped so as to conform,
at the time of sale, to all applicable regulations
adopted by the California Air Resources Board
(ARB).
b. Free from defects in materials and
workmanship which cause the failure of an
emission-related component to be identical in
all material respects to the component as
described in the engine manufacturer's
application for certification for the warranty
period.
112
M0076814-03
Reference Information Section
Reference Materials
Reference Information
Section
NOTICE
Dependant upon engine type and application.
Reference Materials
i06103116
i07677995
Decommissioning and
Reference Material
Disposal
(Extended Service Contract)
When the product is removed from service, local
regulations for the product decommissioning will
Extended Service Contracts - purchased in minutes,
vary. Disposal of the product will vary with local
protected for years.
regulations. Consult the nearest Perkins distributor
for additional information.
Extended Service Contracts (ESC) protect you from
the stress that unexpected repair work brings to your
i05204672
life by covering the cost of getting your engine up and
running again. Unlike other extended warranties,
Maintenance Records
Perkins Platinum ESC protects you against all
component part failures.
Purchase peace of mind from only £0.03 / $0.05 /
Perkins recommends the retention of accurate
euro 0.04 a day and let an ESC make your dreams a
maintenance records. Accurate maintenance records
reality.
can be used for the following purposes:
Why buy an Extended Service Contract?
• Determine operating costs.
1. No surprises - total protection from unexpected
• Establish maintenance schedules for other
repair cost (parts, labor, and travel).
engines that are operated in the same
environment.
2. Enjoy longer lasting product support from Perkins
global network.
• Show compliance with the required maintenance
practices and maintenance intervals.
3. Genuine Perkins parts ensure continued engine
performance.
Maintenance records can be used for various other
business decisions that are related to engine
4. Highly trained technicians carry out all repairs.
maintenance.
5. Transferable coverage should you sell your
Maintenance records are a key element of a
machine.
maintenance program that is correctly managed.
Accurate maintenance records can help your Perkins
Flexible coverage provides the right level of
dealer to fine-tune the recommended maintenance
protection for your Perkins Engine. Coverage can be
intervals in order to meet the specific operating
extended to 2 years/ 1,000 hours right up to 10 year/
situation. This should result in a lower engine
40,000
operating cost.
You can buy an ESC at any time during standard
Records should be kept for the following items:
warranty - even the last day!
Fuel Consumption - A record of fuel consumption is
Each Perkins Distributor has highly trained and
essential in order to determine when the load
experienced Perkins Product Support Service
sensitive components should be inspected or
Technicians. The Support Service is equipped, and
repaired. Fuel consumption also determines overhaul
available around the clock to get your engine running
intervals.
again with the minimum of downtime. Buying an ESC
means that you get all this for free.
Service Hours - A record of service hours is
essential to determine when the speed sensitive
To purchase an Extended Service Contract, is quick
components should be inspected or repaired.
and simple! Contact your local Perkins Distributor
Documents - These items should be easy to obtain,
now and the distributor can provide you with a quote
and these items should be kept in the engine history
in minutes. You can locate your nearest Perkins
file. All of the documents should show this
Distributor by visiting:
information: date, service hours, fuel consumption,

M0076814-03
113
Reference Information Section
Maintenance Log
unit number and engine serial number. The following
types of documents should be kept as proof of
maintenance or repair for warranty:
Keep the following types of documents as proof of
maintenance for warranty. Also, keep these types of
documents as proof of repair for warranty:
• Dealer work orders and itemized bills
• Owners repair costs
• Owners receipts
• Maintenance log
i05204675
Maintenance Log
Table 18
Engine Model
Customer Identifier
Serial Number
Arrangement Number
Service
Quantity Of
Service Item
Date
Authorization
Hours
Fuel
(continued)
M0076814-03
115
Index Section
Index
A
Flush
86
Cooling System Coolant Extender (ELC) -
Additional Messages
7
Add
87
After Starting Engine
47
Cooling System Coolant Level - Check
87
Extended Idle at Cold Ambient
Cooling System Supplemental Coolant
Temperature
48
Additive (SCA) - Test/Add
88
After Stopping Engine
54
Add the SCA, If Necessary
88
Air Compressor - Check (If Equipped)
79
Test for SCA Concentration
88
Air Tank Moisture and Sediment - Drain (If
Crushing Prevention and Cutting Prevention.. 15
Equipped)
79
ARD Spark Plug (Emission Related
Component) - Clean
78
D
Installing the Spark Plug
78
Decommissioning and Disposal
112
Removing the Spark Plug
78
DEF Filler Screen (Emission Related
Component) - Clean
89
B
DEF Manifold Filters (Emission Related
Component) - Replace
89
Battery - Recycle
79
Type 1 Manifold
89
Battery - Replace
80
Type 2 Manifold
91
Battery Disconnect Switch (If Equipped)
37
Diesel Exhaust Fluid (Emission Related
Battery Electrolyte Level - Check
80
Component) - Fill
92
Battery or Battery Cable - Disconnect
81
Diesel Exhaust Fluid Filter (Emission
Before Starting Engine
15, 44
Related Component) - Replace
92
Belts - Inspect/Adjust/Replace (Vee Belt
Diesel Exhaust Fluid Injector (Emission
General Information)
81
Related Component) - Replace
94
Alternator Belt and Fan Belt
81
Diesel Particulate Filter (Emission Related
Belt Tension
83
Component) - Clean
94
Belts - Inspect/Replace (General
Diesel Particulate Filter Regeneration
49
Information for Poly Vee Belts)
83
Carbon Dioxide (CO2) Emissions
Inspect
84
Statement
51
Replace
84
Modes of Regeneration
50
Burn Prevention
12
Regeneration
49
Batteries
12
Regeneration Indicators
49
Coolant
12
Regeneration Switch
49
Diesel Fuel
12
Regeneration System Warning Indicators... 50
Engine and Aftertreatment System
12
Regeneration Triggers
50
Oils
12
Driven Equipment - Check
94
C
E
Cold Weather Operation
55
Electrical System
16
Cold Weather Starting
46
Grounding Practices
16
Ether Injection System (If Equipped)
46
Emissions Certification Film
25
Cooling System Coolant (DEAC) - Change
84
Emissions Warranty Information
111
Drain
85
Engaging the Driven Equipment
51
Fill
85
Engine - Clean
94
Flush
85
Aftertreatment
95
Cooling System Coolant (ELC) - Change
86
Engine Air Cleaner Element - Replace
95
Drain
86
Dual Element Air Cleaner
95
Fill
87
116
M0076814-03
Index Section
Servicing the Air Cleaner Element
95
California Proposition 65 Warning
4
Engine Air Cleaner Service Indicator -
Literature Information
4
Inspect (If Equipped)
96
Maintenance
4
Test the Service Indicator
96
Maintenance Intervals
5
Engine Diagnostics
43
Operation
4
Engine Electronics
17
Overhaul
5
Engine Mounts - Inspect
96
Safety
4
Engine Oil and Filter - Change
98
Fuel and the Effect from Cold Weather
55
Drain the Engine Lubricating Oil
98
Fuel Conservation Practices
52
Fill the Oil Pan
99
Fuel Related Components in Cold Weather ... 55
Oil and Filter Change Intervals
98
Fuel Heaters
56
Engine Oil Level - Check
97
Fuel Tanks
55
Engine Oil Sample - Obtain
97
Fuel System - Prime
103
Obtain the Sample and the Analysis
98
Fuel System Primary Filter (Water
Engine Operation
49
Separator) Element - Replace
104
Engine Operation and the Aftertreatment
Fuel System Primary Filter/Water
System
49
Separator - Drain
105
Engine Starting
16, 44
Fuel System Secondary Filter - Replace
105
Engine Stopping
16, 53
Fuel Tank Water and Sediment - Drain
106
Engine Storage Procedure - Check
100
Drain the Water and the Sediment
106
Additional Information
103
Fuel Storage Tanks
107
Aftertreatment
101
Fuel Tank
106
Coolant System
101
Engine
100
G
Remove Aftertreatment from Storage
102
General Hazard Information
8
Remove Engine from Storage
101
Containing Fluid Spillage
10
Removing Application from Storage
101
Diesel Exhaust Fluid
12
Special Precautions
100
Dispose of Waste Properly
11
Engine Valve Lash - Check
103
Fluid Penetration
9
Inhalation
10
F
Pressurized Air and Water
9
Fault Logging
43
Static Electricity Hazard when Fueling with
Features and Controls
32
Ultra-low Sulfur Diesel Fuel
10
Fire Prevention and Explosion Prevention
13
Grounding Stud - Inspect/Clean/Tighten
107
Ether
14
Fire Extinguisher
14
H
Lines, Tubes, and Hoses
15
Hoses and Clamps - Inspect/Replace
107
Fluid Recommendations
65, 69
Fuel System
108
ELC Cooling System Maintenance
67
Replace the Hoses and the Clamps
108
Engine Oil
70
General Coolant Information
65
General Lubricant Information
69
I
Fluid Recommendations (General Fuel
Important Safety Information
2
Information)
57
Contamination Control Recommendations for
L
Fuels
64
Diesel Fuel Characteristics
60
Lifting and Storage
26
Diesel Fuel Requirements
57
General Information
57
M
Foreword
4
Maintenance Interval Schedule
76
M0076814-03
117
Index Section
Daily
76
Pump Electronic Tank Unit (PETU)
28
Every 10 000 Service Hours
77
Radiator Only
28
Every 12 000 Service Hours or 6 Years
77
Product Storage (Engine and
Every 250 Service Hours
76
Aftertreatment)
28
Every 2500 Service Hours
76
Condition for Storage
28
Every 3000 Service Hours or 3 Years
76
Every 4000 Service Hours
76
R
Every 500 Service Hours
76
Radiator - Clean
109
Every 500 Service Hours or 3 Months
76
Radiator Restrictions
55
Every 5000 Service Hours
76
Reference Information Section
112
Every 585 000 L (154 540 US gal) of Fuel or
Reference Material (Extended Service
10 000 Service Hours
77
Contract)
112
Every 6000 Service Hours or 3 Years
77
Reference Materials
112
Initial 500 Service Hours
76
Refill Capacities
57
When Required
76
Refill Capacities and Recommendations
72
Maintenance Log
113
Recommendation
72
Maintenance Recommendations
73
Refill Capacities
72
Maintenance Records
112
Maintenance Section
57
Manual Stop Procedure
54
S
Model View Illustrations
18
Safety Messages
6
Aftertreatment System
20
Sulfuric Acid Burn (2)
7
Clean Emission Module
20
Universal Warning (1)
7
Engine Views
18
Safety Section
6
Model Views
18
Selective Catalytic Reduction Warning
Monitoring System
32
System
37
Monitoring System Indicators
32
Definitions
38
Mounting and Dismounting
15
Inducement Strategy for DEF Level
(European Union)
38
O
Inducement Strategy for DEF Level
(Worldwide)
40
Operation Section
26
Inducement Strategy for Escalating Time
Overhaul Considerations
108
Inducement Faults (European Union)
39
Inducement Strategy for Escalating Time
P
Inducement Faults (Worldwide)
41
Plate Locations and Film Locations
24
Self-Diagnostics
43
Pump Electronic Tank Unit (PETU) and Pump
Sensors and Electrical Components
32
Electronic Unit (PEU)
25
Aftertreatment System
35
Power Take-Off Clutch - Check
108
Engine
33
Product Description
21
Pump Electronic Tank Unit (PETU)
36
Aftermarket Products and Perkins
Severe Service Application
74
Engines
22
Environmental Factors
75
Electronic Engine Features
22
Incorrect Maintenance Procedures
75
Engine Diagnostics
22
Incorrect Operating Procedures
75
Engine Service Life
22
Starting Motor - Inspect
109
Engine Specifications
22
Starting the Engine
44
Product Identification Information
24
Problems with the Wiring Harness
46
Product Information Section
18
Starting Problems
45
Product Lifting
26
Starting the Engine
45
Clean Emission Module (CEM) Lifting
28
Starting with Jump Start Cables (Do Not
Engine Lifting
27
Use This Procedure in Hazardous
118
M0076814-03
Index Section
Locations that have Explosive
Atmospheres)
46
Stopping the Engine
53
Delayed Engine Shutdown (If Enabled)
53
System Pressure Release
73
Coolant System
73
Engine Oil
73
Fuel System
73
T
Table of Contents
3
W
Walk-Around Inspection
110
Inspect the Engine for Leaks and for Loose
Connections
110
Warranty Information
111
Warranty Section
111
Welding on Engines with Electronic
Controls
73
Product and Dealer Information
Note: For product identification plate locations, see the section “Product Identification Information” in the Operation
and Maintenance Manual.
Delivery Date:
Product Information
Model:
Product Identification Number:
Engine Serial Number:
Transmission Serial Number:
Generator Serial Number:
Attachment Serial Numbers:
Attachment Information:
Customer Equipment Number:
Dealer Equipment Number:
Dealer Information
Name:
Branch:
Address:
Dealer Contact
Phone Number
Hours
Sales:
Parts:
Service: