HNC MQTT Server configuration guide
Content
Important Statement
1
Network Diagram
3
1. Set up MQTT Server
4
1.1. Downloads
4
1.2. Installation
4
1.3. Start
5
1.4. Related Commands
5
1.5. Web Dashboard
5
2. Set up MySQL Server
6
2.1. Downloads
6
2.2. Installation
7
2.3. Verification
14
2.4. Remote Access Permission
14
2.5. Connect to Database Remotely
15
3. HTCloud Designer Programming Configuration
16
3.1. Create a New Project
16
3.2. Add a History Record Group
16
3.3. Data Center
17
3.4. Download Project
17
4. Configure IoTbus Data-link Tool
18
4.1. IoTbus Data link Tool
18
4.2. Configure MQTT Server
18
4.3. Add Task
18
4.4. Start
19
5. Verification
20
5.1. MQTT Server
20
5.2. MySQL Database
20
Important Statement
This article describes a simple procedure of MQTT configuration in detail. The application of MQTT apply to
technicians who are proficient in database or MQTT. Hence, it is sorry that we will not answer to the questions
that are not related to HMI/H-BOX/PLC. If you have any problem about database or MQTT, please refer to
related documents on internet.
** Hint: Computer system is Windows 10 (64-bit) in this article.
**
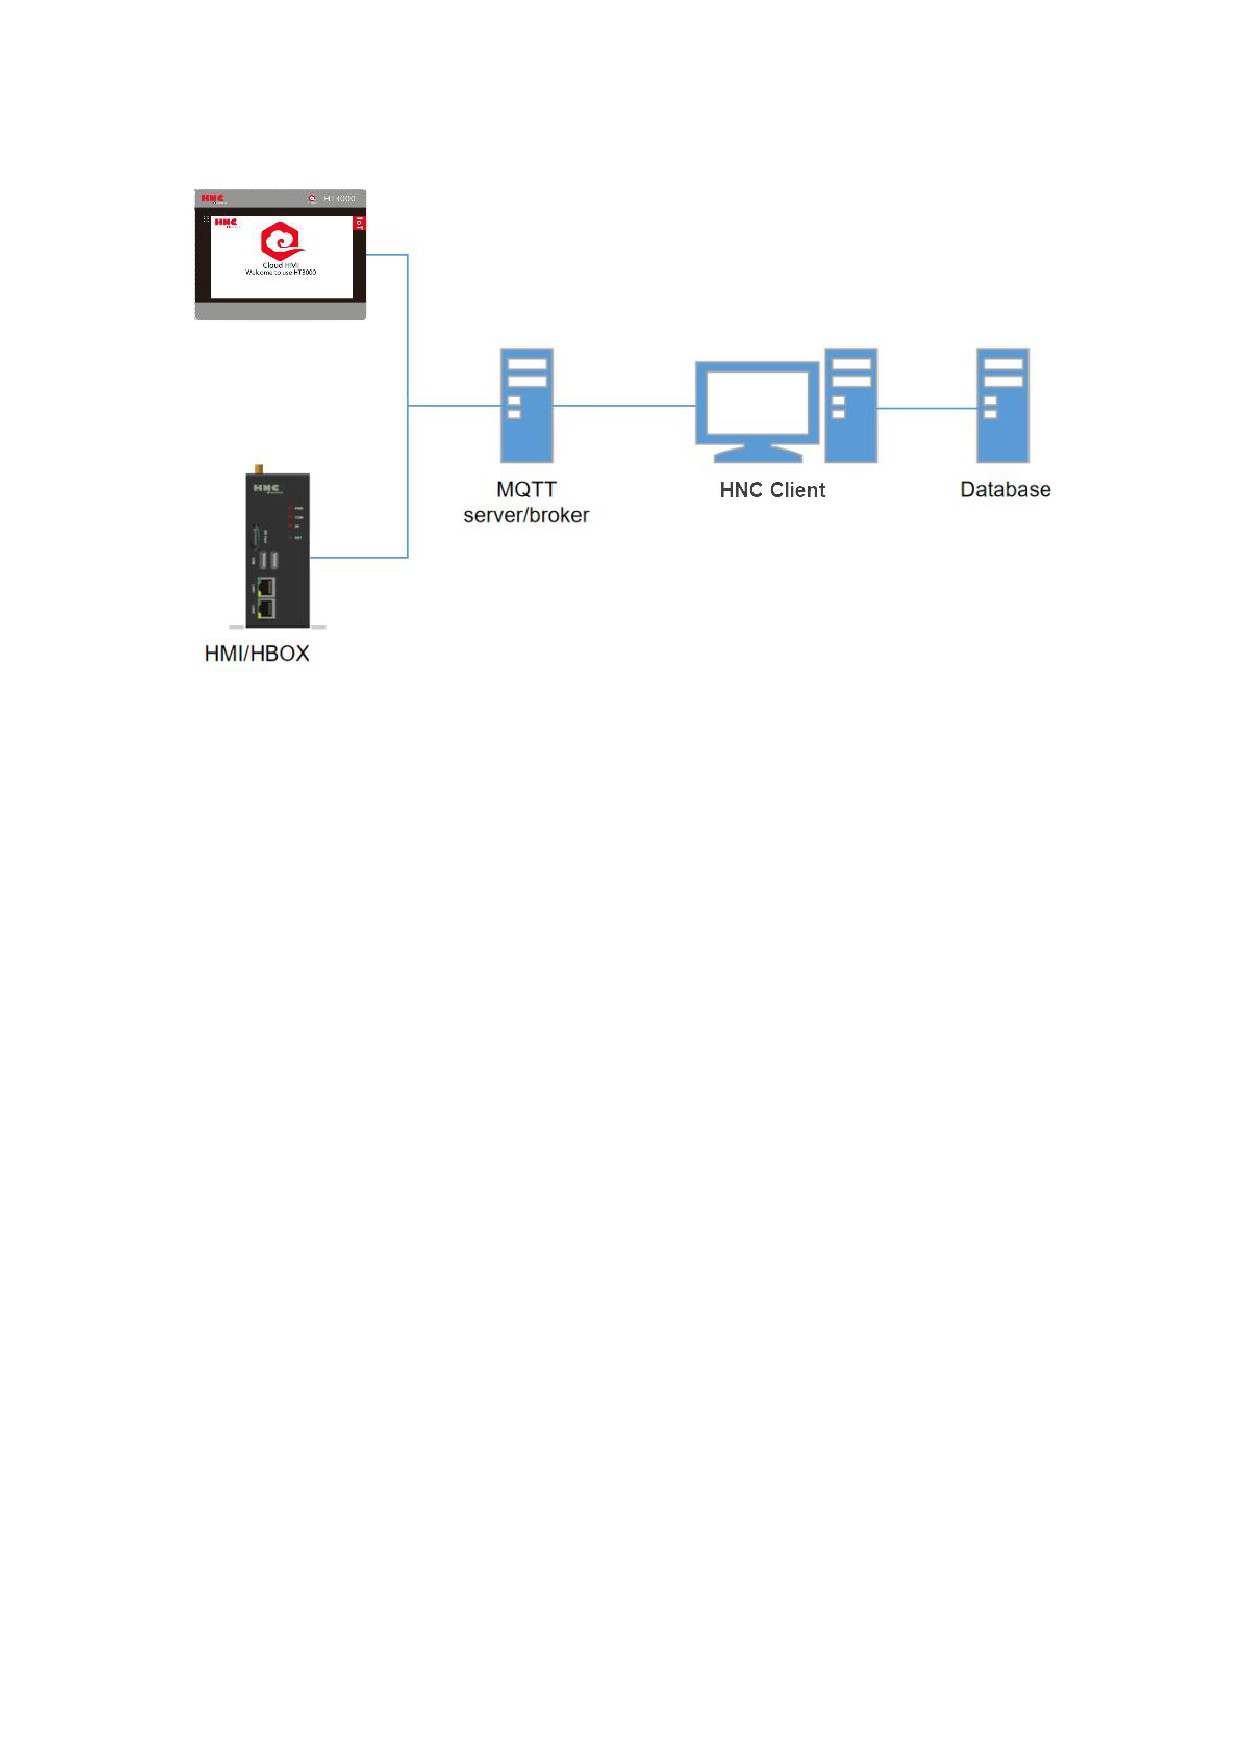
Network Diagram
第 3 页 共 19 页
1. Set up MQTT Server
1.1. Downloads
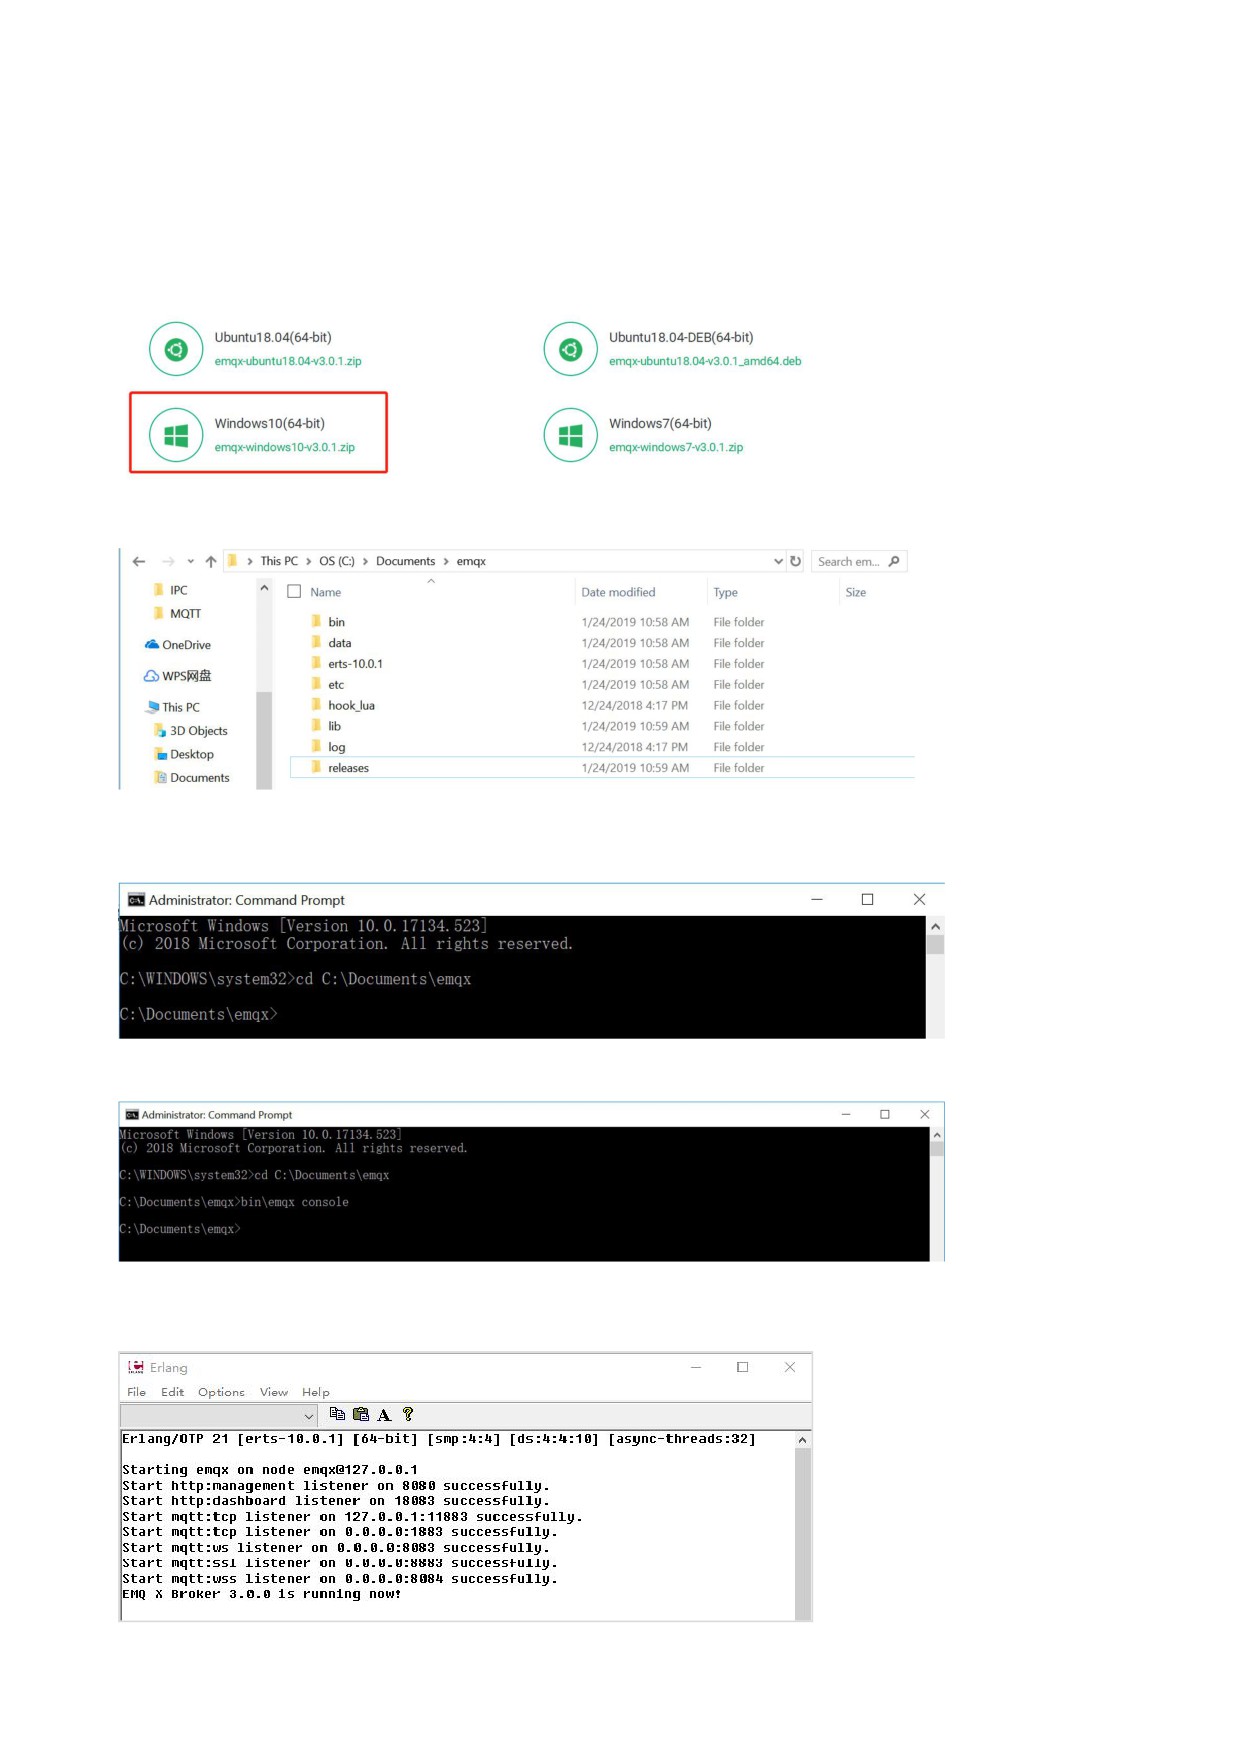
EMQ, an open source MQTT server, is used in this case. It can be downloaded in official website http://emqx.io/.
The relative version is Windows10(64-bit).
Unzip the package to any directory. The install location is C:\Documents\emqx in this example.
1.2. Installation
Run Command Prompt as administrator. Enter the install directory by “cd” command.
Start MQTT broker in console mode by “bin\emqx console” command.
If it is started successfully, an Erlang window will come out. Close the window and continue to register the
Windows service.
第 4 页 共 19 页
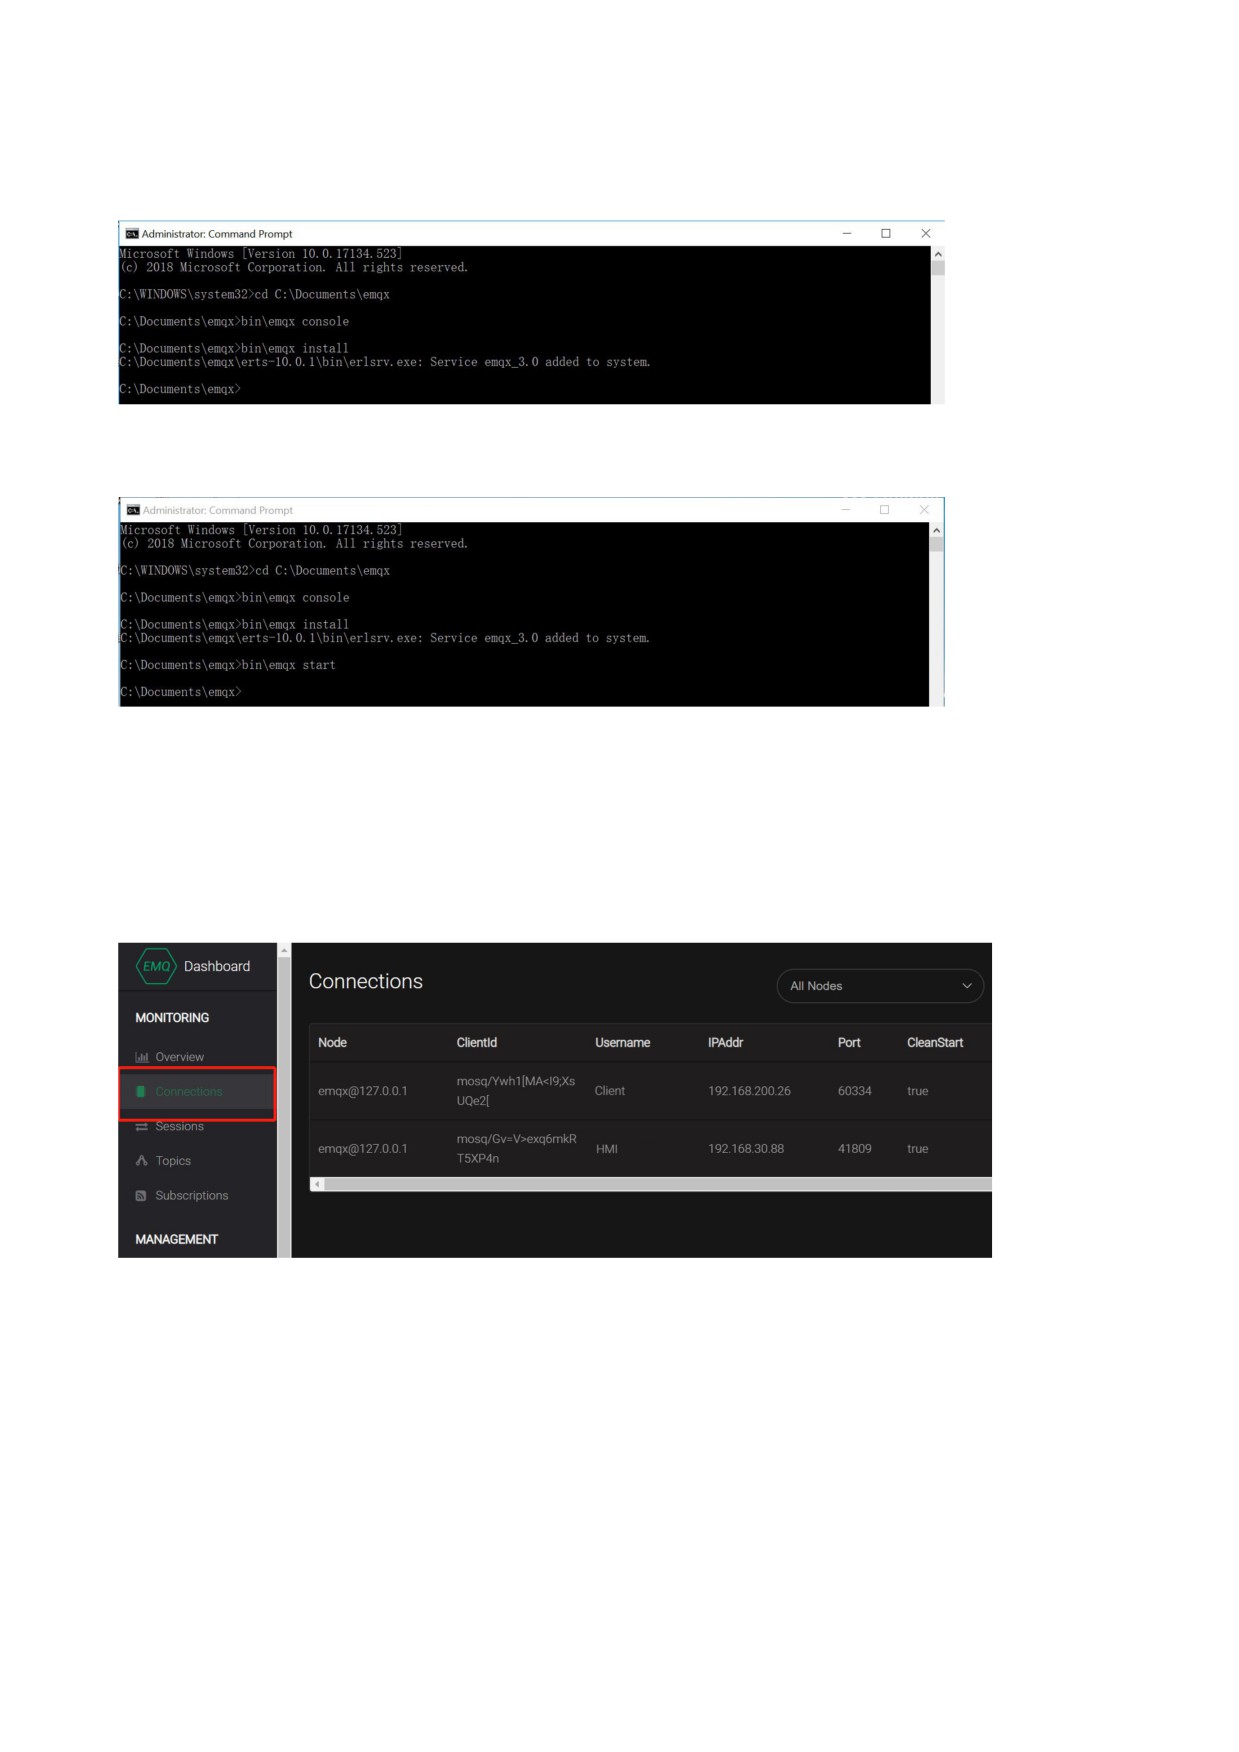
Register EMQ X as Windows service by “bin\emqx install” command. If EMQ X is registered successfully,
Command Prompt will print “Service emqx_3.0 added to system.”.
1.3. Start
Start EMQ X service by “bin\emqx start” command.
1.4. Related Commands
Stop EMQ X service by “bin\emqx stop” command. Uninstall EMQ X service by “bin\emqx uninstall” command.
1.5. Web Dashboard
Users can check and monitor the status of MQTT broker by Web Dashboard after start EMQ X service. Users can
visit the default address http://localhost:18083/ on browser to load Dashboard.Default username: admin,
password: public.
第 5 页 共 19 页
2. Set up MySQL Server
2.1. Downloads
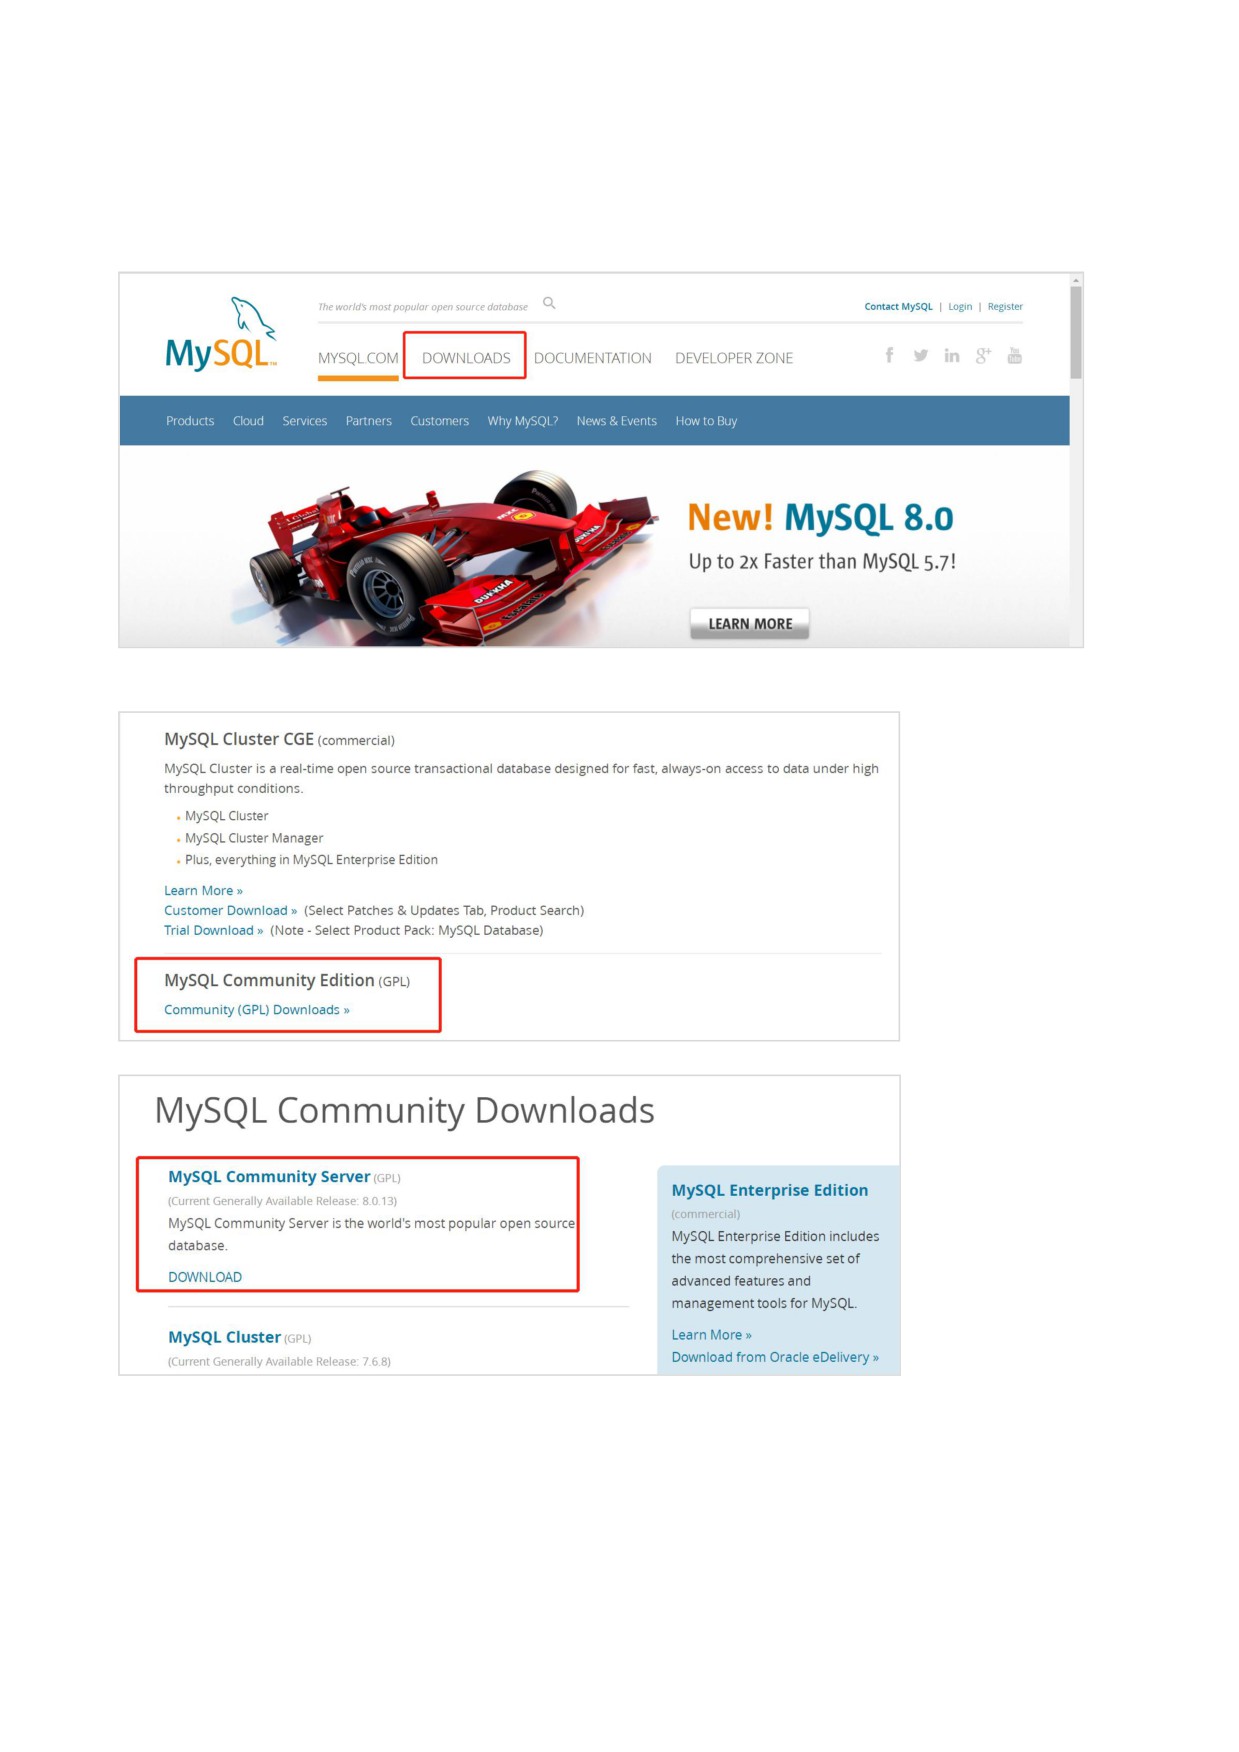
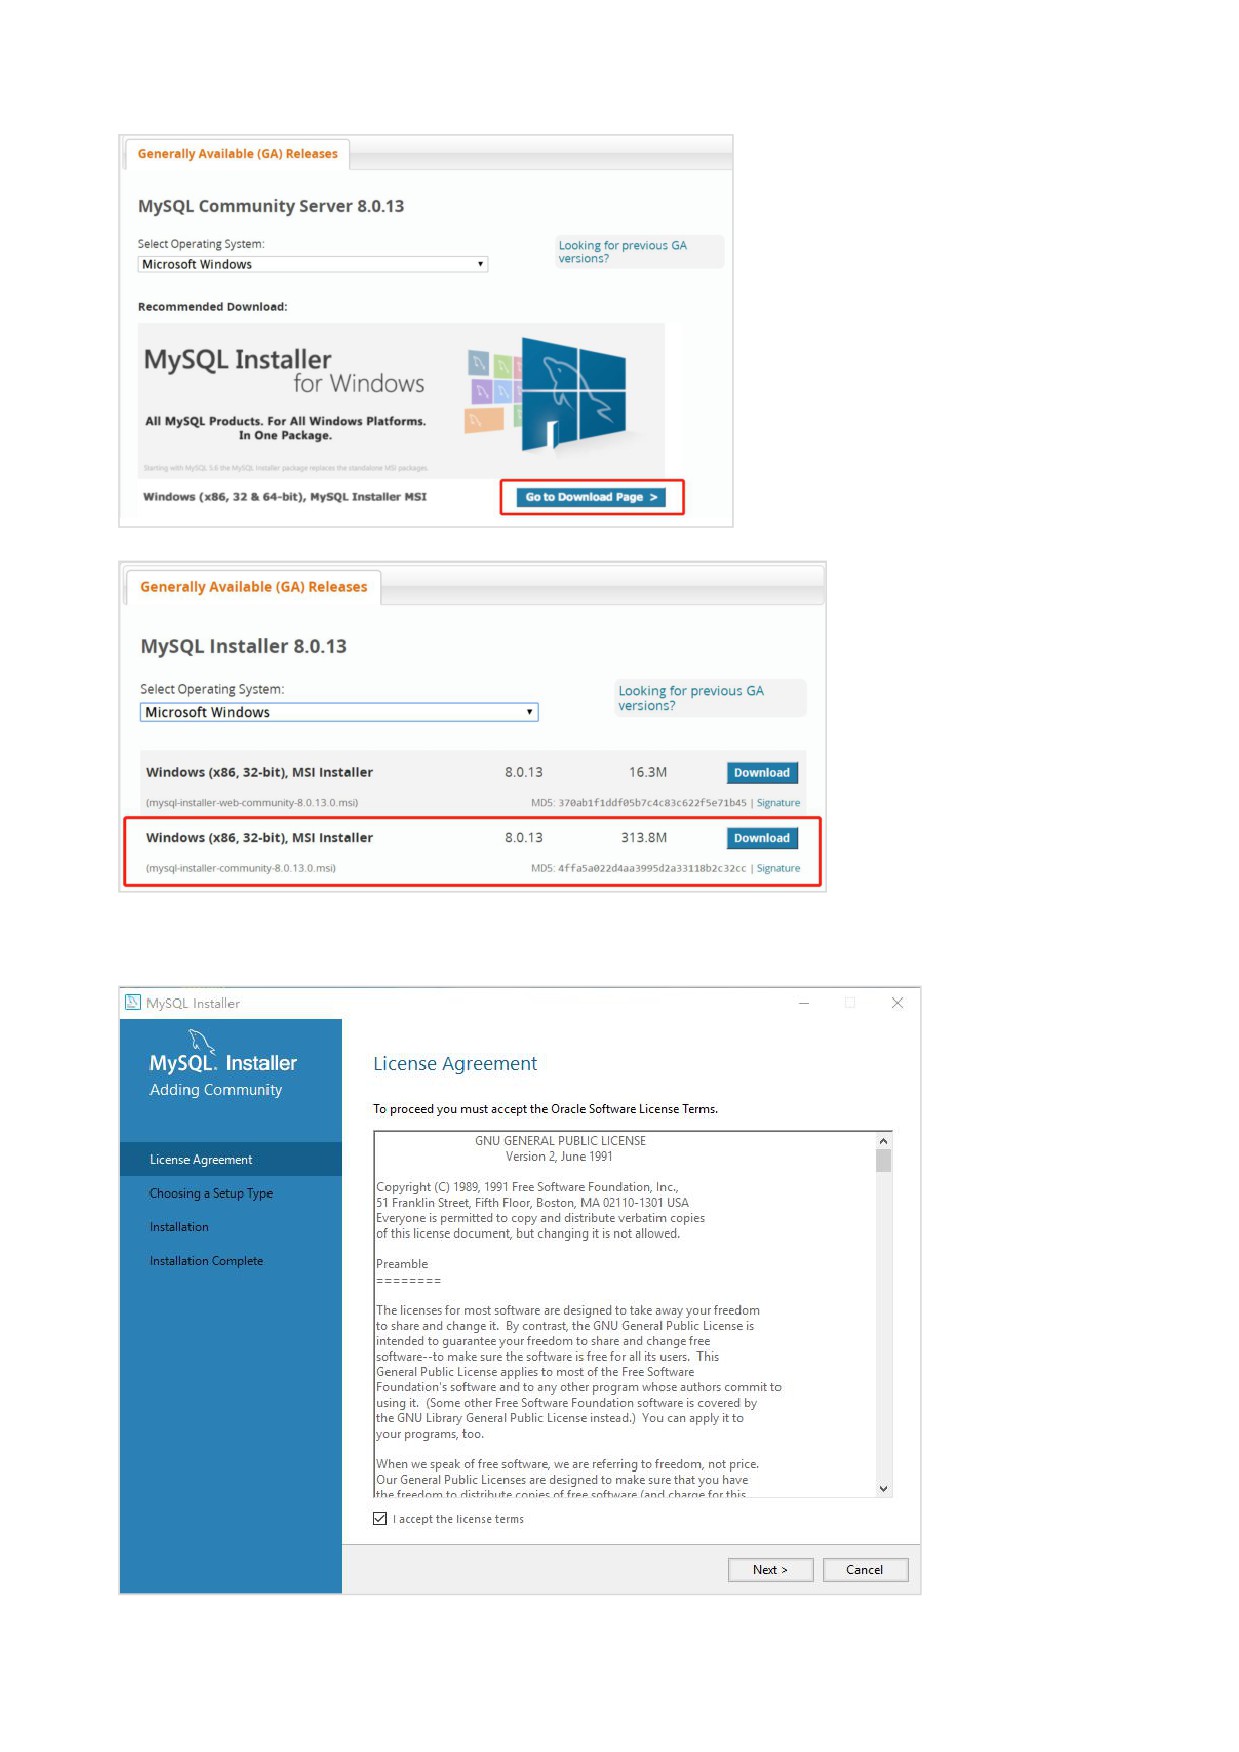
Go to official website https://www.mysql.com/. Choose “DOWNLOADS” tag.
Click on “MySQL Community Edition(GPL)” -> “MySQL Community Server”.
MySQL installer is recommended for simple demonstration. In this version, we don’t have to do complicated
configurations.
第 6 页 共 19 页
2.2. Installation
Open MySQL Installer.Firstly, accept the license terms.
第 7 页 共 19 页
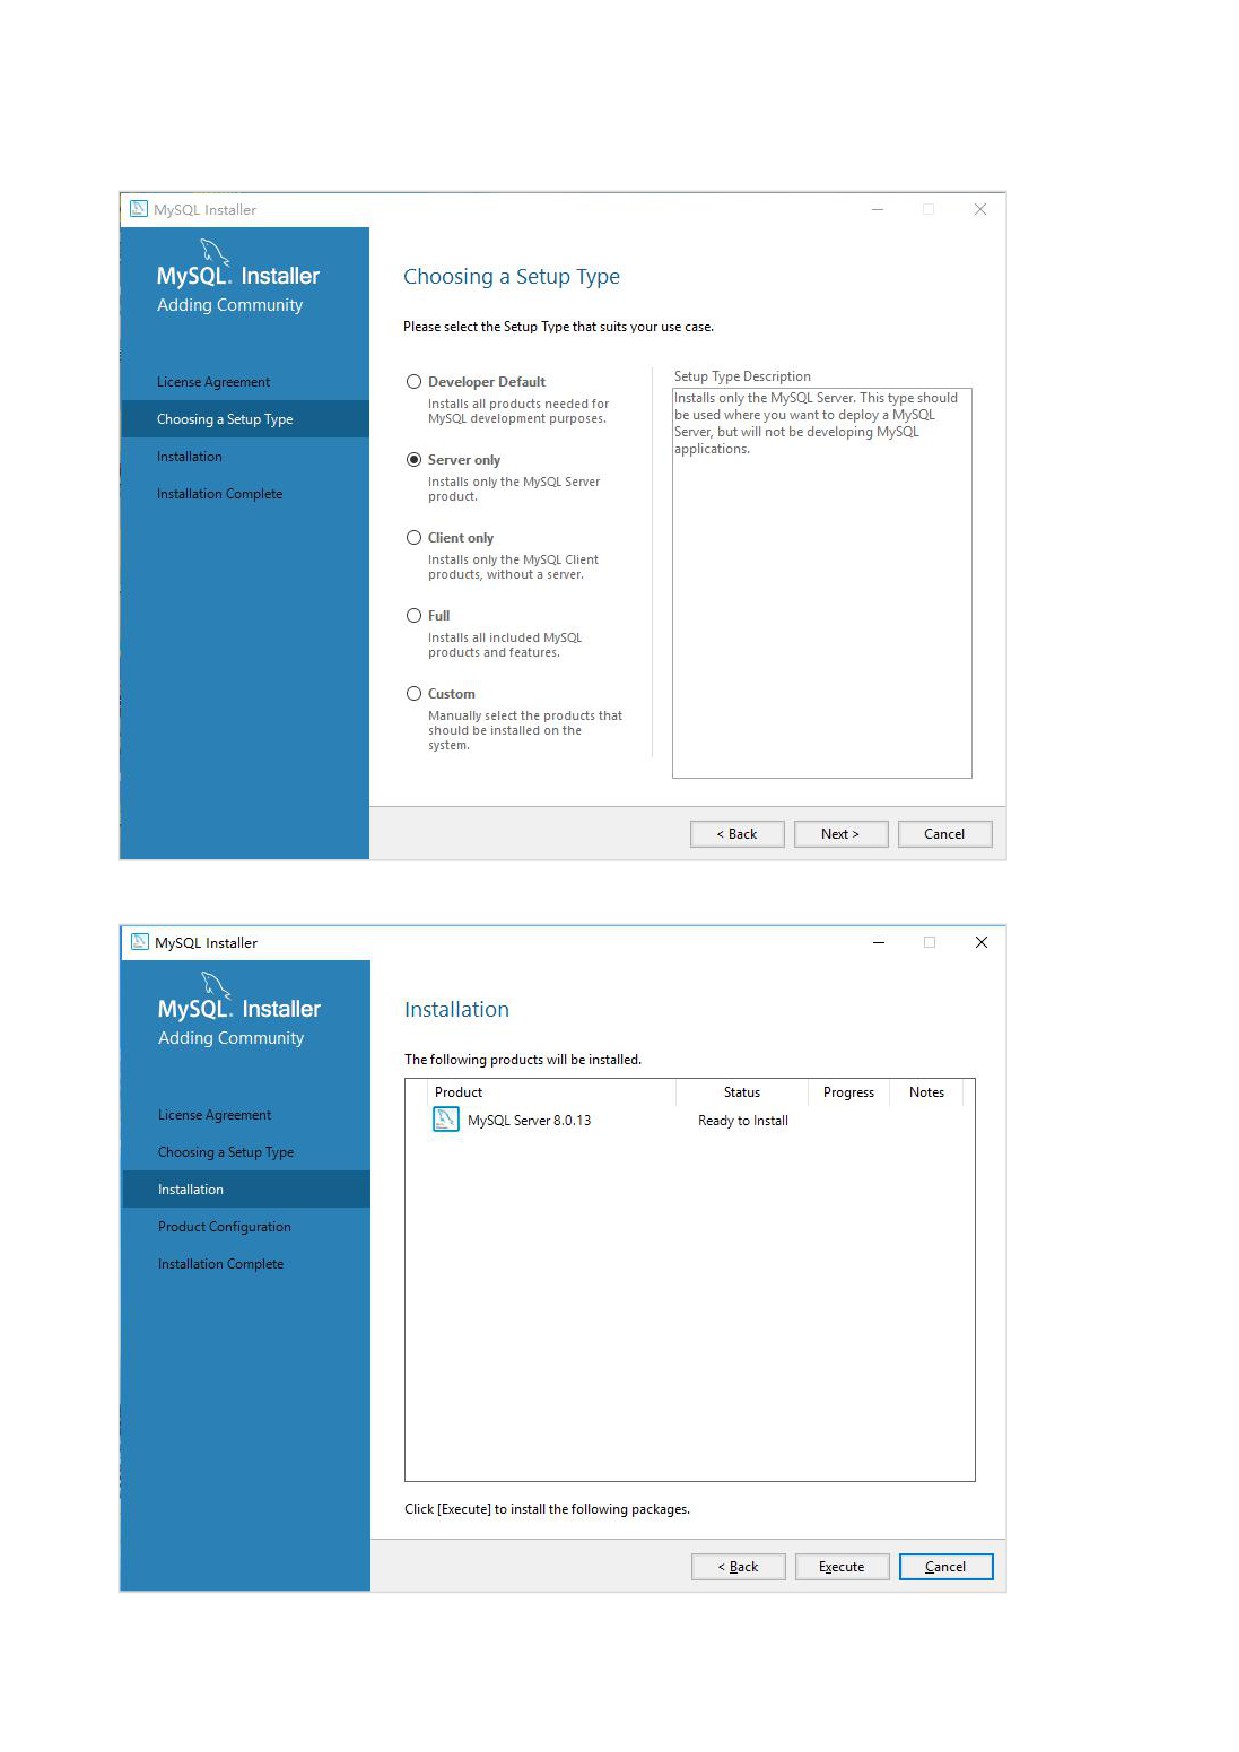
Only MySQL server is needed in this case. Hence, we choose the second option. If you have any other
requirements, you can select other setup type.
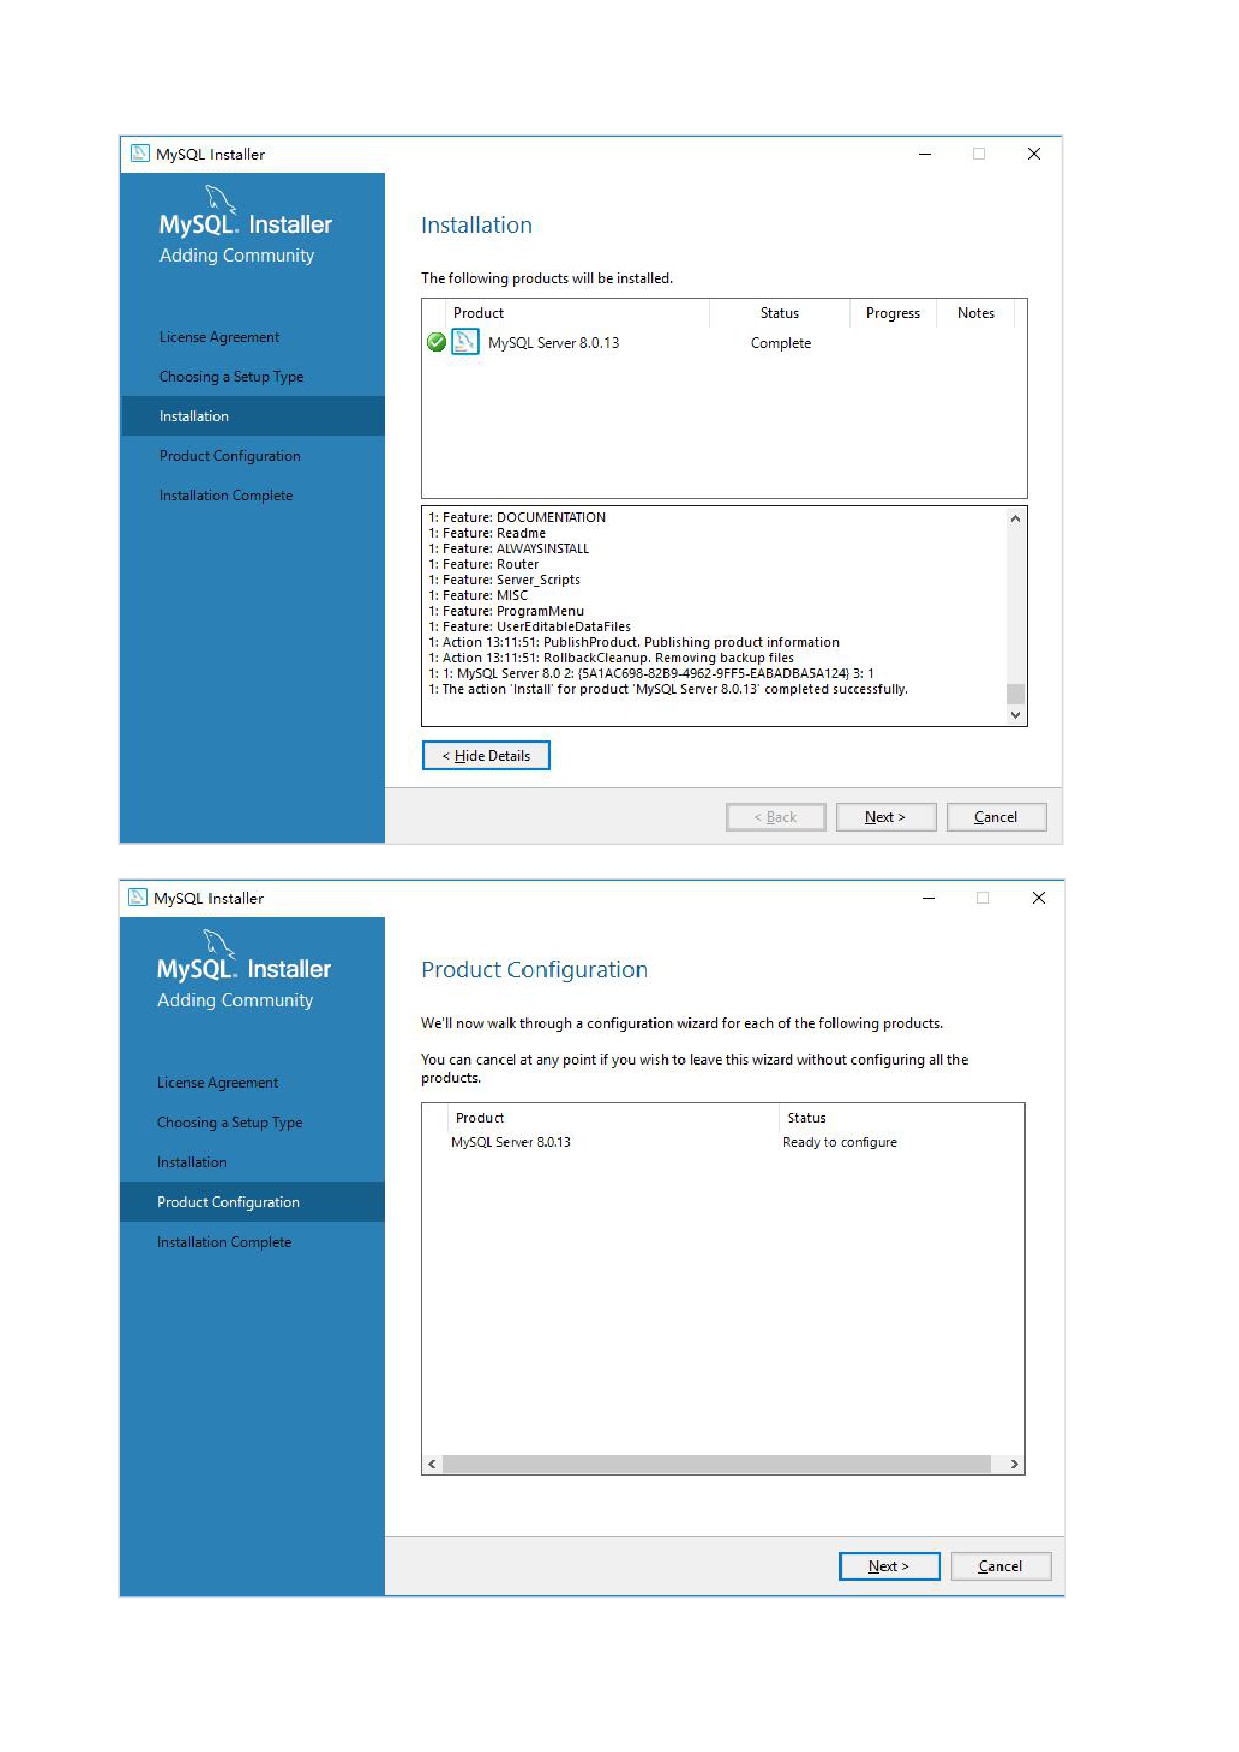
Click “Execute” and enter the configuration page.
第 8 页 共 19 页
第 9 页 共 19 页
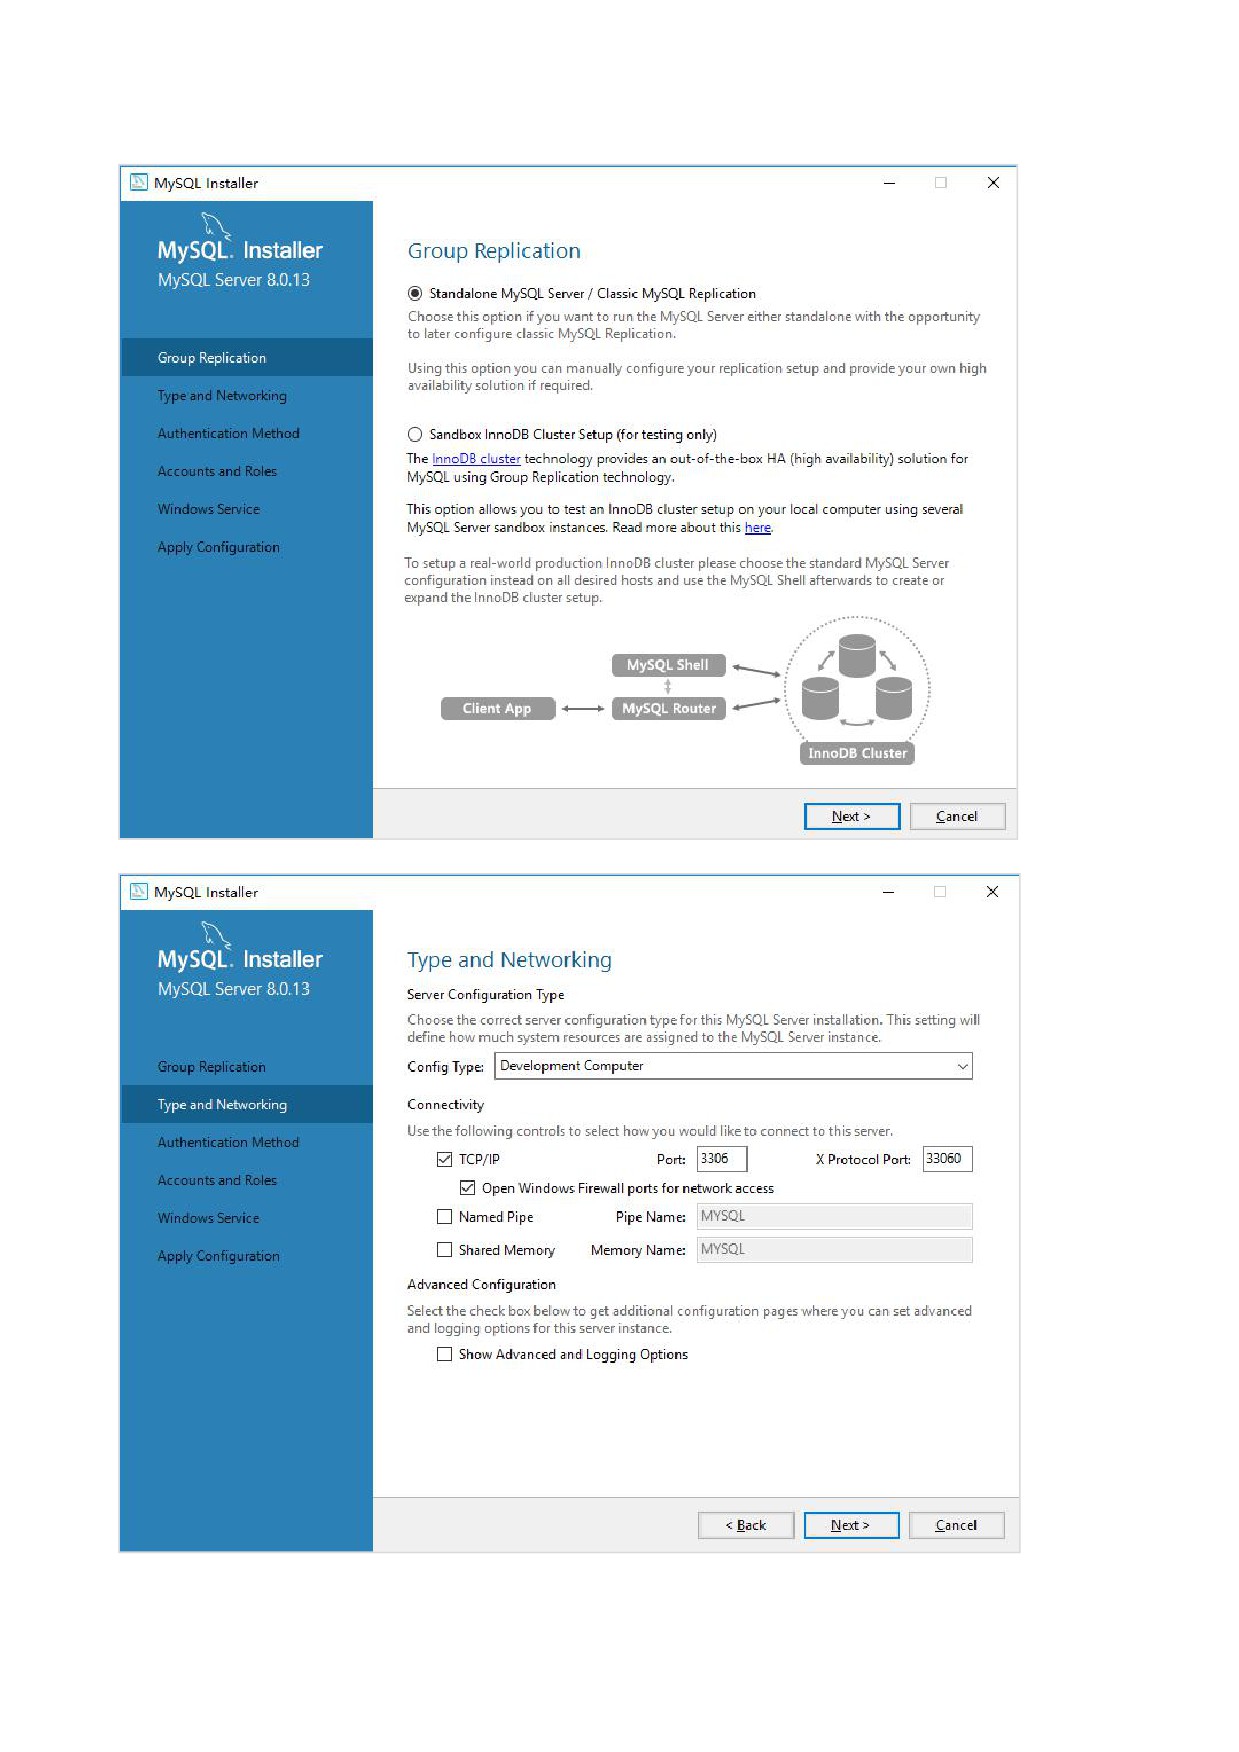
Choose default options for Group Replication and Type and Networking. Default TCP/IP port is 3306.
第 10 页 共 19 页
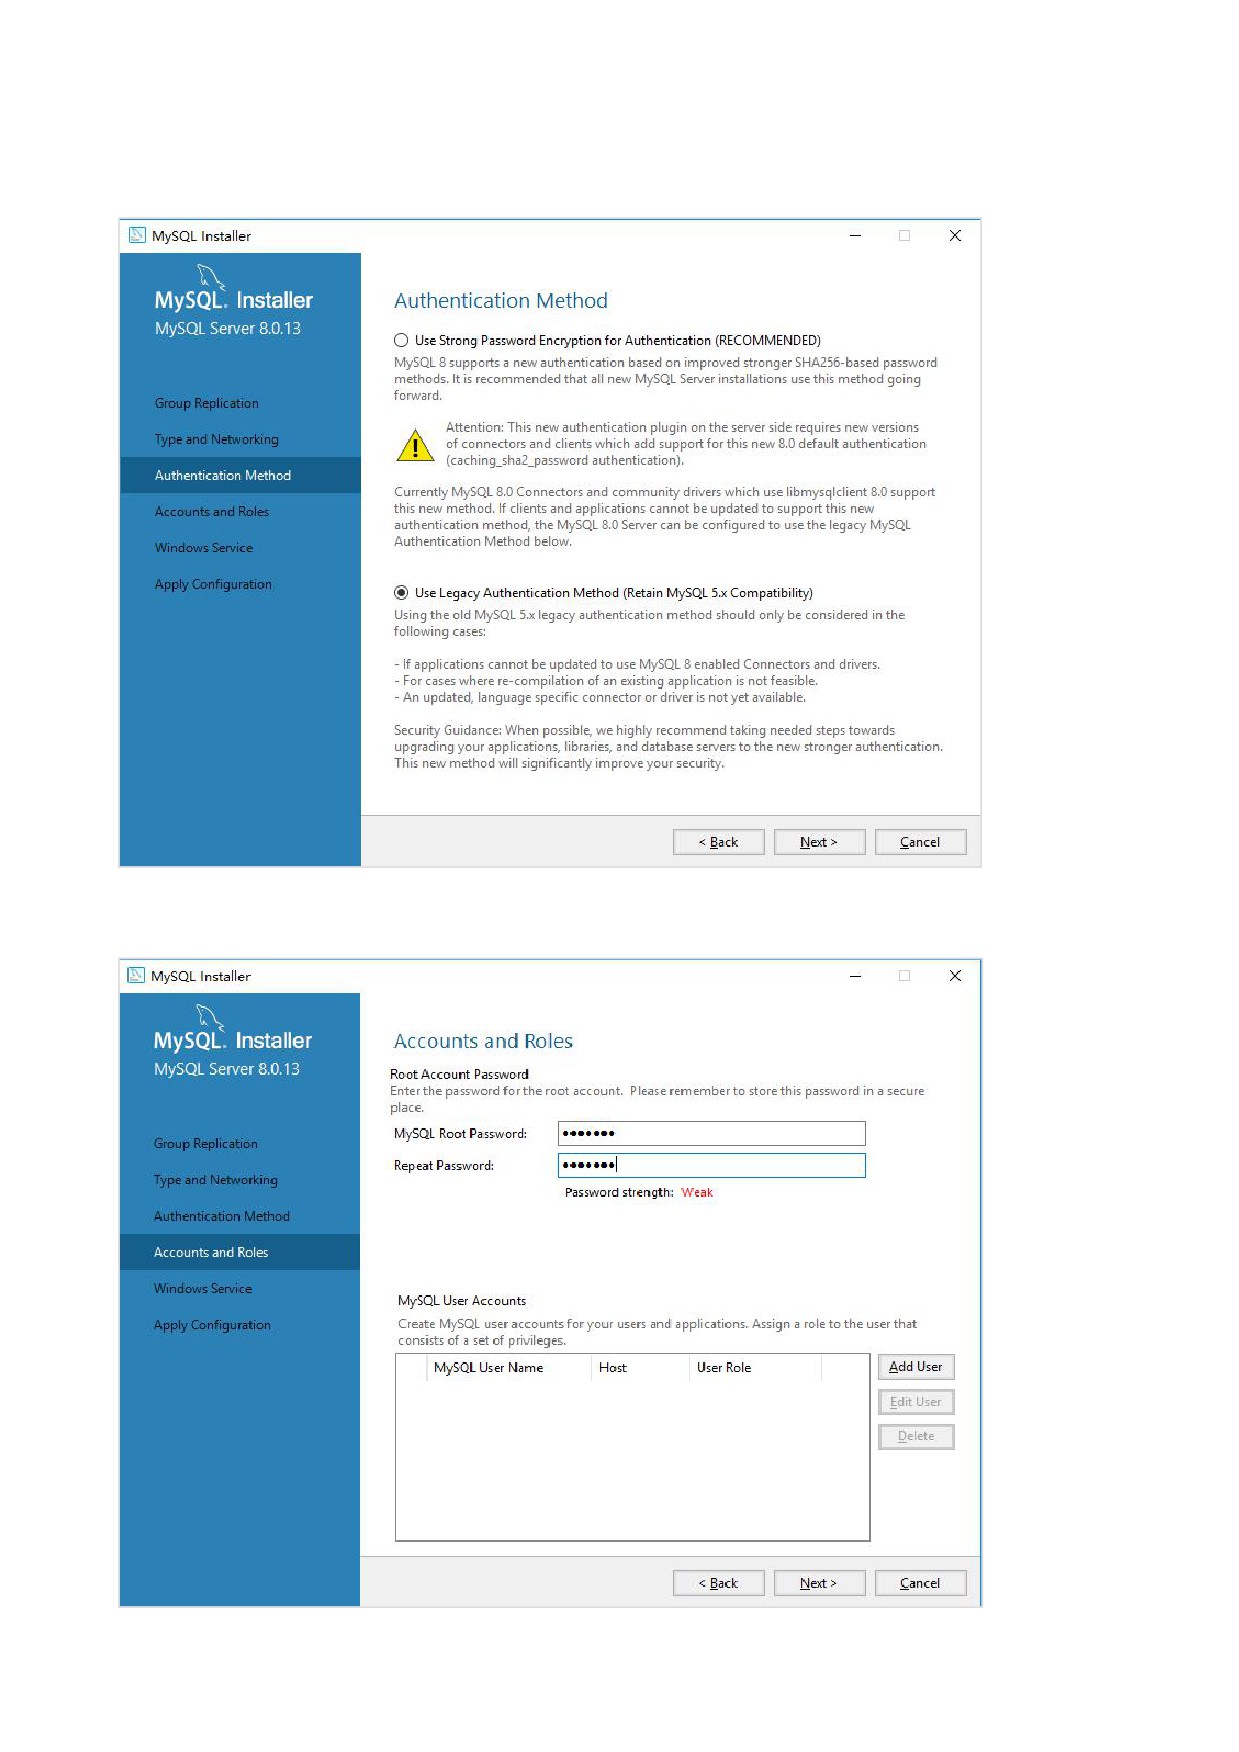
Choose Authentication method. Some of the clients or software haven’t support the new authentication
method. In this case, we have to choose the second method, which is “Use Legacy Authentication Method
(Retain MySQL 5.x Compatibility)”.
The next step is creating password for root account. You can also add other user accounts in this step.
Remember the password. It is needed to create database.
第 11 页 共 19 页
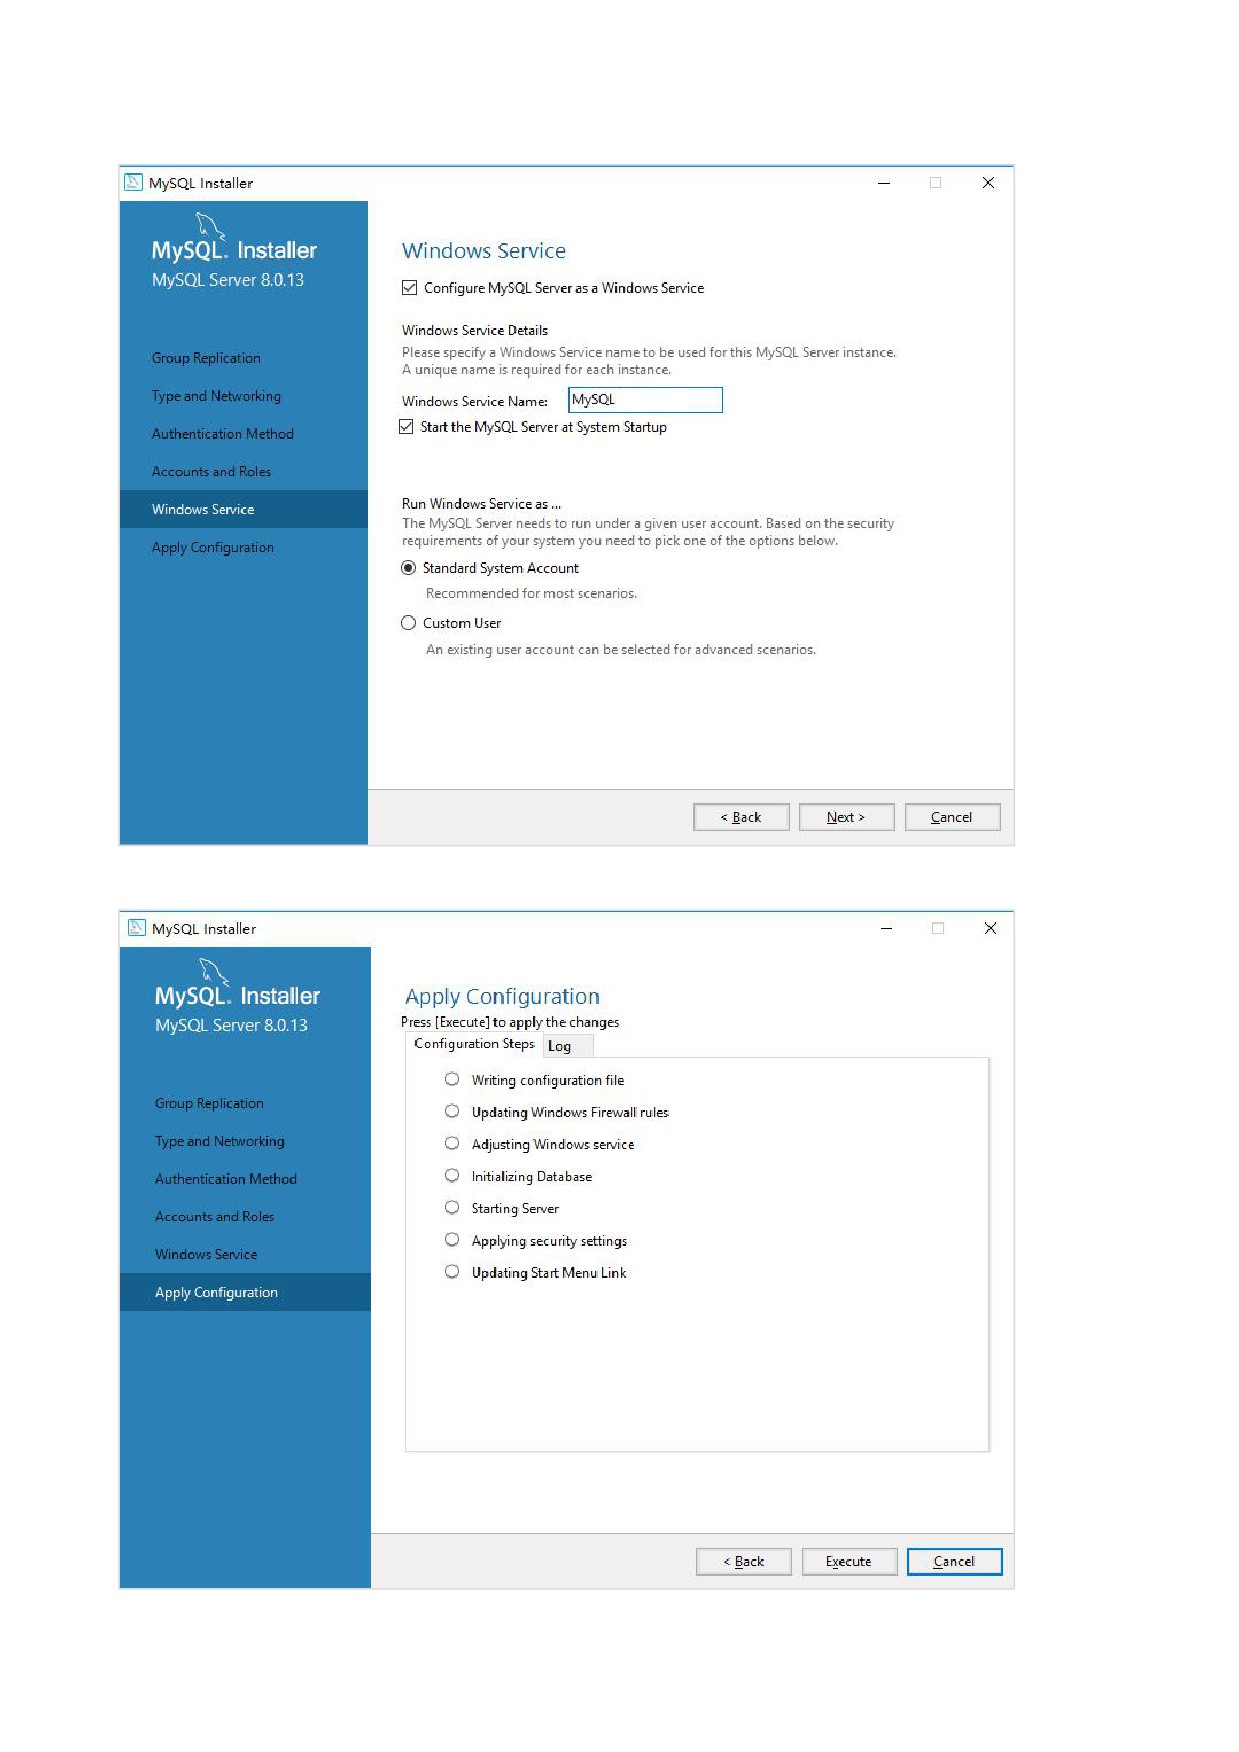
Configure MySQL Server as a Windows Service.
Click “Execute” to apply the configuration. After finishing the configuration, return to install page.
第 12 页 共 19 页
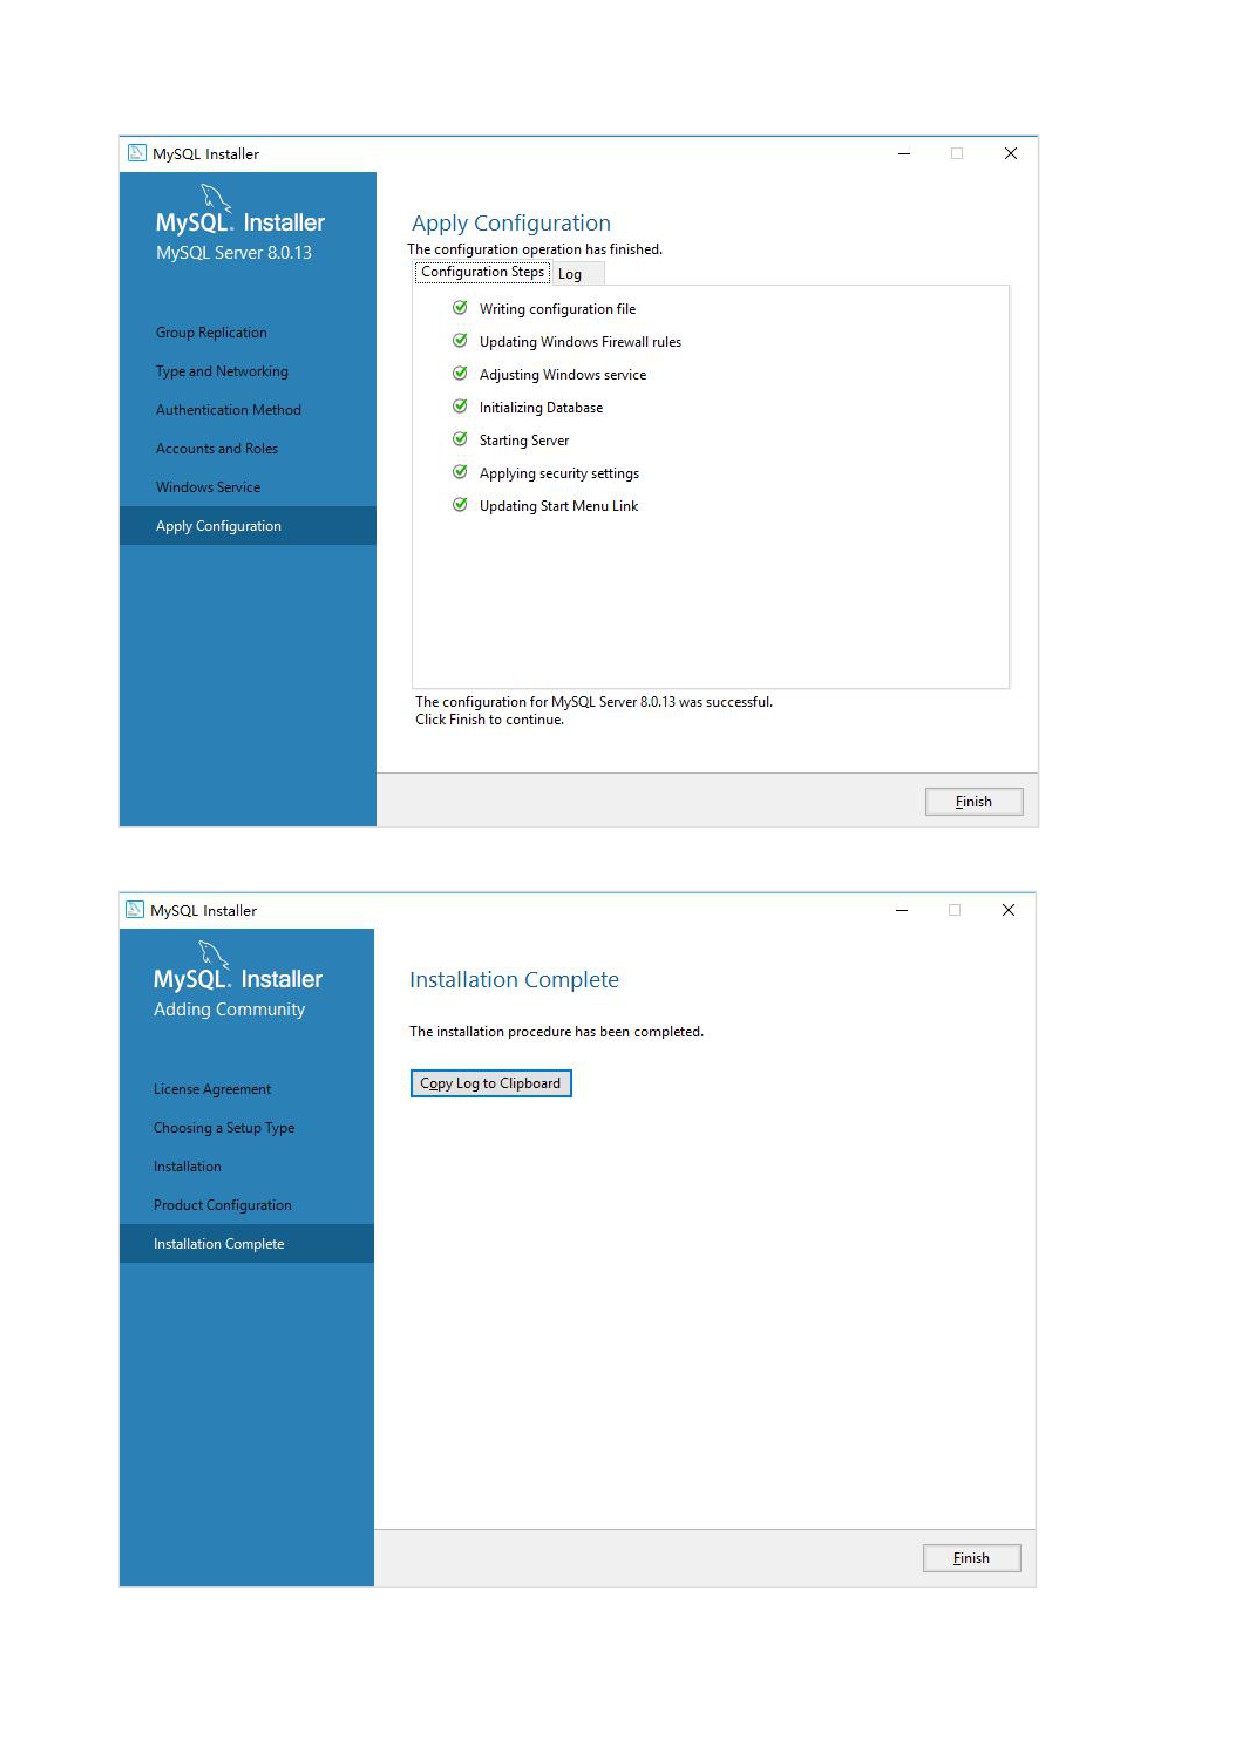
Click “Finish”. The installation is completed.
第 13 页 共 19 页
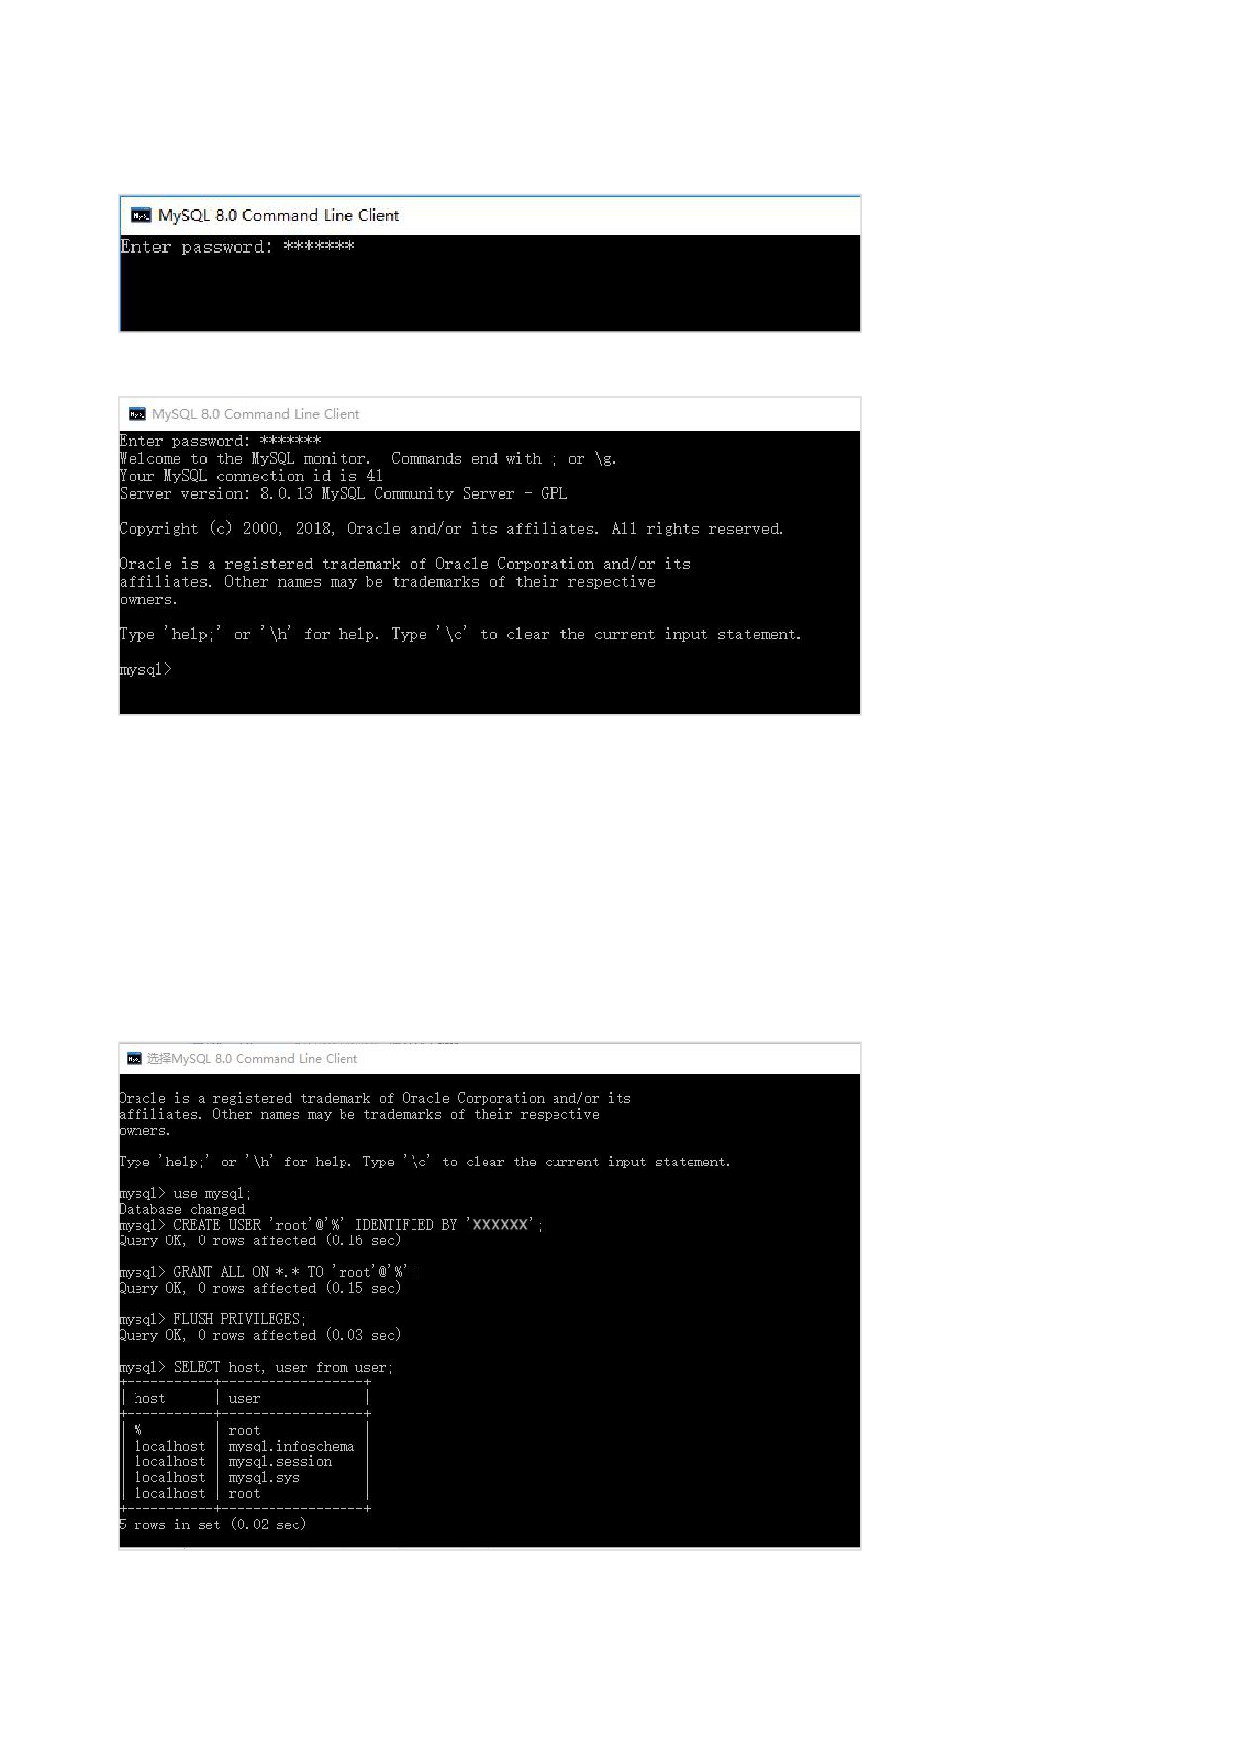
2.3. Verification
Find MySQL Command Line Client in MySQL in start menu. Enter password created in step 2.2.
If MySQL server is installed and launched successfully, the information messages will appear.
2.4. Remote Access Permission
By default MySQL server is only allow connections to local server. We have to enable remote access to MySQL
server. The code sample is as followed.
use mysql;
CREATE USER ‘root’@‘%’ IDENTIFIED BY ‘your password’;
GRANT ALL ON *.* TO ‘root’@‘%’;
FLUSH PRIVILEGES;
The host of root user is changed to % after executing “SELECT host, user from user;” command. It means the
remote access permission is granted.
第 14 页 共 19 页
2.5. Connect to Database Remotely
There are variable MySQL clients such as MySQL Workbench, Navicat, HeidiSQL and so on. In this article, we use
MySQL-Front to connect to database remotely.
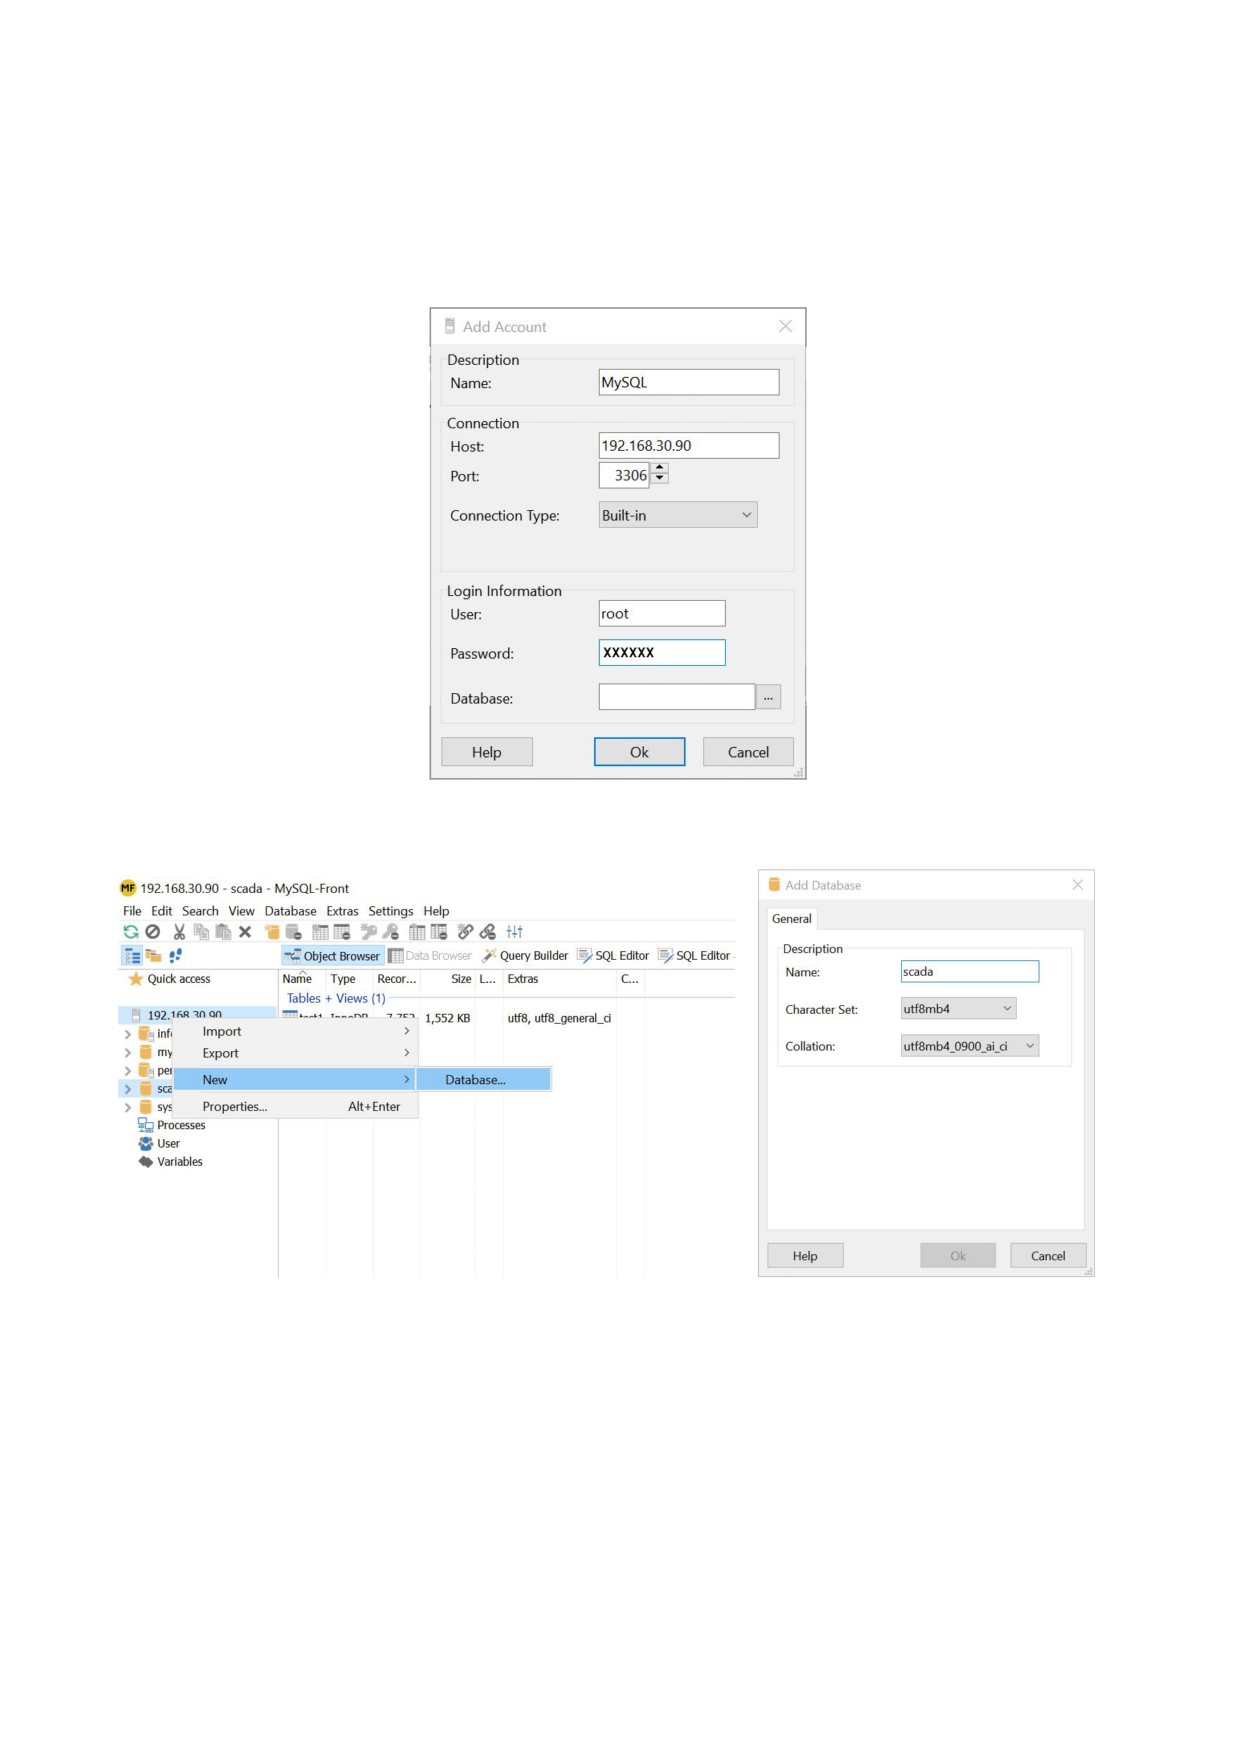
Click MySQL-Front -> File -> Open Connection -> New. Fill in the fields with your database information. Host is
your server hostname. Port is 3306 by default. Enter user and password of root account.
We create a new database to store the historical data uploaded from HMI/H-BOX. Right click on IP address of
the host and select New -> Database. We can edit the name in the pop-up window.
第 15 页 共 19 页
3. HTCloud Designer Programming Configuration
3.1. Create a New Project
Open HTCloud Designer.Create a new project, add a new device and new variables.
3.2. Add a History Record Group
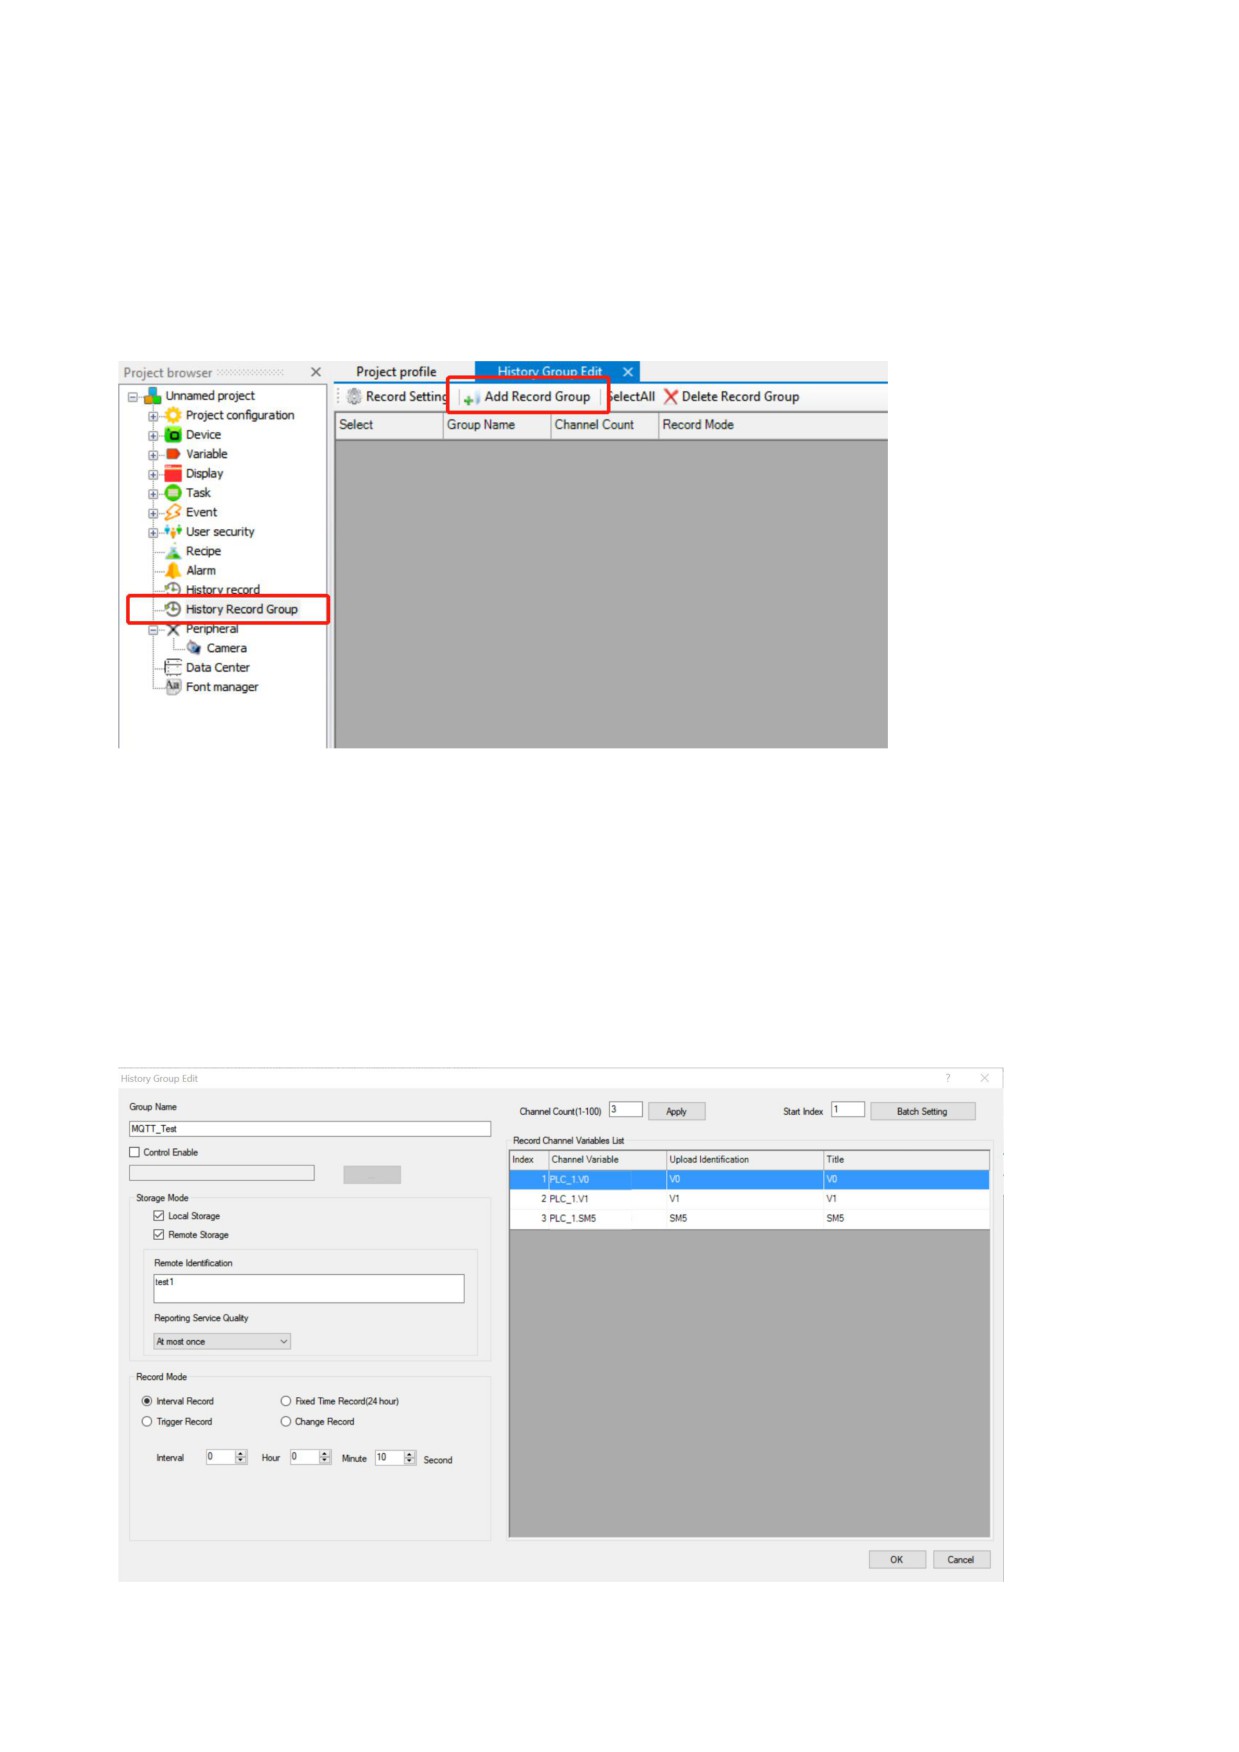
Double click History Record Group on the project browser. Add a new record group.
Add new record channel variables. Remote storage must be selected in storage mode. The variables added in
this article are V0,V1 and SM5. There are three levels of reporting service quality(QoS):
z
At most once (QoS 0) - The client will deliver the message once.
z
At least once (QoS 1) - The receiver will receive the message at least once.The message might be
delivered multiple times.
z
For once (QoS 2) - The client will deliver the message at least once.
Remote identification is corresponding to the table name in MySQL database while upload identification
corresponding to field name. There is no need to create table and field in database in advance as it will be
generated automatically.
第 16 页 共 19 页
3.3. Data Center
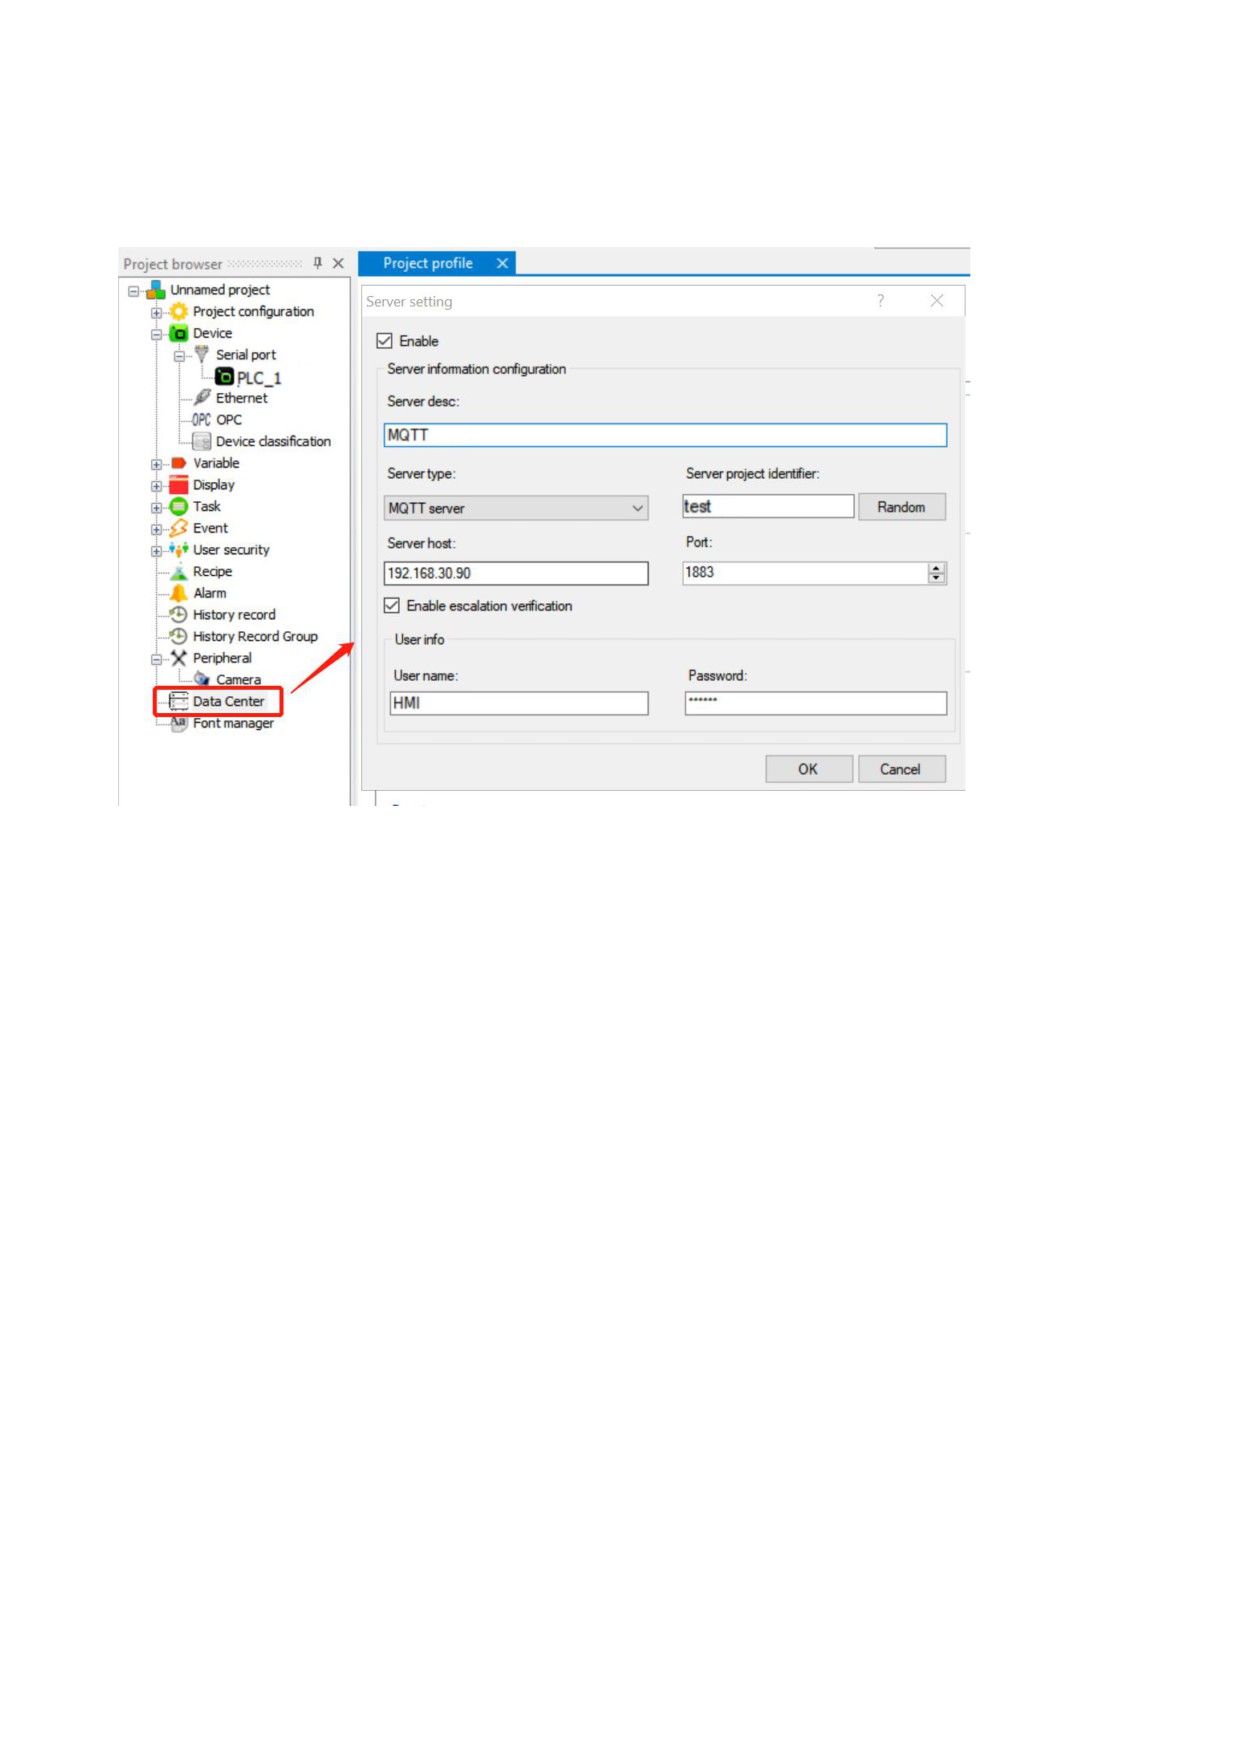
Double click data center to configure MQTT server. Tick on Enable. Enter the IP address of the EMQ X server.
The port is 1883 by default.The server project identifier must be unique.We enable escalation verification in this
article for verification in the final step.
3.4. Download Project
Download your project after edit the displays.
第 17 页 共 19 页
4. Configure IoTbus Data-link Tool
4.1. IoTbus Data link Tool
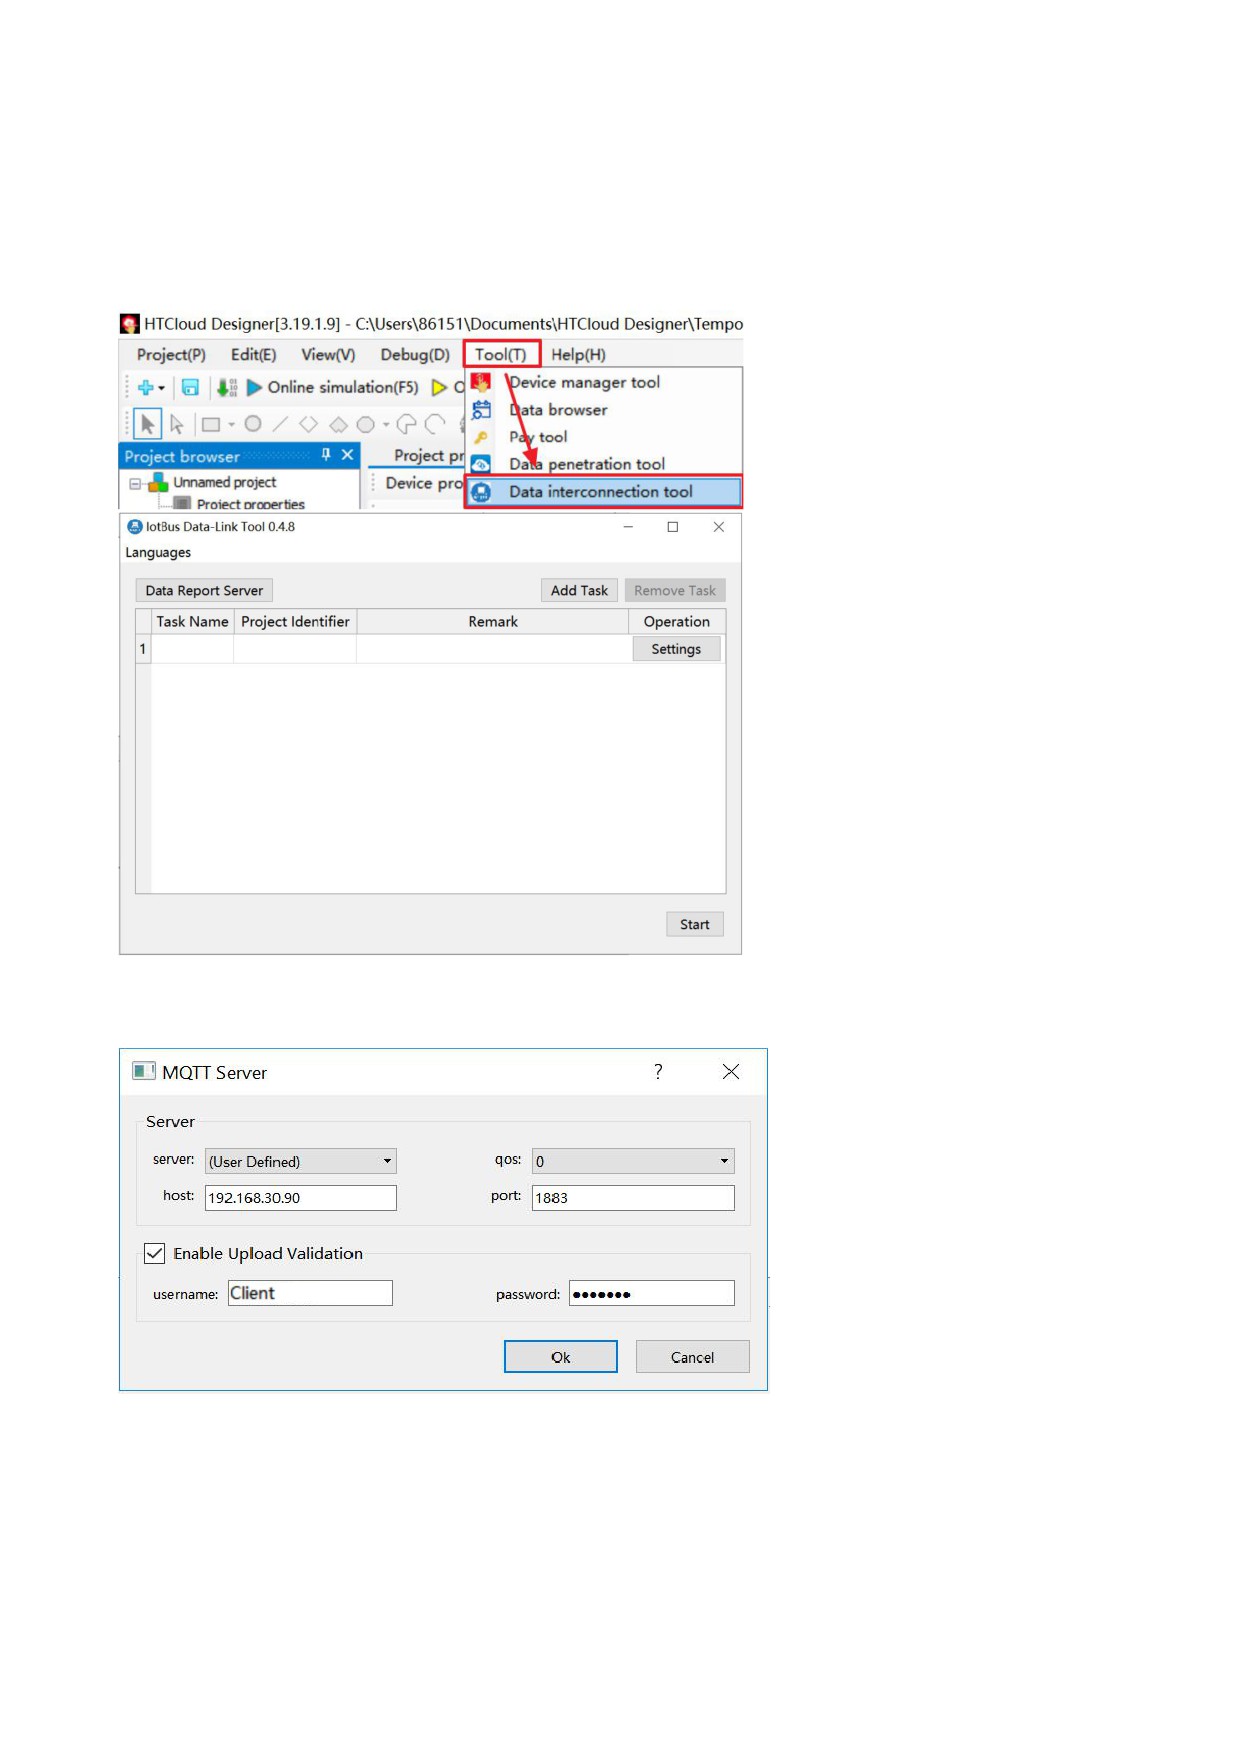
“IoTbus Data link Tool” is an database storage tool developed by HNC which built-in “HTCloud Designer”
4.2. Configure MQTT Server
Click MQTT Server to configuration page. You can refer to 3.3. Data Center for guidance.
4.3. Add Task
Click Add Task -> Settings to set up a new task.
Project flag is corresponding to server project identifier in data center of HTCloud Designer while table name
corresponding to remote identification in history group edit. You can refer to 2.5. Connect to Database
Remotely for other settings. Fill in database option with the database created in 2.5. Connect to Database
Remotely, which is scada.
第 18 页 共 19 页
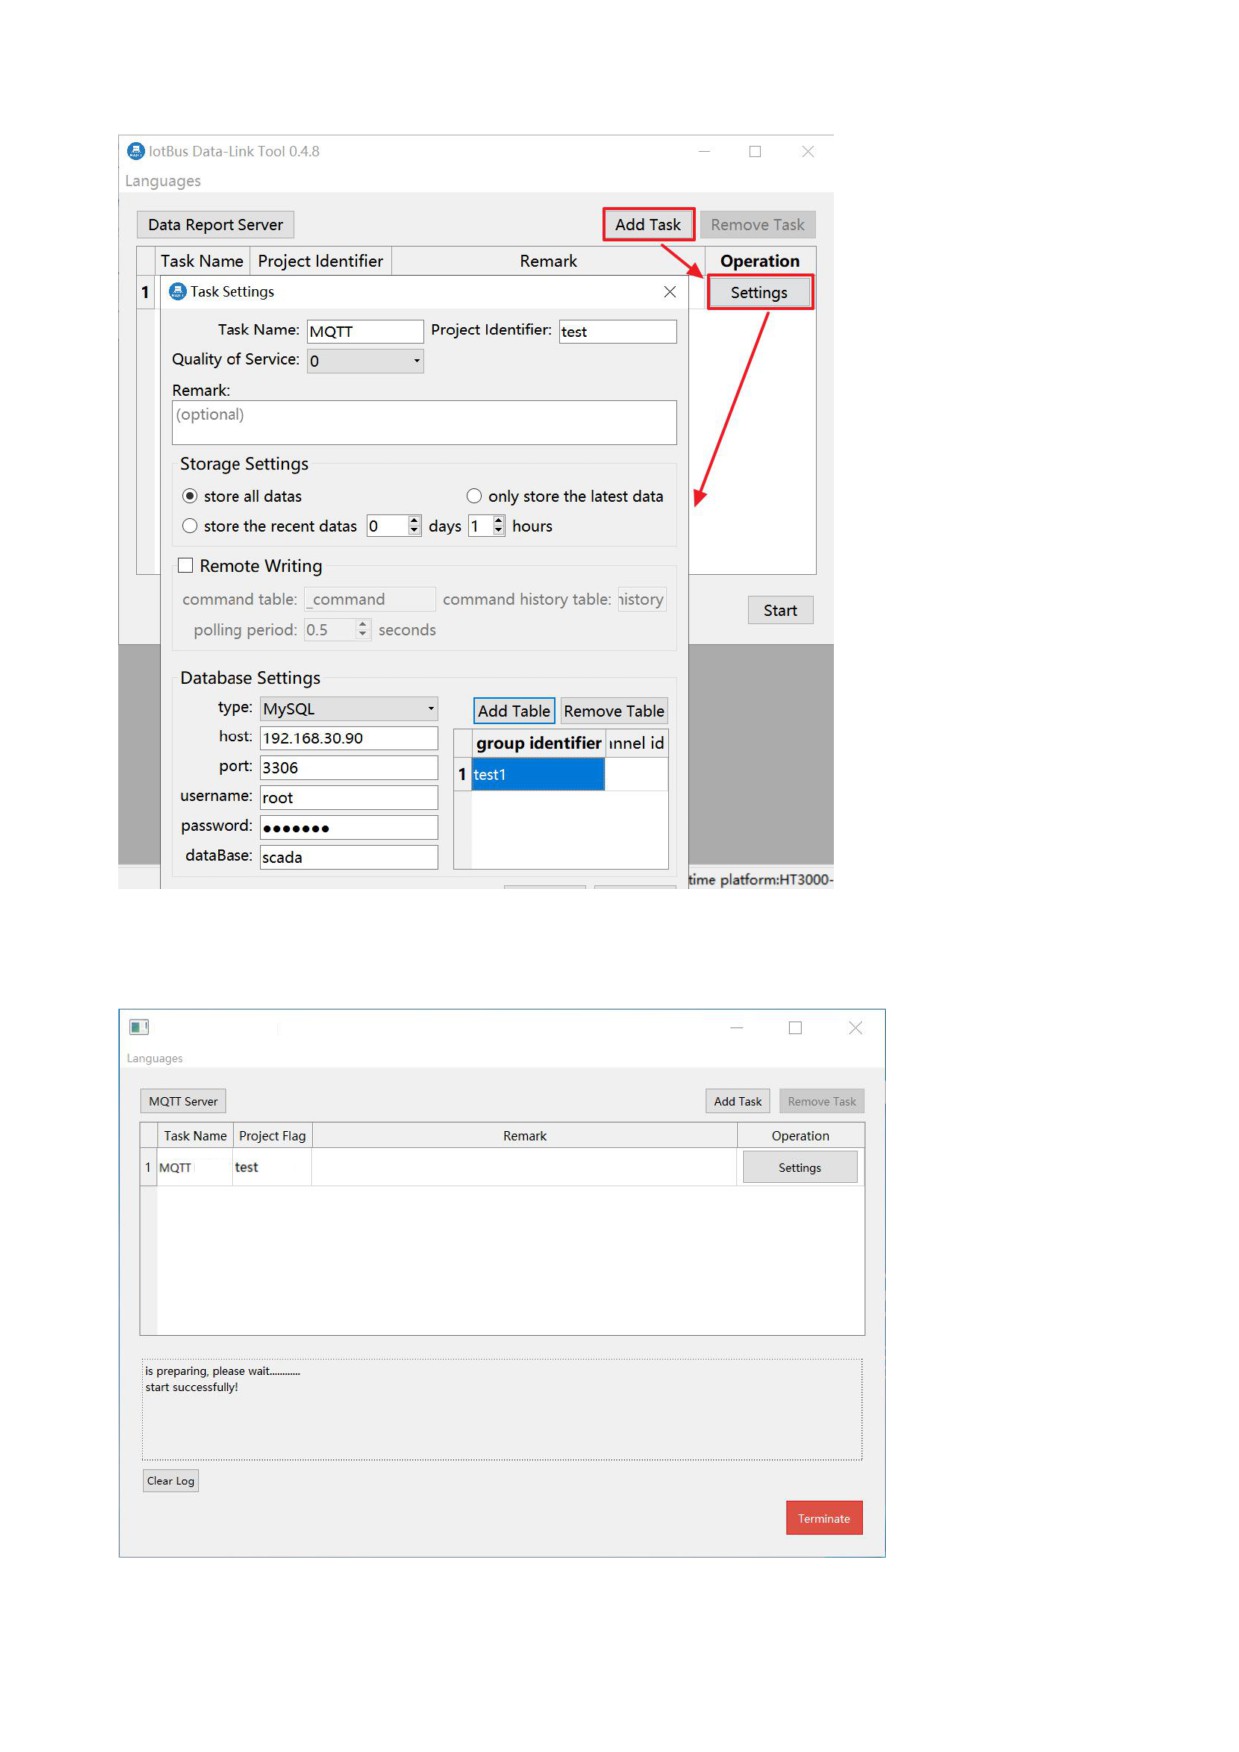
4.4. Start
Click start to execute the task after adding a new task. If the task starts successfully, the log window will show
the information message “start successfully!”.
第 19 页 共 19 页
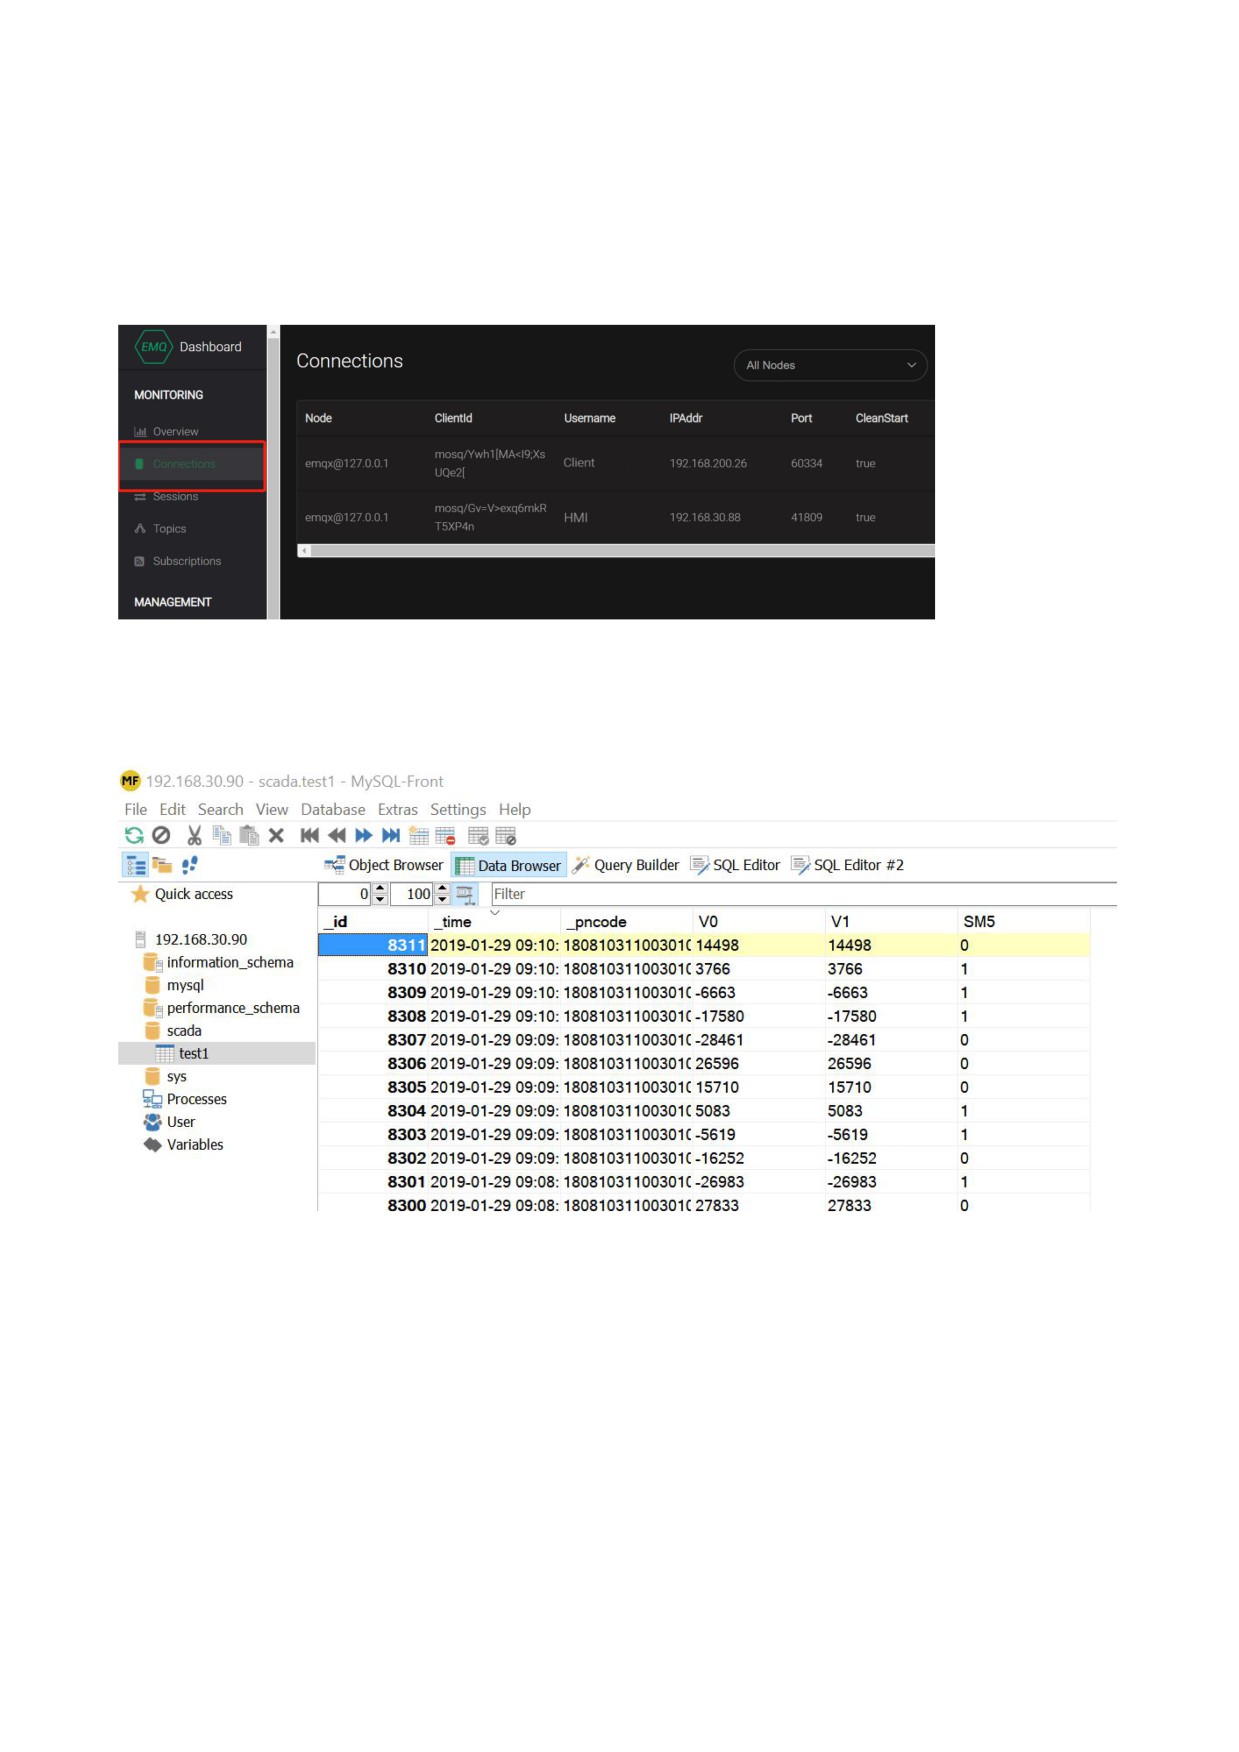
5. Verification
5.1. MQTT Server
Enter EMQ X Web Dashboard. In the connections tag, there are two connections to EMQ X server. The
usernames are Client and HMI, which are the usernames set up previously. Hence, both HMI/HBOX and IoTbus
Data link Tool are connected to MQTT server.
5.2. MySQL Database
Connect to MySQL server remotely with MySQL-Front. A new table, whose name is test1, is created in scada
database. Select data browser mode in test1 table. The values of V0, V1 and SM5 are uploaded and stored in
MySQL database.Hence, the historical data of HMI/H-BOX are stored in MySQL server successfully.