HNC H-BOX User Manual Cloud Box
Contents
1. Product Description
1.1 Product Introduction
3
1.1.1 Main Functions
3
1.1.2 Functional Characteristics
3
1.2 Specification of Product Parameters
3
1.3 Cloud Box Software
4
1.4 Cloud Box appearance and interface diagram
5
2. Software usage description
2.1 Mobile APP Quick Access to the Cloud Box
6
2.2 Cloud access
7
Cloud binding machine owner
7
2.2.1 Connect hots pot to bind machine owner
8
2.2.2 Scan QR code binding machine owner
8
Ordinary users
9
Binding whitelist
9
Binding visitors
9
Administrator
9
Visitors
9
Cloud access
10
2.3 Reset
10
2.4 Cloud Box connection settings
10
2.4.1 Notes and hardware installation steps
10
2.4.2 Hardware wiring
11
2.4.3 Connect Network
11
2.5 Project operation
11
2.6 Device Manager
13
2.6.1 Entering the Device Management Interface
13
2.6.2 Performing Device Management
14
2.7
Background setting
20
2.7.1 Background password setting
20
2.7.2 Reboot the device
21
2.7.3 Demo project
21
2.7.4 Network Settings
21
2.7.5 4G network Settings
23
2.7.6 Cloud Box device basic function settings
24
2.7.7 Cloud settings
26
2.7.8 Multi-language setting
27
2.7.9 Exit background settings
27
2 / 27
1. Product Description
1.1 Product Introduction
1.1.1 Main Functions
Cloud Box is an Internet of things terminal (IoT). We call it " HNC Cloud HMI without screen", which can be easily managed by
mobile app and cloud website. It is an industrial automation monitoring and management equipment which runs in an embedded
system software HTCloud Designer. It monitors the industrial scene by accessing Cloud Box running pictures from mobile APP
and cloud website. It can also communicate with various industrial control devices, collect data and upload it to cloud for further
application.
1.1.2 Functional Characteristics
z
Built-in HNC cloud engine, integrated HNC cloud service, support cloud/mobile access control
z
Integrated HMI function, which can directly monitor the display screen through the mobile phone/PC instead of the HMI
screen. The control is flexible and convenient.
z
Support A/B Key security mechanism, multi-unit network, database, multi-screen interaction, cloud camera remote
monitoring,etc.
z
Support MQTT protocol, support access to database server, easily realizing data acquisition and reporting, match with
ERP/MES and other systems.
z
Support two Ethernet interfaces, support star, tree and bus Ethernet networking.
z
Support HTCloud Designer configuration software, embedded HNC cloud engine, HNC cloud service, support accessing
through Mobile or cloud terminals.
z
Built-in 2 RJ45 interface, 2 USB, 2 serial ports, WIFI, SD card, SIM card, optional 4G, DIN-Rail Mounting.
1.2 Specification of Product Parameters
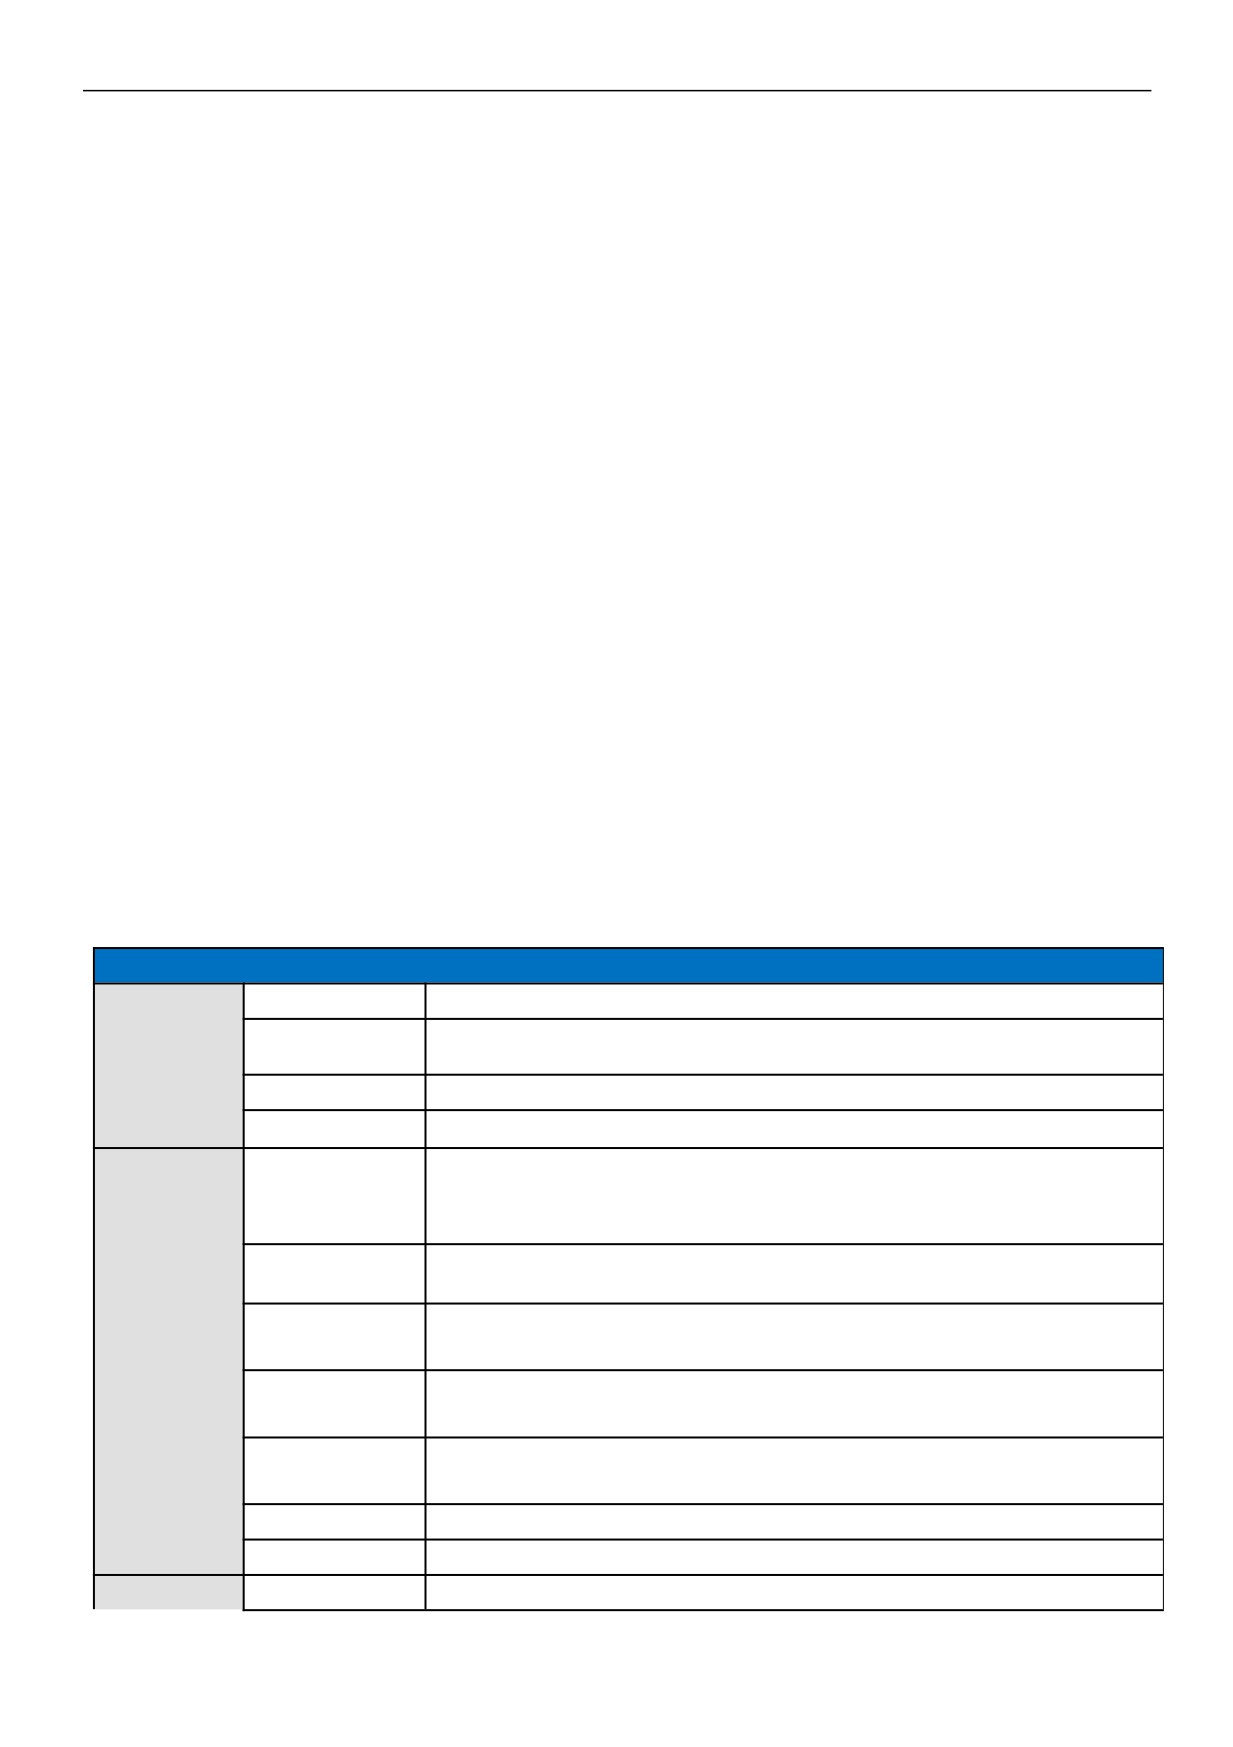
Cloud Box
Input power
24VDC±20%
Power
Power supply
7W
Consumption
parameter
Power isolation
Internal
Withstand voltage
500V AC
environmental
Working temperature: 0 ~ + 55 ℃, storage temperature: - 25 ~ 70 +℃, humidity: 5 ~
temperature and
95% RH, no condensation.
humidity
Vibration
10~57HZ amplitude 0.075mm, 57HZ 150HZ acceleration 1G, X, Y, Z 10 times in
resistance
triaxial direction
Impact
15G, 11 Ms, X, Y, Z, 6 times in the triaxial direction
Environmental
resistance
parameter
Insulation
500V DC between AC terminal and GND terminals , 5M Ω or more (all input / output
impedance
points to ground 500V DC)
Using
Anti-dust, moisture-proof, corrosion-proof, protection from electric shock and
environment
external force impact, etc.
Protection Level
The complete machine is subjected to a salt spray test of 48 hours
Serial COM port
The communication port is a isolated RS485 communication port
Hardware
Memory
EMMC Flash 256MB,DDR3 RAM 256MB
parameter
3 / 27
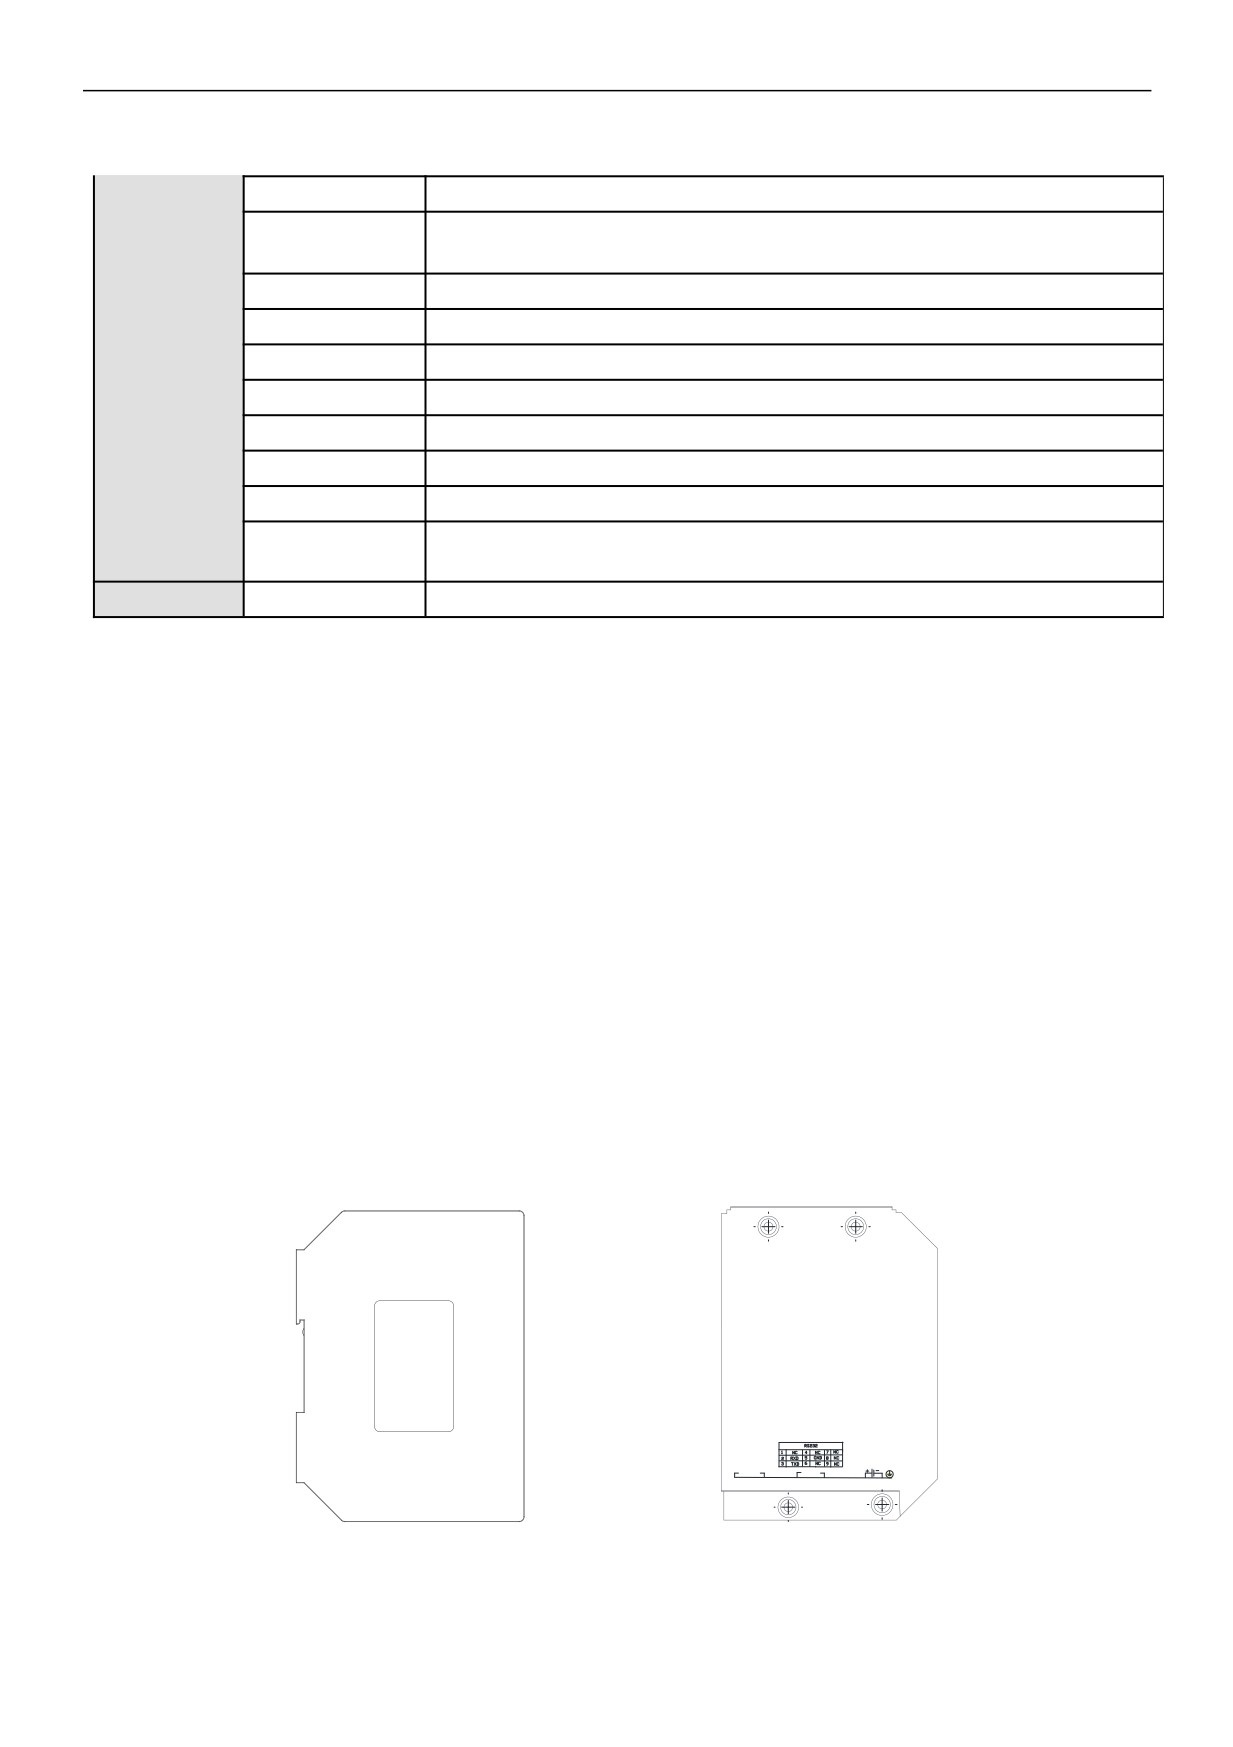
CPU
Processor: Cortex A7, Max Frequency 696MHZ
Communication
With 2 communication ports, COM1 (RS232), COM2 (RS485)
port
Ethernet
Ethernet port:2 * 10/ 100Base-Tx
USB interface
2*USB 2.0
Extended SD
1 * SD Card Slot
S
IM card
1 * SIM Card Slot
WIFI function
Support
4G(7 mode)
Optional
Dimension
50mm*120mm*88mm(Width*height*deep)
Engineering plastics ABC PC (flame retardant requirements: 94V0 grade, in line with
Shell material
ROHS requirements.
Certificate
CE certificate
Compliance with CE certification standard
1.3
Cloud Box Software
z
The Cloud Box needs to be used with the HTCloud Designer. Please download it via the download center of the official
website : www.hncelectric.com
z
HNC Cloud services can be used by visiting the website http://www.iotbus.net/, and it is recommended that you download
HNC Cloud APP.
z
HNC Cloud APP
“IoTBus” download:
9
Login and download from HNC Cloud website: www.iotbus.net/#/login?language=en
9
For iOS terminal, it can search and download "IoTBus"APP in Apple App Store.
9
Scan the QR code below to download.
1.4 Cloud Box appearance and interface diagram
WIFI
SIM
4G
A+ B- GND
24VDC
RS485
RS232
Left side sketch map of the Cloud Box Shell
Right side sketch map of the Cloud Box Shell
4 / 27
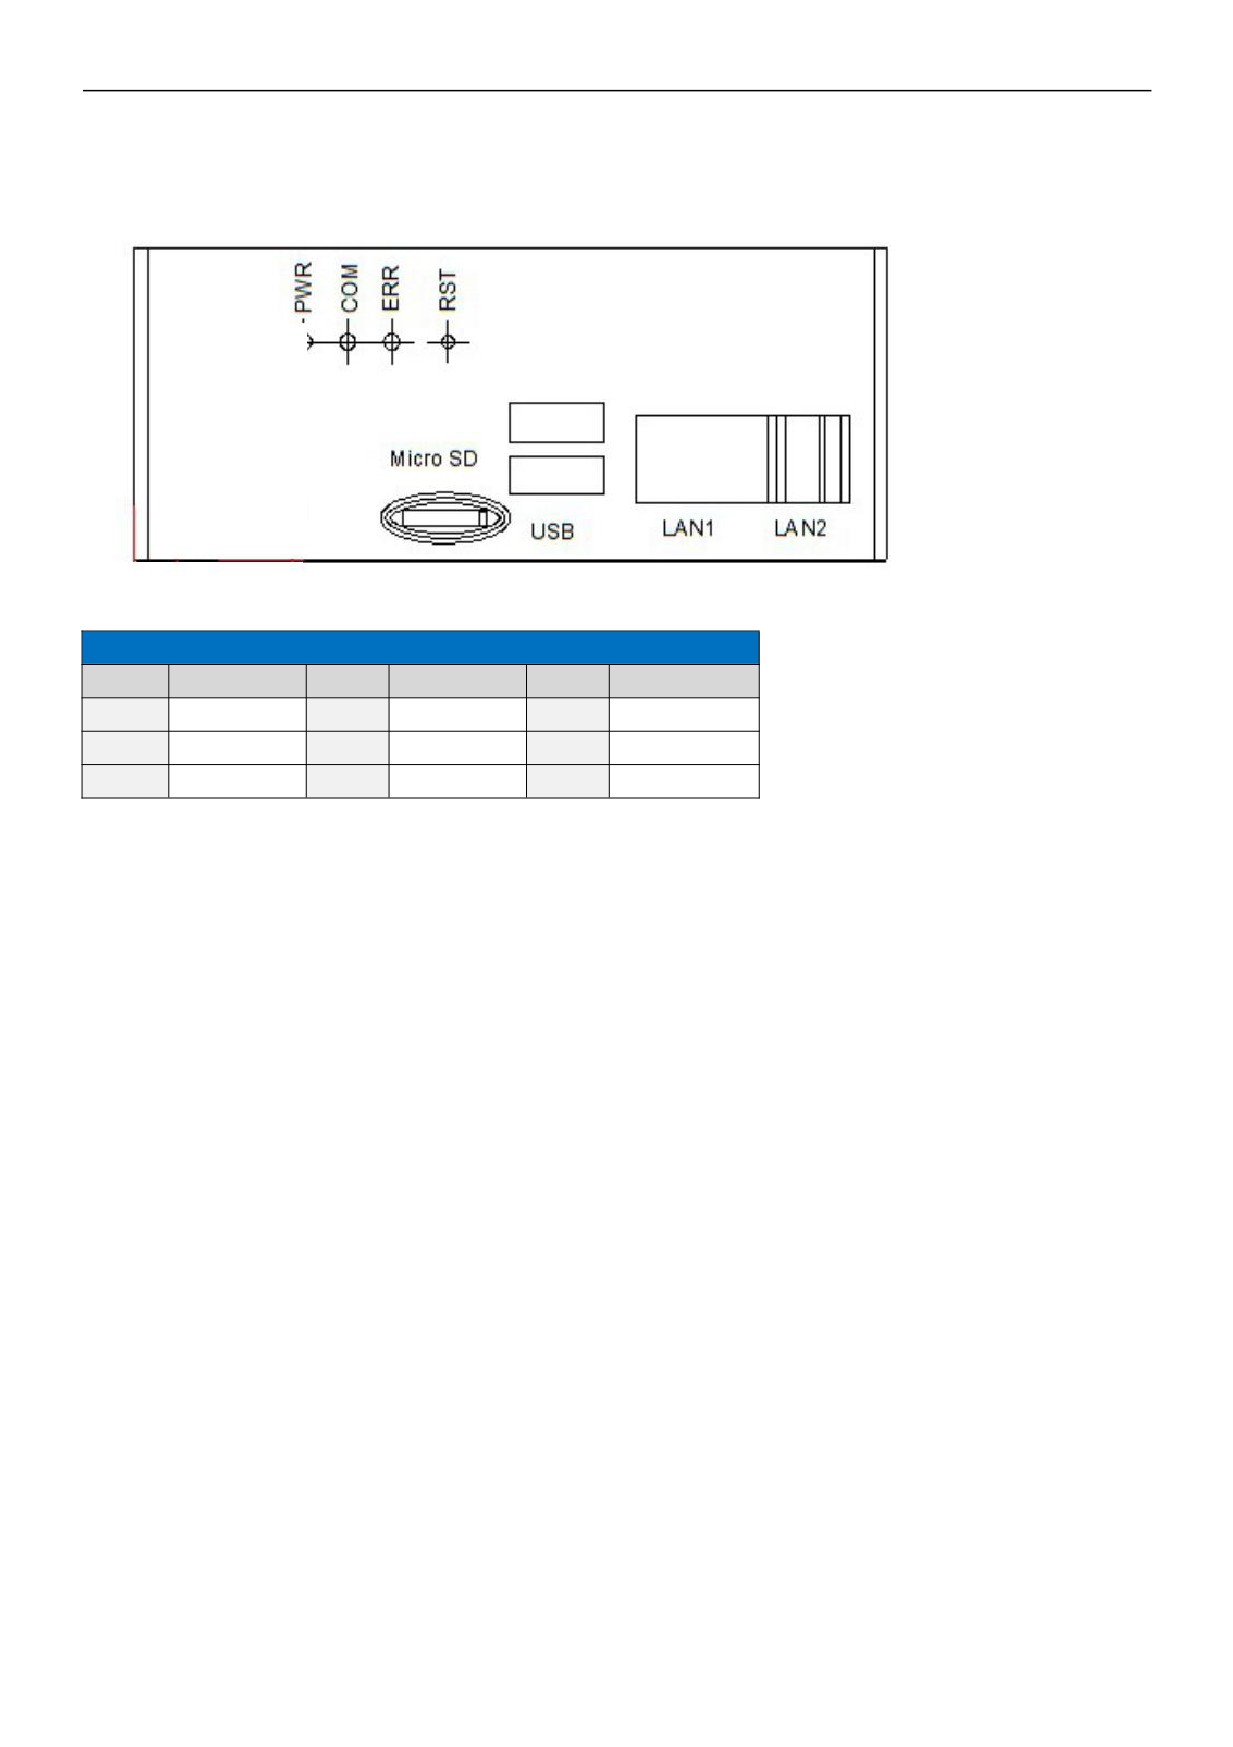
Cloud Box Interface sketch map:
COM1 DB9 Interface definition:
DB9 Interface definition:
Pin
Definition
Pin
Definition
Pin
Definition
1
NC
4
NC
7
NC
2
TXD
5
GND
8
NC
3
RXD
6
NC
9
NC
2. Software usage description
2.1 Mobile APP Quick Access to the Cloud Box
2.1.1 Cloud Box default Factory Information
z
The PN code can be found on the tag attached to the shell.
z
The Wi-Fi hots pot is turned on by default. The mobile phone can be connected to the device through WIFI.
z
The default hot spot name is BOX-(front 6 digits PN code)-(last 5 digits PN code). The default password is empty.
For example: PN code 18012630070100001, then hot spot name is BOX-180126-00001.
2.1.2 Mobile APP Connect Cloud Box Hot spot
Switch on the the mobile phone WIFI network to search the Cloud Box hot spot, the network signal show once connection
success.
2.1.3 Mobile APP access Cloud Box
After mobile phone connected to the Cloud Box hot spot successfully, open cloud APP, choose "local device", drop-down to
refresh, till Cloud Box device information show.
5 / 27
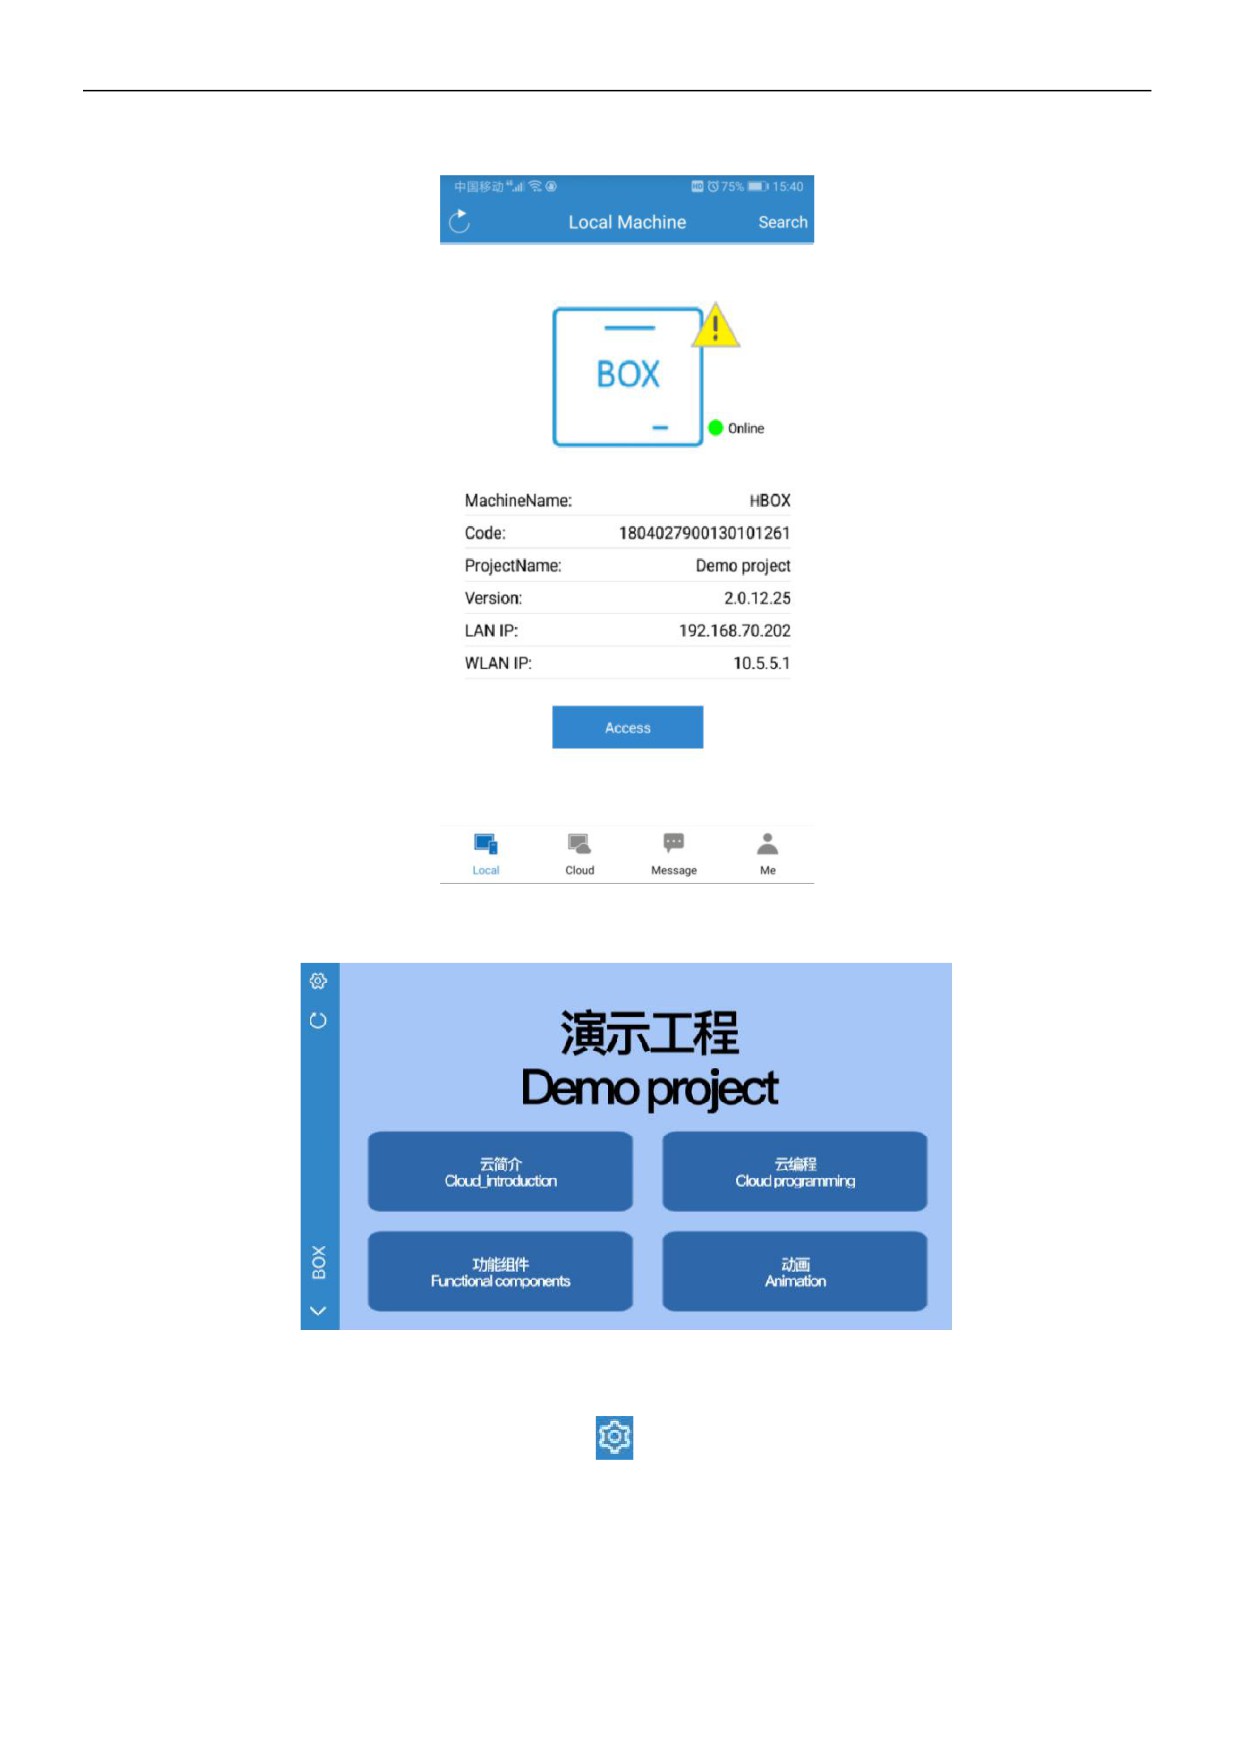
Click to access, enter the Cloud Box project interface.
2.1.4 Cloud Box background settings through mobile APP
Enter the project interface of access Cloud Box, click
, you can enter the background setting interface of Cloud
Box and set the background information.
6 / 27
2.2 Cloud access
z Cloud binding machine owner
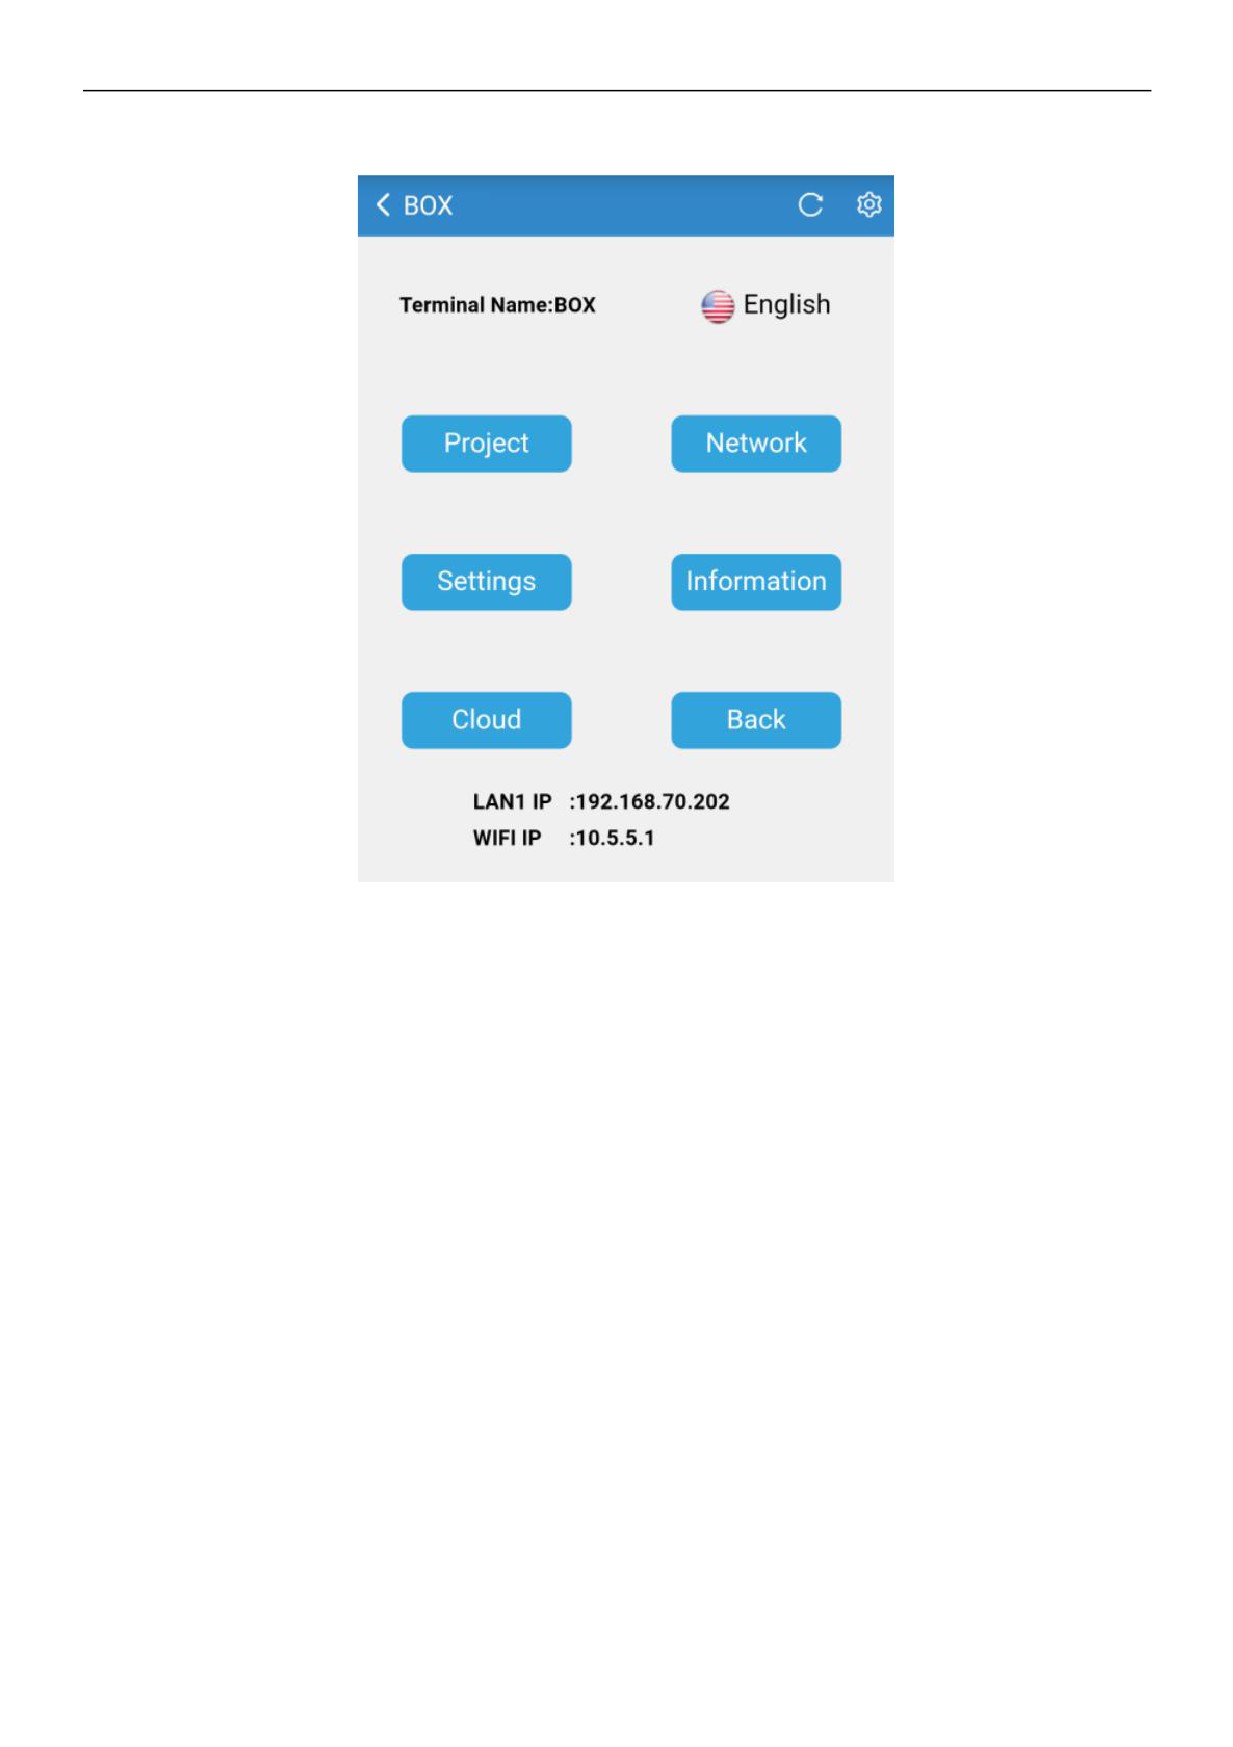
2.2.1 Connect hots pot to bind machine owner
Both Cloud Box and Cloud Box-G (with 4G routing function) can be connected to the Internet through a network cable
connection. Cloud Box-G can also be connected to the Internet by inserting a mobile phone card and turning on 4G wireless
routing. You can search for the local machines in cloud app after mobile phone connecting to Cloud Box hots pot, and display
Cloud Box device which connected to hots pot, then enter Cloud Box background setting interface, click [cloud], then click
[Device Bind], the binding Information confirmation prompt box is displayed then click [OK] to bind as owner successfully or
click [Cancel] to unbind as owner.
7 / 27
2.2.2 Scan QR code binding machine owner
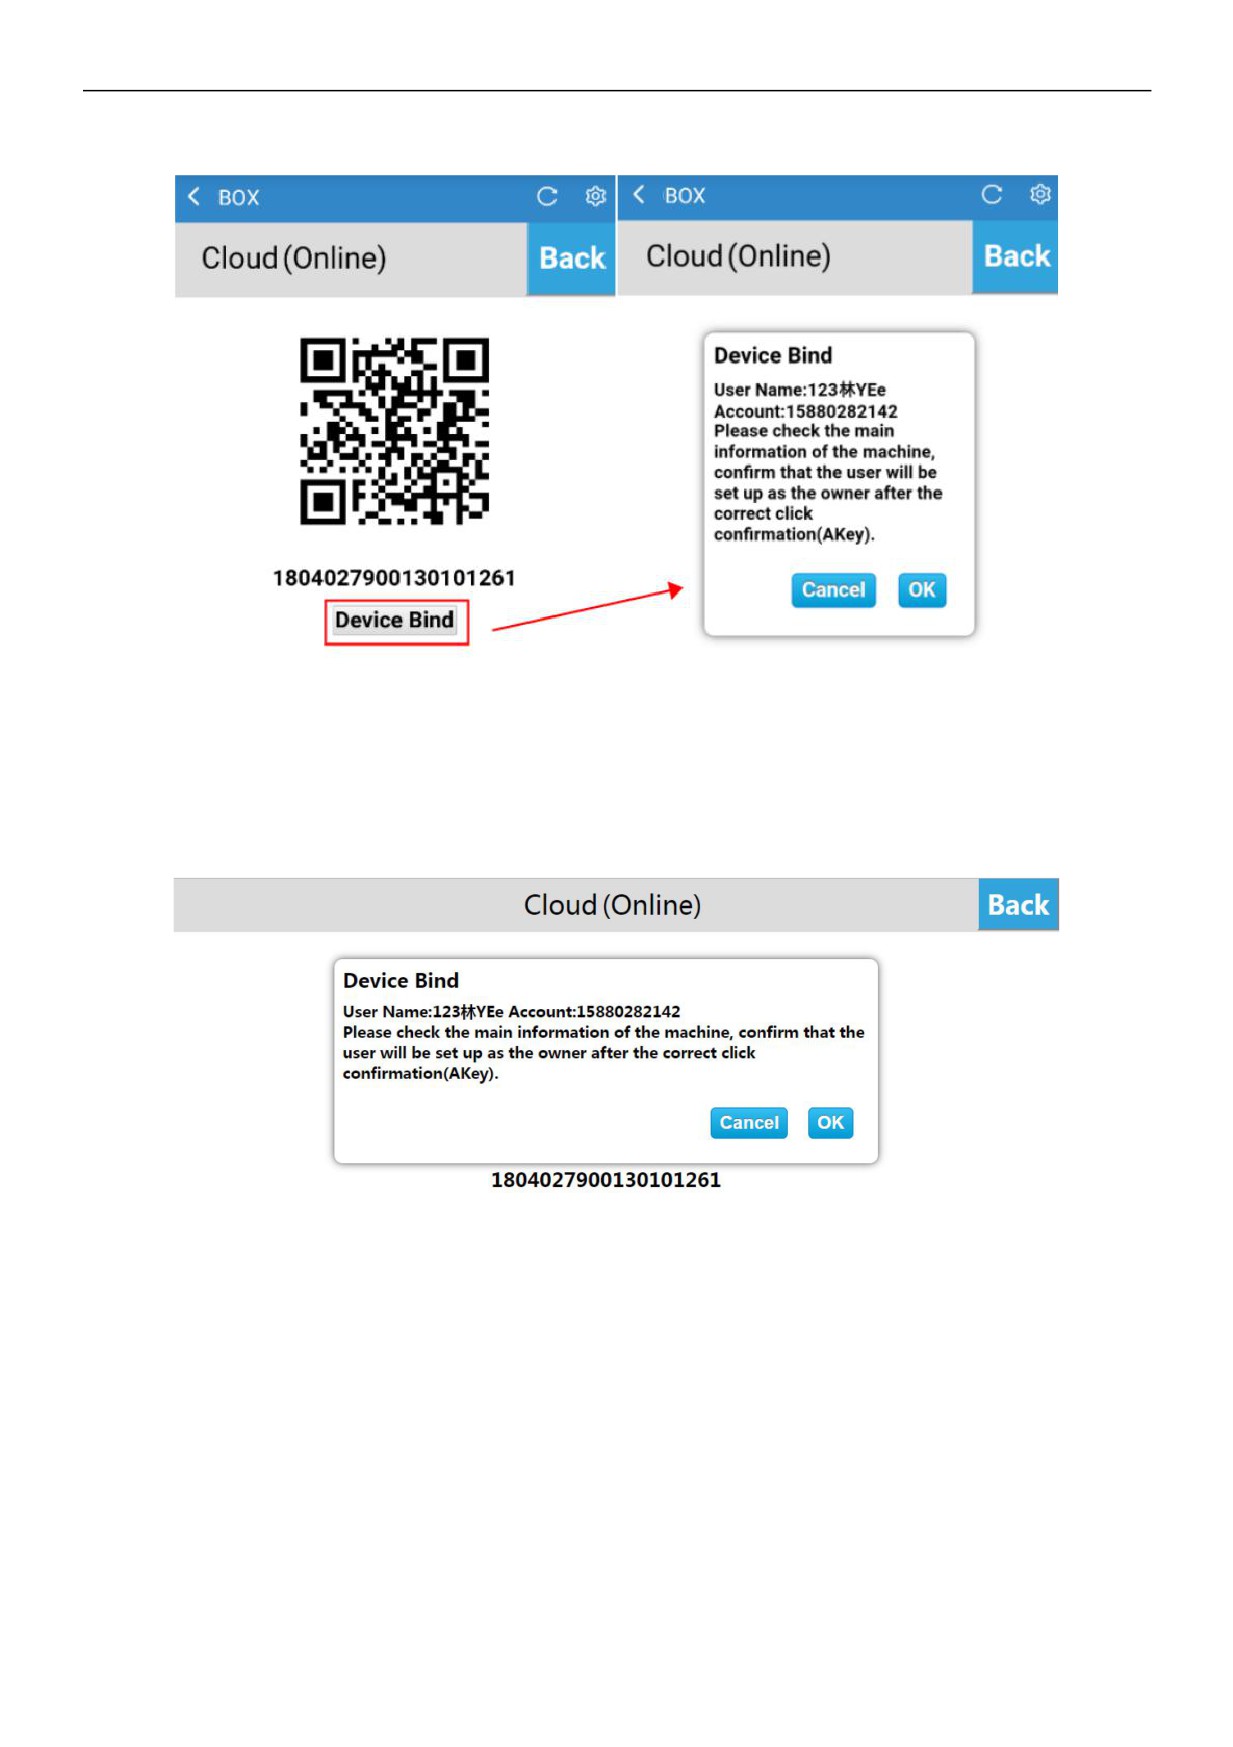
After the Cloud Box connected to the Internet, enter the [Cloud] interface to scan the QR code, click the button in the upper
left corner of the main interface on the cloud APP, and scan the QR code to add the device. The cloud setting interface pops
up the device bind confirmation prompt box, click [OK] to bind the owner successfully,click [Cancel] to cancel the binding as
the owner. Then click to return to the cloud app.
8 / 27
z
Normal users
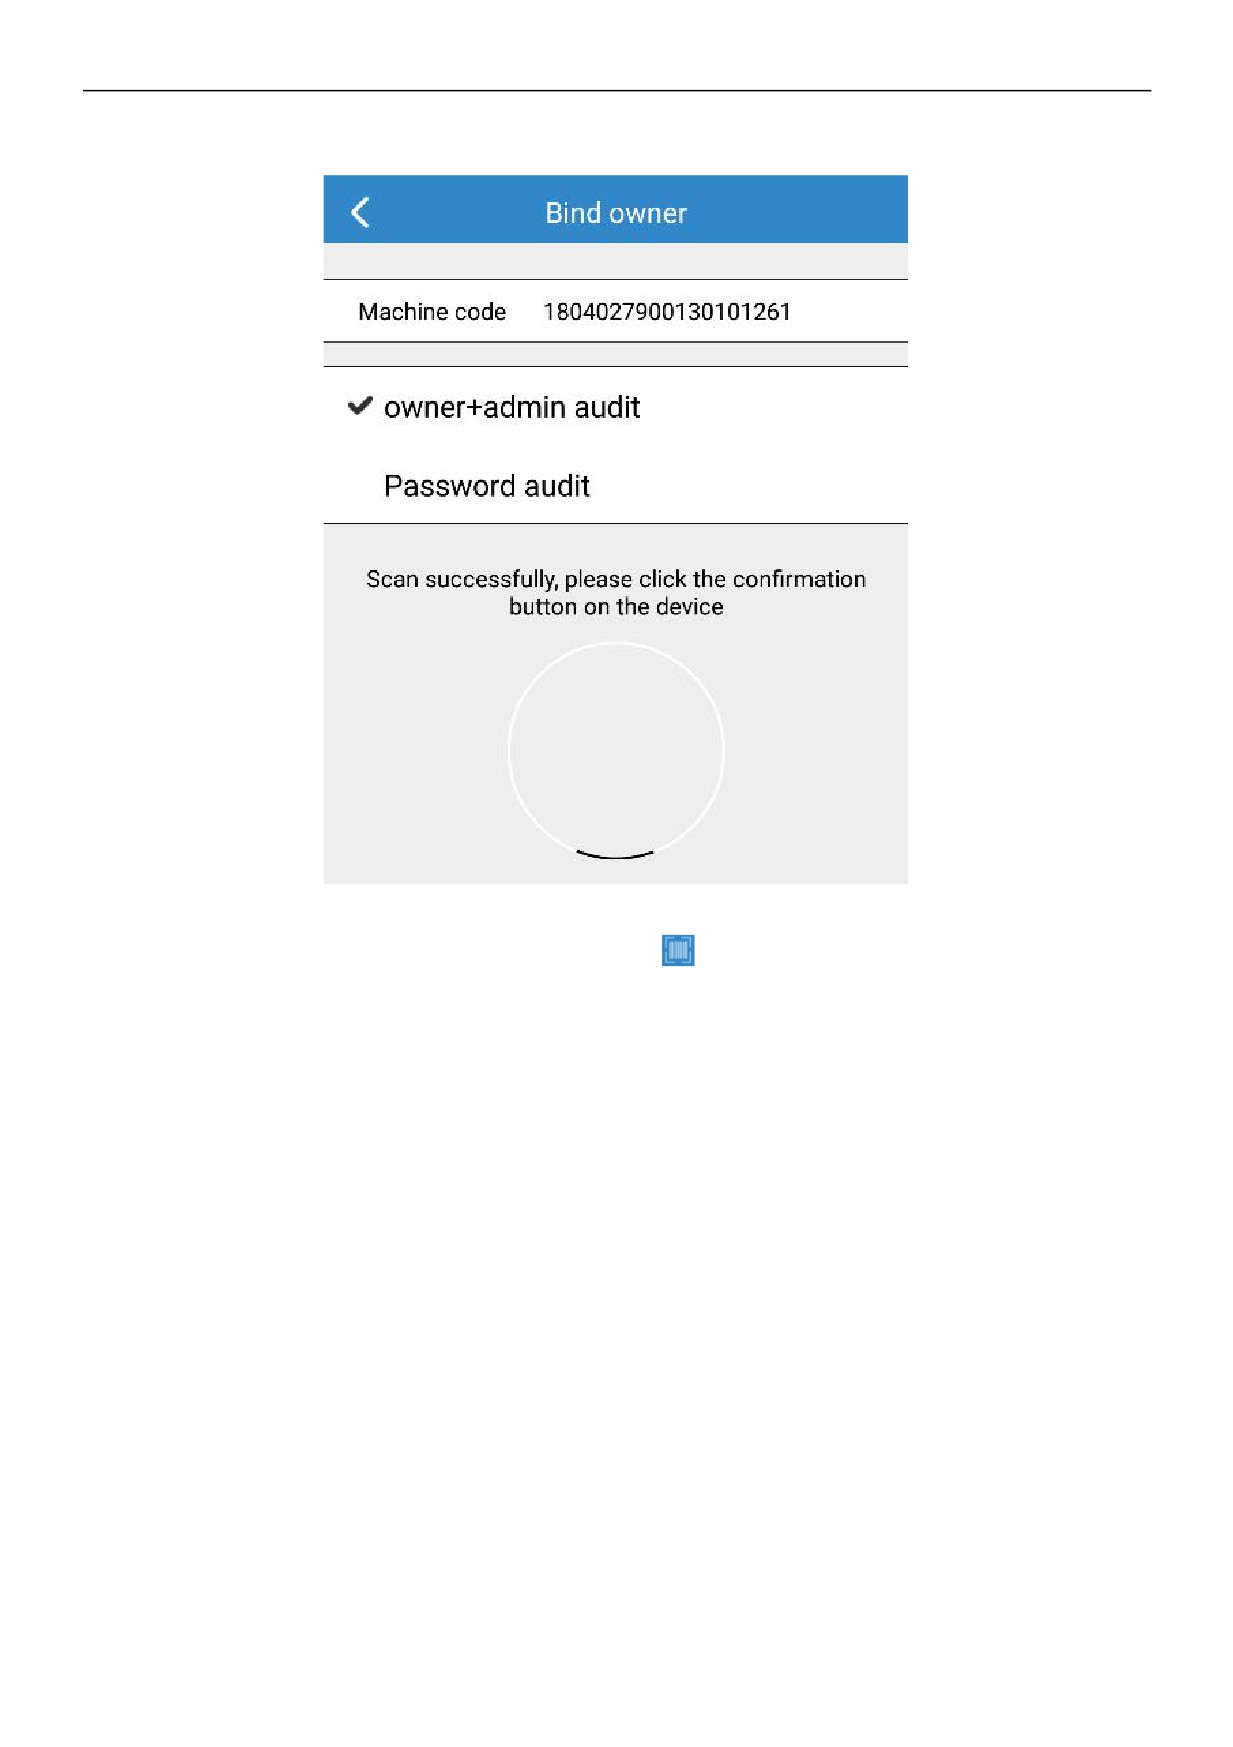
Log in the cloud app, enter the [Cloud] interface, click the button
in the upper left corner of the main interface, scan the
QR code and add the device.
z
Binding white-list
After a normal user adds a device and apply for binding, also the application is approved, it can become a white-list.
The binding application needs to be approved by the auditor. The auditor is the owner and any administrator. Only when all of
them pass, the audit is passed. If one of them refuses, the audit will not be passed.
z Binding visitors
After applying for binding, you can apply for access devices. After the application is approved, then you will become a visitor.
Visitors have time limit.
The access application needs to be approved by the auditor. The auditor is the owner or any administrator. Only when one of
them pass, the audit is passed. If all of them refuse, the audit will not be passed.
z
Administrator
1. When applying for binding, the machine owner can select the mode of "owner+administrator" , then the applied account
can become the administrator of the device.
2. The owner can select the non-administrator and owner account in the device management interface, also can long press
and pop-up menu bar, click to upgrade to administrator, then the account becomes administrator.
z
Visitors
The owner can select the administrator account in the device management interface, long press and pop-up menu bar, click
to upgrade to administrator, then the account becomes administrator.
9 / 27
z Cloud access
Visitors, administrators, and machine owner can click [Cloud] to enter the device interface and click [access] to access the
project.
2.3 Reset
During the use of the device, you can restore the Cloud Box to the initial state by restoring the factory settings. The operation
method is as follows:
Click on the RST button of the Cloud Box and hear the “beep” sound, indicating that the button is normal.
z
Reset network configuration
Reset the network configuration and the password of entering the system settings interface as initial state.
Step: Press and hold the [RST] button for 5 seconds, the three lights flash slowly, enter the network configuration reset mode, release
the [RST] button, wait for the buzzer to make a “beep” sound, then the reset can be successful.
z
Reset factory settings
Reset the network configuration and the password of entering the system settings interface to initial state; reset all the
information of system settings to the initial state.
Step 1: Press and hold the [RST] button 5 seconds, the three lights flash slowly, enter the factory reset network configuration
mode, release the [RST] button;
Step 2: After releasing the [RST] button, press the [RST] button 3seconds again in 3 seconds, the three lights flash quickly,
enter the factory reset mode, release the [RST] button, and the buzzer sounds 3 beeps. , can be restored successfully.
2.4 Cloud Box connection settings
Cloud Box communicates with PLC through RS232 serial port, RS485 serial port or Ethernet. In hardware connection
process, it will briefly introduce Cloud Box-G to communicating with PLC through RS232 serial port, and connecting static
Ethernet network.
2.4.1 Notes and hardware installation steps
z
Notes
①The installation direction must be in accordance with the provisions of this manual, strictly in accordance with the direction
of the terminal wiring, otherwise it will cause product failure or burnout.
②The product and other components on the bottom must be kept in sufficient space to avoid equipment damage caused by
poor heat dissipation.
z
Hardware installation steps
Rail mounting: Use a standard of 35mm rail.
10 / 27
2.4.2 Hardware wiring
z Device connection power
Cloud box, PLC connected to the power supply.
z Device connection
Connect the Cloud Box's COM-232 interface to the PLC's RS232 interface;
2.4.3 Connect Network
The factory default IP address is “192.168.1.112”。
Step 1: Connect the mobile phone or computer to the cloud box hot spot. After connecting the hot spot successfully, access the
cloud box trough the local device of IoTBus APP. Click
access the background setting interface; or access the Cloud Box
through the browser on PC, input “192.168.1.112/setting” to access the background setting interface;
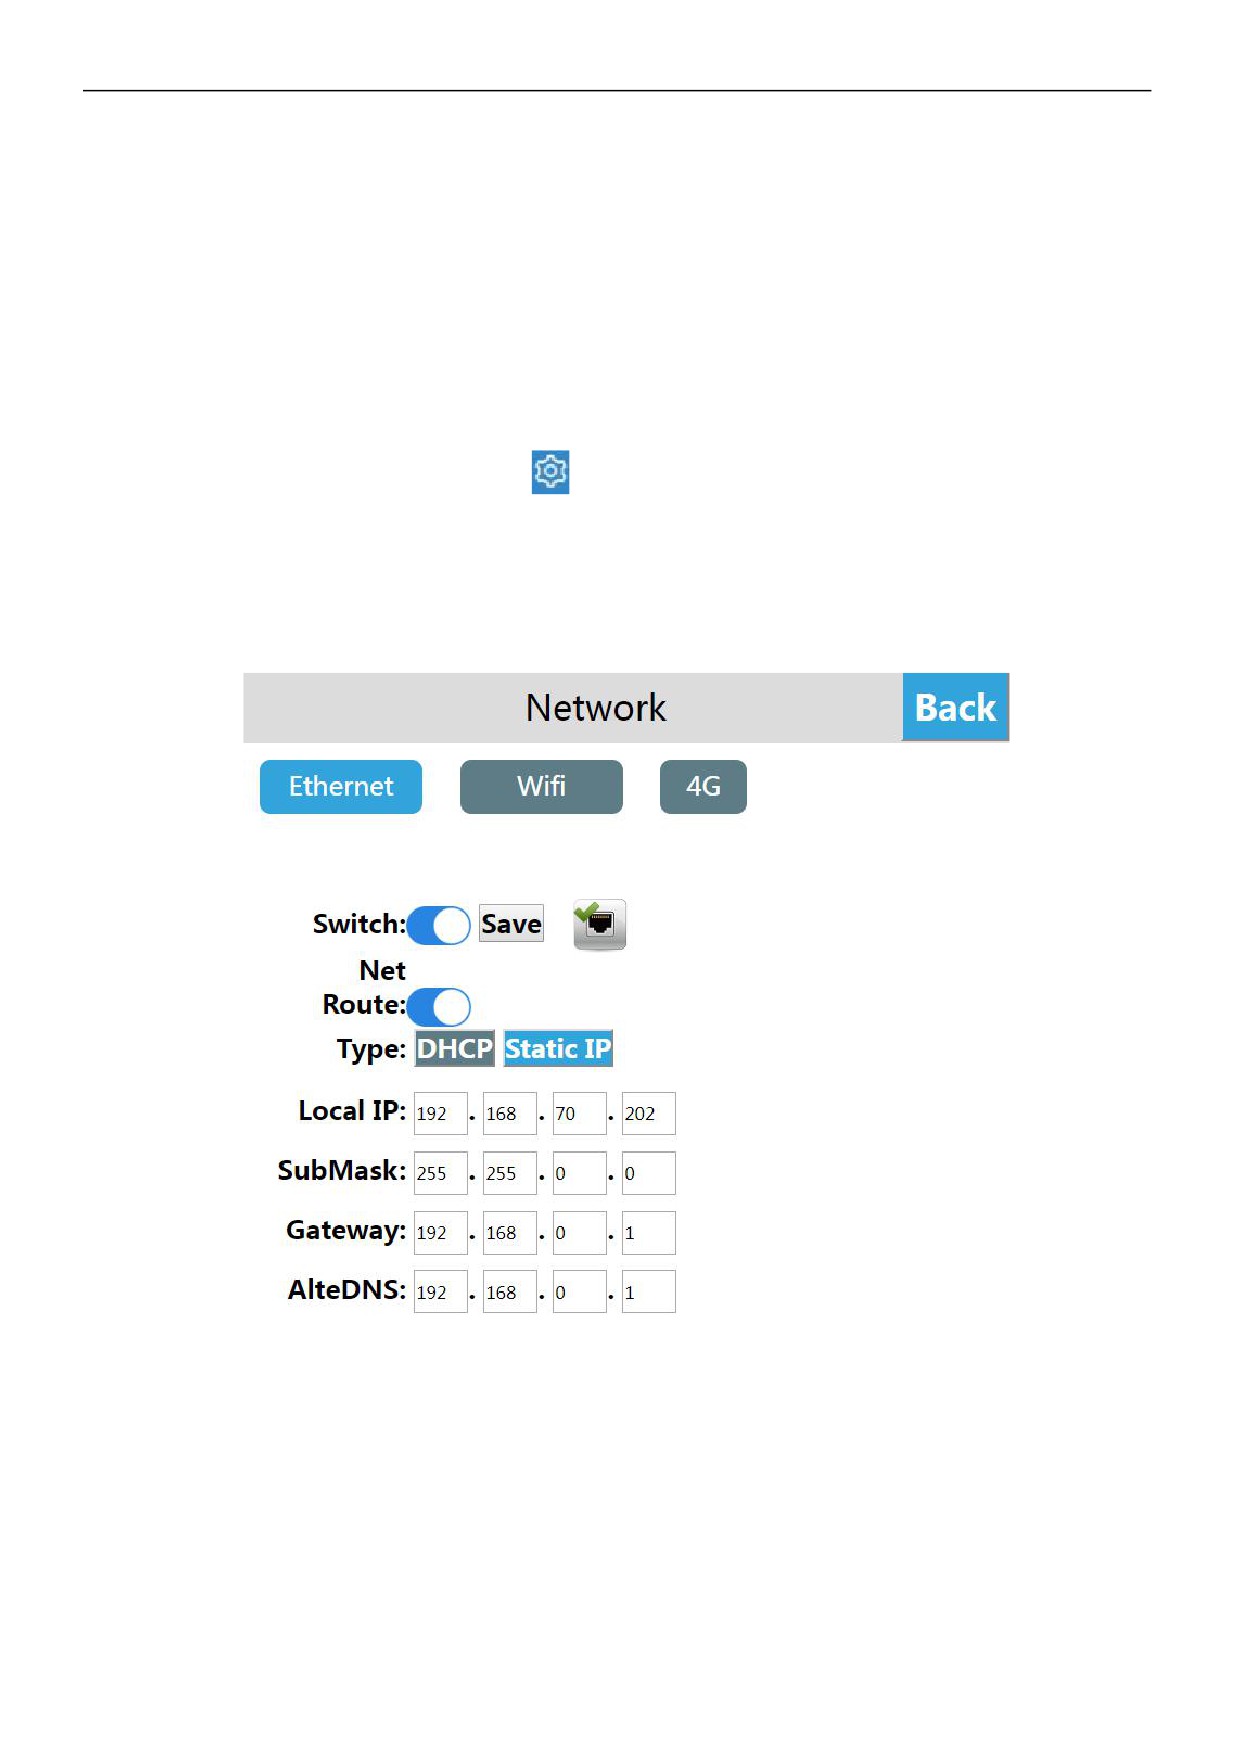
Steps: 2: Click [Network] to access the Ethernet setting interface;
Step 3: Select [Static IP] or [DHCP] as needed.When [Static IP] is selected for the network type, set the network parameters: input
the correct IP address, subnet mask, default gateway and DNS, click [Save]
2.5 Project operation
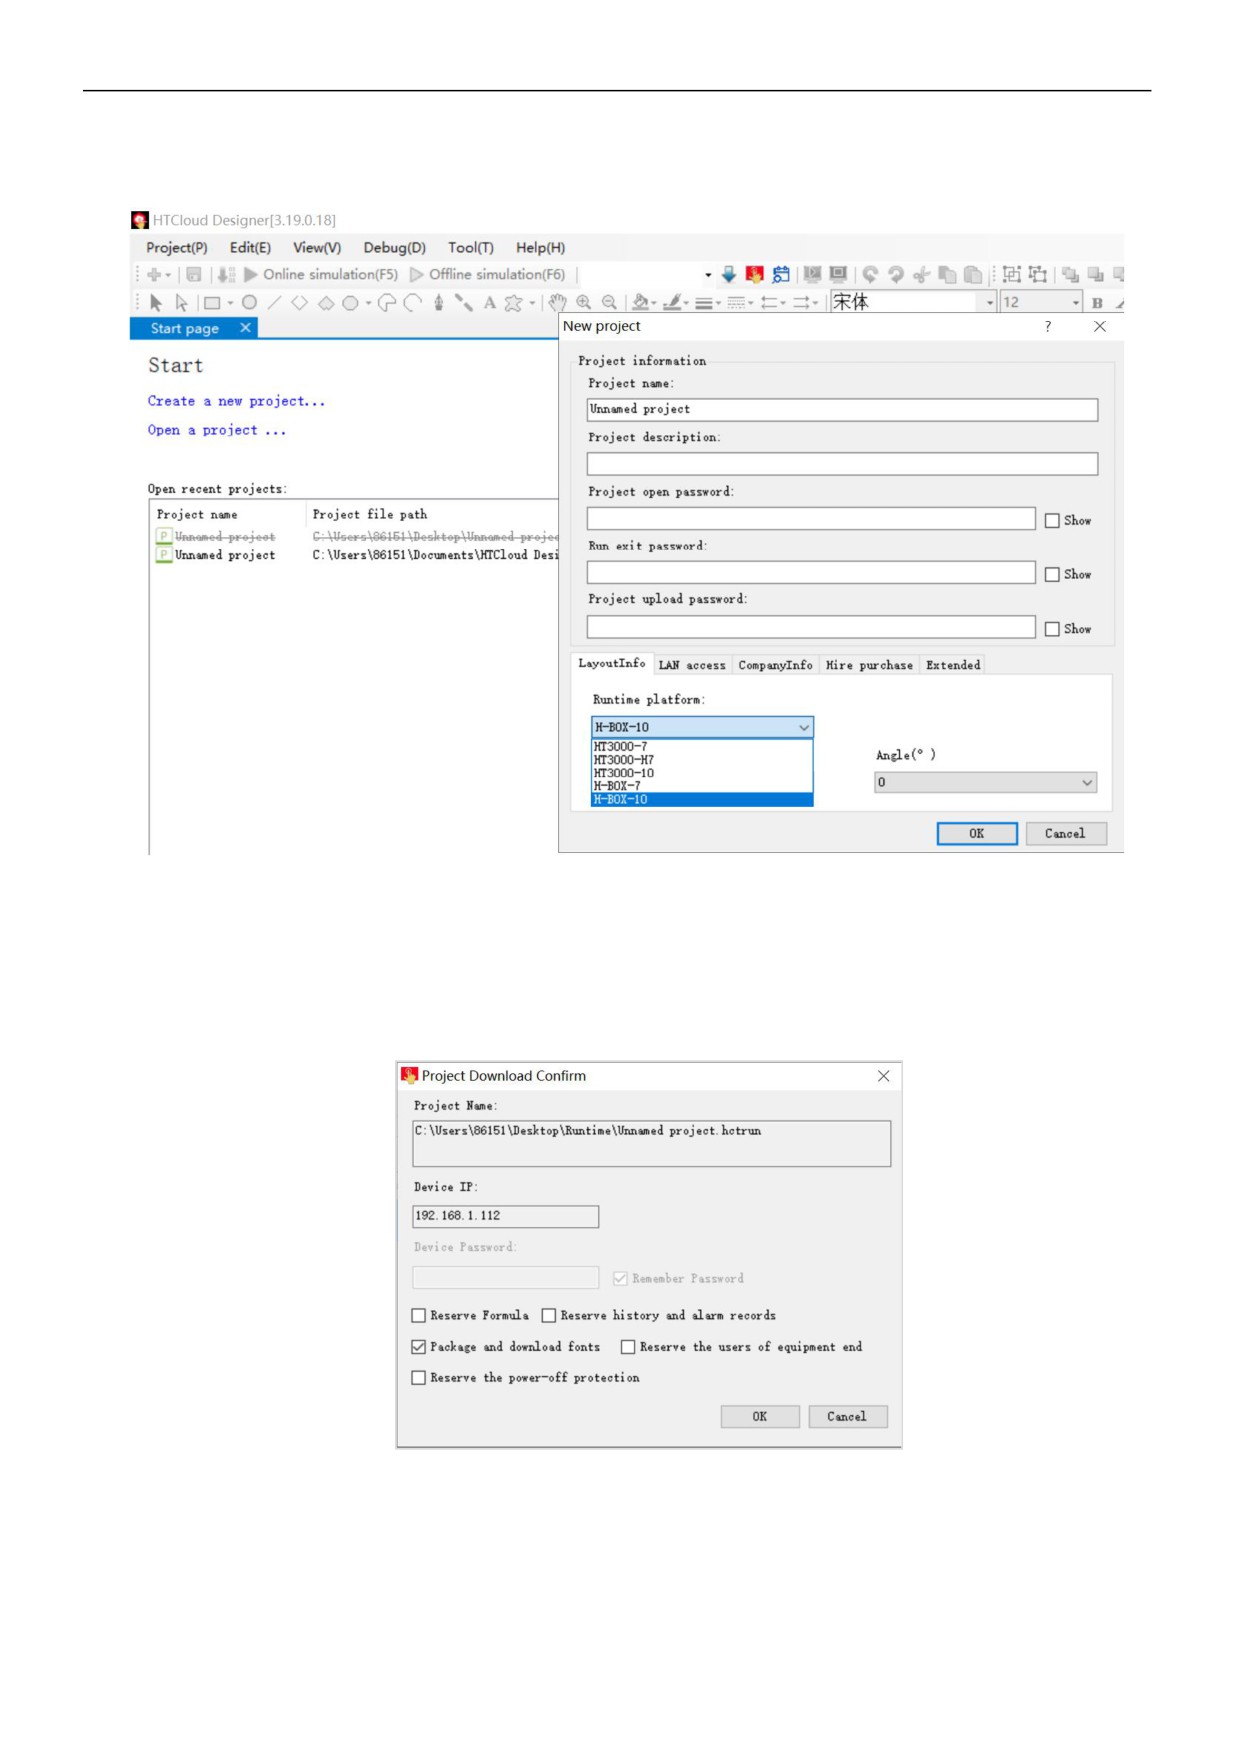
z Select device model
Step 1: Open the HTCloud Designer and create a new project;
Step 2: Expand [Project Configuration] in the Project Browser, and click [Project Properties] to enter the project property
configuration interface.
Step 3: Select the running platform in the [Layout Info] column. Since Cloud Box supports H-Box-7 or H-Box-10, the project
type of this example is H-Box-10. So choose H-Box-10. Click [Save].
11 / 27
z Download project
Project Step 1: Enter the device manager, you can choose to use the local manager or cloud manager;
Step 2: Click [Download Project] to enter the confirmation download interface.
Step 3: In the confirmation download interface, you can choose whether to keep the history and alarm records, whether to keep the
recipe and whether to package the font download. After the setting is completed, click [OK];
Step 4: Wait for the pop-up prompt "Download successful!", click [OK] to run the project on the device
z Operational project
After the project is successfully downloaded, wait for the Cloud Box to reboot. After the reboot is successful, the start up screen
is automatically displayed. The user can access the Cloud Box and operate the project through the HNC cloud application or
browser.
12 / 27
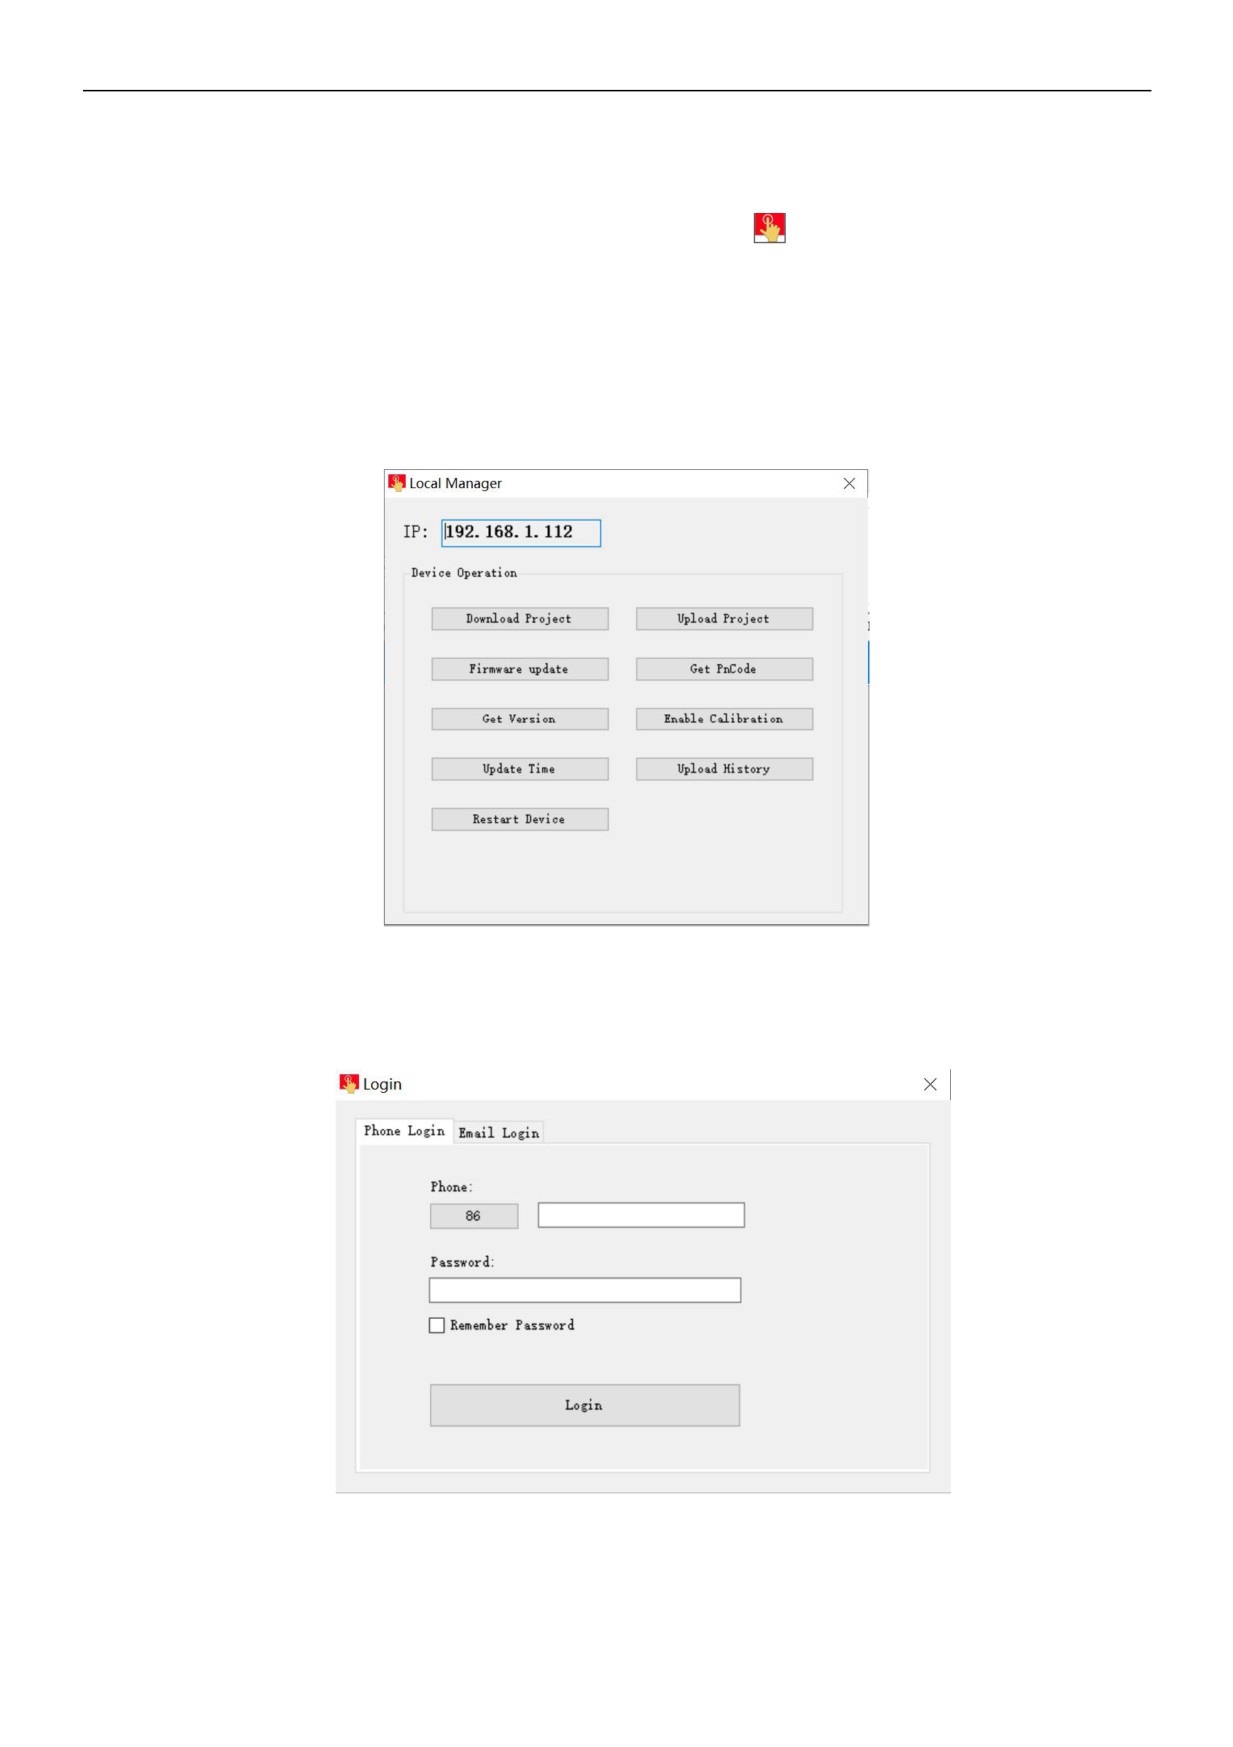
2.6 Device Manager
Open the configuration design of the computer, click the device manager icon
in the menu bar to enter the device
manager; or click [Programs], expand the [HTCloud Designer] installation file, and click [HTCloud Manager] to enter the device
manager. Support local operations and cloud management to effectively perform operations on Cloud Box
2.6.1 Entering the Device Management Interface
z Local manager
Enter the device manager, click [Local ManageR, select the device according to the IP address set by the device, click
[Manage], enter the current device manager, you can operate the current device, as shown below:
z Cloud Manager
Step 1: Enter the device manager and click [Cloud Manager] to select the phone login and email login. Tip: Device
administrators and owners can manage current devices through the cloud manager. Normal users do not have device
management rights.
13 / 27
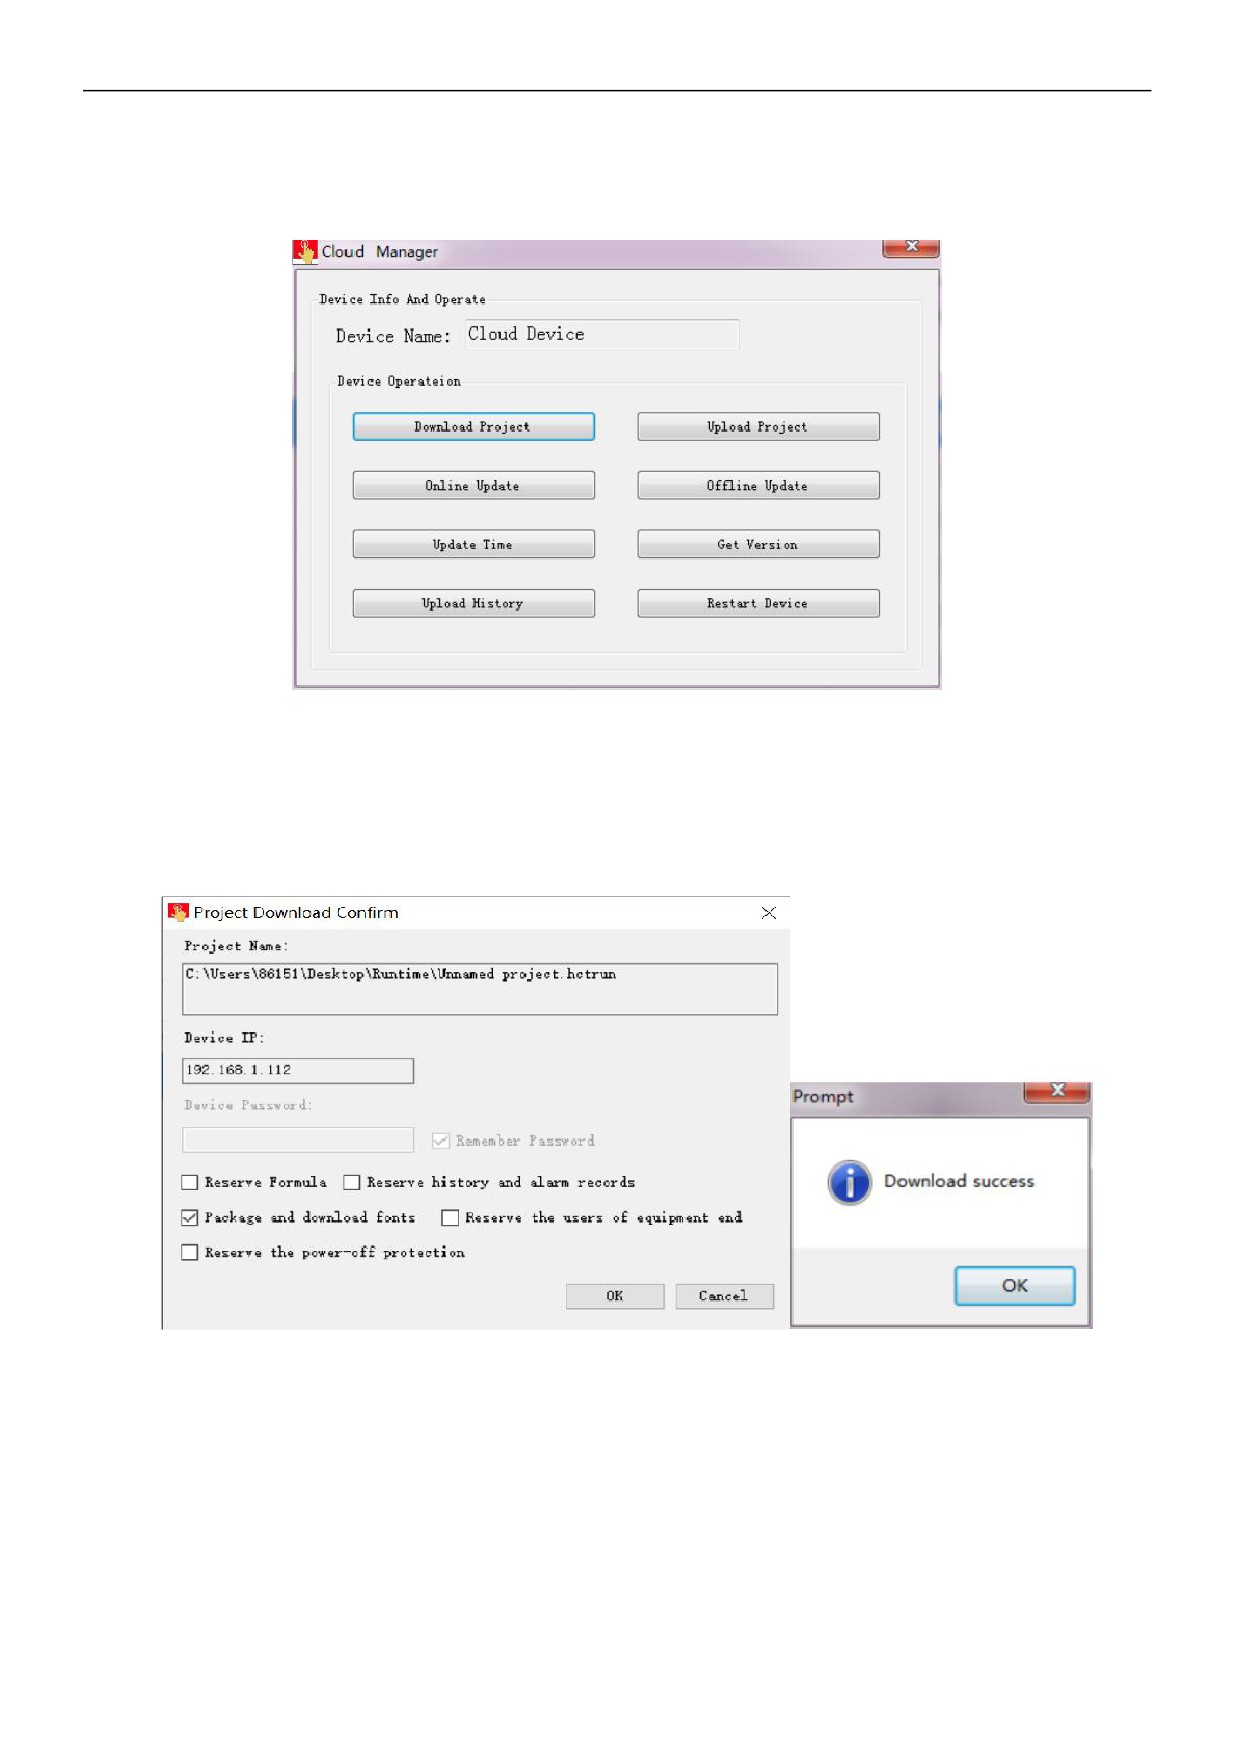
Step 2: The user enters the correct account number and password. Click [Login] to enter the device manager, select the
device, click [Manage], enter the current device manager, and operate the current device, as shown below:
2.6.2 Performing Device Management
z Download project
Step 1: Click [Download Project] to enter the confirmation download interface.
Step 2: In the confirmation download interface, you can choose whether to keep the history and alarm records, whether to keep the
recipe and whether to package the font download. After the setting is completed, click [OK];
Step 3: Wait for the pop-up prompt “Download success!”, click [OK] to run the project on the device.
z Upload project
Step 1: Click [Upload Project], select the project upload path and project name, and click Save.
Step 2: Enter the project upload confirmation page. If the project settings upload password, you need to enter the upload
password in [Project Upload Password]; if the project does not set the upload password, you do not need to enter the password
here;
Step 3: Click [Upload], wait for the pop-up prompt "Project uploading success", click [OK], you can run the project on the device
on the PC side.
14 / 27
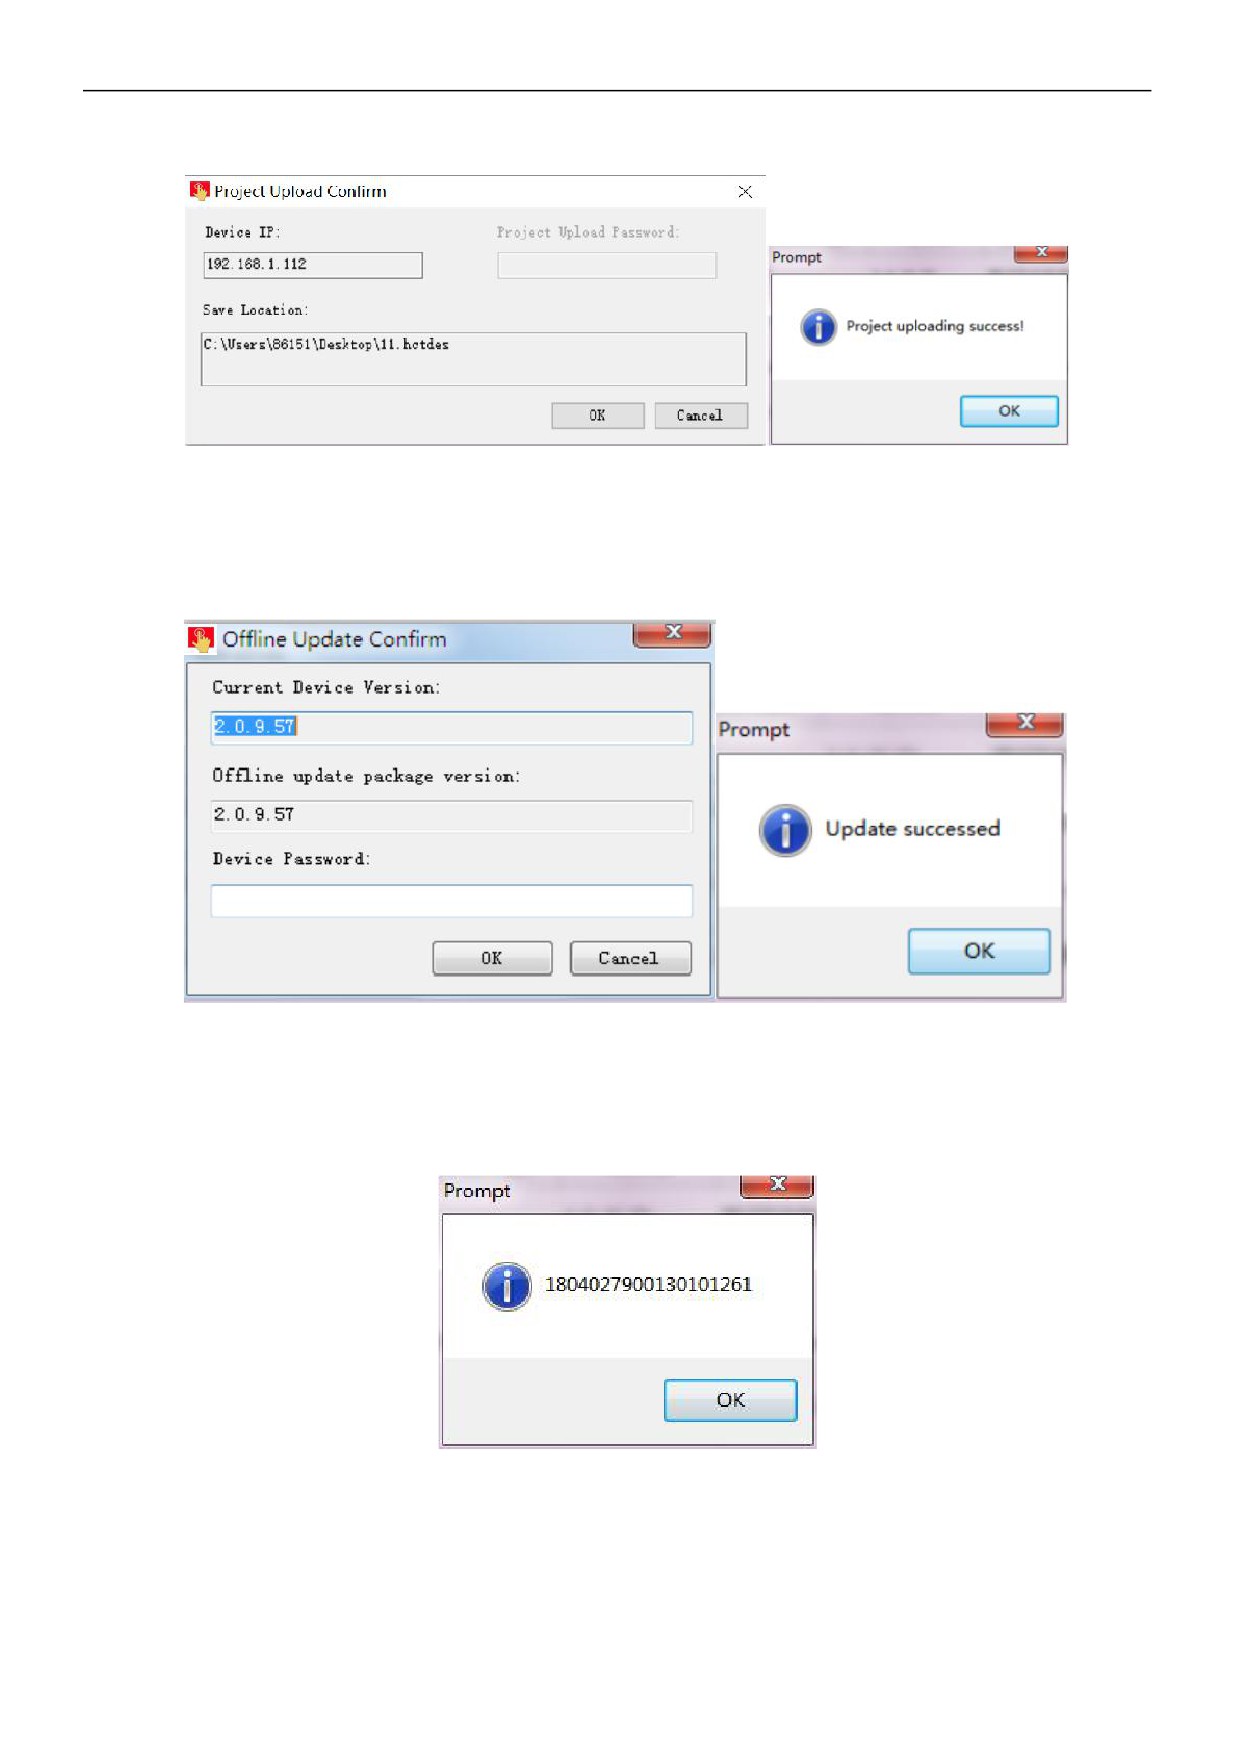
z Offline update
Step 1: Click [Offline Update], select the firmware package, and click [Open];
Step 2:Enter the offline update confirmation page and click [Update];
Step 3: Wait for the update to complete, the prompt box "Update Succeed" pops up, click [OK].
z Update device time
Click [Update Device Time] to update the system time of the device. After the update is successful, check the device time. The
time is the same as the system time on the PC.
z Get the PN code
Click [Get PN Code] to view the PN of the current device.
15 / 27
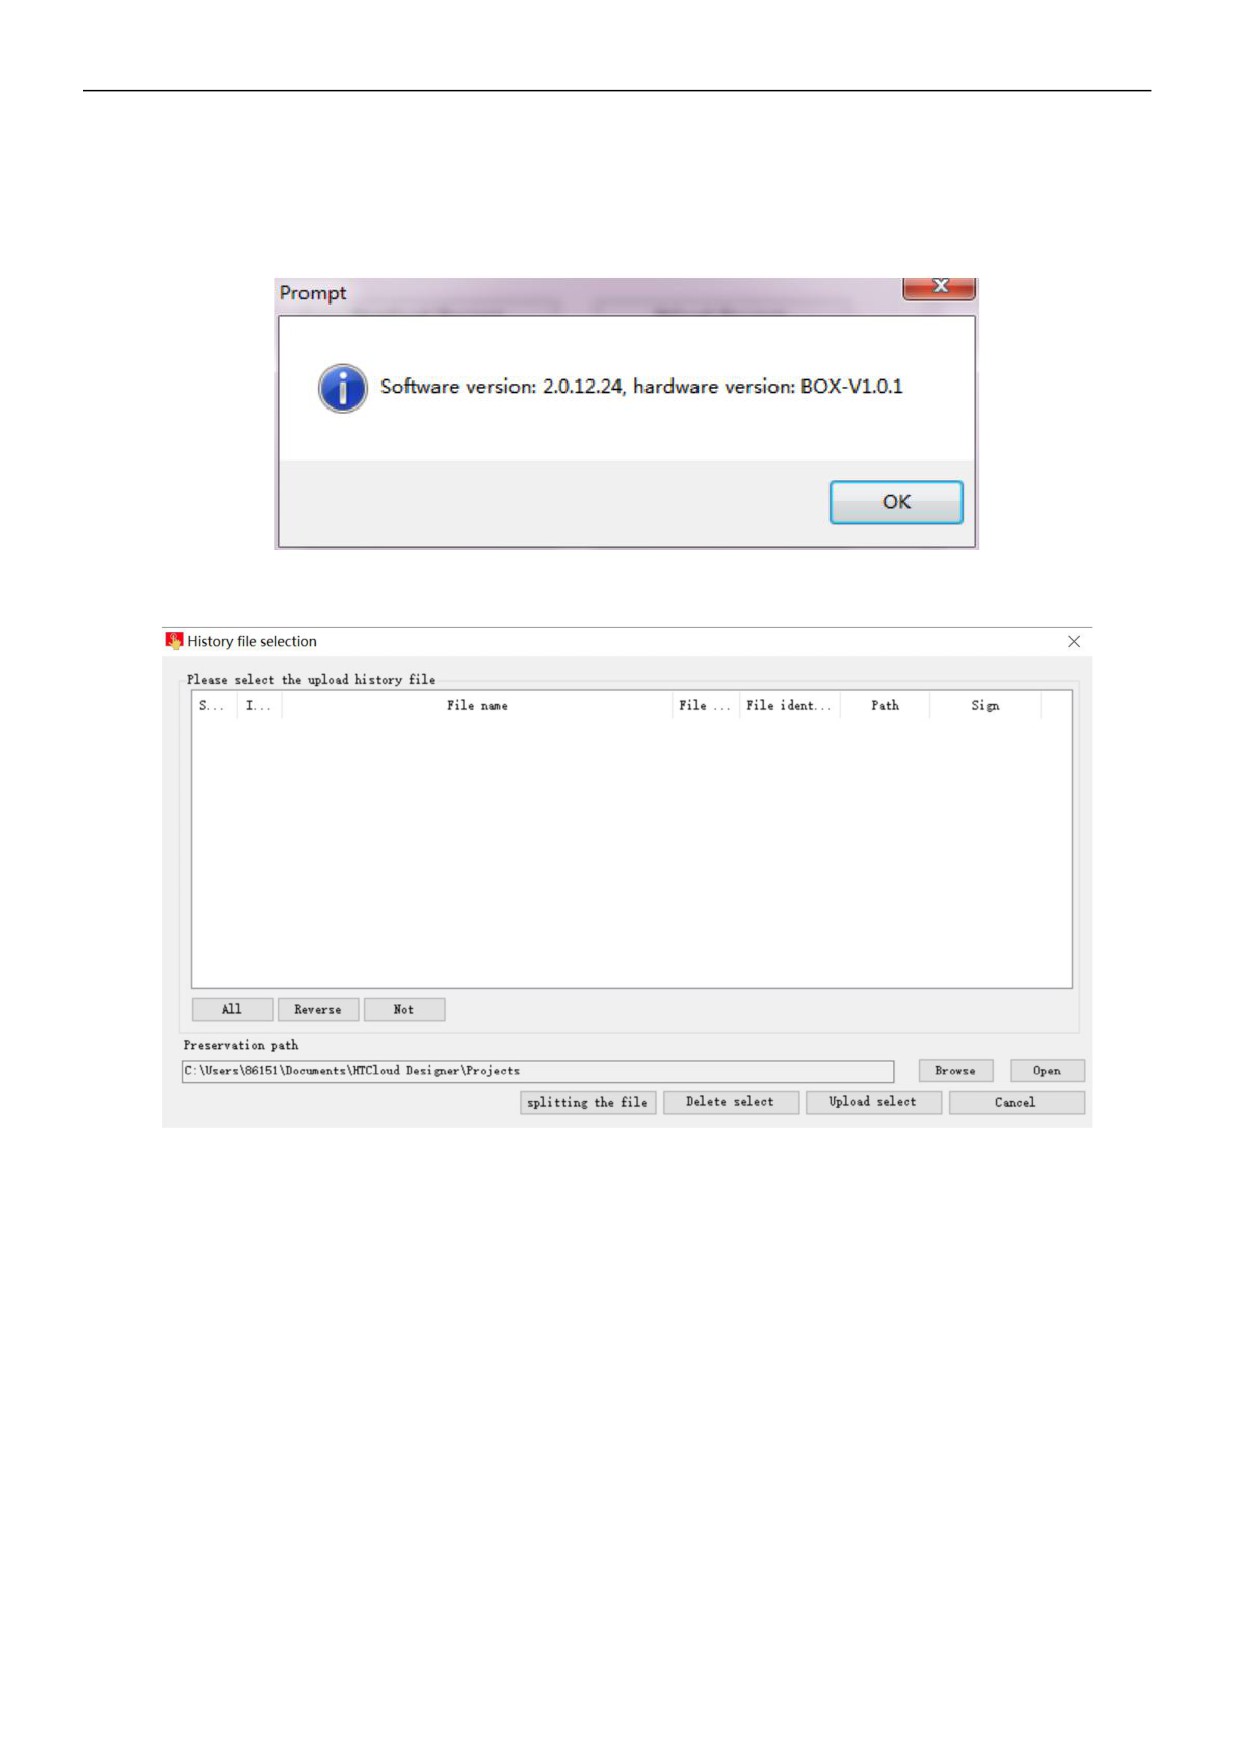
z Detecting device version
Click 【Detecting device version】. It can to check the software and hardware information of device currently.
z History record upload
Click [history record upload]. enter the history record upload interface.
① Split the history file
Step 1: click [splitting the file], it can split the history record file for most recent period of time.
Step 2: waiting for history record file successfully and pop up the “ split success” prompt box. Then click the [OK], there will
add new split history file currently in history record file list.
16 / 27
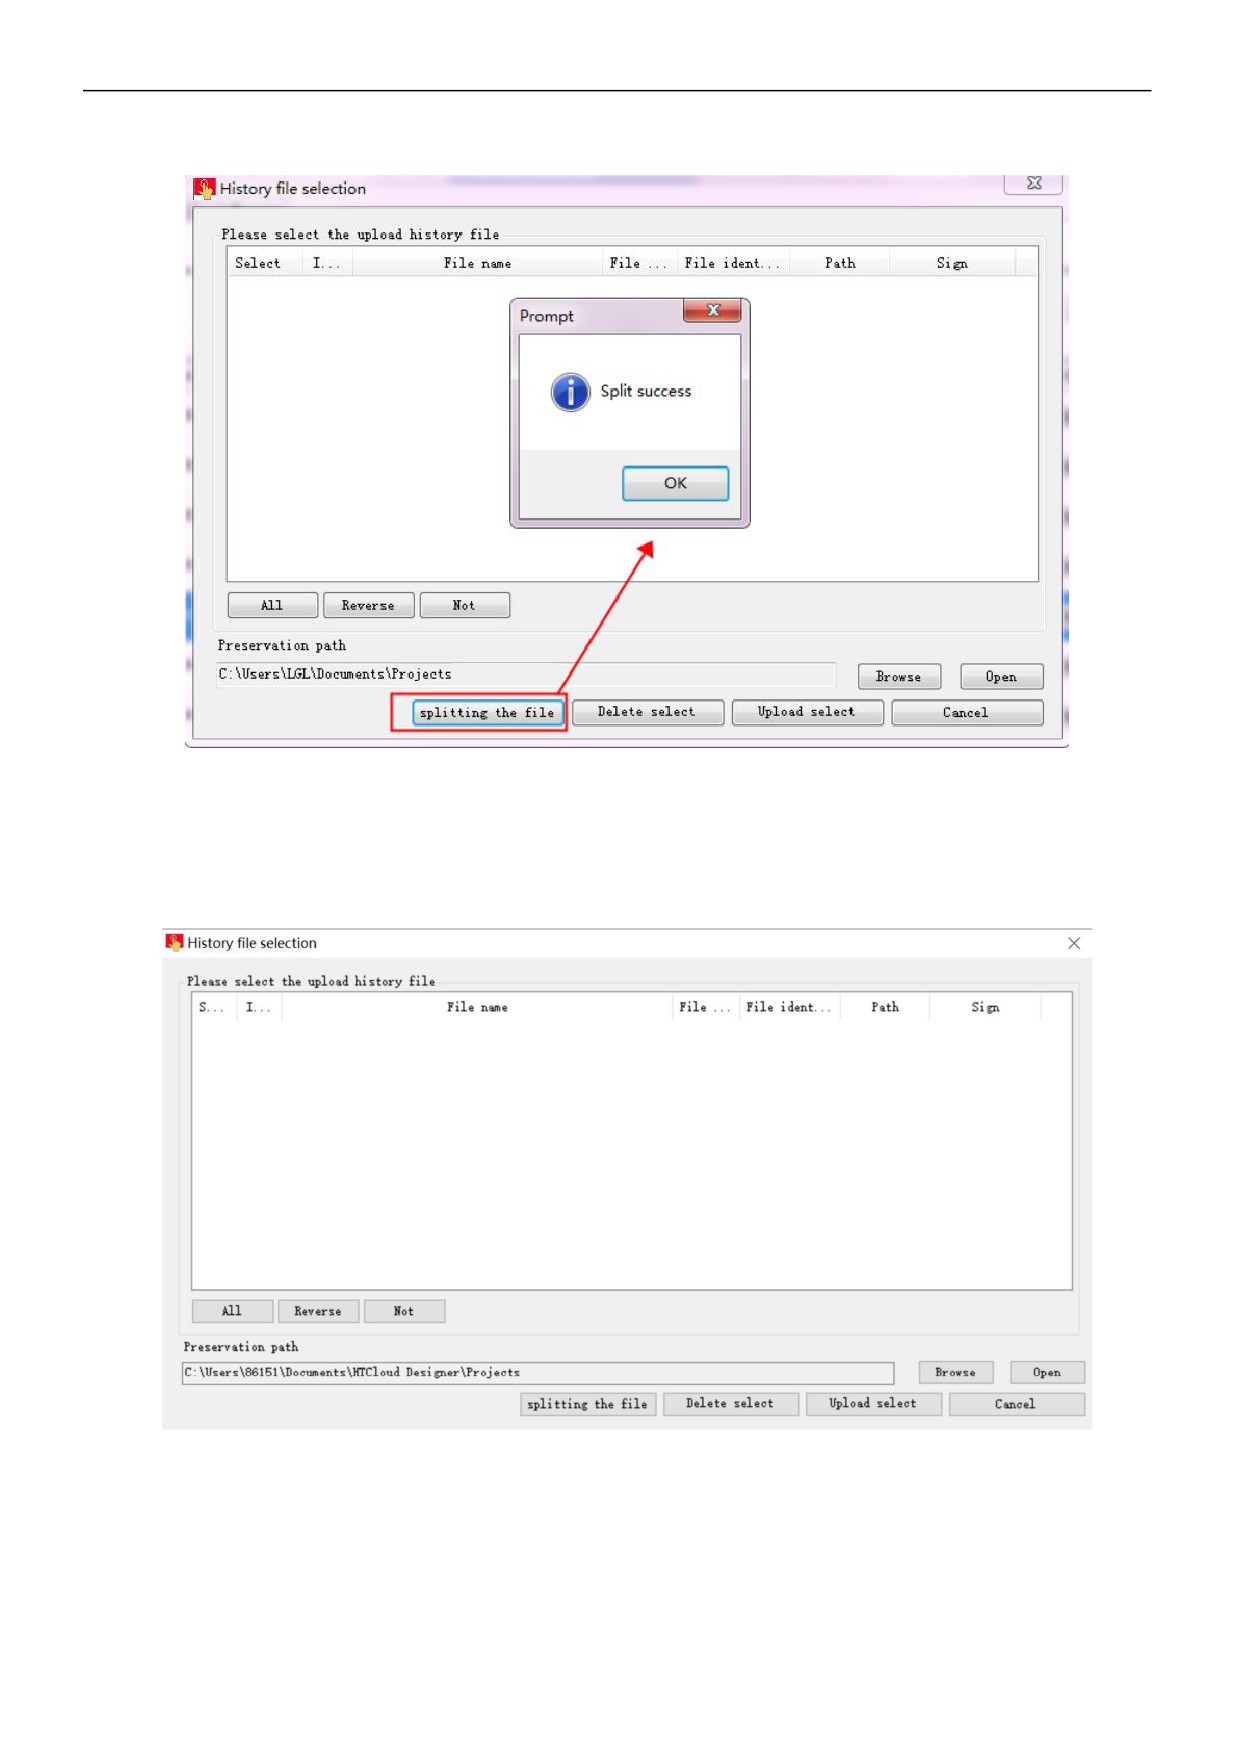
② Upload history file
Step 1: Select the history file in the history file list, enter the history file storage path, and click [Upload Select File];
Step 2: Wait for the history file to be uploaded successfully. The “History upload successed” prompt box will pop up. Click [OK].
After the upload is successful, the current history file is marked as “Uploaded”.
17 / 27
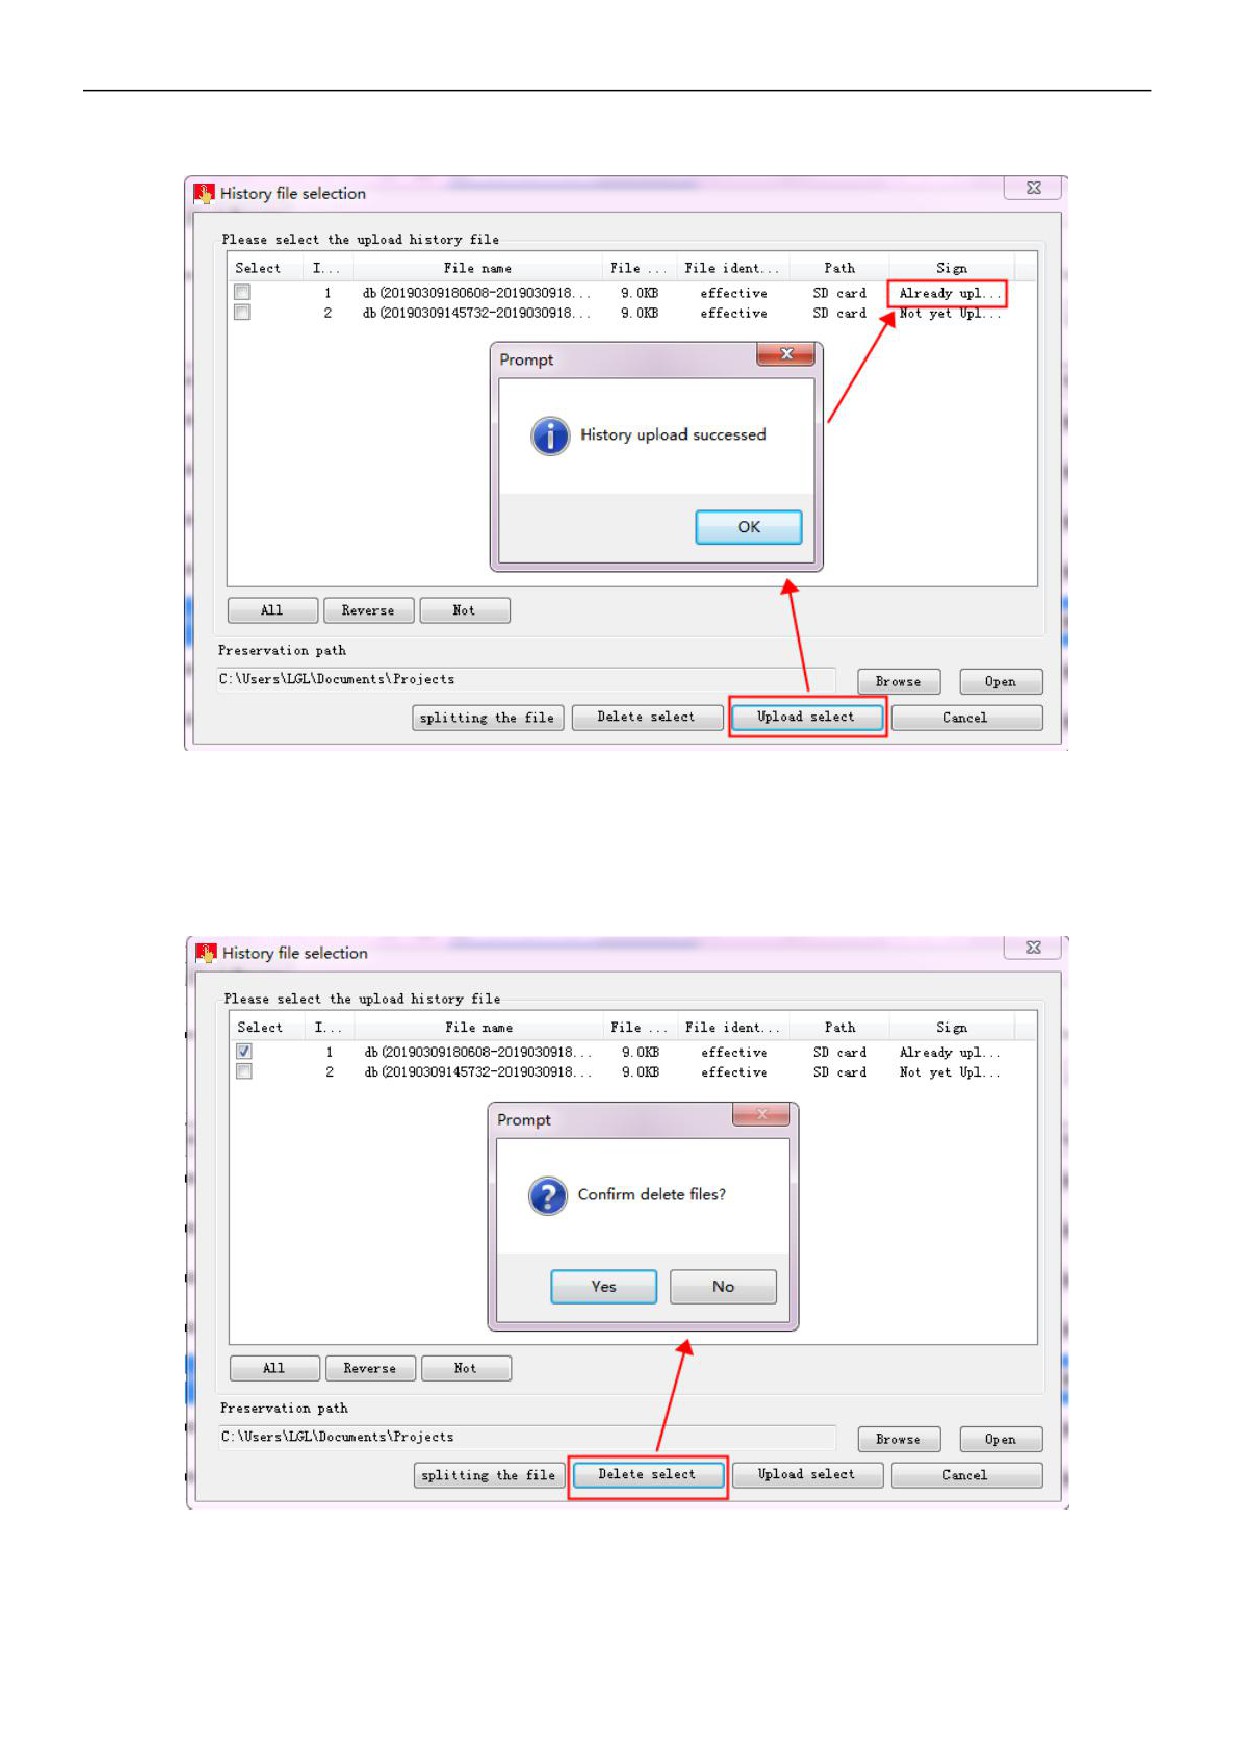
③ Delete history file
Step 1: Select the history file in the history file list and click [Delete Select]
Step 2: Pop up the Confirm Delete File prompt box and click [Yes]
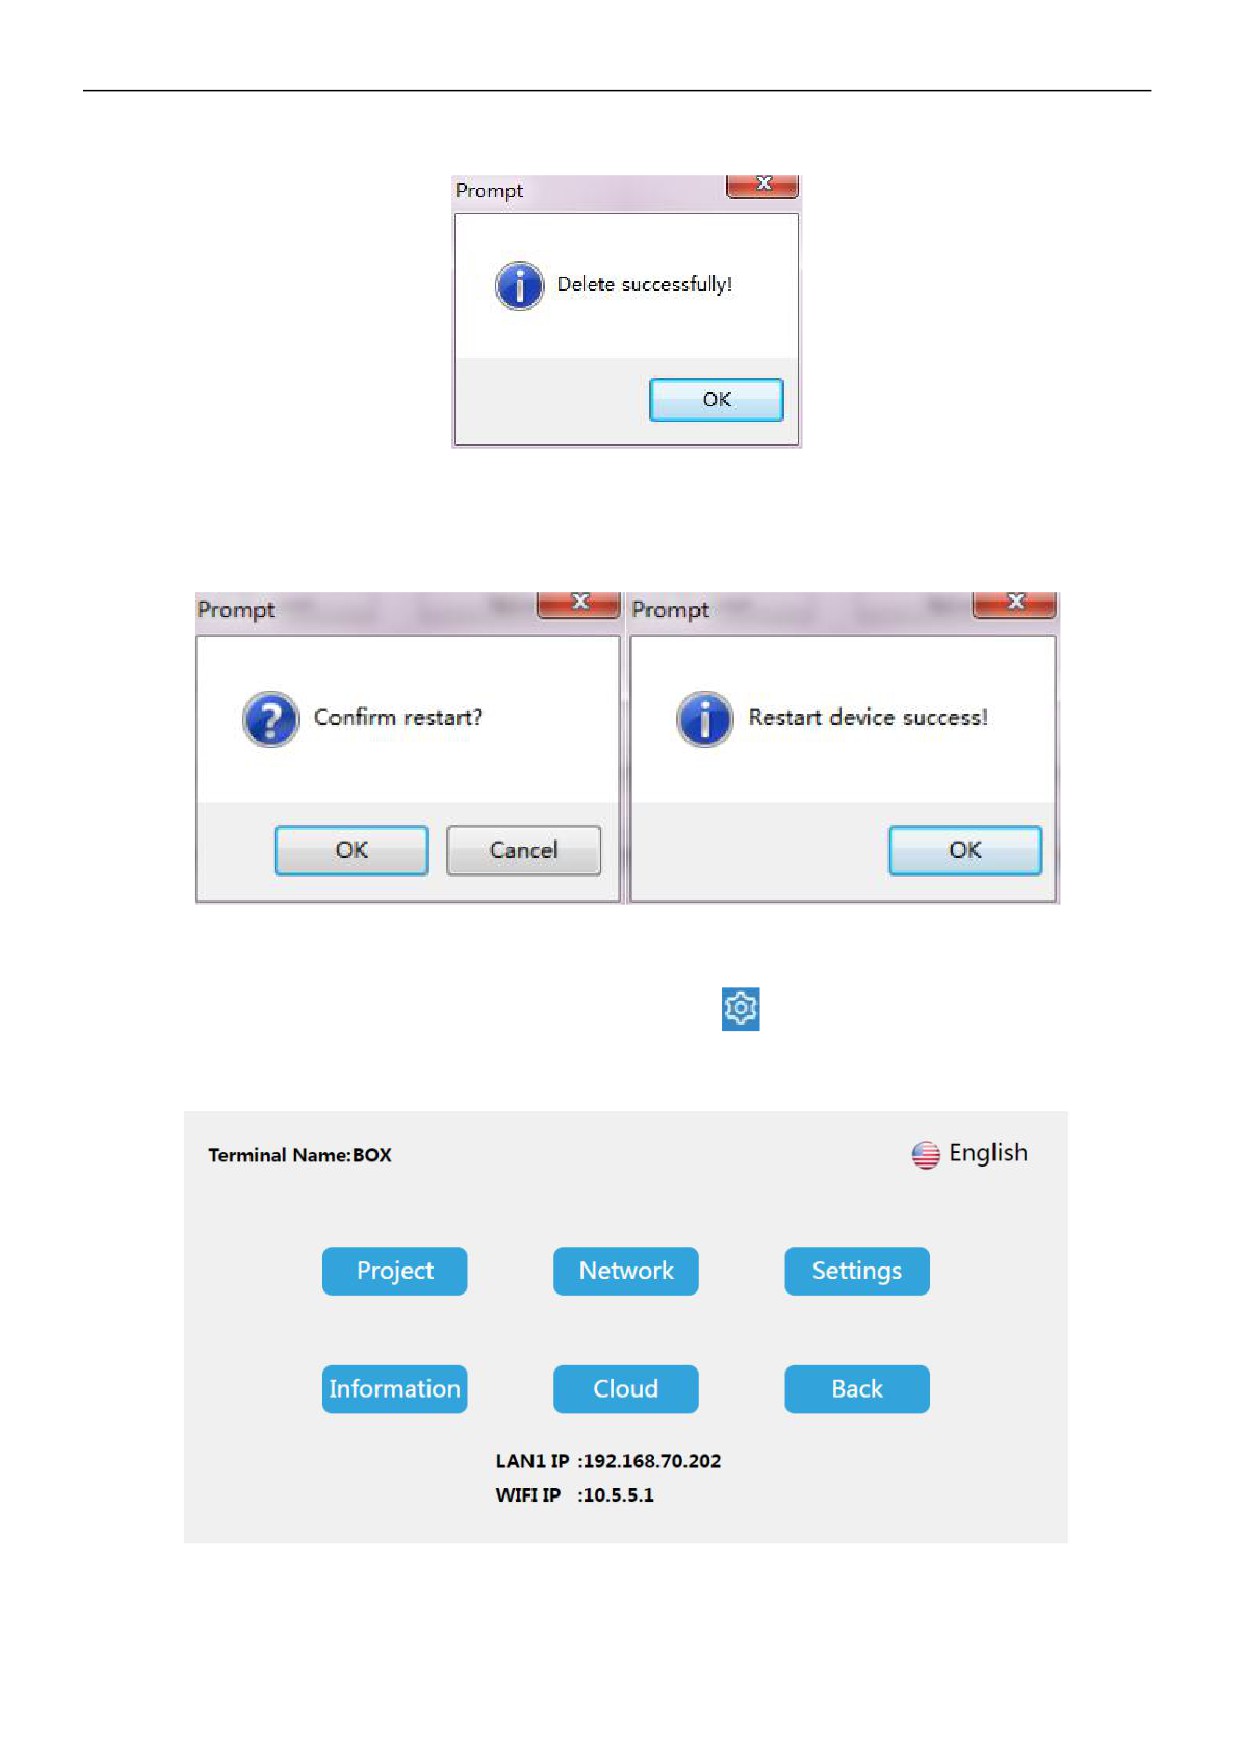
Step 3: Wait for the history file to be deleted successfully. The “Delete Successfully!” prompt box will pop up, click [OK].
18 / 27
z Restart device
Step 1: Click [Restart Device], pop-up confirmation restart prompt box click [Yes];
Step 2: Wait for the device to restart. After the restart is successful, the “Restart device success!” prompt box is displayed, and
click [OK].
2.7
Background setting
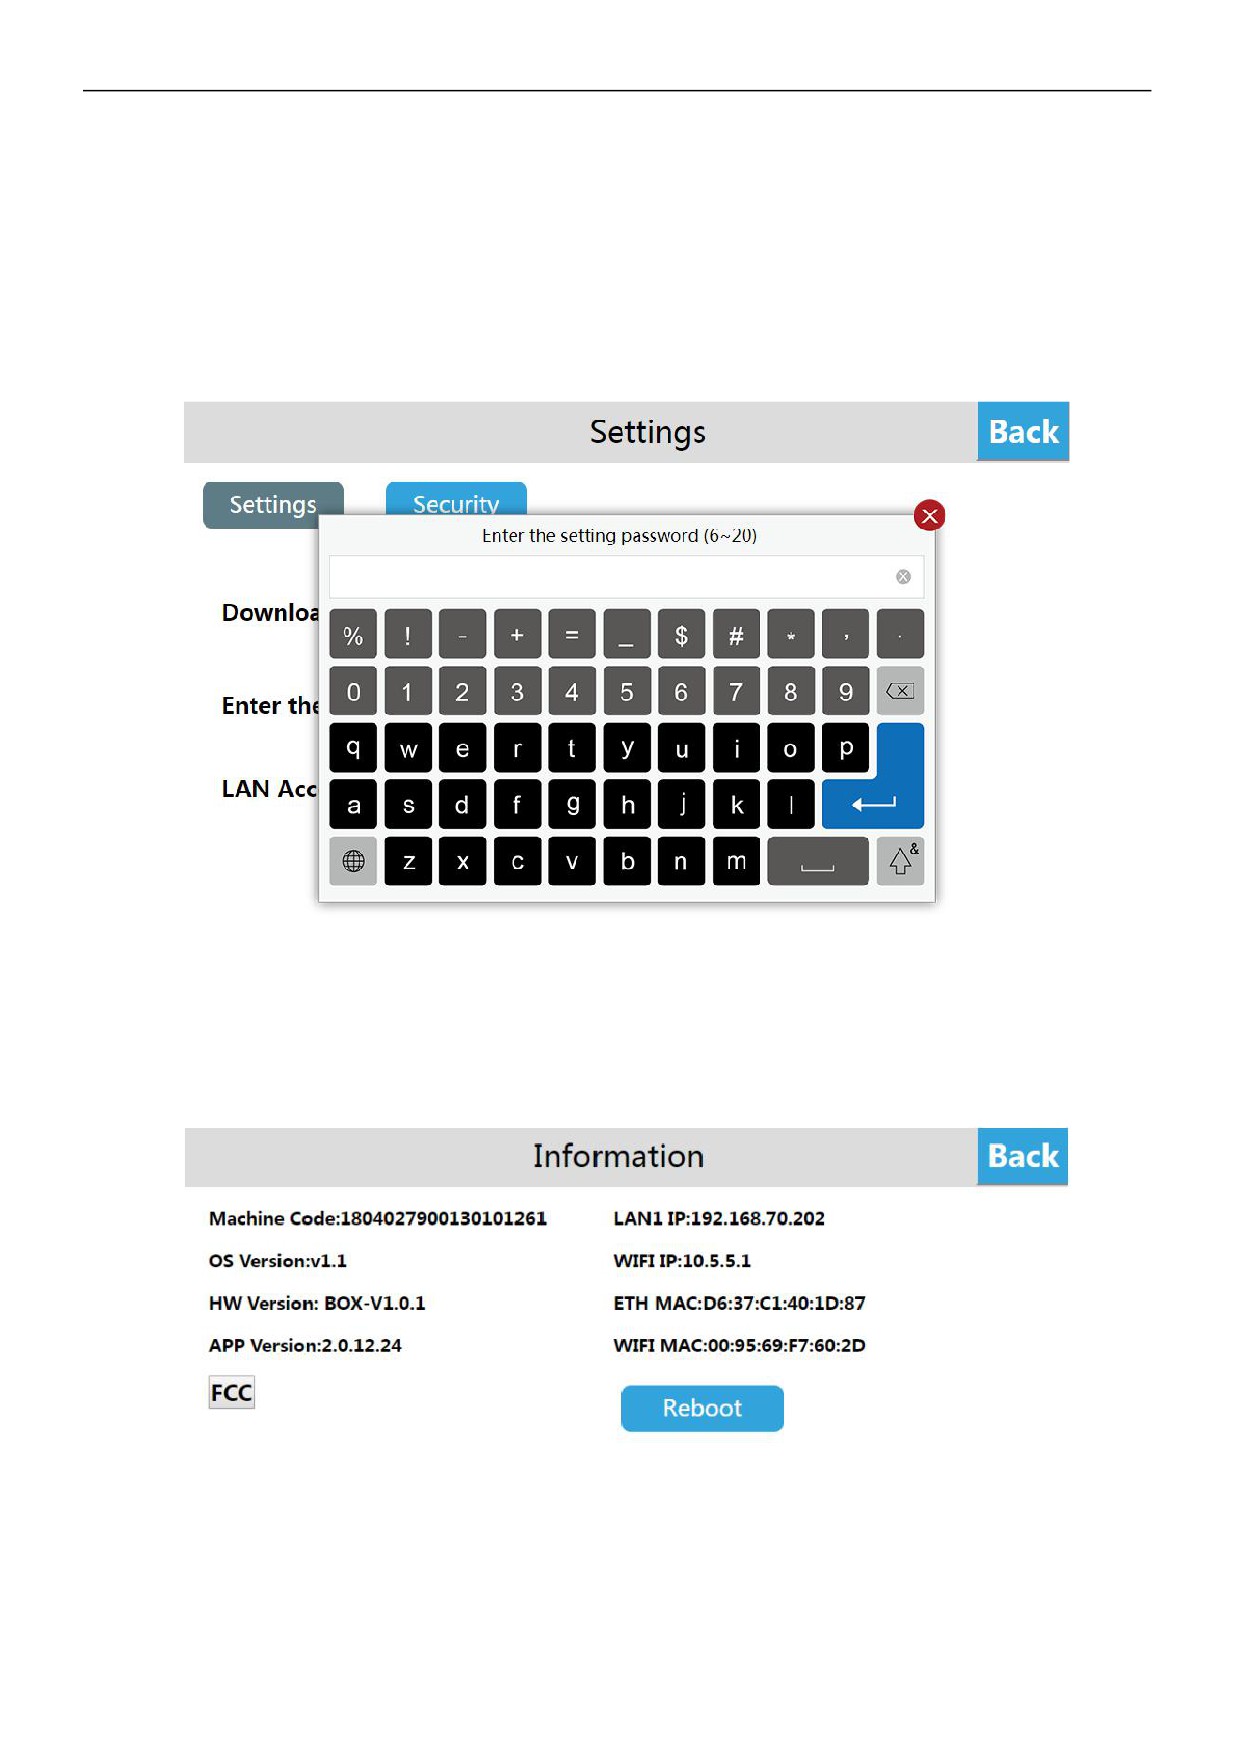
Through the local device of IoTBus APP to visit Cloud Box and click the
to enter the background setting interface; or
through the browser to visit the Cloud Box and input the 192.168.70.202/setting then enter the background setting interface.
19 / 27
2.7.1 Background password setting
Add the password validation into entering background. It can avoid the potential safety hazard and economic losses cause by
misuse of unrelated personal.
Step 1: Enter the Cloud Box background setting interface and click the [hardware setting]
Step 2: Open the [ Enter the setting password] function in [setting] interface
Step 3: Set the entering background password. Set successfully after, user needs the validation password for entering the
background setting.
2.7.2 Reboot the device
The user enters the Cloud Box background setting interface, click [Information], select [Reboot], and then reboot the Cloud
Box device. You can also reboot the device through the Device Manager. For the operation method, please refer to the
Device Manager. - Instructions for reboot the device.
Related topic: How to reboot Cloud Box devices via device manager
20 / 27
2.7.3 Demo project
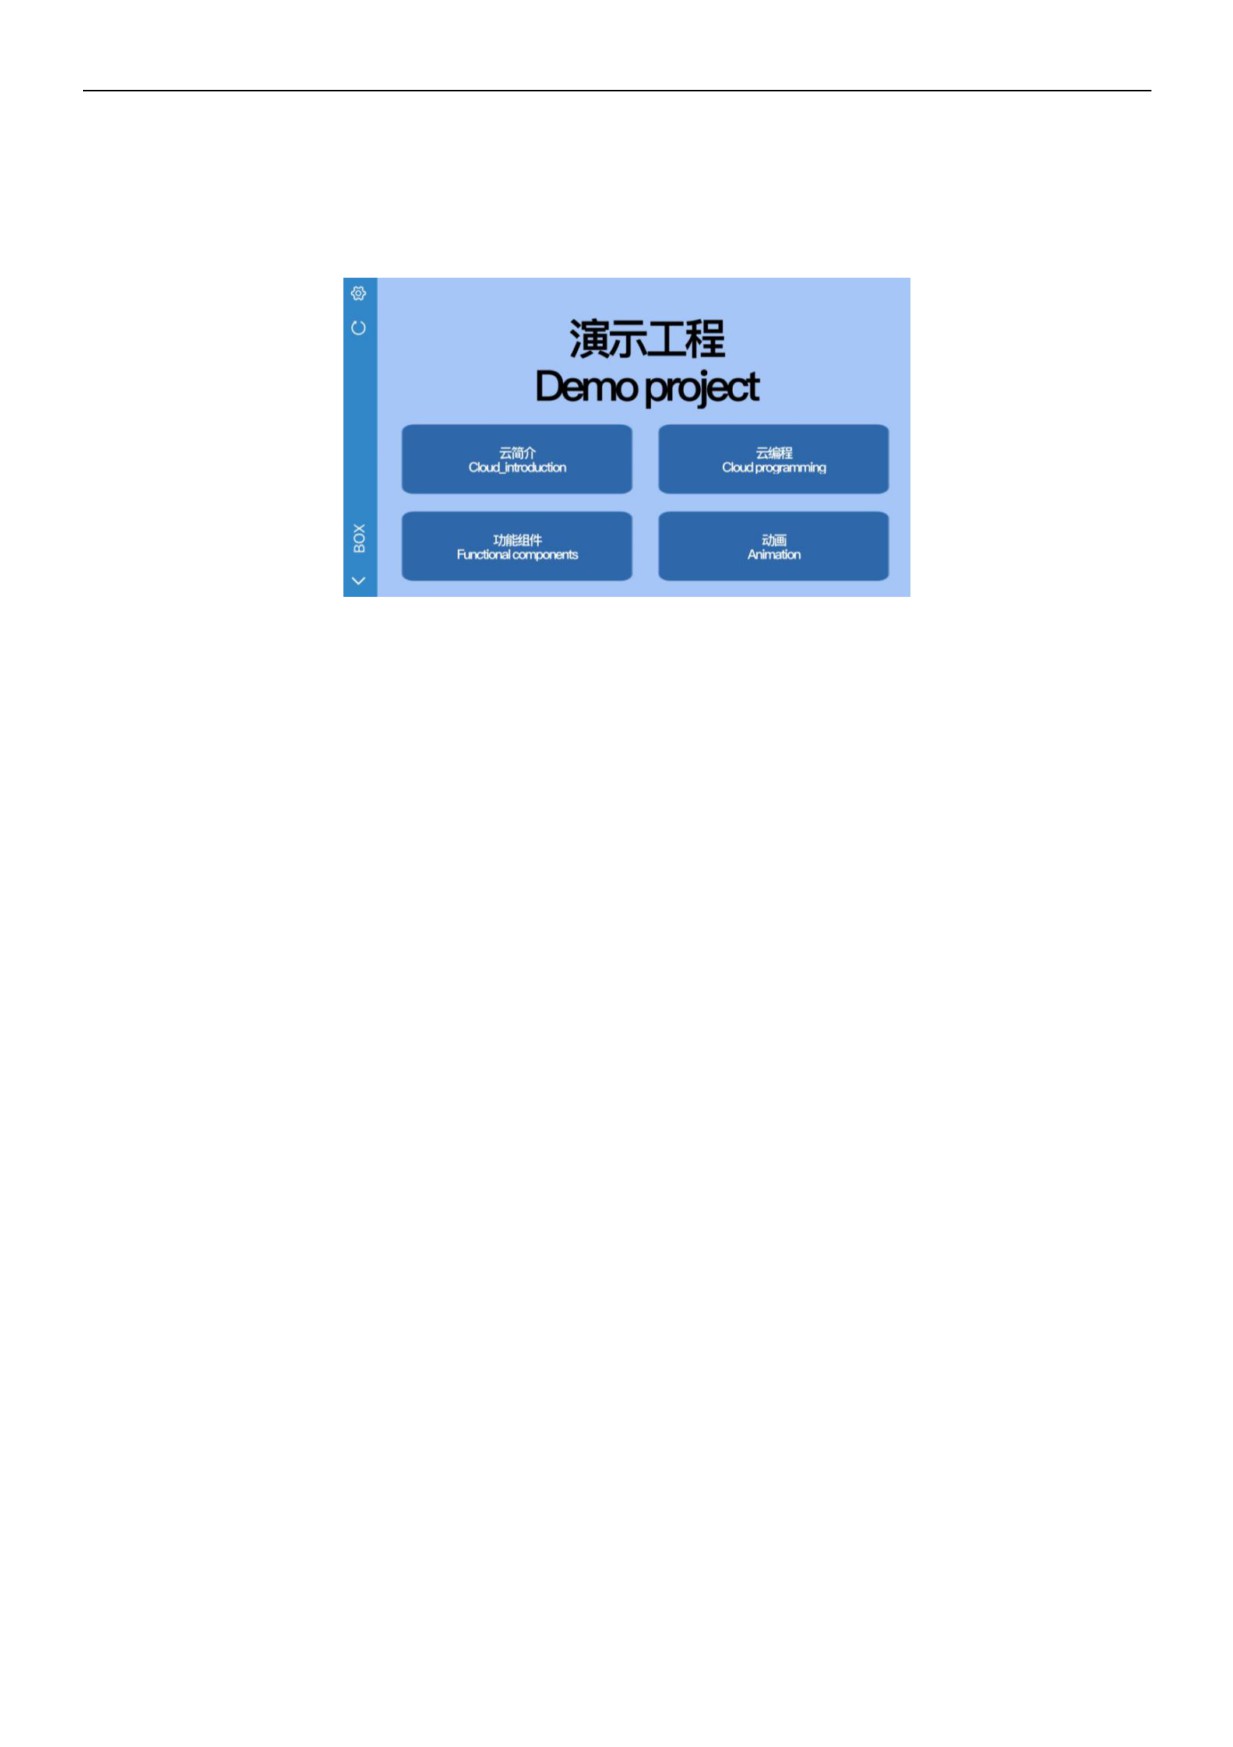
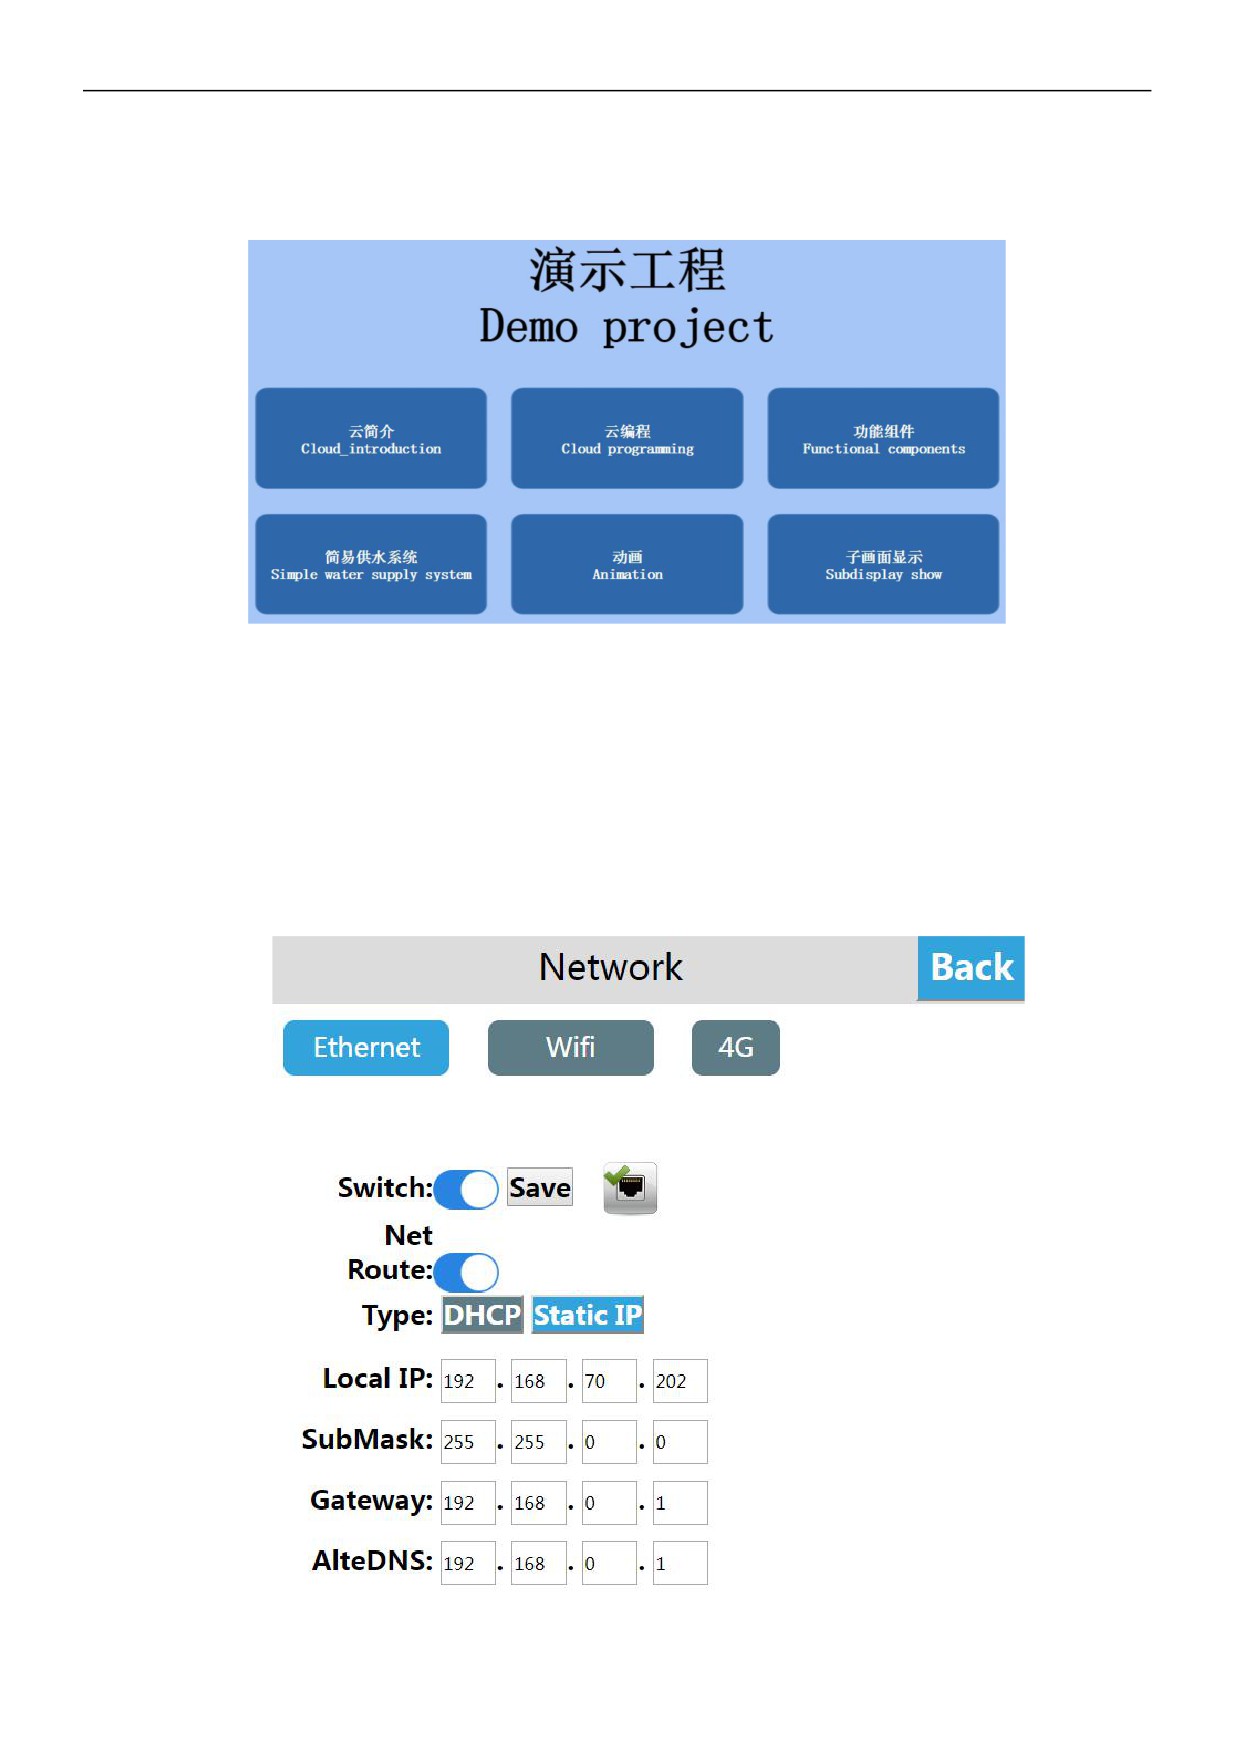
Factory engineering is a demonstration project:
2.7.4 Network Settings
z Ethernet connection
Enter the Cloud Box background setting interface, click [Network Settings], enter the Ethernet setting interface, open [Network
Switch], and the network type includes DHCP and Static IP.
①Dynamic IP
Select [DHCP] for the network type and click [Save],the device will automatically obtain the IP.
②Static IP
Select [Static IP] for the network type, enter the correct IP address, subnet mask, default gateway, and DNS,click [Save]. After
the verification is passed, the cloud box Cloud Box device can connect to the network through Ethernet.
21 / 27
z WIFI Settings
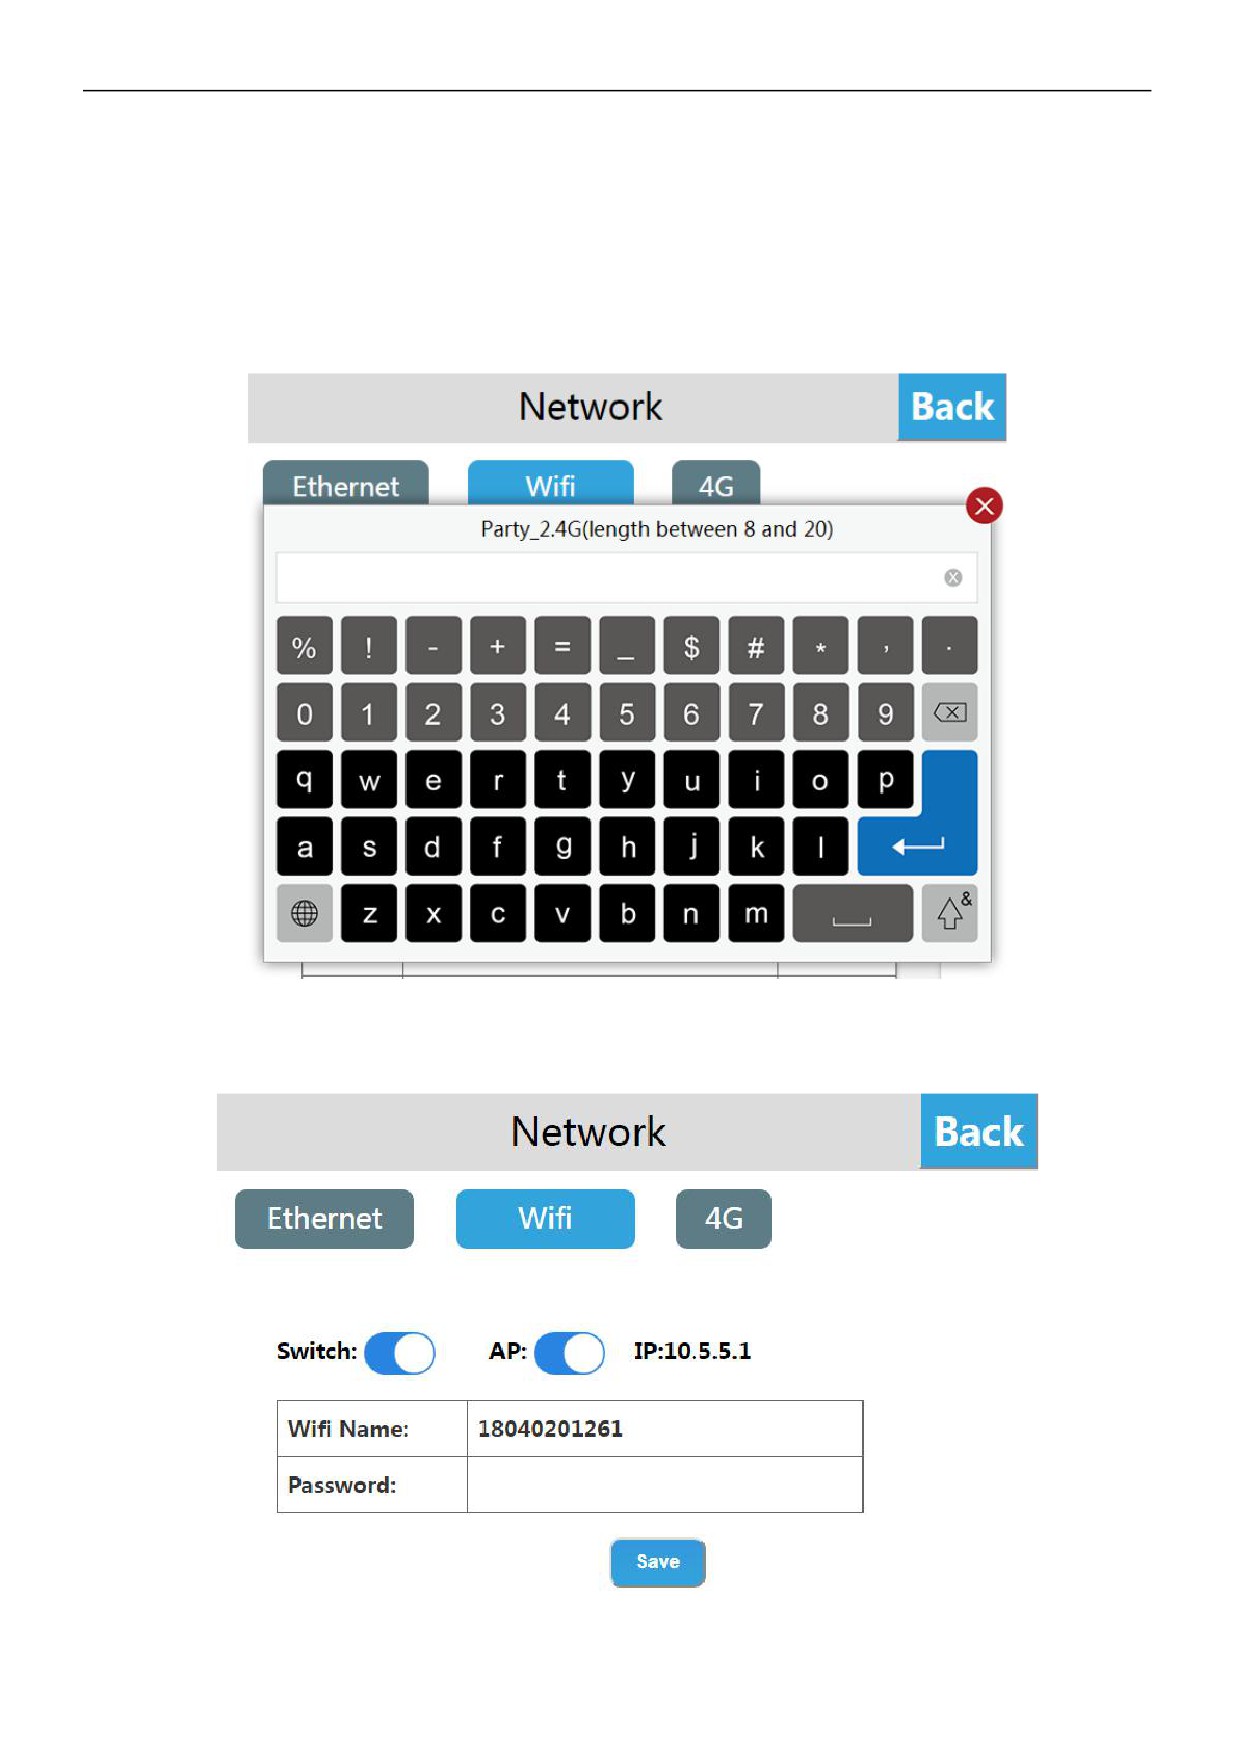
Click [WIFI Settings] to enter the WIFI settings interface to support network connection via WIFI. At the same time, the Cloud
Box built-in network card can also share WIFI hots pots for other users.
① WIFI connection
Enter the WIFI settings interface, open the WIFI switch, select the target WIFI account, enter the correct WIFI password, and
then connect to the WIFI network after verification.
② WIFI sharing
Enter the WIFI settings interface, open the personal hots pot switch, set the hots pot name and password, and then share the
WIFI hots pot for other users.
22 / 27
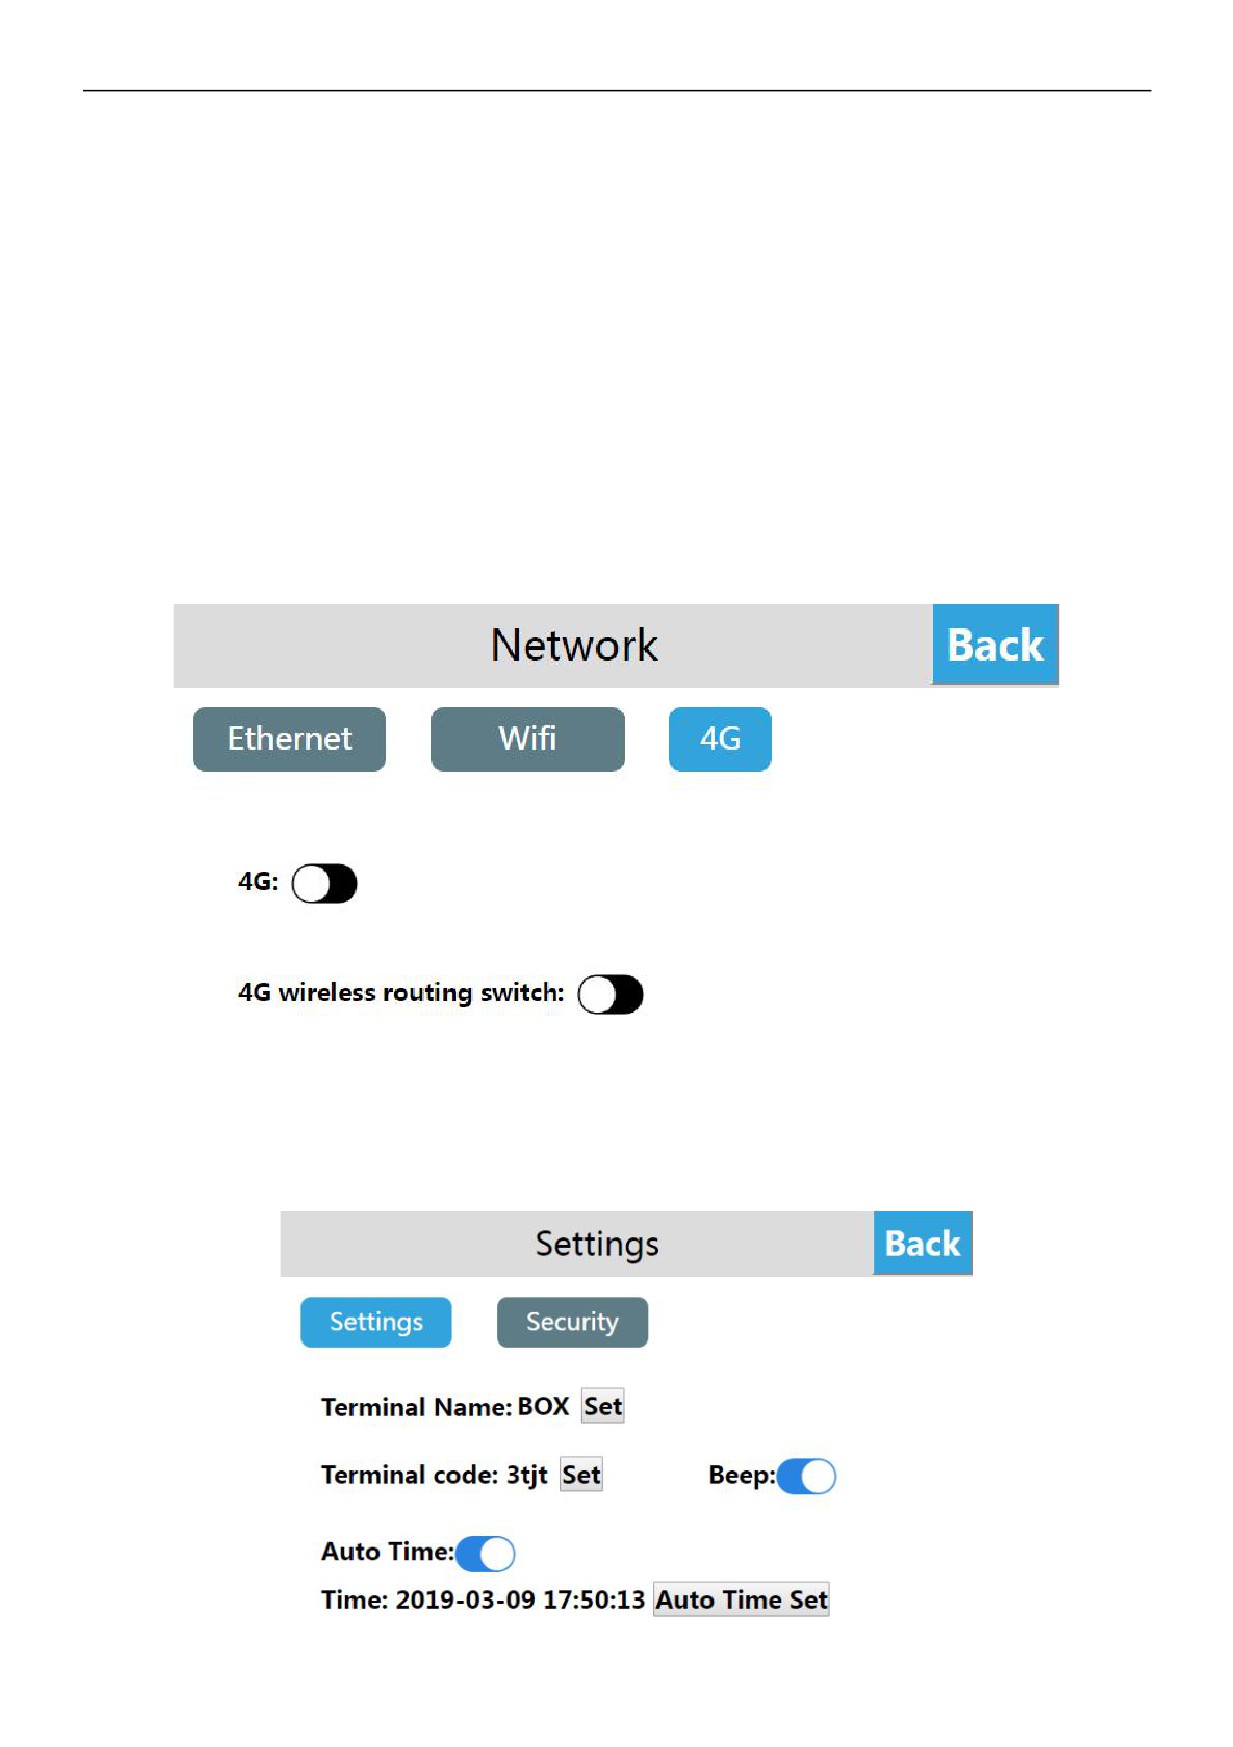
2.7.5 4G network Settings
4G network function is optional
z No 4G
Enter the Cloud Box background setting interface, click [Network Settings], enter the Ethernet setting interface, open [4G
switch], prompt "no 4G module".
z With 4G
The switch of 4G function is off by factory default.
Enter the Cloud Box background setting interface, click [network setting], enter the Ethernet setting interface, and open [4G
switch], then 4G function can be normally used.
1、Turn on the WIFI hots pot, turn off the 4G wireless routing, and connect the hots pot to the mobile phone,the IoTBus app can
access the local device normally , but cannot access the cloud device or access the external network.
2、Turn on the WIFI hots pot, turn on the 4G wireless routing, and connect the hots pot to the mobile phone,the IoTBus app can
use the LAN device and the cloud device normally, and can be connected to the external network.
2.7.6 Cloud Box device basic function settings
z Native machine settings
① Terminal name setting
Enter the Cloud Box background setting interface, click [Settings], in the [Settings] interface, you can see [Terminal name], click
[Set], enter the new machine name, and click [Save].
23 / 27
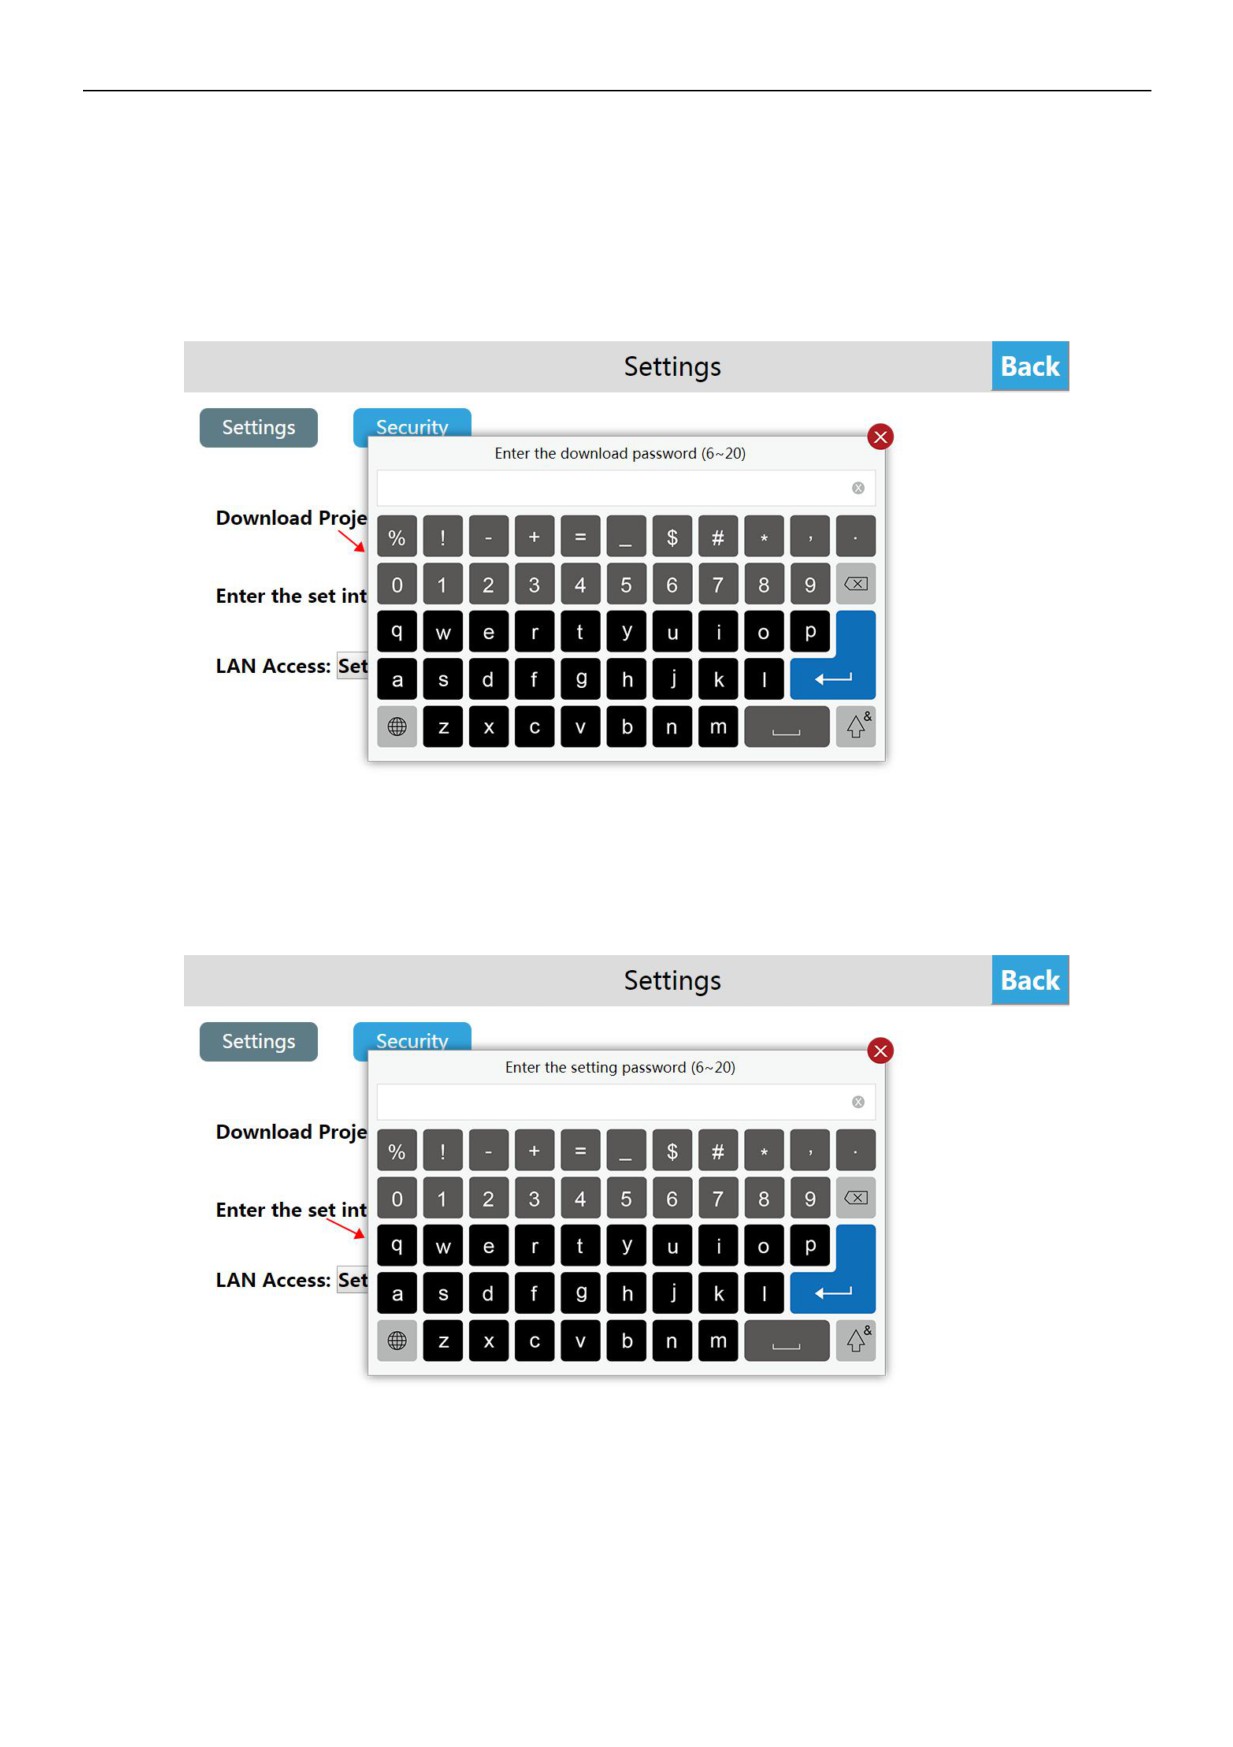
② Set the Cloud Box download password
Enter the Cloud Box background setting interface, click [Settings], open the [Download project Password] function in the
[Settings] interface, and set the Cloud Box download password. the user needs to verify the password when downloading the
project and updating the firmware after the setting is successful, otherwise, the related operation cannot be performed.
③ Set the Cloud Box background password
Enter the Cloud Box background setting interface, click [Settings], open the [Enter the setting password] function in the
[Settings] interface, and set the password to enter the background. After the setting is successful, the user needs to verify the
password when entering the background setting.
24 / 27
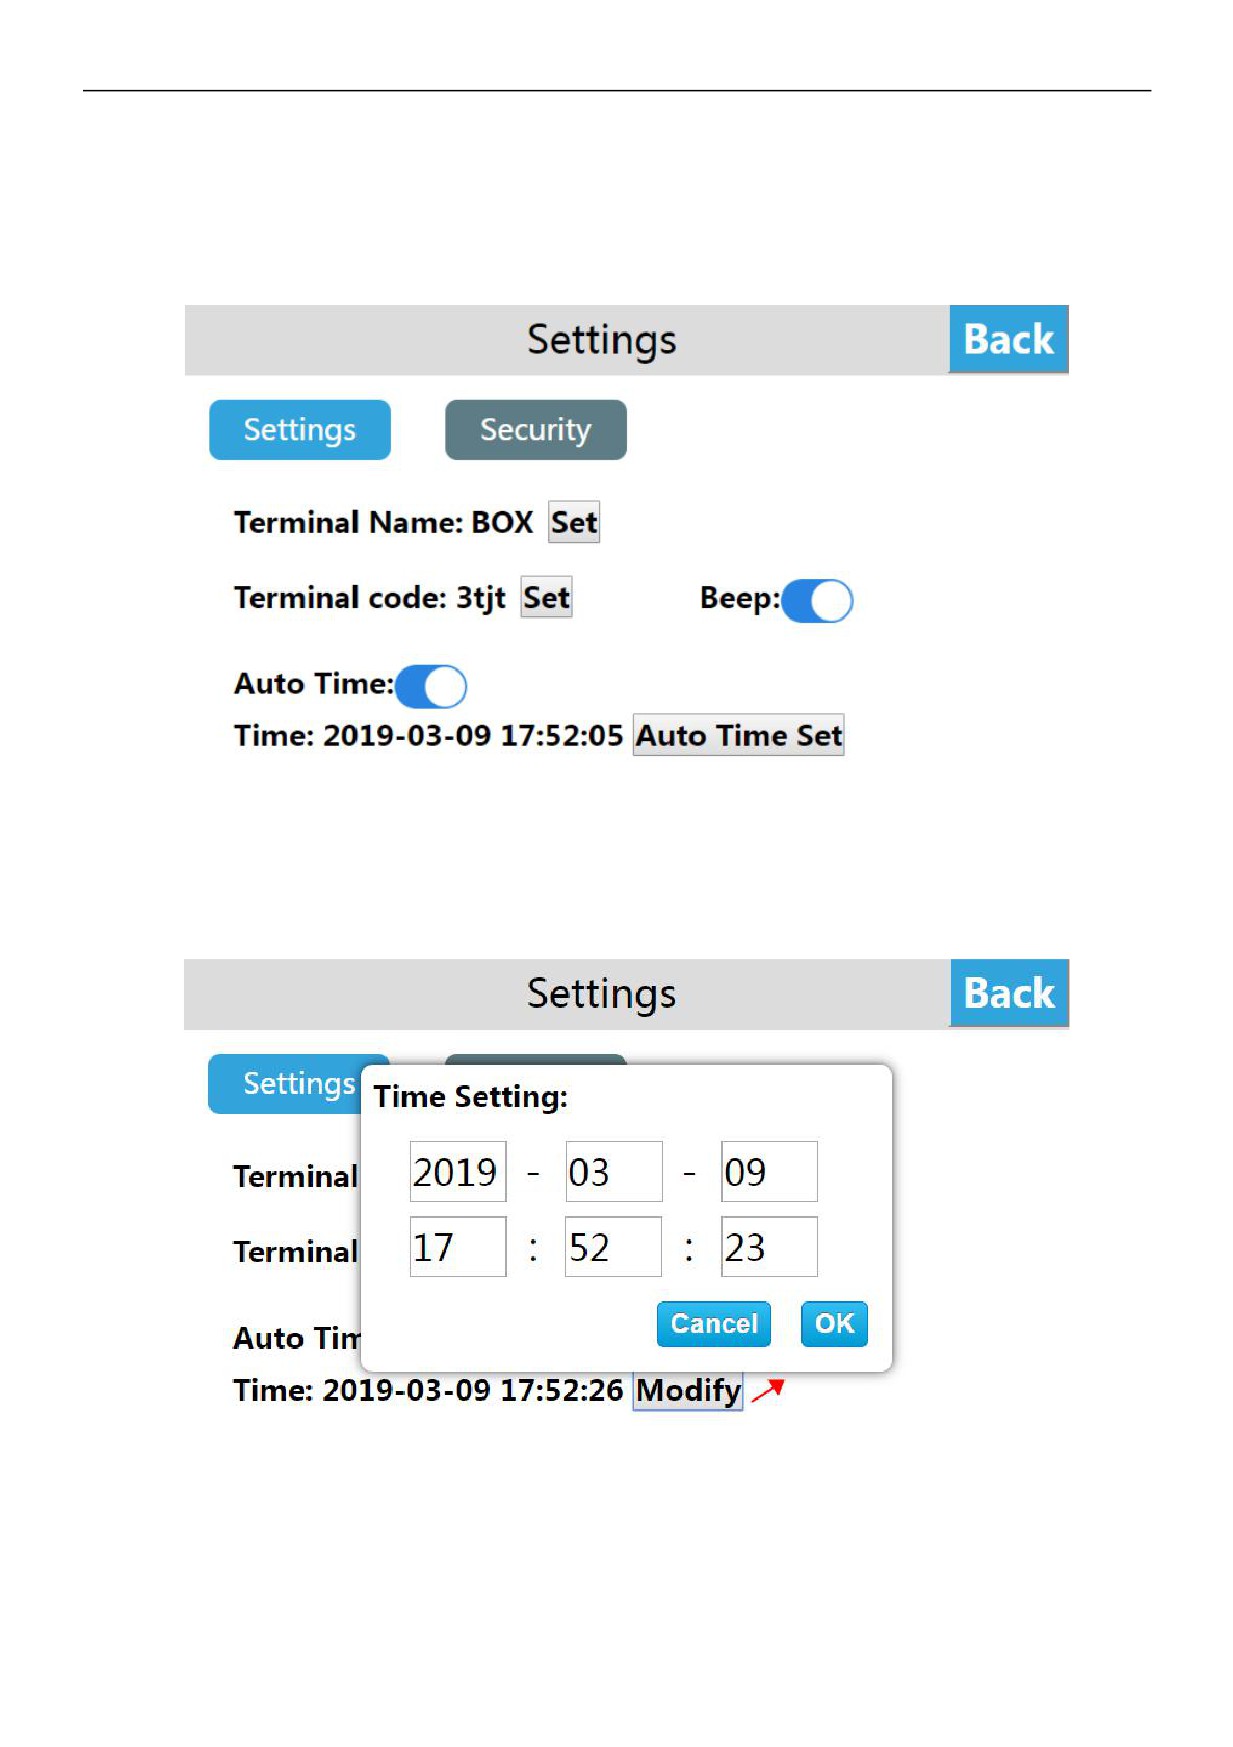
z Beep setting
Enter the Cloud Box background setting interface, click [Settings], and open the [Beep] function in the [Display and Sound]
interface. After the setting is successful, the buzzer will respond when the user clicks the Cloud Box button.
z Time setting
Enter the Cloud Box background setting interface, click [Settings], click [Modify] in the [Time Settings] interface, enter the time
and date setting interface, after completing the setting, click "ok" to set the system time.
25 / 27
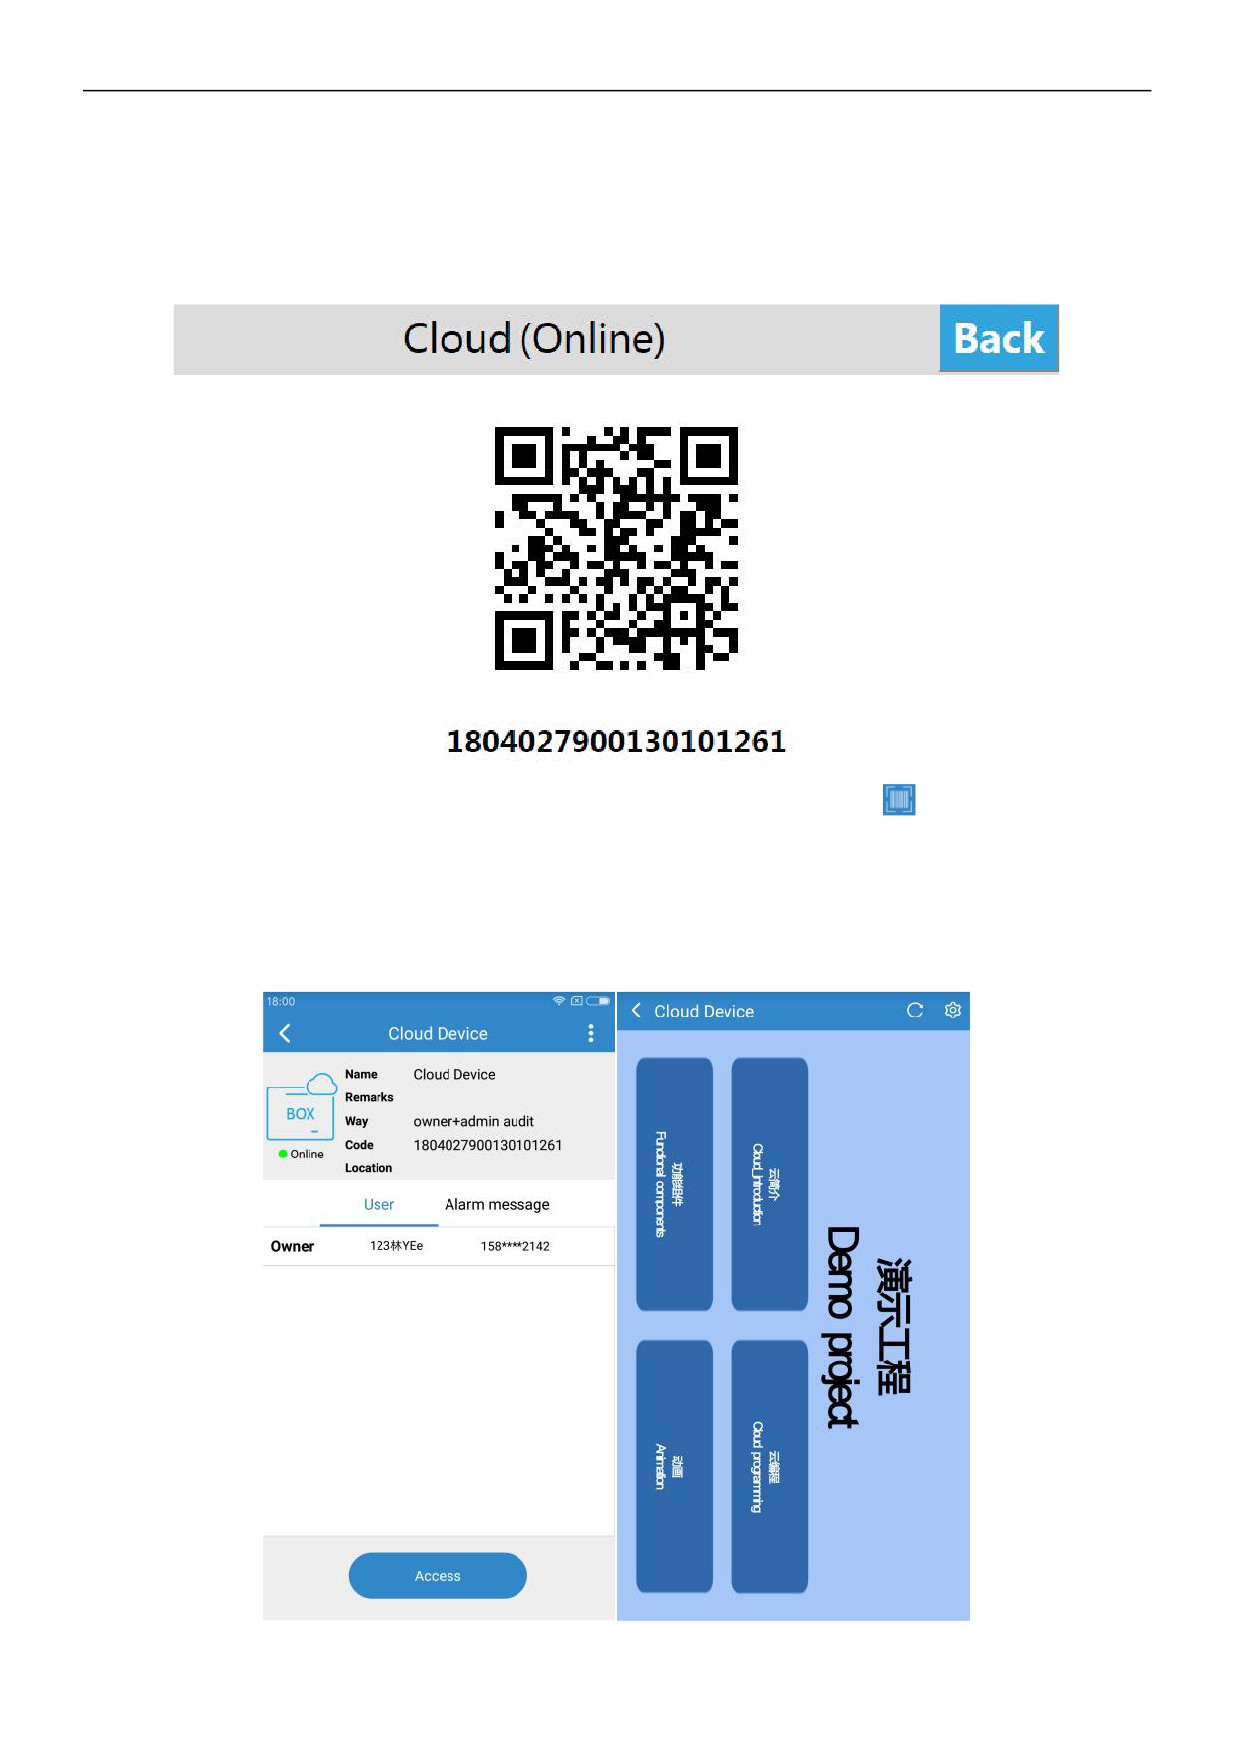
2.7.7 Cloud settings
z Binding device
Enter the Cloud Box background setting interface, click [Cloud (Online)], open the cloud switch, and pop up the QR code and
machine code.
Log in to the cloud app, go to the [Device] interface, click the button in the upper left corner
of the main interface, and
scan the QR code to add the device. The confirmation binding prompt box pops up on the device. Click [OK], the device is
added successfully, and the user can access the device remotely.
z
Remote control
The mobile phone enters the APP and enters the device; click [Access] to access the device. If the current project allows
remote operation, the user can remotely control the device through the mobile phone.
26 / 27
2.7.8 Multi-language setting
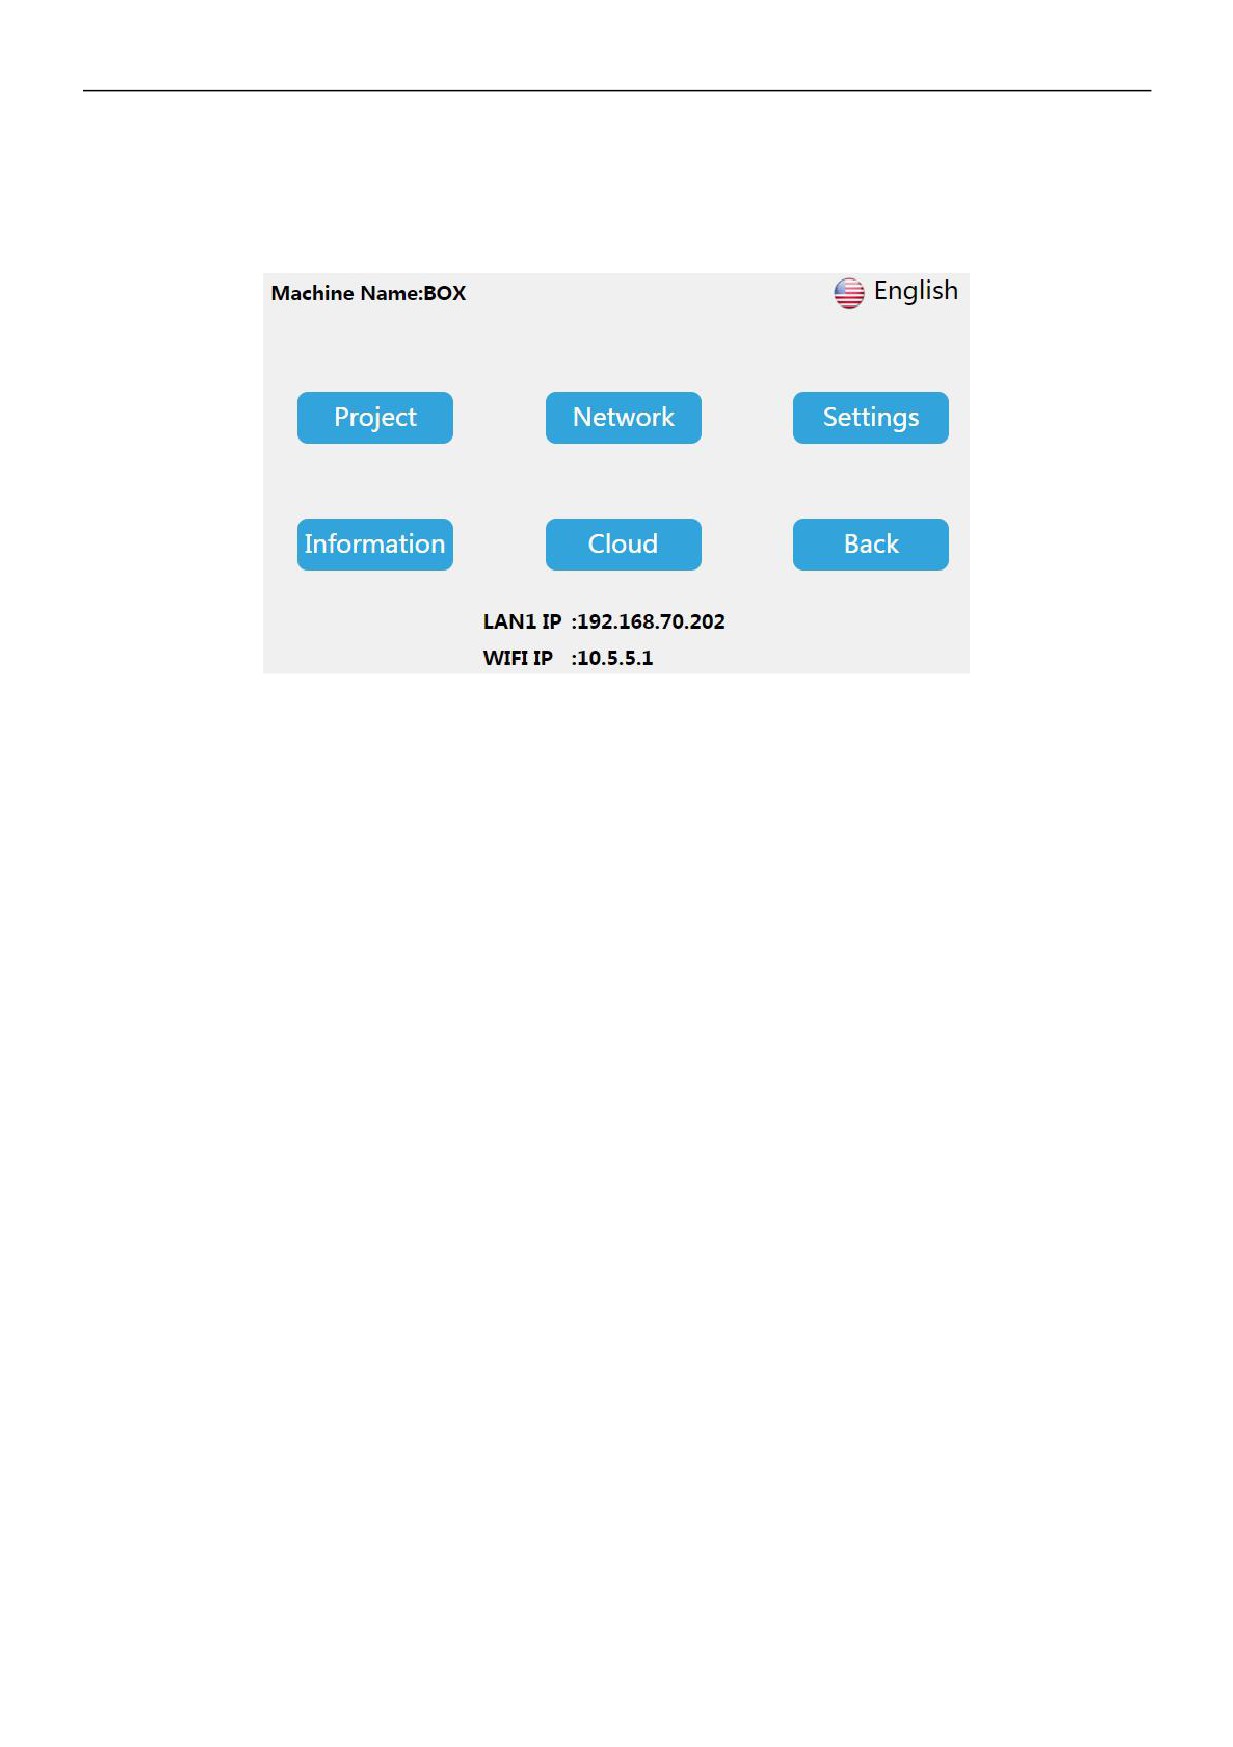
Enter the Cloud Box background setting interface. Click the Language Settings button at the top right of the screen to switch the
system language. The device supports Simplified Chinese and English.
2.7.9 Exit background settings
In the Cloud Box background setting interface, click [Back] to exit the background setting and enter the project running interface.