KitchenAid 5KFPM770 FOOD PROCESSOR. Manual in english (2005)
FOOD PROCESSOR
INSTRUCTIONS AND RECIPES
FOOD PROCESSOR
INSTRUCTIONS AND RECIPES
FOOD PROCESSOR
INSTRUCTIONS AND RECIPES
FOOD PROCESSOR
INSTRUCTIONS AND RECIPES
FOOD PROCESSOR
INSTRUCTIONS AND RECIPES
FOOD PROCESSOR
INSTRUCTIONS AND RECIPES
FOOD PROCESSOR
INSTRUCTIONS AND RECIPES
FOOD PROCESSOR
INSTRUCTIONS AND RECIPES
FOOD PROCESSOR
INSTRUCTIONS AND RECIPES
FOOD PROCESSOR
INSTRUKTIONER OG OPSKRIFTER
FOOD PROCESSOR
INSTRUCTIONS AND RECIPES
FOOD PROCESSOR
INSTRUCTIONS AND RECIPES
FOOD PROCESSOR
INSTRUCTIONS AND RECIPES
Model 5KFPM770
Food Processor
1
Table of Contents
Food Processor Safety
3
Electrical Requirements
3
Important Safeguards
4
Food Processor Features
5
Preparing the Food Processor for Use
Before First Use
7
Work Bowl Assembly
7
Multipurpose Blade & Dough Blade Assembly
8
Slicing & Shredding Disc Assembly
8
Mini Bowl Assembly
9
Chef’s Bowl Assembly
9
Egg Whip Assembly & Use
10
Citrus Press Assembly & Use
10
Using the Food Processor
Before Use
12
Food Pusher Interlock
12
Maximum Liquid Level
12
Turning the Food Processor On and Off
12
Using the Pulse Control
13
2-Piece Food Pusher
13
Disassembling the Food Processor
13
Care and Cleaning
15
Troubleshooting
16
Food Processing Tips
17
Using the Multipurpose Blade
17
Using a Slicing or Shredding Disc
18
Using the Dough Blade
19
Using the Egg Whip
19
Helpful Hints
20
Recipes
22
Warranty and Service Information
Household KitchenAid® Food Processor Warranty for Europe
27
Service Centers
27
Customer Service
28
2
Food Processor Safety
Your safety and the safety of others are very important.
We have provided many important safety messages in this manual and on
your appliance. Always read and obey all safety messages.
This is the safety alert symbol.
This symbol alerts you to potential hazards that can kill or hurt
you and others.
All safety messages will follow the safety alert symbol and either
the word “DANGER” or “WARNING.” These words mean:
You can be killed or seriously
DANGER
injured if you don’t immediately
follow instructions.
You can be killed or seriously
injured if you don’t follow
WARNING
instructions.
All safety messages will tell you what the potential hazard is, tell you how to
reduce the chance of injury, and tell you what can happen if the instructions
are not followed.
Electrical Requirements
Model 5KFPM770:
220-240 Volts A.C.
Hertz: 50/60 Hz
NOTE: Model 5KFPM770 has a
grounded plug. To reduce the risk of
electrical shock, this plug will fit in
an outlet only one way. If the plug
does not fit in the outlet, contact a
qualified electrician. Do not modify
the plug in any way.
Do not use an extension cord. If the
power supply cord is too short, have
a qualified electrician or serviceman
install an outlet near the appliance.
3
IMPORTANT SAFEGUARDS
When using electrical appliances, basic safety precautions should always be
followed, including the following:
1. Read all instructions.
2. To protect against risk of electrical shock do not put Food Processor in
water or other liquid.
3. Close supervision is necessary when any appliance is used by or near
children.
4. Unplug from the outlet when not in use, before putting on or taking off
parts, and before cleaning.
5. Avoid contacting moving parts.
6. Do not operate any appliance with a damaged cord or plug, or after the
appliance malfunctions, or is dropped or damaged in any manner. Return
appliance to the nearest Authorized Service Facility for examination,
repair, or electrical or mechanical adjustment.
7. The use of attachments not recommended or sold by the manufacturer
may cause fire, electric shock or injury.
8. Do not use outdoors.
9. Do not let cord hang over edge of table or counter.
10. Keep hands and utensils away from moving blades or discs while
processing food to reduce the risk of severe injury to persons or damage
to the Food Processor. A scraper may be used but must be used only
when the Food Processor is not running.
11. Blades are sharp. Handle carefully.
12. To reduce the risk of injury, never place cutting blade or discs on base
without first putting bowl properly in place.
13. Be certain cover is securely locked in place before operating appliance.
14. Never feed food by hand. Always use the food pusher.
15. Do not attempt to defeat the cover interlock mechanism.
16. This product is designed for household use only.
SAVE THESE INSTRUCTIONS
4
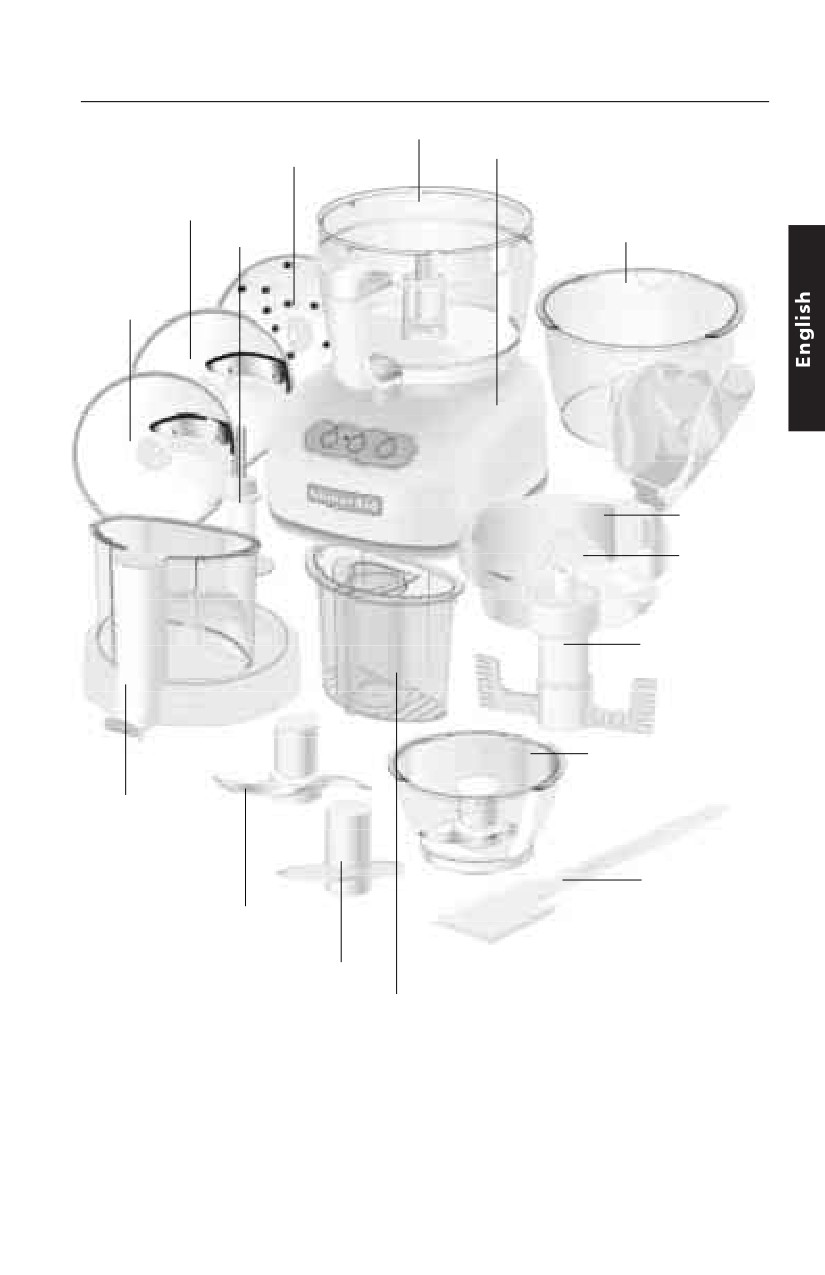
Food Processor Features
Medium (4 mm)
Work Bowl
Die-Cast Metal Base
Shredding Disc
Medium (4 mm)
Slicing Disc
2.4 liters (10 cup)
Disc Stem
Chef's Bowl
Fine (2 mm)
Slicing Disc
Citrus
Press
2-Piece
Cone
Egg Whip
950 ml (4 cup)
Mini Bowl and
Mini Blade
Work Bowl Cover
with Ultra Wide
Mouth Feed Tube
Spatula/
Cleaning
Stainless Steel
Tool
Multipurpose Blade
Dough Blade
2-Piece
Food Pusher
5
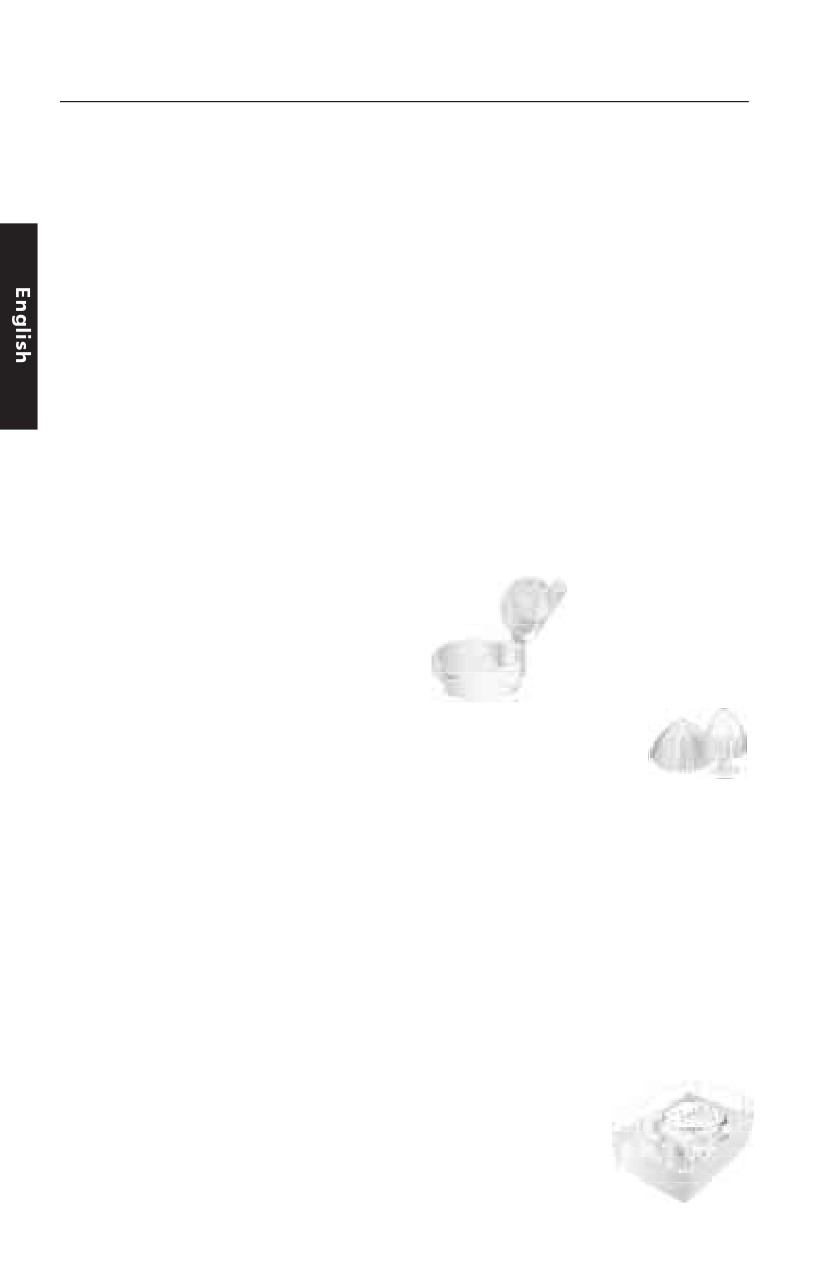
Food Processor Features
Work Bowl Cover with
Disc Stem
Ultra Wide Mouth Feed Tube
Stem fits over the power shaft on
One of the industry’s largest, the
the base and into the bottom of a
Ultra Wide Mouth feed tube
slicing or shredding disc.
accommodates large items -
like tomatoes, cucumbers, and
Stainless Steel
potatoes - with a minimum of
Multipurpose Blade
sectioning or slicing.
Versatile blade chops, minces,
blends, mixes, and emulsifies in a
2-Piece Food Pusher
matter of seconds.
For smaller items, remove the small
pusher from the central tube in the
Dough Blade
large pusher. The small pusher and
The dough blade is specially
feed tube make it easy to process
designed for mixing and kneading
herbs, nuts, single carrots and celery.
yeast dough.
The small pusher can also be used as
a convenient 115 g measuring cup.
Egg Whip
The egg whip will quickly whip
2.8 Liters Work Bowl
cream and egg whites for
The tough polycarbonate bowl
meringues, mousses, soufflés, and
provides capacity for large jobs.
desserts.
Chef’s Bowl
Citrus Press
Place the 2.4 liters Chef’s Bowl
Press consists of a
inside the Work Bowl, and slice or
Strainer Basket,
shred a food item while keeping the
iece Cone, and
Work Bowl clean for another
Lever Arm. Use the
ingredient.
removable outer cone for
larger items, such as
Mini Bowl and Mini Blade
grapefruit, and the inner cone for
950 ml bowl and stainless steel
lemons and limes.
blade are perfect for small chopping
and mixing jobs.
Heavy-Duty Base
The base features the “O”, “I”, and
Fine (2 mm) Slicing Disc
Pulse Buttons along with the power
Disc produces approximately
shaft, which rotates the blades and
1.6 mm slices of most foods, from
discs.
delicate strawberries to partially
frozen meats.
Spatula/Cleaning Tool
Special shape facilitates food
Medium (4 mm) Slicing Disc
removal from bowls, discs, and
Disc produces approximately
blades.
3.2 mm slices slices of most foods.
Chef’s Accessory
Medium (4 mm) Shredding Disc
Case
Disc produces approximately
Stylish and durable
3.2 mm shreds of most firm fruits,
slim-line case
vegetables, and cheese.
organizes and protec
blades, discs, and accessories.
6
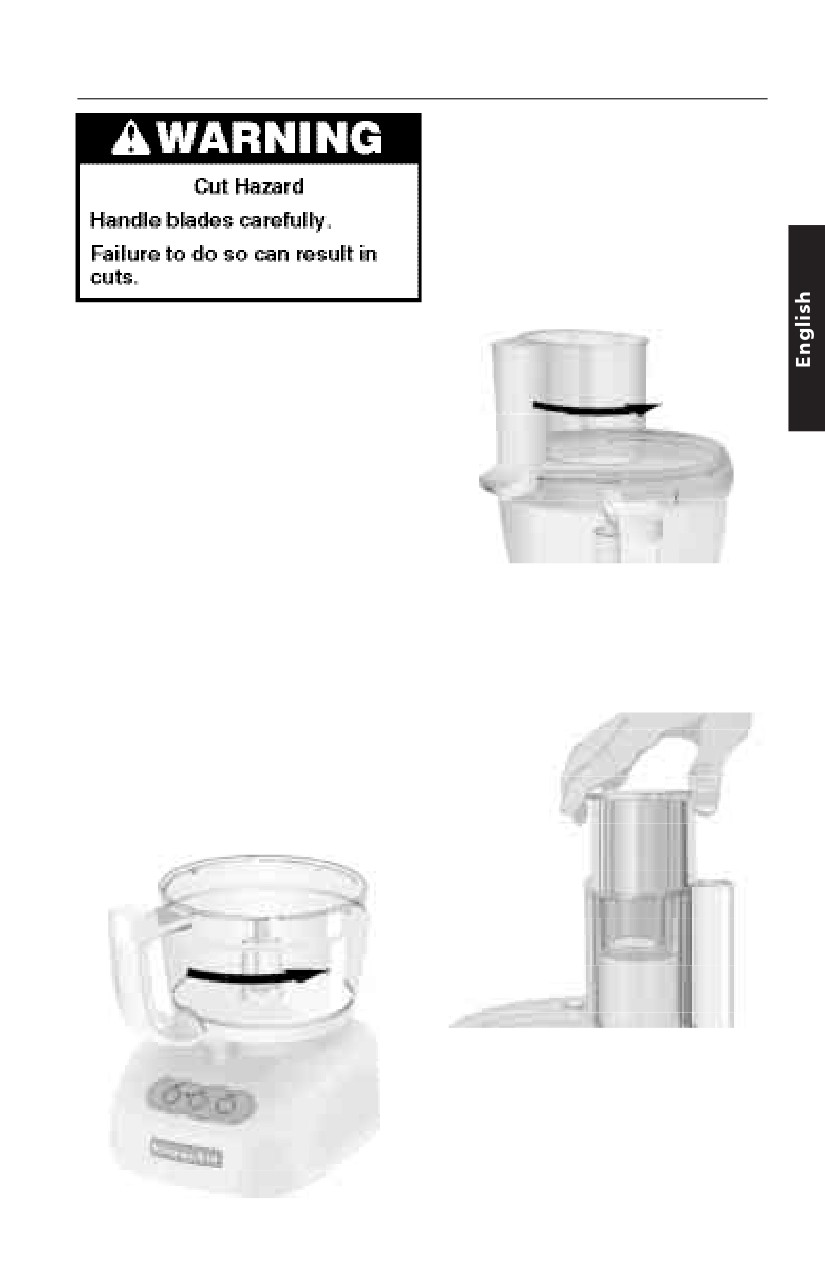
Preparing the Food Processor for Use
4. Insert the desired accessory into
the work bowl. See pages 7-11
for accessory instructions.
5. Place the work bowl cover on the
work bowl with the feed tube
just to the left of the work bowl
handle. Grasp the feed tube and
turn the cover to the right until it
locks into place.
Before First Use
Before using your Food Processor for
the first time, wash the work bowl,
work bowl cover, chef’s bowl, mini
bowl, feed tube pusher, discs, and
blades either by hand or in the
dishwasher (see “Care and Cleaning”
on page 15).
Work Bowl Assembly
1. Place the Food Processor base on
NOTE: Do not attach the cover to
a dry, level countertop with the
the work bowl before the work bowl
controls facing forward. Do not
is locked on the base. Damage to
plug in the unit until it is
the work bowl may result.
completely assembled.
6. Fit the 2-piece food pusher into
2. With the handle just to the left of
the feed tube.
center, place the work bowl on
the base, fitting the center
opening over the power shaft.
3. Grasp the work bowl handle and
turn the bowl to the right until it
locks into position.
Continued on next page
7
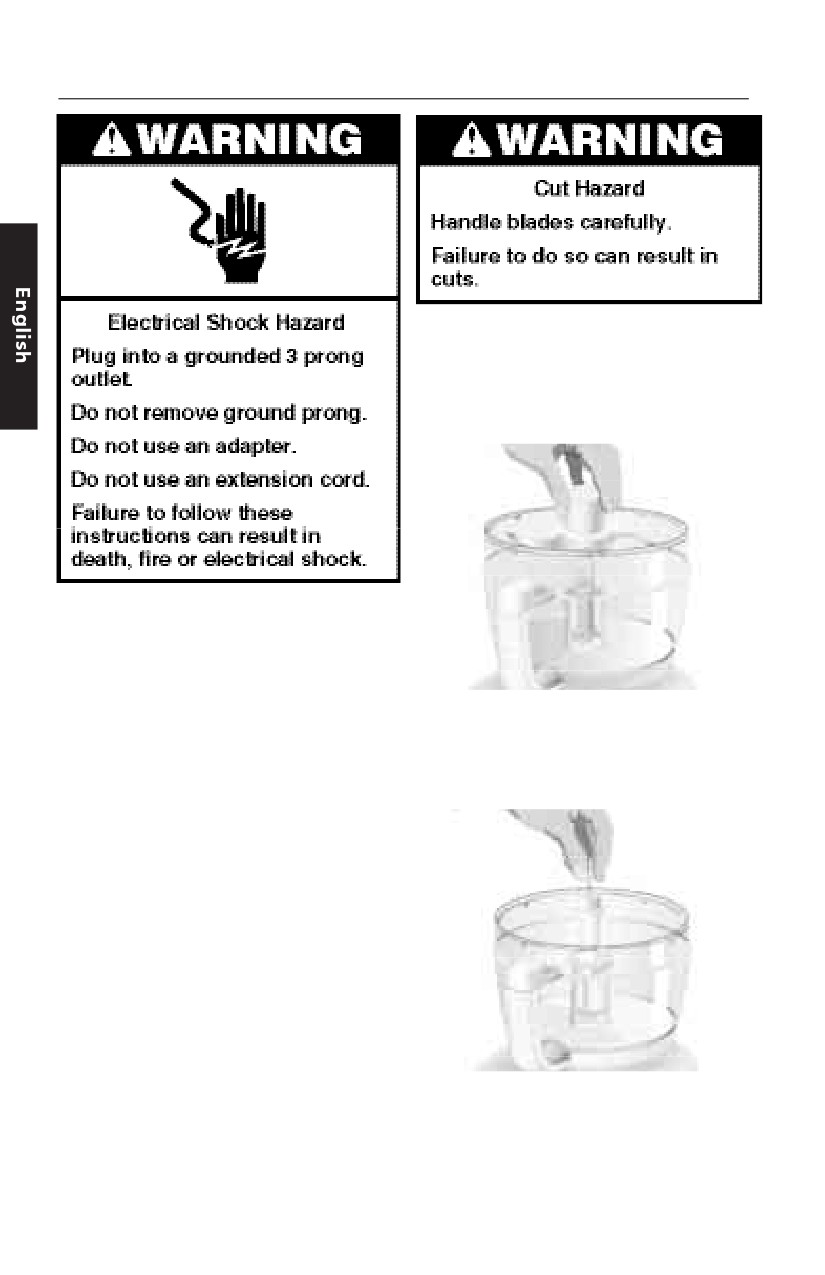
Preparing the Food Processor for Use
Multipurpose Blade and
Dough Blade Assembly
Place the blade on the power shaft.
Rotate the blade so it falls into place
on the shaft.
7. Plug into a proper electrical outlet
(see “Electrical Requirements” on
page 3).
NOTE: Your Food Processor will not
operate unless the work bowl and
work bowl cover are properly locked
Slicing and Shredding Disc
on the base, and the pusher is
Assembly
inserted to the maximum fill line on
1. Place the disc stem on the power
the feed tube.
shaft.
Do not remove the work bowl
from the base without first removing
the work bowl cover. Damage to the
work bowl may result.
8
Preparing the Food Processor for Use
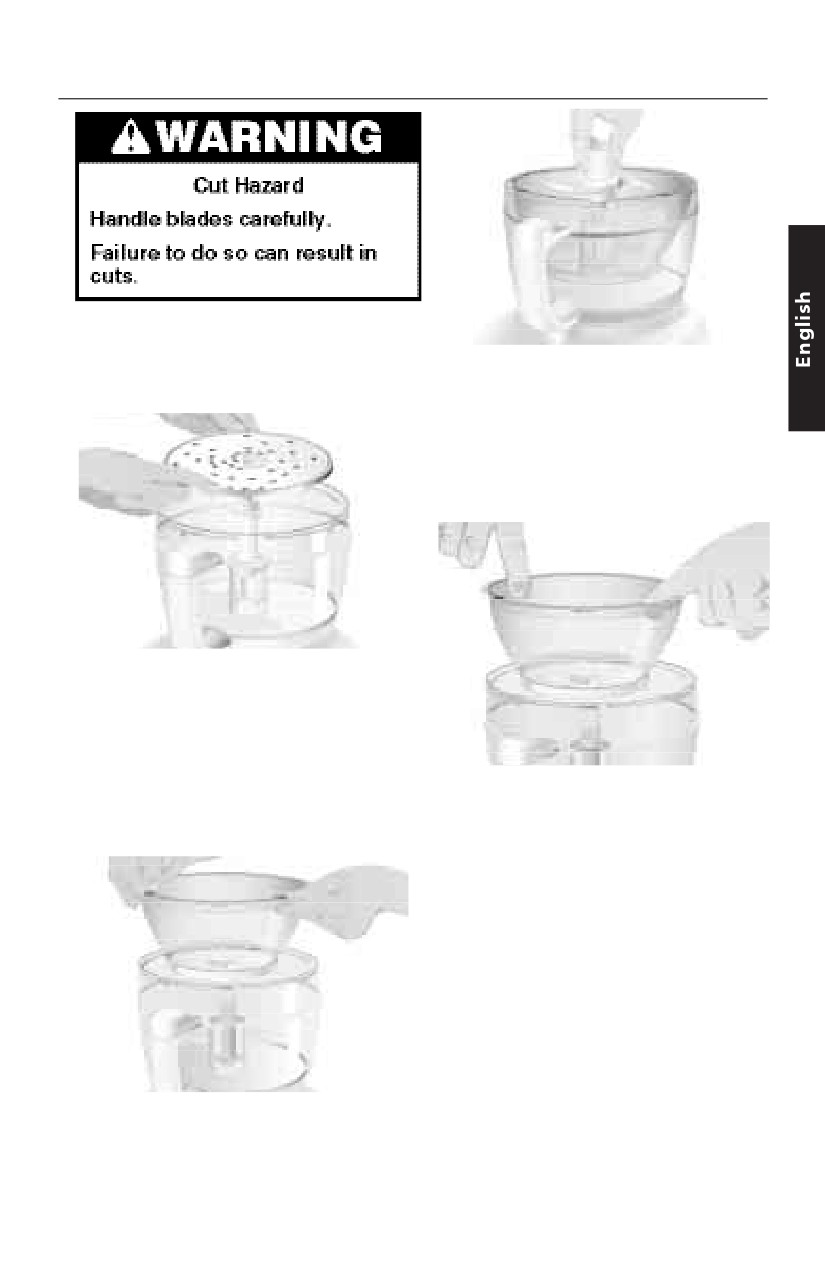
2. Fit the disc over the metal pin
on the disc stem, then rotate
the disc until it falls fully onto
The mini bowl can also be placed
the stem.
in the chef’s bowl in a similar
manner.
3. To remove the mini bowl after
processing, lift the bowl using
the two finger grips located
along the top edge of the bowl.
Mini Bowl Assembly
1.
Place the mini bowl inside the
work bowl over the power shaft.
Rotate the mini bowl until it falls
into place. When properly seated
Chef’s Bowl Assembly
in the work bowl, the mini bowl
cannot be rotated.
Place the chef’s bowl inside the
work bowl over the power shaft.
Rotate the chef’s bowl until it falls
into place. When properly seated in
the work bowl, the chef’s bowl
cannot be rotated.
The chef’s bowl can only be used
with the slicing and shredding discs
- the multipurpose blade cannot be
used. To remove the chef’s bowl
after processing, lift the bowl using
the two finger grips located along
the top edge of the bowl.
2.
Fit the mini blade on the power
shaft. It may be necessary to
rotate the blade until it falls into
place.
Continued on next page
9
Preparing the Food Processor for Use
Egg Whip Assembly and Use
5. Place the work bowl cover on the
work bowl with the feed tube
The egg whip is designed to whip
just to the left of the handle.
egg whites or heavy cream to create
Make sure the center pin of the
toppings or soft meringues. For the
egg whip fits into the center
best results, at least 237 ml (125 g/
opening of the cover. Grasp the
1 cup) of heavy cream or 3 egg
feed tube and turn the cover to
whites should be whipped at a time.
the right to lock it into place.
Whipping smaller quantities may not
Insert the pusher into the feed
result in maximum volume.
tube. The egg whip is now ready
To assemble:
to operate.
6. Press the “I” Button and whip
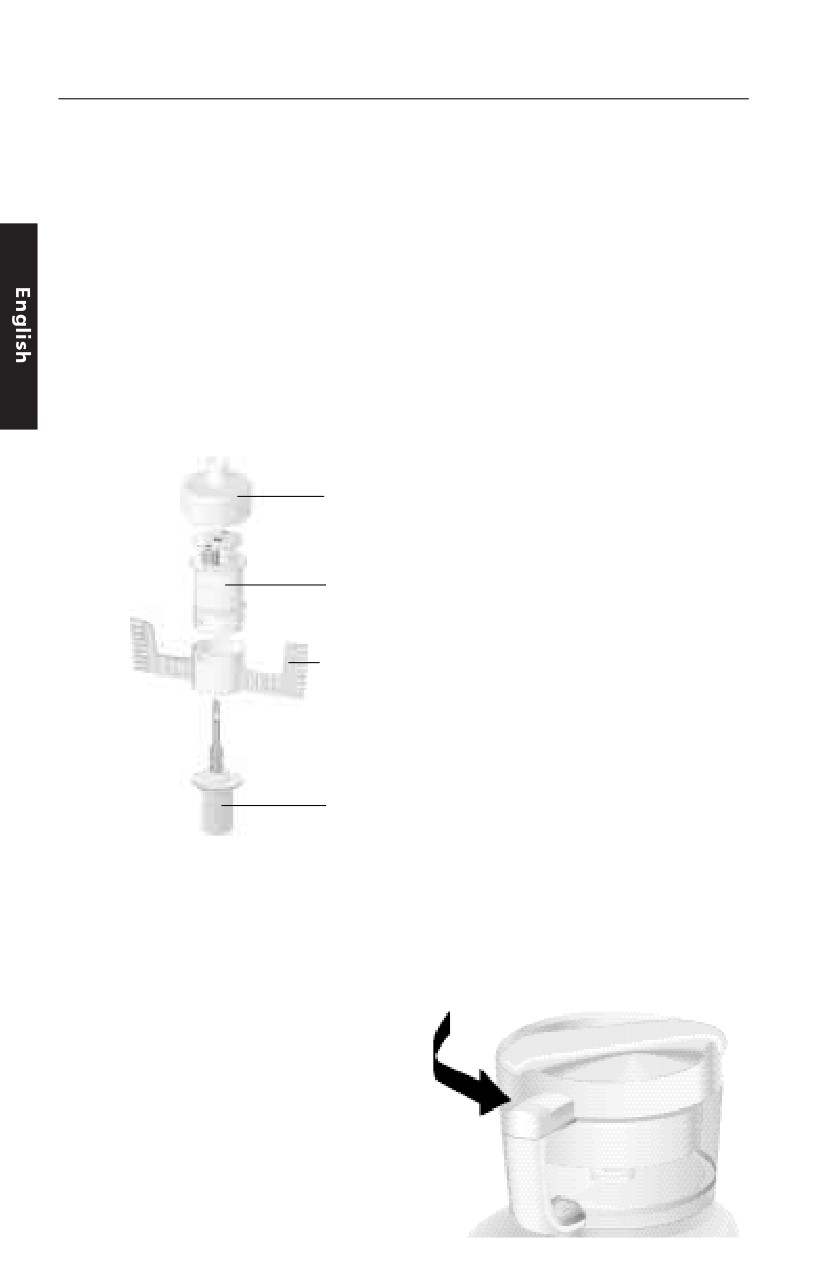
The egg whip consists of 4 pieces -
ingredients to the desired texture
the egg whip stem, stem cover, whip
and volume. Press the “O” Button
paddle, and cap.
when finished.
To disassemble:
Cap
1. Unplug the base from the
electrical outlet. Remove the work
bowl cover with a clockwise turn.
Stem
2. Lift the egg whip assembly off
Cover
the power shaft. Remove
whipped ingredients from the
work bowl.
Whip
3. Pull the cap from the egg whip
Paddle
assembly. Push downward on the
stem pin to remove stem from
the stem cover. Turn the egg
whip paddle to unlock, and slide
the paddle from the stem cover.
Stem
Citrus Press Assembly and Use
1. Position and lock the work bowl
1.
Place the egg-whip stem on the
on the base.
power shaft. Slowly turn the stem
2. Place the strainer basket in the
until it drops fully onto the shaft.
bowl with the locking clip to the
2.
Align the L-shaped notch on the
left of the work bowl handle.
whip paddle with the small post
3. Turn the basket counter-clockwise
on the stem cover, and slide the
until the clip locks into the handle.
paddle onto the cover. Turn
slightly to lock paddle.
3.
Fit the stem cover and paddle
over the egg whip stem. Push
downward to engage the ridges
of the stem with the gears of the
paddle.
4.
Fit the egg whip cap over the egg
whip stem. Push downward to
lock it into place.
10
Preparing the Food Processor for Use
4.
The 2-piece cone offers two sizes;
9. Operate the citrus press by
choose the right size for the fruit
pressing the “I” Button or the
you are juicing. Use the outer
“Pulse” Button.
cone for grapefruit, oranges and
10. When juice is fully extracted,
other large fruits. Remove the
Press the “O” Button.
outer cone to reveal a smaller
NOTE: Do not exceed the maximum
inner cone that’s perfect for
liquid level line on the work bowl, or
lemons and limes.
juice will leak from the bowl.
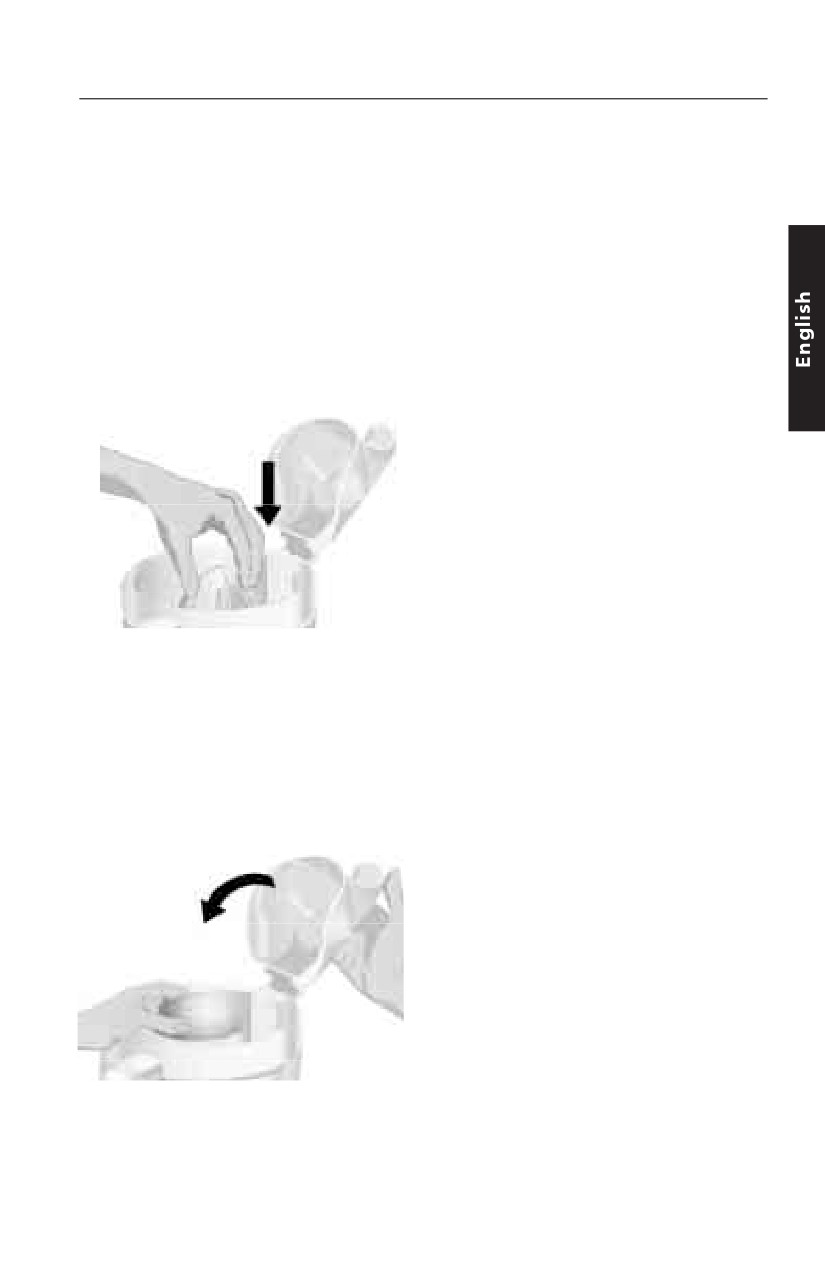
5.
Open the lid and place the cone
11. Unlock the strainer basket by
inside the strainer basket over
turning it clockwise. Remove
the power shaft. It may be
juiced fruit, cone, and strainer
necessary to rotate the cone until
basket from the work bowl.
it falls into place.
12. Remove the work bowl from
Food Processor and pour juice
into desired container.
13. To detach the clip-on lever arm
from the strainer basket for
thorough cleaning, pull the clip
at the bottom of the basket
away from the basket side and
remove the lever-arm from the
basket.
14. When reattaching the lever arm
6.
Halve the fruit to be juiced.
to the strainer basket, make sure
7.
Place fruit half on cone.
the tabs on the clip snap
8.
Close the lid of the strainer
securely into a pair of holes in
basket. Hold the lever arm down
the bottom of the basket.
firmly with an open palm to
maintain even pressure. Operate
the citrus press only when the
lever arm is in the down position,
holding the fruit on the cone.
NOTE: Use of the citrus press
without the clip-on lever arm is not
recommended. If you do use it
without the lever arm, remove the
lever arm from the basket (see
Step 13).
11
Using the Food Processor
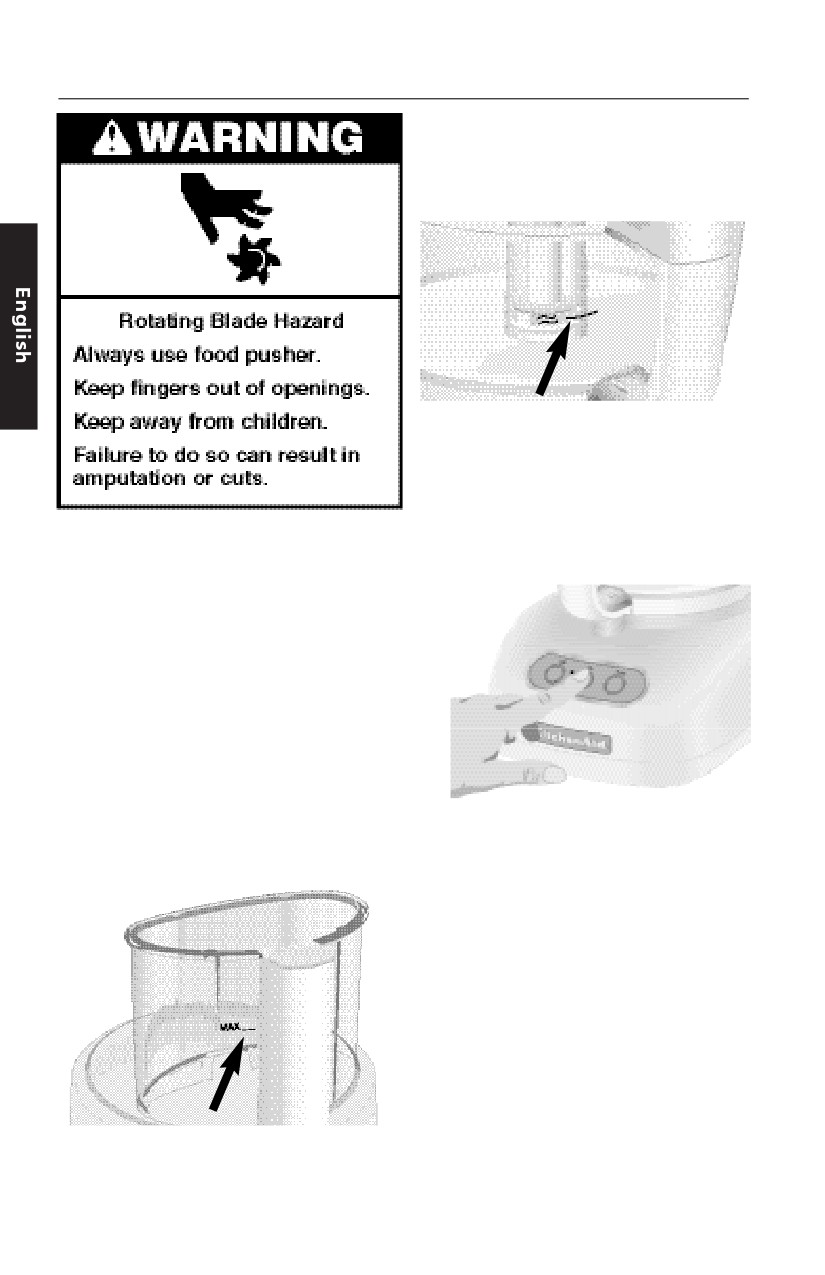
Maximum Liquid Level
This line on the work bowl indicates
the maximum level of liquid that can
be processed by the Food Processor.
Turning the Food Processor
“I” and “O”
1.
To turn on the Food Processor,
press the “I” Button. The unit will
Before Use
run continuously and the
Before operating the Food Processor,
indicator light will glow.
be sure the work bowl, blades, and
work bowl cover are properly
assembled on the Food Processor
base (see “Preparing the Food
Processor for Use” starting on
page 7).
Food Pusher Interlock
The food pusher is part of the safety
interlock system. The Food Processor
will not run unless the pusher is
2.
To stop the Food Processor, press
inserted to the maximum fill line on
the “O” Button. The indicator light
the feed tube.
will go out and an automatic
brake will stop the action of the
blade or disk within seconds.
3.
Wait until the blade or disk
comes to a complete stop before
removing the work bowl cover.
Be sure to turn off the Food
Processor before removing the
work bowl cover, or before
unplugging the unit.
NOTE: If the unit fails to operate,
make sure the work bowl and cover
are properly locked on the base, and
the food pusher is inserted to the
maximum fill line on the feed tube
(see “Preparing the Food Processor
for Use“ starting on page 7).
12
Using the Food Processor
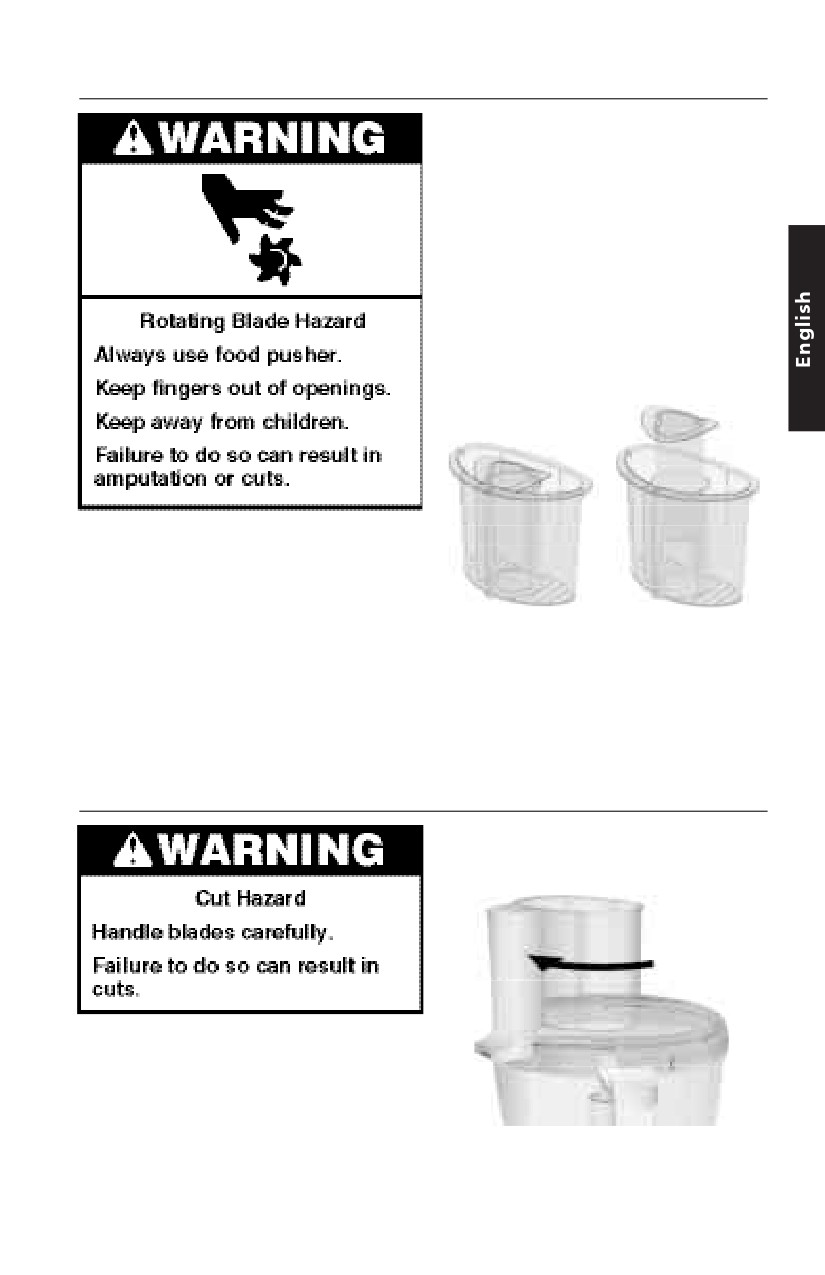
The 2-Piece Food Pusher
To slice or shred small items, insert
the 2-piece food pusher into the
feed tube, then turn the small center
pusher clockwise to unlock and
remove. Use the center feed tube
and pusher to process small or
slender items, or to add liquid while
the Food Processor is running. When
not using the small feed tube, lock
the small pusher into place by
turning it counter-clockwise.
Using the Pulse Control
The pulse control allows precise
control of the duration and frequency
of processing. It’s great for jobs which
require a light touch. Just press and
hold the “Pulse” Button to start
processing, and release it to stop. The
indicator light will glow each time
the “Pulse” Button is pressed.
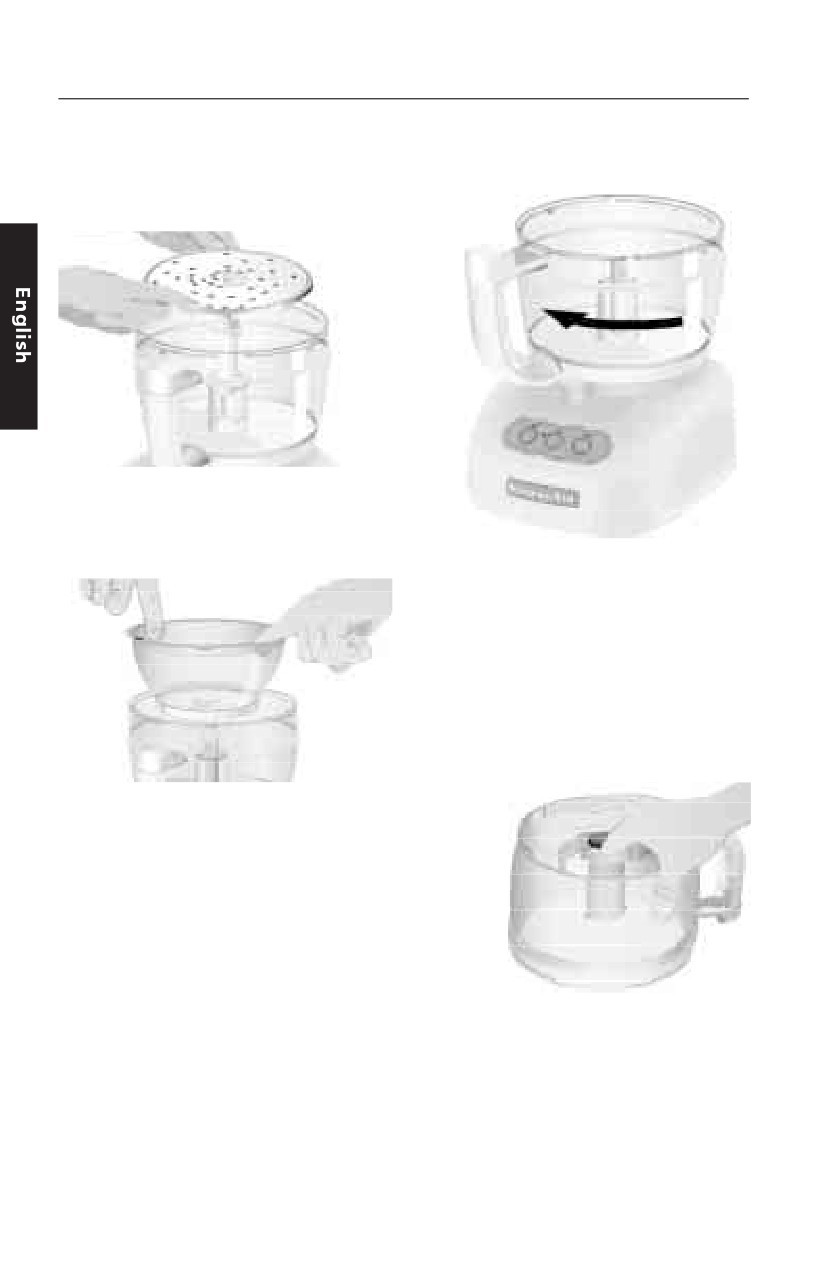
Disassembling the Food Processor
1. Turn the work bowl cover to the
left and remove.
NOTE: If you have difficulty
removing the pusher from the feed
tube, it is likely that food particles
have become lodged in the interlock
system. To free the pusher, soak the
work bowl cover in warm water or
wash it in a dishwasher.
13
Disassembling the Food Processor
2. If using a disc, remove it before
4. Turn the work bowl to the left to
removing the bowl. Place two
unlock it from the base. Lift to
fingers under each side of the
remove.
disc and lift it straight up.
Remove the disc stem.
3. If using the mini bowl or chef’s
bowl, grasp and remove the bowl
using the finger grips located
along the top edge of the bowl.
5. The multipurpose blade can be
removed from the work bowl
before the contents are emptied.
The blade can also be held in
place as you remove food: grasp
the work bowl from the bottom
and place one finger through the
center opening to grip the blade
shaft. Then remove food from the
bowl and blade with a spatula.
14
Care and Cleaning
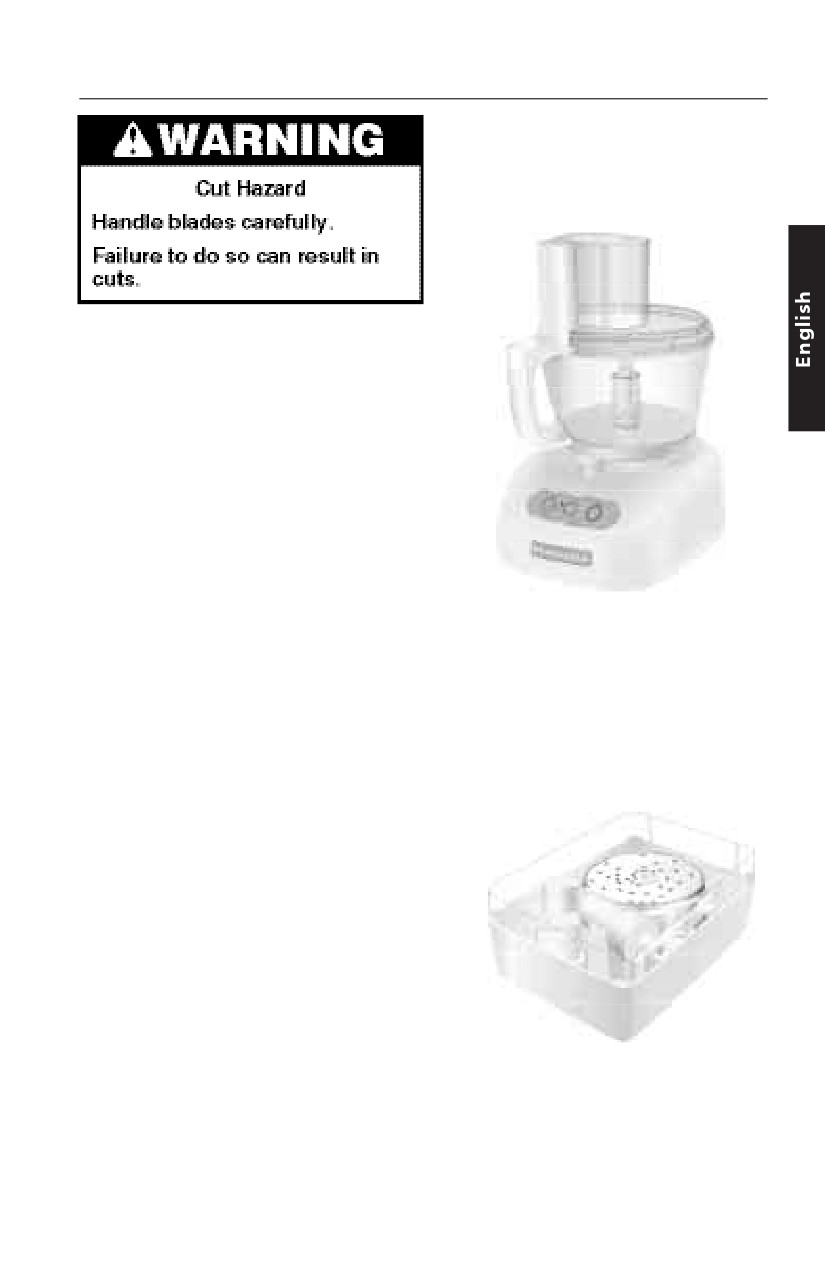
4. To prevent damage to the
interlock system, always store the
work bowl and work bowl cover
in the unlocked position when
not in use.
1.
Press the “O” Button and unplug
the Food Processor before
cleaning.
2.
Wipe the base and cord with a
warm, sudsy cloth, and wipe
clean with a damp cloth. Dry
with a soft cloth. Do not use
abrasive cleansers or scouring
pads.
3.
All the other parts of the Food
Processor are dishwasher safe. Be
sure to load them away from
exposed heating elements in the
dishwasher. If washing the Food
5.
Wrap the power cord around the
Processor parts by hand, avoid
work bowl. Secure the plug by
the use of abrasive cleansers or
clipping it to the cord.
scouring pads. They may scratch
6.
Disassembled discs, shafts, and
or cloud the work bowl and
blades should be stored in the
cover. Thoroughly dry all parts
provided storage case, and in a
after washing.
location out of the reach of
children.
15
Troubleshooting
• If your Food Processor should
• If you have difficulty removing
fail to operate, check the
the food pusher from the
following:
feed tube:
- Make sure the work bowl and
- Food particles are probably lodged
work bowl cover are properly
in the interlock system. To free the
locked on the base, and the food
pusher, soak the work bowl cover
pusher is inserted to the maximum
in warm water or wash it in a
fill line on the feed tube.
dishwasher.
- See if the power cord is plugged
into a proper electrical outlet
If the problem cannot be corrected
(see “Electrical Requirements” on
with the steps in this section, see the
page 3). If it is, unplug the Food
KitchenAid warranty and after sales
Processor, then plug it into the
service section on pages 27-28. Do
same outlet again. If the Food
not return the Food Processor to the
Processor still does not work,
retailer - they do not provide service.
check the fuse or circuit breaker on
the electrical circuit the Food
Processor is connected to and
make sure the circuit is closed.
• If the Food Processor shuts off
while it is running:
- The Food Processor may be
overheated. If the motor exceeds a
certain temperature, it will
automatically shut off to prevent
damage. This should be an
extremely rare occurrence. If it
happens, press the “O” Button and
wait 15 minutes for the Food
Processor to cool before resuming.
If the Food Processor still refuses to
run, wait an additional 15 minutes
for the Food Processor to cool.
16
Food Processing Tips
USING THE
To mince garlic or to chop
MULTIPURPOSE BLADE
fresh herbs or small quantities
of vegetables:
With processor running, add food
To chop fresh fruits or
through the small feed tube. Process
vegetables:
until chopped. For best results, make
Peel, core, and/or remove seeds. Cut
sure work bowl and herbs are very
food in 2.54 to 3.81 cm. Process
dry before chopping.
food to desired size, using short
To chop nuts or make
pulses, 1 to 2 seconds each time.
nut butters:
Scrape sides of bowl, if necessary.
Process up to 375 g (3 cups) of nuts
To puree cooked fruits and
to desired texture, using short
vegetables (except potatoes):
pulses, 1 to 2 seconds each time.
Add 60 ml (1⁄4 cup) liquid from recipe
For a coarser texture, process smaller
per cup of food. Process food, using
batches, pulsing 1 or 2 times, 1 to 2
short pulses, until finely chopped.
seconds each time. Pulse more often
Then process continuously until
for finer texture. For nut butters,
reaching desired texture. Scrape
process continuously until smooth.
sides of bowl, if necessary.
Store in refrigerator.
To prepare mashed potatoes:
To chop cooked or raw meat,
poultry or seafood:
Insert chef’s bowl into the work
bowl. Using the shredding disc, shred
The food should be very cold. Cut in
hot, cooked potatoes. Remove the
2.54 cm pieces. Process up to 450 g
chef’s bowl with potatoes. Place
at a time to desired size, using short
multipurpose blade in work bowl,
pulses, 1 to 2 seconds each time.
and add shredded potatoes, softened
Scrape sides of bowl, if necessary.
butter, milk, and seasonings. Pulse 3
To make bread, cookie, or
to 4 times, 2 to 3 seconds each time,
cracker crumbs:
until milk is absorbed and texture is
smooth. Do not overprocess.
Break food into 3.8 to 5 cm pieces.
Process until fine. For larger pieces,
To chop dried (or sticky) fruits:
pulse 2 to 3 times, 1 to 2 seconds
The food should be cold. Add 30 g
each time. Then process until fine.
(1⁄4 cup) flour from recipe per 60 g
To melt chocolate in a recipe:
(1⁄2 cup) dried fruit. Process fruit,
using short pulses, until reaching
Combine chocolate and sugar from
desired texture.
recipe in work bowl. Process until
finely chopped. Heat liquid from
To finely chop citrus peel:
recipe. With processor running, pour
With sharp knife, peel colored
hot liquid through the small feed
portion (without white membrane)
tube. Process until smooth.
from citrus. Cut peel in small strips.
Process until finely chopped.
17
Food Processing Tips
To grate hard cheeses, such as
To slice or shred fruits or
Parmesan and Pecorino:
vegetables that are long and
relatively small in diameter, such
Never attempt to process cheese
as celery, carrots, and bananas:
that cannot be pierced with the tip
of a sharp knife. You can use the
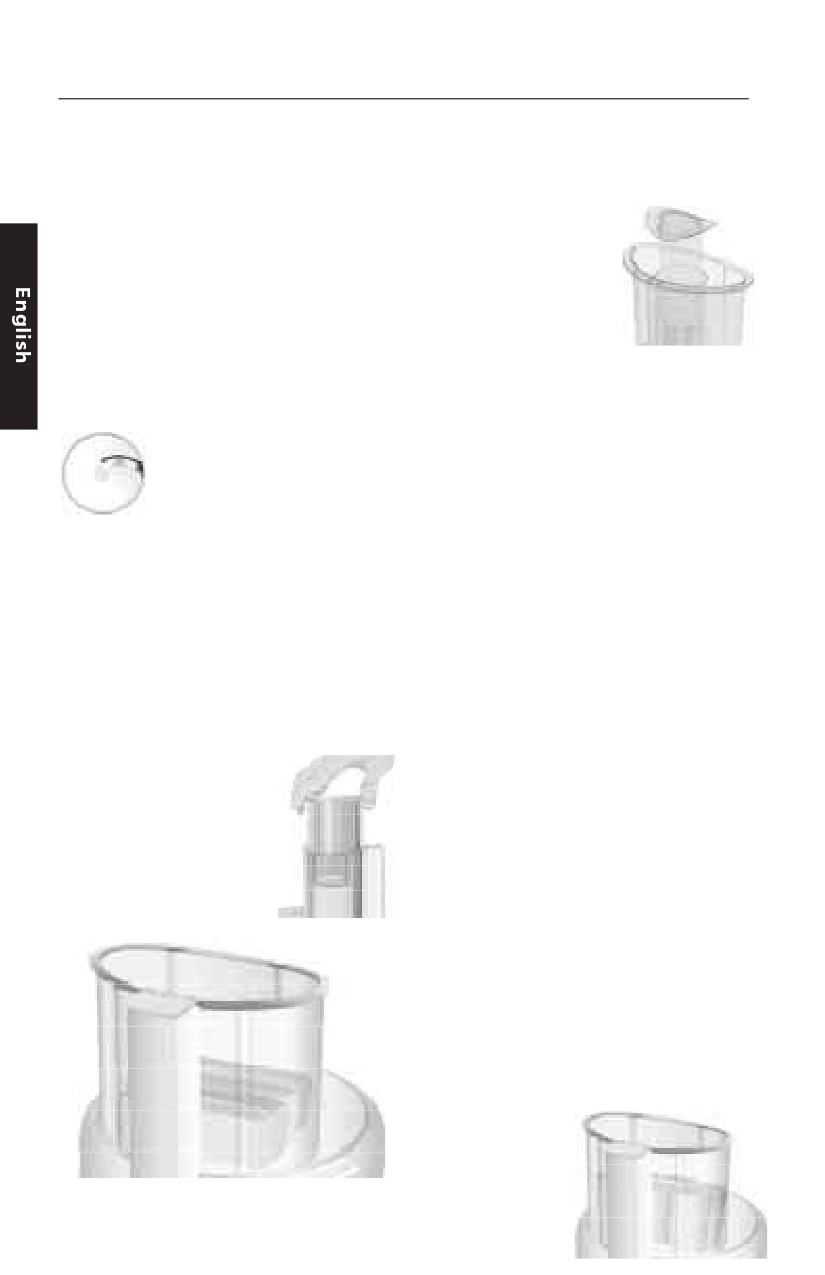
Cut food to fit feed
multi-purpose blade to grate hard
tube vertically or
cheeses. Cut cheese in 2.54 cm
horizontally, and pack
pieces. Place in work bowl. Process,
feed tube securely to
using short pulses, until coarsely
keep food positioned
chopped. Process continuously until
properly. Process
finely grated. Pieces of cheese can
using even pressure. Or use the
also added through the small feed
small feed tube in the two-piece
tube while the processor is running.
food pusher. Position food vertically
in the tube and use the small food
USING A SLICING OR
pusher to process food.
SHREDDING DISC
To slice or shred fruits and
NOTE: When cutting and
vegetables that are round,
packing food items in the
such as onions, apples, and
Ultra Wide Mouth feed tube, do not
green peppers:
exceed the maximum fill line. This
will permit the pusher to engage the
Peel, core, and/or remove seeds. Cut
interlock and the unit to operate.
in halves or quarters to fit feed tube.
Position in feed tube. Process, using
To cut julienne, or match stick,
even pressure.
strips of vegetables and fruits:
To slice or shred fruits and
Cut food to fit feed tube
vegetables that are small, such
horizontally. Position food
as strawberries, mushrooms,
horizontally in feed
and radishes:
tube. Process, using
even pressure to make
Position food vertically or
plank-like slices. Re-stack
horizontally in layers within the feed
slices and position
tube. Fill feed tube in order to keep
vertically or horizontally
food positioned properly, but do not
in feed tube. Process,
exceed the maximum fill line.
using even pressure.
Process, using even pressure. Or use
the small feed tube in the two-piece
food pusher. Position food vertically
in the tube and use the small food
pusher to process food.
To shred spinach and
other leaves:
Stack leaves. Roll up and stand up in
feed tube.
Process, using
even pressure.
18
Food Processing Tips
To slice uncooked meat or
USING THE EGG WHIP
poultry, such as stir-fry meats:
To make soft egg
Cut or roll food to fit feed tube.
white meringue:
Wrap and freeze food until hard to
the touch, 30 minutes to 2 hours,
Place 3 egg whites and 1⁄4 teaspoon
depending on thickness of food.
cream of tartar in work bowl fitted
Check to be sure you can still pierce
with egg whip. Process until foamy,
food with the tip of a sharp knife. If
about 30 to 45 seconds. With
not, allow to thaw slightly. Process,
processor running, slowly add 40 g
using even pressure.
(1⁄3 cup) sugar through the small feed
tube. Process until stiff peaks form,
To slice cooked meat or poultry,
about 21⁄2 to 3 minutes. Stop
including salami, pepperoni, etc.:
processor as necessary to check
Food should be very cold. Cut in
texture of mixture.
pieces to fit feed tube. Process food
To whip cream:
using firm, even pressure.
Place heavy cream in work bowl
To shred firm and soft cheeses:
fitted with egg whip. Process 30
Firm cheese should be very cold. For
seconds. With processor running,
best results with soft cheeses, such as
add 2 tablespoons powdered sugar
mozzarella, freeze 10 to 15 minutes
through the small feed tube. Process
before processing. Cut to fit feed
just until soft peaks form, about 30
tube. Process, using even pressure.
to 40 seconds. Stop processor as
necessary to check texture of
USING THE
mixture. With processor running,
DOUGH BLADE
add 1⁄2 teaspoon vanilla, if desired,
The dough blade is
through the small feed tube. Process
specially designed for mixing and
just until mixed. Do not overprocess.
kneading yeast dough quickly and
thoroughly. For the best results, do
not knead recipes which use more
than 250 to 375 g (2-3 cups) of
flour.
19
Helpful Hints
1.
When cutting and packing food
7. Soft and medium-hard cheese
items in the Ultra Wide Mouth
may spread out or roll up on the
feed tube, do not exceed the
shredding disc. To avoid this,
maximum fill line. This will permit
shred only well-chilled cheese.
the pusher to engage the
8. Sometimes slender
interlock and the unit to operate.
foods, such as
2.
Never process any food that is so
carrots or celery, fall
hard or firmly frozen that it
over in the feed
cannot be pierced with the tip of
tube, resulting in
a sharp knife. Hard food can
an uneven slice. To
cause damage to the blade or
minimize this, cut
motor. If a piece of hard food,
food in several pieces and pack
such as carrot, becomes wedged
the feed tube with the food. For
or stuck on the blade, stop the
processing small or slender items,
processor and remove the blade.
the small feed tube in the two
Carefully remove food from the
piece food pusher will prove
blade.
especially convenient.
3.
Do not overfill work bowl or mini
9. When preparing a cake or cookie
bowl. For thin mixtures, fill work
batter or quick bread, use the
bowl up to 1⁄2 to 2⁄3 full. For thicker
multipurpose blade to cream fat
mixtures, fill work bowl up to
and sugar first. Add dry
3⁄
4 full. For liquids, fill up to the
ingredients last. Place nuts and
maximum level as described on
fruit on top of flour mixture to
page 12. When chopping, the
prevent overchopping. Process
work bowl should be no more
nuts and fruits, using short
than 1⁄3 to 1⁄2 full. Use the mini
pulses, until blended with other
bowl for up to 237 ml (1 cup) of
ingredients. Do not overprocess.
liquid or 63 g (1⁄2 cup) solids.
10. When shredded or sliced food
4.
Position slicing discs so the cutting
piles up on one side of the bowl,
surface is just to the right of the
stop the processor and
feed tube. This allows the blade a
redistribute the food using a
full rotation before contacting
spatula.
the food.
11. When food quantity reaches the
5.
To capitalize on the speed of the
bottom of a slicing or shredding
processor, drop ingredients to be
disc, remove the food.
chopped through the small feed
12. A few larger pieces of food may
tube while the processor is
remain on top of the disc after
running.
slicing or shredding. If desired,
6.
Different foods require varying
cut these by hand and add to
degrees of pressure for best
mixture.
shredding and slicing results. In
13. Organize processing tasks to
general, use light pressure for
minimize bowl cleanup. Process
soft, delicate foods (strawberries,
dry or firm ingredients before
tomatoes, etc.), moderate
liquid ingredients.
pressure for medium foods
14. To clean ingredients from the
(zucchini, potatoes, etc.), and
multipurpose blade easily, just
firmer pressure for harder foods
empty the work bowl, replace
(carrots, apples, hard cheeses,
the lid, and pulse 1 to 2 seconds
partially frozen meats, etc.).
to spin the blade clean.
20
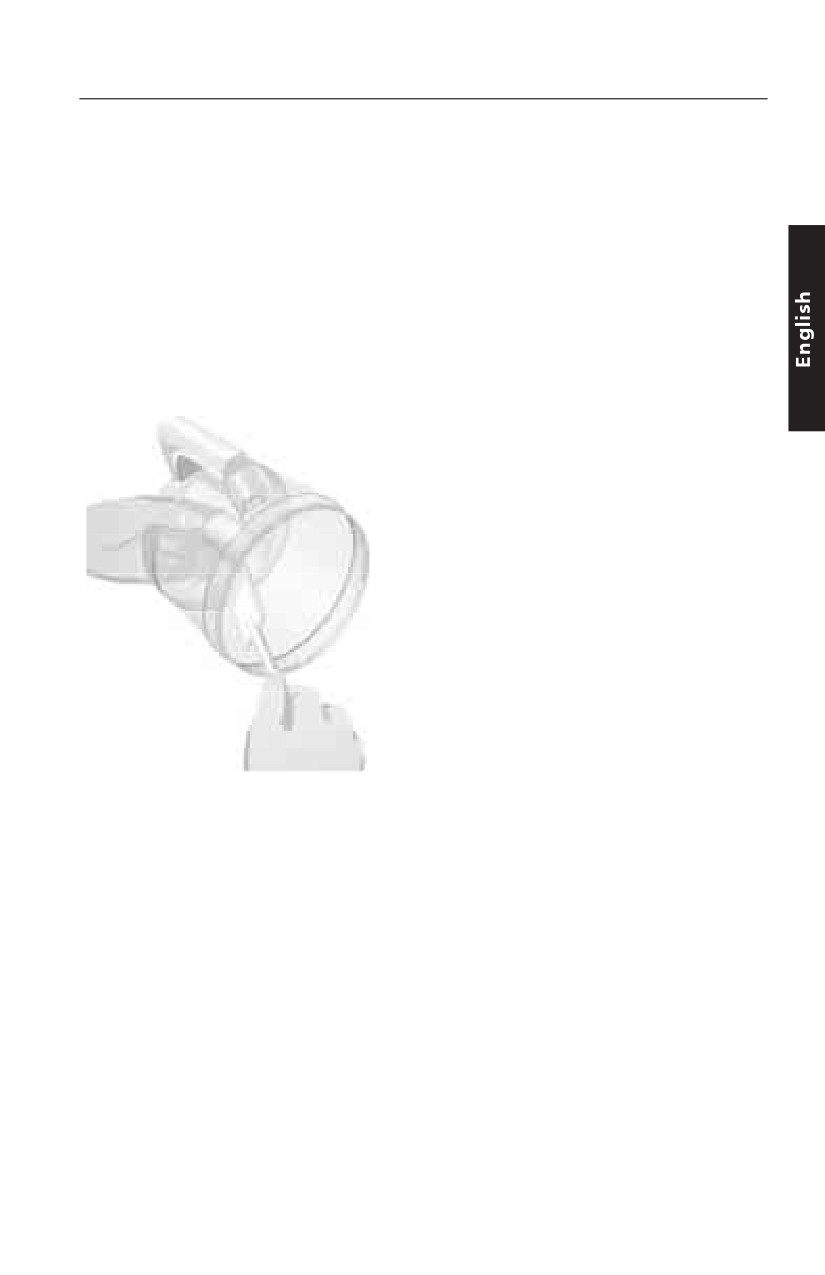
Helpful Hints
15. After removing the work bowl
17. Your Food Processor is not
cover, place it upside down on
designed to perform the
the counter. This will help keep
following functions:
the counter clean.
• grind coffee beans, grains, or
16. To remove the contents of the
hard spices
work bowl without removing the
• grind bones or other inedible
multipurpose blade, grasp the
parts of food
work bowl from the bottom and
• liquefy raw fruits or vegetables
place one finger through the
• slice hard-cooked eggs or
center opening to hold the blade
unchilled meats.
in place. Then remove food from
18. If any plastic parts should
the bowl and blade with a
discolor due to the types of food
spatula.
processed, clean them with
lemon juice.
21
White Balsamic Vinaigrette
1 tablespoon fresh
Position mini bowl and mini blade in work bowl.
basil leaves
With processor running, add basil, oregano, and
1 tablespoon fresh
garlic through the small feed tube. Process until
oregano leaves
chopped, 5 to 8 seconds. Scrape sides of bowl.
1 clove garlic
With processor running, add balsamic vinegar,
3 tablespoons white
wine vinegar, salt, mustard, and red pepper.
balsamic vinegar*
Process until mixed, about 5 seconds. With
3 tablespoons white
processor running, slowly drizzle oil through the
wine vinegar*
small feed tube. Process until smooth and thick.
1⁄2
teaspoon salt
Serve with green salads.
1⁄4
teaspoon dry
mustard
Yield: 8 servings (2 tablespoons per serving).
1⁄8
teaspoon ground red
*Three tablespoons each of dark balsamic vinegar
pepper
and red wine vinegar may be substituted.
180 ml (3⁄4 cup) extra
Per Serving: about 190 cal.
virgin olive oil
22
Cheddar Broccoli Soup
230
g sharp Cheddar
Position 4 mm shredding disc in work bowl. Add
cheese, chilled
cheese. Process to shred. Remove and set aside.
1
small onion, cut into
Exchange shredding disc for 2 mm slicing disc in
halves lengthwise
work bowl. Add onion and celery. Process to slice.
1
rib celery, cut into
Melt butter in large saucepan or Dutch oven over
6 cm pieces
medium heat. Remove onion and celery to
2
tablespoons butter
or margarine
saucepan. Cook 2 to 3 minutes, or until
1
large head (about
crisp-tender, stirring occasionally.
450 g) broccoli
Cut stems from broccoli, and peel tough coating
700
ml (3 cups) chicken
from stems. Cut florets into small pieces. Position
broth
2 mm slicing disc in work bowl. Add broccoli
475
ml (2 cups) milk,
stems. Process to slice. Remove to saucepan.
divided
30
g (1⁄4 cups)
Add broccoli florets and broth to saucepan. Bring
all-purpose flour
to a boil over medium-high heat. Reduce heat;
2
teaspoons Dijon
partially cover and simmer 6 to 10 minutes, or
mustard
until broccoli is crisp-tender, stirring occasionally.
1
teaspoon curry
Remove from heat.
powder, if desired
Exchange slicing disc for multipurpose blade in
1⁄8
teaspoon hot pepper
work bowl. With slotted spoon, remove
sauce
vegetables from saucepan to work bowl. Add
178 ml (3⁄4 cup) milk. Process until chopped, 5 to
8 seconds. Set aside.
In medium mixing bowl, whisk flour into
remaining 300 ml (11⁄4 cups) milk, whisking until
smooth. Add mustard, curry powder, if desired,
and pepper sauce. Stir until combined.
Add milk mixture to broth in saucepan. Cook and
stir over medium-high heat until bubbly and
slightly thickened. Reduce heat to low. Add all but
30 g (1⁄4 cup) shredded cheese; stir until melted.
Add broccoli mixture to saucepan. Heat
thoroughly. Garnish with remaining remaining
30 g (1⁄4 cup) cheese.
Yield: 7 servings (237 ml/1 cup per serving).
Per Serving: About 250 cal.
23
Spring Mix Basmati Rice
1
clove garlic
Position multipurpose blade in work bowl. With
1
medium shallot, cut
processor running, add garlic through the small
into quarters
feed tube. Process 5 seconds. Add shallot. Pulse
1
tablespoon olive oil
2 to 3 times, about 2 seconds each time, or until
1⁄4
pound (about 125 g)
chopped. In large saucepan over medium heat,
fresh green beans,
heat oil. Add shallot mixture. Cook until tender,
trimmed
1 to 2 minutes, stirring often. Remove from heat;
1
small carrot, peeled
set aside.
and cut into halves
crosswise
Exchange multipurpose blade for 2 mm slicing
356
ml (11⁄2 cups) chicken
disc in work bowl. Add green beans and carrot.
broth
Process to slice. Remove to saucepan with shallot
237
ml (1 cup) water
mixture. Add broth, water, salt, black pepper, and
1
teaspoon salt
coriander, if desired. Bring to a boil. Stir in rice.
1⁄4
teaspoon black
Return to boil; reduce heat. Cover, simmer about
pepper
15 minutes, or until liquid is absorbed.
1
teaspoon ground
Meanwhile, cut tips from asparagus and reserve
coriander, if desired
stalks; set aside. Exchange slicing disc for
170
g (11⁄3 cups) rice
multipurpose blade in work bowl. With processor
227
g (1⁄2 pound) fresh
running, add thyme and parsley through the
asparagus
small feed tube. Process until chopped, about
2
teaspoons fresh
3 seconds. Add bell pepper. Pulse 2 to 3 times,
thyme leaves
1 to 2 seconds each time, or until coarsely
2
tablespoons loosely
chopped. Exchange multipurpose blade for 2 mm
packed fresh parsley
leaves
slicing disc in work bowl. Add asparagus stalks.
1⁄4
small red bell
Process to slice. Remove to saucepan with rice
pepper, cut into
mixture. Add asparagus tips; stir well.
quarters
Cover; let stand 10 minutes. Fluff with a fork.
Yield: 6 servings (125 g/1 cup per serving).
Per Serving: About 200 cal.
24
Chicken Satay with Peanut Sauce
Chicken
Position multipurpose blade in work bowl. With
2 cloves garlic
processor running, add garlic and gingerroot
1 teaspoon coarsely
through the small feed tube. Process until
chopped gingerroot
chopped, 5 to 10 seconds. Add soy sauce, oil,
60 ml (1⁄4 cups) soy sauce
and brown sugar. Process until blended and sugar
2 tablespoons peanut
dissolves, 15 to 20 seconds. Remove to plastic
or vegetable oil
resealable food storage bag or shallow pan.
2 teaspoons brown
sugar
Add chicken; coat with marinade. Marinate
1⁄2 hour at room temperature or at least 2 hours in
455 - 570 g (1-11⁄4 pounds)
chicken breast
refrigerator. Remove chicken from marinade,
tenders
reserving marinade.
Thread chicken tenders on soaked wooden or
oiled metal skewers. Grill over medium-hot coals
or broil on oiled broiler pan 10 to 15 cm from
heat for 8 to 10 minutes, or until thoroughly
cooked, turning once. Brush with any remaining
marinade once during cooking, if desired. Serve
with warm or room temperature Peanut Sauce.
Sauce
Position multipurpose blade in work bowl. Add all
80 ml (1⁄3 cup) coconut
ingredients. Process until blended, 5 to 10
milk
seconds.
30 g (1⁄4 cup) peanut
butter
Yield: 4 servings.
2 tablespoons soy
Per Serving: About 290 cal.
sauce
1⁄2
teaspoon red curry
paste
25
Fresh Fruit Tart
Crust
Position multipurpose blade in work bowl. Add
125 g (1 cup) all-purpose
flour, sugar, and salt. Process until mixed, about
flour
2 seconds. Add butter and shortening. Pulse 3 to
2 teaspoons sugar
4 times, 2 to 3 seconds each time, or until
1⁄4
teaspoon salt
crumbly. In small bowl, blend 1 egg yolk,
30 g (1⁄4 cup) cold butter,
2 tablespoons water, and lemon juice. Sprinkle
cut into 2.5 cm
evenly over flour mixture. Pulse 2 to 4 times, 2 to
pieces
3 seconds each time, or until mixture pulls away
1 tablespoon cold
from sides of bowl and clings together. Remove
shortening
dough, cover, and chill 1⁄2 hour.
1 egg yolk
2 tablespoons ice
Meanwhile, in small saucepan over medium heat,
water
combine sugar, cornstarch, and salt. Add half-
1 teaspoon lemon
and-half and 2 egg yolks. Cook and stir until very
juice
thick. Remove from heat. Add vanilla. Whisk until
1 egg, blended with
smooth. Cool completely.
1 tablespoon water
Place dough on floured surface. Roll into a circle
5 cm larger than inverted 25 cm tart pan. Fit into
tart pan, being careful not to stretch dough. Trim
Filling
edges of crust. Prick shell thoroughly with fork.
30 g (1⁄4 cup) sugar
Bake at 200°C for 8 to 12 minutes, or until light
1 tablespoon
cornstarch
golden brown. Brush with egg and water mixture
to seal holes. Bake for 1 minute longer to set egg.
1⁄8
teaspoon salt
Cool completely.
180 ml (3⁄4 cup)
half-and-half
Wash processor. Position 2 mm slicing disc in
2 egg yolks, beaten
work bowl. Add peach. Process to slice. Remove
1⁄2
teaspoon vanilla
and set aside. Position 2 mm slicing disc in work
bowl. Add strawberries. Process to slice.
Spread custard mixture in crust. Arrange sliced
Topping
fruit on custard. Carefully brush with melted jelly
1 medium peach,
peeled, cut into
to cover fruit completely. Refrigerate at least
halves, and pit
1 hour before serving.
removed
Yield: 8 servings.
125 g (1 cup) fresh
strawberries, hulled
Tip: Tart is best served the same day it is made.
2 tablespoons apple
Per Serving: About 230 cal.
jelly, melted
26
Household KitchenAid®
Food Processor Warranty
Length of
KitchenAid
KitchenAid
Warranty:
Will Pay For:
Will Not Pay For:
Europe:
Replacement parts and
A. Repairs when Food
Three Years Full
repair labor costs to
Processor is used
Warranty from date of
correct defects in
for operations
purchase.
materials or
other than normal
workmanship. Service
household food
Other:
must be provided by an
preparation.
One Year Full Warranty
Authorized KitchenAid
from date of purchase.
Service Center
B. Damage resulting
from accident,
alterations, misuse,
abuse, or
installation/
operation not in
accordance with
local electrical
codes.
KITCHENAID DOES NOT ASSUME ANY RESPONSIBILITY FOR
INDIRECT DAMAGES.
Service Centers
All service should be handled locally
In the U.K.:
by an Authorized KitchenAid Service
Call: 0845 6011 287
Center. Contact the dealer from
In Ireland:
whom the unit was purchased to
M.X. ELECTRIC
obtain the name of the nearest
Service Department
Authorized KitchenAid Service Center.
25 Alymer Crescent
Kilcock, CO.KILDARE
Call: 1 679 2398/87 2581574
Fax: 1 628 4368
In Australia:
Call: 1800 990 990
In New Zealand:
Call: 0800 881 200
27